tow SKODA OCTAVIA 2008 2.G / (1Z) User Guide
[x] Cancel search | Manufacturer: SKODA, Model Year: 2008, Model line: OCTAVIA, Model: SKODA OCTAVIA 2008 2.G / (1Z)Pages: 304, PDF Size: 17.69 MB
Page 68 of 304
Lights and Visibility67
Using the systemSafetyDriving TipsGeneral MaintenanceBreakdown assistanceTechnical Data
Front door warning light*
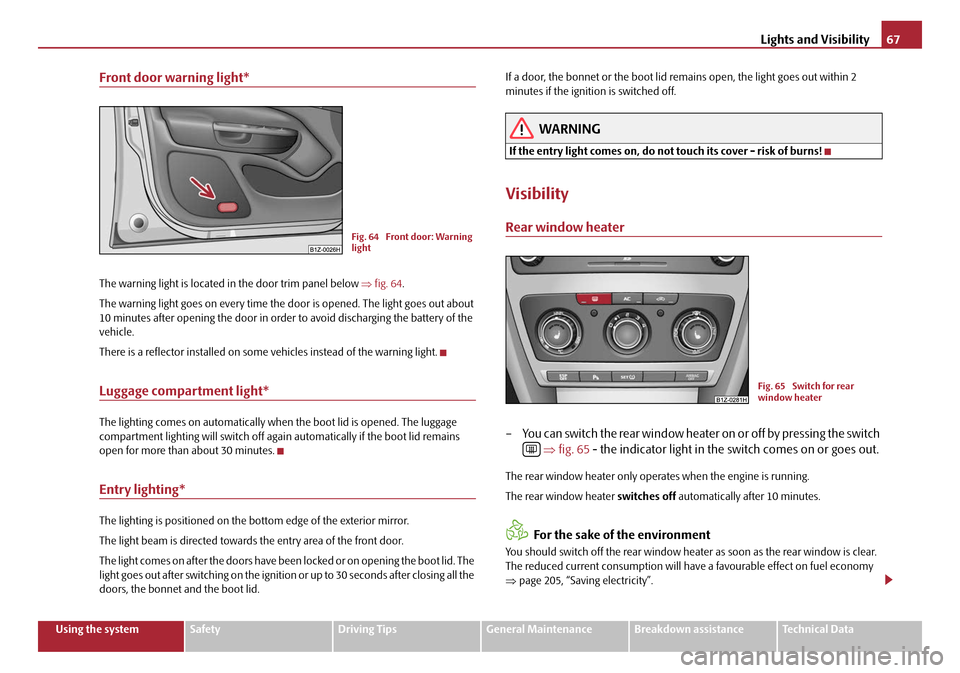
The warning light is located in the door trim panel below ⇒fig. 64 .
The warning light goes on every time the door is opened. The light goes out about
10 minutes after opening the door in order to avoid discharging the battery of the
vehicle.
There is a reflector installed on some vehicles instead of the warning light.
Luggage compartment light*
The lighting comes on automatically when the boot lid is opened. The luggage
compartment lighting will switch off agai n automatically if the boot lid remains
open for more than about 30 minutes.
Entry lighting*
The lighting is positioned on the bottom edge of the exterior mirror.
The light beam is directed towards the entry area of the front door.
The light comes on after the doors have been locked or on opening the boot lid. The
light goes out after switching on the ignition or up to 30 seconds after closing all the
doors, the bonnet and the boot lid. If a door, the bonnet or the boot lid remains open, the light goes out within 2
minutes if the ignition is switched off.
WARNING
If the entry light comes on, do not touch its cover - risk of burns!
Visibility
Rear window heater
– You can switch the rear window heater
on or off by pressing the switch
⇒ fig. 65 - the indicator light in the switch comes on or goes out.
The rear window heater only oper ates when the engine is running.
The rear window heater switches off automatically after 10 minutes.
For the sake of the environment
You should switch off the rear window heater as soon as the rear window is clear.
The reduced current consumption will have a favourable effect on fuel economy
⇒ page 205, “Saving electricity”.
Fig. 64 Front door: Warning
light
Fig. 65 Switch for rear
window heater
20A5Facelift.book Page 67 Saturday, September 6, 2008 2:13 PM
Page 69 of 304
Lights and Visibility
68
Note
•The position and the shape of the switch can differ depending on equipment
installed in the vehicle.
•If the on-board voltage drop s, the rear window heater is switched off automat-
ically, in order to provide sufficient electrical energy for the engine control.
Sun visors
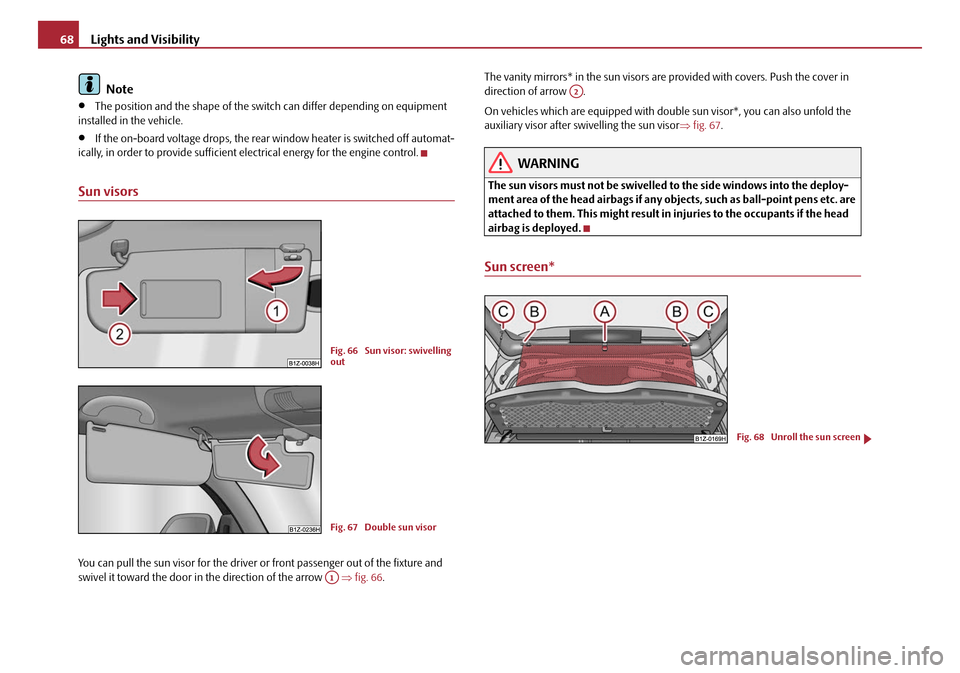
You can pull the sun visor for the driver or front passenger out of the fixture and
swivel it toward the door in the direction of the arrow ⇒fig. 66 . The vanity mirrors* in the sun visors are provided with covers. Push the cover in
direction of arrow .
On vehicles which are equipped with doub
le sun visor*, you can also unfold the
auxiliary visor after swivelling the sun visor⇒ fig. 67.
WARNING
The sun visors must not be swivelled to the side windows into the deploy-
ment area of the head airbags if any obje cts, such as ball-point pens etc. are
attached to them. This might result in injuries to the occupants if the head
airbag is deployed.
Sun screen*
Fig. 66 Sun visor: swivelling
out
Fig. 67 Double sun visor
A1
A2
Fig. 68 Unroll the sun screen
20A5Facelift.book Page 68 Saturday, September 6, 2008 2:13 PM
Page 71 of 304
Lights and Visibility
70
Fast wipe
– Position the lever up into position .
Automatic wipe/wash for windscreen
– Pull the lever towards the steering wheel into sprung position , the wash system sprays immediately, the windscreen wiper starts wiping
a little later. The wash system and the windscreen wiper operate
simultaneously at a speed of more than 120 km/h.
– Release the lever. The windscreen wash system stops and the wiper continues for another 3 - 4 wiper stro kes (depending on the period of
spraying of the windscreen). At a speed of more than 2 km/h, the wiper
wipes once again* 5 seconds after the last wiper stroke in order to
wipe the last drops from the windsc reen. This function can be acti-
vated/deactivated by a specialist garage.
Rain sensor*
– Move the lever into position .
– You can set the sensitivity of the sensor individually with switch .
Wiping the rear window pane*
– Push the lever away from the steering wheel into position - the widescreen wiper will operate every 6 seconds.
Automatic wipe/wash for the rear window pane*
– Press the lever from the steering wheel forward into the sprung posi- tion , the wash system sprays immediately, the windscreen wiper
starts wiping a little later. As long as you hold the lever in this position,
the wiper operates as well as the wash system.
– Letting go of the lever will cause the windscreen wash system to stop and the wiper to continue for anot her 2 - 3 wiper strokes (depending
on the period of spraying of the windscreen). The lever will stay in
position after releasing it . Switching windscreen wipers off
– Move the lever back into its home position .
After the windscreen wiper switches off each
time or the ignition switches off for
the third time, the position of the windscreen wiper changes, this counteracts an
early fatigue of the wiper rubbers.
The windscreen wipers and the wash system only operate if the ignition is switched
on and the bonnet is closed
10).
If the intermittent wipe is switched on, the intervals are also controlled depending
on speed.
The rain sensor* automatically regulates the break between the individual wiper
strokes depending on the intensity of the rain.
The rear window will be wiped again if the front window wipers are on when
reverse gear is selected.
The windscreen washer nozzles are heated* when the ignition is switched on.
Top up with wash liquid ⇒page 235.
Winter position
If the windscreen wipers are in rest posi tion, they cannot be folded out from the
windscreen. For this reason we recommend adjusting the windscreen wipers in
winter so that they can be folded out fr om the windscreen easily. You can set this
rest position as follows:
•Switch on the windscreen wipers.
•Switch off the ignition. The windscreen wipers remain in the position in which
they were when switching off the ignition.
You can also use the service position ⇒page 71 as a winter position.
A3
A5
A1
AA
A6
A7
A6
10)On vehicles which do not have a contact swit ch for the bonnet, the windshield wiper and
wash system operates also when the bonnet is opened.
A0
20A5Facelift.book Page 70 Saturday, September 6, 2008 2:13 PM
Page 77 of 304
Seats and Stowage
76
Seats and Stowage
Front seats
Basic information
The front seats have a wide range of different settings and can thus be matched to
the physical characteristics of the driver and front passenger. Correct adjustment of
the seats is particularly important for
•safely and quickly reaching the controls,
•a relaxed, fatigue-free body position,
•achieving the maximum protection offere d by the seat belts and the airbag
system.
WARNING
•Never transport more occupants than the maximum seating in the
vehicle.
•Each occupant must correctly fasten the seat belt belonging to the seat.
Children must be fastened ⇒page 184, “Transporting children safely” with
a suitable restraint system.
•The front seats and the head restraints must always be adjusted to match
the body size of the seat occupant as well as the seat belts must always be
correctly fastened in order to provide an optimal protection for you and your
occupants.
•Always keep your feet in the footwell when the car is being driven - never
place your feet on the instrument panel, out of the window or on the
surfaces of the seats. This is particularly important for the front seat
passenger. You will be exposed to increased risk of injury if it becomes
necessary to apply the brake or in the event of an accident. If an airbag is
deployed, you may suffer fatal injuries when adopting an incorrect seated
position!
•It is important for the driver and front passenger to maintain a distance
of at least 25 cm from the steering wheel or dash panel. Not maintaining this minimum distance will mean
that the airbag system will not be able to prop-
erly protect you - hazard! The front seats and the head restraints must
always also be correctly adjusted to match the body size of the occupant.
•Ensure that there are no objects in the footwell as any objects may get
behind the pedals during a driving or braking manoeuvre. You would then
no longer be able to operate the clutch, to brake or accelerate.
Adjusting the front seats
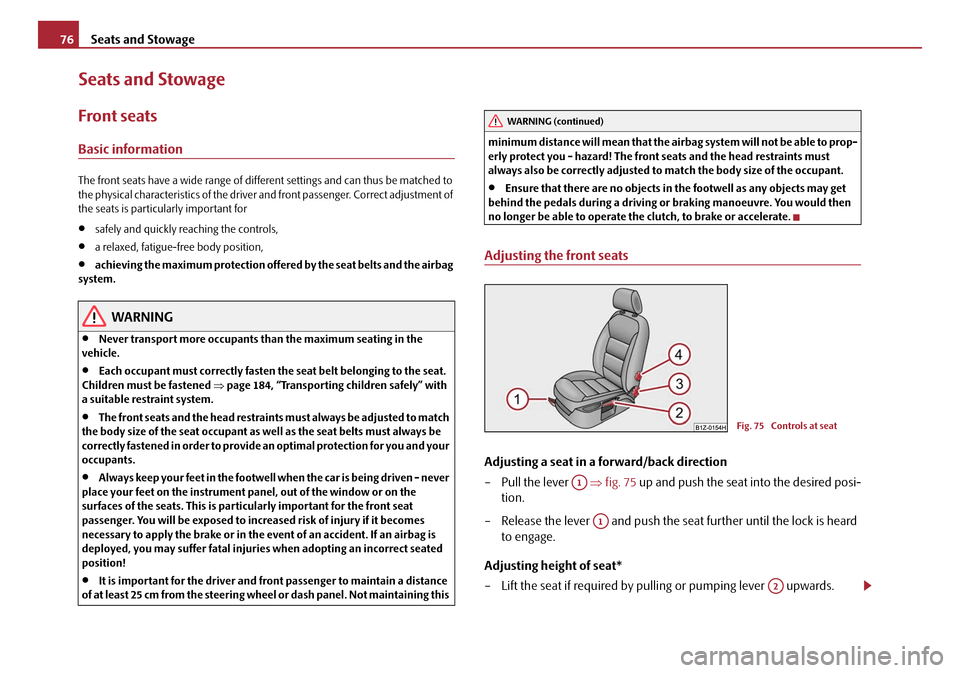
Adjusting a seat in a forward/back direction
– Pull the lever ⇒fig. 75 up and push the seat into the desired posi-
tion.
– Release the lever and push the seat further until the lock is heard to engage.
Adjusting height of seat*
– Lift the seat if required by pulling or pumping lever upwards.
WARNING (continued)
Fig. 75 Controls at seat
A1
A1
A2
20A5Facelift.book Page 76 Saturday, September 6, 2008 2:13 PM
Page 78 of 304
Seats and Stowage77
Using the systemSafetyDriving TipsGeneral MaintenanceBreakdown assistanceTechnical Data
– Lower the seat if required by pushing or pumping lever down-
wards.
Adjust the angle of the seat backrest
– Relieve any pressure on the backrest (do not lean on it) and turn the handwheel ⇒page 76, fig. 75 to adjust the desired angle of the
backrest.
Adjusting lumbar support*
– Turn the handwheel until you have set the most comfortable
curvature of the seat upholstery in the area of your spine.
The driver's seat should be adjusted in such a way that the pedals can be pressed
to the floor with slightly bent legs.
The backrest on the driver's seat should be adjusted in such a way that the upper
point of the steering wheel can be easi ly reached with slightly bent arms.
WARNING
•Only adjust the driver seat when the ve hicle is stationary - risk of injury!
•Take care when adjusting the seat! Adjusting the seat without care can
lead to bruises or injuries.
•The backrests must not be angled too far back when driving otherwise
this will affect proper operation of the seat belts and of the airbag system -
risk of injury!
Adjusting front seats electrically*
Adjusting seats
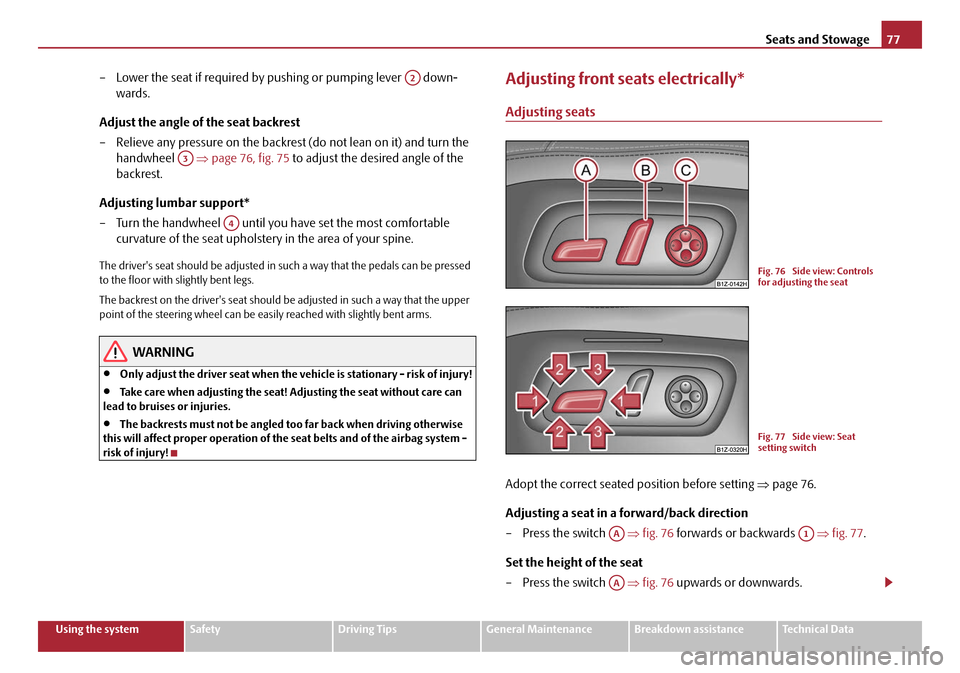
Adopt the correct seated position before setting ⇒page 76.
Adjusting a seat in a forward/back direction
– Press the switch ⇒fig. 76 forwards or backwards ⇒fig. 77 .
Set the height of the seat
– Press the switch ⇒fig. 76 upwards or downwards.
A2
A3
A4
Fig. 76 Side view: Controls
for adjusting the seat
Fig. 77 Side view: Seat
setting switch
AAA1
AA
20A5Facelift.book Page 77 Saturday, September 6, 2008 2:13 PM
Page 79 of 304
Seats and Stowage
78
Adjust the angle of the seat
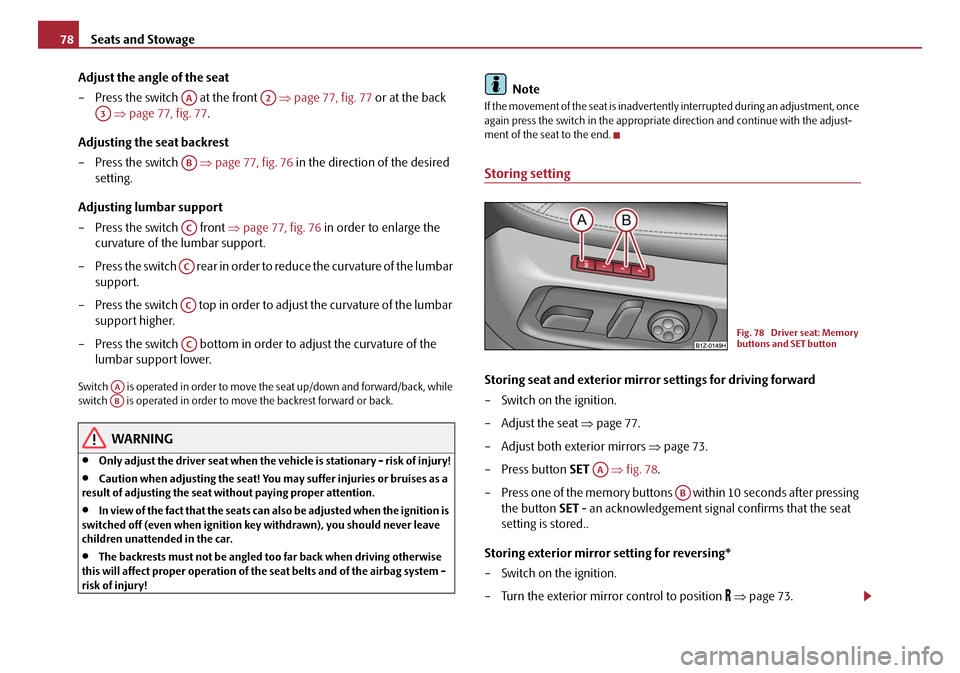
– Press the switch at the front ⇒page 77, fig. 77 or at the back
⇒ page 77, fig. 77 .
Adjusting the seat backrest
– Press the switch ⇒page 77, fig. 76 in the direction of the desired
setting.
Adjusting lumbar support
– Press the switch front ⇒page 77, fig. 76 in order to enlarge the
curvature of the lumbar support.
– Press the switch rear in order to reduce the curvature of the lumbar support.
– Press the switch top in order to adjust the curvature of the lumbar support higher.
– Press the switch bottom in order to adjust the curvature of the lumbar support lower.
Switch is operated in order to move the seat up/down and forward/back, while
switch is operated in order to move the backrest forward or back.
WARNING
•Only adjust the driver seat when the ve hicle is stationary - risk of injury!
•Caution when adjusting the seat! You may suffer injuries or bruises as a
result of adjusting the seat without paying proper attention.
•In view of the fact that the seats can also be adjusted when the ignition is
switched off (even when ignition key withdrawn), you should never leave
children unattended in the car.
•The backrests must not be angled too far back when driving otherwise
this will affect proper operation of th e seat belts and of the airbag system -
risk of injury!
Note
If the movement of the seat is inadvertently interrupted during an adjustment, once
again press the switch in the appropriate direction and continue with the adjust-
ment of the seat to the end.
Storing setting
Storing seat and exterior mirror settings for driving forward
– Switch on the ignition.
– Adjust the seat ⇒page 77.
– Adjust both exterior mirrors ⇒page 73.
– Press button SET ⇒fig. 78 .
– Press one of the memory buttons within 10 seconds after pressing the button SET - an acknowledgement signal confirms that the seat
setting is stored..
Storing exterior mirror setting for reversing*
– Switch on the ignition.
– Turn the exterior mirror control to position
⇒ page 73.
AAA2
A3
AB
AC
AC
AC
AC
AAAB
Fig. 78 Driver seat: Memory
buttons and SET button
AA
AB
20A5Facelift.book Page 78 Saturday, September 6, 2008 2:13 PM
Page 80 of 304
Seats and Stowage79
Using the systemSafetyDriving TipsGeneral MaintenanceBreakdown assistanceTechnical Data
– Engage reverse gear.
– Move the right exterior mirror into the desired position ⇒page 73.
– Take the vehicle out of gear. The set position of the exterior mirror is stored.
Memory buttons
Memory for the seat offers the possibility to store the individual driver seat and
external mirror position. An individual posi tion can be allocated to each of the three
memory buttons ⇒page 78, fig. 78 , that is three in tota l. After pressing the
corresponding memory button , the seat and the exterior mirror are automati-
cally moved into the positions which have been allocated to this button ⇒page 79.
Emergency Off
You can interrupt the setting operation at any time, if you operate any button of the
driver seat.
Note
•When storing settings with the memory buttons, we recommend that you begin
with the front button and assign a memo ry button to each additional driver.
•Each new setting stored with the same button erases the previous setting.
•Each time you store the seat and exterior mirror settings for driving forward you
also have to re-store the individual setting of the exterior mirror on the passenger
side for reversing.
Assigning remote control to the memory buttons
After storing the settings of the seat and exterior mirrors, you have 10
seconds in order to assign the remote control to the appropriate memory
button.
– Withdraw the ignition key.
– Press the button for unlocking the vehicle ⇒page 50. The setting is
stored with the memory button which you have selected.
If you wish to be able to retrieve the settings which are stored in the memory by also
using the remote control, you have to assign the remote control to a memory
button in each case.
If you wish, you can obtain an additional key with radio remote control from a
Škoda dealer and then assign the radio re mote control to another memory button.
Note
•If the remote control had previously been assigned to another memory button,
this setting is then erased by the new assignment.
•If you assign the remote control to a memory button which has already been
assigned to a remote control, the old assi gnment is also replaced by a new assign-
ment in this case.
•The assignment of the remote control to a memory button is retained, however,
after reassigning the seats and exterior mirrors.
Retrieving settings of the seat and mirrors
You can retrieve the stored settings either with the memory buttons
or with the remote control*.
Retrieving settings with memory buttons
– In order to retrieve the stored setting, you have two possibilities:
– One-touch automatic memory: Briefly press the desired memory
button ⇒page 78, fig. 78 . The seat and exterior mirror are moved
automatically into the stored position s (this applies only if the ignition
is switched on and the speed is less than 5 km/h).
– Memory keying : Press and hold the desired memory button
pressed long enough until the seat and the exterior mirror are moved
into the stored positions.
ABAB
AB
AB
20A5Facelift.book Page 79 Saturday, September 6, 2008 2:13 PM
Page 81 of 304
Seats and Stowage
80
Retrieving settings with remote control
– If the driver door is clos ed and the ignition is switched off, briefly press
the unlock button of the remote control ⇒page 50 and then open the
driver door.
– The seat and exterior mirrors now move automatically into the stored positions.
Retrieving setting of exterior mirror for reversing*
– Turn the rotary knob for the exterior mirror setting into the position
⇒ page 73 before engaging the reverse gear.
The mirror returns back into its initial po sition, after the rotary knob is moved out
of the position and put into another position or if the speed is more than 15 km/h.
Emergency Off
You can interrupt the setting operation at an y time, if you operate any button of the
driver seat.
Head restraints
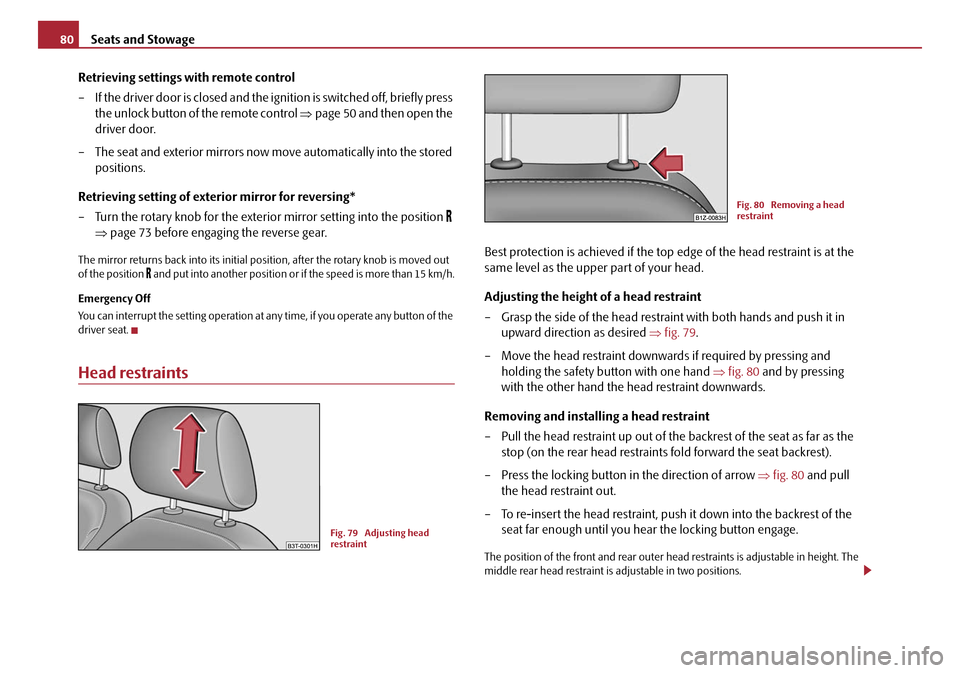
Best protection is achieved if the top edge of the head restraint is at the
same level as the upper part of your head.
Adjusting the height of a head restraint
– Grasp the side of the head restraint with both hands and push it in upward direction as desired ⇒fig. 79 .
– Move the head restraint downwards if required by pressing and holding the safety button with one hand ⇒fig. 80 and by pressing
with the other hand the head restraint downwards.
Removing and installing a head restraint
– Pull the head restraint up out of the backrest of the seat as far as the stop (on the rear head restraints fold forward the seat backrest).
– Press the locking button in the direction of arrow ⇒fig. 80 and pull
the head restraint out.
– To re-insert the head restraint, push it down into the backrest of the seat far enough until you hear the locking button engage.
The position of the front and rear outer head restraints is adjustable in height. The
middle rear head restraint is adjustable in two positions.
Fig. 79 Adjusting head
restraint
Fig. 80 Removing a head
restraint
20A5Facelift.book Page 80 Saturday, September 6, 2008 2:13 PM
Page 82 of 304

Seats and Stowage81
Using the systemSafetyDriving TipsGeneral MaintenanceBreakdown assistanceTechnical Data
The head restraints must be adjusted to
match the size of the seat occupant.
Correctly adjusted head restraints together with the seat belts offer effective
protection for the occupants ⇒page 164, “Correct seated position”.
WARNING
•The head restraints must be correctly adjusted in order to offer effective
protection for the occupants in the event of an accident.
•Do not drive under any circumstance with removed head restraints - risk
of injury!
•If the rear seats are occupied, the rear head restraint must not be in the
lower position.
Middle rear head restraint*
IIn certain countries national legal pr ovisions also require the equipment
of the rear seat with fixing eyes for child seat using the “Top Tether” system
⇒ page 191. For vehicles, which are equipped with such fixing eyes, a
deviating sequence for removing the middle head restraint must be
observed. Removing and installing the rear middle head restraint
– Pull the head restraint out of the back
rest of the seat as far as the stop.
– Press the locking button in the direction of arrow , press simultane- ously the locking button into the opening using a flat screwdriver
with a width of maximum 5 mm an d pull out the head restraint.
– To re-insert the head restraint, push it down into the backrest of the
seat far enough until you hear the locking button engage.
WARNING
•The head restraints must be correctly adjusted in order to offer effective
protection for the occupants in the event of an accident.
•Do not drive under any circumstance with removed head restraints - risk
of injury!
•If the rear seats are occupied, the rear head restraint must not be in the
lower position.
Rear seats
Folding the rear seats forwards
Fig. 81 Rear seats: middle
head restraint
AA
AB
Fig. 82 Folding the rear seat
forwards
20A5Facelift.book Page 81 Saturday, September 6, 2008 2:13 PM
Page 83 of 304

Seats and Stowage
82
To enlarge the luggage compartment, the rear seats can be folded
forwards, if necessary remove the rear seats. The rear seats can be folded
forward individually on vehicles with divided rear seats*.
Folding the rear seats forwards
– Before folding the rear seats forwar d adjust the front seats in such a
way that they are not damaged when folding forward the rear seats.
– Pull up the rear seats in the direction of arrow and fold forwards in direction of arrow ⇒page 81, fig. 82 .
– Press the unlocking knob and fold the rear seat backrest forwards ⇒fig. 83 .
If the front seats are too far back, we recommend that you have the rear head
restraints removed before the seat backrests are folded forward. Store the removed
head restraints in such a way that they cannot be damaged or soiled. Please refer to
the guidelines ⇒page 85.
Folding the seats back into position
Folding the seats back into position
– Install the head restraint in the slightly lifted rear seat backrest.
– Place the rear lateral seat belt behind the edge of the side trim
panel ⇒fig. 84 .
– Then push the seat backrest back into the upright position until the securing knob clicks into place - check by pulling on the rear seat
backrest.
– Make sure that the red pin is covered ⇒fig. 83 .
– Fold the rear seat back into its original position.
WARNING
•The belts and the belt locks must be in their original position after folding
back the rear seats and seat backrests - they must be ready to use.
•The seat backrests must be securely interlocked in position so that no
objects in the luggage compartment can slide into the passenger compart-
ment if there is sudden braking - risk of injury!
Fig. 83 Unlock the seat back-
rest
A1
A2
AA
Fig. 84 Lock the backrest
AC
AB
20A5Facelift.book Page 82 Saturday, September 6, 2008 2:13 PM