ECU SKODA OCTAVIA 2010 2.G / (1Z) User Guide
[x] Cancel search | Manufacturer: SKODA, Model Year: 2010, Model line: OCTAVIA, Model: SKODA OCTAVIA 2010 2.G / (1Z)Pages: 275, PDF Size: 16.43 MB
Page 79 of 275
Seats and Stowage
78
No objects with sharp edges should be stowed in the luggage net, because
they can damage the luggage net.
Luggage compartment cover* (Octavia)
You can use the luggage compartment cover behind the head
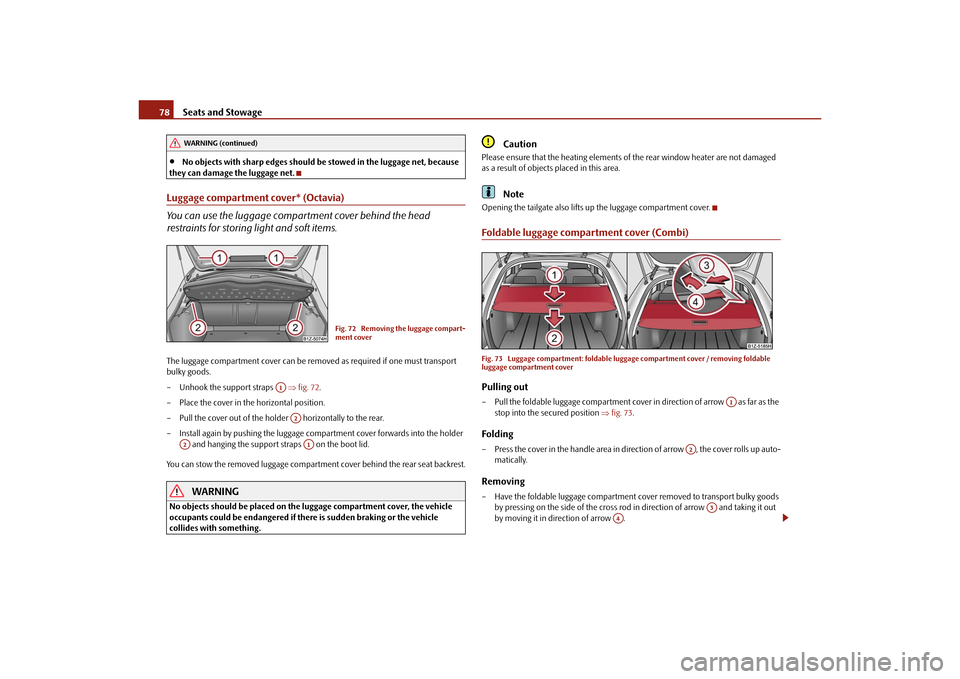
restraints for storing light and soft items.The luggage compartment cover can be removed as required if one must transport
bulky goods.
– Unhook the support straps fig. 72 .
– Place the cover in the horizontal position.
– Pull the cover out of the holder horizontally to the rear.
– Install again by pushing the luggage compartment cover forwards into the holder and hanging the support straps on the boot lid.
You can stow the removed luggage compartment cover behind the rear seat backrest.
WARNING
No objects should be placed on the luggage compartment cover, the vehicle
occupants could be endangered if ther e is sudden braking or the vehicle
collides with something.
Caution
Please ensure that the heating elements of the rear window heater are not damaged
as a result of objects placed in this area.
Note
Opening the tailgate also lifts up the luggage compartment cover.Foldable luggage compartment cover (Combi)Fig. 73 Luggage compartment: foldable lugg age compartment cover / removing foldable
luggage compartment coverPulling out– Pull the foldable luggage compartment cover in direction of arrow as far as the
stop into the secured position fig. 73 .Folding– Press the cover in the handle area in di rection of arrow , the cover rolls up auto-
matically.Removing– Have the foldable luggage compartment cover removed to transport bulky goods by pressing on the side of the cross rod in direction of arrow and taking it out
by moving it in direction of arrow .
WARNING (continued)
Fig. 72 Removing the luggage compart-
ment cover
A1
A2
A2
A1
A1
A2
A3
A4
s43s.1.book Page 78 Thursday, May 13, 2010 1:21 PM
Page 80 of 275
Seats and Stowage79
Using the system
Safety
Driving Tips
General Maintenance
Breakdown assistance
Technical Data
WARNING
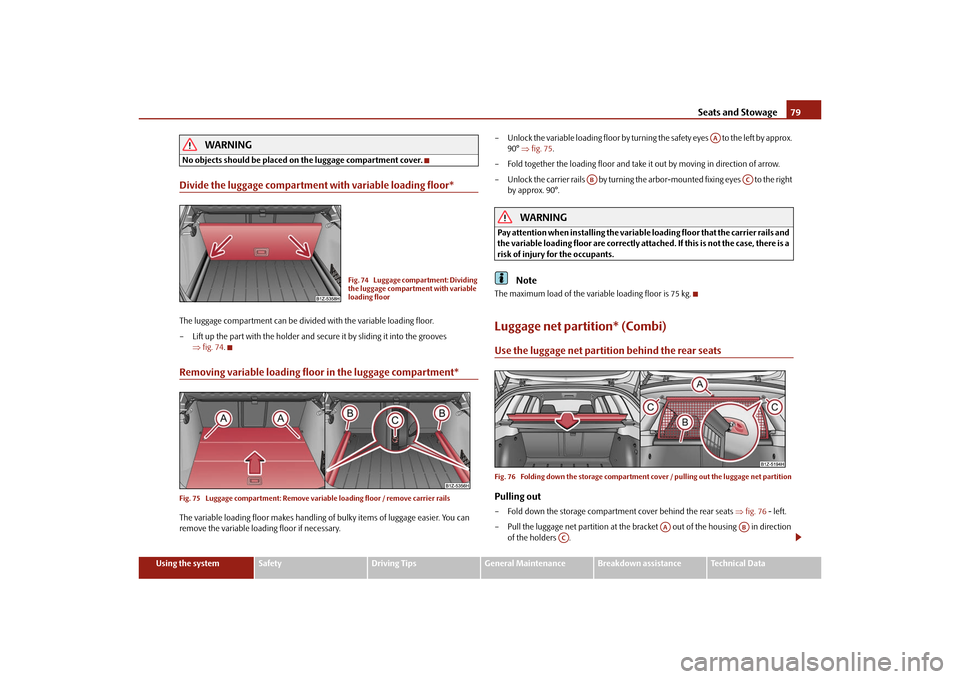
No objects should be placed on the luggage compartment cover.Divide the luggage compartment with variable loading floor*The luggage compartment can be divided with the variable loading floor.
– Lift up the part with the holder and secure it by sliding it into the grooves
fig. 74 .Removing variable loading floor in the luggage compartment*Fig. 75 Luggage compartment: Remove variab le loading floor / remove carrier railsThe variable loading floor makes handling of bulky items of luggage easier. You can
remove the variable loading floor if necessary. – Unlock the variable loading floor by turning
the safety eyes to the left by approx.
90° fig. 75 .
– Fold together the loading floor and take it out by moving in direction of arrow.
– Unlock the carrier rails by turning the arbor-mounted fixing eyes to the right by approx. 90°.
WARNING
Pay attention when installing the variable loading floor that the carrier rails and
the variable loading fl oor are correctly attached. If this is not the case, there is a
risk of injury for the occupants.
Note
The maximum load of the variable loading floor is 75 kg.Luggage net partition* (Combi)Use the luggage net partition behind the rear seatsFig. 76 Folding down the storage compartmen t cover / pulling out the luggage net partitionPulling out– Fold down the storage compartment cover behind the rear seats fig. 76 - left.
– Pull the luggage net partition at the bracket out of the housing in direction of the holders .
Fig. 74 Luggage compartment: Dividing
the luggage compartment with variable
loading floor
AA
AB
AC
AA
AB
AC
s43s.1.book Page 79 Thursday, May 13, 2010 1:21 PM
Page 81 of 275
Seats and Stowage
80
– Insert the cross rod into one of the mounts and push the cross rod forwards.
– In the same way, fix the cross rod to the other side of the vehicle, mount .
– Fold the storage compartment cover downwards.Folding– Fold down the storage compartment cover behind the rear seats page 79,
fig. 76 .
– Pull the cross rod back slightly, first on th e one side then on the other side and take
the cross rod out of the mounts .
– Hold the cross rod in such a way that the net partition can roll up slowly and
without damage into housing .
– Fold the storage compartment cover downwards.
If you wish to use the entire luggage compartment, you can remove the luggage
compartment cover page 78, fig. 73 .
WARNING
First check for yourself that the cross road is inserted into the mounts in
the front position!
Pay attention that the rear seat backrest is correctly interlocked. It is only
then that the three-point seat belt for the middle seat can reliably fulfil its
function.
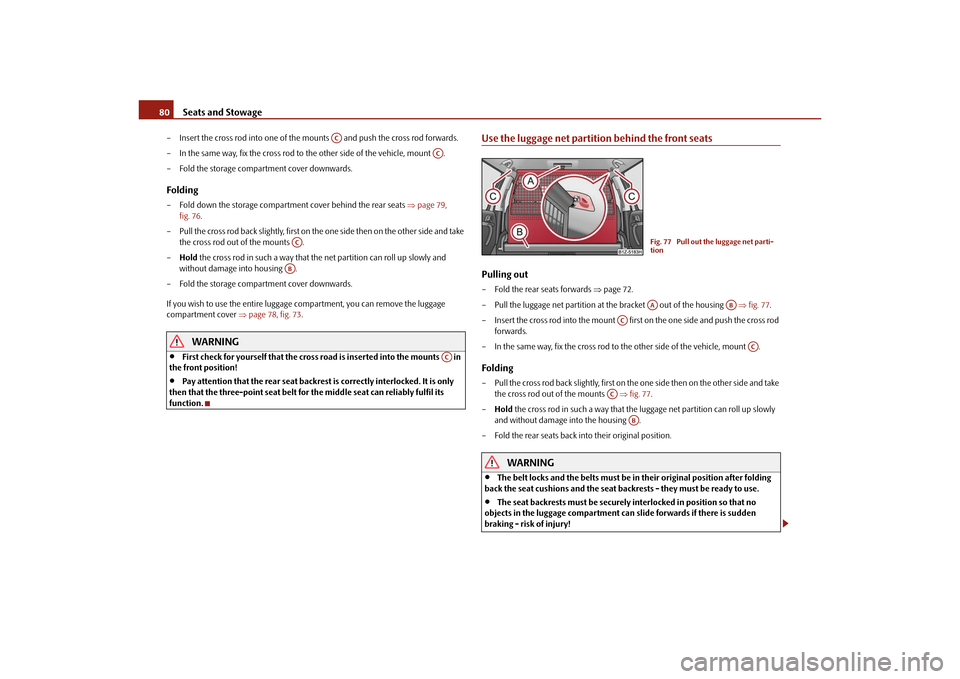
Use the luggage net partition behind the front seatsPulling out– Fold the rear seats forwards page 72.
– Pull the luggage net partition at the bracket out of the housing fig. 77 .
– Insert the cross rod into the mount first on the one side and push the cross rod forwards.
– In the same way, fix the cross rod to the other side of the vehicle, mount .Folding– Pull the cross rod back slightly, first on the one side then on the other side and take the cross rod out of the mounts fig. 77 .
– Hold the cross rod in such a way that the luggage net partition can roll up slowly
and without damage into the housing .
– Fold the rear seats back into their original position.
WARNING
The belt locks and the belts must be in their original position after folding
back the seat cushions and the seat backrests - they must be ready to use.
The seat backrests must be securely interlocked in position so that no
objects in the luggage compartment can slide forwards if there is sudden
braking - risk of injury!
AC
AC
ACAB
AC
Fig. 77 Pull out the luggage net parti-
tionAA
AB
AC
AC
AC
AB
s43s.1.book Page 80 Thursday, May 13, 2010 1:21 PM
Page 89 of 275
Seats and Stowage
88WARNING
The storage compartment is not a substi tute for the ashtray and must also
not be used for such purposes - risk of fire!
The pull-out storage compartment must always be kept closed when
driving for safety reasons.
Do not put any highly inflammable obje cts or objects which are sensitive to
heat (e.g. lighters, spra ys, spectacles, carbonated drinks) in the storage
compartment.
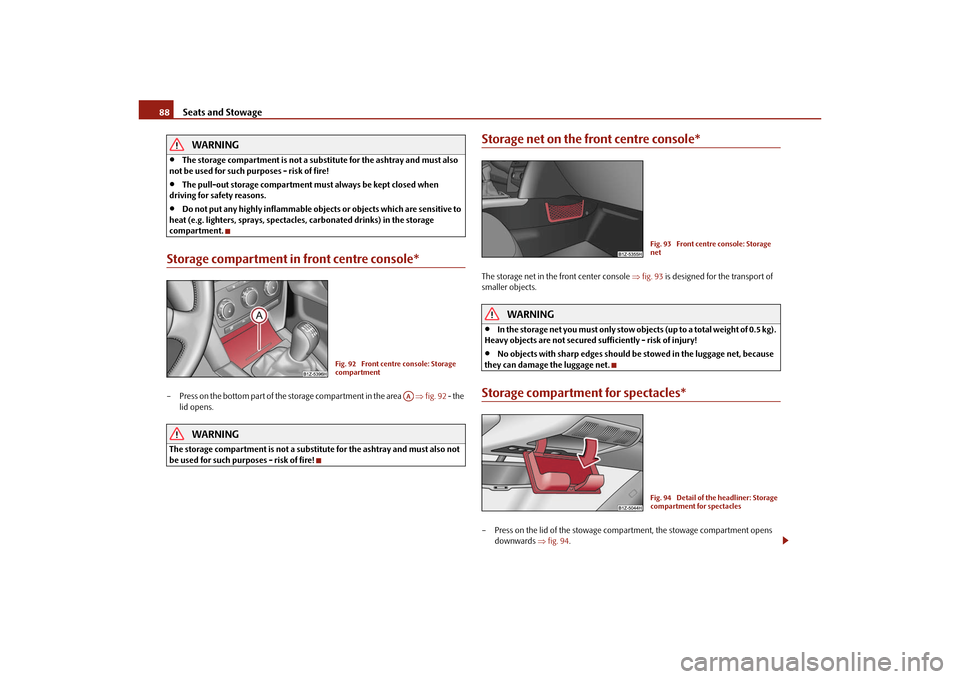
Storage compartment in front centre console*– Press on the bottom part of the storage compartment in the area fig. 92 - the
lid opens.
WARNING
The storage compartment is not a substitu te for the ashtray and must also not
be used for such purposes - risk of fire!
Storage net on the front centre console*The storage net in the front center console fig. 93 is designed for the transport of
smaller objects.
WARNING
In the storage net you must only stow objects (up to a total weight of 0.5 kg).
Heavy objects are not secured sufficiently - risk of injury!
No objects with sharp edges should be stowed in the luggage net, because
they can damage the luggage net.
Storage compartment for spectacles*– Press on the lid of the stowage comp artment, the stowage compartment opens
downwards fig. 94 .
Fig. 92 Front centre console: Storage
compartment
AA
Fig. 93 Front centre console: Storage
netFig. 94 Detail of the headliner: Storage
compartment for spectacles
s43s.1.book Page 88 Thursday, May 13, 2010 1:21 PM
Page 92 of 275

Seats and Stowage91
Using the system
Safety
Driving Tips
General Maintenance
Breakdown assistance
Technical Data
Seat backrest with opening for skis*Fig. 100 Rear seats: Handle of lid / luggage compartment: Unlock buttonAfter folding open the armrest and the lid, an opening in the seat backrest becomes
visible through which you can push long objects e.g. skis etc. You can fold open the
armrest and the lid from the passenger or luggage compartment.Opening from passenger compartment– Fold down the armrest of the rear seat at the loop page 73.
– Pull the handle up to the stop in upward direction and fold open the lid downwards fig. 100 - left.Opening from luggage compartment– Push the unlock button downwards fig. 100 - right and fold the lid (with armrest)
to the front.Closing– Fold the lid and the armrest up to the stop in upward direction - the lid must click into place audibly.
Ensure that the armrest is always locked into place after closing. You can recognize this
on the fact that the red field above the unlocking button of the luggage compart-
ment is not visible.
Removeable through-loading bag*The removeable through-loading bag is solely used for transporting
skis.Loading– Open the boot lid.
– Fold the rear armrest and the cover in the seat backrest downwards page 91,
“Seat backrest with opening for skis*”.
– Place the empty through-loadi ng bag in such a way that the end of the bag with the
zip lies in the boot.
– Push the skis into the through-loadi ng bag from the luggage compartment .Securing– Tighten the strap on the free end around the skis in front of the bindings
fig. 101 .
– Fold the seat backrest a little forward.
– Guide the securing strap through the op ening in the seat backrest around the
upper part of the seat backrest.
– Then push the seat backrest back into th e upright position until the locking button
clicks into place - check by pulling on the seat backrest.
– Insert the securing strap into the lock until it is heard to lock in place.
AA
Fig. 101 Securing the removeable
through-loading bag
AA
ABAB
AC
s43s.1.book Page 91 Thursday, May 13, 2010 1:21 PM
Page 93 of 275
Seats and Stowage
92
On vehicles fitted with a luggage net partition, guide the securing strap around the
housing when the net partition is rolled up . After fixing the luggage net partition in
place, it is not longer possible to unroll the luggage net partition.
WARNING
After placing skis into the through-lo ading bag, you must secure the bag
with the securing strap .
The strap must hold the skis tight.
Make sure that the strap holds the skis in front of the binding (see also
imprint on the removeable through-loading bag).Note
The through-loading bag is foreseen for four pairs of skis. The total weight of the
skis which are transported must not exceed 17 kg.
You must put the skis and the sticks in the through-loading bag with the tips facing
the rear.
If there are several pairs of skis in the th rough-loading bag, ensure that the bindings
are positioned at the same height.
Carefully fold the empty (dry) through-loading bag together, place it in the luggage
compartment and secure it to prevent it sl ipping. The through-loading bag must never
be folded together or stowed when moist.
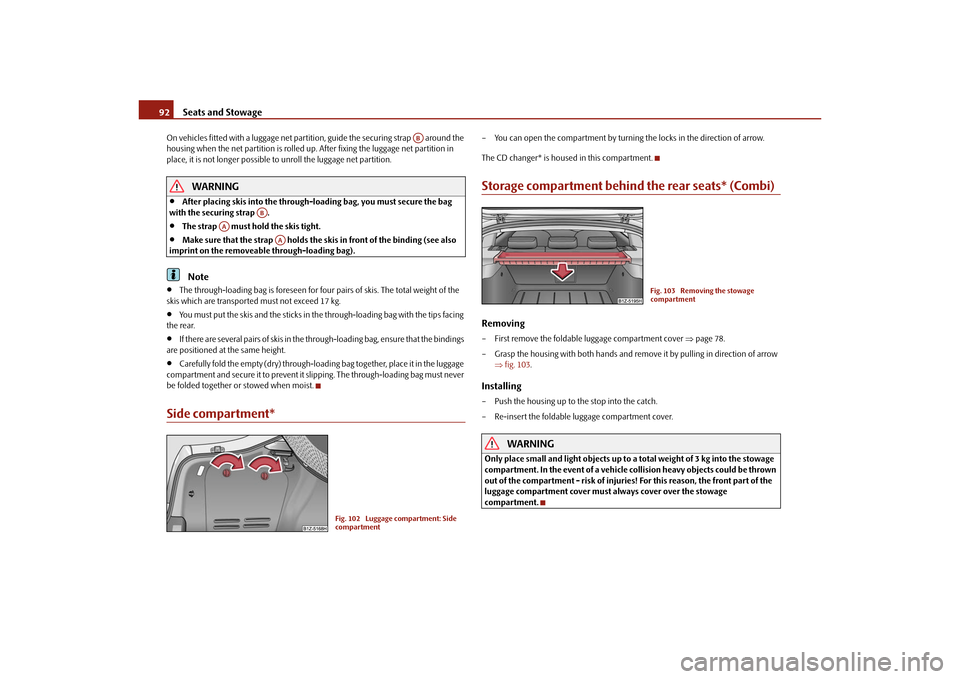
Side compartment*
– You can open the compartment by turnin g the locks in the direction of arrow.
The CD changer* is housed in this compartment.Storage compartment behind the rear seats* (Combi)Removing– First remove the foldable luggage compartment cover page 78.
– Grasp the housing with both hands and remove it by pulling in direction of arrow fig. 103 .Installing– Push the housing up to the stop into the catch.
– Re-insert the foldable luggage compartment cover.
WARNING
Only place small and light objects up to a total weight of 3 kg into the stowage
compartment. In the event of a vehicle collision heavy objects could be thrown
out of the compartment - risk of injuries! For this reason, the front part of the
luggage compartment cover must always cover over the stowage
compartment.
AB
AB
AA
AA
Fig. 102 Luggage compartment: Side
compartment
Fig. 103 Removing the stowage
compartment
s43s.1.book Page 92 Thursday, May 13, 2010 1:21 PM
Page 128 of 275
Communication127
Using the system
Safety
Driving Tips
General Maintenance
Breakdown assistance
Technical Data
During the connecting procedur
e, no other mobile phone may be connected with the
hands-free system.
Up to four mobile phones can be paired to the hands-free system, whereby only one
mobile phone can communicate with the hands-free system.
Connection with an already paired mobile phone
After switching on the ignition, the connect ion is automatically established for the
already paired mobile phone
12). Check on the mobile unit if the automatic connection
was established.
Disconnecting the connection
By withdrawing the ignition key.
By disconnecting the device in the information display.
By disconnecting the device in the mobile phone.
Solving connection problems
If the system announces No paired phone found , check the operating state of the
telephone:
Is the telephone switched on?
Is the PIN code entered?
Is Bluetooth
® active?
Is the visibility of the mobile phone active?
Was the telephone already paired with the hands-free system?
WARNING
In the event of air transport, the Bluetooth
® function of the hands-free system
must be switched off by a specialist garage!
Note
Not valid for all mobile phones which enable a communication via Bluetooth
®.
You can ask at an authorised Škoda Service Partner if your telephone is compatible
with the universal telephone preinstallation GSM II.
If a suitable adapter is available for your mobile phone, use your mobile phone
exclusively in the adapter so that the radiation in the vehicle drops to a minimum.
Inserting the mobile phone into the adapter ensures an optimal sending and
receiving power and offers at the same ti me the advantage of the battery charging.
The range of the Bluetooth
® connection to the hands-free system is restricted to
the vehicle interior. The range is dependent on local factors, e.g. obstacles between the
devices and mutual interferences with other de vices. If your mobile phone is e.g. in a
jacket pocket, this can lead to diffic ulties when establishing the Bluetooth
® connection
with the hands-free system or the data transfer.
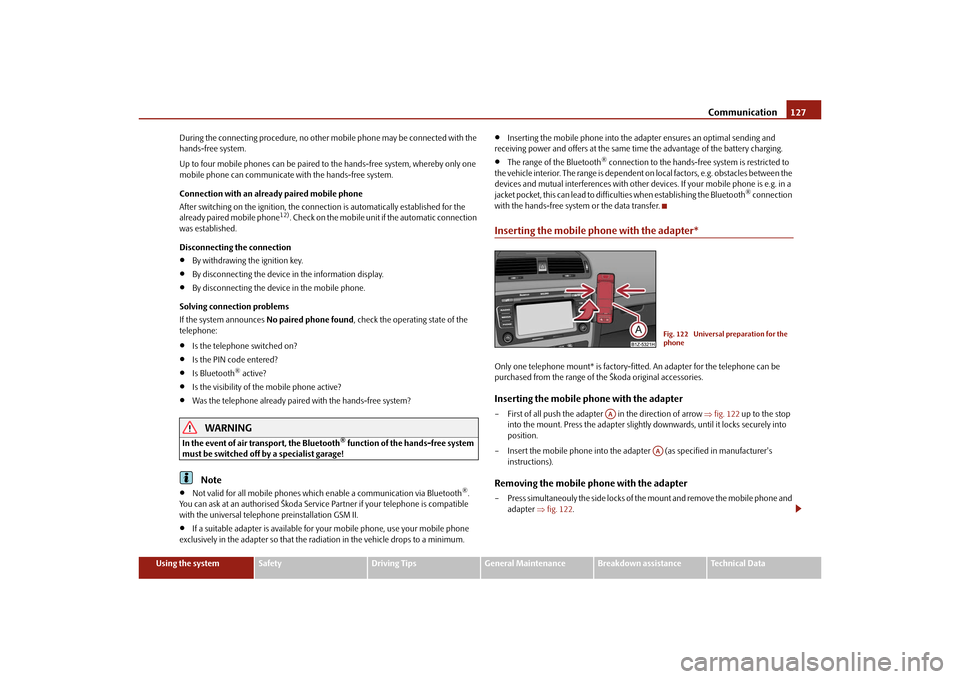
Inserting the mobile phone with the adapter*Only one telephone mount* is factory-fitted. An adapter for the telephone can be
purchased from the range of the Škoda original accessories.Inserting the mobile phone with the adapter– First of all push the adapter in the direction of arrow fig. 122 up to the stop
into the mount. Press the adapter slightly downwards, until it locks securely into
position.
– Insert the mobile phone into the adap ter (as specified in manufacturer's
instructions).Removing the mobile phone with the adapter– Press simultaneouly the side locks of the mount and remove the mobile phone and adapter fig. 122 .
Fig. 122 Universal preparation for the
phone
AA
AA
s43s.1.book Page 127 Thursday, May 13, 2010 1:21 PM
Page 141 of 275
Communication
140
– Touch the desired button and guide the CD into the CD-case .Ejecting a CD– Briefly touch the button , in order to eject a CD. For assigned memory spaces,
now the LEDs light up in the buttons .
– Touch the corresponding bu tton . The CD is ejected.Ejecting all CDs– Hold the button pressed for more than 2 seconds, in order to eject the CDs. All
CDs in the CD-changer are ejected consecutively.
Note
Always guide the CD into the CD-case with the printed side pointing upwards.
Never push the CD with force into the CD-case as the insertion is performed auto-
matically.
After loading a CD into the CD-changer, yo u must wait until the LED of the corre-
sponding button lights up. Then the CD -case is free to load the next CD.
If you have selected a position, on which a CD is already located, this CD will be
ejected. Take out the ejected CD and load the desired CD.
AD
AB
AA
AD
AD
AA
AB
AD
AB
s43s.1.book Page 140 Thursday, May 13, 2010 1:21 PM
Page 160 of 275
Transporting children safely159
Using the system
Safety
Driving Tips
General Maintenance
Breakdown assistance
Technical Data
Transporting children safelyWhat you should know about transporting children!An introduction to the subject
Accident statistics have revealed that children are generally more safely
transported on the rear seats than on the front passenger seat.Children younger than 12 years of age should normally travel on the rear seat of the
vehicle (take note of any national legal provis ions which differ from this). They should
be secured there by means of a child restraint system or by using the existing seat belts
depending on their age, body size and we ight. The child seat should be mounted
behind the front passenger seat for safety reasons.
The physical principle of an accident does, of course, also apply to children
page 145, “The physical principle of a fronta l collision”. They differ from adults in
that their muscles and bone structure of children are not yet fully developed. Thus chil-
dren are exposed to increased risk of injury.
Children should be transporte d by using special child safety seats in order to reduce
this risk of injury.
Use only child safety seats which are officia lly approved and are suitable for children
and which comply with the ECE-R 44 standard, which classifies child safety seats into
5 groups page 161. Child restraint systems which have been tested for conformity
to ECE-R 44 standard have a non-detachable test seal (a large E within a circle and
below this the test number) attached to the seat.
We recommend that you use child safety seats from the Škoda genuine accessories.
These child seats were developed and also tested for use in Škoda vehicles. They fulfil
the ECE-R 44 standard.
WARNING
Always comply with legal provisions and instructions from the relevant child
safety seat manufacturer when inst alling and using the child seat page 159.
Note
Any varying national legal regulations take priority over the information provided in
these instructions for use, or stated in this chapter.Important safety information regarding the use of child safety seats
Correct use of child safety seats cons iderably reduces the risk of injury!
WARNING
All the occupants of the car - in particular children - must wear a seat belt
when the car is moving.
Children, who are less than 1.50 m in height and who weigh less than 36 kg,
must not use a normal seat belt without a child restraint system otherwise this
may result in injuries to the stomach and neck areas. Comply with the national
legal requirements.
One should never carry children, and also not babies! - on one's lap.
You can transport a child safely in a suitable child safety seat page 161,
“Child seat”!
Only one child may be fastened with a seat belt into a child safety seat.
Never leave the child sitting unattended in the seat.
Certain outside climatic conditions can cause life-threatening tempera-
tures in the vehicle.
Never allow your child to be transported in a vehicle without the use of a
suitable restraint system.
Children should also never stand up in a vehicle or kneel on the seats when
the vehicle is moving. In the event of an accident the child will be thrown
through the vehicle and may as a result suffer fatal injuries, and also injure
other occupants.
Children are exposed to an increased risk of injury in the event of an acci-
dent if they lean forward or adopt an in correct seated position when the vehicle
is moving. This particularly applies to children who are transported on the front
s43s.1.book Page 159 Thursday, May 13, 2010 1:21 PM
Page 183 of 275
Towing a trailer
182
Towing a trailerTo w i n g a t r a i l e rTechnical requirements
The towing device must satisfy certain technical requirements.Your vehicle is designed primarily for tr ansporting persons and luggage. It can,
however, also be used for towing a traile r - provided certain technical equipment is
fitted.
If your vehicle has already been supplied with a factory-fitted towing device then
everything that is nece ssary for towing a trailer in technical terms, and in terms of the
law, has already been taken into account.
Your vehicle is fitted with a 13-pin power socket for the electrical connection between
the vehicle and trailer. If the tr ailer which you wish to tow has a 7-pin connector, you
can use a suitable adapter
16) from Škoda original accessories.
This work must be carried out in accordance with the manufacturer's specifications if
a towing device is retrofitted.
Authorised Škoda Service Partners are familiar with details relating to retrofitting a
towing device and for any necessary modifications to the cooling system.
WARNING
We recommend that you have the towing device from Škoda original accesso-
ries installed by an authorised Škoda Service Partner. He is familiar with all the
relevant details relating to retrofitting such equipment. There is a risk of an
accident if the towing device is not properly fitted!
General Maintenance
There are a number of points to pay attention to when towing a trailer.Trailer load
The permissible trailer load must on no account be exceeded.
You can negotiate appropriately steeper inclin es and descents if you do not make full
use of the permissible trailer load.
The trailer loads specified only apply for altitudes up to 1 000 metres above mean sea
level. The fact that the engi ne power output drops with increasing height due to a
lowering of air pressure and thus the abil ity to climb, means that the towed weight
must be reduced by 10% for every further increase of 1 000 metres in height above sea
level. The towed weight is the weight of the (laden) vehicle and the (laden) trailer
together. One should take this into account before driving up to higher altitudes.
The trailer and drawbar load information on the type plate of the towing device
are merely test data for the towing device The data relating to your vehicle, which
is often less than this test data, can be found in your vehicle registration docu-
ments.
Distribution of the load
Distribute the load in the trailer in such a way that any heavy items are located as close
as possible to the axle. Secure th e items to prevent them slipping.
Tyre inflation pressure
Select the tyre inflation pressure on yo ur vehicle for that of “fully laden”, page 208.
The inflation pressure of the tyres fitted to the trailer adjust in accordance with the
manufacturer's recommendation.
Exterior mirrors
You have to have additional ex terior mirrors fitted if you are not able to see the traffic
behind the trailer with the standard rear-view mirrors. Both exterior mirrors should be
attached to folding arms. Adjust the mirrors so that they provide you with an adequate
field of view to the rear.
16)In some countries the adapter is supplied with the towing device.s43s.1.book Page 182 Thursday, May 13, 2010 1:21 PM