Main beam SKODA OCTAVIA 2010 2.G / (1Z) User Guide
[x] Cancel search | Manufacturer: SKODA, Model Year: 2010, Model line: OCTAVIA, Model: SKODA OCTAVIA 2010 2.G / (1Z)Pages: 275, PDF Size: 16.43 MB
Page 109 of 275
Starting-off and Driving
108
You should not switch on any major elec trical components during the heating
period otherwise the vehicle battery will be drained unnecessarily.
- start engine
Applies to all models:
Position
To lock the steering , with the ignition key withdrawn, turn the steering wheel until the
steering locking pin is heard to engage. You should always lock the steering as a general
rule if you leave your vehicle. This acts as a deterrent against possible theft of your
vehicle .
Position
Move the steering wheel back and forward a little if the ignition key cannot, or cannot
easily be turned into this position, in order to release the steering lock.
Position
The engine is started in this position. At th e same time switched on low beam or main
beam or other electrical components wi th major power consumption are briefly
switched off. The ignition key moves back into position when one releases the key.
The ignition key must be turned back into position each time before starting the
engine again. The starter repeat lock in th e ignition lock prevents the starter being
engaged when the engine is r unning and thus getting damaged.
Ignition key withdrawal lock (automatic gearbox)
You can only withdraw the ignition key after switching off the ignition if the selector
lever is in position P.
WARNING
When driving, the ignition key must always be in the position (ignition
switched on) without the engine running. This position is indicated by the
warning lights coming on. If this is not the case, it could result in unexpected
locking of the steering wh eel - risk of accident!
Only remove the ignition key from the ignition lock when the vehicle has
come to a standstill (by applying the handbrake or moving the selector lever
into the position P). The steering lock can engage imme diately - risk of acci-
dent!
Always withdraw the ignition key if you are going to leave the vehicle, even
for a short time. This is particularly important if children are left in the vehicle.
The children might otherwise start the engi ne or switch on electrical equipment
(e.g. power windows) - risk of accident or injury!
Starting the engineGeneral
You can only start the engine only using an original ignition key.
Place the gearshift lever into neutral (or place the selector lever to the position P or
N in the case of an automatic gearbox) and put on the handbrake firmly before starting
the engine.
Before starting, it is necessary to depres s the clutch pedal and to hold it pressed
until the engine starts. If you start the engi ne without depressing the clutch pedal, the
engine does not start and a message is shown in the display of the instrument cluster
to remind you of th e necessity to depress the clutch pedal.
Let go of the key as soon as the engine starts otherwise there may be damage to
the starter.
The engine running noises may louder at first be louder for a short time after starting
the cold engine until oil pressure can be built up in the hydraulic valve clearance
compensation. This is quite normal and is not an operating problem.
If the engine does not start ...
You can use the battery of anothe r vehicle as a jump-start aid page 221.
It is only possible to tow-start vehicles fi tted with a manual gearbox. The tow-starting
distance must not be more than 50 metres page 225.
WARNING
Never run the engine in non ventilated or enclosed areas. The exhaust gases
of the engine contain besides the odorless and colourless carbon monoxide a
A3
A1A2A3
A2
A1
A2
WARNING (continued)
s43s.1.book Page 108 Thursday, May 13, 2010 1:21 PM
Page 181 of 275
Driving and the Environment
180
Solvent-free protection of the vehicle for transportation from the production plant
to the customer.
The use of solvent-free adhesives.
No CFCs used in the production process.
Without use of mercury.
Use of water-soluble paints.
Trade-in and recycling of old cars
Škoda Auto meets the requirements of the brand and its products regarding environ-
ment and ressource protection. All new Škoda vehicles can be utilized up to 95% and
always
15) be returned. In a lot of countries sufficient trade-in networks have been
created, where you can trade-in your vehicle. After you trade-in your vehicle, you will
receive a confirmation stating the recycling in accordance with environmental regula-
tions.
Vehicles with special built-on types
Technical documents regarding changes carried out on the vehicle must be kept by the
vehicle user, in order to hand over later to the old car user. This ensures the recycling
in accordance with en vironmental regulations.
Note
Detailed information about the trade-in and recycling of old cars is available from a
Škoda Service Partner.Motoring abroadGeneral
Other circumstances may exist abroad.It is also possible, in certai n countries, that the Škoda Service Partner network is limited
or has not been established yet. This is the reason why obtaining certain spare parts
may be somewhat complicated and specialist garage personnel may only be able to
make limited repairs. Škoda Auto in the Czech Republic and relevant importers are happy to provide information about technical
aspects of the vehicle, required mainte-
nance work and possibilities for getting repairs done.
Unleaded petrolA vehicle fitted with a petrol engine must always be refuelled with unleaded petrol
page 176. The automobile associations can provide you with information regarding
the locations of filling stations which offer unleaded petrol.HeadlightThe low beam of your headligh ts is set asymmetrically. It illuminates the side of the
road on which you are driving to a greater ex tent. If you drive abroad on the other side
of the road, you will da zzle oncoming traffic.
In order to prevent the dazzling of oncoming tr affic, it is necessary that an adjustment
of the headlights is carried out by your auth orised Škoda Service Partner.
The adaptation of the headlights with Xenon lights* (applies only to vehicles which are
designed for driving on the left and on the right) is performed in the menu Setup
Lights & Vision & Tra v e l m o d e in the main menu of the information display*
page 22.Avoiding damage to your vehicleWhen driving on poor roads and lanes or when driving over kerbstones, steep ramps
etc., you must pay particular attention to ensuring that any low-slung parts of the
vehicle, such as spoiler and exhaust, do not touch the ground and get damaged.
This particularly applies to models with a lowered suspension (sport suspension) and
also when your vehicle is fully laden.
15)Subject to fulfilment of the national legal requirements.s43s.1.book Page 180 Thursday, May 13, 2010 1:21 PM
Page 184 of 275
Towing a trailer183
Using the system
Safety
Driving Tips
General Maintenance
Breakdown assistance
Technical Data
Headlights
Before starting off with a hitched trailer, also check the setting of the headlights. Alter
the setting as necessary with the ai
d of the headlight beam adjuster page 56.
Detachable ball head
The ball rod is detachable on vehicles which feature a factory-fitted towing device. It is
stowed together with separate fitting instru ctions in the spare wheel well in the luggage
compartment of the vehicle.
Further information on the towing device page 184.
Note
We recommend that you also have your vehicle inspected between service inter-
vals if you tow a trailer frequently.
The handbrake on the towing vehicle must be put on when coupling and decou-
pling the trailer.
Driving Tips
Particular caution is required when towing a trailer.– Do not, as far as possible, drive with your vehicle unladen and the trailer laden.
– Do not make full use of the legal maximum speeds. This applies in particular to downhill sections.
– Apply the brakes in good time.
– Keep a check on the coolant temperature gauge if the outside temperature is high.
Distribution of weight
The distribution of the weight is very poor if your vehicle is unladen and the trailer is
laden. Maintain a particularly low speed if you cannot avoid driving with this combina-
tion.
Driving speed
Do not drive faster than 80 km/hour for safety reasons. This also applies for countries
in which higher speeds are allowed. The fact that the driving stability of the vehicle + trailer combination reduces with
increasing speed means that the legally allowed speed should not be used when there
are unfavourable road, weather or wind cond
itions, particularly near accident black
spots.
You must always reduce your speed immediat ely as soon as you detect even just the
slightest swaying of the trailer. On no account attempt to stop the trailer from
“swaying” by accelerating.
Apply the brakes in good time! If the trailer is fitted with a trailer brake, apply the
brakes gently at first and then brake firmly. This will avoid brake jolts resulting from the
trailer wheels locking. Shift down gears in good time before negotiating a downhill
section to allow the engine to also act as a brake.
Engine overheating
Please keep a check on the coolant temperature gauge if you have to negotiate a
lengthy slope in a low gear at a high engi ne speed when the outside temperature is
very high page 16, “Coolant temperature gauge”.
If the needle of the coolant temperature gauge moves into the right-hand area or even
the red area of the scale, reduce your speed immediately. Stop and switch off the
engine if the warning light
in the instrument cluster begins flashing. Wait a few
minutes and check the level of coolant in the coolant expansion bottle page 201,
“Inspecting the coolant level”.
Please refer to the following guidelines page 31, “Coolant temperature/coolant
level ”.
The coolant temperature can be reduced by switching on the heating.
Any increase in the cooling effect of the coolant fan through shifting down a gear and
increasing the engine speed is not possible since the fan speed is independent of the
engine speed. One should also not drop a gear for this reason when towing a trailer as
long as the engine can manage th e slope without any drop in speed.
s43s.1.book Page 183 Thursday, May 13, 2010 1:21 PM
Page 229 of 275
Fuses and light bulbs
228
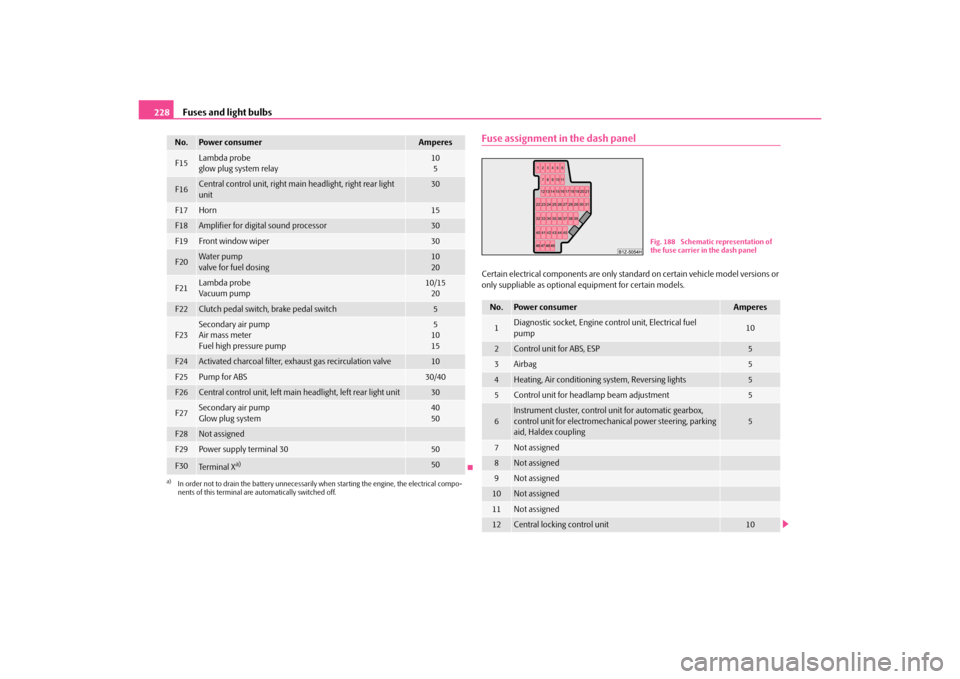
Fuse assignment in the dash panelCertain electrical components are only stan dard on certain vehicle model versions or
only suppliable as optional equipment for certain models.
F15
Lambda probe
glow plug system relay
10
5
F16
Central control unit, right main headlight, right rear light
unit
30
F17
Horn
15
F18
Amplifier for digital sound processor
30
F19
Front window wiper
30
F20
Wa te r pump
valve for fuel dosing
10
20
F21
Lambda probe
Vacuum pump
10/15 20
F22
Clutch pedal switch, brake pedal switch
5
F23
Secondary air pump
Air mass meter
Fuel high pressure pump
5
10
15
F24
Activated charcoal filter, ex haust gas recirculation valve
10
F25
Pump for ABS
30/40
F26
Central control unit, left main headlight, left rear light unit
30
F27
Secondary air pump
Glow plug system
40
50
F28
Not assigned
F29
Power supply terminal 30
50
F30
Te r m i n a l X
a)
50
a)In order not to drain the battery unnecessarily wh en starting the engine, the electrical compo-
nents of this terminal are automatically switched off.No.
Power consumer
Amperes
No.
Power consumer
Amperes
1
Diagnostic socket, Engine co ntrol unit, Electrical fuel
pump
10
2
Control unit for ABS, ESP
5
3
Airbag
5
4
Heating, Air conditioning system, Reversing lights
5
5
Control unit for headla mp beam adjustment
5
6
Instrument cluster, control unit for automatic gearbox,
control unit for electromecha nical power steering, parking
aid, Haldex coupling
5
7
Not assigned
8
Not assigned
9
Not assigned
10
Not assigned
11
Not assigned
12
Central locking control unit
10
Fig. 188 Schematic representation of
the fuse carrier in the dash panel
s43s.1.book Page 228 Thursday, May 13, 2010 1:21 PM
Page 231 of 275
Fuses and light bulbs
230
We therefore recommend that you have an y bulbs changed by an authorised Škoda
Service Partner or, in exceptional cases, by calling on other professional assistance.
Please note that the engine compartment is a hazardous area page 197, “Working
in the engine compartment”.
We recommend that you always have a small box of replacement bulbs in your vehicle.
You can obtain replacement bulbs from Škoda original accessories or from a specialist
garage
21).
A stowage place for the bulbs is located in the box in the spare wheel.
Fitted with a xenon headlight
Change of bulbs on vehicles with Xenon lights (low beam lights, parking lights and
main beam lights) should be und ertaken by a specialist garage.
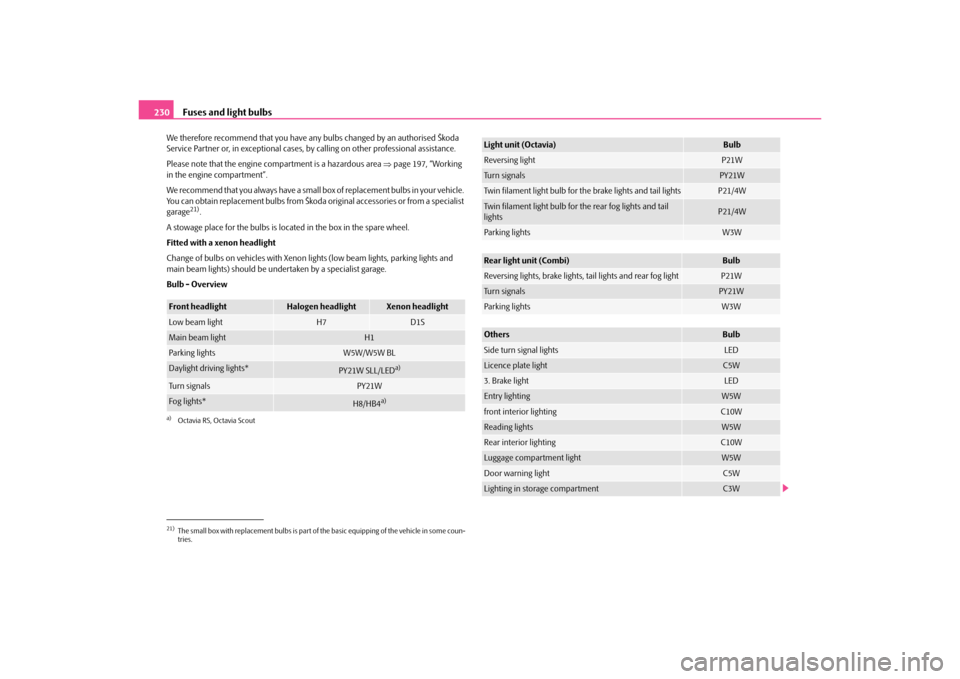
Bulb - Overview
21)The small box with replacement bulbs is part of the basic equipping of the vehicle in some coun-
tries.Front headlight
Halogen headlight
Xenon headlight
Low beam light
H7
D1S
Main beam light
H1
Parking lights
W5W/W5W BL
Daylight driving lights*
PY21W SLL/LED
a)
a)Octavia RS, Octavia ScoutTu r n s i g n a l s
PY21W
Fog lights*
H8/HB4
a)
Light unit (Octavia)
Bulb
Reversing light
P21W
Turn signals
PY21W
Twin filament light bulb for th e brake lights and tail lights
P21/4W
Twin filament light bulb for the rear fog lights and tail
lights
P21/4W
Parking lights
W3W
Rear light unit (Combi)
Bulb
Reversing lights, brake lights, tail lights and rear fog light
P21W
Turn signals
PY21W
Parking lights
W3W
Others
Bulb
Side turn signal lights
LED
Licence plate light
C5W
3. Brake light
LED
Entry lighting
W5W
front interior lighting
C10W
Reading lights
W5W
Rear interior lighting
C10W
Luggage compartment light
W5W
Door warning light
C5W
Lighting in storage compartment
C3W
s43s.1.book Page 230 Thursday, May 13, 2010 1:21 PM
Page 232 of 275
Fuses and light bulbs231
Using the system
Safety
Driving Tips
General Maintenance
Breakdown assistance
Technical Data
WARNING
Bulbs H7 and H1 are pressurised and may burst when changing the bulb -
risk of injury!
It is recommended to wear gloves and safety glasses when changing a bulb.
Gas discharge bulbs* (xenon bulbs) operate with a high voltage, profes-
sional knowledge is required - danger to life!Caution
Do not take hold of the glass bulb with naked fingers (even the smallest amount of dirt
reduces the working life of the light bulb). Use a clean cloth, serviette or something
similar.
Note
This Owner's Manual only describes the replacement of bulbs where it is assumed that
no major complications will arise. Other light bulbs should be replaced by your
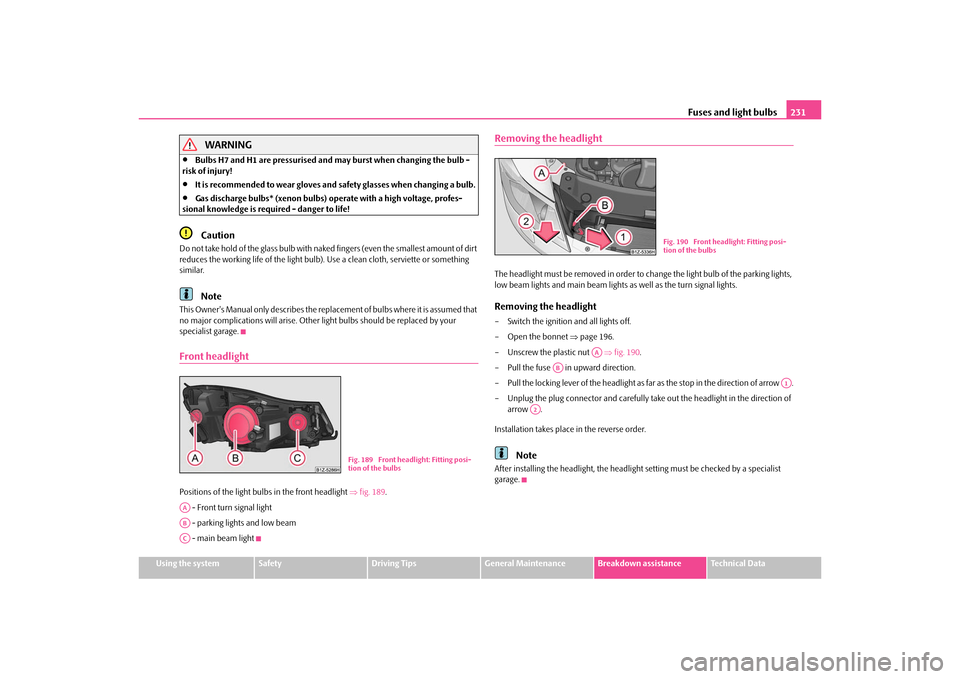
specialist garage.Front headlightPositions of the light bulbs in the front headlight fig. 189 .
- Front turn signal light
- parking lights and low beam
- main beam light
Removing the headlightThe headlight must be removed in order to ch ange the light bulb of the parking lights,
low beam lights and main beam lights as well as the turn signal lights.Removing the headlight– Switch the ignition and all lights off.
– Open the bonnet page 196.
– Unscrew the plastic nut fig. 190 .
– Pull the fuse in upward direction.
– Pull the locking lever of the headlight as far as the stop in the direction of arrow .
– Unplug the plug connector and carefully ta ke out the headlight in the direction of
arrow .
Installation takes place in the reverse order.
Note
After installing the headlight, the headligh t setting must be checked by a specialist
garage.
Fig. 189 Front headlight: Fitting posi-
tion of the bulbs
AAABAC
Fig. 190 Front headlight: Fitting posi-
tion of the bulbs
AA
AB
A1
A2
s43s.1.book Page 231 Thursday, May 13, 2010 1:21 PM
Page 234 of 275
Fuses and light bulbs233
Using the system
Safety
Driving Tips
General Maintenance
Breakdown assistance
Technical Data
Note
In order to facilitate the removal of the socket with the bulb for the parking light, we
recommend to remove first of all the bulb for the low beam light.
After installing the headlight, the headlight setting must be checked by a specialist
garage.
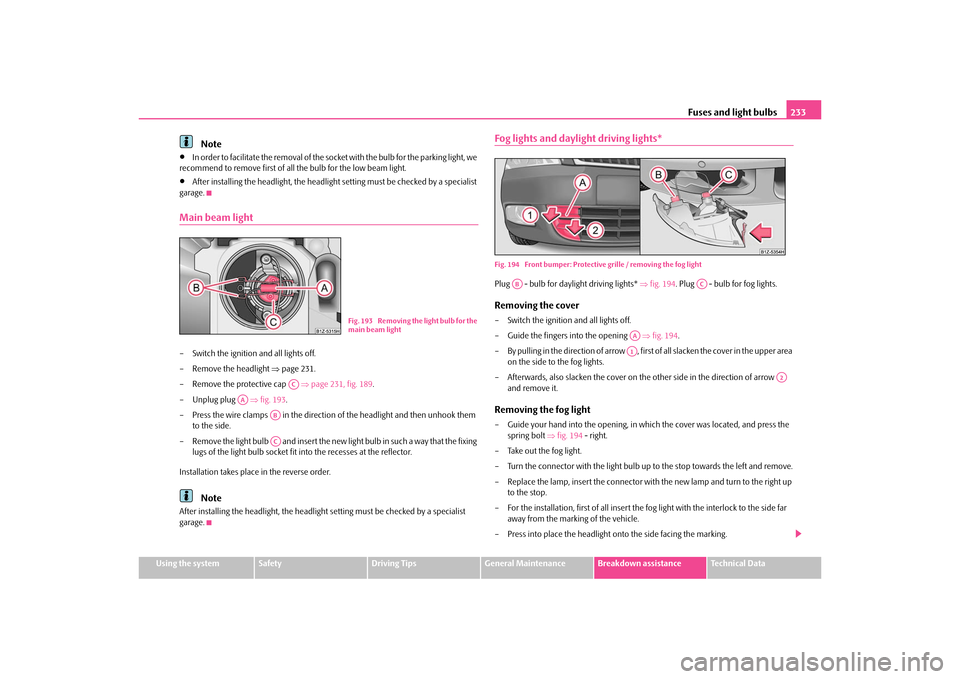
Main beam light– Switch the ignition and all lights off.
– Remove the headlight page 231.
– Remove the protective cap page 231, fig. 189 .
– Unplug plug fig. 193.
– Press the wire clamps in the directio n of the headlight and then unhook them
to the side.
– Remove the light bulb and insert the new light bulb in such a way that the fixing
lugs of the light bulb socket fit into the recesses at the reflector.
Installation takes place in the reverse order.
Note
After installing the headlight, the headligh t setting must be checked by a specialist
garage.
Fog lights and daylight driving lights*Fig. 194 Front bumper: Protective grille / removing the fog lightPlug - bulb for daylight driving lights* fig. 194 . Plug - bulb for fog lights.Removing the cover– Switch the ignition and all lights off.
– Guide the fingers into the opening fig. 194 .
– By pulling in the direction of arrow , first of all slacken the cover in the upper area on the side to the fog lights.
– Afterwards, also slacken the cover on th e other side in the direction of arrow
and remove it.Removing the fog light– Guide your hand into the opening, in which the cover was located, and press the
spring bolt fig. 194 - right.
– Take out the fog light.
– Turn the connector with the light bulb up to the stop towards the left and remove.
– Replace the lamp, insert the connector with the new lamp and turn to the right up to the stop.
– For the installation, first of all insert the fog light with the interlock to the side far away from the marking of the vehicle.
– Press into place the headlight on to the side facing the marking.
Fig. 193 Removing the light bulb for the
main beam light
AC
AA
ABAC
AB
AC
AAA1
A2
s43s.1.book Page 233 Thursday, May 13, 2010 1:21 PM
Page 267 of 275
Index
266
Light
automatic . . . . . . . . . . . . . . . . . . . . . . . . . . . . . . . . . 52
Changing bulbs . . . . . . . . . . . . . . . . . . . . . . . . . . 229
Lighting of the interior of the vehicle rear . . . . . . . . . . . . . . . . . . . . . . . . . . . . . . . . . . . . . . . 58
Lights converting/masking over . . . . . . . . . . . . . . . . . 180
Range adjustment . . . . . . . . . . . . . . . . . . . . . . . . . 56
switching on and off . . . . . . . . . . . . . . . . . . . . . . . 51
Warning lights . . . . . . . . . . . . . . . . . . . . . . . . . . . . . 27
Liquid in reservoir for windshield washer system Warning light . . . . . . . . . . . . . . . . . . . . . . . . . . . . . . 34
Loading . . . . . . . . . . . . . . . . . . . . . . . . . . . . . . . . . . . . . . 74
Lock Central locking system . . . . . . . . . . . . . . . . . . . . . 40
lock Central locking system . . . . . . . . . . . . . . . . . . . . . 40
Locking . . . . . . . . . . . . . . . . . . . . . . . . . . . . . . . . . . . . . . . 38 Remote control . . . . . . . . . . . . . . . . . . . . . . . . . . . . 43
Locking and unlocking from inside . . . . . . . . . . . . . . 41
Low beam . . . . . . . . . . . . . . . . . . . . . . . . . . . . . . . . . . . . 51 Warning light . . . . . . . . . . . . . . . . . . . . . . . . . . . . . . 29
Lugagge . . . . . . . . . . . . . . . . . . . . . . . . . . . . . . . . . . . . . . 42
Luggage compartment . . . . . . . . . . . . . . . . . . . . . 42, 74 Folding double hooks . . . . . . . . . . . . . . . . . . . . . . 77
Folding hooks . . . . . . . . . . . . . . . . . . . . . . . . . . . . . 77
Lashing eyes . . . . . . . . . . . . . . . . . . . . . . . . . . . . . . . 75
Luggage compartment door Lighting . . . . . . . . . . . . . . . . . . . . . . . . . . . . . . . . . . . 59
Luggage net partition . . . . . . . . . . . . . . . . . . . . . . . . . . 79
Luggage rack . . . . . . . . . . . . . . . . . . . . . . . . . . . . . . . . . . 81
MMain beam . . . . . . . . . . . . . . . . . . . . . . . . . . . . . . . . 51, 57 Warning light . . . . . . . . . . . . . . . . . . . . . . . . . . . . . 29
Manual gearbox . . . . . . . . . . . . . . . . . . . . . . . . . . . . . 110
Manual shifting of gears . . . . . . . . . . . . . . . . . . . . . . 110
Memory for the on-board computer . . . . . . . . . . . 19
Mobile phone . . . . . . . . . . . . . . . . . . . . . . . . . . . 125, 132 Connection to the hands-fr ee system . . . . . . 133
Connection with the hands-free system . . . . 126
Voice control . . . . . . . . . . . . . . . . . . . . . . . . . . . . 137
Motoring abroad . . . . . . . . . . . . . . . . . . . . . . . . . . . . 180
Multifunction steering wheel . . . . . . . . . . . . . . . . . 122
Multi-functional indicator . . . . . . . . . . . . . . . . . . . . . 19
Multimedia . . . . . . . . . . . . . . . . . . . . . . . . . . . . . . . . . 139 AUX-IN . . . . . . . . . . . . . . . . . . . . . . . . . . . . . . . . . . 139
CD changer . . . . . . . . . . . . . . . . . . . . . . . . . . . . . . 139
MDI . . . . . . . . . . . . . . . . . . . . . . . . . . . . . . . . . . . . . 139NNote holder . . . . . . . . . . . . . . . . . . . . . . . . . . . . . . . . . . 83OOil . . . . . . . . . . . . . . . . . . . . . . . . . . . . . . . . . . . . . . . . . 198Warning light . . . . . . . . . . . . . . . . . . . . . . . . . . . . . 30
Oil dipstick . . . . . . . . . . . . . . . . . . . . . . . . . . . . . . . . . . 198
Onboard computer . . . . . . . . . . . . . . . . . . . . . . . . . . . 19
Open door Warning light . . . . . . . . . . . . . . . . . . . . . . . . . . . . . 34
Opening a single door . . . . . . . . . . . . . . . . . . . . . . . . 38
Opening for skis . . . . . . . . . . . . . . . . . . . . . . . . . . . . . . 91 Operation in winter
Battery . . . . . . . . . . . . . . . . . . . . . . . . . . . . . . . . . . 206
Biodiesel . . . . . . . . . . . . . . . . . . . . . . . . . . . . . . . . 194
De-icing windows . . . . . . . . . . . . . . . . . . . . . . . . 187
Outside temperature . . . . . . . . . . . . . . . . . . . . . . . . . . 20
Overview of the engine compartment . . . . . . . . . 198
PPaint . . . . . . . . . . . . . . . . . . . . . . . . . . . . . . . . . . . . . . . . 187
Paint damage . . . . . . . . . . . . . . . . . . . . . . . . . . . . . . . 187
Parking . . . . . . . . . . . . . . . . . . . . . . . . . . . . . . . . . . . . . 111
Parking aid rear . . . . . . . . . . . . . . . . . . . . . . . . . . . . . . . . . . . . . 111
parking aid Front and rear . . . . . . . . . . . . . . . . . . . . . . . . . . . 112
Parking light . . . . . . . . . . . . . . . . . . . . . . . . . . . . . . . . . . 57
Parking the vehicle . . . . . . . . . . . . . . . . . . . . . . . . . . . 111
Passive Safety . . . . . . . . . . . . . . . . . . . . . . . . . . . . . . . 141
Pedals . . . . . . . . . . . . . . . . . . . . . . . . . . . . . . . . . . . . . . . 74
Petrol . . . . . . . . . . . . . . . . . . . . . . . . . . . . . . . . . . . . . . . 192
Petrol engines Starting the engine . . . . . . . . . . . . . . . . . . . . . . . 109
Polishing . . . . . . . . . . . . . . . . . . . . . . . . . . . . . . . . . . . . 187
Power steering . . . . . . . . . . . . . . . . . . . . . . . . . . . . . . 172 Warning light . . . . . . . . . . . . . . . . . . . . . . . . . . . . . 30
Power window . . . . . . . . . . . . . . . . . . . . . . . . . . . . . . . 46
Power windows Button in front passenger door and in rear doors 47
Buttons on the driver's door . . . . . . . . . . . . . . . 46
with central locking system . . . . . . . . . . . . . . . . 48
s43s.1.book Page 266 Thursday, May 13, 2010 1:21 PM