warning light SKODA OCTAVIA 2010 2.G / (1Z) Manual PDF
[x] Cancel search | Manufacturer: SKODA, Model Year: 2010, Model line: OCTAVIA, Model: SKODA OCTAVIA 2010 2.G / (1Z)Pages: 275, PDF Size: 16.43 MB
Page 114 of 275
Starting-off and Driving113
Using the system
Safety
Driving Tips
General Maintenance
Breakdown assistance
Technical Data
the play function volume decreases when activating the parking aid, see Owner's
Manual radio* or navigation system*. This
improves the audibility of the parking aid.
Activating
The parking aid is activated when the reverse gear is engaged and the ignition is
switched on or by pressing the button page 112, fig. 115 - left, the symbol lights
up in the button. The activation is conf irmed by a brief acknowledgement signal.
Deactivating
The parking aid is deactivated after pressing the button page 112, fig. 115 - left,
or at a speed of more than 10 km/h - the symbol
in the button is no longer illumi-
nated.
WARNING
The parking aid is not a substitute for the driver paying proper attention and
it is always the driver's responsibility to take care when reversing the vehicle or
carrying out similar manoeuvres.
You should therefore satisfy yourself, befo re reversing, that there is no small
obstacle, such as a rock, thin post, trailer drawbar etc., in front or behind your
vehicle. Such an obstacle might not be within the range detected by the sensors.
Under certain circumstances, surfaces of certain objects and types of
clothing cannot reflect the signal of the parking aid. Thus, these objects or
people who wear such clothing are not recognised by the sensors of the parking
aid.Note
Only the front parking aid operates if yo u are towing a trailer (applies only to
models which feature a factory-fitted towing device*).
If a warning signal sounds for about 3 seco nds after activating the system and there
is no obstacle close to your vehicle, this indicates a system fault. The fault is confirmed
additionally when the symbol flashes in the button page 112, fig. 115 - left.
Have the fault rectified by a specialist workshop.
The sensors must be kept clean and free of ice to enable the parking aid to operate
properly.
If the parking aid is activated and the sele ctor lever of the automatic gearbox is in
the position , warning signal indicates inte rruption (vehicle can no longer move).
Cruise control system (CCS)*IntroductionThe cruise control system (CCS) maintains a constant speed, more than 30 km/h (20
mph), once it has been set, without you havi ng to depress the accelerator pedal. This
is only possible within the range which is permitted by the power output and braking
power of the engine. The cruise control system makes it possible - particularly on long
journeys - for you to rest your “accelerator foot”.
WARNING
For safety reasons, the cruise control system must not be used in dense
traffic or on unfavourable ro ad surfaces (such as icy roads, slippery roads, loose
gravel) - risk of accident!
In order to prevent unintentional use of the cruise control system, always
switch off the system after use.Note
Models fitted with a manual gearbox: Alwa ys depress the clutch pedal if you switch
on the cruise control system when the gearbo x is in Neutral! Otherwise the engine can
rev up unintentionally.
The cruise control system is not able to maintain a constant speed when driving on
steep downhill sections. The weight of the vehicle increases the speed at which it
travels. One should shift down in good time to a lower gear or slow the vehicle down
by applying the foot brake.
It is not possible on vehicles fitted with an automatic gearbox to switch on the
cruise control system if the sele ctor lever is in the position P, N or R.
AP
s43s.1.book Page 113 Thursday, May 13, 2010 1:21 PM
Page 117 of 275
Automatic gearbox
116
Automatic gearboxAutomatic gearbox*Information for driving with the 6-speed automatic gearbox*
Your car is equipped with a conv entional 6-speed automatic gearbox.The maximum speed is reached in the 5th gear. The 6th gear serves as an economic
driving programme, which is intended to redu ce the fuel consumption. Shifting up and
down through the gears is performed automa tically. You can also, however, switch the
gearbox over into the Tiptronic mode. This mode makes it possible for you to also shift
gears manually page 120.Starting-off and Driving– Depress the brake pedal fully and keep it depressed.
– Press the Shiftlock button (button in ha ndle of the selector lever), move the
selector lever into the desired position, e.g. D page 118, and then release the
Shiftlock button.
– Wait a moment until the gearbox has shif ted (a slight engagement nudge can be
felt).
– Release the brake pedal and depress the accelerator .Stop– The selector lever position N does not have to be selected when stopping just for
a short time, such as at a cross roads. It is absolutely sufficient to hold the stopped
vehicle stationary by depressing the foot brake. The engine can, however, be
allowed just to idle.Parking– Depress the brake pedal and hold it depressed.
– Apply the handbrake firmly.
– Press and Shiftlock button in the selector lever, move the selector lever to P and
then release the Shiftlock button. The engine can only be
started when the selector lever is in position P or N
page 108.
It is sufficient to engage selector lever position P when parking on a flat surface. When
parking on a slope you should first apply the handbrake firmly and then move the
selector lever into position P. This is to ensure that there is no excessive pressure acting
on the lock mechanism and that it is easier to subsequently move the selector lever out
of position P.
If the selector lever position N is selected by accident while driving it is first necessary
to release pressure on the accelerator pedal and wait for idling speed of the engine to
be reached before engaging a driv e position in the selector lever.
WARNING
Do not depress the accelerator when changing the position of the selector
lever if the car is stationary and the engine is running - risk of accident!
Never move the selector lever into position R or P when driving - risk of an
accident!
When the engine is running and the vehi cle is stationary, it is necessary to
hold the car with the brake pedal in all the positions of the selector lever (except
P and N) since the power transmission is never completely interrupted, also not
when the engine is idling - the vehicle creeps.
Information for driving with the automatic gearbox DSG*
The abbreviation DSG means Direct shift gearbox (Direct shift gearbox). Two independent clutches are needed for the power transmission between the engine
and the gearbox. These replace the torque converter of the conventional automatic
gearbox. Their shifting is matched in such a way that there are no jerks when shifting
the gear and the power transmission of the engine to the front wheels is not inter-
rupted. Shifting up and down through the gears is performed automatically. You can
also, however, switch the gearbox over into the Tiptronic mode. This mode makes it
possible for you to also shift gears manually page 120.
s43s.1.book Page 116 Thursday, May 13, 2010 1:21 PM
Page 119 of 275
Automatic gearbox
118
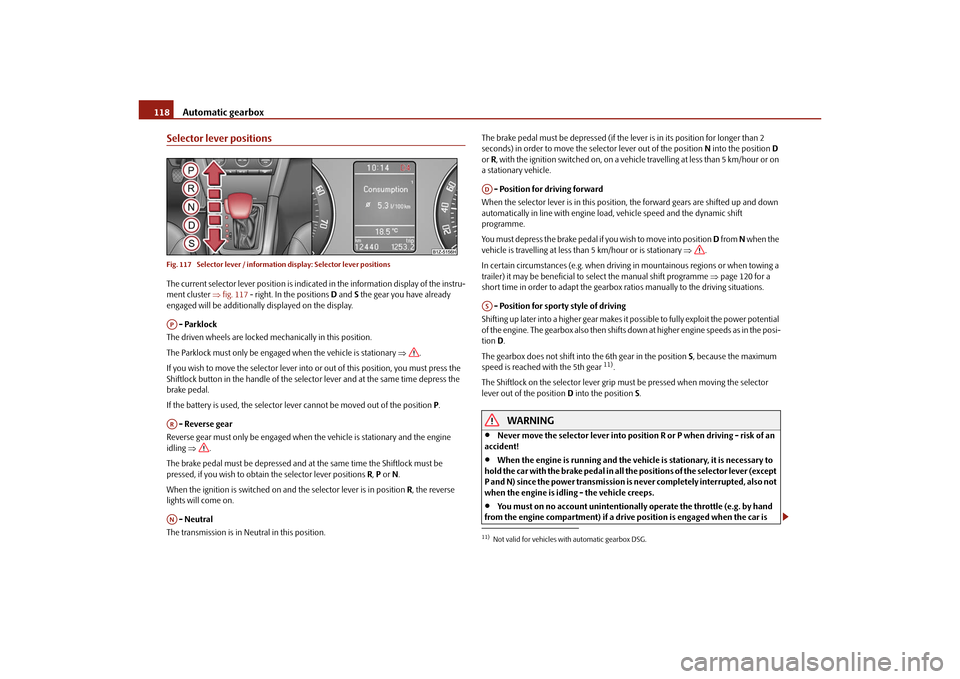
Selector lever positionsFig. 117 Selector lever / informatio n display: Selector lever positionsThe current selector lever position is indica ted in the information display of the instru-
ment cluster fig. 117 - right. In the positions D and S the gear you have already
engaged will be additionally displayed on the display.
- Parklock
The driven wheels are locked mechanically in this position.
The Parklock must only be engage d when the vehicle is stationary .
If you wish to move the selector lever into or out of this position, you must press the
Shiftlock button in the handle of the select or lever and at the same time depress the
brake pedal.
If the battery is used, the selector lever cannot be moved out of the position P.
- Reverse gear
Reverse gear must only be engaged when the vehicle is stationary and the engine
idling .
The brake pedal must be depressed and at the same time the Shiftlock must be
pressed, if you wish to obtain the selector lever positions R, P or N.
When the ignition is switched on an d the selector lever is in position R, the reverse
lights will come on.
- Neutral
The transmission is in Neutral in this position. The brake pedal must be depressed (if the le
ver is in its position for longer than 2
seconds) in order to move the se lector lever out of the position N into the position D
or R, with the ignition switched on, on a vehicl e travelling at less than 5 km/hour or on
a stationary vehicle.
- Position for driving forward
When the selector lever is in this position, the forward gears are shifted up and down
automatically in line with engine load, vehicle speed and the dynamic shift
programme.
You must depress the brake pedal if you wish to move into position D from N when the
vehicle is travelling at less th an 5 km/hour or is stationary .
In certain circumstances (e.g. when driving in mountainous regions or when towing a
trailer) it may be beneficial to select the manual shift programme page 120 for a
short time in order to adapt the gearbox ratios manually to the driving situations.
- Position for sporty style of driving
Shifting up later into a higher gear makes it possible to fully exploit the power potential
of the engine. The gearbox also then shifts down at higher engine speeds as in the posi-
tion D.
The gearbox does not shift into the 6th gear in the position S, because the maximum
speed is reached with the 5th gear
11).
The Shiftlock on the selector lever grip mu st be pressed when moving the selector
lever out of the position D into the position S.
WARNING
Never move the selector lever into position R or P when driving - risk of an
accident!
When the engine is running and the vehi cle is stationary, it is necessary to
hold the car with the brake pedal in all the positions of the selector lever (except
P and N) since the power transmission is never completely interrupted, also not
when the engine is idling - the vehicle creeps.
You must on no account unintentionally operate the throttle (e.g. by hand
from the engine compartment) if a driv e position is engaged when the car is
APARAN
11)Not valid for vehicles with automatic gearbox DSG.ADAS
s43s.1.book Page 118 Thursday, May 13, 2010 1:21 PM
Page 120 of 275
Automatic gearbox119
Using the system
Safety
Driving Tips
General Maintenance
Breakdown assistance
Technical Data
stationary. The vehicle would otherwise
immediately start off - also when the
handbrake is firmly applied - risk of an accident!
You must move the selector lever into position P and firmly apply the hand-
brake first before you or any other person opens the bonnet and starts working
on the engine when it is running - risk of accident! It is also essential to observe
all warnings page 197, “Working in the engine compartment”.
Selector lever lockAutomatic selector lever lock
With the ignition on, the selector lever is locked when it is in the positions P and N . You
must first of all depress the brake pedal in or der to move the selector lever out of this
position. The warning light
page 33 lights up in the instrument cluster as a
reminder for the driver when the selector lever is in the positions P and N.
A time delay element ensures that the selector lever is not blocked when rapidly
switching over the position N (e.g. from R to D). This does, for example, allow one to
seesaw out a stuck vehicle. The selector lever lo ck will click into place if the lever is in
the N position for more than 2 seconds without the brake pedal being pressed.
The selector lever lock is only active if the vehicle is stationary or moving at speed of
less than 5 km/hour. The lock is swit ched off automatically into position N when the
car is travelling at a higher speed.
Shiftlock button
The Shiftlock button in the hand le of selector lever prevents certain selector lever posi-
tions being engaged inadvertently. The selector lever lock is cancelled when you press
the Shiftlock button.
Keylock - Ignition key withdrawal lock
You can only withdraw the ignition key after switching off the ignition if the selector
lever is in position P. If the ignition key is withdrawn, the selector lever is blocked in
position P.
Kickdown function
The kickdown function provides you with maximum acceleration
power.Fully depressing the a ccelerator pedal allows the kickdown function to be activated in
the desired driving program. This function has precedence over the driving
programme and serves for maximum accelerati on of the vehicle when exploiting the
maximum power potential of the engine wi thout taking into account the current
selector lever position ( D, S or Tiptronic). The gearbox shifts down to one or several
gears in line with the driving state and the vehicle accelerates. The gearbox does not
shift up into the highest gear until the en gine has reached its maximum revolutions for
this gear range.
WARNING
Please note that using the kickdown function can result in the driven wheels
spinning on a smooth or slippery road surface - risk of skidding!Dynamic shift programmeThe automatic gearbox of your vehicle is controlled electronically. Shifting up and
down through the gears is performed automatically on the basis of pre-defined driving
programmes.
Adopting a moderate style of driving will cause the gearbox to select the most
economical driving programme. Shifting up into a higher gear as soon as possible and
shifting down as late as po ssible will have a favourable effect on your fuel consump-
tion.
Adopting a sporty style of driving with rapid movements of the accelerator pedal
combined with sharp acceleration and freque nt changes in speed, exploiting the top
speed of the car or depressing the accele rator pedal (kickdown function), will cause
the gearbox to switch over to this style of driving and shift down earlier with frequent
changes in gears in comparison to the moderate style of driving.
Selecting the most appropriate driving programme for the particular style of driving is
a continuous process. Irrespective of this it is, however, possible to switch or shift down
into a dynamic shift programme by depressi ng the accelerator rapidly. The gearbox
shifts down into a lower gear matching the speed of the car and this allows you to
WARNING (continued)
s43s.1.book Page 119 Thursday, May 13, 2010 1:21 PM
Page 128 of 275
Communication127
Using the system
Safety
Driving Tips
General Maintenance
Breakdown assistance
Technical Data
During the connecting procedur
e, no other mobile phone may be connected with the
hands-free system.
Up to four mobile phones can be paired to the hands-free system, whereby only one
mobile phone can communicate with the hands-free system.
Connection with an already paired mobile phone
After switching on the ignition, the connect ion is automatically established for the
already paired mobile phone
12). Check on the mobile unit if the automatic connection
was established.
Disconnecting the connection
By withdrawing the ignition key.
By disconnecting the device in the information display.
By disconnecting the device in the mobile phone.
Solving connection problems
If the system announces No paired phone found , check the operating state of the
telephone:
Is the telephone switched on?
Is the PIN code entered?
Is Bluetooth
® active?
Is the visibility of the mobile phone active?
Was the telephone already paired with the hands-free system?
WARNING
In the event of air transport, the Bluetooth
® function of the hands-free system
must be switched off by a specialist garage!
Note
Not valid for all mobile phones which enable a communication via Bluetooth
®.
You can ask at an authorised Škoda Service Partner if your telephone is compatible
with the universal telephone preinstallation GSM II.
If a suitable adapter is available for your mobile phone, use your mobile phone
exclusively in the adapter so that the radiation in the vehicle drops to a minimum.
Inserting the mobile phone into the adapter ensures an optimal sending and
receiving power and offers at the same ti me the advantage of the battery charging.
The range of the Bluetooth
® connection to the hands-free system is restricted to
the vehicle interior. The range is dependent on local factors, e.g. obstacles between the
devices and mutual interferences with other de vices. If your mobile phone is e.g. in a
jacket pocket, this can lead to diffic ulties when establishing the Bluetooth
® connection
with the hands-free system or the data transfer.
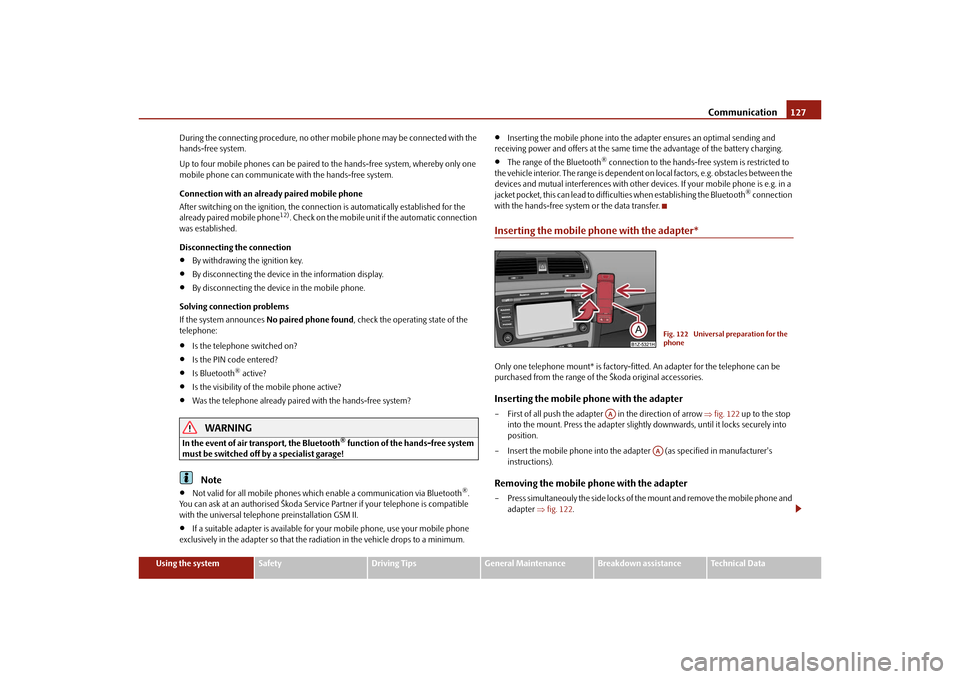
Inserting the mobile phone with the adapter*Only one telephone mount* is factory-fitted. An adapter for the telephone can be
purchased from the range of the Škoda original accessories.Inserting the mobile phone with the adapter– First of all push the adapter in the direction of arrow fig. 122 up to the stop
into the mount. Press the adapter slightly downwards, until it locks securely into
position.
– Insert the mobile phone into the adap ter (as specified in manufacturer's
instructions).Removing the mobile phone with the adapter– Press simultaneouly the side locks of the mount and remove the mobile phone and adapter fig. 122 .
Fig. 122 Universal preparation for the
phone
AA
AA
s43s.1.book Page 127 Thursday, May 13, 2010 1:21 PM
Page 135 of 275
Communication
134
the icon on the touch-screen of the radio
13) or the navigation, see operating instruc-
tions for radio or for navigation.
WARNING
Pay attention primarily to the traffic situation! As the driver you are fully
responsible for road safety. Use the teleph one system only to such an extent, so
that you are in full control of your vehicle at any time - risk of accident!
In the event of air transport, the Bluetooth
® function of the hands-free
system must be switched off by a specialist garage!
Note
In the memory of the control unit, up to three users can be stored, whereby the
hands-free system can only communicate actively with one user. In the case of mutual
connection with a fourth mobile phone, you must erase one user.
Not valid for all mobile phones which enable a communication via Bluetooth
®.
You can ask at an authorised Škoda Service Partner if your telephone is compatible
with the universal telephon e preinstallation GSM IIl.
When connecting to the control unit, follow the instructions on your mobile phone.
The range of the Bluetooth
® connection to the hands-free system is intended for
the vehicle interior. The range is dependent on local factors, e.g. obstacles between the
devices and interferences with other devices.
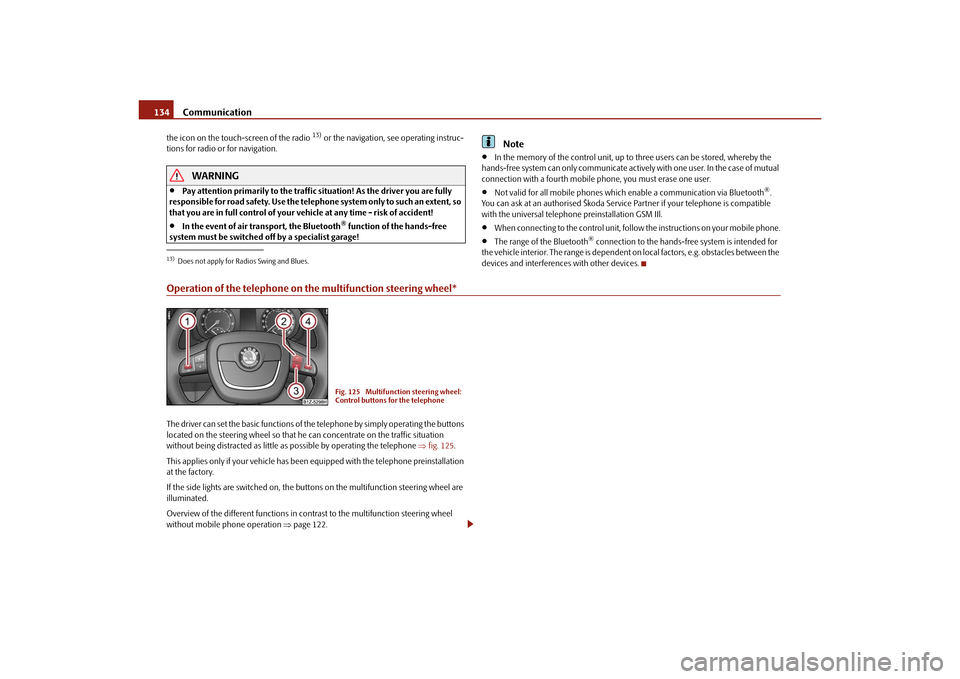
Operation of the telephone on the multifunction steering wheel*The driver can set the basic functions of the telephone by simply operating the buttons
located on the steering whee l so that he can concentrate on the traffic situation
without being distracted as little as possible by operating the telephone fig. 125 .
This applies only if your vehicle has been equipped with the telephone preinstallation
at the factory.
If the side lights are switched on, the butt ons on the multifunction steering wheel are
illuminated.
Overview of the different functions in contrast to the multifunction steering wheel
without mobile phone operation page 122.13)Does not apply for Radios Swing and Blues.
Fig. 125 Multifunction steering wheel:
Control buttons for the telephone
s43s.1.book Page 134 Thursday, May 13, 2010 1:21 PM
Page 142 of 275
Passive Safety141
Using the system
Safety
Driving Tips
General Maintenance
Breakdown assistance
Technical Data
SafetyPassive SafetyBasic informationDriving the safe way
Passive safety measures reduce the risk of injury in accident situations.In this section you will find important info rmation, tips and notes on the subject of
passive safety in your vehicle. We have combined everything here which you should
be familiar with, for example, regarding seat belts, airbags, child seats and safety of
children. It is therefore important, in partic ular, to comply with the notes and warnings
in this section for your own interest and in the interest of those travelling with you.
WARNING
This chapter contains important information on how to use the vehicle for
the driver and his occupants. You will find further information on safety, which
concerns you and those travelling with you, in the following chapters of this
Owner's Manual.
The complete on-board literature should always be in the vehicle. This
applies in particular, if you rent out or sell the vehicle.
Safety equipment
The safety equipment is part of the occupant protection and it can
reduce the risk of injuries in accident situations.“Do not put at risk” your safety and the safety of those travelling with you . In the event
of an accident, the safety equipment can redu ce the risk of injuries. The following list
contains part of the safety equipment in your vehicle:
Three-point seat belts for all the seats,
belt force limiter for front and outer rear seats*,
belt tensioner for front seats,
seat belt height adjuster for front seats,
front airbag for the driver and the front seat passenger*,
side airbags*,
head airbags*,
anchoring points for child seat using the “ISOFIX” system,
anchoring points for child seat using the “Top Tether” system,
head restraint adjustable for height,
adjustable steering column.
The specified safety equipment works togeth er, in order to optimally protect you and
those travelling with you in accident situat ions. The safety equipment does not protect
you or the people travelling with you, if you or your occupants adopt an incorrect
seated position or the equipment is not correctly adjusted or used.
For this reason you will be provided with information on why this equipment is very
important, how it protects you and the occupants, what should be observed when
using the equipment and how you and the peop le travelling with you can make full use
of the existing safety equipment. This Owner's Manual contains important warning
notes, which you and those travelling with you should pay attention to in order to
reduce a risk of injury.
Safety concerns everybody!
Before setting off
The driver is always fully responsibl e for his occupants and for the oper-
ating safety of the vehicle.For your own safety and the safety of the pe ople travelling with you, please pay atten-
tion to the following points before setting off:
Ensure that the lighting and the turn signal system are functioning properly.
Inspect the tyre inflation pressure.
s43s.1.book Page 141 Thursday, May 13, 2010 1:21 PM
Page 151 of 275
Airbag system
150
Airbag systemDescription of the airbag systemGeneral information on the airbag systemThe front airbag system is complementary to the three-point seat belts and offers addi-
tional protection for the head and chest area of the driver and passenger in the event
of a frontal collision.
In the case of a violent side cr ash, the side* and head airbags* reduce the risk of inju-
ries to the occupants on the side of the collision .
The airbag system is only functional af ter the ignition has been switched on.
The operational readiness of the airbag syst em is monitored electronically. The airbag
indicator light comes on for a few seconds each time the ignition is switched on.
The airbag system (according to vehicle equipment) consists of:
an electronic control unit,
front airbag for the driver and the front seat passenger*,
side airbags*,
head airbags*,
an airbag indicator light in the instrument cluster,
a front passenger airbag switch* page 157,
an indicator light for a switched off fron t seat passenger airbag* in the middle of
the dash panel page 157.
A fault in the airbag system exists if:
the airbag indicator light does not light up when the ignition is switched on,
the warning light does not go out after about 4 seconds after the ignition is
switched on,
the airbag indicator light goes out and come s on again after the ignition is switched
on,
the airbag indicator light comes on or flickers when driving,
an airbag indicator light showing a switched-off front passenger airbag* in the
middle of the dash panel flashes.
WARNING
To enable the occupants of a vehicle to be protected with the greatest
possible effect when the airbag is deployed, the front seats must be
page 142, “Correct seated position” correctly adjusted to match the body
size of the occupant.
If you do not fasten the seat belts when driving, lean too far forward or
adopt an incorrect seated position, you are exposing yourself to increased risk
of injury in the event of an accident.
Have the airbag system checked immediat ely by a specialist garage if a fault
exists. Otherwise, there is a risk of the airbag not being activated in the event of
an accident.
No modifications of any kind may be made to parts of the airbag system.
It is prohibited to manipulate individual parts of the airbag system as this
might result in the airbag being deployed.
The protective function of the airbag system is sufficient for only one acci-
dent. The airbag system must then be re placed if the airbag has been deployed.
The airbag system needs no maintenance during its working life.
If you sell your car, please hand over the complete vehicle documentation to
the new owener. Please note that the documents relating to the possibility of
deactivating the front passenger airbag are also part of the vehicle documents!
If the vehicle or individual parts of the airbag system are scrapped, it is
essential to observe the relevant safety precautions. The authorised Škoda
Service Partners are familiar with these regulations.
When disposing of vehicle or parts of the airbag system, it is important to
comply with the national legal requirements.
s43s.1.book Page 150 Thursday, May 13, 2010 1:21 PM
Page 152 of 275
Airbag system151
Using the system
Safety
Driving Tips
General Maintenance
Breakdown assistance
Technical Data
When are the airbags deployed?The airbag system is designed in such a wa y that the driver and front passenger airbag
are deployed in the event of a violent frontal collision.
In the case of a violent side collision , the side airbag* on the side of the vehicle at
which the collision occurs, is deployed to gether with the relevant head airbag*.
In special cases, the front as well as th e relevant side and head airbags may be
deployed together.
The airbags are not deployed in the case of minor frontal and side collisions, in the
case of rear-end collisi ons and vehicle rollover.
Deployment factors
It is not possible to state globally which deployment conditions apply to the airbag
system in every situation as the circumstances which exist in the case of accidents vary
greatly. An important role in this case is played by factors such as the type of object
against which the vehicle impacts (hard, soft ), the angle of impact, the relative speed
during the accident etc.
A decisive factor for the deployment of the airbags is the deceleration which occurs
during a collision. The control unit analyses the nature of the collision and activates the
relevant restraint system. If the vehicle deceleration which occurs and is measured
during the collision remains below the prescribed reference values specified in the
control unit, the airbags are no t deployed although the vehicle may well suffer severe
damage to the bodywork as a consequence of the accident.
The airbags are not deployed if:
ignition off,
a minor frontal collision,
a minor side collision,
a rear-end collision,
Rollover of the vehicle.Note
A grey white, non harmful gas is released when airbag is inflated. This is perfectly
normal and is not an indicati on of a fire in the vehicle.
In the event of an accident in which the airbags are deployed:
The interior lighting comes on (if the switch for the interior light is in the door
contact position),
The hazard warning light is switched on,
All the doors are unlocked,
the fuel supply to the engine is interrupted.
Front airbagsDescription of the front airbags
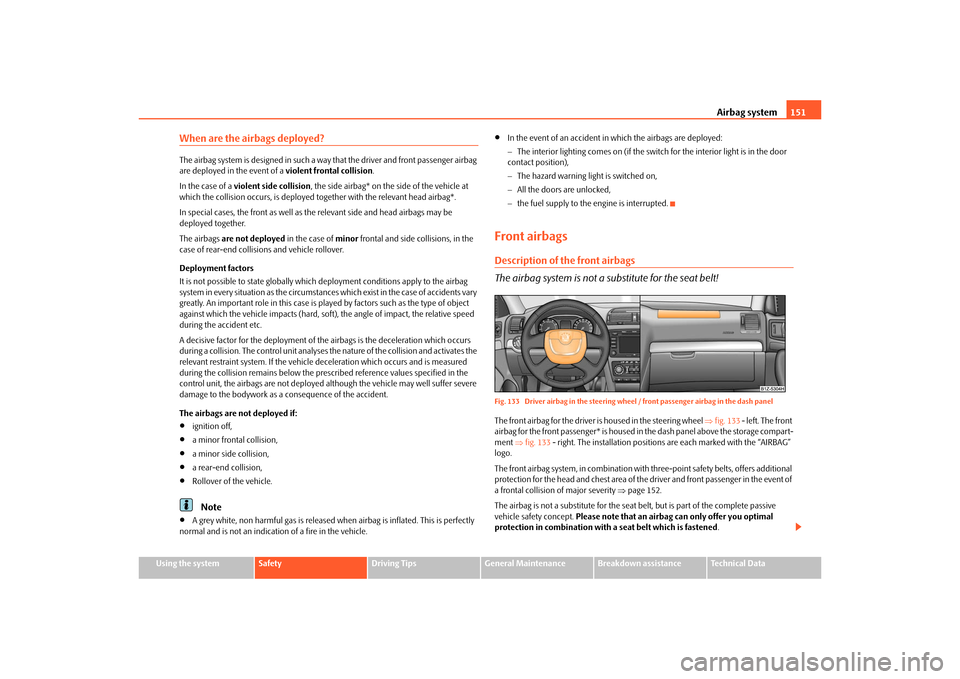
The airbag system is not a su bstitute for the seat belt!Fig. 133 Driver airbag in th e steering wheel / front passenger airbag in the dash panelThe front airbag for the driver is housed in the steering wheel fig. 133 - left. The front
airbag for the front passenger* is housed in the dash panel above the storage compart-
ment fig. 133 - right. The installation positions are each marked with the “AIRBAG”
logo.
The front airbag system, in combination with three-point safety belts, offers additional
protection for the head and chest area of the driver and front passenger in the event of
a frontal collision of major severity page 152.
The airbag is not a substitute for the seat belt, but is part of the complete passive
vehicle safety concept. Please note that an airbag can only offer you optimal
protection in combination with a seat belt which is fastened .
s43s.1.book Page 151 Thursday, May 13, 2010 1:21 PM
Page 156 of 275
Airbag system155
Using the system
Safety
Driving Tips
General Maintenance
Breakdown assistance
Technical Data
Always work with an authorised Škoda dealer or have it carried out by a
competent specialist workshop.
Only hang light items of clothing on the clothes hooks to the vehicle. Never
leave any heavy or sharp-edged objects in the pockets of the items of clothing.
Ensure that there are no excessive forc es, such as violent knocks, kicks etc.,
impact on the backrests of the seats otherwise the system may be damaged.
The side airbags would not be deployed in such a case!
Any seat or protective covers which you fit to the driver or front passenger
seats must only be of the type expressly authorised by Škoda Auto. In view of
the fact that the airbag inflates out of the backrest of the seat, use of non-
approved seat or protective covers would considerably impair the protective
function of the side airbag.
Any damage to the original seat covers in the area of the side airbag module
must be repaired without dela y by your specialist garage.
The airbag modules in the front seats must not display any damage, cracks
or deep scratches. It is not permissible to use force in order to open the
modules.
Any work on the side airbag system including removing and installing
system components because of other repair work (e.g. removing seats) must
only be carried out by a specialist garage.
Head airbags*Description of the head airbags
The head airbag together with the side airbag offers enhanced occu-
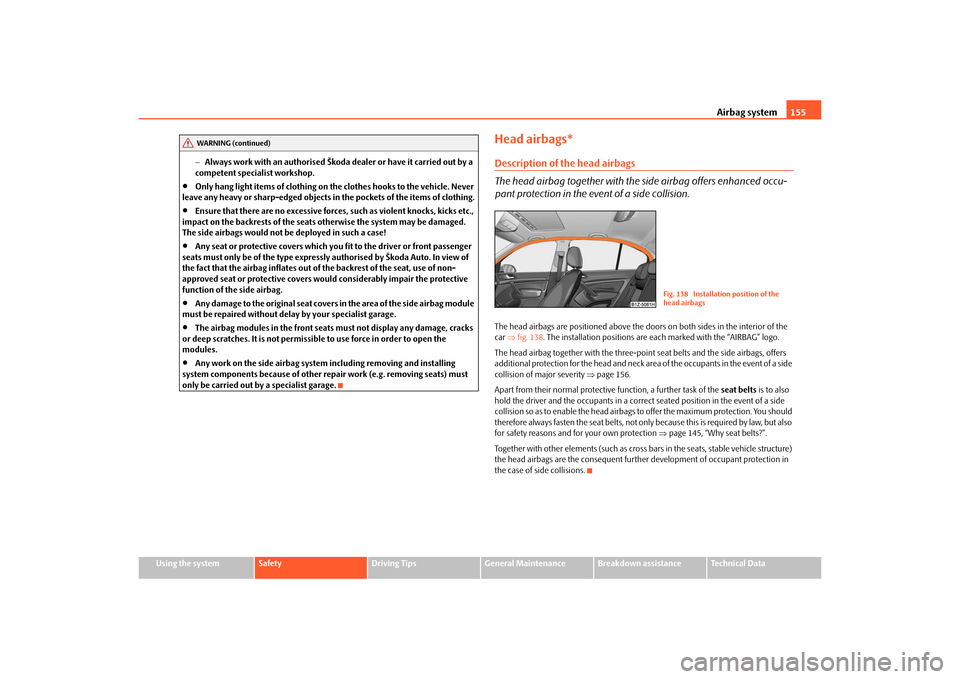
pant protection in the event of a side collision.The head airbags are positioned above the door s on both sides in the interior of the
car fig. 138 . The installation positions are each marked with the “AIRBAG” logo.
The head airbag together with the three-poin t seat belts and the side airbags, offers
additional protection for the head and neck ar ea of the occupants in the event of a side
collision of major severity page 156.
Apart from their normal protective function, a further task of the seat belts is to also
hold the driver and the occupants in a correct seated position in the event of a side
collision so as to enable the head airbags to offer the maximum protection. You should
therefore always fasten the seat belts, not only because this is required by law, but also
for safety reasons and for your own protection page 145, “Why seat belts?”.
Together with other elements (such as cross bars in the seats, stable vehicle structure)
the head airbags are the consequent further development of occupant protection in
the case of side collisions.
WARNING (continued)
Fig. 138 Installation position of the
head airbags
s43s.1.book Page 155 Thursday, May 13, 2010 1:21 PM