infotainment SKODA OCTAVIA 2013 3.G / (5E) Owner's Guide
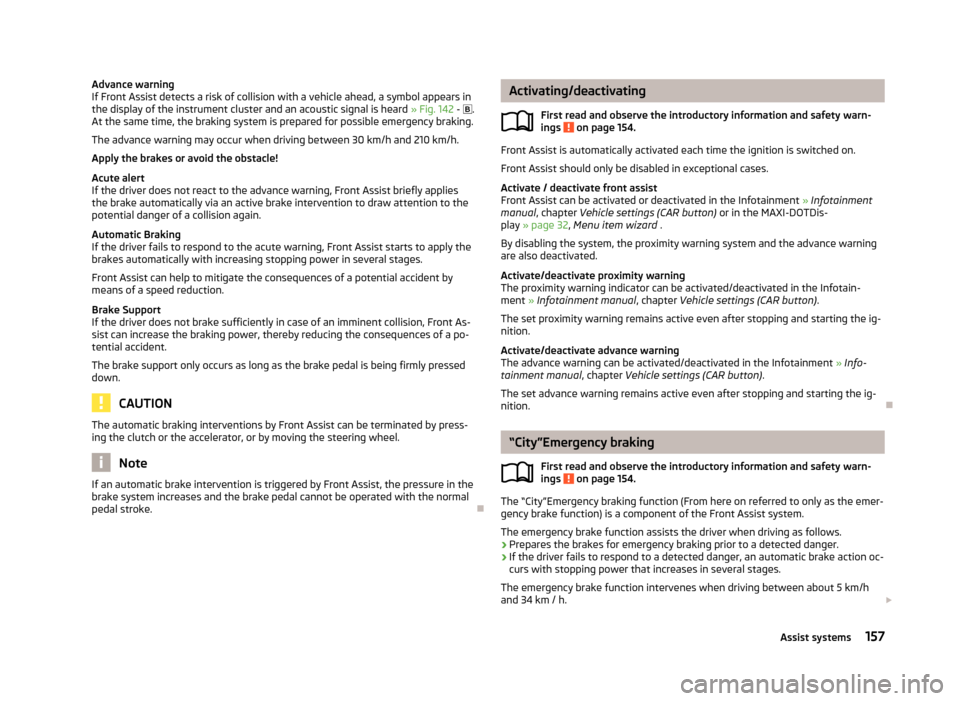
[x] Cancel search | Manufacturer: SKODA, Model Year: 2013, Model line: OCTAVIA, Model: SKODA OCTAVIA 2013 3.G / (5E)Pages: 287, PDF Size: 18.55 MB
Page 144 of 287
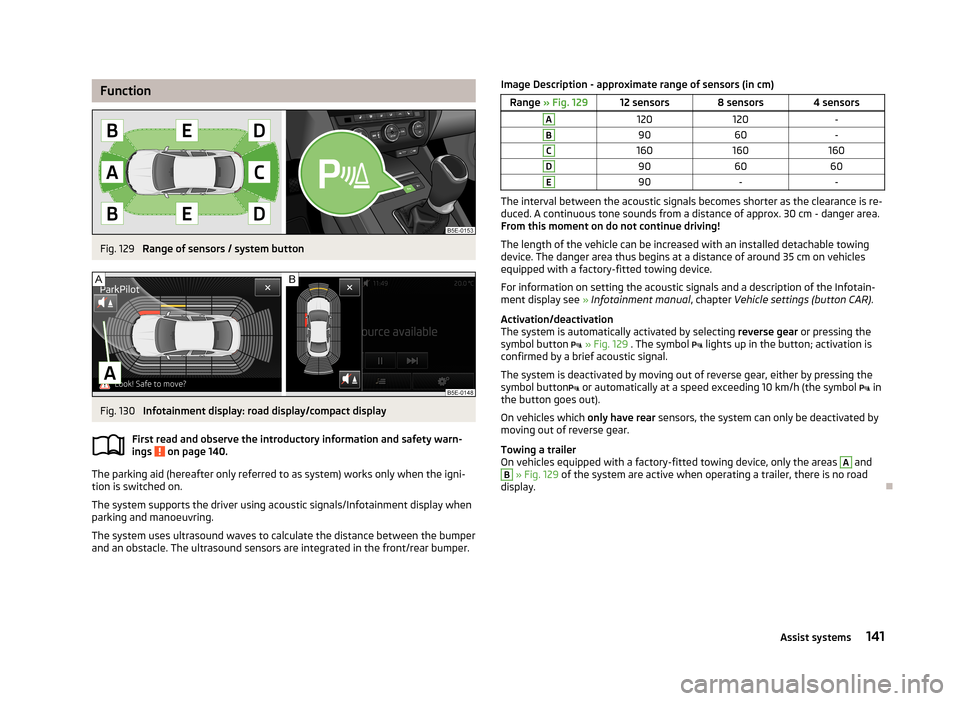
FunctionFig. 129
Range of sensors / system button
Fig. 130
Infotainment display: road display/compact display
First read and observe the introductory information and safety warn-
ings
on page 140.
The parking aid (hereafter only referred to as system) works only when the igni- tion is switched on.
The system supports the driver using acoustic signals/Infotainment display when
parking and manoeuvring.
The system uses ultrasound waves to calculate the distance between the bumper
and an obstacle. The ultrasound sensors are integrated in the front/rear bumper.
Image Description - approximate range of sensors (in cm)Range » Fig. 12912 sensors8 sensors4 sensorsA120120-B9060-C160160160D906060E90--
The interval between the acoustic signals becomes shorter as the clearance is re-
duced. A continuous tone sounds from a distance of approx. 30 cm - danger area.
From this moment on do not continue driving!
The length of the vehicle can be increased with an installed detachable towing
device. The danger area thus begins at a distance of around 35 cm on vehicles
equipped with a factory-fitted towing device.
For information on setting the acoustic signals and a description of the Infotain-
ment display see » Infotainment manual , chapter Vehicle settings (button CAR) .
Activation/deactivation
The system is automatically activated by selecting reverse gear or pressing the
symbol button
» Fig. 129 . The symbol
lights up in the button; activation is
confirmed by a brief acoustic signal.
The system is deactivated by moving out of reverse gear, either by pressing the
symbol button
or automatically at a speed exceeding 10 km/h (the symbol
in
the button goes out).
On vehicles which only have rear sensors, the system can only be deactivated by
moving out of reverse gear.
Towing a trailer
On vehicles equipped with a factory-fitted towing device, only the areas
A
and
B
» Fig. 129 of the system are active when operating a trailer, there is no road
display.
141Assist systems
Page 145 of 287
Automatic system activation when moving forwardFirst read and observe the introductory information and safety warn-ings
on page 140.
Automatic activation takes place at a speed below around 10 km/h under the fol-
lowing conditions.
› The distance to the obstacle at the front is less than around 90 cm.
› The distance to the obstacle at the front is less than around 30 cm.
› The distance to the obstacle to the side of the vehicle is less than around
30 cm.
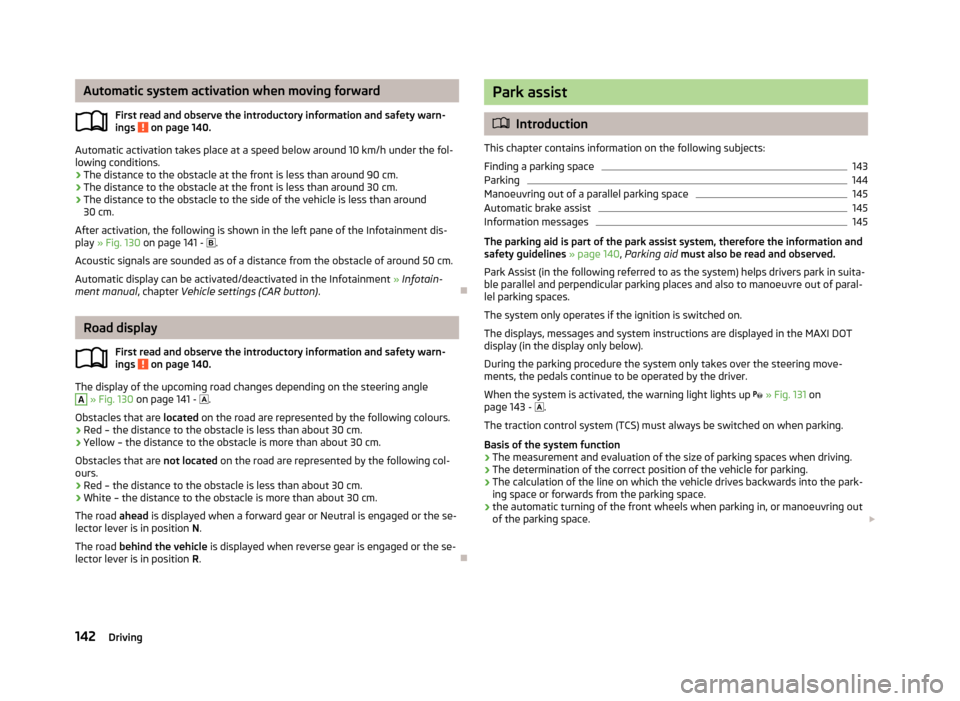
After activation, the following is shown in the left pane of the Infotainment dis-
play » Fig. 130 on page 141 -
.
Acoustic signals are sounded as of a distance from the obstacle of around 50 cm.
Automatic display can be activated/deactivated in the Infotainment » Infotain-
ment manual , chapter Vehicle settings (CAR button) .
Road display
First read and observe the introductory information and safety warn-ings
on page 140.
The display of the upcoming road changes depending on the steering angle
A
» Fig. 130 on page 141 -
.
Obstacles that are located on the road are represented by the following colours.
› Red – the distance to the obstacle is less than about 30 cm.
› Yellow – the distance to the obstacle is more than about 30 cm.
Obstacles that are not located on the road are represented by the following col-
ours.
› Red – the distance to the obstacle is less than about 30 cm.
› White – the distance to the obstacle is more than about 30 cm.
The road ahead is displayed when a forward gear or Neutral is engaged or the se-
lector lever is in position N.
The road behind the vehicle is displayed when reverse gear is engaged or the se-
lector lever is in position R.
Park assist
Introduction
This chapter contains information on the following subjects:
Finding a parking space
143
Parking
144
Manoeuvring out of a parallel parking space
145
Automatic brake assist
145
Information messages
145
The parking aid is part of the park assist system, therefore the information and
safety guidelines » page 140 , Parking aid must also be read and observed.
Park Assist (in the following referred to as the system) helps drivers park in suita- ble parallel and perpendicular parking places and also to manoeuvre out of paral-lel parking spaces.
The system only operates if the ignition is switched on. The displays, messages and system instructions are displayed in the MAXI DOTdisplay (in the display only below).
During the parking procedure the system only takes over the steering move- ments, the pedals continue to be operated by the driver.
When the system is activated, the warning light lights up
» Fig. 131 on
page 143 -
.
The traction control system (TCS) must always be switched on when parking.
Basis of the system function› The measurement and evaluation of the size of parking spaces when driving.
› The determination of the correct position of the vehicle for parking.
› The calculation of the line on which the vehicle drives backwards into the park-
ing space or forwards from the parking space.
› the automatic turning of the front wheels when parking in, or manoeuvring out
of the parking space.
142Driving
Page 153 of 287
WARNING■If you suspect that the sensor is damaged, deactivate the ACC. Have the
sensor checked by a specialist garage.■
The sensor can become misaligned by collisions or by damage to the front of
the vehicle, the wheel arch or the underside of the vehicle. This can lead to an
impairment of the ACC function - risk of accidents! If this is the case, have the
sensor checked by a specialist garage.
■
Any improperly carried out work to the front of the vehicle may cause the
sensor to become misaligned. We therefore recommend only having these
modifications and technical alterations carried out by a specialist garage.
Please also observed the instructions in » page 200, Service work, adjust-
ments and technical alterations .
■
The area in front of and around the sensor must not be covered with stick-
ers, additional lights or similar items. This can lead to impaired function of the sensor - risk of accidents!
CAUTION
The sensor may not be able to distinguish all objects correctly under certain cir-cumstances. We therefore recommend that you avoid using the ACC in the follow-
ing cases.■
When driving through places where metal objects (such as metal buildings, rail-
road tracks, etc.) can be found.
■
When driving through very divided and enclosed spaces (such as large-capacity
garages, car ferries, tunnels and the like.).
CAUTION
Remove the snow with a brush and the ice with a solvent-free de-icer.
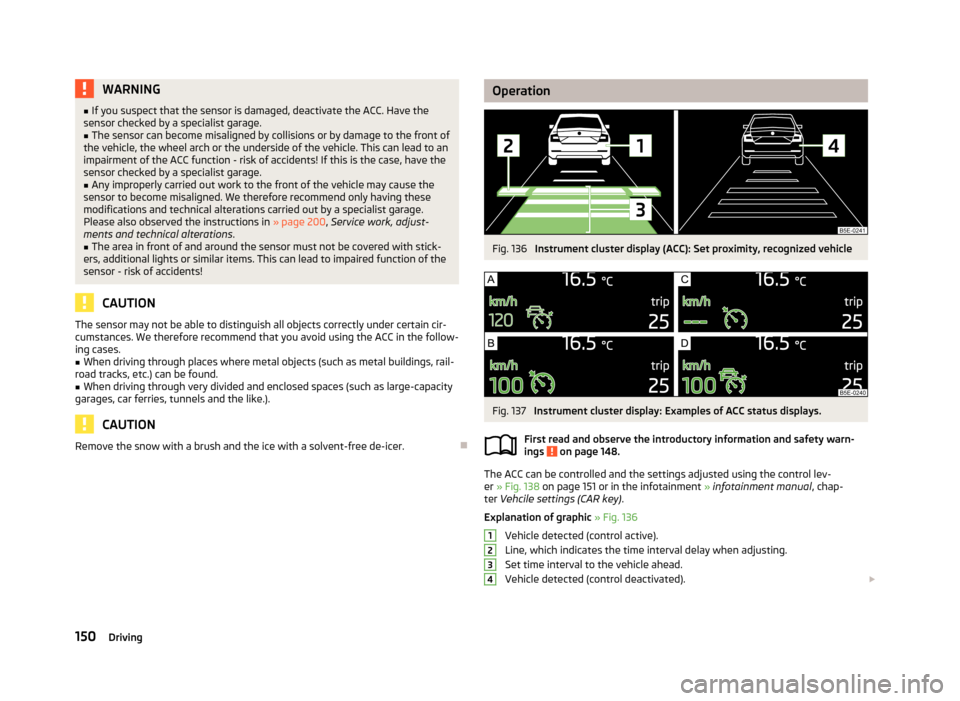
OperationFig. 136
Instrument cluster display (ACC): Set proximity, recognized vehicle
Fig. 137
Instrument cluster display: Examples of ACC status displays.
First read and observe the introductory information and safety warn-
ings
on page 148.
The ACC can be controlled and the settings adjusted using the control lev-
er » Fig. 138 on page 151 or in the infotainment » infotainment manual , chap-
ter Vehcile settings (CAR key) .
Explanation of graphic » Fig. 136
Vehicle detected (control active).
Line, which indicates the time interval delay when adjusting. Set time interval to the vehicle ahead.
Vehicle detected (control deactivated).
1234150Driving
Page 156 of 287
Change speed by adopting the current speed) - Requirements
ACC is enabled.
The vehicle is moving at a speed other than that which is stored.
Note
■
If during control the speed is increased by pressing the accelerator, control is
temporarily stopped. Upon releasing the accelerator, control is automatically re-
sumed.■
If during control the speed is reduced by applying the brake, control is stopped.
Control needs to be restarted in order to resume » page 152.
■
If the vehicle is controlled by a lower speed than the stored speed, then the
current speed is stored by the first press of the button , press the button again
and the speed is reduced in increments of 1 km / h.
Set time interval level
First read and observe the introductory information and safety warn-ings
on page 148.
The proximity to the vehicle ahead can be set with the lever » Fig. 138 on page 151
or in the Infotainment » infotainment manual , chapter Vehicle settings (CAR but-
ton) .
Setting by means of the lever
›
Set the switch
in the sprung position or
-
» Fig. 138 on page 151.
The display of the instrument cluster shows line
2
» Fig. 136 on page 150, which
indicates the proximity.
›
Using the switch
on the lever, adjust line
2
to the desired proximity lev-
el.
Note
■ If the proximity is changed in the infotainment, the change will only come into
effect after a subsequent activation of the ACC.■
The proximity is dependent on the speed. The higher the speed, the greater the
proximity to the vehicle ahead.
■
On wet roads, a longer time interval to the vehicle ahead should always be se-
lected than on dry roads.
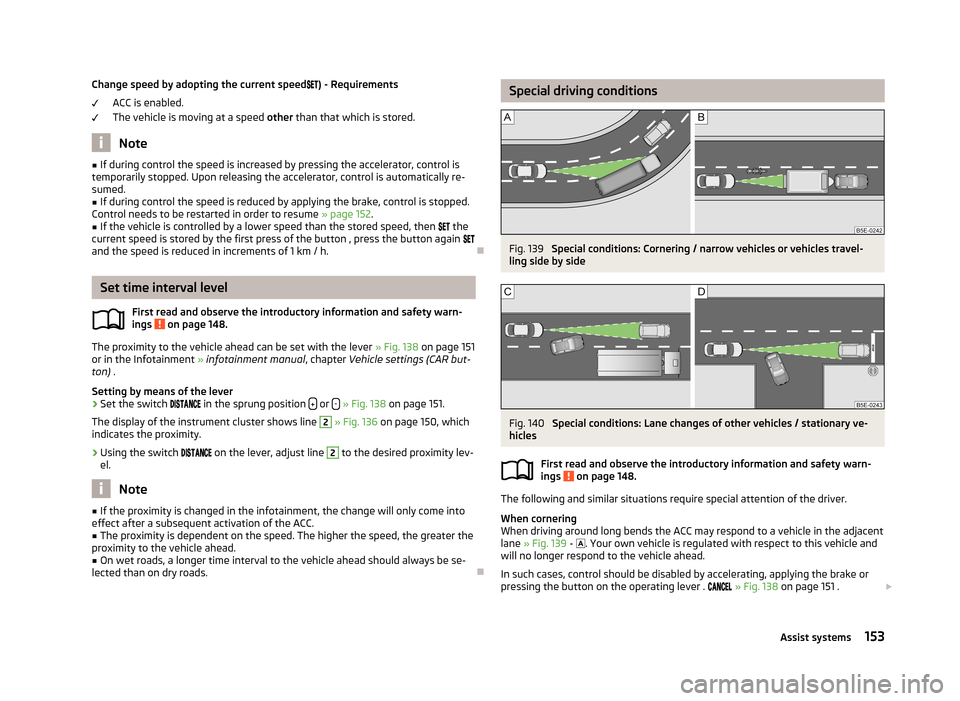
Special driving conditionsFig. 139
Special conditions: Cornering / narrow vehicles or vehicles travel-
ling side by side
Fig. 140
Special conditions: Lane changes of other vehicles / stationary ve-
hicles
First read and observe the introductory information and safety warn-
ings
on page 148.
The following and similar situations require special attention of the driver.
When cornering
When driving around long bends the ACC may respond to a vehicle in the adjacent
lane » Fig. 139 -
. Your own vehicle is regulated with respect to this vehicle and
will no longer respond to the vehicle ahead.
In such cases, control should be disabled by accelerating, applying the brake or
pressing the button on the operating lever .
» Fig. 138 on page 151 .
153Assist systems
Page 160 of 287
Advance warning
If Front Assist detects a risk of collision with a vehicle ahead, a symbol appears in
the display of the instrument cluster and an acoustic signal is heard » Fig. 142 - .
At the same time, the braking system is prepared for possible emergency braking.
The advance warning may occur when driving between 30 km/h and 210 km/h.
Apply the brakes or avoid the obstacle!
Acute alert
If the driver does not react to the advance warning, Front Assist briefly applies
the brake automatically via an active brake intervention to draw attention to the
potential danger of a collision again.
Automatic Braking
If the driver fails to respond to the acute warning, Front Assist starts to apply the
brakes automatically with increasing stopping power in several stages.
Front Assist can help to mitigate the consequences of a potential accident by
means of a speed reduction.
Brake Support
If the driver does not brake sufficiently in case of an imminent collision, Front As-
sist can increase the braking power, thereby reducing the consequences of a po-
tential accident.
The brake support only occurs as long as the brake pedal is being firmly pressed
down.
CAUTION
The automatic braking interventions by Front Assist can be terminated by press-
ing the clutch or the accelerator, or by moving the steering wheel.
Note
If an automatic brake intervention is triggered by Front Assist, the pressure in the
brake system increases and the brake pedal cannot be operated with the normal
pedal stroke.
Activating/deactivating
First read and observe the introductory information and safety warn-ings
on page 154.
Front Assist is automatically activated each time the ignition is switched on.
Front Assist should only be disabled in exceptional cases.
Activate / deactivate front assist
Front Assist can be activated or deactivated in the Infotainment » Infotainment
manual , chapter Vehicle settings (CAR button) or in the MAXI-DOTDis-
play » page 32 , Menu item wizard .
By disabling the system, the proximity warning system and the advance warning are also deactivated.
Activate/deactivate proximity warning
The proximity warning indicator can be activated/deactivated in the Infotain-
ment » Infotainment manual , chapter Vehicle settings (CAR button) .
The set proximity warning remains active even after stopping and starting the ig-
nition.
Activate/deactivate advance warning
The advance warning can be activated/deactivated in the Infotainment » Info-
tainment manual , chapter Vehicle settings (CAR button) .
The set advance warning remains active even after stopping and starting the ig- nition.
“City”Emergency braking
First read and observe the introductory information and safety warn-ings
on page 154.
The “City”Emergency braking function (From here on referred to only as the emer-
gency brake function) is a component of the Front Assist system.
The emergency brake function assists the driver when driving as follows. › Prepares the brakes for emergency braking prior to a detected danger.
› If the driver fails to respond to a detected danger, an automatic brake action oc-
curs with stopping power that increases in several stages.
The emergency brake function intervenes when driving between about 5 km/h
and 34 km / h.
157Assist systems
Page 161 of 287
The emergency brake function is automatically activated or deactivated togetherwith the Front Assist system.
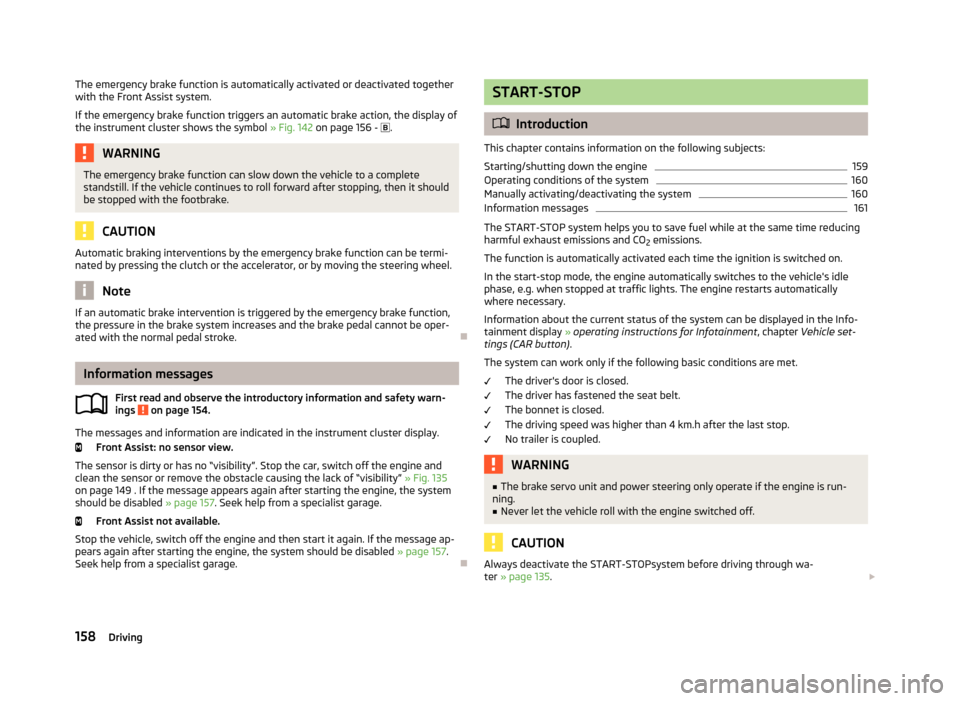
If the emergency brake function triggers an automatic brake action, the display of
the instrument cluster shows the symbol » Fig. 142 on page 156 - .WARNINGThe emergency brake function can slow down the vehicle to a complete
standstill. If the vehicle continues to roll forward after stopping, then it should
be stopped with the footbrake.
CAUTION
Automatic braking interventions by the emergency brake function can be termi-
nated by pressing the clutch or the accelerator, or by moving the steering wheel.
Note
If an automatic brake intervention is triggered by the emergency brake function,
the pressure in the brake system increases and the brake pedal cannot be oper-
ated with the normal pedal stroke.
Information messages
First read and observe the introductory information and safety warn-
ings
on page 154.
The messages and information are indicated in the instrument cluster display.
Front Assist: no sensor view.
The sensor is dirty or has no “visibility”. Stop the car, switch off the engine and clean the sensor or remove the obstacle causing the lack of “visibility” » Fig. 135
on page 149 . If the message appears again after starting the engine, the system
should be disabled » page 157. Seek help from a specialist garage.
Front Assist not available.
Stop the vehicle, switch off the engine and then start it again. If the message ap-
pears again after starting the engine, the system should be disabled » page 157.
Seek help from a specialist garage.
START-STOP
Introduction
This chapter contains information on the following subjects:
Starting/shutting down the engine
159
Operating conditions of the system
160
Manually activating/deactivating the system
160
Information messages
161
The START-STOP system helps you to save fuel while at the same time reducing
harmful exhaust emissions and CO 2 emissions.
The function is automatically activated each time the ignition is switched on.
In the start-stop mode, the engine automatically switches to the vehicle's idle phase, e.g. when stopped at traffic lights. The engine restarts automatically
where necessary.
Information about the current status of the system can be displayed in the Info-
tainment display » operating instructions for Infotainment , chapter Vehicle set-
tings (CAR button) .
The system can work only if the following basic conditions are met. The driver's door is closed.
The driver has fastened the seat belt. The bonnet is closed.
The driving speed was higher than 4 km.h after the last stop.
No trailer is coupled.
WARNING■ The brake servo unit and power steering only operate if the engine is run-
ning.■
Never let the vehicle roll with the engine switched off.
CAUTION
Always deactivate the START-STOPsystem before driving through wa-
ter » page 135 . 158Driving
Page 164 of 287
Information messagesFirst read and observe the introductory information and safety warn-
ings
on page 158.
The messages and information are indicated in the instrument cluster display.
Start the engine manually!
START MANUALLY
The driver sees this message when the conditions for the automatic start proce-
dure are not met during the STOP phase. The engine must be started manual-
ly » page 121 .
Error: start-stop system
START STOP ERROR
Error in the START-STOP system. Seek help from a specialist garage.
Driving mode
Introduction
This chapter contains information on the following subjects:
Selecting driving mode
161
Normal Mode
162
Sportmode
162
Ecomode
162
Individualmode
163
Selecting the driving mode allows you to adjust a range of different driving pa-
rameters for the vehicle.
The set driving mode remains stored even after switching the ignition on and off.
WARNING■ Setting the driving mode while driving can distract you from other traffic –
risk of accident.■
Concentrate fully at all times on your driving! As the driver you are fully re-
sponsible for the operation of your vehicle.
■
Adjust the speed and driving style to the current visibility, weather, road and
traffic conditions.
Note
The driver can change some vehicle functions irrespective of the selected driving
mode. For instance, in the driving mode Eco, the driver can switch the automatic
transmission to the mode S.
Selecting driving mode
Fig. 146
Button for selecting the driving mode: Octavia, Octavia Combi / Fa-
bia RS Octavia RS
First read and observe the introductory information and safety warn-ings
on page 161.
The menu for selecting the driving mode allows you to set the vehicle to one of
the three preset driving modes Normal, Sportand Eco, or to the driving mode
Individual which allows individual settings.
The selected driving mode is accessed by pressing the symbol button
or
» Fig. 146 , and the menu is opened in the Infotainment display. More informa-
tion about setting the driving mode » operating instructions for Infotainment ,
chapter Vehicle settings .
161Assist systems
Page 166 of 287
Note■The Eco driving mode is not available when towing a trailer. When the vehicle is
connected electrically to a trailer and is in the Eco driving mode, the Normal driv-
ing mode is configured automatically.■
The maximum vehicle acceleration (kickdown function) is possible also in driving
mode Eco.
Individualmode
First read and observe the introductory information and safety warn-
ings
on page 161.
In mode Individual you can select between Normal, Sport and Eco for each system
separately » Operating instructions for Infotainment , chapter Vehicle settings .
ProActive passenger protection
Introduction
This chapter contains information on the following subjects:
Function
163WARNINGAdjust the speed and driving style to the current visibility, weather, road and
traffic conditions. The increased safety by ProActive passenger protection must not tempt you to take greater risks than otherwise – risk of accident!
Note
■ If the front passenger front airbag is deactivated » page 191 the belt tension-
ing function for the front passenger seat is switched off.■
The system component service life is monitored electronically. Further informa-
tion » page 19 , Security Systems .
Function
First read and observe the introductory information and safety warn-ings
on page 163.
ProActive passenger protection (From here on referred to only as system) increa-
ses passenger protection in the front seats in situations that could lead to vehicle
impact or overturning.
The system is ready to intervene automatically in the following conditions. The ignition is switched on.
The vehicle moves at a speed of more than 30 km/h.
In critical driving situations (e.g. during emergency braking or a sudden change in
direction), the following steps can be taken separately or combined in order to re-
duce the risk of serious injury.
› The front passenger's and driver's seatbelts, if worn, are automatically
ten-
sioned closely over the body.
› The windows in the side doors (if open) are automatically closed up to a gap of
about 5 cm from the edge.
› The sliding/tilting roof is closed.
Once the critical driving situation has passed, the tension on the seatbelts will be
released again.
The system operates at two levels of protection.
The first level of protection
The system already intervenes in situations that may occur during dynamic driv-
ing. As a result, this primarily helps to keep the driver and the passenger in the
correct seated position.
The first level of protection can be deactivated by one of the following measures. › Deactivation of the system in Infotainment
» Operating instructions for Info-
tainment , chapter Vehicle settings (CAR button) .
› Deactivation of TCS
» page 138.
› Selecting the driving mode Sport
» page 161.
The second level of protection
The system intervenes only if the situation is evaluated as critical, such as in pan-
ic braking at high speeds.
This level of protection cannot be deactivated.
163Assist systems
Page 168 of 287
If the turn signal is switched on prior to driving over the boundary line (e.g. whenmaking a turn), no steering intervention takes place when the vehicle approaches
the boundary line. The system regards the situation as an intended lane change.
The system can intervene when the following basic conditions are present. The system is activated.
The vehicle is travelling at more than 65 km/h.
The boundary lines are clearly visible (appropriate longitudinal markings).
The boundary line of at least one side of the lane is detected. The driver's hands are on the steering wheel.The lane is more than 2.5 m in width.
Adaptive lane assist
Adaptive lane assist helps to keep the vehicle in the position between the boun- dary lines selected by the driver, by means of steering intervention.
If the system detects only one boundary line, it will help to maintain the selectedproximity from said boundary line.
If the proximity to the detected boundary line is changed, the system quickly
adapts and maintains the newly-selected position.
Adaptive lane assist can be activated/deactivated in the Infotainment » operating
instructions for Infotainment , chapter Vehicle settings (CAR button) .
Activating/deactivating
First read and observe the introductory information and safety warn-ings
on page 164.
The system can be activated or deactivated in the Infotainment » Infotainment
manual , chapter Vehicle settings (CAR button) or in the MAXI DOTdis-
play » page 32 , Menu item wizard .
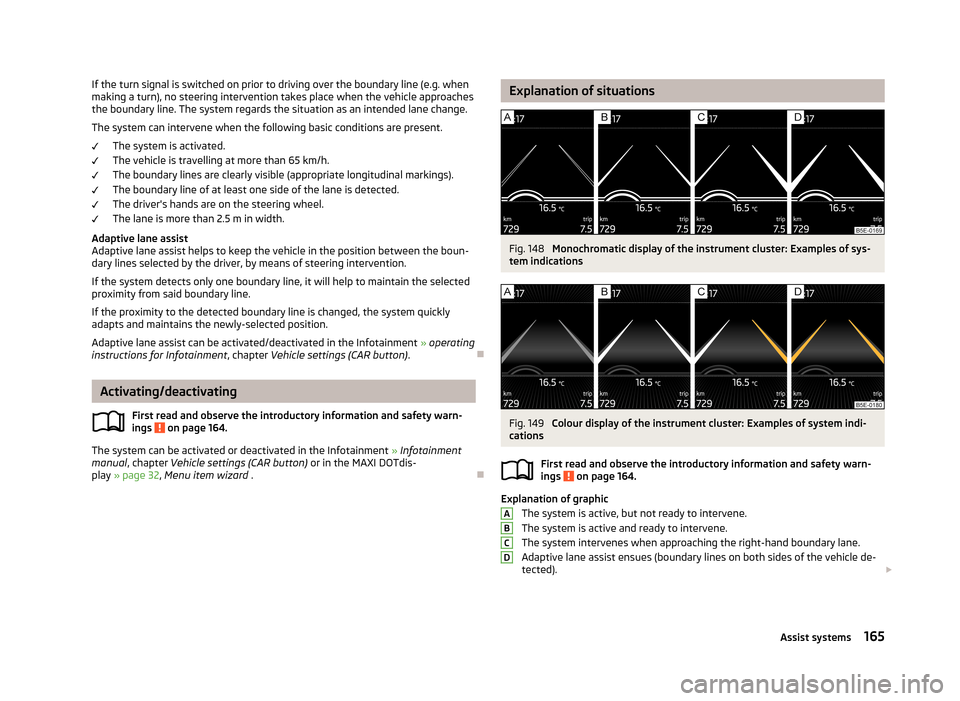
Explanation of situationsFig. 148
Monochromatic display of the instrument cluster: Examples of sys-
tem indications
Fig. 149
Colour display of the instrument cluster: Examples of system indi-
cations
First read and observe the introductory information and safety warn-
ings
on page 164.
Explanation of graphic
The system is active, but not ready to intervene.
The system is active and ready to intervene.
The system intervenes when approaching the right-hand boundary lane.
Adaptive lane assist ensues (boundary lines on both sides of the vehicle de-
tected).
ABCD165Assist systems
Page 170 of 287
The system works on the basis of the data captured by the camera and is only
able to show traffic signs which are in the camera's “viewing range” » Fig. 150.
Data from the camera can be supplemented by information from the Infotainment
Navigation. This is the reason why traffic signs with maximum speeds can also be shown on sections of roads which do not have any traffic signs.
The system may not be available or may only be available to a limited extent in the following situations.
› Poor visibility conditions, e.g. fog, heavy rain, thick snowfall.
› The camera is blinded by the sun.
› The camera is blinded by the oncoming traffic.
› The camera “viewing range” is obstructed by an obstacle.
› Travelling at high speed.
› The traffic signs are fully or partially obscured (e.g. by trees, snow, dirt or other
vehicles).
› The traffic signs are not standard (round with a red border).
› The traffic signs are damaged or bent.
› The traffic signs are attached to flashing neon signs.
› The traffic signs were changed (the navigation data are out of date).
Notifications and settings
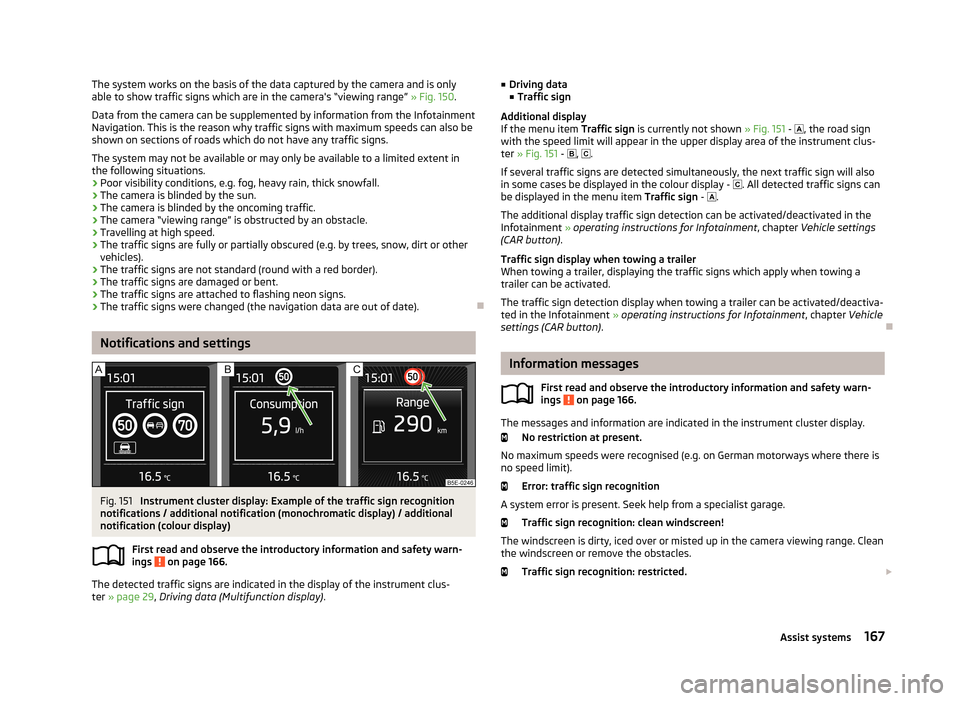
Fig. 151
Instrument cluster display: Example of the traffic sign recognition
notifications / additional notification (monochromatic display) / additional
notification (colour display)
First read and observe the introductory information and safety warn-ings
on page 166.
The detected traffic signs are indicated in the display of the instrument clus- ter » page 29 , Driving data (Multifunction display) .
■
Driving data
■ Traffic sign
Additional display
If the menu item Traffic sign is currently not shown » Fig. 151 - , the road sign
with the speed limit will appear in the upper display area of the instrument clus-
ter » Fig. 151 - , .
If several traffic signs are detected simultaneously, the next traffic sign will also
in some cases be displayed in the colour display - . All detected traffic signs can
be displayed in the menu item Traffic sign - .
The additional display traffic sign detection can be activated/deactivated in the
Infotainment » operating instructions for Infotainment , chapter Vehicle settings
(CAR button) .
Traffic sign display when towing a trailer
When towing a trailer, displaying the traffic signs which apply when towing a
trailer can be activated.
The traffic sign detection display when towing a trailer can be activated/deactiva-
ted in the Infotainment » operating instructions for Infotainment , chapter Vehicle
settings (CAR button) .
Information messages
First read and observe the introductory information and safety warn-
ings
on page 166.
The messages and information are indicated in the instrument cluster display.
No restriction at present.
No maximum speeds were recognised (e.g. on German motorways where there is
no speed limit).
Error: traffic sign recognition
A system error is present. Seek help from a specialist garage. Traffic sign recognition: clean windscreen!
The windscreen is dirty, iced over or misted up in the camera viewing range. Clean the windscreen or remove the obstacles.
Traffic sign recognition: restricted.
167Assist systems