heater SKODA OCTAVIA 2015 3.G / (5E) User Guide
[x] Cancel search | Manufacturer: SKODA, Model Year: 2015, Model line: OCTAVIA, Model: SKODA OCTAVIA 2015 3.G / (5E)Pages: 268, PDF Size: 37.54 MB
Page 190 of 268
Fabric
Clean upholstery cover materials and cloth trims on doors, luggage compart-
ment cover, etc. using specific cleaning agents, e.g., dry foam.
Use a soft sponge, brush, or commercially available microfibre cloth.
Use a cloth and a cleaning agent specifically designed for this purpose to clean the roof trim.
Remove any lumps on the cover fabric and any fabric residue using a brush.
Remove stubborn hair using a “cleaning glove”.
Alcantara ®
Dust and dirt in pores, creases and seams may chafe and damage the surface.
Therefore, they must be removed regularly at short intervals with a cloth or
vacuum cleaner.
Minor changes in colour caused by use are normal.
CAUTION
■ For Alcantara ®
seat covers, do not use any solvents, floor wax, shoe cream,
stain remover, leather cleaners or similar agents.■
Avoid leaving the vehicle in bright sunlight for long periods of time in order
to stop the artificial leather, materials or Alcantara ®
from bleaching. During ex-
tended periods of standing outdoors, protect artificial leather, fabrics or Alcan-
tara ®
by covering.
■
Some clothing materials, e.g. dark denim, do not have sufficient colour fast-
ness. This can cause damage or clearly visible discolouration to seat covers,
even when used correctly. This applies particularly to light-coloured seat cov-
ers. This does not relate to a fault in the seat cover, but rather to poor colour
fastness of the clothing textiles.
Seat covers
Read and observe
and on page 187 first.
Electrically heated seats
Use a specific cleaning agent such as dry foam or similar to clean the covers. »
.
Seats without seat heating
Thoroughly vacuum the seat covers with a vacuum cleaner before cleaning.
Clean the seat covers with a damp cloth or cleaning products specially de-
signed for this purpose.
Indented points arising on the fabrics by everyday use, can be removed by
brushing against the direction of hair with a damp brush.
Always clean all parts of the covers, so that there are no visible edges. Then
allow the seat to dry completely.
CAUTION
■ Do not clean the covers of electrically heated seats either with water or with
other liquids - there is a risk of damaging the seat heating system.■
Regularly remove dust from the seat covers using a vacuum cleaner.
■
Electrically heated seats must not be dried after cleaning by switching on the
heater.
■
Do not sit on wet seats - risk of seat deformation.
■
Always clean the seats from “seam to seam”.
Safety belts
Read and observe
and on page 187 first.
Wash dirty seat belts with mild soapy water.
Remove coarse dirt with a soft brush.
WARNING■ The seat belts must not be removed for cleaning.■Never clean the seat belts chemically as chemical cleaning products could
destroy the fabric.■
The seat belts must not be allowed to come into contact with corrosive
liquids (e.g. acids).
■
The seat belts must be fully dried before being rolled up.
188General Maintenance
Page 201 of 268
The coolant additive percentage in the coolant must be at least 40%.
The coolant additive may be increased to a maximum of 60%.
The correct mixing ratio of water and coolant additive is to be checked if nec-
essary by a specialist garage or is to be restored if necessary.
The description of the coolant is shown in the coolant expansion reservoir
» Fig. 207 on page 199 .WARNINGThe engine compartment of your car is a hazardous area. The following
warning instructions must be followed at all times when working in the en-
gine compartment » page 194.■
The coolant is harmful to health.
■
Avoid contact with the coolant.
■
Coolant vapours are harmful to health.
■
Never open the end cover of the coolant expansion reservoir while the
engine is still warm. The cooling system is pressurized!
■
When opening the end cover of the coolant expansion reservoir, cover it
with a cloth to protect your face, hands and arms from hot steam or hot
coolant.
■
If any coolant splashes into your eyes, immediately rinse out your eyes
with clear water and contact a doctor as soon as possible.
■
Always keep the coolant in the original container, safe from people who
are not completely independent, especially children - there is a danger of
poisoning!
■
If coolant is swallowed, consult a doctor immediately.
■
Never spill operating fluids over the hot engine - risk of fire.
CAUTION
■ If for some reason it is not possible to top up the coolant under the current
circumstances, do not continue driving! Switch off the engine and seek as-
sistance from a specialist garage.■
If the expansion tank is empty, do not top up with coolant. The system could
aerate - risk of engine damage,
do not continue driving! Switch off the en-
gine and seek assistance from a specialist garage.
■
The amount of coolant additive in the coolant must never be allowed to be
less than 40 %.
■
Over 60 % of coolant additive in the coolant reduces the antifreeze protec-
tion and coolant effectiveness.
■
A coolant additive that does not comply with the correct specification can
significantly reduce the corrosion protection of the cooling system.
■ Any faults resulting from corrosion may cause a loss of coolant and can con-
sequently result in major engine damage.■
Do not fill the coolant above the mark
A
» Fig. 207 on page 199 .
■
If an error occurs, leading to the engine overheating, the help of a professio-
nal garage is to be sought - there is a risk of serious engine damage occurring.
■
Additional headlights and other attached components in front of the air inlet
impair the cooling efficiency of the coolant.
■
Never cover the radiator - there is a risk of the engine overheating.
Note
On vehicles that are fitted with an auxiliary heater (auxiliary heating and venti-
lation), the coolant capacity is approx. 1 l larger.
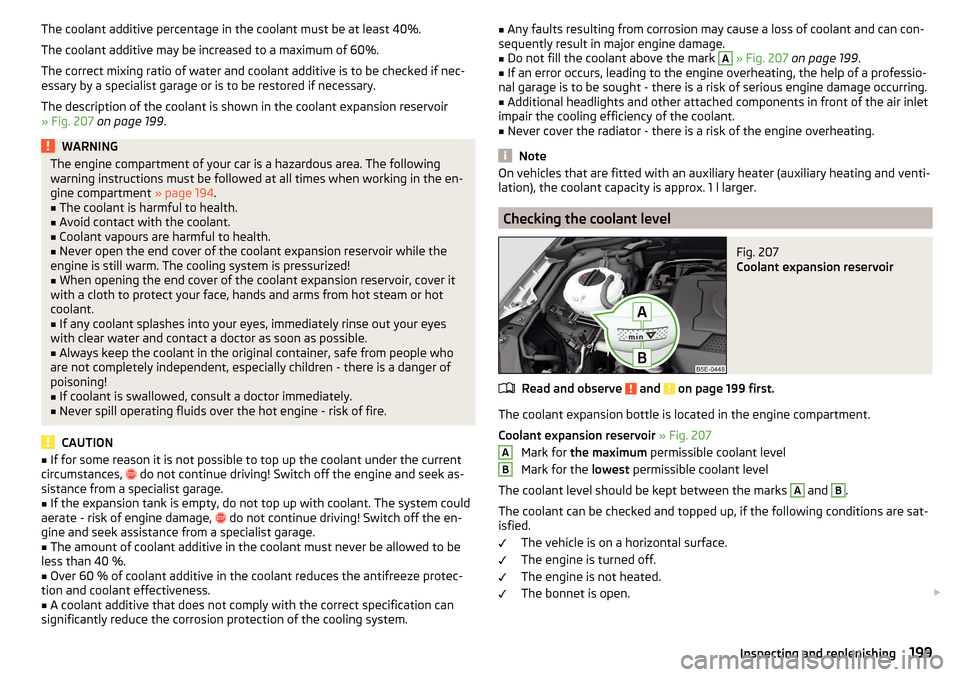
Checking the coolant level
Fig. 207
Coolant expansion reservoir
Read and observe and on page 199 first.
The coolant expansion bottle is located in the engine compartment.
Coolant expansion reservoir » Fig. 207
Mark for the maximum permissible coolant level
Mark for the lowest permissible coolant level
The coolant level should be kept between the marks
A
and
B
.
The coolant can be checked and topped up, if the following conditions are sat-
isfied.
The vehicle is on a horizontal surface.
The engine is turned off.
The engine is not heated.
The bonnet is open.
AB199Inspecting and replenishing
Page 206 of 268
›Firstly disconnect the battery's negative terminal
, followed by the positive
terminal .
Connecting›
Firstly connect the battery's positive terminal
, followed by the negative
terminal
.
After disconnecting and re-connecting the vehicle battery, the following func- tions or devices are partially or completely inoperative.
Function / deviceOperating measureElectrical power windows» page 64Panorama sliding/tilting roof» page 66Sun screen» page 66Time settings» page 31
CAUTION
■ Disconnect the vehicle battery only with the ignition turned off - there is a
risk of damaging the electrical system of the vehicle.■
Under no circumstances must the battery cables be connected incorrectly –
risk of a cable fire.
Note
■ After disconnecting and re-connecting the vehicle battery, we recommend
having the vehicle checked by a specialist to ensure that the full functionality
of all electrical systems is guaranteed.■
The data of the multi-function display will be reset.
Automatic load deactivation
Read and observe
and on page 201 first.
The vehicle's electrical system automatically prevents the battery from dis-
charging when the battery is being heavily used. This manifests itself by the
following. ▶ The idling speed is raised to allow the generator to deliver more electricity to
the electrical system.
▶ Where appropriate large convenience consumers, e.g. seat heaters, rear win-
dow heaters, have their power limited or in case of emergency shut off com-
pletely.
CAUTION■ Despite such intervention by the vehicle electric system management, the
vehicle battery may be drained. For example, when the ignition is switched on
a long time with the engine turned off or the side or parking lights are turned
on during longer parking.■
Consumers which are supplied via a 12 V socket can cause the vehicle battery
to discharge when the ignition is switched off.
Note
Driving comfort is not disrupted by any shutting off of consumers. Often the
driver is not aware of it having taken place.204General Maintenance
Page 231 of 268
No.Consumer39Central locking front door - right, power windows - front and rear
right4012-Volt power socket41Not assigned42Central locking rear door - left, right, headlight washer system,
windscreen washer system43Visor for gas discharge bulbs, interior lighting44Towing hitch - contact in the socket45Operating the seat adjustment46230-Volt power socket47Rear window wiper48Not assigned49Coil on starter relay, clutch pedal switch50Opening the boot lid51Belt tensioner - front passenger side52Not assigned53Relay for rear window heater
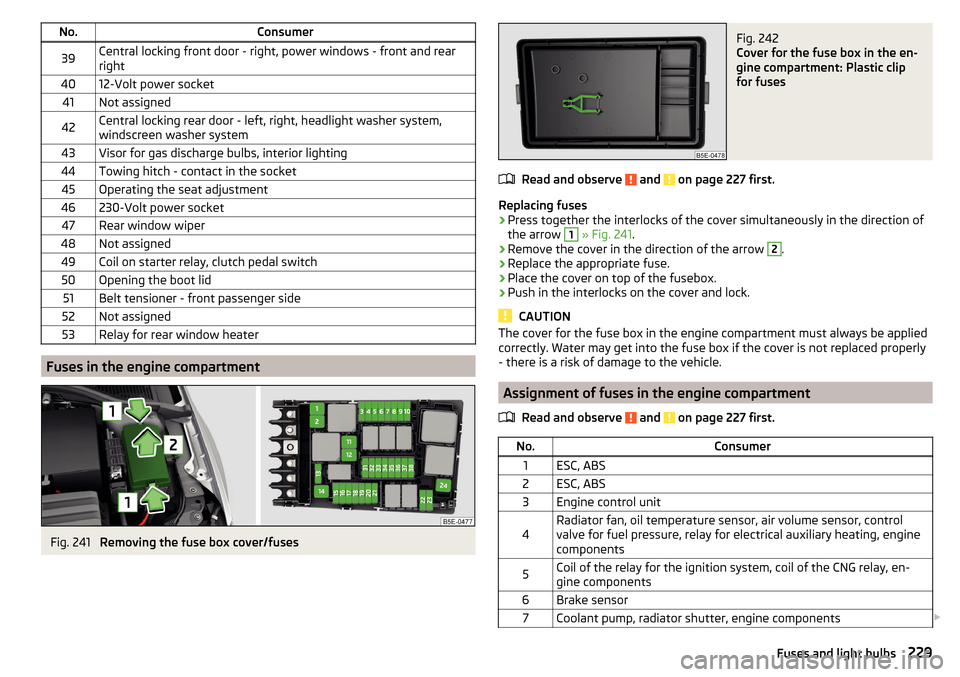
Fuses in the engine compartment
Fig. 241
Removing the fuse box cover/fuses
Fig. 242
Cover for the fuse box in the en-
gine compartment: Plastic clip
for fuses
Read and observe and on page 227 first.
Replacing fuses
›
Press together the interlocks of the cover simultaneously in the direction of
the arrow
1
» Fig. 241 .
›
Remove the cover in the direction of the arrow
2
.
›
Replace the appropriate fuse.
›
Place the cover on top of the fusebox.
›
Push in the interlocks on the cover and lock.
CAUTION
The cover for the fuse box in the engine compartment must always be applied
correctly. Water may get into the fuse box if the cover is not replaced properly
- there is a risk of damage to the vehicle.
Assignment of fuses in the engine compartment
Read and observe
and on page 227 first.
No.Consumer1ESC, ABS2ESC, ABS3Engine control unit4Radiator fan, oil temperature sensor, air volume sensor, control
valve for fuel pressure, relay for electrical auxiliary heating, engine
components5Coil of the relay for the ignition system, coil of the CNG relay, en-
gine components6Brake sensor7Coolant pump, radiator shutter, engine components 229Fuses and light bulbs
Page 232 of 268
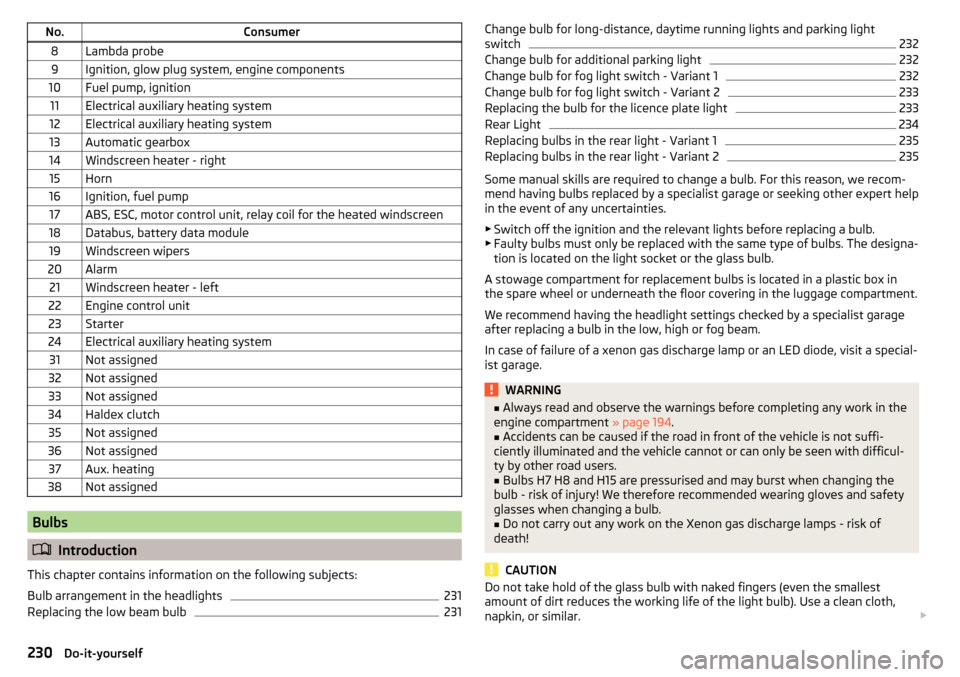
No.Consumer8Lambda probe9Ignition, glow plug system, engine components10Fuel pump, ignition11Electrical auxiliary heating system12Electrical auxiliary heating system13Automatic gearbox14Windscreen heater - right15Horn16Ignition, fuel pump17ABS, ESC, motor control unit, relay coil for the heated windscreen18Databus, battery data module19Windscreen wipers20Alarm21Windscreen heater - left22Engine control unit23Starter24Electrical auxiliary heating system31Not assigned32Not assigned33Not assigned34Haldex clutch35Not assigned36Not assigned37Aux. heating38Not assigned
Bulbs
Introduction
This chapter contains information on the following subjects:
Bulb arrangement in the headlights
231
Replacing the low beam bulb
231Change bulb for long-distance, daytime running lights and parking light
switch232
Change bulb for additional parking light
232
Change bulb for fog light switch - Variant 1
232
Change bulb for fog light switch - Variant 2
233
Replacing the bulb for the licence plate light
233
Rear Light
234
Replacing bulbs in the rear light - Variant 1
235
Replacing bulbs in the rear light - Variant 2
235
Some manual skills are required to change a bulb. For this reason, we recom-
mend having bulbs replaced by a specialist garage or seeking other expert help
in the event of any uncertainties.
▶ Switch off the ignition and the relevant lights before replacing a bulb.
▶ Faulty bulbs must only be replaced with the same type of bulbs. The designa-
tion is located on the light socket or the glass bulb.
A stowage compartment for replacement bulbs is located in a plastic box in
the spare wheel or underneath the floor covering in the luggage compartment.
We recommend having the headlight settings checked by a specialist garage
after replacing a bulb in the low, high or fog beam.
In case of failure of a xenon gas discharge lamp or an LED diode, visit a special- ist garage.
WARNING■ Always read and observe the warnings before completing any work in the
engine compartment » page 194.■
Accidents can be caused if the road in front of the vehicle is not suffi-
ciently illuminated and the vehicle cannot or can only be seen with difficul-
ty by other road users.
■
Bulbs H7 H8 and H15 are pressurised and may burst when changing the
bulb - risk of injury! We therefore recommended wearing gloves and safety
glasses when changing a bulb.
■
Do not carry out any work on the Xenon gas discharge lamps - risk of
death!
CAUTION
Do not take hold of the glass bulb with naked fingers (even the smallest
amount of dirt reduces the working life of the light bulb). Use a clean cloth,
napkin, or similar. 230Do-it-yourself
Page 255 of 268
Fog lights72
Warning light36
Fold in passenger's mirror80
Footmats128
see footmats128
Force limit Electric boot lid
60
Power windows63
Sliding/tilting roof65
Front airbag15
Front Assist155
Disable/enable156
Distance warning156
Information messages157
Operation155
Radar sensor135
Warning and automatic braking156
Warning light40
Front door warning light75
fuel lead-free petrol
190
Fuel189
CNG193
Diesel191
Natural gas reserve display30
Petrol / Diesel reserve display30
refer to Fuel189
Refuelling189
Refuelling - natural gas192
Warning light36
Fuel consumption239
Fuel filter Warning messages
39
Fuel reserve Warning light
36
Fuses Assignment
226
Assignment of fuses in the dash panel228
Colour coding226
Fuse assignment in the engine compartment 229
Plastic clip229
Replacing226
G
Gear change Gear recommendation
41
Information on the selected gear41
Gear changing Gear stick
128
General view Cockpit
27
Genuine parts179
Glasses compartment95
Glow plug system Warning light
34
H
Handbrake
127
Warning light32
Hazard warning light system73
HBA137
Head airbag18
Headlight cleaning system Headlight cleaning system
78
Headlights Bulb arrangement
231
Driving abroad74
Headlight cleaning system78
Headlights with CORNER function73
Headrest Removing and installing
83
Head restraints82
Adjust height82
Heater Windscreen and rear window
76
Heating112
Air distribution control115
Controls113
Exterior mirrors80
Seats85
HHC137
High-beam assistant71
High beam assistant Warning light
39
Hill Start Assist (HHC)137
Hitch167
Drawback load167
Hook103
Horn27
I
Ice scrapers
184
Ignition lock121
Immobilizer120
Individual settings Locking
56
Unlocking56
Inertia reel13
Information system40
Compass point display49
Door warning40
Eco-tips49
Gear recommendation41
Lap timer48
MAXI DOT display44
Multifunction display41
operation42
Service interval display49
Stop watch48
Information system operation42
Infotainment4
Instrument cluster28
Auto-check control40
Counter for distance driven30
Display29
Overview28
Revolutions counter29
253Index
Page 258 of 268
P
Park assist Departing from a parallel parking space
147
Information messages147
Parking146
Park Assist144
Automatic brake assist147
Operation145
Parking space search146
Parking128
Park Assist144
Parking aid140
Rear View Camera143
Parking aid140
Automatic system activation when moving for- ward
143
Function141
Parking assistance Activation / deactivation
142
Display in the Infotainment display142
Parking lights68
Park Pilot140
Park the vehicle see Parking
128
Part replacement178
Passive safety Before setting off
8
Driving safety8
Passive Safety8
Pedals128
Footmats128
Petrol see fuel
190
Phonebox91
Plastic parts184
Polishing vehicle paint work see vehicle care
183
Positioning the jack
215
Power limitsliding/tilting roof65
Power outlet 12 V
93
Power steering Warning light
33
Power windows61
Button in the front passenger door63
Button in the rear doors63
Practical equipment Reflective vest
211
Practical features 12-Volt power outlet
93
Pockets on the backs of the front seats96
Seat backrest with long cargo channel88
Waste container93
Proactive passenger protection160
Warning light35
ProActive passenger protection Function
160
Protective films183
Puncture repair kit217
R
Radiator fan
196
Radio see Infotainment
4
Radio remote control Auxiliary heating (heating and ventilation)
119
Raising the vehicle215
Rear-view mirror Exterior mirrors
80
Fold in passenger mirror80
Synchronous adjustment of the rear-view mir- ror
80
Rear fog light72
Warning light34
Rear mirror79
Rear View Camera143
Function keys144
Operation143
Orientation Lines144
Rear view mirror Interior mirror
79
Rear window - heater76
Refuelling189
Fuel189
Fuel - natural gas192
Remote control Locking
54
Replacing the battery223
Synchronisation process223
Unlocking54
Remote control key Replacing the battery
223
Removable through-loading bag98
Removing the bar ball, Step 1
170
bar ball, Step 2171
Repairs and technical alterations178
Replace the battery in the auxiliary heating (auxiliary heating) in the remote control
223
Replacing Bulb for the licence plate light
233
Bulbs230
Fuses226
Fuses – engine compartment229
Fuses – LHD227
Fuses – RHD227
Low beam bulb231
Rear window wiper blade226
Vehicle battery203
windscreen wiper blades225
Replenishing Coolant
200
Engine oil198
Windscreen washer fluid196
256Index
Page 262 of 268
Visibility76
Visors see front sun visors
76
see Sun screen77
W
Warning indicator of a low temperature Warning light
39
Warning lights31
Warning symbols see Warning lights
31
Warning triangle211
warning when speeding43
Washing Automatic car wash system
182
by hand181
High-pressure cleaner182
Washing vehicles181
Waste container93
Water in the fuel filter Warning light
39
warning messages39
Weather conditions178
Wheel bolts Anti-theft wheel bolts
214
Caps214
Loosening and tightening215
Wheel rims205
Wheels Age of wheels
205
Changing213
Driving style206
Full trim213
General information205
Load index208
Low-profile tyres207
Remove213
Snow chains209
Speed symbol208
stow213
Tyre damage207
Tyre pressure205
Tyre size208
Tyre storage205
Tyre wear206
Tyre wear indicator207
Wheel balance206
Wheel replacement207
Winter tyres209
Wi-Fi Connection
51
Password51
Password change52
see Infotainment4
Setting52
Wi-Fi Direct Connection
51
Password change52
Setting52
Window operation Convenience operation
64
Malfunctions64
Window wiper Replacing the rear window wiper blade
226
Windscreen Heater
76
Windscreen washer fluid Checking
196
Replenishing196
Warning light39
Winter196
Windscreen washers Windscreen washers
78
Windscreen washer system196
Windscreen wipers automatic rear window wipers
78
operation78
Replacing the windscreen wipers225
Windscreen washer fluid196
Windscreen wipers and washers77
Winter operation209
De-icing windows184
Snow chains209
Winter tyres209
Winter tyres See Wheels
209
Wiper blades186
Service position of the windscreen wiper arms 225
Wiper interval
78
Wipers Maintaining wiper blades
186
X
XDS
137
Xenon headlight70
260Index