ESP SKODA OCTAVIA TOUR 2011 2.G / (1Z) User Guide
[x] Cancel search | Manufacturer: SKODA, Model Year: 2011, Model line: OCTAVIA TOUR, Model: SKODA OCTAVIA TOUR 2011 2.G / (1Z)Pages: 183, PDF Size: 11.13 MB
Page 54 of 183
Seats and Stowage53
Using the system
Safety
Driving Tips
General Maintenance
Breakdown assistance
Technical Data
WARNING
If you or the passenger have a subdued pa in and/or temperature sensitivity, e.g.
through medication, paralysis or because of chronic illness (e.g. diabetes), we
recommend not to use the seat heating at al l. This can lead to burns on the back,
the posterior and the legs which are difficult to heal. If the seat heating is used,
we recommend to make regular breaks in your journey when driving long
distances, so that in specific cases as mentioned above the body can recuperate
from the stress of the journey. Please consult your doctor, who can evaluate
your specific condition.
Caution
•
You should not kneel on the seats or otherwise apply pressure at specific points
in order to avoid damaging the heating elements of the seat heaters.
•
Do not use the seat heating if the seats are not occupied by persons or if objects
are fastened or stored on them, for example a child seat, a bag etc. A fault of the
heating elements in the seat heating can occur.
•
Do not clean the seats moist page 125.Note
•
The seat heating should only be switched on when the engine is running. This
has a significant effect of saving on the battery capacity.
•
If the on-board voltage drops, the seat heating is switched off automatically, in
order to provide sufficient electrical energy for the engine control.
PedalsConcerning a secure depressing of the peda l, you should use only footmats from the
Škoda genuine accessories.
Operation of the pedals must not be hindered!
WARNING
•
Greater pedal distances may be needed when there is a fault in the brake
system.
•
Do not place any footmats or other additional floor coverings in the area of
the pedals in order to ensure that all the pedals can be fully depressed and are
able to return unobstructed to their initial position - risk of accident!
•
There must be no objects on the floor which could roll under the pedals. You
would then no longer be able to apply the brakes, operate the clutch or acceler-
ator - risk of accident!
luggage compartmentLoading the luggage compartmentPlease observe the following in the interest of having good handling characteristics
of your vehicle:
– Distribute the items of luggage as evenly as possible.
– Place heavy objects as far forward as possible.
– Attach the items of luggage to the lashing eyes or the fixing net* page 54.
In the event of an accident, there is such a high kinetic energy which is produced by
small and light objects that they can cause severe injuries. The magnitude of the
kinetic energy depends on the speed at which the vehicle is travelling and on the
weight of the object. The speed at which the vehicle is travelling is in this case the
more significant factor.
Example: In the event of a frontal collis ion at a speed of 50 km/h, an unsecured
object with a weight of 4.5 kg produces an energy, which corresponds to 20 times
its own weight. This means that it results in a weight of approx. 90 kg. You can
imagine the injuries that can occur, if this “bullet” is flying through the interior
compartment and hits an occupant.
WARNING
•
Stow the objects in the luggage compartment and attach them to the lashing
eyes.
•
Loose objects in the passenger compar tment can be thrown forward during
a sudden manoeuvre or in case of an ac cident and can injure the occupants or
other oncoming traffic. This risk is still increased, if the objects which are flying
around are hit by a deployed airbag. In this case, the objects which are thrown
back can injure th e occupants - hazard.
•
Please note that the handling properti es of your vehicle may be affected
when transporting heavy objects as a result of the displacement of the centre of
gravity. The speed and style of driv ing must be adjusted accordingly.WARNING (continued)
s2lk.2.book Page 53 Monday, April 18, 2011 7:41 AM
Page 72 of 183
Heating and air conditioning system71
Using the system
Safety
Driving Tips
General Maintenance
Breakdown assistance
Technical Data
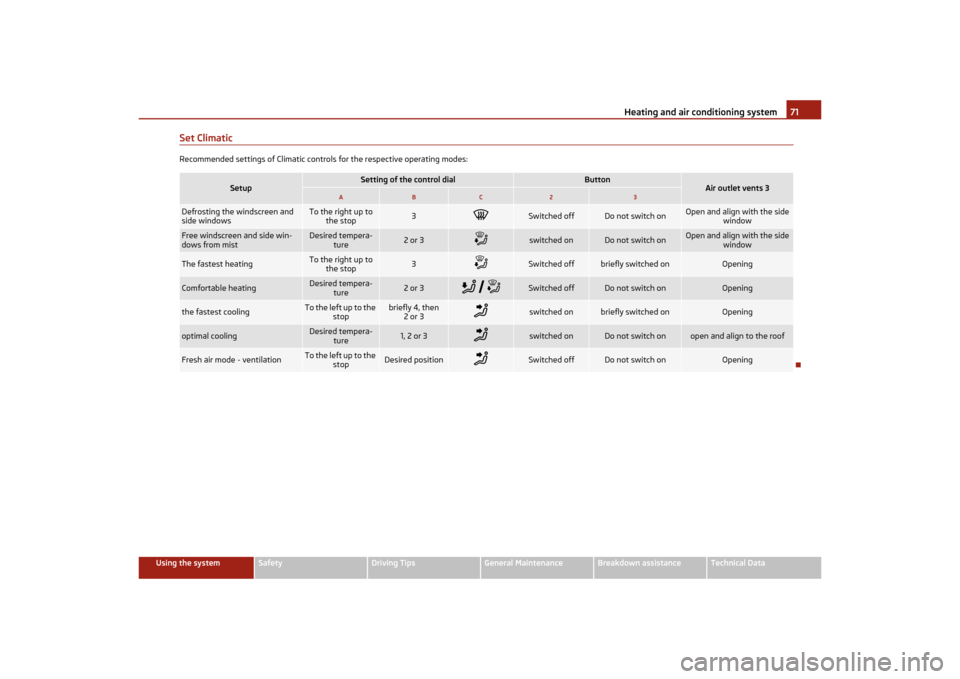
Set ClimaticRecommended settings of Climatic controls for the respective operating modes:
Setup
Setting of the control dial
Button
Air outlet vents 3
Defrosting the windscreen and
side windows
To the right up to
the stop
3
Switched off
Do not switch on
Open and align with the side window
Free windscreen and side win-
dows from mist
Desired tempera-ture
2 or 3
switched on
Do not switch on
Open and align with the side window
The fastest heating
To the right up to the stop
3
Switched off
briefly switched on
Opening
Comfortable heating
Desired tempera- ture
2 or 3
Switched off
Do not switch on
Opening
the fastest cooling
T o t h e l e f t u p t o t h e stop
briefly 4, then 2or 3
switched on
briefly switched on
Opening
optimal cooling
Desired tempera- ture
1, 2 or 3
switched on
Do not switch on
open and align to the roof
Fresh air mode - ventilation
T o t h e l e f t u p t o t h e stop
Desired position
Switched off
Do not switch on
Opening
A
B
C
2
3
s2lk.2.book Page 71 Monday, April 18, 2011 7:41 AM
Page 78 of 183
Starting-off and Driving77
Using the system
Safety
Driving Tips
General Maintenance
Breakdown assistance
Technical Data
Caution
Each time the vehicle is parked, first of all apply the handbrake and then additionally
engage the 1st gear.Rear parking aid*The parking aid provides a warnin g of obstacles behind the vehicle.The audible parking aid determines the distance from the rear bumper to an
obstacle behind the car with the aid of ultrasound sensors. These ultrasound
sensors are integrated in the rear bumper.
Range of sensors
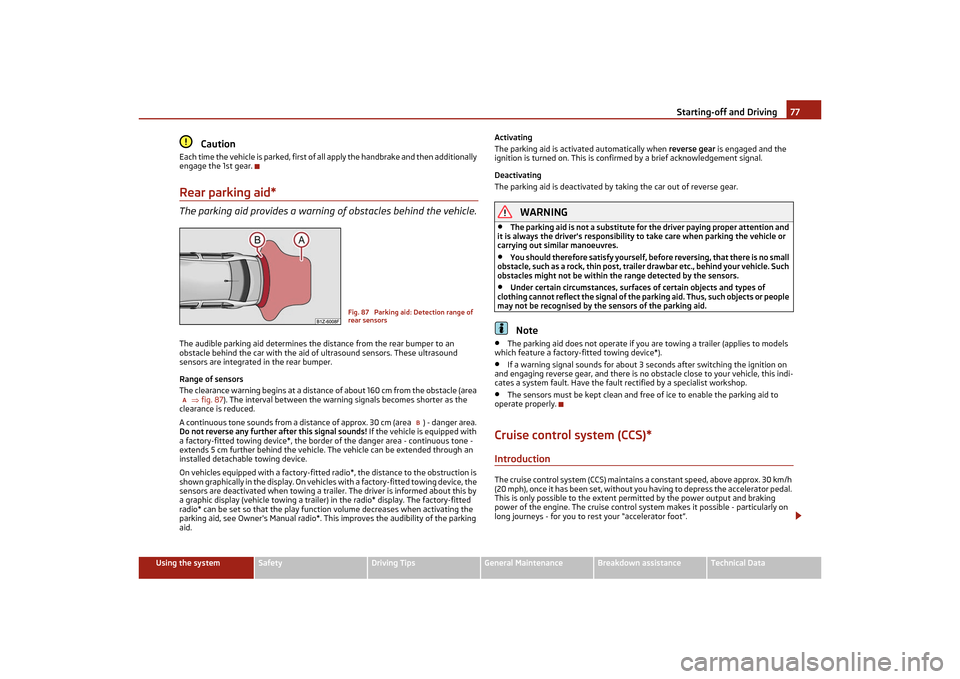
The clearance warning begins at a distance of about 160 cm from the obstacle (area
fig. 87 ). The interval between the warning signals becomes shorter as the
clearance is reduced.
A continuous tone sounds from a distance of approx. 30 cm (area ) - danger area.
Do not reverse any further after this signal sounds! If the vehicle is equipped with
a factory-fitted towing device*, the border of the danger area - continuous tone -
extends 5 cm further behind the vehicle. The vehicle can be extended through an
installed detachable towing device.
On vehicles equipped with a factory-fitted radio*, the distance to the obstruction is
shown graphically in the display. On vehicl es with a factory-fitted towing device, the
sensors are deactivated when towing a trailer. The driver is informed about this by
a graphic display (vehicle towing a trailer) in the radio* display. The factory-fitted
radio* can be set so that the play function volume decreases when activating the
parking aid, see Owner's Manual radio*. This improves the audibility of the parking
aid. Activating
The parking aid is activated automatically when
reverse gear is engaged and the
ignition is turned on. This is confirmed by a brief acknowledgement signal.
Deactivating
The parking aid is deactivated by taking the car out of reverse gear.
WARNING
•
The parking aid is not a substitute for the driver paying proper attention and
it is always the driver's responsibility to take care when parking the vehicle or
carrying out similar manoeuvres.
•
You should therefore satisfy yourself, before reversing, that there is no small
obstacle, such as a rock, thin post, traile r drawbar etc., behind your vehicle. Such
obstacles might not be within the range detected by the sensors.
•
Under certain circumstances, surfaces of certain objects and types of
clothing cannot reflect the signal of the pa rking aid. Thus, such objects or people
may not be recognised by the sensors of the parking aid.Note
•
The parking aid does not operate if you are towing a trailer (applies to models
which feature a factory-fitted towing device*).
•
If a warning signal sounds for about 3 seconds after switching the ignition on
and engaging reverse gear, and there is no obstacle close to your vehicle, this indi-
cates a system fault. Have the fault rectified by a specialist workshop.
•
The sensors must be kept clean and free of ice to enable the parking aid to
operate properly.
Cruise control system (CCS)*IntroductionThe cruise control system (CCS) maintains a constant speed, above approx. 30 km/h
(20 mph), once it has been set, without yo u having to depress the accelerator pedal.
This is only possible to the extent pe rmitted by the power output and braking
power of the engine. The cruise control syst em makes it possible - particularly on
long journeys - for you to rest your “accelerator foot”.
Fig. 87 Parking aid: Detection range of
rear sensors
A
B
s2lk.2.book Page 77 Monday, April 18, 2011 7:41 AM
Page 82 of 183
Passive Safety81
Using the system
Safety
Driving Tips
General Maintenance
Breakdown assistance
Technical Data
SafetyPassive SafetyBasic informationDriving the safe way
Passive safety measures reduce the risk of injury in accident situa-
tions.In this section you will find important information, tips and notes on the subject of
passive safety in your vehicle. We have combined everything here which you should
be familiar with, for example, regarding seat belts, airbags, child seats and safety of
children. It is therefore important, in particular, to comply with the notes and warn-
ings in this section for your own interest and in the interest of those travelling with
you.
WARNING
•
This chapter contains important information on how to use the vehicle for
the driver and his occupants. You will find further information on safety, which
concerns you and those travelling with yo u, in the following chapters of this
Owner's Manual.
•
The complete on-board literature shou ld always be in the vehicle. This
applies in particular, if you rent out or sell the vehicle.
Safety equipment
The safety equipment is part of th e occupant protection and it can
reduce the risk of injuries in accident situations.“Do not put at risk” your safety and the safe ty of those travelling with you . In the
event of an accident, the safety equipment can reduce the risk of injuries. The
following list contains part of th e safety equipment in your vehicle:•
Three-point seat belts for all the seats,
•
belt force limiter for front seats and outer rear seats*,
•
belt tensioner for front seats,
•
seat belt height adjuster for front seats,
•
front airbag for the driver and the front seat passenger*,
•
side airbags*,
•
head airbags*,
•
anchoring points for child seat using the “ISOFIX” system,
•
anchoring points for child seat using the “Top Tether” system,
•
head restraint adjustable for height,
•
adjustable steering column.
The specified safety equipment works toge ther, in order to optimally protect you
and those travelling with yo u in accident situations. The safety equipment does not
protect you or the people travelling with you, if you or your occupants adopt an
incorrect seated position or the equipment is not correctly adjusted or used.
For this reason you will be provided with information on why this equipment is very
important, how it protects you and the occupants, what should be observed when
using the equipment and how you and the peop le travelling with you can make full
use of the existing safety equipment. This Owner's Manual contains important
warning notes, which you and those travelli ng with you should pay attention to in
order to reduce a risk of injury.
Safety concerns everybody!
Before setting off
The driver is always fully responsible for his occupants and for the
operating safety of the vehicle.For your own safety and the safety of the people travelling with you, please pay
attention to the following points before setting off:•
Ensure that the lighting and the turn signal system are functioning properly.
•
Inspect the tyre inflation pressure.
•
Ensure that all the windows offer a good visibility to the outside.
•
Safely attach the items of luggage page 53, “Loading the luggage compart-
ment”.
•
Ensure that no objects can obstruct the pedal.
•
Adjust the mirror, the front seat and the head restraint to match your body size.
s2lk.2.book Page 81 Monday, April 18, 2011 7:41 AM
Page 83 of 183
Passive Safety
82
•
Point out to your occupants that the head restraints must be adjusted to match
their body size.
•
Protect the children in suit able child seats with correctly fastened seat belts
page 97, “Transporting children safely”.
•
Adopt the correct seated position page 82, “Correct seated position”. Also
inform your occupants to adop t the correct seated position.
•
Fasten the seat belt correctly. Also inform your occupants to properly fasten the
seat belts page 87, “How are seat belts correctly fastened?”.
What influences the driving safety?
The driving safety is primarily determined by the style of driving and
the personal behaviour of all the occupants.The driver is fully responsible for himself and his occupants. If your driving safety is
effected, you place yourself and the oncoming traffic at risk. Please refer to the
following guidelines.•
Do not get distracted from concentrating on the traffic situation, e.g. by your
occupants or mobile phone calls.
•
Never drive when your driving ability is impaired, e.g. through medication,
alcohol, drugs.
•
Keep to the traffic regulations and the permissible speed limit.
•
Adjust the driving speed at all times to th e road condition as well as to the traffic
and weather conditions.
•
Take regular breaks on long journe ys - at the latest every two hours.
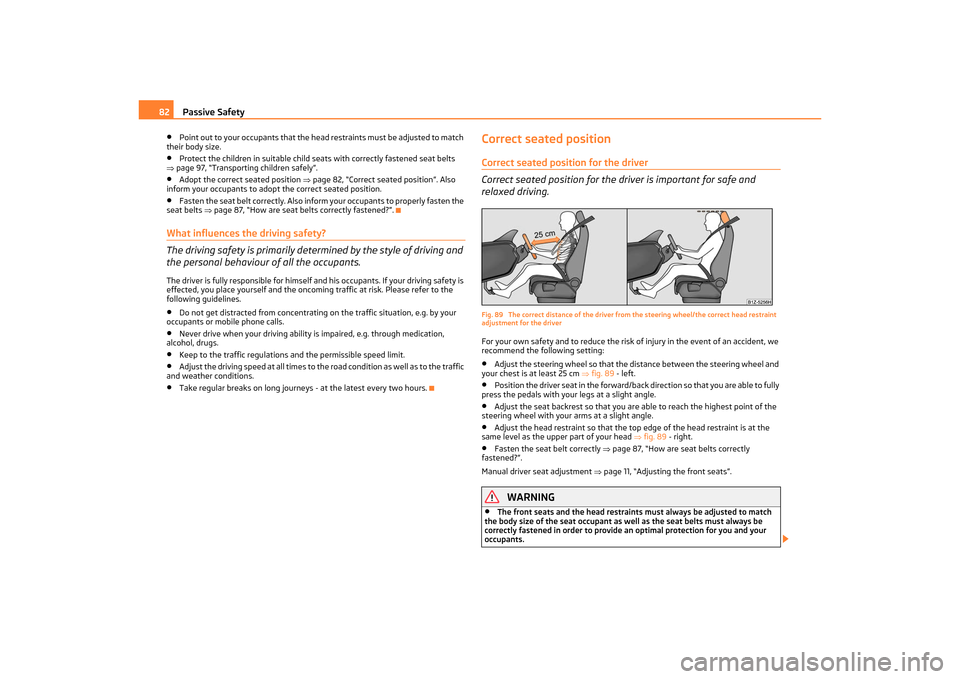
Correct seated positionCorrect seated position for the driver
Correct seated position for the driver is important for safe and
relaxed driving.Fig. 89 The correct distance of the driver fr om the steering wheel/the correct head restraint
adjustment for the driverFor your own safety and to reduce the risk of injury in the event of an accident, we
recommend the following setting:•
Adjust the steering wheel so that the distance between the steering wheel and
your chest is at least 25 cm fig. 89 - left.
•
Position the driver seat in the forward/back direction so that you are able to fully
press the pedals with your legs at a slight angle.
•
Adjust the seat backrest so that you ar e able to reach the highest point of the
steering wheel with your arms at a slight angle.
•
Adjust the head restraint so that the to p edge of the head restraint is at the
same level as the upper part of your head fig. 89 - right.
•
Fasten the seat belt correctly page 87, “How are seat belts correctly
fastened?”.
Manual driver seat adjustment page 11, “Adjusting the front seats”.
WARNING
•
The front seats and the head restraints must always be adjusted to match
the body size of the seat occupant as well as the seat belts must always be
correctly fastened in order to provide an optimal protection for you and your
occupants.
s2lk.2.book Page 82 Monday, April 18, 2011 7:41 AM
Page 85 of 183
Passive Safety
84
Examples of an incorrect seated position
An incorrect seated posi tion can lead to severe injuries or death for
the occupants.Seat belts offer their optimum protection on ly if the webbing of the seat belts is
properly routed. Incorrect seated positions considerably reduce the protective func-
tions of the seat belts and therefore increase the risk of injury due to an incorrect
routing of the seat belt. The driver is fully responsible for himself and the occupants,
in particular for the children. Do not permit an occupant to adopt an incorrect seated
position when the car is moving.
The following list contains the examples of seated positions which are dangerous
for the occupants. This list is not complete, however we would like you to get
familiar with this subject.
Therefore, while the car is moving never:•
stand up in the vehicle,
•
stand up on the seats,
•
kneel onto the seats,
•
tilt the seat backrest fully to the back,
•
lean against the dash panel,
•
lie on the rear seats,
•
only sit on the front area of the seat,
•
sit to the side,
•
lean out of the window,
•
put the feet out of the window,
•
put the feet on the dash panel,
•
put the feet on the seat upholstery,
•
occupy the footwell,
•
have the seat belt not fastened,
•
occupy the luggage compartment.
WARNING
•
If the occupant adopts an incorrect seat ed position, he is exposed to life-
threatening injuries, in case he is hit by a deployed airbag.
•
Before setting off, please adopt the correct seated position and do not
change this seated position while the car is moving. Also advise your occupants to adopt the correct seated
position and not to change this seated position
while the car is moving.
WARNING (continued)
s2lk.2.book Page 84 Monday, April 18, 2011 7:41 AM
Page 96 of 183
Airbag system95
Using the system
Safety
Driving Tips
General Maintenance
Breakdown assistance
Technical Data
Important safety information on the head airbag
Correct use of the airbag system considerably reduces the risk of
injury!
WARNING
•
It is essential to always switch off the front passenger airbag when
attaching a child safety seat on the fr ont passenger seat where the child is
seated with its back facing in direction of travel (in some countries also when
the child is facing the direction of travel) page 95, “Deactivating an airbag”. If
this is not done, there is a risk of the child suffering severe or even fatal injuries
if the front passenger airbag is deployed . The national legal provisions in certain
countries require that both the front, side and head airbags be deactivated.
When transporting a child on the front passenger seat, please comply with the
appropriate national legal provisions re garding the use of child safety seats.
•
There must not be any objects in the deployment area of the head airbags
which might prevent the airbags from inflating properly.
•
Only hang light items of clothing on the clothes hooks to the vehicle. Never
leave any heavy or sharp-edged objects in the pockets of the items of clothing.
In addition, it is not permitted to us e clothes hangers for hanging up items of
clothing.
•
The airbag control unit operates to gether with the sensors, which are
attached in the front doors. For this reason no modifications must be carried out
at the doors as well as at the door panels (for example additional installation of
loudspeakers). Resulting damages can hav e a negative affect on the operation
of the airbag system. All work on the front doors and their panels must only be
carried out by a specialist garage.
•
There must not be any other persons (e.g. children) or animals between the
sitting occupant and the deployment area of the head airbag. In addition, none
of the occupants should lean their head out of the window when driving, or
extend their arms and hands out of the window.
•
The sun visors must not be swivelled to the side windows into the deploy-
ment area of the head airbags if any ob jects, such as ball-point pens etc. are
attached to them. This might result in injuries to the occupants if the head
airbag is deployed.
•
Installing impermissible accessories in the area of the head airbags may
considerably impair the protection offered by the head airbag in the event of it
being deployed. When the deployed head airbag is inflated, parts of the acces-
sories fitted may in certain circumstances be thrown into the interior of the car
and cause injuries to the occupants page 146, “Accessories, changing and
replacing parts”.
•
Any work on the head airbag system including installing and removing
system components because of other repair work (e.g. removing headliner) must
only be carried out by a specialist garage.
Deactivating an airbagDeactivating airbags
If any airbags have been deactivate d, switch them on again as soon
as possible so that they are able to again provide their proper
protection.There is the technical means installed within your vehicle to switch off the front,
side* or head airbag* (take out of commission).
This is why you should have the deacti vation of the airbags carried out by a
specialist garage.
On vehicles equipped with the switch for deactivation of the airbags, you can deac-
tivate the front passenger airbag by means of this switch page 96.
Deactivation of airbags is envisaged only for particular instances, such as if:•
you must in exceptional cases use a child seat on the front passenger seat
where the child has its back to the direction of travel of the vehicle (in some coun-
tries this must be in the direction of trav el due to other legal regulations applying)
page 97, “Important safety information regarding the use of child safety seats”,
•
you are not able to maintain the distance of at least 25 cm between middle of
steering wheel and chest, despite the driver seat being correctly adjusted,
•
special attachments are required in the area of the steering wheel because of a
physical disability,
•
you have installed other seats (e.g. orthopaedic seats without side airbags).
Monitoring the airbag system
The functionality of the airbag system is also monitored electronically when one
airbag has been switched off.
If the airbag was switched o ff using diagnostic equipment:
•
The warning light for the airbag system lights up for 4 seconds after switching
on the ignition and then flashes for 12 seconds afterwards in 2 second intervals.WARNING (continued)
s2lk.2.book Page 95 Monday, April 18, 2011 7:41 AM
Page 97 of 183
Airbag system
96
Front passenger airbags switched off using the switch for front passenger
airbags* in storage compartmen t on the front passenger side:•
the airbag indicator light in the instrument cluster comes on for about 4 seconds
each time the ignition is switched on,
•
if the airbags are switched off, this is indicated in the middle of the dash panel
by the lighting up of the indicator light
fig. 102 - right.
Note
Your authorised Škoda Servic e Partner will be able to advise you whether national
legislation in your country allows airbags in your vehicle to be deactivated, and
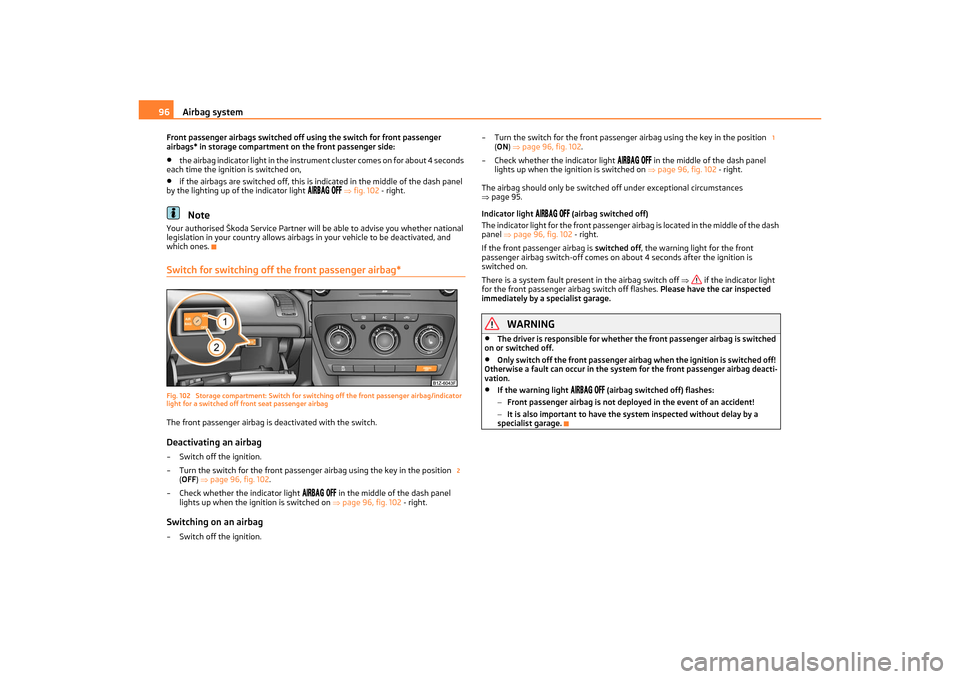
which ones.Switch for switching off the front passenger airbag*Fig. 102 Storage compartment: Switch for switching off the front passenger airbag/indicator
light for a switched off front seat passenger airbagThe front passenger airbag is deactivated with the switch.Deactivating an airbag– Switch off the ignition.
– Turn the switch for the front passenger ai rbag using the key in the position
( OFF) page 96, fig. 102 .
– Check whether the indicator light
in the middle of the dash panel
lights up when the ignition is switched on page 96, fig. 102 - right.
Switching on an airbag– Switch off the ignition. – Turn the switch for the front passenger airbag using the key in the position
(ON ) page 96, fig. 102 .
– Check whether the indicator light
in the middle of the dash panel
lights up when the ignition is switched on page 96, fig. 102 - right.
The airbag should only be switched off under exceptional circumstances
page 95.
Indicator light
(airbag switched off)
The indicator light for the front passenger ai rbag is located in the middle of the dash
panel page 96, fig. 102 - right.
If the front passenger airbag is switched off, the warning light for the front
passenger airbag switch-o ff comes on about 4 seconds after the ignition is
switched on.
There is a system fault present in the airbag switch off if the indicator light
for the front passenger airbag switch off flashes. Please have the car inspected
immediately by a specialist garage.
WARNING
•
The driver is responsible for whether the front passenger airbag is switched
on or switched off.
•
Only switch off the front passenger airbag when the ignition is switched off!
Otherwise a fault can occur in the system for the front passenger airbag deacti-
vation.
•
If the warning light
(airbag switched off) flashes:
− Front passenger airbag is not depl oyed in the event of an accident!
− It is also important to have the sy stem inspected without delay by a
specialist garage.
2
1
s2lk.2.book Page 96 Monday, April 18, 2011 7:41 AM
Page 103 of 183
Transporting children safely
102− in a specialist garage
− or by using the key-operated switch for the front passenger airbag*
page 96, “Switch for switching off the front passenger airbag*”.
•
The shoulder part of the seat belt mu st run approximately across the middle
of the shoulder and fit snugly against the chest. It must on no account run across
the neck. The lap part of the seat belt mu st run across the pelvis and fits snugly;
it must not run over the belly. Tighten th e belt webbing over your hip if neces-
sary.
•
Please comply with any differing national legal regulations regarding the use
of child safety seats.
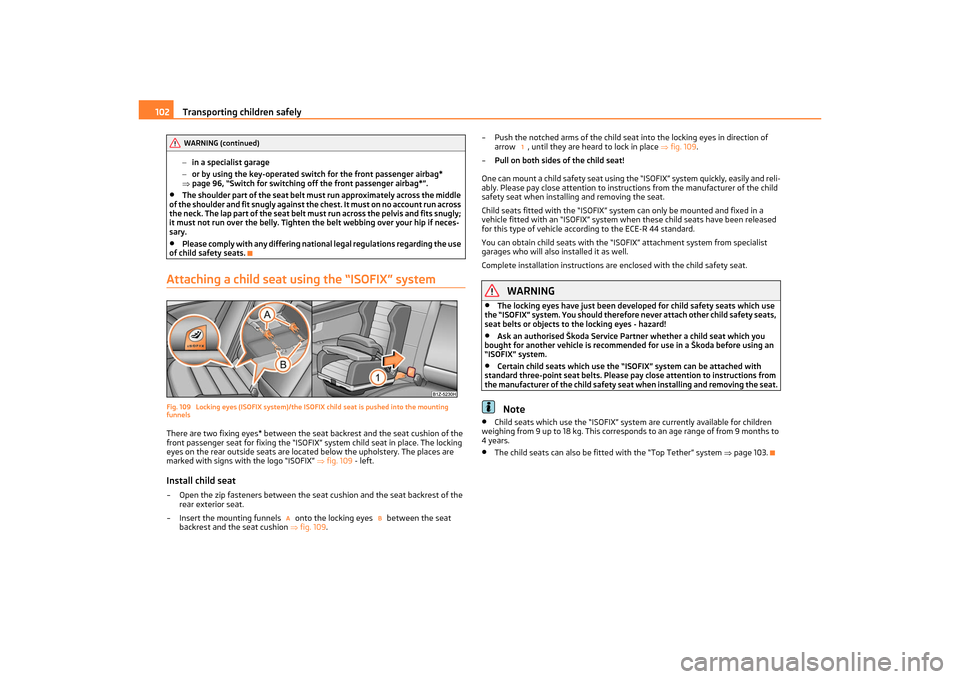
Attaching a child seat using the “ISOFIX” systemFig. 109 Locking eyes (ISOFIX system)/the ISOF IX child seat is pushed into the mounting
funnelsThere are two fixing eyes* between the seat backrest and the seat cushion of the
front passenger seat for fixing the “ISOFIX” system child seat in place. The locking
eyes on the rear outside seats are loca ted below the upholstery. The places are
marked with signs with the logo “ISOFIX” fig. 109 - left.Install child seat– Open the zip fasteners between the seat cushion and the seat backrest of the
rear exterior seat.
– Insert the mounting funnels onto the locking eyes between the seat backrest and the seat cushion fig. 109 . – Push the notched arms of the child seat into the locking eyes in direction of
arrow , until they are he ard to lock in place fig. 109 .
– Pull on both sides of the child seat!
One can mount a child safety seat using the “ISOFIX” system quickly, easily and reli-
ably. Please pay close attent ion to instructions from the manufacturer of the child
safety seat when installing and removing the seat.
Child seats fitted with the “ISOFIX” system can only be mounted and fixed in a
vehicle fitted with an “ISOFIX” system wh en these child seats have been released
for this type of vehicle according to the ECE-R 44 standard.
You can obtain child seats with the “ISOFIX” attachment system from specialist
garages who will also installed it as well.
Complete installation instructions are enclosed with the child safety seat.
WARNING
•
The locking eyes have just been develo ped for child safety seats which use
the “ISOFIX” system. You should therefore never attach other child safety seats,
seat belts or objects to the locking eyes - hazard!
•
Ask an authorised Škoda Service Partner whether a child seat which you
bought for another vehicle is recommend ed for use in a Škoda before using an
“ISOFIX” system.
•
Certain child seats which use the “ISOFIX” system can be attached with
standard three-point seat belts. Please pa y close attention to instructions from
the manufacturer of the child safety seat when installing and removing the seat.Note
•
Child seats which use the “ISOFIX” system are currently available for children
weighing from 9 up to 18 kg. This corresponds to an age range of from 9 months to
4 years.
•
The child seats can also be fitted with the “Top Tether” system page 103.
WARNING (continued)
A
B
1
s2lk.2.book Page 102 Monday, April 18, 2011 7:41 AM
Page 106 of 183
Intelligent Technology105
Using the system
Safety
Driving Tips
General Maintenance
Breakdown assistance
Technical Data
Driving TipsIntelligent TechnologyElectronic stability programme (ESP)*GeneralThe ESP aids you in maintaining control of your vehicle in situations in which the
vehicle is driving at its dynamic limits, such as entering a curve fast. The risk of skid-
ding is reduced and your vehicle thus offers greater driving stability depending on
the conditions of the road surface. The system operates at all speeds.
The following systems are integrated into the electronic stability programme:•
Electronic Differential Lock (EDL),
•
Traction control system (TCS),
•
active driver-steering recommendation (DSR),
•
Antilock brake system (ABS),
•
Brake Assist,
•
Uphill-Start off-Assist.
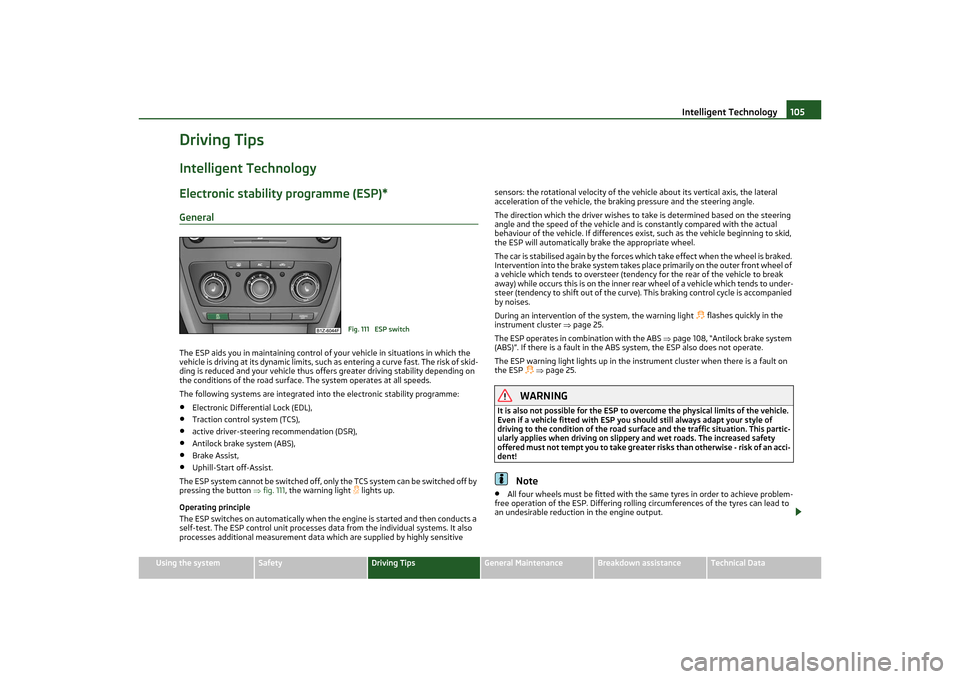
The ESP system cannot be switched off, only the TCS system can be switched off by
pressing the button fig. 111 , the warning light
lights up.
Operating principle
The ESP switches on automatically when th e engine is started and then conducts a
self-test. The ESP control unit processes data from the individual systems. It also
processes additional measurement data which are supplied by highly sensitive sensors: the rotational velocity of the ve
hicle about its vertical axis, the lateral
acceleration of the vehicle, the braking pressure and the steering angle.
The direction which the driver wishes to take is determined based on the steering
angle and the speed of the vehicle and is constantly compared with the actual
behaviour of the vehicle. If differences exist, such as the vehicle beginning to skid,
the ESP will automatically brake the appropriate wheel.
The car is stabilised again by the forces which take effect when the wheel is braked.
Intervention into the brake system takes pl ace primarily on the outer front wheel of
a vehicle which tends to oversteer (tendency for the rear of the vehicle to break
away) while occurs this is on the inner re ar wheel of a vehicle which tends to under-
steer (tendency to shift out of the curve). This braking control cycle is accompanied
by noises.
During an intervention of the system, the warning light
flashes quickly in the
instrument cluster page 25.
The ESP operates in combination with the ABS page 108, “Antilock brake system
(ABS)”. If there is a fault in the ABS system, the ESP also does not operate.
The ESP warning light lights up in the instrument cluster when there is a fault on
the ESP
page 25.
WARNING
It is also not possible for the ESP to over come the physical limits of the vehicle.
Even if a vehicle fitted with ESP you sh ould still always adapt your style of
driving to the condition of the road surfac e and the traffic situation. This partic-
ularly applies when driving on slippery and wet roads. The increased safety
offered must not tempt you to take greate r risks than otherwise - risk of an acci-
dent!
Note
•
All four wheels must be fitted with the same tyres in order to achieve problem-
free operation of the ESP. Differing rolling circumferences of the tyres can lead to
an undesirable reduction in the engine output.
Fig. 111 ESP switch
s2lk.2.book Page 105 Monday, April 18, 2011 7:41 AM