turn signal SKODA OCTAVIA TOUR 2011 2.G / (1Z) User Guide
[x] Cancel search | Manufacturer: SKODA, Model Year: 2011, Model line: OCTAVIA TOUR, Model: SKODA OCTAVIA TOUR 2011 2.G / (1Z)Pages: 183, PDF Size: 11.13 MB
Page 82 of 183
Passive Safety81
Using the system
Safety
Driving Tips
General Maintenance
Breakdown assistance
Technical Data
SafetyPassive SafetyBasic informationDriving the safe way
Passive safety measures reduce the risk of injury in accident situa-
tions.In this section you will find important information, tips and notes on the subject of
passive safety in your vehicle. We have combined everything here which you should
be familiar with, for example, regarding seat belts, airbags, child seats and safety of
children. It is therefore important, in particular, to comply with the notes and warn-
ings in this section for your own interest and in the interest of those travelling with
you.
WARNING
•
This chapter contains important information on how to use the vehicle for
the driver and his occupants. You will find further information on safety, which
concerns you and those travelling with yo u, in the following chapters of this
Owner's Manual.
•
The complete on-board literature shou ld always be in the vehicle. This
applies in particular, if you rent out or sell the vehicle.
Safety equipment
The safety equipment is part of th e occupant protection and it can
reduce the risk of injuries in accident situations.“Do not put at risk” your safety and the safe ty of those travelling with you . In the
event of an accident, the safety equipment can reduce the risk of injuries. The
following list contains part of th e safety equipment in your vehicle:•
Three-point seat belts for all the seats,
•
belt force limiter for front seats and outer rear seats*,
•
belt tensioner for front seats,
•
seat belt height adjuster for front seats,
•
front airbag for the driver and the front seat passenger*,
•
side airbags*,
•
head airbags*,
•
anchoring points for child seat using the “ISOFIX” system,
•
anchoring points for child seat using the “Top Tether” system,
•
head restraint adjustable for height,
•
adjustable steering column.
The specified safety equipment works toge ther, in order to optimally protect you
and those travelling with yo u in accident situations. The safety equipment does not
protect you or the people travelling with you, if you or your occupants adopt an
incorrect seated position or the equipment is not correctly adjusted or used.
For this reason you will be provided with information on why this equipment is very
important, how it protects you and the occupants, what should be observed when
using the equipment and how you and the peop le travelling with you can make full
use of the existing safety equipment. This Owner's Manual contains important
warning notes, which you and those travelli ng with you should pay attention to in
order to reduce a risk of injury.
Safety concerns everybody!
Before setting off
The driver is always fully responsible for his occupants and for the
operating safety of the vehicle.For your own safety and the safety of the people travelling with you, please pay
attention to the following points before setting off:•
Ensure that the lighting and the turn signal system are functioning properly.
•
Inspect the tyre inflation pressure.
•
Ensure that all the windows offer a good visibility to the outside.
•
Safely attach the items of luggage page 53, “Loading the luggage compart-
ment”.
•
Ensure that no objects can obstruct the pedal.
•
Adjust the mirror, the front seat and the head restraint to match your body size.
s2lk.2.book Page 81 Monday, April 18, 2011 7:41 AM
Page 155 of 183
Breakdown assistance
154WARNING
•
The non-insulated parts of the termi nal clamps must never make contact
with each other. Furthermore, the cable connected to the positive terminal of
the battery must not come into contact with electrically conducting parts of the
vehicle - risk of a short circuit!
•
Do not affix the jump starting cables to the negative terminal of the
discharged battery. There is the risk of detonating gas seeping out the battery
being ignited by the strong spark which results from the engine being started.
•
Run the jump-start cables so that they cannot be caught by any rotating
parts in the engine compartment.
•
Do not bend over the batteries - risk of caustic burns!
•
The vent screws of the battery cells must be tightened firmly.
•
Keep any sources of ignition (naked fl ame, smouldering cigarettes etc.) away
from the battery - risk of an explosion!
•
Never jump-start the batteries which have a too low electrolyte level - risk
of explosion and caustic burns!
Tow-starting and towing vehicleGeneralPlease pay attention to the following instru ctions if you are going to use a tow rope:Driver of the towing vehicle– Do not drive off until the tow rope is taught.
– Release the clutch particularly gently when starting off.Driver of the towed vehicle– Switch the ignition on so that the steering wheel is not blocked and you can also
operate the turn signal lights, the headli ght flasher, the windscreen wipers and
windscreen washer system.
–Move the gearshift lever into Neutral.
– Note that the brake servo unit and power steering only operate if the engine is running. You will require significantly greater physical force to depress the brake
pedal and to steer the vehicle if the engine is not running.
– Ensure that the tow rope is always kept taught. Tow rope or tow bar
A tow
bar is safest way of towing a vehicle and also minimizes any shocks. You can
use a tow rope only if a suitable tow bar is not available.
The tow rope must be elastic to protect the vehicle. Thus one should only use
plastic fibre rope or a rope made out of a similarly elastic material.
Only attach the tow rope to the towing eyes provided for this purpose page 155
and page 155.
Driving style
Towing another vehicle requires a certain amount of practice. Both drivers should
be familiar with the particular points about towing a vehicle. Unskilled drivers
should not attempt to tow in another vehicle or to be towed in.
One should be constantly vigilant not to allow impermissibly high towing forces or
jerky loadings. There is always a risk of excessive stresses and damage resulting at
the points to which you attach the tow rope or tow bar when you attempt to tow a
vehicle which is not standing on a paved road.
Caution
If the gearbox of your vehicle no longer contains any oil because of a defect, your
vehicle must only be towed in with the driven wheels raised clear of the ground, or
on a special vehicle tr ansporter or trailer.
Note
•
Please comply with any national legal provisions particularly regarding the
switched on signal systems, when towing in or tow-starting another vehicle.
•
The tow rope must not be twisted as it ma y in certain circumstances result in the
front towing eye being unsc rewed out of your vehicle.
s2lk.2.book Page 154 Monday, April 18, 2011 7:41 AM
Page 161 of 183
Fuses and light bulbs
160
A stowage place for the bulbs is located in the box in the spare wheel.
Bulb - Overview
WARNING
•
Bulbs H7 and H1 are pressurised and ma y burst when changing the bulb - risk
of injury!
•
It is recommended to wear gloves and safety glasses when changing a bulb.Caution
Do not take hold of the glass bulb with naked fingers (even the smallest amount of
dirt reduces the working life of the light bu lb). Use a clean cloth, serviette or some-
thing similar.
Note
This Owner's Manual only describes the replacement of bulbs where it is assumed
that no major complications will arise. Other light bulbs should be replaced by your
specialist garage.
9)The small box with replacement bulbs is part of the basic equipping of the vehicle in some
countries.Front headlight
Halogen headlight
Low beam light
H7
Main beam light
H1
Parking lights
W5W
Turn signals
PY21W
Fog lights*
H8
Light unit (Octavia)
Bulb
Reversing light
P21W
Turn signals
PY21W
Twin filament light bulb for the brake lights and tail
lights
P21/4W
Twin filament light bulb for the rear fog lights and tail
lights
P21/4W
Parking lights
W3W
Rear light unit (Combi)
Bulb
Reversing lights, brake lights, tail lights and rear fog
light
P21W
Turn signals
PY21W
Parking lights
W3W
Others
Bulb
Side turn signal lights
LED
Licence plate light
C5W
3. Brake light
LED
Interior lighting
C10W
Reading lights
W5W
Luggage compartment light
W5W
s2lk.2.book Page 160 Monday, April 18, 2011 7:41 AM
Page 162 of 183
Fuses and light bulbs161
Using the system
Safety
Driving Tips
General Maintenance
Breakdown assistance
Technical Data
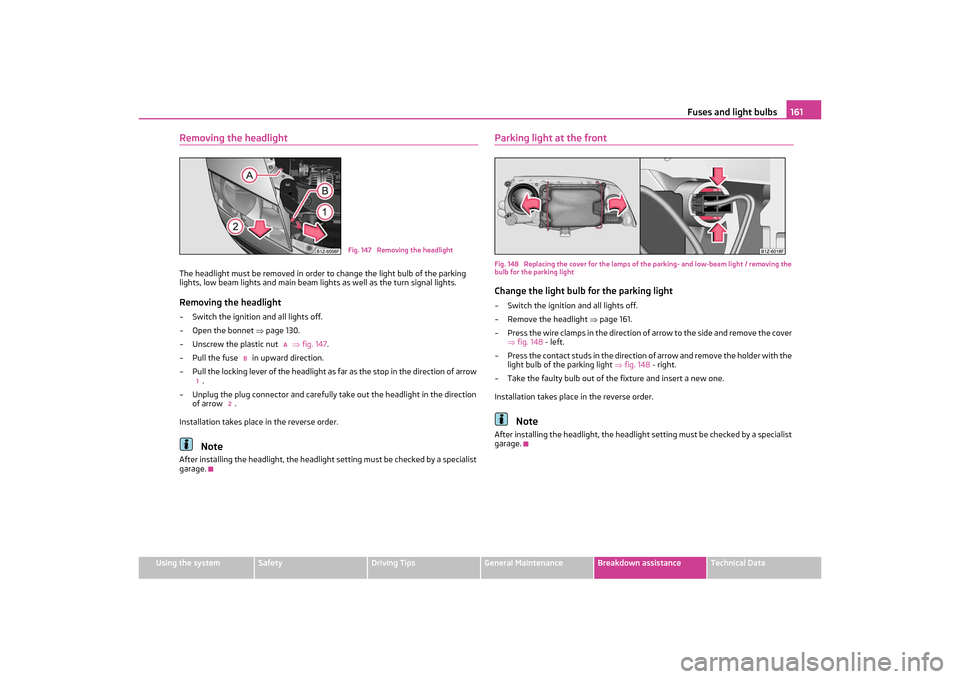
Removing the headlightThe headlight must be removed in order to change the light bulb of the parking
lights, low beam lights and main beam ligh ts as well as the turn signal lights.Removing the headlight– Switch the ignition and all lights off.
–Open the bonnet page 130.
– Unscrew the plastic nut fig. 147 .
– Pull the fuse in upward direction.
– Pull the locking lever of the headlight as far as the stop in the direction of arrow .
– Unplug the plug connector and carefully take out the headlight in the direction
of arrow .
Installation takes place in the reverse order.
Note
After installing the headlight, the headlight setting must be checked by a specialist
garage.
Parking light at the frontFig. 148 Replacing the cover for the lamps of th e parking- and low-beam light / removing the
bulb for the parking lightChange the light bulb for the parking light– Switch the ignition and all lights off.
– Remove the headlight page 161.
– Press the wire clamps in the direction of arrow to the side and remove the cover fig. 148 - left.
– Press the contact studs in the direction of arrow and remove the holder with the light bulb of the parking light fig. 148 - right.
– Take the faulty bulb out of the fixture and insert a new one.
Installation takes plac e in the reverse order.
Note
After installing the headlight, the headlight setting must be checked by a specialist
garage.
Fig. 147 Removing the headlight
A
B
1
2
s2lk.2.book Page 161 Monday, April 18, 2011 7:41 AM
Page 164 of 183
Fuses and light bulbs163
Using the system
Safety
Driving Tips
General Maintenance
Breakdown assistance
Technical Data
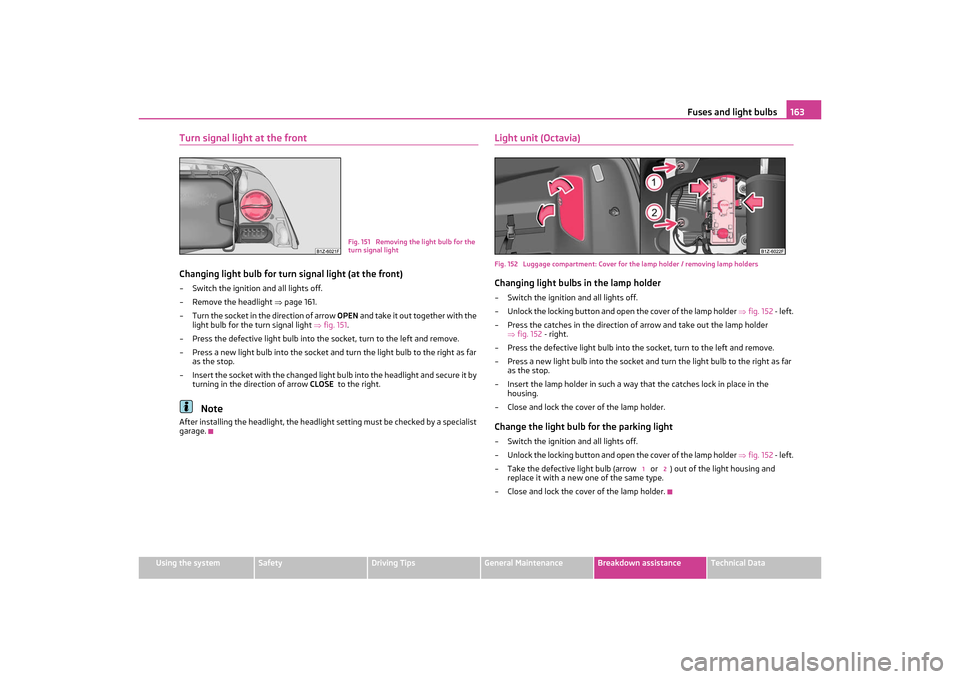
Turn signal light at the frontChanging light bulb for turn signal light (at the front)– Switch the ignition and all lights off.
– Remove the headlight page 161.
– Turn the socket in the direction of arrow OPEN and take it out together with the
light bulb for the turn signal light fig. 151.
– Press the defective light bulb into th e socket, turn to the left and remove.
– Press a new light bulb into the socket and turn the light bulb to the right as far as the stop.
– Insert the socket with the changed light bu lb into the headlight and secure it by
turning in the direction of arrow CLOSE to the right.
Note
After installing the headlight, the headlight setting must be checked by a specialist
garage.
Light unit (Octavia)Fig. 152 Luggage compartment: Cover for th e lamp holder / removing lamp holdersChanging light bulbs in the lamp holder– Switch the ignition and all lights off.
– Unlock the locking button and open the cover of the lamp holder fig. 152 - left.
– Press the catches in the direction of arrow and take out the lamp holder
fig. 152 - right.
– Press the defective light bulb into the socket, turn to the left and remove.
– Press a new light bulb into the socket and turn the light bulb to the right as far as the stop.
– Insert the lamp holder in such a way that the catches lock in place in the
housing.
– Close and lock the cover of the lamp holder.Change the light bulb for the parking light– Switch the ignition and all lights off.
– Unlock the locking button and open the cover of the lamp holder fig. 152 - left.
– Take the defective light bulb (arrow or ) out of the light housing and replace it with a new one of the same type.
– Close and lock the cover of the lamp holder.
Fig. 151 Removing the light bulb for the
turn signal light
1
2
s2lk.2.book Page 163 Monday, April 18, 2011 7:41 AM
Page 179 of 183
Index
178
Replacing fuses . . . . . . . . . . . . . . . . . . . . . . . . . . . . . 156
Replacing the wiper blades . . . . . . . . . . . . . . . . . . . 47
Roof aerial . . . . . . . . . . . . . . . . . . . . . . . . . . . . . . . . . . 121
Running in the car . . . . . . . . . . . . . . . . . . . . . . . . . . . . 111SSafe securing . . . . . . . . . . . . . . . . . . . . . . . . . . . . . . . . 31
Safety . . . . . . . . . . . . . . . . . . . . . . . . . . . . . . . . . . . . . . . 81
Safety information
Engine compartment . . . . . . . . . . . . . . . . . . . . . 131
Safety wheel bolts . . . . . . . . . . . . . . . . . . . . . . . . . . 152
Saving electrical energy . . . . . . . . . . . . . . . . . . . . . 112
Seat belt height adjuster . . . . . . . . . . . . . . . . . . . . . 87
Seat belt warning light . . . . . . . . . . . . . . . . . . . . . . . 87
Seat belts . . . . . . . . . . . . . . . . . . . . . . . . . . . . . . . 85, 88 Belt tensioners . . . . . . . . . . . . . . . . . . . . . . . . . . . 88
Cleaning . . . . . . . . . . . . . . . . . . . . . . . . . . . . . . . . 126
fastening . . . . . . . . . . . . . . . . . . . . . . . . . . . . . . . . . 87
Height adjustment . . . . . . . . . . . . . . . . . . . . . . . . 87
Safety information . . . . . . . . . . . . . . . . . . . . . . . . 86
taking off . . . . . . . . . . . . . . . . . . . . . . . . . . . . . . . . 88
Warning light . . . . . . . . . . . . . . . . . . . . . . . . . . . . . 27
Seat heaters . . . . . . . . . . . . . . . . . . . . . . . . . . . . . . . . . 52
Service Display . . . . . . . . . . . . . . . . . . . . . . . . . . . . . . . 17
Service Interval Display . . . . . . . . . . . . . . . . . . . . . . . 17
Setting temperature Heating . . . . . . . . . . . . . . . . . . . . . . . . . . . . . . . . . . 67
Setting the clock . . . . . . . . . . . . . . . . . . . . . . . . . . . . . 17
Shifting . . . . . . . . . . . . . . . . . . . . . . . . . . . . . . . . . . . . . . 76
Side airbag . . . . . . . . . . . . . . . . . . . . . . . . . . . . . . . . . . . 92
Side lights . . . . . . . . . . . . . . . . . . . . . . . . . . . . . . . . . . . 40
Snow chains . . . . . . . . . . . . . . . . . . . . . . . . . . . . . . . . 145
Spare wheel . . . . . . . . . . . . . . . . . . . . . . . . . . . . . . . . 148
Speedometer . . . . . . . . . . . . . . . . . . . . . . . . . . . . . . . . 16
Stability system . . . . . . . . . . . . . . . . . . . . . . . . . . . . . 105
Starting the engine . . . . . . . . . . . . . . . . . . . . . . . . . . . 74 after fuel tank has run empty . . . . . . . . . . . . . . 75
Diesel engines . . . . . . . . . . . . . . . . . . . . . . . . . . . . 75
Petrol engines . . . . . . . . . . . . . . . . . . . . . . . . . . . . 75 Steering
active driver-steering recommendation . . . 107
Steering force assistance . . . . . . . . . . . . . . . . . . . . 109
Storage compartments . . . . . . . . . . . . . . . . . . . . . . . 61
Storage facilities . . . . . . . . . . . . . . . . . . . . . . . . . . . . . 61
Sun visors . . . . . . . . . . . . . . . . . . . . . . . . . . . . . . . . . . . 45
Switching lights on and off . . . . . . . . . . . . . . . . . . . 40
Switching off the engine . . . . . . . . . . . . . . . . . . . . . 75
TTaking care of your vehicle . . . . . . . . . . . . . . . . . . 121
TCS Warning light . . . . . . . . . . . . . . . . . . . . . . . . . . . . . 25
Temperature outside . . . . . . . . . . . . . . . . . . . . . . . . . . . . . . . . . . 19
the first 1 500 kilometres . . . . . . . . . . . . . . . . . . . . . 111
The roof luggage rack system . . . . . . . . . . . . . . . . . 58
Thickness of brake pads Warning light . . . . . . . . . . . . . . . . . . . . . . . . . . . . . 27
Tool . . . . . . . . . . . . . . . . . . . . . . . . . . . . . . . . . . . . . . . . 147
Top Tether . . . . . . . . . . . . . . . . . . . . . . . . . . . . . . . . . 103
Towing a trailer . . . . . . . . . . . . . . . . . . . . . . . . . . . . . 118
Towing device . . . . . . . . . . . . . . . . . . . . . . . . . . . . . . 119
towing vehicle . . . . . . . . . . . . . . . . . . . . . . . . . . . . . . 154
Tow-starting . . . . . . . . . . . . . . . . . . . . . . . . . . . . . . . . 154
Traction control system . . . . . . . . . . . . . . . . . . . . . 106
Traction control system (TCS) Warning light . . . . . . . . . . . . . . . . . . . . . . . . . . . . . 25
Trailer . . . . . . . . . . . . . . . . . . . . . . . . . . . . . . . . . . . . . . 118 General Maintenance . . . . . . . . . . . . . . . . . . . . 118
Transporting children . . . . . . . . . . . . . . . . . . . . . . . . . 97
Tread depth . . . . . . . . . . . . . . . . . . . . . . . . . . . . . . . . 142
Turn signal lights . . . . . . . . . . . . . . . . . . . . . . . . . . . . . 42 Warning light . . . . . . . . . . . . . . . . . . . . . . . . . . . . . 23
Two-way radio systems . . . . . . . . . . . . . . . . . . . . . . 80
Tyre . . . . . . . . . . . . . . . . . . . . . . . . . . . . . . . . . . . . . . . . 141
Tyre inflation pressure Warning light . . . . . . . . . . . . . . . . . . . . . . . . . . . . . 26
Tyre repair kit . . . . . . . . . . . . . . . . . . . . . . . . . . . . . . . 148 Tyres
Winter tyres . . . . . . . . . . . . . . . . . . . . . . . . . . . . . 144
UUnderbody protection . . . . . . . . . . . . . . . . . . . . . . . 124
Unlocking . . . . . . . . . . . . . . . . . . . . . . . . . . . . . . . . . . . 30Remote control . . . . . . . . . . . . . . . . . . . . . . . . . . . 35VVehicle tool kit . . . . . . . . . . . . . . . . . . . . . . . . . . . . . . 147
Visors . . . . . . . . . . . . . . . . . . . . . . . . . . . . . . . . . . . . . . . 45WWarning lights . . . . . . . . . . . . . . . . . . . . . . . . . . . . . . . 21
Warning symbols . . . . . . . . . . . . . . . . . . . . . . . . . . . . . 21
Warning triangle . . . . . . . . . . . . . . . . . . . . . . . . . . . . 147
Washing . . . . . . . . . . . . . . . . . . . . . . . . . . . . . . . . . . . . . 121with a high-pressure cleaner . . . . . . . . . . . . . 122
Washing the vehicle . . . . . . . . . . . . . . . . . . . . . . . . . . 121
Washing vehicle by hand . . . . . . . . . . . . . . . . . . . . 122
Wax treatment . . . . . . . . . . . . . . . . . . . . . . . . . . . . . . 122
Wheel Changing . . . . . . . . . . . . . . . . . . . . . . . . . . . . . . . . 149
Spare . . . . . . . . . . . . . . . . . . . . . . . . . . . . . . . . . . . 148
Wheel bolts . . . . . . . . . . . . . . . . . . . . . . . . . . . . . . . . . 144
Wheel trim . . . . . . . . . . . . . . . . . . . . . . . . . . . . . . 141, 150
Wheels . . . . . . . . . . . . . . . . . . . . . . . . . . . . . . . . . . . . . 141
Window . . . . . . . . . . . . . . . . . . . . . . . . . . . . . . . . . . . . . 37
Windows de-icing . . . . . . . . . . . . . . . . . . . . . . . . . . . . . . . . . 123
Windscreen washer nozzles . . . . . . . . . . . . . . . . . . 45
Windshield washer fluid reservoir . . . . . . . . . . . . 140
Windshield washer system . . . . . . . . . . . . . . . . . . 140
Windshield wiper . . . . . . . . . . . . . . . . . . . . . . . . . . . . . 45
Winter tyres . . . . . . . . . . . . . . . . . . . . . . . . . . . . . . . . 144
Wiper blades Replacing the wiper blades . . . . . . . . . . . . . . . . 47
s2lk.2.book Page 178 Monday, April 18, 2011 7:41 AM