window SKODA RAPID 2014 1.G User Guide
[x] Cancel search | Manufacturer: SKODA, Model Year: 2014, Model line: RAPID, Model: SKODA RAPID 2014 1.GPages: 200, PDF Size: 25.57 MB
Page 58 of 200

NoteThe function of the button in the grip above the licence plate is deactivated
when starting off or at a speed of 5 km/hour or more for vehicles with central
locking. The function is restored after the vehicle stops and the door is
opened.
Opening/closing
Fig. 36
Opening / closing tailgate
Read and observe
on page 54 first.
After unlocking the vehicle, the boot lid can be opened with the button in the
handle above the number plate.
Opening / closing tailgate » Fig. 36
Unlocking the door
Open flap
Closing the flap (by pulling the handle)
Delayed locking of the boot lid
Read and observe
on page 54 first.
If the boot lid is unlocked with the symbol button
on the remote control
key, then the door is automatically locked after closing.
The period after which the boot lid is locked automatically can be extended by a specialist garage.
After activation of delayed locking, the boot lid can be opened again after clos-
ing within a limited period.
123Delayed locking can be deactivated by a specialist garage at any time.
CAUTION
There is a risk of unwanted entry into the vehicle before the boot lid is locked
automatically. We therefore recommend locking the vehicle with the symbol
button
on the remote control key.
Power windows
Introduction
This chapter contains information on the following subjects:
Opening/closing the windows
56
Force limit
56
The electrical power windows can only be operated when the ignition is
switched on.
WARNINGThe electrical power windows are fitted with a force limiter » page 56. If
there is an obstacle, the closing process is stopped and the window goes
down by several centimetres. However, the windows should be closed
carefully – risk of injury!
CAUTION
■ Keep the windows clean to ensure the correct functionality of the electric
windows.■
In the event that the windows are frozen, first of all eliminate the
ice » page 130 , Windows and external mirrors and only then operate the elec-
trical power windows. Otherwise, the window sealing and the electrical power
window mechanism could be damaged.
■
Make sure that the windows are closed whenever you leave the locked vehi-
cle.
For the sake of the environment
At high speeds, you should keep the windows closed to prevent unnecessarily high fuel consumption. 55Unlocking and opening
Page 59 of 200
Note■When driving always use the existing heating, air conditioning and ventila-
tion system for ventilating the interior of the vehicle. If the windows are
opened, dust as well as other dirt can get into the vehicle and in addition the wind noise is more at certain speeds.■
The window lift mechanism is equipped with protection against overheating.
Repeated opening and closing of the window can cause this mechanism to
overheat. If this happens, it will not be possible to operate the window for a
short time. You will be able to operate the window again as soon as the over-
heating protection has cooled down.
Opening/closing the windows
Fig. 37
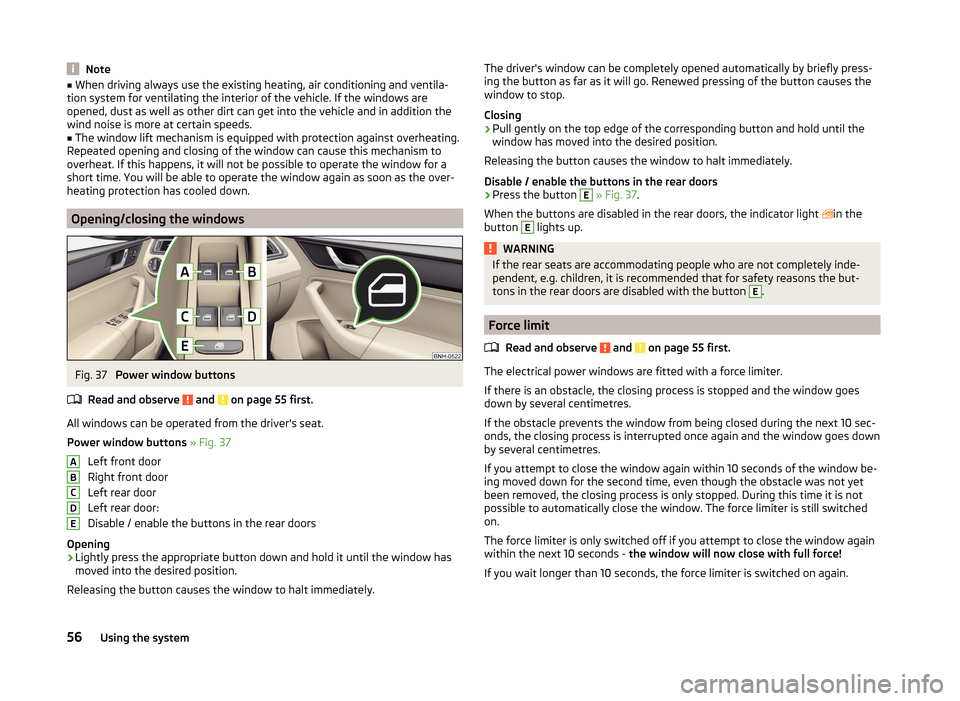
Power window buttons
Read and observe
and on page 55 first.
All windows can be operated from the driver's seat.
Power window buttons » Fig. 37
Left front door
Right front door
Left rear door
Left rear door:
Disable / enable the buttons in the rear doors
Opening
›
Lightly press the appropriate button down and hold it until the window has
moved into the desired position.
Releasing the button causes the window to halt immediately.
ABCDEThe driver's window can be completely opened automatically by briefly press-
ing the button as far as it will go. Renewed pressing of the button causes the
window to stop.
Closing›
Pull gently on the top edge of the corresponding button and hold until the
window has moved into the desired position.
Releasing the button causes the window to halt immediately.
Disable / enable the buttons in the rear doors
›
Press the button
E
» Fig. 37 .
When the buttons are disabled in the rear doors, the indicator light
in the
button
E
lights up.
WARNINGIf the rear seats are accommodating people who are not completely inde-
pendent, e.g. children, it is recommended that for safety reasons the but-
tons in the rear doors are disabled with the button E
.
Force limit
Read and observe
and on page 55 first.
The electrical power windows are fitted with a force limiter.
If there is an obstacle, the closing process is stopped and the window goes
down by several centimetres.
If the obstacle prevents the window from being closed during the next 10 sec-
onds, the closing process is interrupted once again and the window goes down
by several centimetres.
If you attempt to close the window again within 10 seconds of the window be-
ing moved down for the second time, even though the obstacle was not yet
been removed, the closing process is only stopped. During this time it is not
possible to automatically close the window. The force limiter is still switched
on.
The force limiter is only switched off if you attempt to close the window again
within the next 10 seconds - the window will now close with full force!
If you wait longer than 10 seconds, the force limiter is switched on again.
56Using the system
Page 60 of 200
Mechanical windows
Introduction
This chapter contains information on the following subjects:
Open / close window
57
The window can be operated mechanically by means of the handle attached to
the respective door panel.
WARNINGThe windows should nevertheless be closed carefully – risk of injury!
CAUTION
■ In the event that the windows are frozen, first of all eliminate the
ice » page 130 , Windows and external mirrors and only then operate the elec-
trical power windows. Otherwise, the window sealing and the electrical power
window mechanism could be damaged.■
Make sure that the windows are closed whenever you leave the locked vehi-
cle.
For the sake of the environment
At high speeds, you should keep the windows closed to prevent unnecessarily high fuel consumption.
Note
When driving always use the existing heating, air conditioning and ventilation
system for ventilating the interior of the vehicle. If the windows are opened,
dust as well as other dirt can get into the vehicle and in addition the wind
noise is more at certain speeds.Open / close windowFig. 38
Window operations: left / right
Read and observe
and on page 57 first.
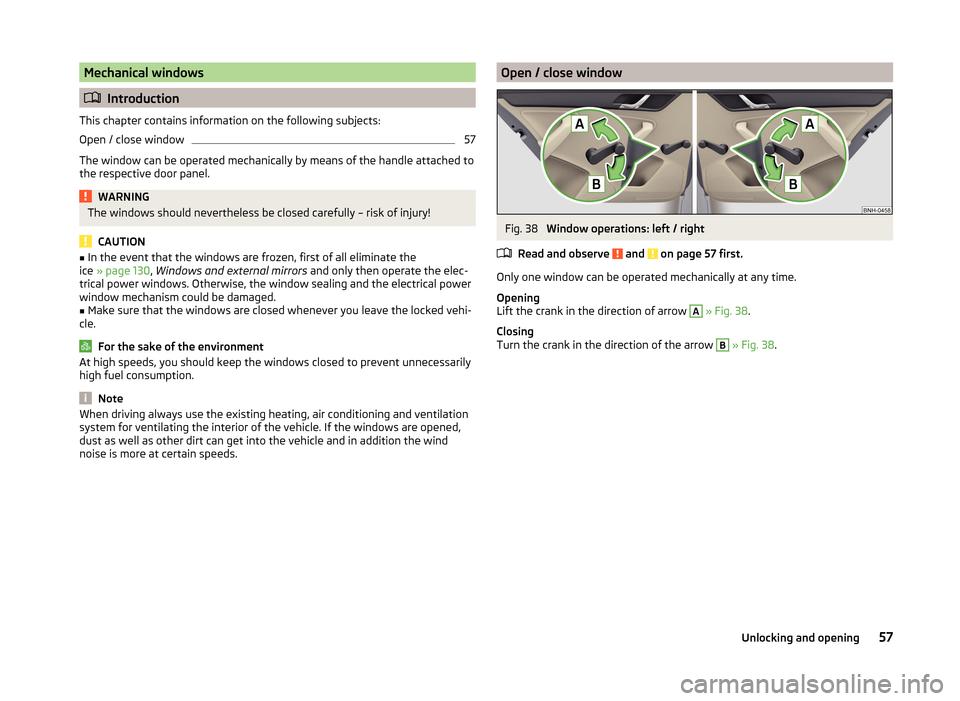
Only one window can be operated mechanically at any time.
Opening
Lift the crank in the direction of arrow
A
» Fig. 38 .
Closing
Turn the crank in the direction of the arrow
B
» Fig. 38 .
57Unlocking and opening
Page 67 of 200
The system is turned off when any of the following is present.
› The vehicle is locked.
› The ignition is switched on.
› About 30 seconds after all the doors have been closed.
Rear interior light
Fig. 45
Interior lights at the rear
Switch for lamp
» Fig. 45
Switching on/off
The rear interior light is operated together with the front interior light 1)
.
› When the front interior lighting is
switched on, the rear interior lighting also
turns on automatically.
› When the front interior lighting is
switched off, the rear interior lighting can
be turned on/off as required.
Visibility
Introduction
This chapter contains information on the following subjects:
Rear window heater
64
Front sun visors
65Rear window heaterFig. 46
Dash panel: Button for rear win-
dow heater
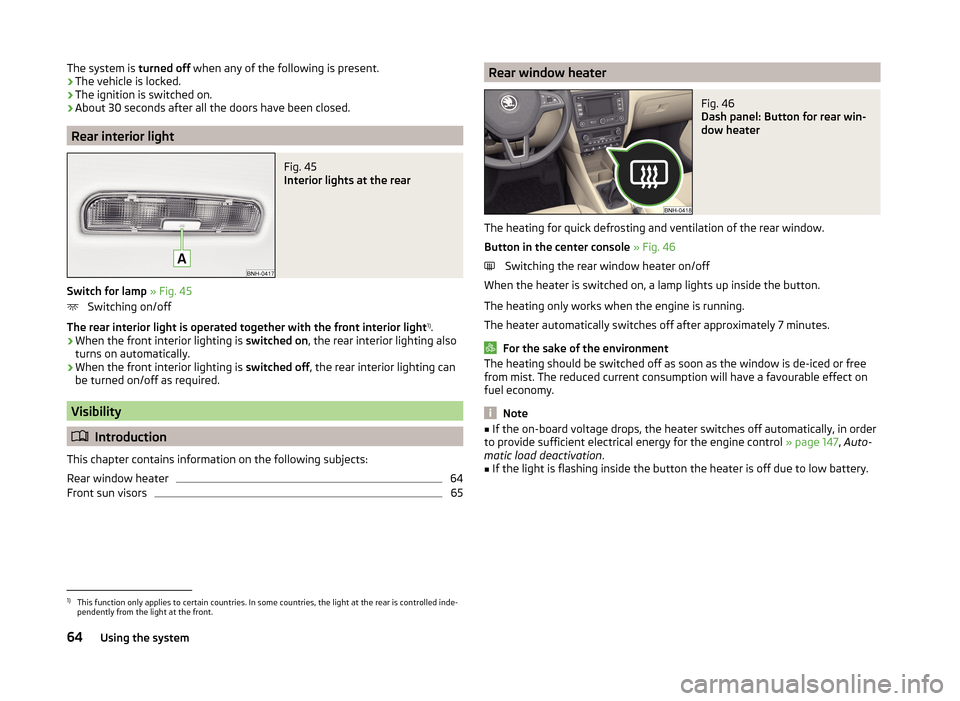
The heating for quick defrosting and ventilation of the rear window.
Button in the center console » Fig. 46
Switching the rear window heater on/off
When the heater is switched on, a lamp lights up inside the button.
The heating only works when the engine is running.
The heater automatically switches off after approximately 7 minutes.
For the sake of the environment
The heating should be switched off as soon as the window is de-iced or free
from mist. The reduced current consumption will have a favourable effect on
fuel economy.
Note
■ If the on-board voltage drops, the heater switches off automatically, in order
to provide sufficient electrical energy for the engine control » page 147, Auto-
matic load deactivation .■
If the light is flashing inside the button the heater is off due to low battery.
1)
This function only applies to certain countries. In some countries, the light at the rear is controlled inde-
pendently from the light at the front.
64Using the system
Page 68 of 200
Front sun visorsFig. 47
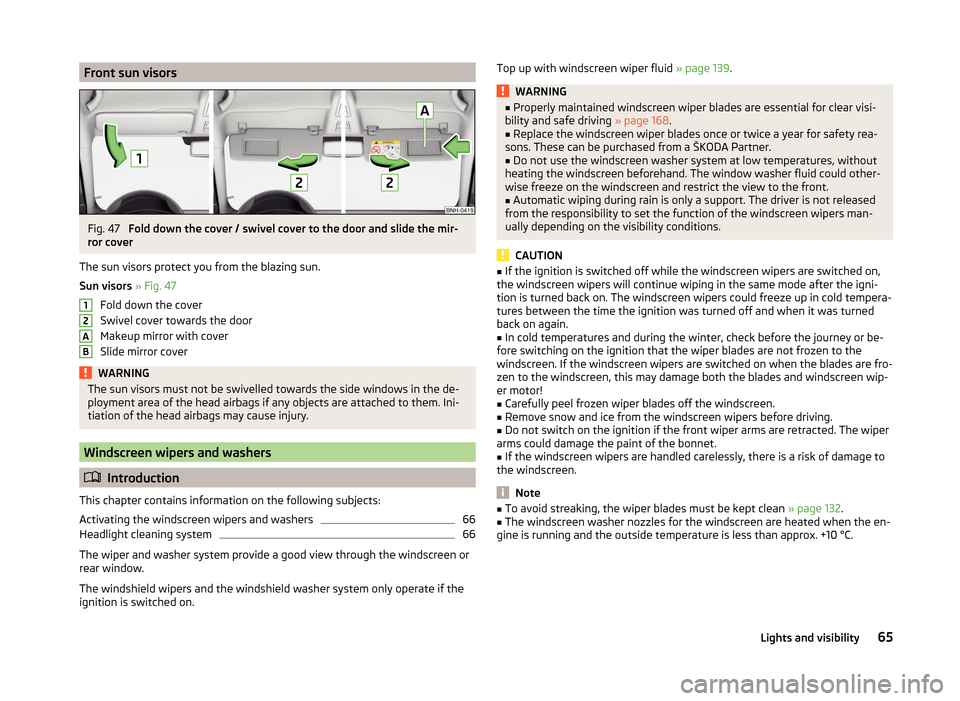
Fold down the cover / swivel cover to the door and slide the mir-
ror cover
The sun visors protect you from the blazing sun.
Sun visors » Fig. 47
Fold down the cover
Swivel cover towards the door
Makeup mirror with cover
Slide mirror cover
WARNINGThe sun visors must not be swivelled towards the side windows in the de-
ployment area of the head airbags if any objects are attached to them. Ini-
tiation of the head airbags may cause injury.
Windscreen wipers and washers
Introduction
This chapter contains information on the following subjects:
Activating the windscreen wipers and washers
66
Headlight cleaning system
66
The wiper and washer system provide a good view through the windscreen or
rear window.
The windshield wipers and the windshield washer system only operate if the
ignition is switched on.
12ABTop up with windscreen wiper fluid » page 139.WARNING■
Properly maintained windscreen wiper blades are essential for clear visi-
bility and safe driving » page 168.■
Replace the windscreen wiper blades once or twice a year for safety rea-
sons. These can be purchased from a ŠKODA Partner.
■
Do not use the windscreen washer system at low temperatures, without
heating the windscreen beforehand. The window washer fluid could other-
wise freeze on the windscreen and restrict the view to the front.
■
Automatic wiping during rain is only a support. The driver is not released
from the responsibility to set the function of the windscreen wipers man-
ually depending on the visibility conditions.
CAUTION
■ If the ignition is switched off while the windscreen wipers are switched on,
the windscreen wipers will continue wiping in the same mode after the igni-
tion is turned back on. The windscreen wipers could freeze up in cold tempera-
tures between the time the ignition was turned off and when it was turned
back on again.■
In cold temperatures and during the winter, check before the journey or be-
fore switching on the ignition that the wiper blades are not frozen to the
windscreen. If the windscreen wipers are switched on when the blades are fro-
zen to the windscreen, this may damage both the blades and windscreen wip-
er motor!
■
Carefully peel frozen wiper blades off the windscreen.
■
Remove snow and ice from the windscreen wipers before driving.
■
Do not switch on the ignition if the front wiper arms are retracted. The wiper
arms could damage the paint of the bonnet.
■
If the windscreen wipers are handled carelessly, there is a risk of damage to
the windscreen.
Note
■ To avoid streaking, the wiper blades must be kept clean » page 132.■The windscreen washer nozzles for the windscreen are heated when the en-
gine is running and the outside temperature is less than approx. +10 °C.65Lights and visibility
Page 69 of 200
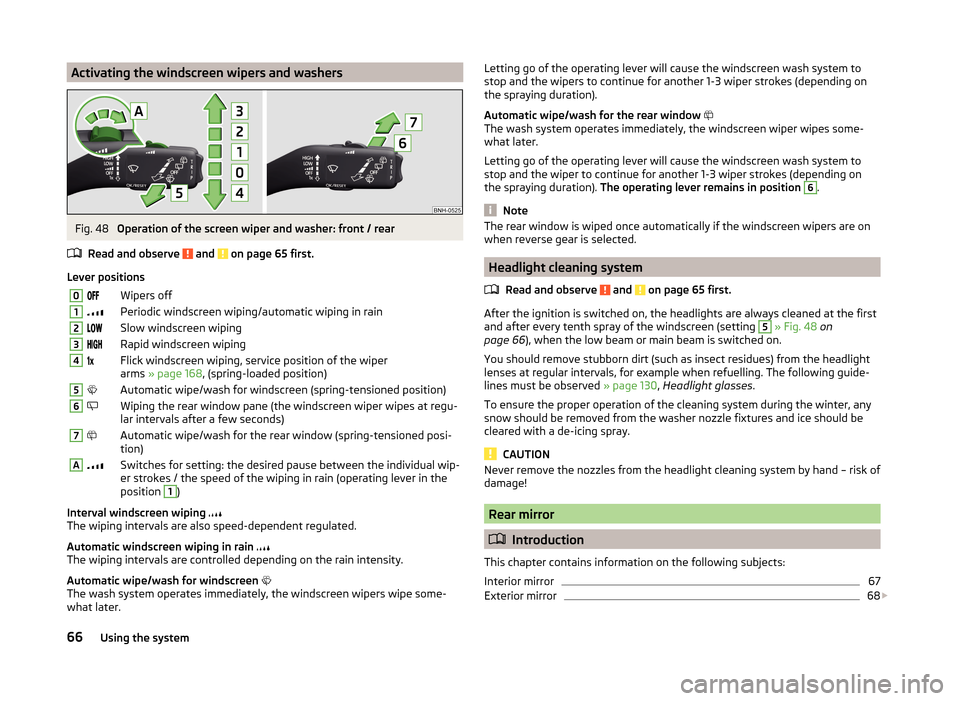
Activating the windscreen wipers and washersFig. 48
Operation of the screen wiper and washer: front / rear
Read and observe
and on page 65 first.
Lever positions
0Wipers off1Periodic windscreen wiping/automatic wiping in rain2Slow windscreen wiping3Rapid windscreen wiping4 Flick windscreen wiping, service position of the wiper
arms » page 168 , (spring-loaded position)5Automatic wipe/wash for windscreen (spring-tensioned position)6Wiping the rear window pane (the windscreen wiper wipes at regu-
lar intervals after a few seconds)7Automatic wipe/wash for the rear window (spring-tensioned posi-
tion)ASwitches for setting: the desired pause between the individual wip-
er strokes / the speed of the wiping in rain (operating lever in the
position 1
)
Interval windscreen wiping
The wiping intervals are also speed-dependent regulated.
Automatic windscreen wiping in rain
The wiping intervals are controlled depending on the rain intensity.
Automatic wipe/wash for windscreen
The wash system operates immediately, the windscreen wipers wipe some-
what later.
Letting go of the operating lever will cause the windscreen wash system to
stop and the wipers to continue for another 1-3 wiper strokes (depending on
the spraying duration).
Automatic wipe/wash for the rear window
The wash system operates immediately, the windscreen wiper wipes some-
what later.
Letting go of the operating lever will cause the windscreen wash system to
stop and the wiper to continue for another 1-3 wiper strokes (depending on
the spraying duration). The operating lever remains in position 6
.
Note
The rear window is wiped once automatically if the windscreen wipers are on
when reverse gear is selected.
Headlight cleaning system
Read and observe
and on page 65 first.
After the ignition is switched on, the headlights are always cleaned at the first
and after every tenth spray of the windscreen (setting
5
» Fig. 48 on
page 66 ), when the low beam or main beam is switched on.
You should remove stubborn dirt (such as insect residues) from the headlight
lenses at regular intervals, for example when refuelling. The following guide-
lines must be observed » page 130, Headlight glasses .
To ensure the proper operation of the cleaning system during the winter, any
snow should be removed from the washer nozzle fixtures and ice should be
cleared with a de-icing spray.
CAUTION
Never remove the nozzles from the headlight cleaning system by hand – risk of
damage!
Rear mirror
Introduction
This chapter contains information on the following subjects:
Interior mirror
67
Exterior mirror
68
66Using the system
Page 70 of 200

WARNING■Make sure that the mirror is not covered by ice, snow, mist or other ob-
jects.■
Convex (curved outward) or aspheric exterior mirrors increase the field of
vision. They do, however, make objects appear smaller in the mirror. These
mirrors are therefore only of limited use for estimating distances to the fol-
lowing vehicles.
■
Whenever possible use the interior mirror for estimating the distances to
the following vehicles.
Interior mirror
Fig. 49
Interior mirror: manual dimming / auto-dimming / light sensor
Read and observe
on page 67 first.
Mirrors with manual dimming » Fig. 49
Basic position of the mirror
Mirror blackout
Mirror with automatic dimming » Fig. 49
Warning light - lights when dimming is activated
Switch for the activation of the automatic mirror dimming
Light sensor
Light sensor on the back of the mirror
Mirror with automatic dimming
If the automatic dimming is enabled, the mirror dims automatically depending
on the light falling on the sensors.
12ABCDWhen the interior lights are switched on or the reverse gear is engaged, the
mirror always moves back into the basic position (not dimmed).
Do not attach external navigation devices on to the windscreen or in the vicini-
ty of the automatic dimming interior mirror »
.
WARNINGThe illuminated display of an external navigation unit can lead to opera-
tional faults to the automatic dimming interior mirror – risk of accident.WARNINGThe mirrors with automatic dimming contain an electrolyte liquid which can
escape if mirror glass is broken.■
The leaking electrolytic fluid can irritate the skin, eyes and breath appara-
tus. Immediately seek out fresh air and leave the vehicle. If this is not pos-
sible, at least open the window.
■
If you swallow electrolytic fluid, seek medical assistance immediately.
■
If your eyes or skin come into contact with the electrolytic fluid, immedi-
ately wash the affected area for a few minutes long with a lot of water.
Then consult a doctor immediately.
CAUTION
Automatic mirror dimming operates only properly if the light striking the sen-
sors is not affected by other objects.67Lights and visibility
Page 71 of 200
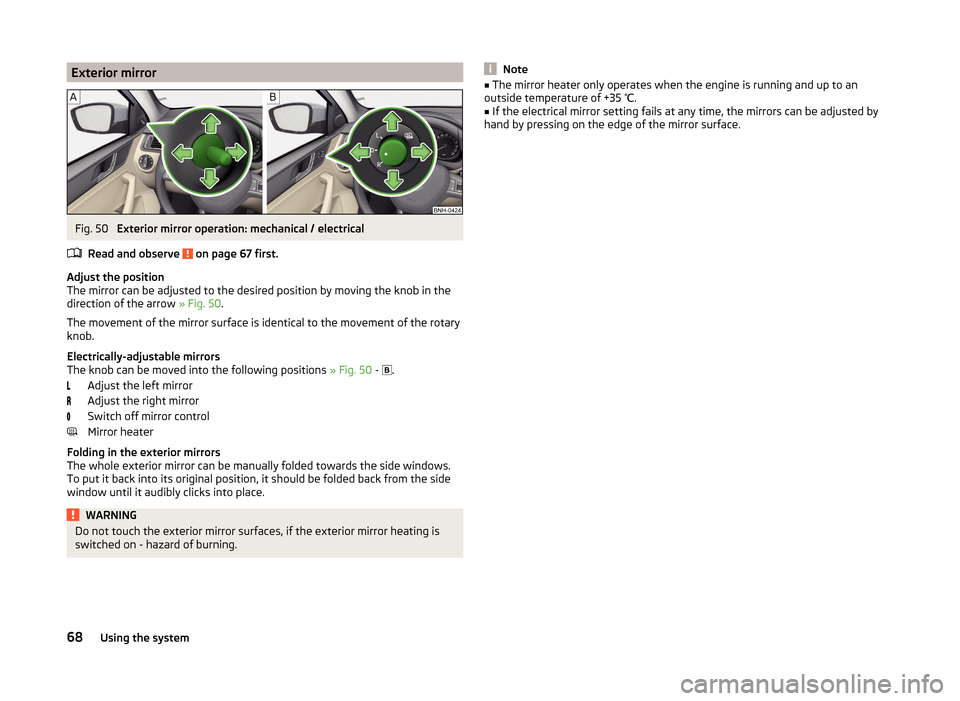
Exterior mirrorFig. 50
Exterior mirror operation: mechanical / electrical
Read and observe
on page 67 first.
Adjust the position
The mirror can be adjusted to the desired position by moving the knob in the
direction of the arrow » Fig. 50.
The movement of the mirror surface is identical to the movement of the rotary
knob.
Electrically-adjustable mirrors
The knob can be moved into the following positions » Fig. 50 -
.
Adjust the left mirror
Adjust the right mirror
Switch off mirror control
Mirror heater
Folding in the exterior mirrors
The whole exterior mirror can be manually folded towards the side windows. To put it back into its original position, it should be folded back from the side
window until it audibly clicks into place.
WARNINGDo not touch the exterior mirror surfaces, if the exterior mirror heating is
switched on - hazard of burning.Note■ The mirror heater only operates when the engine is running and up to an
outside temperature of +35 ℃.■
If the electrical mirror setting fails at any time, the mirrors can be adjusted by
hand by pressing on the edge of the mirror surface.
68Using the system
Page 84 of 200
WARNING (Continued)■The transported items must be stowed in such a way that no objects are
able to slip forward on sudden driving or braking manoeuvres – risk of in-
jury!■
When transporting objects in the luggage compartment that has been en-
larged by folding the rear seats forward, ensure the safety of the passen-
gers transported on the other rear seats » page 11, Correct seated position
for the passengers in the rear seats .
■
If the rear seat next to the folded forward seat is occupied, ensure maxi-
mum safety, e.g. by placing the goods to be transported in such a way that
the seat is prevented from folding back in case of a rear collision.
■
Do not drive with the luggage compartment lid open or unlatched, other-
wise exhaust gases may get into the interior of the vehicle – risk of poison-
ing!
■
Do not exceed the permissible axle loads and permissible gross weight of
the vehicle – risk of accident!
■
Do not transport people in the boot!
CAUTION
■ Please ensure that the heating elements for the rear window heater are not
damaged as a result of abrasive objects.■
Tyre pressure must be adjusted to the load » page 149.
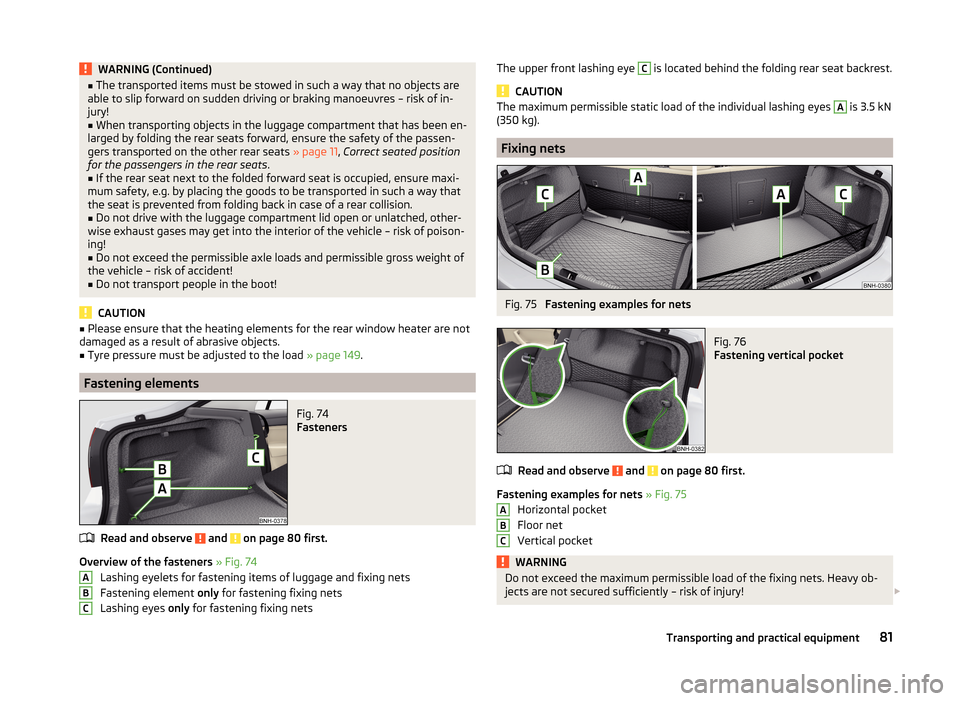
Fastening elements
Fig. 74
Fasteners
Read and observe and on page 80 first.
Overview of the fasteners » Fig. 74
Lashing eyelets for fastening items of luggage and fixing nets
Fastening element only for fastening fixing nets
Lashing eyes only for fastening fixing nets
ABCThe upper front lashing eye C is located behind the folding rear seat backrest.
CAUTION
The maximum permissible static load of the individual lashing eyes A is 3.5 kN
(350 kg).
Fixing nets
Fig. 75
Fastening examples for nets
Fig. 76
Fastening vertical pocket
Read and observe and on page 80 first.
Fastening examples for nets » Fig. 75
Horizontal pocket
Floor net
Vertical pocket
WARNINGDo not exceed the maximum permissible load of the fixing nets. Heavy ob-
jects are not secured sufficiently – risk of injury! ABC81Transporting and practical equipment
Page 88 of 200
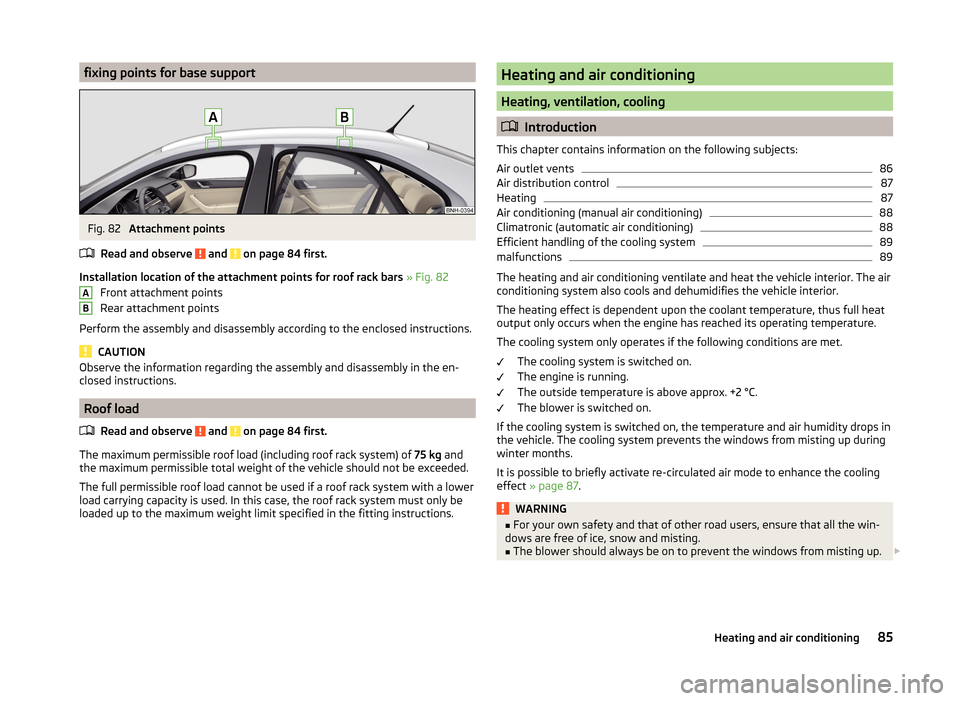
fixing points for base supportFig. 82
Attachment points
Read and observe
and on page 84 first.
Installation location of the attachment points for roof rack bars » Fig. 82
Front attachment points
Rear attachment points
Perform the assembly and disassembly according to the enclosed instructions.
CAUTION
Observe the information regarding the assembly and disassembly in the en-
closed instructions.
Roof load
Read and observe
and on page 84 first.
The maximum permissible roof load (including roof rack system) of 75 kg and
the maximum permissible total weight of the vehicle should not be exceeded.
The full permissible roof load cannot be used if a roof rack system with a lower
load carrying capacity is used. In this case, the roof rack system must only be
loaded up to the maximum weight limit specified in the fitting instructions.
ABHeating and air conditioning
Heating, ventilation, cooling
Introduction
This chapter contains information on the following subjects:
Air outlet vents
86
Air distribution control
87
Heating
87
Air conditioning (manual air conditioning)
88
Climatronic (automatic air conditioning)
88
Efficient handling of the cooling system
89
malfunctions
89
The heating and air conditioning ventilate and heat the vehicle interior. The air
conditioning system also cools and dehumidifies the vehicle interior.
The heating effect is dependent upon the coolant temperature, thus full heat
output only occurs when the engine has reached its operating temperature.
The cooling system only operates if the following conditions are met. The cooling system is switched on.
The engine is running.
The outside temperature is above approx. +2 °C.
The blower is switched on.
If the cooling system is switched on, the temperature and air humidity drops in
the vehicle. The cooling system prevents the windows from misting up during
winter months.
It is possible to briefly activate re-circulated air mode to enhance the cooling
effect » page 87 .
WARNING■
For your own safety and that of other road users, ensure that all the win-
dows are free of ice, snow and misting.■
The blower should always be on to prevent the windows from misting up.
85Heating and air conditioning