headrest SKODA RAPID SPACEBACK 2013 1.G Owner's Manual
[x] Cancel search | Manufacturer: SKODA, Model Year: 2013, Model line: RAPID SPACEBACK, Model: SKODA RAPID SPACEBACK 2013 1.GPages: 193, PDF Size: 14.8 MB
Page 23 of 193

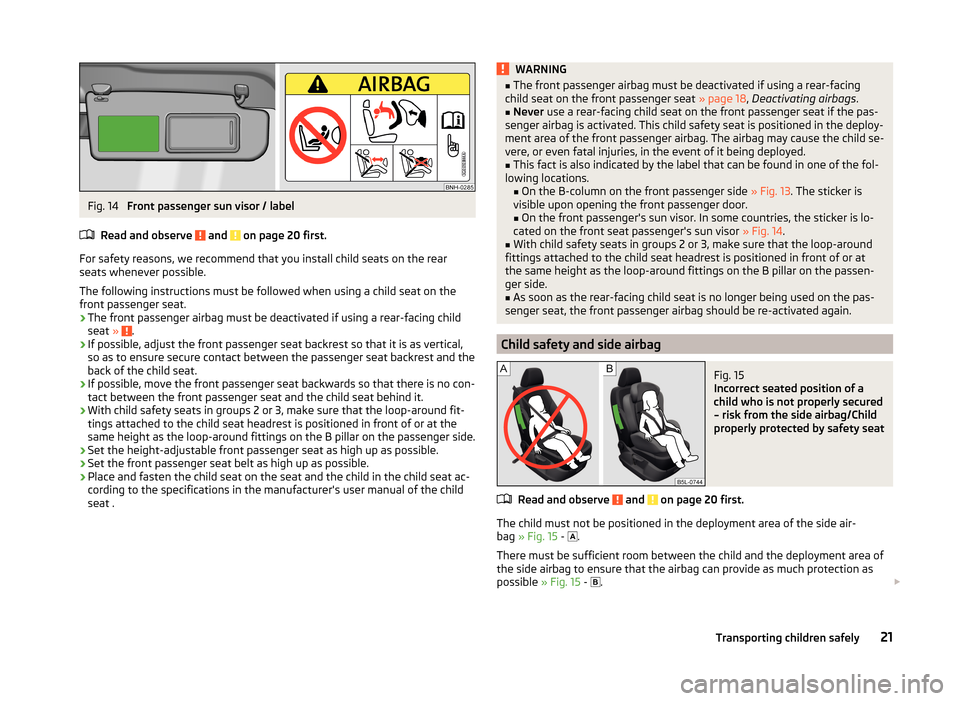
Fig. 14
Front passenger sun visor / label
Read and observe
and on page 20 first.
For safety reasons, we recommend that you install child seats on the rear
seats whenever possible.
The following instructions must be followed when using a child seat on the
front passenger seat.
› The front passenger airbag must be deactivated if using a rear-facing child
seat »
.
› If possible, adjust the front passenger seat backrest so that it is as vertical,
so as to ensure secure contact between the passenger seat backrest and the
back of the child seat.
› If possible, move the front passenger seat backwards so that there is no con-
tact between the front passenger seat and the child seat behind it.
› With child safety seats in groups 2 or 3, make sure that the loop-around fit-
tings attached to the child seat headrest is positioned in front of or at the
same height as the loop-around fittings on the B pillar on the passenger side.
› Set the height-adjustable front passenger seat as high up as possible.
› Set the front passenger seat belt as high up as possible.
› Place and fasten the child seat on the seat and the child in the child seat ac-
cording to the specifications in the manufacturer's user manual of the child
seat .
WARNING■ The front passenger airbag must be deactivated if using a rear-facing
child seat on the front passenger seat » page 18, Deactivating airbags .■
Never use a rear-facing child seat on the front passenger seat if the pas-
senger airbag is activated. This child safety seat is positioned in the deploy-
ment area of the front passenger airbag. The airbag may cause the child se-
vere, or even fatal injuries, in the event of it being deployed.
■
This fact is also indicated by the label that can be found in one of the fol-
lowing locations. ■On the B-column on the front passenger side » Fig. 13. The sticker is
visible upon opening the front passenger door.
■ On the front passenger's sun visor. In some countries, the sticker is lo-
cated on the front seat passenger's sun visor » Fig. 14.
■
With child safety seats in groups 2 or 3, make sure that the loop-around
fittings attached to the child seat headrest is positioned in front of or at
the same height as the loop-around fittings on the B pillar on the passen-
ger side.
■
As soon as the rear-facing child seat is no longer being used on the pas-
senger seat, the front passenger airbag should be re-activated again.
Child safety and side airbag
Fig. 15
Incorrect seated position of a
child who is not properly secured
– risk from the side airbag/Child
properly protected by safety seat
Read and observe and on page 20 first.
The child must not be positioned in the deployment area of the side air-
bag » Fig. 15 -
.
There must be sufficient room between the child and the deployment area of
the side airbag to ensure that the airbag can provide as much protection as
possible » Fig. 15 -
.
21Transporting children safely
Page 67 of 193

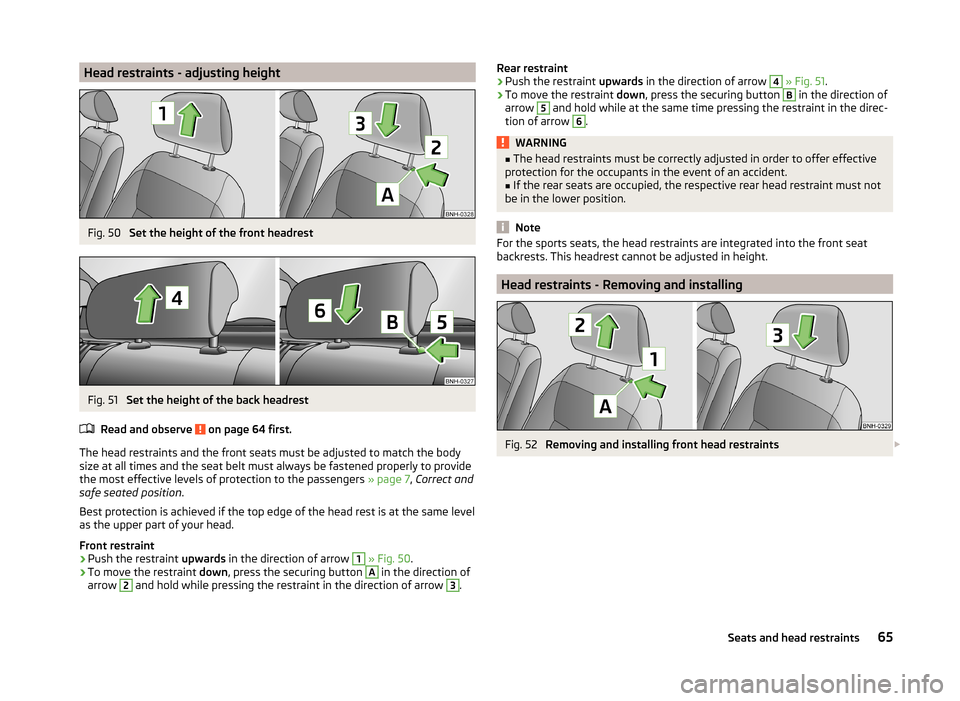
Head restraints - adjusting heightFig. 50
Set the height of the front headrest
Fig. 51
Set the height of the back headrest
Read and observe
on page 64 first.
The head restraints and the front seats must be adjusted to match the body
size at all times and the seat belt must always be fastened properly to provide
the most effective levels of protection to the passengers » page 7, Correct and
safe seated position .
Best protection is achieved if the top edge of the head rest is at the same level
as the upper part of your head.
Front restraint
›
Push the restraint upwards in the direction of arrow
1
» Fig. 50 .
›
To move the restraint down, press the securing button
A
in the direction of
arrow
2
and hold while pressing the restraint in the direction of arrow
3
.
Rear restraint›Push the restraint upwards in the direction of arrow 4 » Fig. 51 .›
To move the restraint down, press the securing button
B
in the direction of
arrow
5
and hold while at the same time pressing the restraint in the direc-
tion of arrow
6
.
WARNING■ The head restraints must be correctly adjusted in order to offer effective
protection for the occupants in the event of an accident.■
If the rear seats are occupied, the respective rear head restraint must not
be in the lower position.
Note
For the sports seats, the head restraints are integrated into the front seat
backrests. This headrest cannot be adjusted in height.
Head restraints - Removing and installing
Fig. 52
Removing and installing front head restraints
65Seats and head restraints
Page 68 of 193

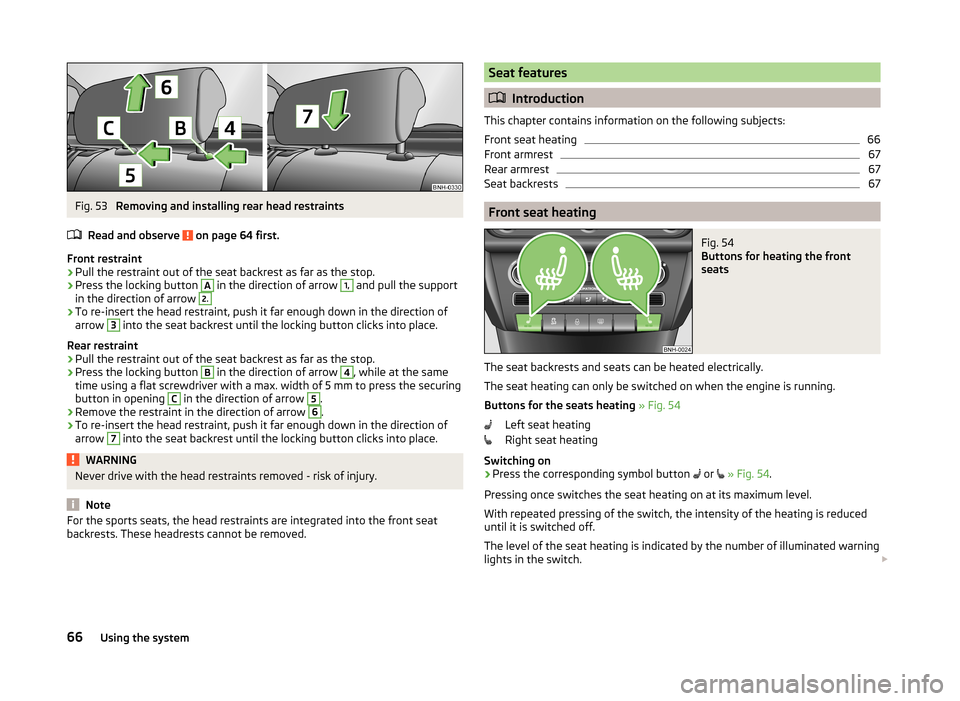
Fig. 53
Removing and installing rear head restraints
Read and observe
on page 64 first.
Front restraint
›
Pull the restraint out of the seat backrest as far as the stop.
›
Press the locking button
A
in the direction of arrow
1,
and pull the support
in the direction of arrow
2.›
To re-insert the head restraint, push it far enough down in the direction of
arrow
3
into the seat backrest until the locking button clicks into place.
Rear restraint
›
Pull the restraint out of the seat backrest as far as the stop.
›
Press the locking button
B
in the direction of arrow
4
, while at the same
time using a flat screwdriver with a max. width of 5 mm to press the securing button in opening
C
in the direction of arrow
5
.
›
Remove the restraint in the direction of arrow
6
.
›
To re-insert the head restraint, push it far enough down in the direction of
arrow
7
into the seat backrest until the locking button clicks into place.
WARNINGNever drive with the head restraints removed - risk of injury.
Note
For the sports seats, the head restraints are integrated into the front seat
backrests. These headrests cannot be removed.Seat features
Introduction
This chapter contains information on the following subjects:
Front seat heating
66
Front armrest
67
Rear armrest
67
Seat backrests
67
Front seat heating
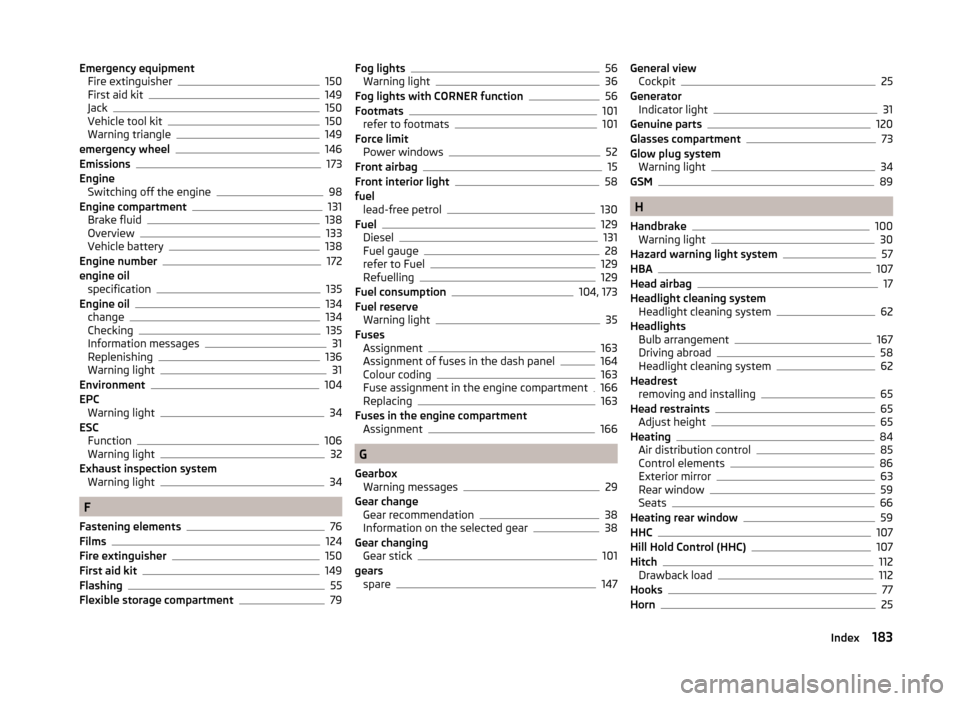
Fig. 54
Buttons for heating the front
seats
The seat backrests and seats can be heated electrically.
The seat heating can only be switched on when the engine is running.
Buttons for the seats heating » Fig. 54
Left seat heating
Right seat heating
Switching on
›
Press the corresponding symbol button or
» Fig. 54 .
Pressing once switches the seat heating on at its maximum level.
With repeated pressing of the switch, the intensity of the heating is reduced
until it is switched off.
The level of the seat heating is indicated by the number of illuminated warning
lights in the switch.
66Using the system
Page 185 of 193

Emergency equipmentFire extinguisher150
First aid kit149
Jack150
Vehicle tool kit150
Warning triangle149
emergency wheel146
Emissions173
Engine Switching off the engine
98
Engine compartment131
Brake fluid138
Overview133
Vehicle battery138
Engine number172
engine oil specification
135
Engine oil134
change134
Checking135
Information messages31
Replenishing136
Warning light31
Environment104
EPC Warning light
34
ESC Function
106
Warning light32
Exhaust inspection system Warning light
34
F
Fastening elements
76
Films124
Fire extinguisher150
First aid kit149
Flashing55
Flexible storage compartment79
Fog lights56
Warning light36
Fog lights with CORNER function56
Footmats101
refer to footmats101
Force limit Power windows
52
Front airbag15
Front interior light58
fuel lead-free petrol
130
Fuel129
Diesel131
Fuel gauge28
refer to Fuel129
Refuelling129
Fuel consumption104, 173
Fuel reserve Warning light
35
Fuses Assignment
163
Assignment of fuses in the dash panel164
Colour coding163
Fuse assignment in the engine compartment166
Replacing163
Fuses in the engine compartment Assignment
166
G
Gearbox Warning messages
29
Gear change Gear recommendation
38
Information on the selected gear38
Gear changing Gear stick
101
gears spare
147
General viewCockpit25
Generator Indicator light
31
Genuine parts120
Glasses compartment73
Glow plug system Warning light
34
GSM89
H
Handbrake
100
Warning light30
Hazard warning light system57
HBA107
Head airbag17
Headlight cleaning system Headlight cleaning system
62
Headlights Bulb arrangement
167
Driving abroad58
Headlight cleaning system62
Headrest removing and installing
65
Head restraints65
Adjust height65
Heating84
Air distribution control85
Control elements86
Exterior mirror63
Rear window59
Seats66
Heating rear window59
HHC107
Hill Hold Control (HHC)107
Hitch112
Drawback load112
Hooks77
Horn25
183Index