ECU SKODA RAPID SPACEBACK 2014 1.G Owner's Guide
[x] Cancel search | Manufacturer: SKODA, Model Year: 2014, Model line: RAPID SPACEBACK, Model: SKODA RAPID SPACEBACK 2014 1.GPages: 204, PDF Size: 27.11 MB
Page 162 of 204
›Remove the fire extinguisher.›For mounting, fit the fire extinguisher back into the holder and secure it with
straps.
Please read carefully the instructions which are attached to the fire extin-
guisher.
The fire extinguisher must be checked by an authorised person once a year.
The national legal requirements must be observed.WARNINGThe fire extinguisher must always be secured safely so that they do not
come loose when making an emergency braking or in a vehicle collision
which could cause injuries to occupants.
Note
■ The fire extinguisher must comply with national legal requirements.■Pay attention to the expiration date of the fire extinguisher. Proper function-
ing of the fire extinguisher is not assured once it has passed its expiry date.■
The fire extinguisher is part of the scope of delivery in certain countries only.
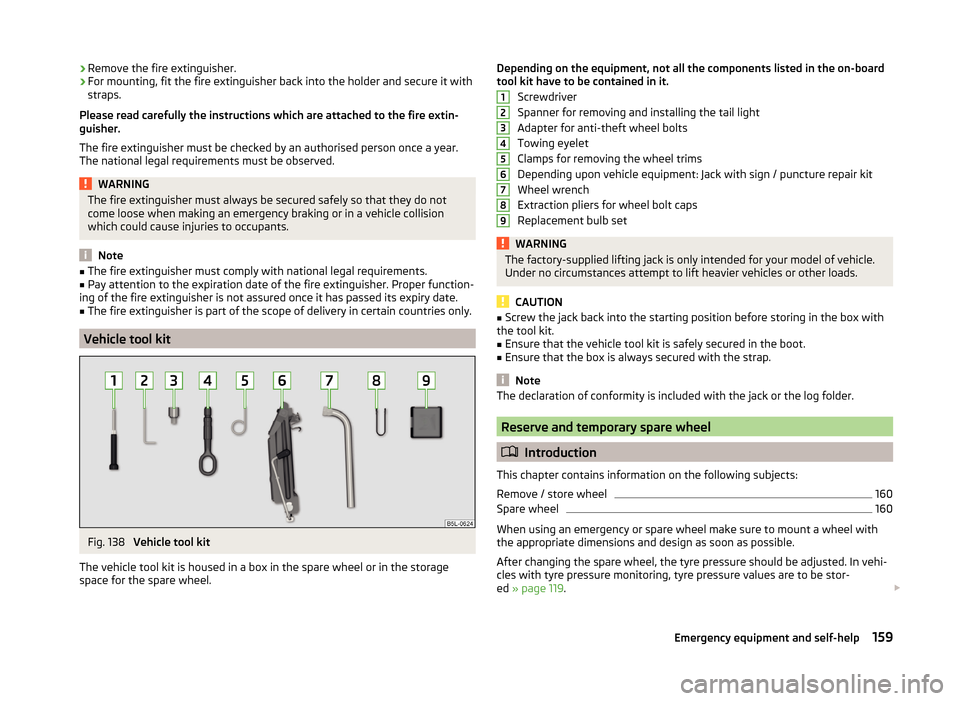
Vehicle tool kit
Fig. 138
Vehicle tool kit
The vehicle tool kit is housed in a box in the spare wheel or in the storage
space for the spare wheel.
Depending on the equipment, not all the components listed in the on-board
tool kit have to be contained in it.
Screwdriver
Spanner for removing and installing the tail light
Adapter for anti-theft wheel bolts
Towing eyelet
Clamps for removing the wheel trims
Depending upon vehicle equipment: Jack with sign / puncture repair kit
Wheel wrench
Extraction pliers for wheel bolt caps
Replacement bulb setWARNINGThe factory-supplied lifting jack is only intended for your model of vehicle.
Under no circumstances attempt to lift heavier vehicles or other loads.
CAUTION
■ Screw the jack back into the starting position before storing in the box with
the tool kit.■
Ensure that the vehicle tool kit is safely secured in the boot.
■
Ensure that the box is always secured with the strap.
Note
The declaration of conformity is included with the jack or the log folder.
Reserve and temporary spare wheel
Introduction
This chapter contains information on the following subjects:
Remove / store wheel
160
Spare wheel
160
When using an emergency or spare wheel make sure to mount a wheel with
the appropriate dimensions and design as soon as possible.
After changing the spare wheel, the tyre pressure should be adjusted. In vehi- cles with tyre pressure monitoring, tyre pressure values are to be stor-
ed » page 119 .
123456789159Emergency equipment and self-help
Page 163 of 204
WARNING■If, in the case of puncture occurring, the spare tyre with a non-bound di-
rection or an opposite direction of rotation must be mounted, then drive
carefully. The best properties of the tyre are no longer present in this situa-
tion.■
If the dimensions or design of the spare wheel differ from the tyres fitted
to the vehicle (e.g. winter tyres or low-profile tyres), it must only be used
briefly in the event of a puncture and if an appropriately cautious style of
driving is adopted.
■
If the dimensions or design of the temporary spare wheel differ from the
fitted tyres, never drive faster than 80 km/h (or 50 mph).
■
Never use the temporary spare wheel if it is damaged.
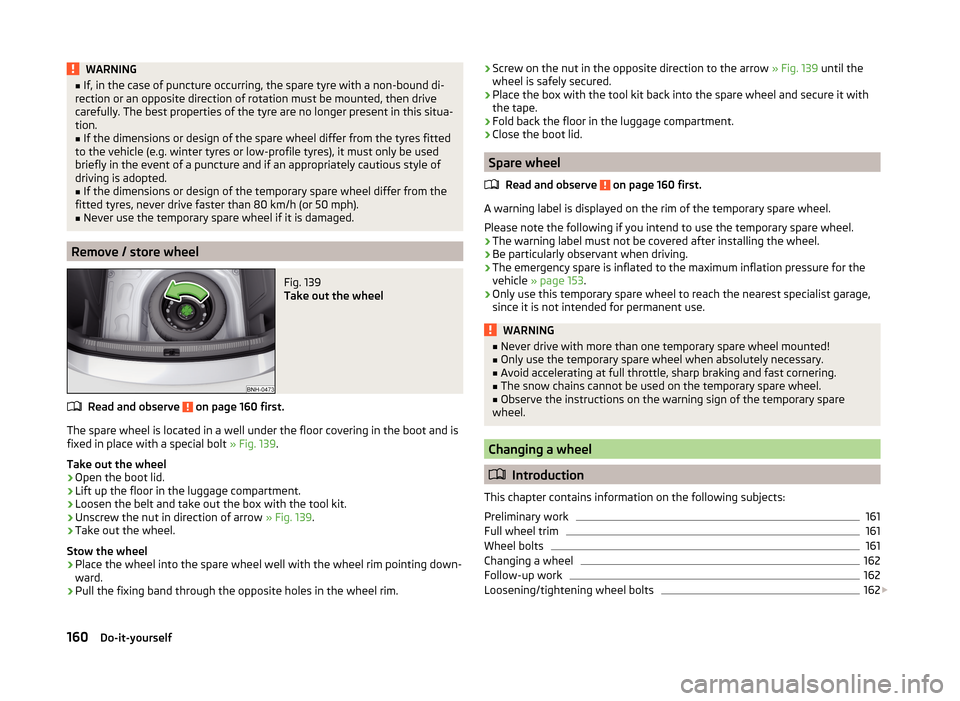
Remove / store wheel
Fig. 139
Take out the wheel
Read and observe on page 160 first.
The spare wheel is located in a well under the floor covering in the boot and is fixed in place with a special bolt » Fig. 139.
Take out the wheel
›
Open the boot lid.
›
Lift up the floor in the luggage compartment.
›
Loosen the belt and take out the box with the tool kit.
›
Unscrew the nut in direction of arrow » Fig. 139.
›
Take out the wheel.
Stow the wheel
›
Place the wheel into the spare wheel well with the wheel rim pointing down-
ward.
›
Pull the fixing band through the opposite holes in the wheel rim.
› Screw on the nut in the opposite direction to the arrow
» Fig. 139 until the
wheel is safely secured.›
Place the box with the tool kit back into the spare wheel and secure it with
the tape.
›
Fold back the floor in the luggage compartment.
›
Close the boot lid.
Spare wheel
Read and observe
on page 160 first.
A warning label is displayed on the rim of the temporary spare wheel.
Please note the following if you intend to use the temporary spare wheel. › The warning label must not be covered after installing the wheel.
› Be particularly observant when driving.
› The emergency spare is inflated to the maximum inflation pressure for the
vehicle » page 153 .
› Only use this temporary spare wheel to reach the nearest specialist garage,
since it is not intended for permanent use.
WARNING■ Never drive with more than one temporary spare wheel mounted!■Only use the temporary spare wheel when absolutely necessary.■
Avoid accelerating at full throttle, sharp braking and fast cornering.
■
The snow chains cannot be used on the temporary spare wheel.
■
Observe the instructions on the warning sign of the temporary spare
wheel.
Changing a wheel
Introduction
This chapter contains information on the following subjects:
Preliminary work
161
Full wheel trim
161
Wheel bolts
161
Changing a wheel
162
Follow-up work
162
Loosening/tightening wheel bolts
162
160Do-it-yourself
Page 165 of 204
Installing›Push the cap onto the wheel bolt up to the stop.
Changing a wheel
When changing a wheel, the following instructions must be followed.
›
Remove the full wheel trim or the caps of the wheel bolts.
›
First of all slacken the anti-theft wheel bolt and then the other wheel bolts.
›
Jack up the vehicle until the wheel that needs changing is clear of the
ground.
›
Unscrew the wheel bolts and place them on a clean surface (cloth, paper, etc.).
›
Remove the wheel carefully.
›
Attach the spare wheel and slightly screw on the wheel bolts.
›
Lower the vehicle.
›
Alternately tighten wheel bolts opposite (diagonally) with the wheel wrench.
Tighten the anti-theft wheel bolt last.
›
Replace the wheel trim or the caps.
When fitting unidirectional tyres, ensure that the direction of rotation is cor-
rect » page 155 .
WARNING■
Undo the wheel bolts only a little (about one turn) provided that the vehi-
cle has not yet been jacked up. Otherwise the wheel could become loose
and fall off.■
All bolts must be clean and must turn easily.
■
If it is established when changing a wheel that the wheel bolts are corro-
ded and difficult to move, then these must be replaced.
■
Under no circumstances grease or oil the wheel bolts!
Follow-up work
After changing the wheel, the following work must be carried out.
›
Stow and attach the replaced wheel in the spare wheel well using a special
screw » page 159 .
›
Stow the tool kit in the space provided and secure using the band.
›
Check the tyre pressure on the installed spare wheel as soon as possible.
›Have the
tightening torque of the wheel bolts checked with a torque
wrench as soon as possible.
After changing the wheel, the tyre pressure should be adjusted. In vehicles
with tyre pressure monitoring, tyre pressure values are to be stor-
ed » page 119 .
Replace the damaged wheel or consult a specialist garage about repair op-
tions.WARNINGInformation on the wheel bolts■The prescribed tightening torque of the wheel bolts for steel and light al-
loy wheels is 120 Nm.■
If the wheel bolts are tightened to a too low tightening torque, the rim
can come loose when the car is moving. A tightening torque which is too
high can damage the bolts and threads and this can result in permanent
deformation of the contact surfaces on the rim.
■
In case of incorrect treatment of the wheel bolts, the wheel can loosen
when the car is moving.
■
Drive cautiously and only at a moderate speed until the tightening torque
has been checked.
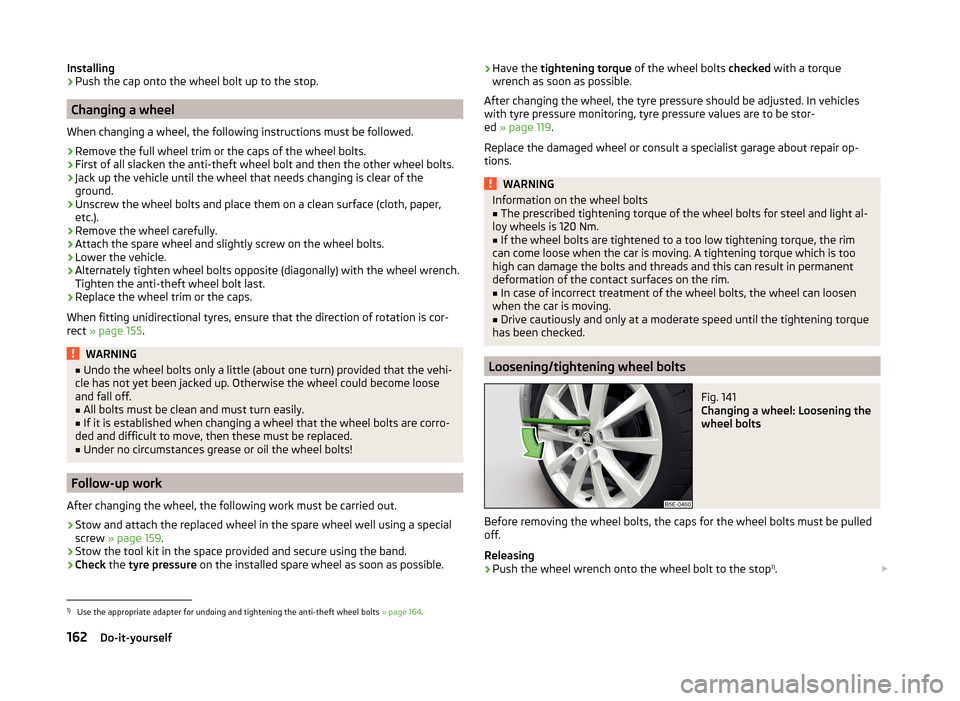
Loosening/tightening wheel bolts
Fig. 141
Changing a wheel: Loosening the
wheel bolts
Before removing the wheel bolts, the caps for the wheel bolts must be pulled
off.
Releasing
›
Push the wheel wrench onto the wheel bolt to the stop 1)
.
1)
Use the appropriate adapter for undoing and tightening the anti-theft wheel bolts
» page 164.
162Do-it-yourself
Page 166 of 204
›Grasp the end of the wrench and turn the bolt about
one turn in the direction
of the arrow » Fig. 141.
Tightening›
Push the wheel wrench onto the wheel bolt to the stop 1)
.
›
Grasp the end of the wrench and turn the bolt against the direction of the
arrow » Fig. 141 until it is tight.
After tightening the wheel bolts, the covering caps must be replaced.
WARNINGIf it proves difficult to undo the bolts, carefully apply pressure to the end of
the wrench with your foot. Keep hold of the vehicle when doing so, and
make sure you keep your footing.
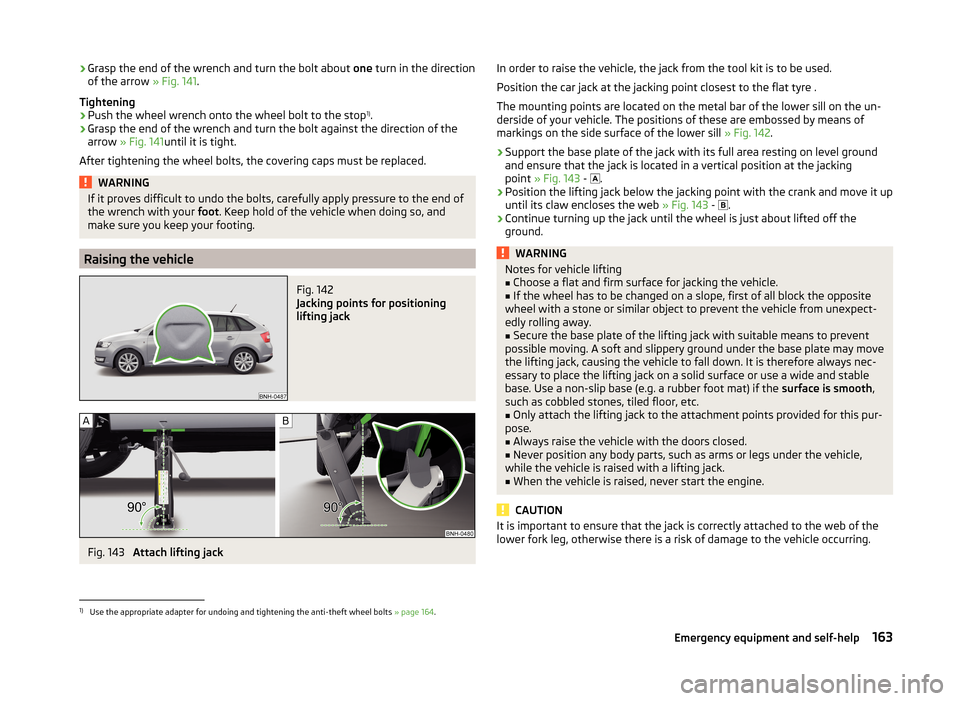
Raising the vehicle
Fig. 142
Jacking points for positioning
lifting jack
Fig. 143
Attach lifting jack
In order to raise the vehicle, the jack from the tool kit is to be used.
Position the car jack at the jacking point closest to the flat tyre .
The mounting points are located on the metal bar of the lower sill on the un-
derside of your vehicle. The positions of these are embossed by means of
markings on the side surface of the lower sill » Fig. 142.›
Support the base plate of the jack with its full area resting on level ground
and ensure that the jack is located in a vertical position at the jacking
point » Fig. 143 -
.
›
Position the lifting jack below the jacking point with the crank and move it up
until its claw encloses the web » Fig. 143 -
.
›
Continue turning up the jack until the wheel is just about lifted off the
ground.
WARNINGNotes for vehicle lifting■Choose a flat and firm surface for jacking the vehicle.■
If the wheel has to be changed on a slope, first of all block the opposite
wheel with a stone or similar object to prevent the vehicle from unexpect-
edly rolling away.
■
Secure the base plate of the lifting jack with suitable means to prevent
possible moving. A soft and slippery ground under the base plate may move
the lifting jack, causing the vehicle to fall down. It is therefore always nec-
essary to place the lifting jack on a solid surface or use a wide and stable
base. Use a non-slip base (e.g. a rubber foot mat) if the surface is smooth,
such as cobbled stones, tiled floor, etc.
■
Only attach the lifting jack to the attachment points provided for this pur-
pose.
■
Always raise the vehicle with the doors closed.
■
Never position any body parts, such as arms or legs under the vehicle,
while the vehicle is raised with a lifting jack.
■
When the vehicle is raised, never start the engine.
CAUTION
It is important to ensure that the jack is correctly attached to the web of the
lower fork leg, otherwise there is a risk of damage to the vehicle occurring.1)
Use the appropriate adapter for undoing and tightening the anti-theft wheel bolts » page 164.
163Emergency equipment and self-help
Page 175 of 204

Replacing the windscreen wiper bladesFig. 155
Windscreen wiper blade
Read and observe
on page 171 first.
Before replacing the windscreen wiper blade, put the windscreen wiper arms
into the service position.
Service position for changing wiper blades
›
Close the bonnet.
›
Switch the ignition on and off again.
›
Place the operating lever in position
4
» page 66 , Activating the windscreen
wipers and washers .
Move the windscreen wiper arms into the service position.
Removing the wiper blade
›
Lift the wiper arm from the window in the direction of
1
» Fig. 155 .
›
Tilt the wiper blade to the stop in the same direction.
›
Hold the upper part of the wiper arm and press the securing mechanism
A
in the direction of arrow
2
.
›
Remove the wiper blade in the direction of the arrow
3
.
Attaching the windscreen wiper blade
›
Push the windscreen wiper blade to the stop until it locks into place.
›
Check that the windscreen wiper blade is correctly attached.
›
Fold the windscreen wiper arm back to the windscreen.
›
Turn on the ignition and press the lever into position
4
» page 66 , Activat-
ing the windscreen wipers and washers .
Move the windscreen wiper arms into the home position.
Replacing the rear window wiper bladeFig. 156
Rear window wiper blade
Read and observe
on page 171 first.
Removing the wiper blade
›
Lift the wiper arm from the window in the direction of
1
» Fig. 156 .
›
Tilt the wiper blade to the stop in the same direction.
›
Hold the upper part of the wiper arm and press the securing mechanism
A
in the direction of arrow
2
.
›
Remove the wiper blade in the direction of the arrow
3
.
Attaching the windscreen wiper blade
›
Push the windscreen wiper blade to the stop until it locks into place.
›
Check that the windscreen wiper blade is correctly attached.
›
Fold the windscreen wiper arm back to the windscreen.
172Do-it-yourself
Page 178 of 204
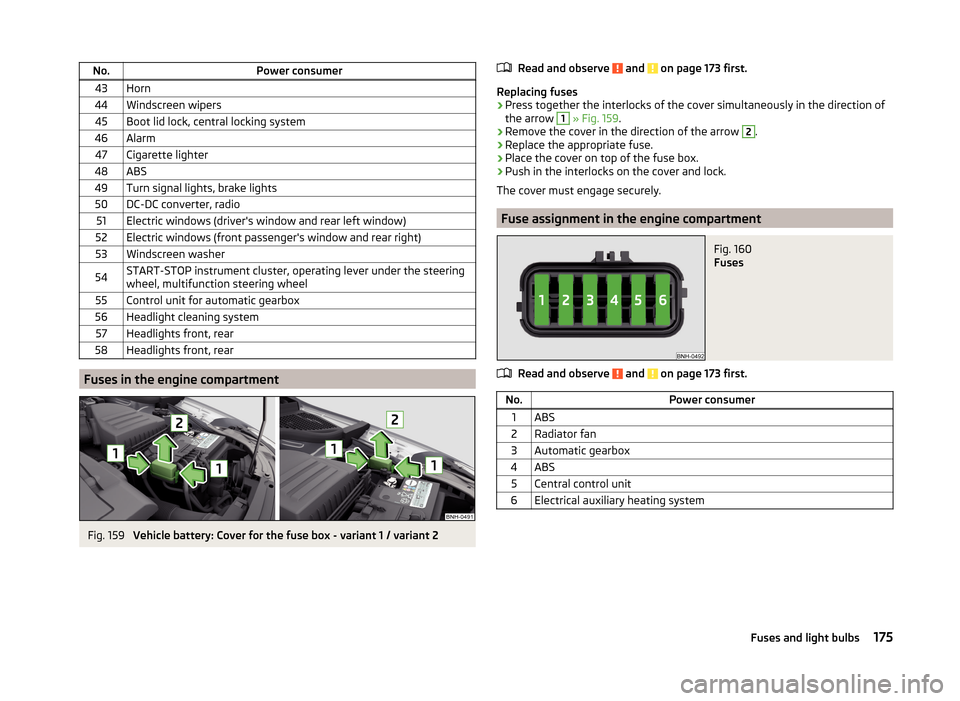
No.Power consumer43Horn44Windscreen wipers45Boot lid lock, central locking system46Alarm47Cigarette lighter48ABS49Turn signal lights, brake lights50DC-DC converter, radio51Electric windows (driver's window and rear left window)52Electric windows (front passenger's window and rear right)53Windscreen washer54START-STOP instrument cluster, operating lever under the steering
wheel, multifunction steering wheel55Control unit for automatic gearbox56Headlight cleaning system57Headlights front, rear58Headlights front, rear
Fuses in the engine compartment
Fig. 159
Vehicle battery: Cover for the fuse box - variant 1 / variant 2
Read and observe and on page 173 first.
Replacing fuses
›
Press together the interlocks of the cover simultaneously in the direction of
the arrow
1
» Fig. 159 .
›
Remove the cover in the direction of the arrow
2
.
›
Replace the appropriate fuse.
›
Place the cover on top of the fuse box.
›
Push in the interlocks on the cover and lock.
The cover must engage securely.
Fuse assignment in the engine compartment
Fig. 160
Fuses
Read and observe and on page 173 first.
No.Power consumer1ABS2Radiator fan3Automatic gearbox4ABS5Central control unit6Electrical auxiliary heating system175Fuses and light bulbs
Page 182 of 204

›Attach the connector.
Refit the headlight and grille›
Replace the fog light by inserting it in the opposite direction of the arrow
4
» Fig. 166 and tightening.
›
Insert the protective grille and carefully press it in.
The protective grille must engage firmly.
Replacing the bulb for the licence plate light
Fig. 167
Remove the number plate light/replace the bulb
Read and observe
and on page 176 first.
›
Open the boot lid.
›
Push in the lamp in the direction of the arrow
1
» Fig. 167 .
The lamp comes loose.
›
Swivel out the lamp in the direction of the arrow
2
and remove it.
›
Remove the faulty bulb from the holder in the direction of the arrow
3
.
›
Insert a new bulb into the holder.
›
Reinsert the lamp in the opposite direction to the arrow
1
.
›
Push on the light until the spring clicks into place.
Check that the light is securely inserted.
Rear LightFig. 168
Remove light / pull out connector
Read and observe
and on page 176 first.
Removing
›
Open the boot lid.
›
Insert the clamps for removing the full wheel covers » page 159, Vehicle tool
kit into opening
A
» Fig. 168 .
›
Remove the cover by pulling the hook in the direction of arrow
1
.
›
Unscrew the screws
B
with the key from the tool kit.
›
Grasp the lamp and carefully remove in the direction of arrow
2
.
›
Press the latch on the connector in the direction of arrow
3
.
›
Carefully remove the connector from the tail lamp assembly in the direction
of the arrow
4
.
Fitting
›
Insert the bulb holder into the lamp.
The lock on the plug must be inserted securely.
›
Insert the lamp with the pin
B
» Fig. 169 on page 180 into the recesses
C
» Fig. 168 in the body.
179Fuses and light bulbs
Page 183 of 204

›Carefully push the cover in
» .›Screw the tail lamp into place and install the cover.
The cover must engage securely.
CAUTION
■ Ensure that the cable bundle does not become pinched between the body
and the lamp when it is being refitted – risk of damage to the electrical instal-
lation and risk of water ingress.■
If you are not sure whether the cable bundle has become pinched, we recom-
mend that you have the light connection checked by a specialist garage.
■
Ensure that the vehicle paintwork and the tail lamp are not damaged when
removing and installing the tail lamp.
Replacing bulbs in rear light
Fig. 169
Outer part of the lamp/inner part of the lamp
Read and observe
and on page 176 first.
Outer part of the lamp
›
Rotate the lamp socket
A
» Fig. 169 in direction of arrow
1
and remove in
direction of arrow
2
from the lamp housing.
›
Changing the lamp, reinsert the holder with the bulb into the lamp housing
and turn in the opposite direction of the arrow
1
to the stop.
Inner parts of the lamp
›
Unlock the bulb holder using the marked area with arrows » Fig. 169 and re-
move the bulb holder from the light.
›
Turn the respective bulb counter clockwise until it stops.
›
Remove the holder from the lamp.
›
Insert a new bulb into the holder and turn in a clockwise direction to the
stop.
› Insert the bulb holder in the tail lamp assembly.
The lamp holder must engage firmly.180Do-it-yourself
Page 198 of 204
Rear fog light61
Warning light38
Rear mirror67
Exterior mirror68
Interior mirror67
Refuelling139
Fuel139
Remote control Locking
50
Replacing the battery170
Synchronisation process170
Unlocking50
Remote control key Replacing the battery
170
Removing the bar ball, Step 1
123
bar ball, Step 2123
Repairs and technical alterations128
Replacement parts128
Replacing Bulb for main beam, daytime running lights and parking light
177
Bulb for the fog light178
Bulb for the licence plate light179
Bulb in rear light180
Fuses173
Fuses in the dash panel173
Fuses in the engine compartment175
High beam bulb (halogen headlights)177
Rear window wiper blade172
Vehicle battery151
windscreen wiper blades172
Replenishing Coolant
147
Engine oil146
Windscreen washer fluid143
Retraction and economical driving111
Revolution counter31
Roof Load
88
Roof rack88
mounting points88
Roof load88
Rubber seals133
S
SAFE See Safe securing system
51
SAFELOCK See Safe securing system
51
Safe securing system51
Safety8
Child safety22
Child safety seats22
Correct seated position9
Head restraints70
ISOFIX25
TOP TETHER26
Save electrical energy111
Save fuel111
Seals Vehicle care
133
Seat Adjusting
69
Seat belt Warning light
35
Seat belts12
Belt tensioners15
fastening and unfastening14
Height adjustment15
Inertia reels15
The physical principle of a frontal collision13
Seat features71
Seats Front armrest
72
Head restraints70
Heating71
Rear armrest72
Seat backrests72
Seats and head restraint69
Selector lever Refer to Selector lever109
Service129
Service interval display47
Setting33
Lower position of the variable loading floor86
seats and head restraints69
Upper position of the variable loading floor85
Setting the33
Side airbag18
SmartGate connection
102
Password103
Settings102
Smart Gate Website
102
Snow chains157
Spare change
160
spare wheel159
change160
instructions160
Speedometer31
See speedometer31
Speed symbol Refer to Wheels
155
Spoiler130
Staring engine Jump-starting
167
START-STOP116
Jump-starting167
Manually deactivating/activating the system118
Operating conditions of the system117
operation in vehicles with automatic gearbox117
operation in vehicles with manual gearbox117
system-related automatic start-up118
Start engine105
Starting engine Jump-starting
166
195Index