tow SKODA ROOMSTER 2010 1.G Owner's Guide
[x] Cancel search | Manufacturer: SKODA, Model Year: 2010, Model line: ROOMSTER, Model: SKODA ROOMSTER 2010 1.GPages: 231, PDF Size: 12.91 MB
Page 89 of 231
Starting-off and Driving
88
You should not switch on any major elec trical components during the heating
period otherwise the vehicle battery will be drained unnecessarily.
- start engine
Applies to all models:
Position
To lock the steering , with the ignition key withdrawn, turn the steering wheel until the
steering locking pin is heard to engage. You should always lock the steering as a general
rule if you leave your vehicle. This acts as a deterrent against possible theft of your
vehicle .
Position
Move the steering wheel back and forward a little if the ignition key cannot, or cannot
easily be turned into this position, in order to release the steering lock.
Position
The engine is started in this position. At th e same time switched on low beam or main
beam or other electrical components wi th major power consumption are briefly
switched off. The ignition key moves back into position when one releases the key.
The ignition key must be turned back into position each time before starting the
engine again. The starter repeat lock in th e ignition lock prevents the starter being
engaged when the engine is r unning and thus getting damaged.
WARNING
When driving, the ignition key must always be in the position (ignition
switched on) without the engine running. This position is indicated by the
warning lights coming on. If this is not the case, it could result in unexpected
locking of the steering wh eel - risk of accident!
Do not withdraw the ignition key from the lock until the vehicle has come to
a stop. The steering lock can engage immediately - risk of accident!
Always withdraw the ignition key if you are going to leave the vehicle, even
for a short time. This is particularly important if children are left in the vehicle.
The children might otherwise start the en gine or operate electrical equipment
(e.g. power windows) - risk of injury!
Starting the engineGeneral
You can only start the engine only using an original ignition key.
Place the gearshift lever into neutral and put on the handbrake firmly before
starting the engine.
The clutch pedal should be fully depressed when starting the engine - the starter
then only has to crank the engine.
Let go of the key as soon as the engine starts otherwise there may be damage to
the starter.
The engine running noises may louder at first be louder for a short time after starting
the cold engine until oil pressure can be built up in the hydraulic valve clearance
compensation. This is quite normal and is not an operating problem.
If the engine does not start ...
You can use the battery of anothe r vehicle as a jump-start aid page 186.
It is only possible to tow-start vehicles fi tted with a manual gearbox. The tow-starting
distance must not be more than 50 metres page 189.
WARNING
Never run the engine in non ventilated or enclosed areas. The exhaust gases
of the engine contain besides the odorless and colourless carbon monoxide a
poisonous gas - hazard! Carbon mono xide can cause unconsciousness and
death.
Never leave your vehicle unattended with the engine running.Caution
The starter may only be operated (ignitio n key position ), if the engine is not
running. If the starter is imme diately operated after switchin g off the engine, the starter
or the engine can be damaged.
Avoid high engine revolutions, full throttle and high engine loads as long as the
engine has not yet reached its normal oper ating temperature - risk of damaging the
engine!
A3
A1A2A3
A2
A1
A2
A3
s16g.4.book Page 88 Wednesda y, February 10, 2010 3:53 PM
Page 90 of 231
Starting-off and Driving89
Using the system
Safety
Driving Tips
General Maintenance
Breakdown assistance
Praktik
Technical Data
Vehicles which are fitted with an exhaust gas catalytic converter should not be tow-
started over a distance of more than 50 metres.For the sake of the environment
Never warm up the engine when the vehicle is standing. Drive off right away. When
driving the engine reaches its operating te mperature more rapidly and the pollutant
emissions are lower.Petrol enginesThese engines are fitted with a starter system which selects the correct fuel-air mixture
for every external air temperature.
Do not operate accelerator before and when starting engine.
Interrupt the attempt at starting after 10 seconds if the engine does not start right
awayand wait for about 30 seconds before repeating the attempt.
It is possible that the fuse on the electric al fuel pump is defect if the engine still
does not start. Check the fuse and replace it if necessary page 191.
If the engine does not start, contact the nearest specialist garage to obtain profes-
sional assistance.
It may be necessary, if the engine is very hot, to slightly depress the accelerator after
the engine has started.
Diesel enginesGlow plug system
Diesel engines are equipped with a glow plug system, the preglow period being
controlled automatically in line with the coolant temperature and outside tempera-
ture.
The preglow indicator light
comes on after the ignition has been switched on.
You should not switch on any major electrical components during the heating
period otherwise the vehicle battery will be drained unnecessarily.
You should start the engine immediately after the glow plug warning light
has
gone out.
The glow plug warning light will come on for about one second if the engine is at a
normal operating temperature or if the outside temperature is above +5°C. This means
that you can start the engine right away.
Interrupt the attempt at starting after 10 seconds if the engine does not start right
awayand wait for about 30 seconds before repeating the attempt.
It is possible that the fuse on the diesel preglow system is defect if the engine still
does not start. Check the fuse and replace it if necessary page 191.
Contact the nearest specialist garage to obtain professional assistance.
Starting the engine after fuel tank has run dry
It may take longer than normal to start the engine after refuelling if the fuel tank has
run completely dry - up to one minute. This is because the fuel system must first of all
be filled while the attempting to start the engine.
Switching off the engine– The engine can be switched off by turnin g the ignition key from position into
page 87, fig. 92 .
WARNING
Never switch off the engine before the vehicle is stationary - risk of accident!
The brake booster only operates when the engine is running. Greater phys-
ical effort for braking is required when en gine is switched off. Because if you do
not stop as normal, this can cause an accident and severe injuries.Caution
you should not switch the engine off right away at the end of your journey after the
engine has been operated for a lengthy period at high loads but should be allowed it
to run at idling speed for about 2 minutes. This prevents any accumulation of heat
when the engine is switched off.
Note
The radiator fan may continue running fo r a further 10 minutes or so after the
engine and the ignition have been switched off. The coolant fan may, however, also
A1
s16g.4.book Page 89 Wednesday, February 10, 2010 3:53 PM
Page 92 of 231
Starting-off and Driving91
Using the system
Safety
Driving Tips
General Maintenance
Breakdown assistance
Praktik
Technical Data
Never leave children unattended in the vehicle. The children might, for
example, release the handbrake or take the vehicle out of gear. The vehicle
might then move off - risk of accident!Caution
After the car has come to a stop, always firs t of all apply the handbrake firmly before
then additionally engaging a gear (manual gearbox) or moving the selector lever into
position P (automatic gearbox).Parking aid*The parking aid provides a warning of obstacles behind the vehicle.The audible parking aid determines the di stance between the rear bumper and an
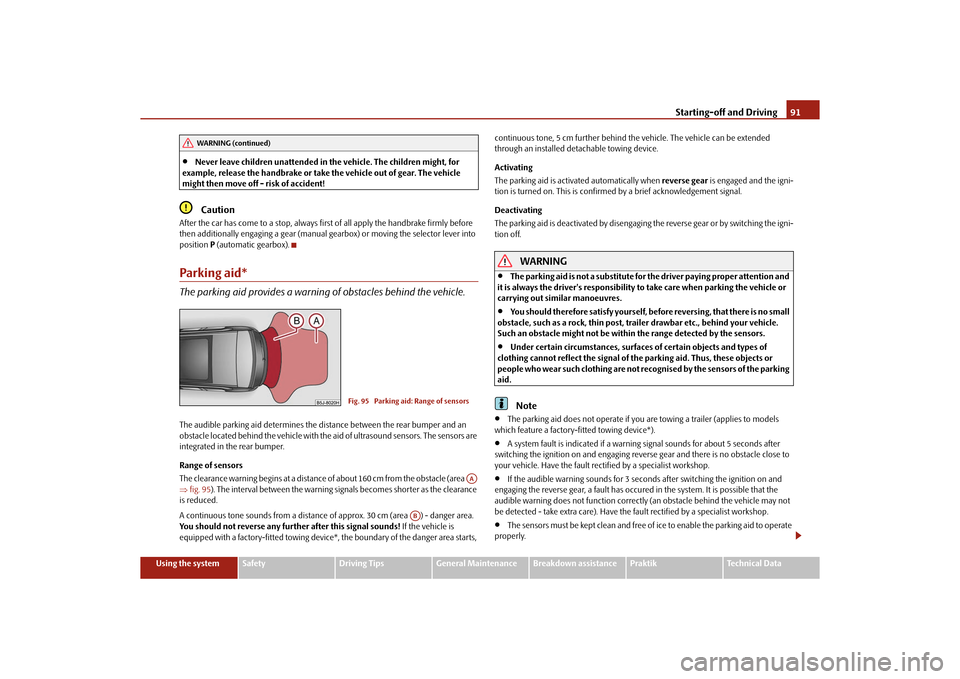
obstacle located behind the vehicle with the aid of ultrasound sensors. The sensors are
integrated in the rear bumper.
Range of sensors
The clearance warning begins at a distance of about 160 cm from the obstacle (area
fig. 95 ). The interval between the warning signals becomes shorter as the clearance
is reduced.
A continuous tone sounds from a distance of approx. 30 cm (area ) - danger area.
You should not reverse any further after this signal sounds! If the vehicle is
equipped with a factory-fitted towing device*, the boundary of the danger area starts, continuous tone, 5 cm furt
her behind the vehicle. The vehicle can be extended
through an installed deta chable towing device.
Activating
The parking aid is activated automatically when reverse gear is engaged and the igni-
tion is turned on. This is confirmed by a brief acknowledgement signal.
Deactivating
The parking aid is deactivated by disengaging the reverse gear or by switching the igni-
tion off.
WARNING
The parking aid is not a substitute for the driver paying proper attention and
it is always the driver's responsibility to take care when parking the vehicle or
carrying out similar manoeuvres.
You should therefore satisfy yourself, before reversing, that there is no small
obstacle, such as a rock, thin post, trailer drawbar etc., behind your vehicle.
Such an obstacle might not be within the range detected by the sensors.
Under certain circumstances, surfaces of certain objects and types of
clothing cannot reflect the signal of the parking aid. Thus, these objects or
people who wear such clothing are not recognised by the sensors of the parking
aid.Note
The parking aid does not operate if you are towing a trailer (applies to models
which feature a factory-fitted towing device*).
A system fault is indicated if a warning signal sounds for about 5 seconds after
switching the ignition on and engaging reverse gear and there is no obstacle close to
your vehicle. Have the fault rectified by a specialist workshop.
If the audible warning sounds for 3 seconds after switching the ignition on and
engaging the reverse gear, a fault has occured in the system. It is possible that the
audible warning does not function correctl y (an obstacle behind the vehicle may not
be detected - take extra care). Have the fault rectified by a specialist workshop.
The sensors must be kept clean and free of ice to enable the parking aid to operate
properly.
WARNING (continued)
Fig. 95 Parking aid: Range of sensors
AA
AB
s16g.4.book Page 91 Wednesda y, February 10, 2010 3:53 PM
Page 97 of 231
Automatic gearbox
96
the right. In the positions D and S the gear you have already engaged will be addition-
ally displayed on the display.
- Parklock
The driven wheels are locked mechanically in this position.
The Parklock must only be engage d when the vehicle is stationary .
If you wish to move the selector lever into or out of this position, you must press the
Shiftlock button in the handle of the selector lever and at the same time depress the
brake pedal.
- Reverse gear
Reverse gear must only be engaged when the vehicle is stationary and the engine
idling .
The brake pedal must be depressed and at the same time the Shiftlock must be
pressed, if you wish to obtain the selector lever positions R, P or N.
When the ignition is switched on an d the selector lever is in position R, the reverse
lights will come on.
- Neutral
The transmission is in Neutral in this position.
The brake pedal must be depressed (if the le ver is in its position for longer than 2
seconds) in order to move the selector lever out of the position N into the position D,
with the ignition switched on, on a vehicle travelling at less than 5 km/hour or on a
stationary vehicle.
- Position for driving forward
When the selector lever is in this position , the forward gears are shifted up and down
automatically in line with engine lo ad, vehicle speed and the dynamic shift
programme.
You must depress the brake pedal if you wish to move into position D from N when the
vehicle is travelling at less th an 5 km/hour or is stationary .
In certain circumstances (e.g. when driving in mountainous regions or when towing a
trailer) it may be beneficial to select the manual shift programme page 98 for a short
time in order to adapt the gearbox rati os manually to the driving situations. - Position for sporty style of driving
Shifting up later into a higher gear makes it possible to fully exploit the power potential
of the engine. The gearbox also then shifts down at higher engine speeds as in the posi-
tion D.
The gearbox does not shift into the 6th gear in the position S, because the maximum
speed is reached with the 5th gear
9).
The Shiftlock on the selector lever grip mu st be pressed when moving the selector
lever out of the position D into the position S.
WARNING
Never move the selector lever into position R or P when driving - risk of an
accident!
When the engine is running and the vehi cle is stationary, it is necessary to
hold the car with the brake pedal in all the positions of the selector lever (except
P and N) since the power transmission is never completely interrupted, also not
when the engine is idling - the vehicle creeps.
You must on no account unintentionally operate the throttle (e.g. by hand
from the engine compartment) if a driv e position is engaged when the car is
stationary. The vehicle would otherwise immediately start off - also when the
handbrake is firmly applied - risk of an accident!
You must move the selector lever into position P and firmly apply the hand-
brake first before you or any other person opens the bonnet and starts working
on the engine when it is running - risk of accident! It is also essential to observe
all warnings page 162, “Working in the engine compartment”.
Selector lever lockAutomatic selector lever lock
With the ignition on, the selector lever is locked when it is in the positions P and N. You
must first of all depress the brake pedal in or der to move the selector lever out of this
position. The warning light
page 30 lights up in the instrument cluster as a
reminder for the driver when the selector lever is in position P or N.
APARANAD
9)Not valid for vehicles with automatic gearbox DSG.AS
s16g.4.book Page 96 Wednesda y, February 10, 2010 3:53 PM
Page 100 of 231
Automatic gearbox99
Using the system
Safety
Driving Tips
General Maintenance
Breakdown assistance
Praktik
Technical Data
– Simultaneously press the shiftlock button in
the handle of the selector lever in the
position N
10).
Tow-starting and towing vehicle Tow-starting a vehicle
It is not possible to tow-start vehicles fitted with automatic gearbox page 188.
you can use jump-start cables connected to the battery of another vehicle for starting
your car if the vehicle battery is flat page 187.
Towing a vehicle
Please pay attention to the following information if it comes necessary to tow-in your
car page 188.10)If the selector lever is moved again into the position P, it is once again blocked.
s16g.4.book Page 99 Wednesday, February 10, 2010 3:53 PM
Page 114 of 231
Seat belts113
Using the system
Safety
Driving Tips
General Maintenance
Breakdown assistance
Praktik
Technical Data
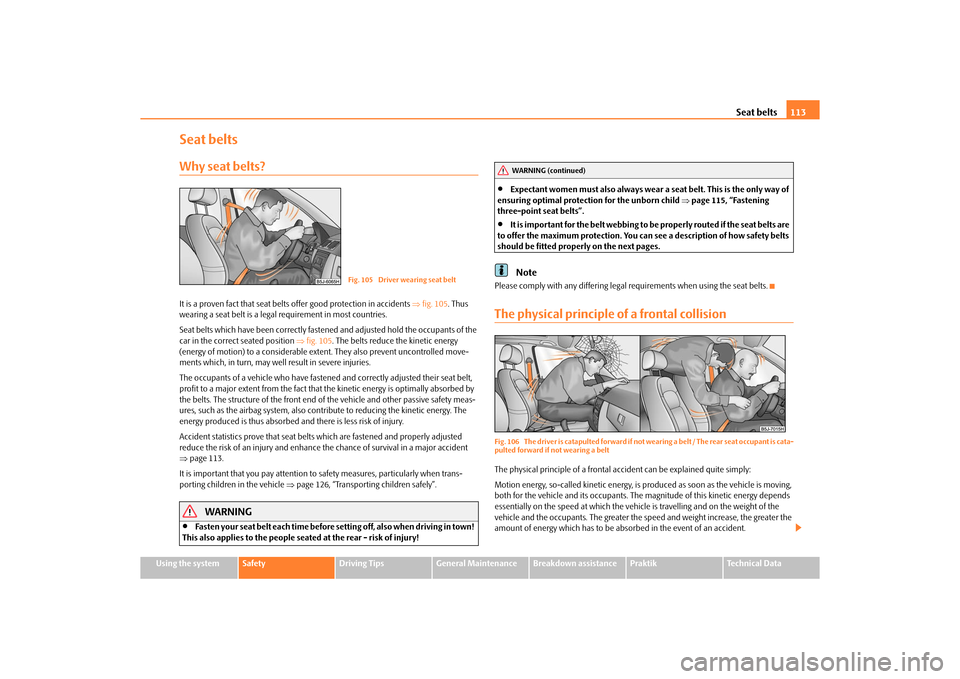
Seat beltsWhy seat belts?It is a proven fact that seat belt s offer good protection in accidents fig. 105 . Thus
wearing a seat belt is a legal requirement in most countries.
Seat belts which have been correctly fasten ed and adjusted hold the occupants of the
car in the correct seated position fig. 105 . The belts reduce the kinetic energy
(energy of motion) to a considerable exte nt. They also prevent uncontrolled move-
ments which, in turn, may well result in severe injuries.
The occupants of a vehicle who have fastened and correctly adjusted their seat belt,
profit to a major extent from the fact that the kinetic energy is optimally absorbed by
the belts. The structure of the front end of the vehicle and other passive safety meas-
ures, such as the airbag system, also cont ribute to reducing the kinetic energy. The
energy produced is thus absorbed and there is less risk of injury.
Accident statistics prove that seat belts which are fastened and properly adjusted
reduce the risk of an injury and enhance the chance of survival in a major accident
page 113.
It is important that you pay attention to safety measures, particularly when trans-
porting children in the vehicle page 126, “Transporting children safely”.
WARNING
Fasten your seat belt each time before setting off, also when driving in town!
This also applies to the people seated at the rear - risk of injury!
Expectant women must also always wear a seat belt. This is the only way of
ensuring optimal protection for the unborn child page 115, “Fastening
three-point seat belts”.
It is important for the belt webbing to be properly routed if the seat belts are
to offer the maximum protection. You can see a description of how safety belts
should be fitted properly on the next pages.Note
Please comply with any differing legal requirements when using the seat belts.The physical principle of a frontal collisionFig. 106 The driver is catapulted forward if not wearing a belt / The rear seat occupant is cata-
pulted forward if not wearing a beltThe physical principle of a frontal a ccident can be explained quite simply:
Motion energy, so-called kinetic energy, is produced as soon as the vehicle is moving,
both for the vehicle and its occupants. The magnitude of this kinetic energy depends
essentially on the speed at which the vehicl e is travelling and on the weight of the
vehicle and the occupants. The greater the speed and weight increase, the greater the
amount of energy which has to be ab sorbed in the event of an accident.
Fig. 105 Driver wearing seat belt
WARNING (continued)
s16g.4.book Page 113 Wednesda y, February 10, 2010 3:53 PM
Page 130 of 231
Transporting children safely129
Using the system
Safety
Driving Tips
General Maintenance
Breakdown assistance
Praktik
Technical Data
Children who are more than 1.50 m in height or who weigh more than 36 kg can use
the normal seat belts without a seat bolster.
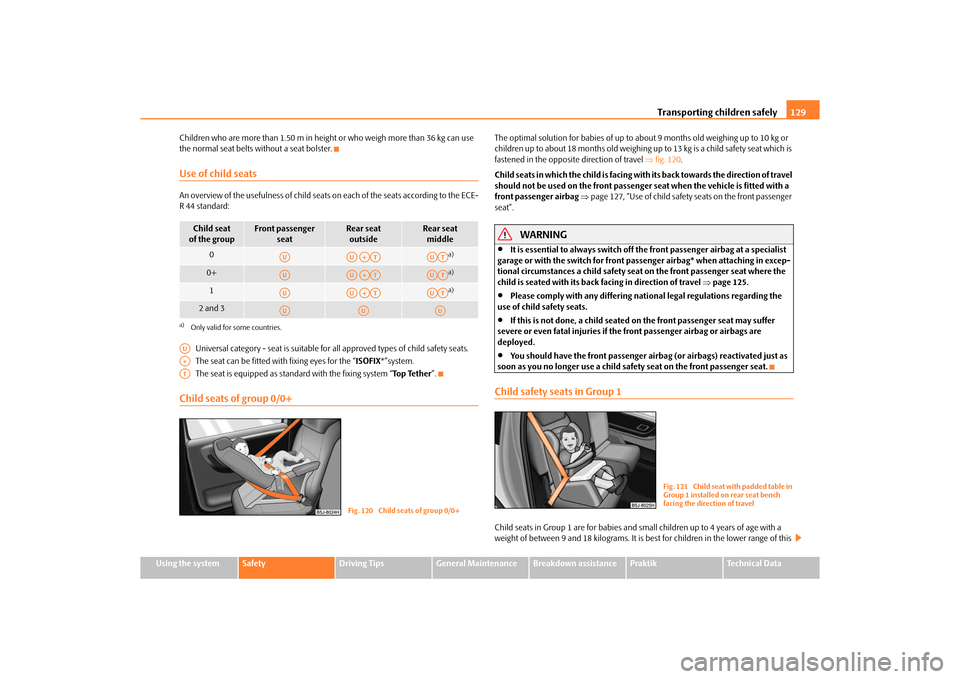
Use of child seatsAn overview of the usefulness
of child seats on each of the seats according to the ECE-
R44 standard:
Universal category - seat is suitable for all approved types of child safety seats.
The seat can be fitted with fixing eyes for the “ISOFIX*”system.
The seat is equipped as standa rd with the fixing system “To p Te t h e r”.Child seats of group 0/0+
The optimal solution for babies of up to about 9 months old weighing up to 10 kg or
children up to about 18 months old weighing up to 13 kg is a child safety seat which is
fastened in the opposite direction of travel fig. 120 .
Child seats in which the child is facing with its back towards the direction of travel
should not be used on the front passenger seat when the vehicle is fitted with a
front passenger airbag page 127, “Use of child safety seats on the front passenger
seat”.
WARNING
It is essential to always switch off the front passenger airbag at a specialist
garage or with the switch for front passenger airbag* when attaching in excep-
tional circumstances a child safety seat on the front passenger seat where the
child is seated with its back facing in direction of travel page 125.
Please comply with any differing nati onal legal regulations regarding the
use of child safety seats.
If this is not done, a child seated on the front passenger seat may suffer
severe or even fatal injuries if the front passenger airbag or airbags are
deployed.
You should have the front passenger airbag (or airbags) reactivated just as
soon as you no longer use a child safe ty seat on the front passenger seat.
Child safety seats in Group 1Child seats in Group 1 are for babies and small children up to 4 years of age with a
weight of between 9 and 18 kilograms. It is best for children in the lower range of this
Child seat
of the group
Front passenger seat
Rear seat outside
Rear seat middle
0
a)
a)Only valid for some countries.
0+
a)
1
a)
2 and 3
AU
AUA+AT
AUAT
AU
AUA+AT
AUAT
AU
AUA+AT
AUAT
AU
AU
AU
AUA+AT
Fig. 120 Child seats of group 0/0+
Fig. 121 Child seat with padded table in
Group 1 installed on rear seat bench
facing the direction of travel
s16g.4.book Page 129 Wednesda y, February 10, 2010 3:53 PM
Page 131 of 231
Transporting children safely
130
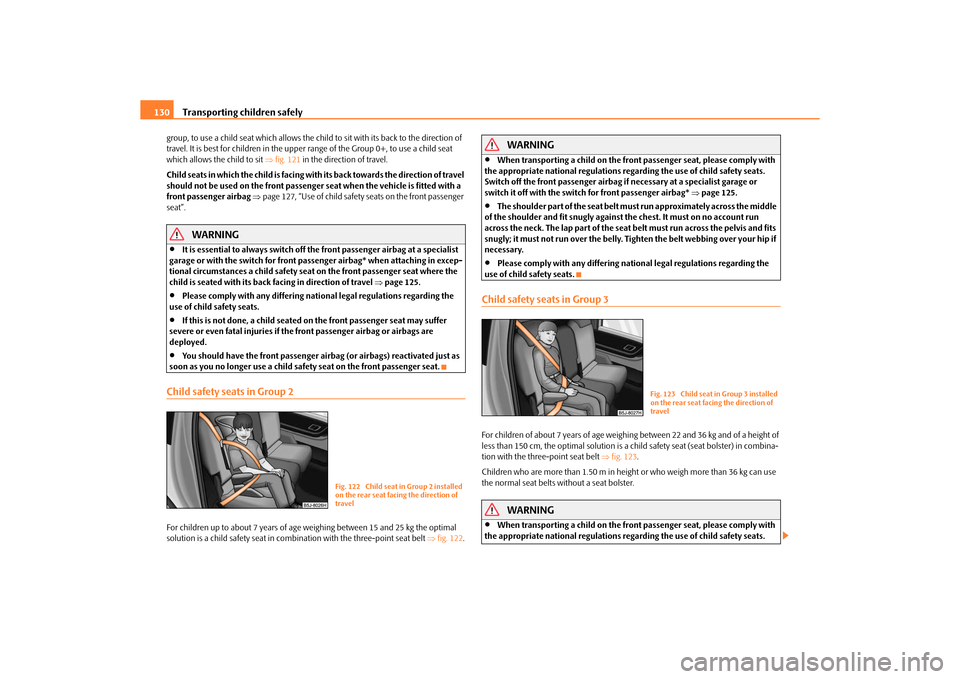
group, to use a child seat which allows the ch ild to sit with its back to the direction of
travel. It is best for children in the uppe r range of the Group 0+, to use a child seat
which allows the child to sit fig. 121 in the direction of travel.
Child seats in which the child is facing with its back towards the direction of travel
should not be used on the front passenger seat when th e vehicle is fitted with a
front passenger airbag page 127, “Use of child safety seats on the front passenger
seat”.
WARNING
It is essential to always switch off the front passenger airbag at a specialist
garage or with the switch for front passenger airbag* when attaching in excep-
tional circumstances a child safety seat on the front passenger seat where the
child is seated with its back facing in direction of travel page 125.
Please comply with any differing nati onal legal regulations regarding the
use of child safety seats.
If this is not done, a child seated on the front passenger seat may suffer
severe or even fatal injuries if the front passenger airbag or airbags are
deployed.
You should have the front passenger airb ag (or airbags) reactivated just as
soon as you no longer use a child safe ty seat on the front passenger seat.
Child safety seats in Group 2For children up to about 7 years of age weighing between 15 and 25 kg the optimal
solution is a child safety seat in combination with the three-point seat belt fig. 122 .
WARNING
When transporting a child on the front passenger seat, please comply with
the appropriate national regulations rega rding the use of child safety seats.
Switch off the front passenger airbag if necessary at a specialist garage or
switch it off with the switch for front passenger airbag* page 125.
The shoulder part of the seat belt mu st run approximately across the middle
of the shoulder and fit snugly against the chest. It must on no account run
across the neck. The lap part of the seat belt must run across the pelvis and fits
snugly; it must not run over the belly. Tighten the belt webbing over your hip if
necessary.
Please comply with any differing nati onal legal regulations regarding the
use of child safety seats.
Child safety seats in Group 3For children of about 7 years of age weighing between 22 and 36 kg and of a height of
less than 150 cm, the optimal solution is a child safety seat (seat bolster) in combina-
tion with the three-point seat belt fig. 123 .
Children who are more than 1.50 m in heig ht or who weigh more than 36 kg can use
the normal seat belts without a seat bolster.
WARNING
When transporting a child on the front passenger seat, please comply with
the appropriate national regulations rega rding the use of child safety seats.
Fig. 122 Child seat in Group 2 installed
on the rear seat facing the direction of
travel
Fig. 123 Child seat in Group 3 installed
on the rear seat facing the direction of
travel
s16g.4.book Page 130 Wednesday, February 10, 2010 3:53 PM
Page 136 of 231
Intelligent Technology135
Using the system
Safety
Driving Tips
General Maintenance
Breakdown assistance
Praktik
Technical Data
Operating principle
The EDL is activated automaticall
y, that is without any action on the part of the driver.
It monitors the speeds of the driven wheels with the aid of the ABS sensors. Should
only one drive wheel begin spinning on a slippery surface there will be an appreciable
difference in the speed of the driven wheels. The EDL function brakes the slipping
wheel and the differential transmits a greater driving force to the other driven wheel.
This control process is also accompanied by noises.
Overheating of the brakes
The EDL switches off automatically if unusually severe stresses exist in order to avoid
excessive heat generation in the disc brake on the wheel which is being braked. The
vehicle can continue to be driven and has the same characteristics as a vehicle not
fitted with EDL.
The EDL switches on again automatically as soon as the brake has cooled down.
WARNING
Carefully depress the accelerator when accelerating on uniformly slippery
road surfaces, such as ice and snow. The driven wheels might still spin despite
the EDL and affect the stability of the vehicle - risk of an accident!
You should always adapt your style of driving to the condition of road
surface and to the traffic situation even when your vehicle is fitted with EDL.
The increased safety offered must not tempt you to take greater risks than
otherwise - risk of an accident!Note
If the ABS or TCS or ESP warning light comes on, this may also indicate a fault in the
EDL. Please have the vehicle inspected as soon as possible by a specialist garage.
Changes to vehicle (e.g. on engine, on th e brakes, on chassis or another combina-
tion of tyres and wheels) can in fluence the function of the EDL page 179, “Accesso-
ries, changes and replacement of parts”.
BrakesWhat has a negative effect on braking efficiency?Wear-and-tear
Wear-and-tear to the brake pa ds is greatly dependent on the operating conditions of
the vehicle and your style of driving. Particularly if you drive a great deal in towns and
over short distances or if you adopt a sporty style of driving, it may be necessary to
have the thickness of the brake pads insp ected at a specialist garage between the
service inspections.
Wet roads or road salt
There may be a certain delay before the brakes take full effect un der certain conditions
such as when driving through water, during heavy rain showers or after the vehicle has
been washed in an automatic vehicle wash , since the brake discs and brake pads may
be moist or even have a coating of ice on them in winter. You should dry the brakes as
soon as possible by applying and releasing the brakes several times.
There also may be a certain delay before the full braking efficiency is available when
driving on roads which have been treated with road salt if you have not used the brakes
for some considerable time beforehand. The layer of salt on the brake discs and brake
pads must first be rubbed off when you apply the brakes.
Corrosion
Corrosion on the brake discs and dirt on th e bake pads occur if the vehicle has been
parked for a long period and if you do not make much use of the braking system.
We recommend cleaning the brake discs by firm ly applying the brakes at a fairly high
speed if you do not make much use of the braking system or if surface corrosion is
present .
Faults in the brake surface
If you notice that the braking distance has suddenly become longer and that the brake
pedal can be depressed further, it is possib le that a brake circuit of the dual-circuit
brake system has failed. Drive, in such cases, to the nearest specialist garage without
delay in order to have the problem rectified. Drive at a reduced speed while on your
way to the dealer and adapt your style of driving to the higher brake pedal pressure
required.
s16g.4.book Page 135 Wednesda y, February 10, 2010 3:53 PM
Page 139 of 231
Intelligent Technology
138
You will place great stresses on the power steering system if the steering is turned to
full lock when the vehicle is stationary. Turn ing the steering to full lock in such a situa-
tion will be accompanied by noises.
It is still possible to fully steer the vehicle if the power steering fails or if the engine is
not running (vehicle being towed in). The only difference is that greater physical effort
is required.
It is possible that the hydraulic pump of the power steering will not run due to the low
vehicle network voltage if the battery has gone flat and the engine must started with
the help off jump leads. This condition will be indicated by lighting up of the warning
light.
The power steering operates again if the ba ttery is charged to a specific range when
engine is running. It also op erates again, if the engine can be started with its own
battery.
If there is a fault in the power steering, the warning light lights up in the instrument
cluster
page 25.
Caution
Do not leave the steering at full lock fo r more than 15 seconds when the engine is
running - risk of damaging the power steering!
Note
Have the steering inspected as soon as possible by a specialist garage if there is a leak
or fault in the system.
Tyre pressure monitoring system*The tyre pressure monitoring system compares with the aid of the ABS sensors the
speed and also the rolling circumference of the individual wheels. If the tyre inflation
pressure is significantly changed and thus the rolling circumference of a wheel, the
warning light
lights up in the instrument cluster page 30. The tyre pressure moni-
toring system functions late or too sensitively if:
the structure of the tyre is damaged,
the vehicle is loaded to one side or with a load on the roof,
the wheels of an axle are loaded heavily (e.g. when towing a trailer or when driving
uphill or downhill),
the vehicle is operated in unfavourable wi nter conditions or on an unfirm ground,
snow chains or emergency wheel are mounted,
the driver has a sporty style of driving (with sharp acceleration and high speed
when cornering).
Basic setting of the system
After changing the tyre inflation pressures or after changing one or several wheels, a
basic setting of the system mu st be carried out as follows.
Inflate all tyres to the specified inflation pressure page 173.
Switch on the ignition.
Press button
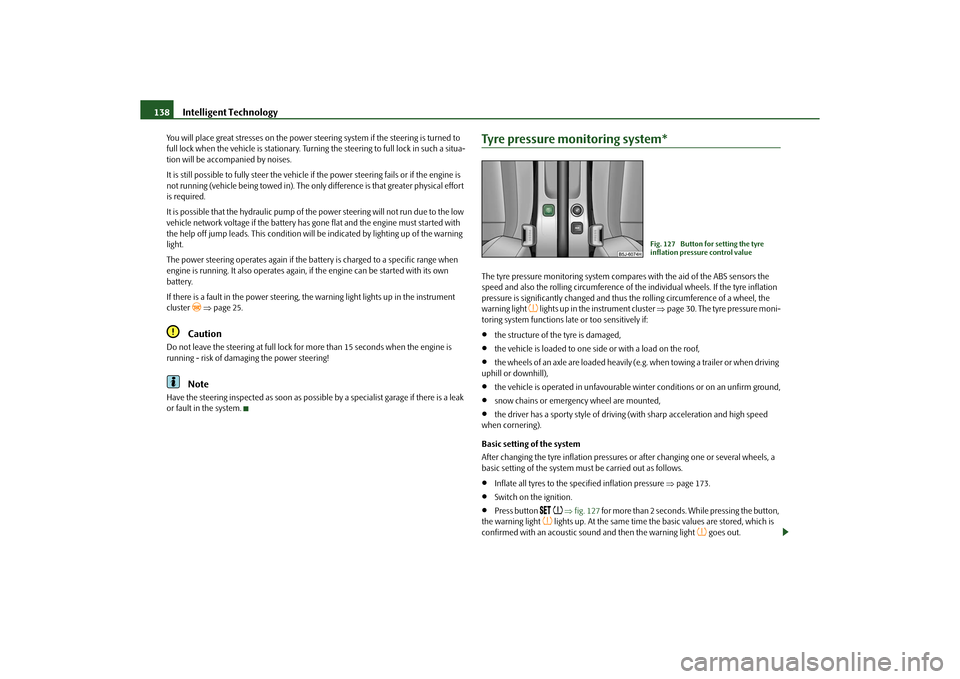
fig. 127 for more than 2 seconds. While pressing the button,
the warning light
lights up. At the same time the basic values are stored, which is
confirmed with an acoustic sound and then the warning light
goes out.
Fig. 127 Button for setting the tyre
inflation pressure control value
s16g.4.book Page 138 Wednesda y, February 10, 2010 3:53 PM