display SKODA ROOMSTER 2011 1.G User Guide
[x] Cancel search | Manufacturer: SKODA, Model Year: 2011, Model line: ROOMSTER, Model: SKODA ROOMSTER 2011 1.GPages: 212, PDF Size: 3.3 MB
Page 20 of 212
■
Phone ⇒ page 94
■ Vehicle status ⇒ page 94
■ Settings ⇒ page 19
The menu point Audio is only then displayed when the factory-fitted car radio is
switched on.
The menu point Navigation is only then displayed when the factory-fitted radio
navigation system is switched on. Note
● If warning messages are shown in the information display ⇒ page 18, these
messages can be confirmed with the button B on the windshield wiper lever in
order to call up the main menu.
● If you do not activate the information display at that moment, the menu shifts
to one level higher every 10 seconds.
● The operation of the factory-fitted car stereo or radio navigation system is de-
scribed in separate operating instructions to be found in the on-board literature.
Door, luggage compartment door and bonnet ajar warning The door, luggage compartment and bonnet ajar warning lights up if at least one
door, the luggage compartment or bonnet are not closed. The symbol indicates
which door is still open or whether the luggage compartment door or bonnet is
not closed
.
The symbol goes out as soon as the doors, luggage compartment door and bonnet
are completely closed.
A warning signal sounds if the car is driven at a speed of more than 6km/hour and
if the engine or the luggage compartment door is open.
Auto Check Control
Car state The Auto Check Control carries out a check of certain functions and vehicle com-
ponents. The check is performed constantly when the ignition is switched on,
both when the vehicle is stationary, as well as when driving. Some operational faults, urgent repairs, service work or other information appear
in the display of the instrument cluster. The displays are shown with a red or yel-
low light symbol depending on the priority of the message.
The red symbols indicate danger (priority 1) while the yellow symbols indicate a
warning (priority 2). Information for the driver may also appear in addition to the
symbols ⇒
page 20.
There is at least one error message when the term Vehicle status is displayed in
the menu. After selecting this menu the first of the error messages is displayed.
Several error messages are shown on the display under the message e.g. 1/3. This
indicates that the first of a total of three error messages is displayed. The respec-
tive messages are displayed one after the other in an interval of 5 seconds. Check
as soon as possible the displayed error messages.
As long as the operational faults are not rectified, the symbols are always indica-
ted again. After the first display, the symbols are indicated without information for
the driver.
If a fault occurs, a warning signal will also sound in addition to the symbol and
text in the display:
● Priority 1 - three warning signals
● Priority 2 - one warning signal
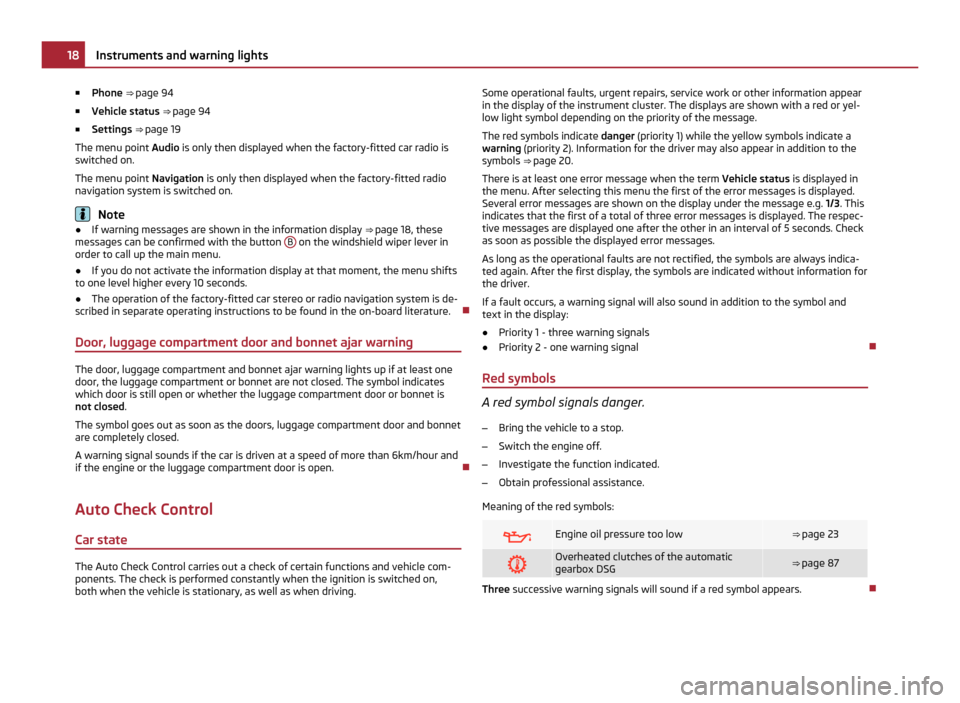
Red symbols A red symbol signals danger.
– Bring the vehicle to a stop.
– Switch the engine off.
– Investigate the function indicated.
– Obtain professional assistance.
Meaning of the red symbols: Engine oil pressure too low ⇒ page 23
Overheated clutches of the automatic
gearbox DSG
⇒ page 87
Three successive warning signals will sound if a red symbol appears.
18
Instruments and warning lights
Page 21 of 212
Yellow symbols
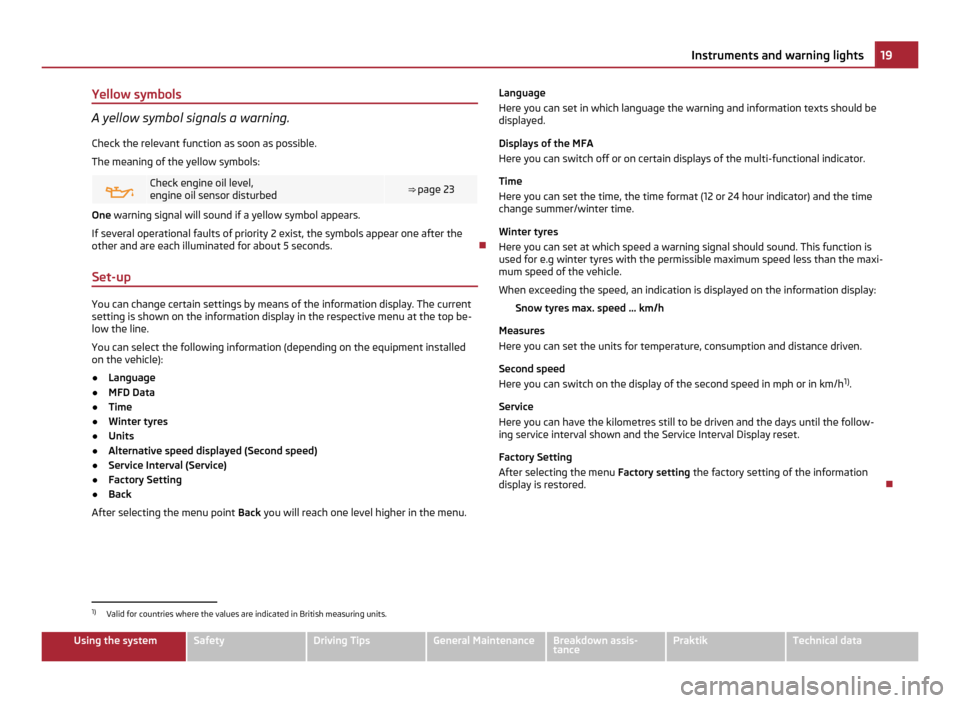
A yellow symbol signals a warning.
Check the relevant function as soon as possible.
The meaning of the yellow symbols: Check engine oil level,
engine oil sensor disturbed
⇒
page 23 One warning signal will sound if a yellow symbol appears.
If several operational faults of priority 2 exist, the symbols appear one after the
other and are each illuminated for about 5 seconds.
Set-up You can change certain settings by means of the information display. The current
setting is shown on the information display in the respective menu at the top be-
low the line.
You can select the following information (depending on the equipment installed
on the vehicle):
●
Language
● MFD Data
● Time
● Winter tyres
● Units
● Alternative speed displayed (Second speed)
● Service Interval (Service)
● Factory Setting
● Back
After selecting the menu point Back you will reach one level higher in the menu. Language
Here you can set in which language the warning and information texts should be
displayed.
Displays of the MFA
Here you can switch off or on certain displays of the multi-functional indicator.
Time
Here you can set the time, the time format (12 or 24 hour indicator) and the time
change summer/winter time.
Winter tyres
Here you can set at which speed a warning signal should sound. This function is
used for e.g winter tyres with the permissible maximum speed less than the maxi-
mum speed of the vehicle.
When exceeding the speed, an indication is displayed on the information display:
Snow tyres max. speed ... km/h
Measures
Here you can set the units for temperature, consumption and distance driven.
Second speed
Here you can switch on the display of the second speed in mph or in km/h 1)
.
Service
Here you can have the kilometres still to be driven and the days until the follow-
ing service interval shown and the Service Interval Display reset.
Factory Setting
After selecting the menu Factory setting the factory setting of the information
display is restored. 1)
Valid for countries where the values are indicated in British measuring units. 19
Instruments and warning lights Using the system Safety Driving Tips General Maintenance Breakdown assis-
tance Praktik Technical data
Page 24 of 212
Bulb failure
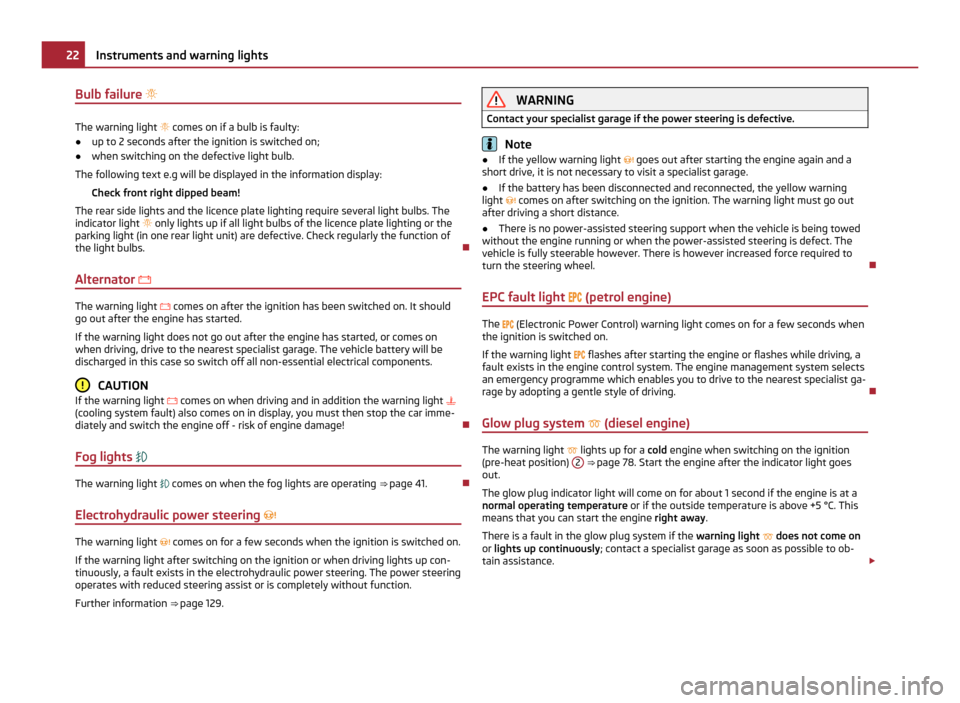
The warning light
comes on if a bulb is faulty:
● up to 2 seconds after the ignition is switched on;
● when switching on the defective light bulb.
The following text e.g will be displayed in the information display: Check front right dipped beam!
The rear side lights and the licence plate lighting require several light bulbs. The
indicator light only lights up if all light bulbs of the licence plate lighting or the
parking light (in one rear light unit) are defective. Check regularly the function of
the light bulbs.
Alternator The warning light
comes on after the ignition has been switched on. It should
go out after the engine has started.
If the warning light does not go out after the engine has started, or comes on
when driving, drive to the nearest specialist garage. The vehicle battery will be
discharged in this case so switch off all non-essential electrical components. CAUTION
If the warning light comes on when driving and in addition the warning light
(cooling system fault) also comes on in display, you must then stop the car imme-
diately and switch the engine off - risk of engine damage!
Fog lights The warning light
comes on when the fog lights are operating ⇒ page 41.
Electrohydraulic power steering The warning light
comes on for a few seconds when the ignition is switched on.
If the warning light after switching on the ignition or when driving lights up con-
tinuously, a fault exists in the electrohydraulic power steering. The power steering
operates with reduced steering assist or is completely without function.
Further information ⇒
page 129. WARNING
Contact your specialist garage if the power steering is defective. Note
● If the yellow warning light goes out after starting the engine again and a
short drive, it is not necessary to visit a specialist garage.
● If the battery has been disconnected and reconnected, the yellow warning
light comes on after switching on the ignition. The warning light must go out
after driving a short distance.
● There is no power-assisted steering support when the vehicle is being towed
without the engine running or when the power-assisted steering is defect. The
vehicle is fully steerable however. There is however increased force required to
turn the steering wheel.
EPC fault light
(petrol engine) The
(Electronic Power Control) warning light comes on for a few seconds when
the ignition is switched on.
If the warning light flashes after starting the engine or flashes while driving, a
fault exists in the engine control system. The engine management system selects
an emergency programme which enables you to drive to the nearest specialist ga-
rage by adopting a gentle style of driving.
Glow plug system (diesel engine) The warning light
lights up for a
cold
engine when switching on the ignition
(pre-heat position) 2 ⇒ page 78. Start the engine after the indicator light goes
out.
The glow plug indicator light will come on for about 1 second if the engine is at a
normal operating temperature or if the outside temperature is above +5 °C. This
means that you can start the engine right away.
There is a fault in the glow plug system if the warning light
does not come on
or lights up continuously ; contact a specialist garage as soon as possible to ob-
tain assistance. £22
Instruments and warning lights
Page 25 of 212
If the
warning light begins to flash while driving, a fault exists in the engine
control. The engine management system selects an emergency programme which
enables you to drive to the nearest specialist garage by adopting a gentle style of
driving.
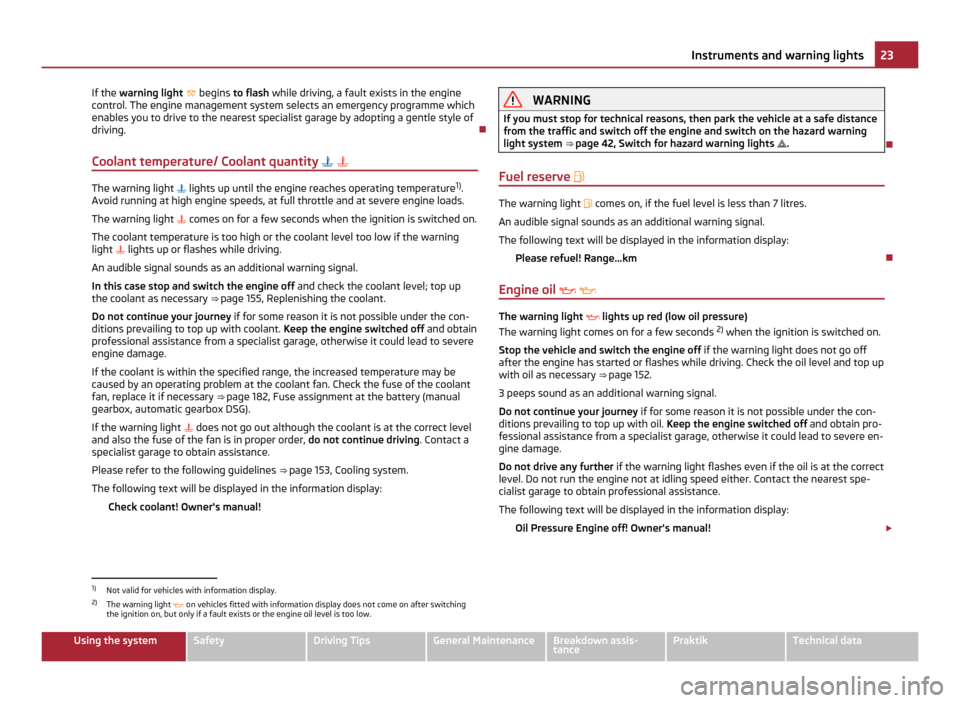
Coolant temperature/ Coolant quantity The warning light
lights up until the engine reaches operating temperature 1)
.
Avoid running at high engine speeds, at full throttle and at severe engine loads.
The warning light comes on for a few seconds when the ignition is switched on.
The coolant temperature is too high or the coolant level too low if the warning
light lights up or flashes while driving.
An audible signal sounds as an additional warning signal.
In this case stop and switch the engine off and check the coolant level; top up
the coolant as necessary ⇒ page 155, Replenishing the coolant
.
Do not continue your journey if for some reason it is not possible under the con-
ditions prevailing to top up with coolant. Keep the engine switched off and obtain
professional assistance from a specialist garage, otherwise it could lead to severe
engine damage.
If the coolant is within the specified range, the increased temperature may be
caused by an operating problem at the coolant fan. Check the fuse of the coolant
fan, replace it if necessary ⇒ page 182, Fuse assignment at the battery (manual
gearbox, automatic gearbox DSG).
If the warning light does not go out although the coolant is at the correct level
and also the fuse of the fan is in proper order, do not continue driving. Contact a
specialist garage to obtain assistance.
Please refer to the following guidelines ⇒ page 153, Cooling system.
The following text will be displayed in the information display: Check coolant! Owner's manual! WARNING
If you must stop for technical reasons, then park the vehicle at a safe distance
from the traffic and switch off the engine and switch on the hazard warning
light system ⇒ page 42
, Switch for hazard warning lights .
Fuel reserve The warning light
comes on, if the fuel level is less than 7 litres.
An audible signal sounds as an additional warning signal.
The following text will be displayed in the information display: Please refuel! Range...km
Engine oil The warning light
lights up red (low oil pressure)
The warning light comes on for a few seconds 2)
when the ignition is switched on.
Stop the vehicle and switch the engine off if the warning light does not go off
after the engine has started or flashes while driving. Check the oil level and top up
with oil as necessary ⇒
page 152.
3 peeps sound as an additional warning signal.
Do not continue your journey if for some reason it is not possible under the con-
ditions prevailing to top up with oil. Keep the engine switched off and obtain pro-
fessional assistance from a specialist garage, otherwise it could lead to severe en-
gine damage.
Do not drive any further if the warning light flashes even if the oil is at the correct
level. Do not run the engine not at idling speed either. Contact the nearest spe-
cialist garage to obtain professional assistance.
The following text will be displayed in the information display:
Oil Pressure Engine off! Owner's manual! £1)
Not valid for vehicles with information display.
2) The warning light on vehicles fitted with information display does not come on after switching
the ignition on, but only if a fault exists or the engine oil level is too low. 23
Instruments and warning lights Using the system Safety Driving Tips General Maintenance Breakdown assis-
tance Praktik Technical data
Page 26 of 212
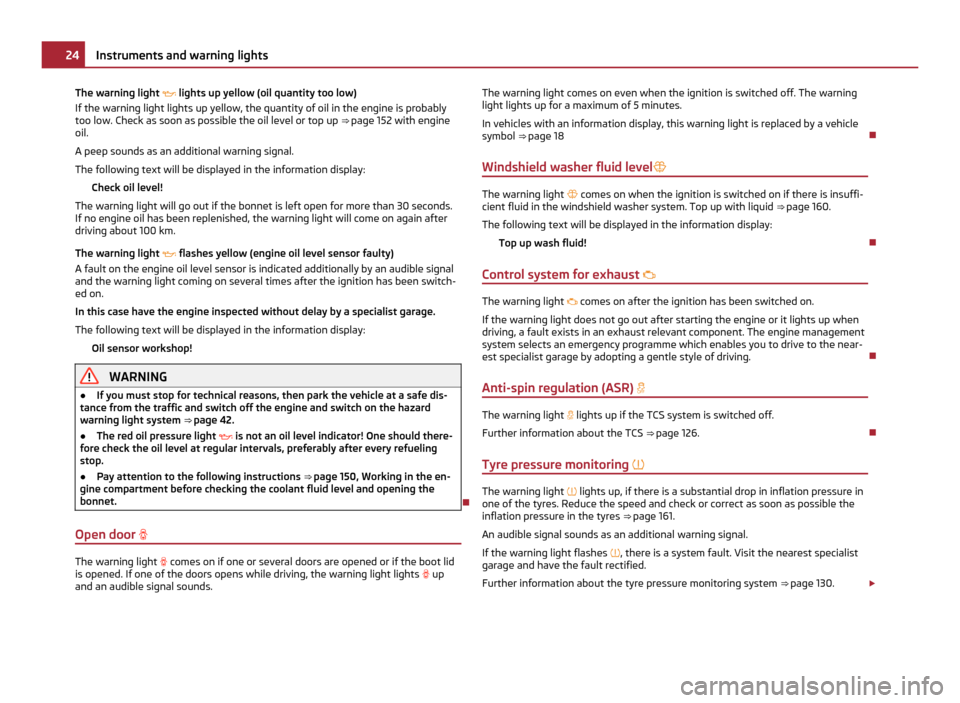
The warning light
lights up yellow (oil quantity too low)
If the warning light lights up yellow, the quantity of oil in the engine is probably
too low. Check as soon as possible the oil level or top up ⇒
page 152 with engine
oil.
A peep sounds as an additional warning signal.
The following text will be displayed in the information display: Check oil level!
The warning light will go out if the bonnet is left open for more than 30 seconds.
If no engine oil has been replenished, the warning light will come on again after
driving about 100 km.
The warning light flashes yellow (engine oil level sensor faulty)
A fault on the engine oil level sensor is indicated additionally by an audible signal
and the warning light coming on several times after the ignition has been switch-
ed on.
In this case have the engine inspected without delay by a specialist garage.
The following text will be displayed in the information display:
Oil sensor workshop! WARNING
● If you must stop for technical reasons, then park the vehicle at a safe dis-
tance from the traffic and switch off the engine and switch on the hazard
warning light system ⇒ page 42
.
● The red oil pressure light is not an oil level indicator! One should there-
fore check the oil level at regular intervals, preferably after every refueling
stop.
● Pay attention to the following instructions ⇒ page 150
, Working in the en-
gine compartment before checking the coolant fluid level and opening the
bonnet.
Open door The warning light
comes on if one or several doors are opened or if the boot lid
is opened. If one of the doors opens while driving, the warning light lights up
and an audible signal sounds. The warning light comes on even when the ignition is switched off. The warning
light lights up for a maximum of 5 minutes.
In vehicles with an information display, this warning light is replaced by a vehicle
symbol ⇒ page 18
Windshield washer fluid level The warning light
comes on when the ignition is switched on if there is insuffi-
cient fluid in the windshield washer system. Top up with liquid ⇒ page 160.
The following text will be displayed in the information display: Top up wash fluid!
Control system for exhaust The warning light
comes on after the ignition has been switched on.
If the warning light does not go out after starting the engine or it lights up when
driving, a fault exists in an exhaust relevant component. The engine management
system selects an emergency programme which enables you to drive to the near-
est specialist garage by adopting a gentle style of driving.
Anti-spin regulation (ASR) The warning light
lights up if the TCS system is switched off.
Further information about the TCS ⇒ page 126
.
Tyre pressure monitoring The warning light
lights up, if there is a substantial drop in inflation pressure in
one of the tyres. Reduce the speed and check or correct as soon as possible the
inflation pressure in the tyres ⇒
page 161.
An audible signal sounds as an additional warning signal.
If the warning light flashes , there is a system fault. Visit the nearest specialist
garage and have the fault rectified.
Further information about the tyre pressure monitoring system ⇒ page 130. £24
Instruments and warning lights
Page 28 of 212
WARNING
● If the brake system warning light comes on together with the ABS
warning light stop the vehicle immediately and check the brake fluid level
in the reservoir ⇒ page 156
, Brake fluid. If the fluid level has dropped below
the MIN marking, do not drive any further - risk of accident! Contact a Škoda
dealer to obtain professional assistance.
● Pay attention to the following instructions ⇒
page 150, Working in the en-
gine compartment before checking the brake fluid level and opening the bon-
net.
● If the brake fluid is at the correct level, the ABS control function has failed.
The rear wheels may then block very rapidly when braking. In certain circum-
stances, this can result in the rear end of the car breaking away - risk of skid-
ding! Drive carefully to the nearest specialist garage and have the fault recti-
fied.
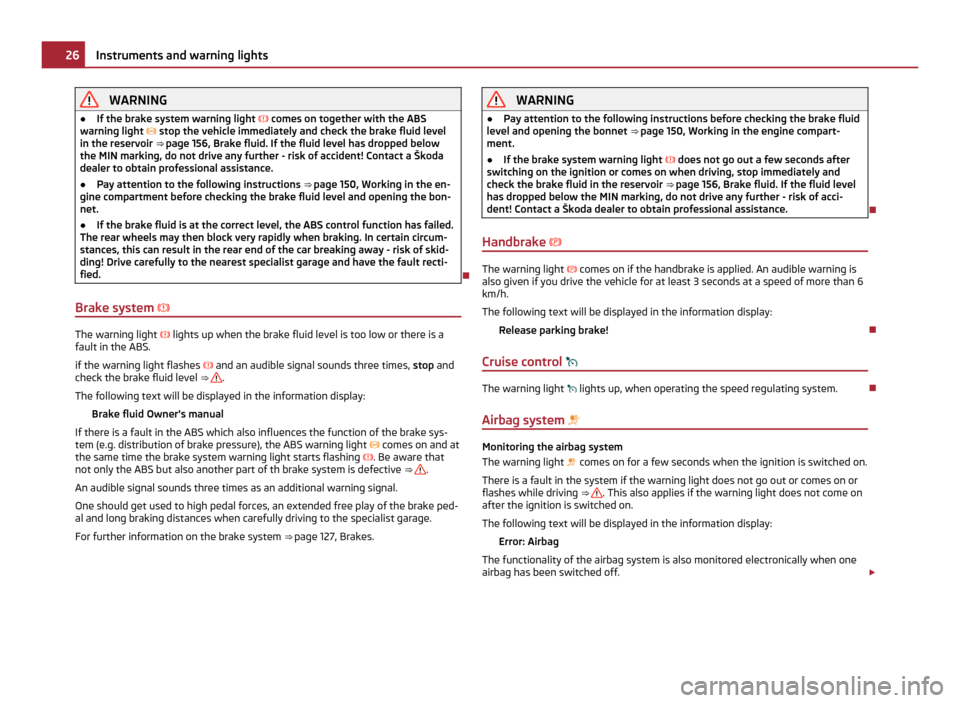
Brake system The warning light
lights up when the brake fluid level is too low or there is a
fault in the ABS.
if the warning light flashes and an audible signal sounds three times,
stop and
check the brake fluid level ⇒ .
The following text will be displayed in the information display: Brake fluid Owner's manual
If there is a fault in the ABS which also influences the function of the brake sys-
tem (e.g. distribution of brake pressure), the ABS warning light comes on and at
the same time the brake system warning light starts flashing . Be aware that
not only the ABS but also another part of th brake system is defective ⇒ .
An audible signal sounds three times as an additional warning signal.
One should get used to high pedal forces, an extended free play of the brake ped-
al and long braking distances when carefully driving to the specialist garage.
For further information on the brake system ⇒ page 127,
Brakes. WARNING
● Pay attention to the following instructions before checking the brake fluid
level and opening the bonnet ⇒ page 150
, Working in the engine compart-
ment.
● If the brake system warning light does not go out a few seconds after
switching on the ignition or comes on when driving, stop immediately and
check the brake fluid in the reservoir ⇒
page 156, Brake fluid. If the fluid level
has dropped below the MIN marking, do not drive any further - risk of acci-
dent! Contact a Škoda dealer to obtain professional assistance.
Handbrake The warning light
comes on if the handbrake is applied. An audible warning is
also given if you drive the vehicle for at least 3 seconds at a speed of more than 6
km/h.
The following text will be displayed in the information display:
Release parking brake!
Cruise control The warning light
lights up, when operating the speed regulating system.
Airbag system Monitoring the airbag system
The warning light
comes on for a few seconds when the ignition is switched on.
There is a fault in the system if the warning light does not go out or comes on or
flashes while driving ⇒ . This also applies if the warning light does not come on
after the ignition is switched on.
The following text will be displayed in the information display:
Error: Airbag
The functionality of the airbag system is also monitored electronically when one
airbag has been switched off. £26
Instruments and warning lights
Page 29 of 212
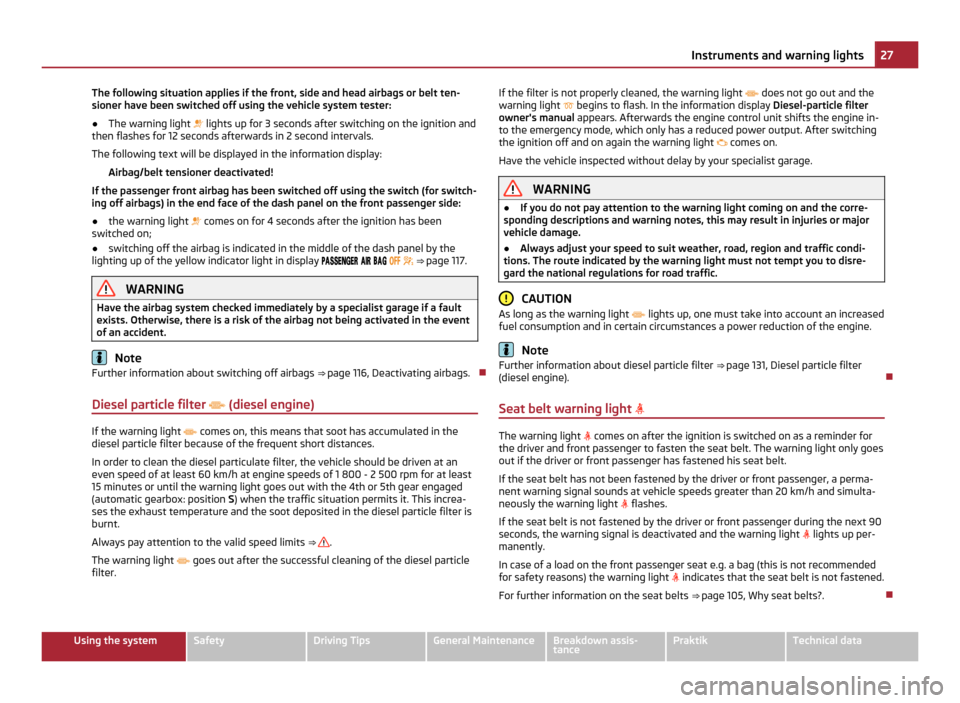
The following situation applies if the front, side and head airbags or belt ten-
sioner have been switched off using the vehicle system tester:
●
The warning light lights up for 3 seconds after switching on the ignition and
then flashes for 12 seconds afterwards in 2 second intervals.
The following text will be displayed in the information display: Airbag/belt tensioner deactivated!
If the passenger front airbag has been switched off using the switch (for switch-
ing off airbags) in the end face of the dash panel on the front passenger side:
● the warning light comes on for 4 seconds after the ignition has been
switched on;
● switching off the airbag is indicated in the middle of the dash panel by the
lighting up of the yellow indicator light in display
⇒ page 117. WARNING
Have the airbag system checked immediately by a specialist garage if a fault
exists. Otherwise, there is a risk of the airbag not being activated in the event
of an accident. Note
Further information about switching off airbags ⇒ page 116
, Deactivating airbags.
Diesel particle filter (diesel engine) If the warning light
comes on, this means that soot has accumulated in the
diesel particle filter because of the frequent short distances.
In order to clean the diesel particulate filter, the vehicle should be driven at an
even speed of at least 60 km/h at engine speeds of 1
800 - 2 500 rpm for at least
15 minutes or until the warning light goes out with the 4th or 5th gear engaged
(automatic gearbox: position S) when the traffic situation permits it. This increa-
ses the exhaust temperature and the soot deposited in the diesel particle filter is
burnt.
Always pay attention to the valid speed limits ⇒ .
The warning light
goes out after the successful cleaning of the diesel particle
filter. If the filter is not properly cleaned, the warning light
does not go out and the
warning light begins to flash. In the information display Diesel-particle filter
owner's manual appears. Afterwards the engine control unit shifts the engine in-
to the emergency mode, which only has a reduced power output. After switching
the ignition off and on again the warning light comes on.
Have the vehicle inspected without delay by your specialist garage. WARNING
● If you do not pay attention to the warning light coming on and the corre-
sponding descriptions and warning notes, this may result in injuries or major
vehicle damage.
● Always adjust your speed to suit weather, road, region and traffic condi-
tions. The route indicated by the warning light must not tempt you to disre-
gard the national regulations for road traffic. CAUTION
As long as the warning light lights up, one must take into account an increased
fuel consumption and in certain circumstances a power reduction of the engine. Note
Further information about diesel particle filter ⇒
page 131, Diesel particle filter
(diesel engine).
Seat belt warning light The warning light
comes on after the ignition is switched on as a reminder for
the driver and front passenger to fasten the seat belt. The warning light only goes
out if the driver or front passenger has fastened his seat belt.
If the seat belt has not been fastened by the driver or front passenger, a perma-
nent warning signal sounds at vehicle speeds greater than 20 km/h and simulta-
neously the warning light flashes.
If the seat belt is not fastened by the driver or front passenger during the next 90
seconds, the warning signal is deactivated and the warning light lights up per-
manently.
In case of a load on the front passenger seat e.g. a bag (this is not recommended
for safety reasons) the warning light indicates that the seat belt is not fastened.
For further information on the seat belts ⇒ page 105, Why seat belts?
. 27
Instruments and warning lights Using the system Safety Driving Tips General Maintenance Breakdown assis-
tance Praktik Technical data
Page 33 of 212
The safe securing system is again activated the next time the vehicle is unlocked
and locked again.
If the vehicle is locked and the safe securing system is deactivated, you can open
the vehicle from the inside by pulling on the door opening lever. The door is un-
locked and opened at the same time.
WARNING
If the vehicle is locked from the outside and the safe securing system is acti-
vated, there must not be any person and animals in the vehicle as it is then
not possible to open either a door or a window from the inside. The locked
doors make it more difficult for rescuers to get into the vehicle in an emergen-
cy - hazard! Note
● The anti-theft alarm system is also activated with the deactivated safe secur-
ing system when locking the vehicle. The interior monitor is however not activa-
ted.
● When activating the Safelock function after you lock the vehicle, the message
CHECK DEADLOCK will appear to inform you about this. In vehicles equipped with
an information display, the message Check deadlock! appears Owner's manual!
(CHECK DEADLOCK appears.
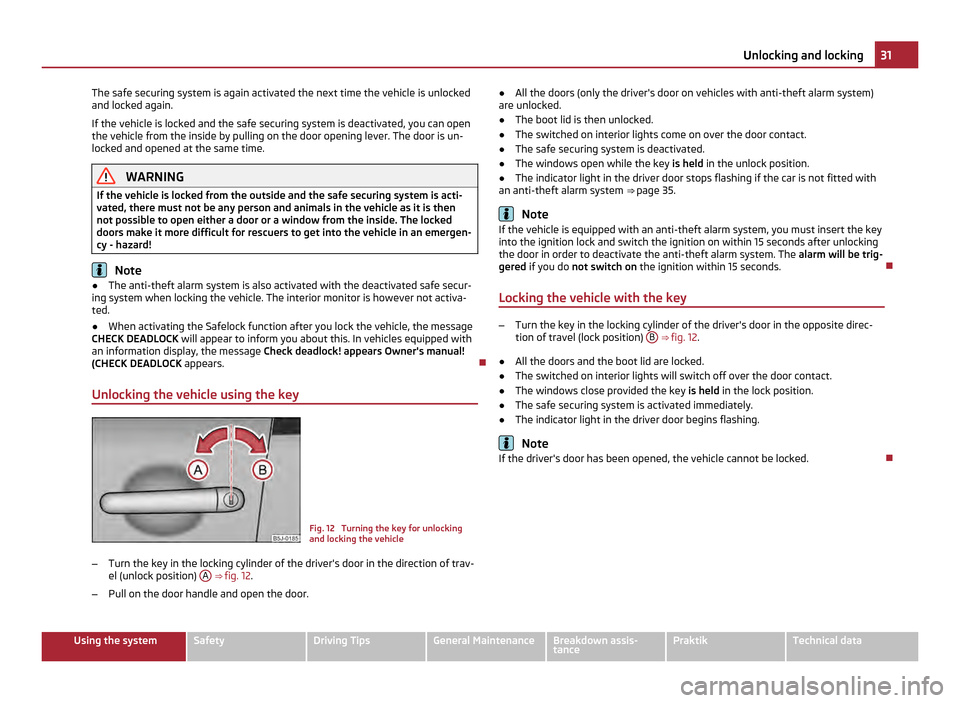
Unlocking the vehicle using the key Fig. 12 Turning the key for unlocking
and locking the vehicle
– Turn the key in the locking cylinder of the driver's door in the direction of trav-
el (unlock position) A
⇒ fig. 12 .
– Pull on the door handle and open the door. ●
All the doors (only the driver's door on vehicles with anti-theft alarm system)
are unlocked.
● The boot lid is then unlocked.
● The switched on interior lights come on over the door contact.
● The safe securing system is deactivated.
● The windows open while the key is held in the unlock position.
● The indicator light in the driver door stops flashing if the car is not fitted with
an anti-theft alarm system ⇒
page 35. Note
If the vehicle is equipped with an anti-theft alarm system, you must insert the key
into the ignition lock and switch the ignition on within 15 seconds after unlocking
the door in order to deactivate the anti-theft alarm system. The alarm will be trig-
gered
if you do not switch on the ignition within 15 seconds.
Locking the vehicle with the key –
Turn the key in the locking cylinder of the driver's door in the opposite direc-
tion of travel (lock position) B
⇒
fig. 12.
● All the doors and the boot lid are locked.
● The switched on interior lights will switch off over the door contact.
● The windows close provided the key is held in the lock position.
● The safe securing system is activated immediately.
● The indicator light in the driver door begins flashing. Note
If the driver's door has been opened, the vehicle cannot be locked. 31
Unlocking and locking Using the system Safety Driving Tips General Maintenance Breakdown assis-
tance Praktik Technical data
Page 36 of 212
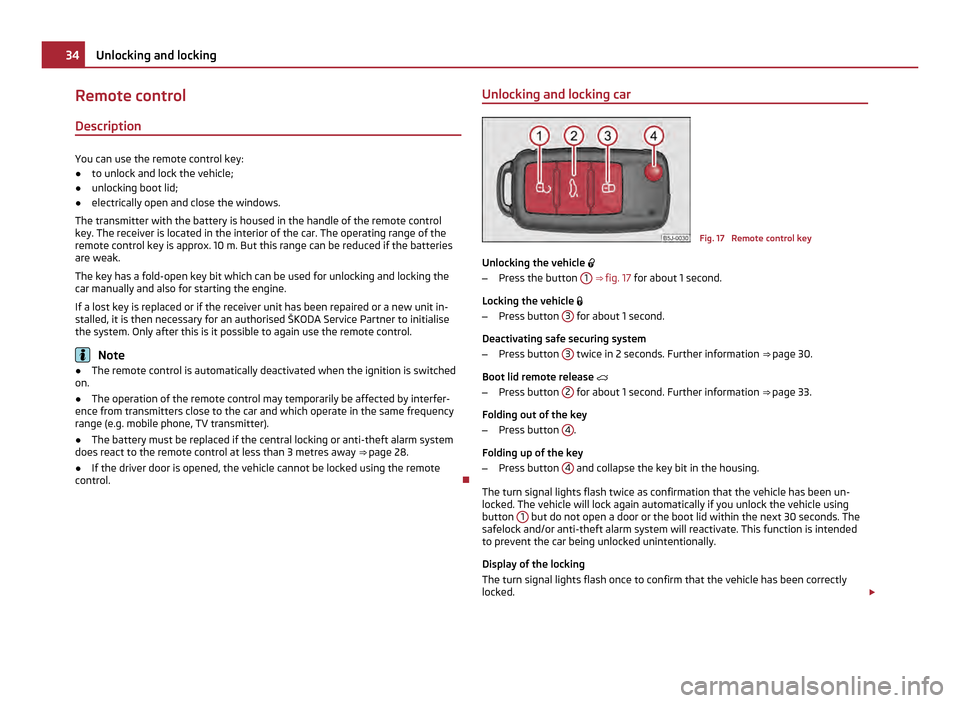
Remote control
Description You can use the remote control key:
●
to unlock and lock the vehicle;
● unlocking boot lid;
● electrically open and close the windows.
The transmitter with the battery is housed in the handle of the remote control
key. The receiver is located in the interior of the car. The operating range of the
remote control key is approx. 10 m. But this range can be reduced if the batteries
are weak.
The key has a fold-open key bit which can be used for unlocking and locking the
car manually and also for starting the engine.
If a lost key is replaced or if the receiver unit has been repaired or a new unit in-
stalled, it is then necessary for an authorised
ŠKODA Service Partner to initialise
the system. Only after this is it possible to again use the remote control. Note
● The remote control is automatically deactivated when the ignition is switched
on.
● The operation of the remote control may temporarily be affected by interfer-
ence from transmitters close to the car and which operate in the same frequency
range (e.g. mobile phone, TV transmitter).
● The battery must be replaced if the central locking or anti-theft alarm system
does react to the remote control at less than 3
metres away ⇒ page 28.
● If the driver door is opened, the vehicle cannot be locked using the remote
control. Unlocking and locking car Fig. 17 Remote control key
Unlocking the vehicle
– Press the button 1
⇒ fig. 17 for about 1 second.
Locking the vehicle
– Press button 3 for about 1 second.
Deactivating safe securing system
– Press button 3 twice in 2 seconds. Further information
⇒
page 30.
Boot lid remote release
– Press button 2 for about 1 second. Further information
⇒
page 33.
Folding out of the key
– Press button 4 .
Folding up of the key
– Press button 4 and collapse the key bit in the housing.
The turn signal lights flash twice as confirmation that the vehicle has been un-
locked. The vehicle will lock again automatically if you unlock the vehicle using
button 1 but do not open a door or the boot lid within the next 30 seconds. The
safelock and/or anti-theft alarm system will reactivate. This function is intended
to prevent the car being unlocked unintentionally.
Display of the locking
The turn signal lights flash once to confirm that the vehicle has been correctly
locked. £34
Unlocking and locking
Page 77 of 212
The recirculated air mode is switched off automatically if the air distribution con-
trol
C is in position ⇒
fig. 75. You can also switch recirculated air mode on
again from this setting by repeatedly pressing pushbutton .
WARNING
You should not leave recirculated air mode on over a longer period of time, as
“stale
” air may result in fatigue in the driver and occupants, divert your atten-
tion and also cause the windows to mist up. The risk of having an accident in-
creases. Switch recirculated air mode off as soon as the windows begin mist-
ing up.
Climatronic (automatic air conditioning) Description The Climatronic system is an automatic heating, fresh air and cool-
ing system which provides optimal comfort for the occupants of the
car.
The Climatronic maintains a constant temperature fully automatically, once it has
been set. This is achieved by automatically varying the temperature of the out-
flowing air, the blower stages and the air distribution. The system also takes into
account sunlight which eliminates the need to alter the settings manually. The
automatic mode ⇒ page 76 ensures maximum well-being of the occupants at all
times of the year.
Description of Climatronic system
The cooling operates only if the following conditions are met:
● engine running,
● outside temperature above approx. +2 °C,
● AC switched on.
The AC compressor is switched off at a high coolant temperature in order to en-
sure cooling of the engine at high loads. Recommended setting for all periods of the year:
●
Set the desired temperature, we recommend 22 °C (72 °F).
● Press the button AUTO ⇒ fig. 76
.
● Move the air outlet vents 3 and 4 so that the air flow is directed slightly up-
wards.
Switching over between degrees Celsius and degrees Fahrenheit
Press and hold the buttons AUTO and
AC ⇒ fig. 76
at the same time. The informa-
tion in the desired temperature measuring unit appears in the display. Note
● We recommend that you have Climatronic cleaned by a specialist garage once
every year.
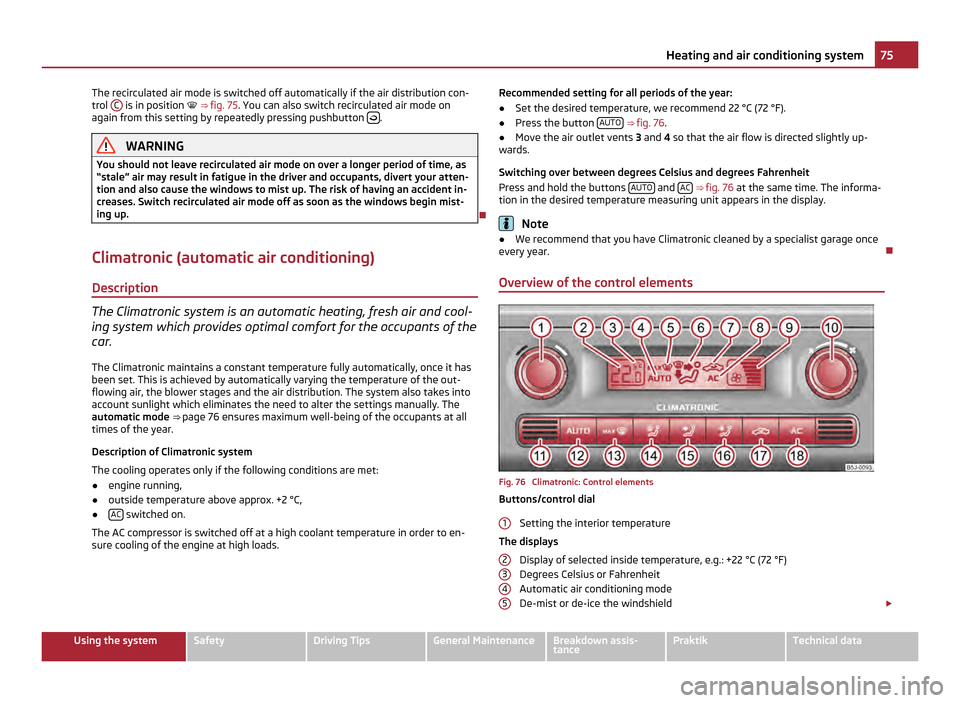
Overview of the control elements Fig. 76 Climatronic: Control elements
Buttons/control dial
Setting the interior temperature
The displays Display of selected inside temperature, e.g.: +22
°C (72 °F)
Degrees Celsius or Fahrenheit
Automatic air conditioning mode
De-mist or de-ice the windshield £
1 2
3
4
5 75
Heating and air conditioning system Using the system Safety Driving Tips General Maintenance Breakdown assis-
tance Praktik Technical data