remove seats SKODA ROOMSTER 2012 1.G Owner's Manual
[x] Cancel search | Manufacturer: SKODA, Model Year: 2012, Model line: ROOMSTER, Model: SKODA ROOMSTER 2012 1.GPages: 194, PDF Size: 4.8 MB
Page 47 of 194
›
With the other hand unlock the locking button A
in the direction of arrow and
remove the wiper blade.
Attaching the wiper blade
› Position the wiper blade onto the wiper arm and lock the locking but-
ton A
» Fig. 32
.
› Check that the wiper blade is correctly attached.
› Fold the wiper arm back to the windscreen. ÐRear window
Manual dimming interior mirror
Basic setting
› Pull the lever on the bottom edge of the mirror forward.
Dimming mirror
› Push the lever on the bottom edge of the mirror backwards. ÐAdditional rear-view mirror
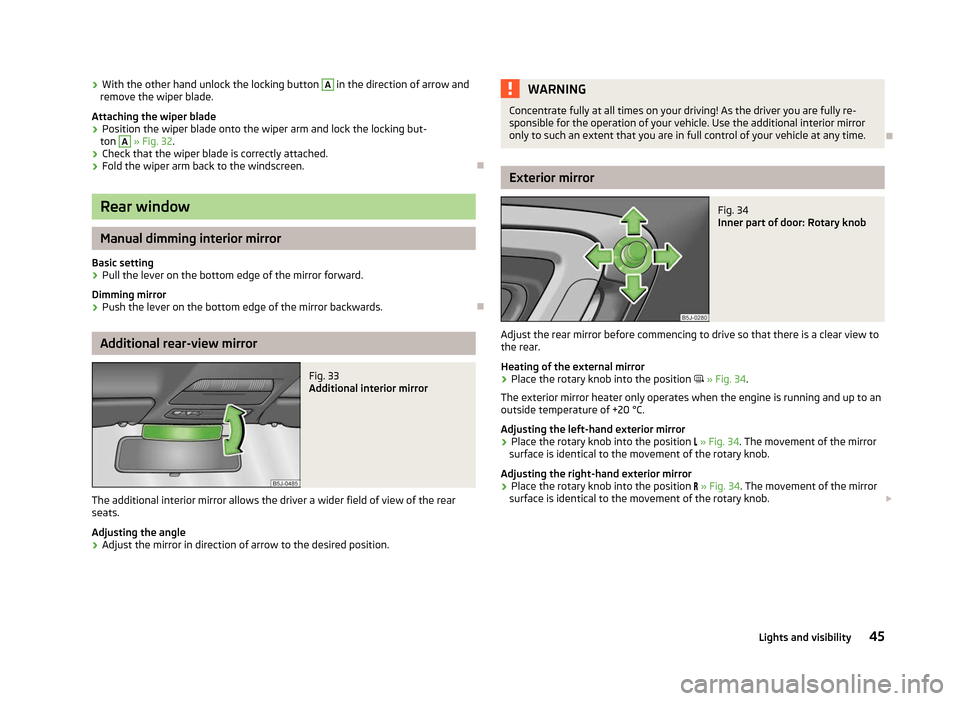
Fig. 33
Additional interior mirror
The additional interior mirror allows the driver a wider field of view of the rear
seats.
Adjusting the angle › Adjust the mirror in direction of arrow to the desired position. WARNING
Concentrate fully at all times on your driving! As the driver you are fully re-
sponsible for the operation of your vehicle. Use the additional interior mirror
only to such an extent that you are in full control of your vehicle at any time. Ð Exterior mirror
Fig. 34
Inner part of door: Rotary knob
Adjust the rear mirror before commencing to drive so that there is a clear view to
the rear.
Heating of the external mirror
› Place the rotary knob into the position
» Fig. 34.
The exterior mirror heater only operates when the engine is running and up to an
outside temperature of +20 °C.
Adjusting the left-hand exterior mirror
› Place the rotary knob into the position
» Fig. 34. The movement of the mirror
surface is identical to the movement of the rotary knob.
Adjusting the right-hand exterior mirror
› Place the rotary knob into the position
» Fig. 34. The movement of the mirror
surface is identical to the movement of the rotary knob. £
45
Lights and visibility
Page 51 of 194
›
Press the locking button in direction of the arrow
» Fig. 37 - and pull the
head restraint out.
› To re-insert the head restraint, push it far enough down into the seat backrest
until the locking button clicks into place.
Best protection is achieved if the top edge of the head restraint is at the same
level as the upper part of your head.
The head restraints must be adjusted to match the size of the seat occupant. Cor-
rectly adjusted head restraints together with the seat belts offer effective protec-
tion for the occupants » page 101.WARNING
■ The head restraints must be correctly adjusted in order to offer effective
protection for the occupants in the event of an accident.
■ Never drive with the head restraints removed - risk of injury!
■ If the rear seats are occupied, the rear head restraint must not be in the
lower position. ÐRear seats
Adjusting seats in forward/back direction
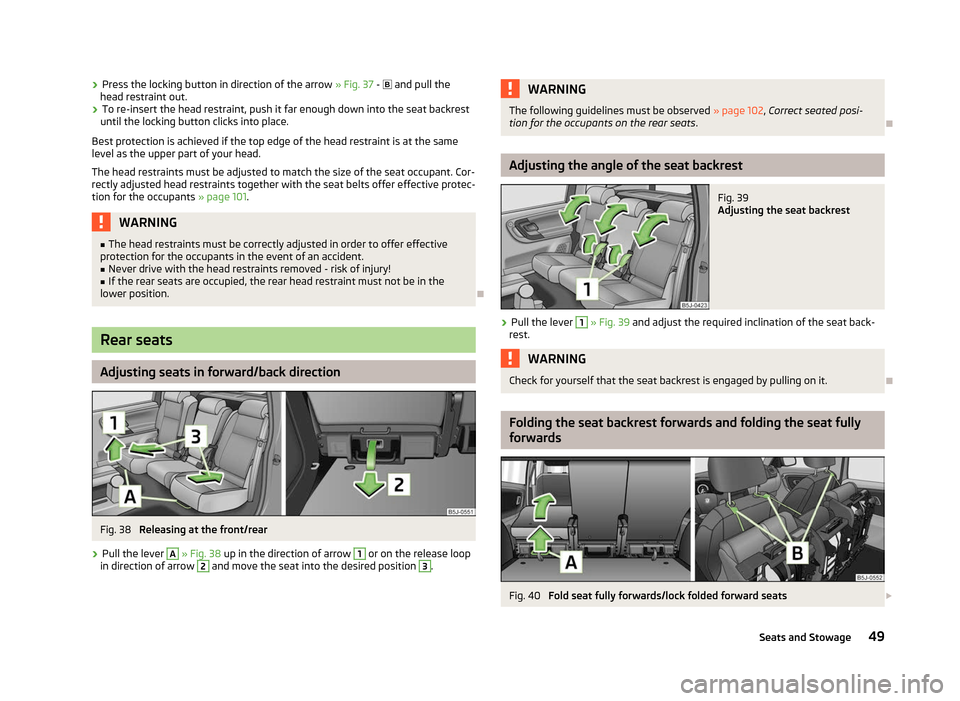
Fig. 38
Releasing at the front/rear
› Pull the lever A
» Fig. 38 up in the direction of arrow 1
or on the release loop
in direction of arrow 2
and move the seat into the desired position 3
. WARNING
The following guidelines must be observed » page 102, Correct seated posi-
tion for the occupants on the rear seats . Ð Adjusting the angle of the seat backrest
Fig. 39
Adjusting the seat backrest
› Pull the lever 1
» Fig. 39 and adjust the required inclination of the seat back-
rest. WARNING
Check for yourself that the seat backrest is engaged by pulling on it. Ð Folding the seat backrest forwards and folding the seat fully
forwards
Fig. 40
Fold seat fully forwards/lock folded forward seats £
49
Seats and Stowage
Page 52 of 194
Folding the seat backrest forwards
›
Put the belt tongue into the opening on the respective side of the vehicle -
safety position.
› Remove the head restraint from the rear middle seat
» page 48, Head re-
straints.
› Push the outer rear seats towards the rear as far as they will go
» page 49,
Adjusting seats in forward/back direction .
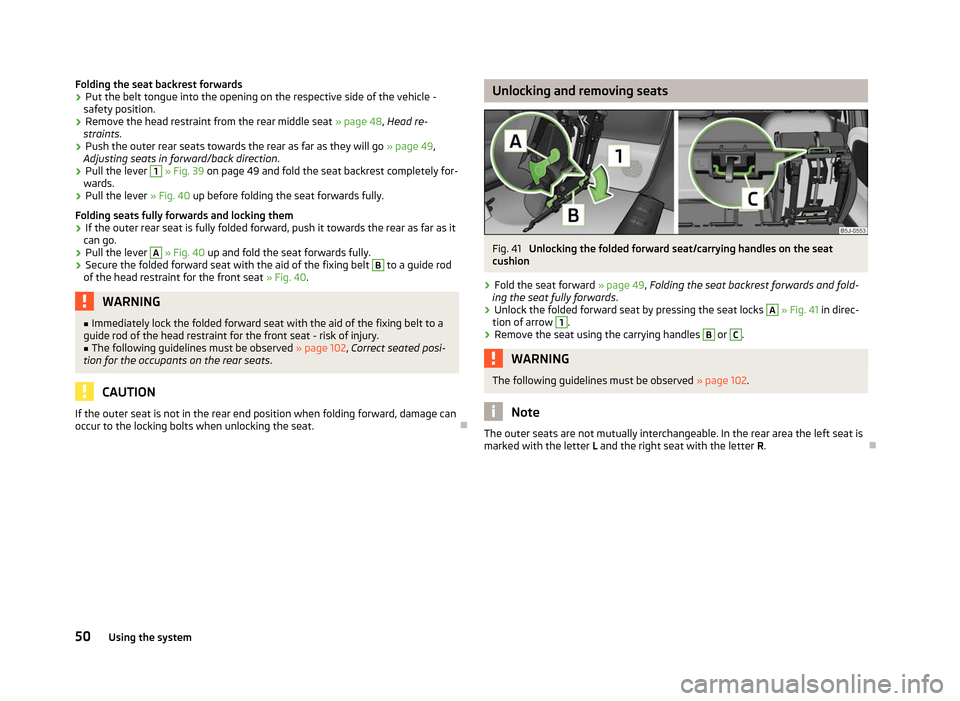
› Pull the lever 1
» Fig. 39 on page 49 and fold the seat backrest completely for-
wards.
› Pull the lever
» Fig. 40 up before folding the seat forwards fully.
Folding seats fully forwards and locking them
› If the outer rear seat is fully folded forward, push it towards the rear as far as it
can go.
› Pull the lever A
» Fig. 40 up and fold the seat forwards fully.
› Secure the folded forward seat with the aid of the fixing belt B
to a guide rod
of the head restraint for the front seat » Fig. 40. WARNING
■ Immediately lock the folded forward seat with the aid of the fixing belt to a
guide rod of the head restraint for the front seat - risk of injury.
■ The following guidelines must be observed » page 102, Correct seated posi-
tion for the occupants on the rear seats .CAUTION
If the outer seat is not in the rear end position when folding forward, damage can
occur to the locking bolts when unlocking the seat. Ð Unlocking and removing seats
Fig. 41
Unlocking the folded forward seat/carrying handles on the seat
cushion
› Fold the seat forward
» page 49, Folding the seat backrest forwards and fold-
ing the seat fully forwards .
› Unlock the folded forward seat by pressing the seat locks A
»
Fig. 41
in direc-
tion of arrow 1
.
› Remove the seat using the carrying handles B
or C
.
WARNING
The following guidelines must be observed » page 102. Note
The outer seats are not mutually interchangeable. In the rear area the left seat is
marked with the letter L and the right seat with the letter R.Ð
50 Using the system
Page 53 of 194
Adjusting seats in crosswise direction
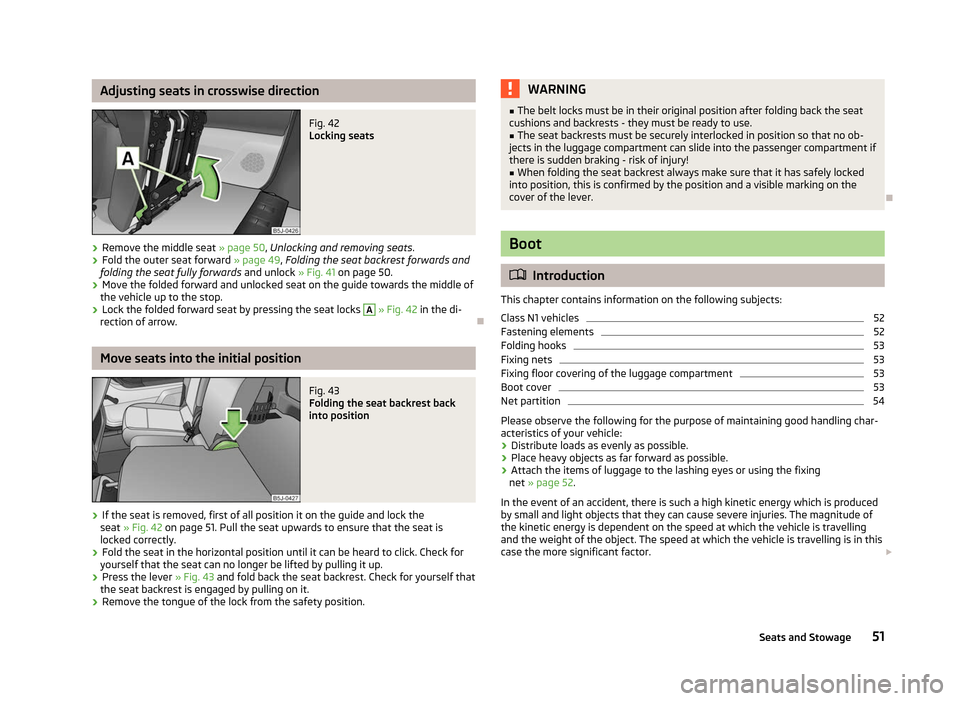
Fig. 42
Locking seats
› Remove the middle seat
» page 50, Unlocking and removing seats .
› Fold the outer seat forward
» page 49, Folding the seat backrest forwards and
folding the seat fully forwards and unlock » Fig. 41 on page 50.
› Move the folded forward and unlocked seat on the guide towards the middle of
the vehicle up to the stop.
› Lock the folded forward seat by pressing the seat locks A
» Fig. 42 in the di-
rection of arrow. ÐMove seats into the initial position
Fig. 43
Folding the seat backrest back
into position
› If the seat is removed, first of all position it on the guide and lock the
seat » Fig. 42 on page 51. Pull the seat upwards to ensure that the seat is
locked correctly.
› Fold the seat in the horizontal position until it can be heard to click. Check for
yourself that the seat can no longer be lifted by pulling it up.
› Press the lever
» Fig. 43 and fold back the seat backrest. Check for yourself that
the seat backrest is engaged by pulling on it.
› Remove the tongue of the lock from the safety position. WARNING
■ The belt locks must be in their original position after folding back the seat
cushions and backrests - they must be ready to use.
■ The seat backrests must be securely interlocked in position so that no ob-
jects in the luggage compartment can slide into the passenger compartment if
there is sudden braking - risk of injury! ■ When folding the seat backrest always make sure that it has safely locked
into position, this is confirmed by the position and a visible marking on the
cover of the lever. Ð Boot
ä
Introduction
This chapter contains information on the following subjects:
Class
N1 vehicles 52
Fastening elements 52
Folding hooks 53
Fixing nets 53
Fixing floor covering of the luggage compartment 53
Boot cover 53
Net partition 54
Please observe the following for the purpose of maintaining good handling char-
acteristics of your vehicle:
› Distribute loads as evenly as possible.
› Place heavy objects as far forward as possible.
› Attach the items of luggage to the lashing eyes or using the fixing
net »
page 52 .
In the event of an accident, there is such a high kinetic energy which is produced
by small and light objects that they can cause severe injuries. The magnitude of
the kinetic energy is dependent on the speed at which the vehicle is travelling
and the weight of the object. The speed at which the vehicle is travelling is in this
case the more significant factor. £
51
Seats and Stowage
Page 55 of 194
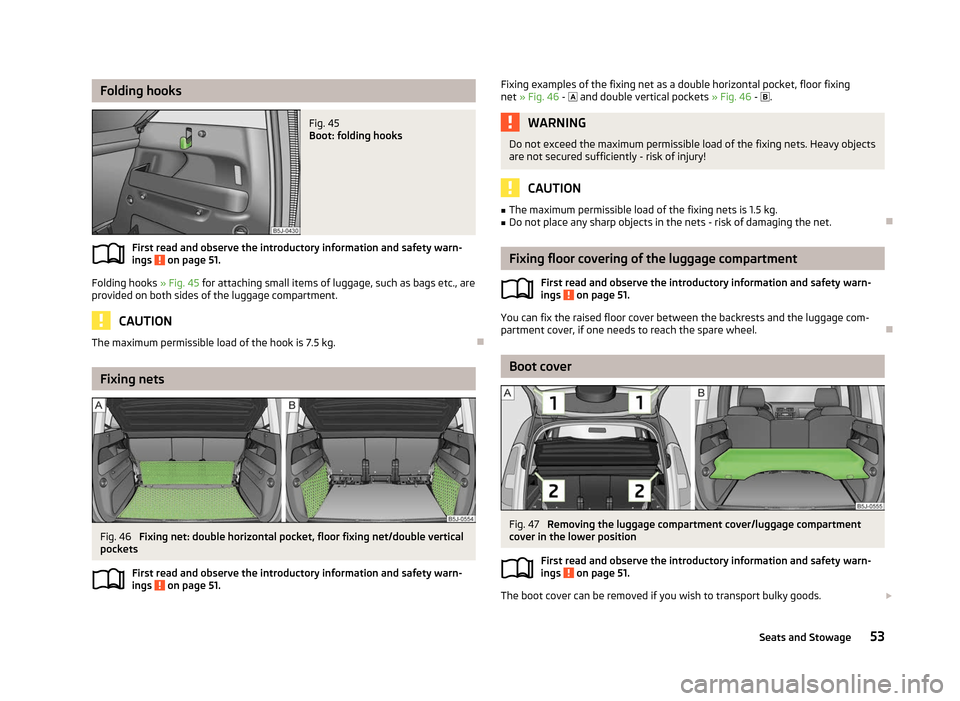
Folding hooks
Fig. 45
Boot: folding hooks
First read and observe the introductory information and safety warn-
ings on page 51.
Folding hooks
» Fig. 45 for attaching small items of luggage, such as bags etc., are
provided on both sides of the luggage compartment. CAUTION
The maximum permissible load of the hook is 7.5 kg. ÐFixing nets
Fig. 46
Fixing net: double horizontal pocket, floor fixing net/double vertical
pockets
First read and observe the introductory information and safety warn-
ings on page 51.ä
ä Fixing examples of the fixing net as a double horizontal pocket, floor fixing
net
» Fig. 46 - and double vertical pockets » Fig. 46 - . WARNING
Do not exceed the maximum permissible load of the fixing nets. Heavy objects
are not secured sufficiently - risk of injury! CAUTION
■ The maximum permissible load of the fixing nets is 1.5 kg.
■ Do not place any sharp objects in the nets - risk of damaging the net. Ð Fixing floor covering of the luggage compartment
First read and observe the introductory information and safety warn-
ings on page 51.
You can fix the raised floor cover between the backrests and the luggage com-
partment cover, if one needs to reach the spare wheel. Ð Boot cover
Fig. 47
Removing the luggage compartment cover/luggage compartment
cover in the lower position
First read and observe the introductory information and safety warn-
ings on page 51.
The boot cover can be removed if you wish to transport bulky goods.
£
ä
ä
53
Seats and Stowage
Page 56 of 194
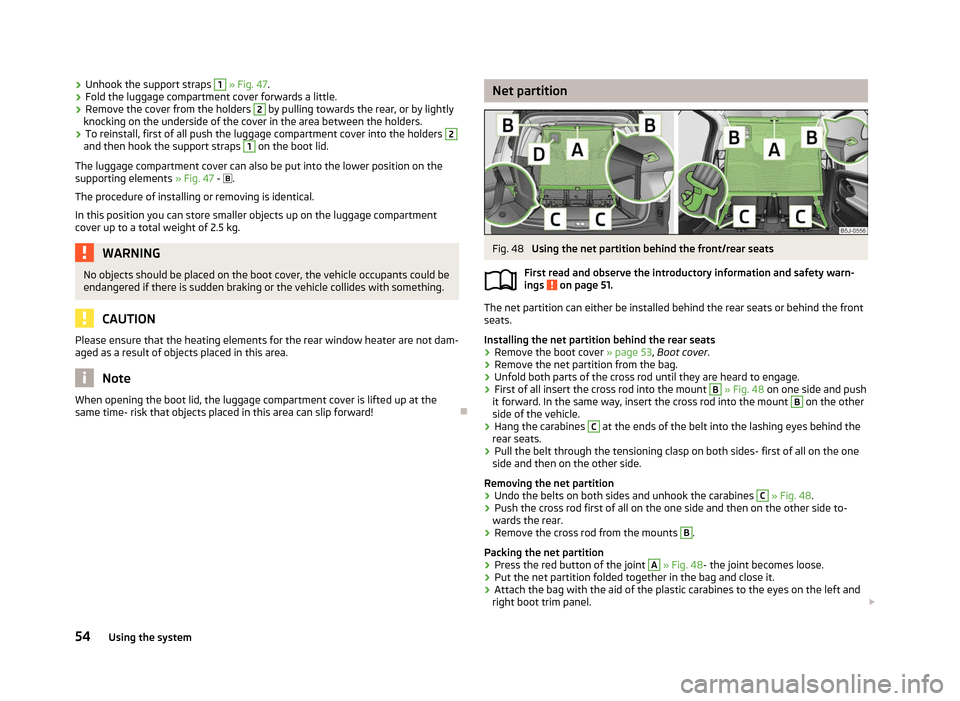
›
Unhook the support straps 1
» Fig. 47.
› Fold the luggage compartment cover forwards a little.
› Remove the cover from the holders 2
by pulling towards the rear, or by lightly
knocking on the underside of the cover in the area between the holders.
› To reinstall, first of all push the luggage compartment cover into the holders 2
and then hook the support straps 1
on the boot lid.
The luggage compartment cover can also be put into the lower position on the
supporting elements » Fig. 47 - .
The procedure of installing or removing is identical.
In this position you can store smaller objects up on the luggage compartment
cover up to a total weight of 2.5 kg. WARNING
No objects should be placed on the boot cover, the vehicle occupants could be
endangered if there is sudden braking or the vehicle collides with something. CAUTION
Please ensure that the heating elements for the rear window heater are not dam-
aged as a result of objects placed in this area. Note
When opening the boot lid, the luggage compartment cover is lifted up at the
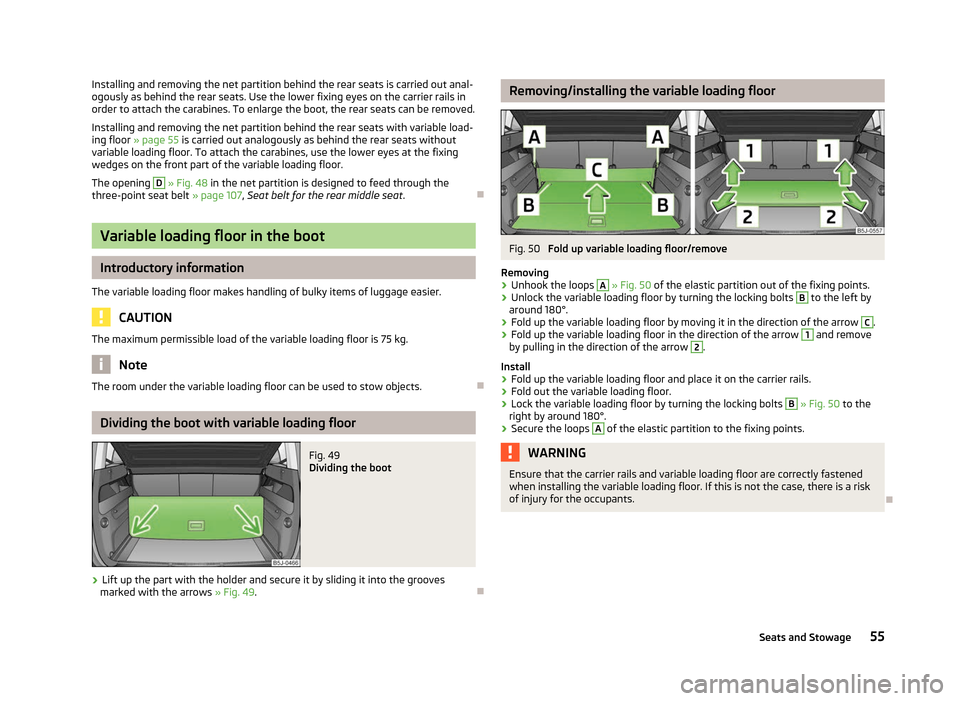
same time- risk that objects placed in this area can slip forward! Ð Net partition
Fig. 48
Using the net partition behind the front/rear seats
First read and observe the introductory information and safety warn-
ings on page 51.
The net partition can either be installed behind the rear seats or behind the front
seats.
Installing the net partition behind the rear seats
›
Remove the boot cover » page 53, Boot cover.
› Remove the net partition from the bag.
› Unfold both parts of the cross rod until they are heard to engage.
› First of all insert the cross rod into the mount B
» Fig. 48
on one side and push
it forward. In the same way, insert the cross rod into the mount B
on the other
side of the vehicle.
› Hang the carabines C
at the ends of the belt into the lashing eyes behind the
rear seats.
› Pull the belt through the tensioning clasp on both sides- first of all on the one
side and then on the other side.
Removing the net partition
› Undo the belts on both sides and unhook the carabines C
» Fig. 48.
› Push the cross rod first of all on the one side and then on the other side to-
wards the rear.
› Remove the cross rod from the mounts B
.
Packing the net partition
› Press the red button of the joint A
» Fig. 48
- the joint becomes loose.
› Put the net partition folded together in the bag and close it.
› Attach the bag with the aid of the plastic carabines to the eyes on the left and
right boot trim panel. £
ä
54 Using the system
Page 57 of 194
Installing and removing the net partition behind the rear seats is carried out anal-
ogously as behind the rear seats. Use the lower fixing eyes on the carrier rails in
order to attach the carabines. To enlarge the boot, the rear seats can be removed.
Installing and removing the net partition behind the rear seats with variable load-
ing floor » page 55 is carried out analogously as behind the rear seats without
variable loading floor. To attach the carabines, use the lower eyes at the fixing
wedges on the front part of the variable loading floor.
The opening D
» Fig. 48
in the net partition is designed to feed through the
three-point seat belt » page 107, Seat belt for the rear middle seat .ÐVariable loading floor in the boot
Introductory information
The variable loading floor makes handling of bulky items of luggage easier. CAUTION
The maximum permissible load of the variable loading floor is 75 kg.Note
The room under the variable loading floor can be used to stow objects. ÐDividing the boot with variable loading floor
Fig. 49
Dividing the boot
› Lift up the part with the holder and secure it by sliding it into the grooves
marked with the arrows »
Fig. 49. Ð Removing/installing the variable loading floor
Fig. 50
Fold up variable loading floor/remove
Removing › Unhook the loops A
» Fig. 50 of the elastic partition out of the fixing points.
› Unlock the variable loading floor by turning the locking bolts B
to the left by
around 180°.
› Fold up the variable loading floor by moving it in the direction of the arrow C
.
› Fold up the variable loading floor in the direction of the arrow 1
and remove
by pulling in the direction of the arrow 2
.
Install
› Fold up the variable loading floor and place it on the carrier rails.
› Fold out the variable loading floor.
› Lock the variable loading floor by turning the locking bolts B
» Fig. 50 to the
right by around 180°.
› Secure the loops A
of the elastic partition to the fixing points.
WARNING
Ensure that the carrier rails and variable loading floor are correctly fastened
when installing the variable loading floor. If this is not the case, there is a risk
of injury for the occupants. Ð
55
Seats and Stowage
Page 59 of 194
WARNING
When transporting bicycles, ensuring the safety of the passengers is para-
mount. CAUTION
Be careful when maneuvering the bicycle - risk of damage to the vehicle. ÐInstall cross member
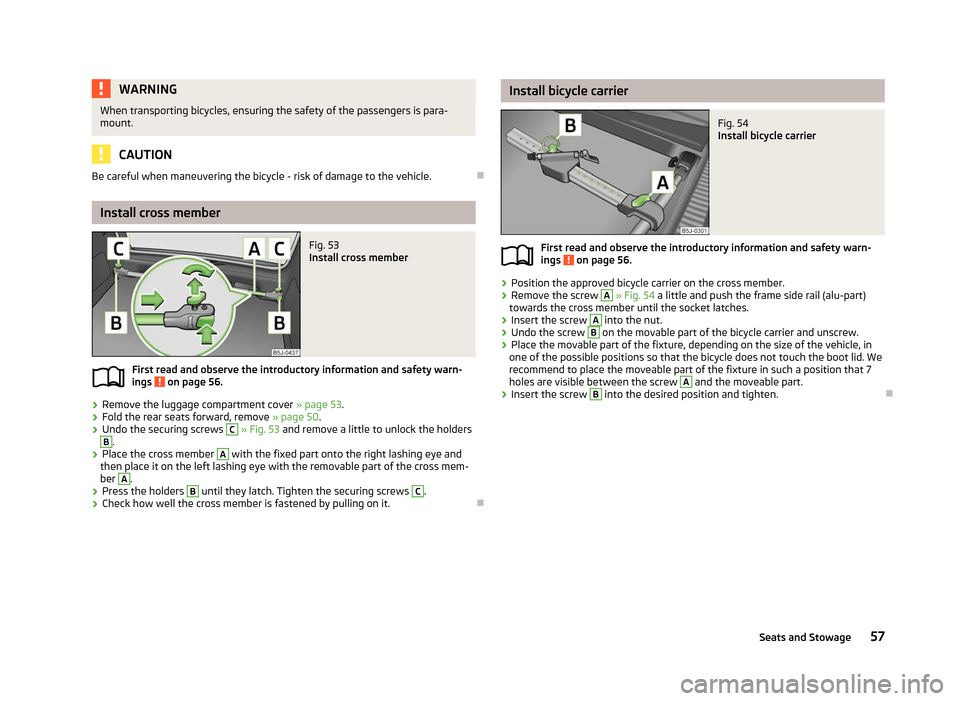
Fig. 53
Install cross member
First read and observe the introductory information and safety warn-
ings on page 56.
›
Remove the luggage compartment cover
» page 53.
› Fold the rear seats forward, remove
» page 50.
› Undo the securing screws C
» Fig. 53 and remove a little to unlock the holders B
.
› Place the cross member A
with the fixed part onto the right lashing eye and
then place it on the left lashing eye with the removable part of the cross mem-
ber A
.
› Press the holders B
until they latch. Tighten the securing screws C
.
› Check how well the cross member is fastened by pulling on it. Ð
ä Install bicycle carrier
Fig. 54
Install bicycle carrier
First read and observe the introductory information and safety warn-
ings on page 56.
›
Position the approved bicycle carrier on the cross member.
› Remove the screw A
» Fig. 54 a little and push the frame side rail (alu-part)
towards the cross member until the socket latches.
› Insert the screw A
into the nut.
› Undo the screw B
on the movable part of the bicycle carrier and unscrew.
› Place the movable part of the fixture, depending on the size of the vehicle, in
one of the possible positions so that the bicycle does not touch the boot lid. We
recommend to place the moveable part of the fixture in such a position that 7
holes are visible between the screw A
and the moveable part.
› Insert the screw B
into the desired position and tighten.
Ð
ä
57
Seats and Stowage
Page 60 of 194
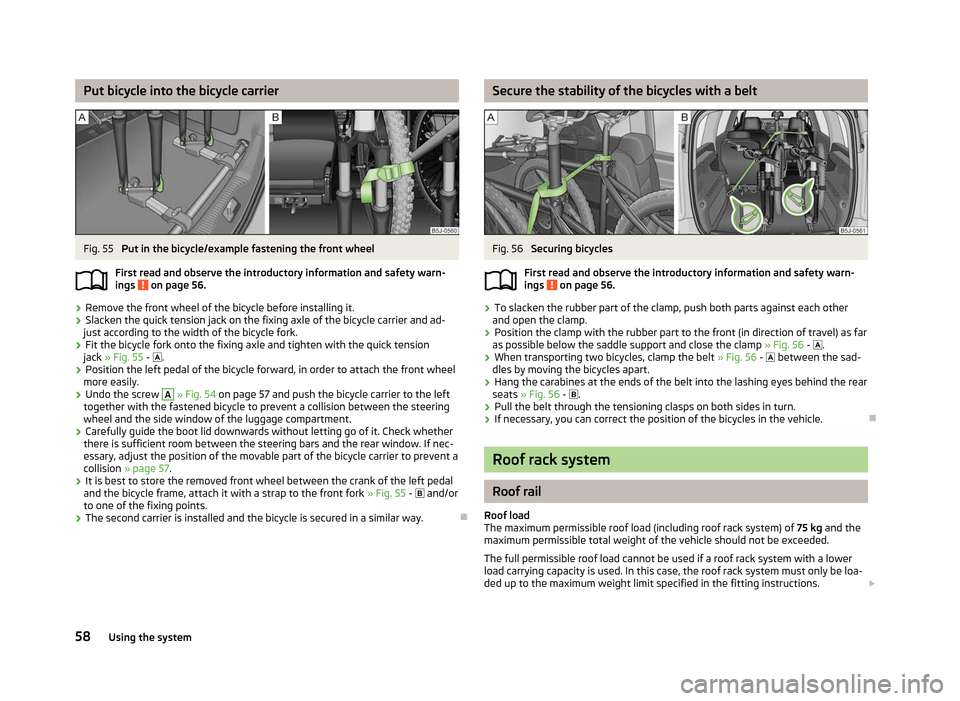
Put bicycle into the bicycle carrier
Fig. 55
Put in the bicycle/example fastening the front wheel
First read and observe the introductory information and safety warn-
ings on page 56.
›
Remove the front wheel of the bicycle before installing it.
› Slacken the quick tension jack on the fixing axle of the bicycle carrier and ad-
just according to the width of the bicycle fork.
› Fit the bicycle fork onto the fixing axle and tighten with the quick tension
jack »
Fig. 55 - .
› Position the left pedal of the bicycle forward, in order to attach the front wheel
more easily.
› Undo the screw A
» Fig. 54 on page 57
and push the bicycle carrier to the left
together with the fastened bicycle to prevent a collision between the steering
wheel and the side window of the luggage compartment.
› Carefully guide the boot lid downwards without letting go of it. Check whether
there is sufficient room between the steering bars and the rear window. If nec-
essary, adjust the position of the movable part of the bicycle carrier to prevent a
collision » page 57 .
› It is best to store the removed front wheel between the crank of the left pedal
and the bicycle frame, attach it with a strap to the front fork » Fig. 55 - and/or
to one of the fixing points.
› The second carrier is installed and the bicycle is secured in a similar way. Ð
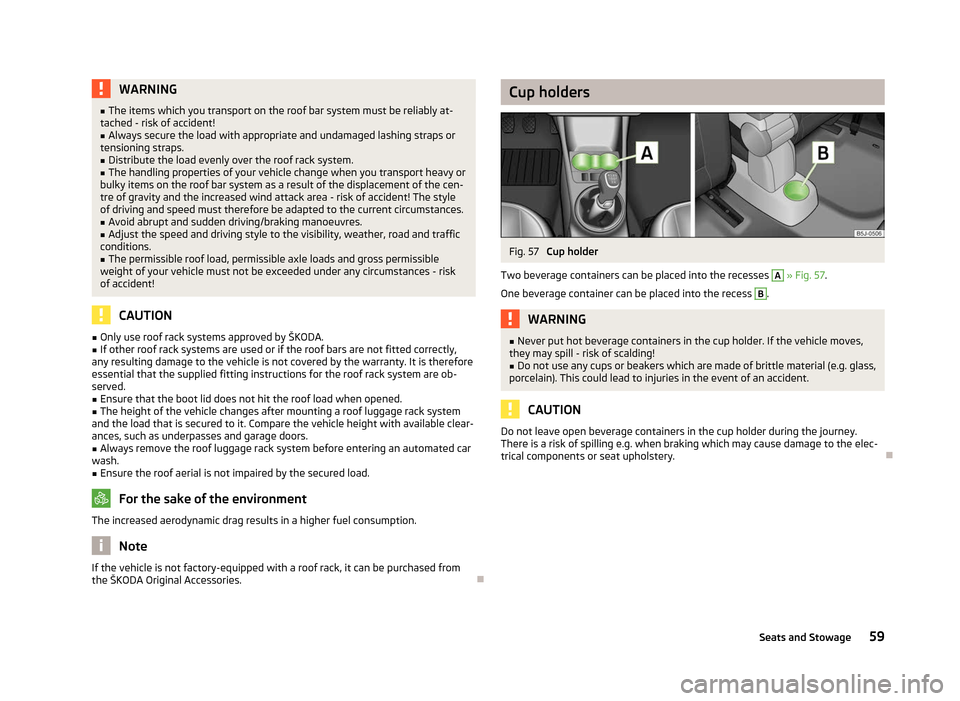
ä Secure the stability of the bicycles with a belt
Fig. 56
Securing bicycles
First read and observe the introductory information and safety warn-
ings on page 56.
›
To slacken the rubber part of the clamp, push both parts against each other
and open the clamp.
› Position the clamp with the rubber part to the front (in direction of travel) as far
as possible below the saddle support and close the clamp » Fig. 56
- .
› When transporting two bicycles, clamp the belt
» Fig. 56 - between the sad-
dles by moving the bicycles apart.
› Hang the carabines at the ends of the belt into the lashing eyes behind the rear
seats » Fig. 56 - .
› Pull the belt through the tensioning clasps on both sides in turn.
› If necessary, you can correct the position of the bicycles in the vehicle. Ð Roof rack system
Roof rail
Roof load
The maximum permissible roof load (including roof rack system) of 75 kg and the
maximum permissible total weight of the vehicle should not be exceeded.
The full permissible roof load cannot be used if a roof rack system with a lower
load carrying capacity is used. In this case, the roof rack system must only be loa-
ded up to the maximum weight limit specified in the fitting instructions. £
ä
58 Using the system
Page 61 of 194
WARNING
■ The items which you transport on the roof bar system must be reliably at-
tached - risk of accident!
■ Always secure the load with appropriate and undamaged lashing straps or
tensioning straps. ■ Distribute the load evenly over the roof rack system.
■ The handling properties of your vehicle change when you transport heavy or
bulky items on the roof bar system as a result of the displacement of the cen-
tre of gravity and the increased wind attack area - risk of accident! The style
of driving and speed must therefore be adapted to the current circumstances. ■ Avoid abrupt and sudden driving/braking manoeuvres.
■ Adjust the speed and driving style to the visibility, weather, road and traffic
conditions. ■ The permissible roof load, permissible axle loads and gross permissible
weight of your vehicle must not be exceeded under any circumstances - risk
of accident! CAUTION
■ Only use roof rack systems approved by ŠKODA.
■ If other roof rack systems are used or if the roof bars are not fitted correctly,
any resulting damage to the vehicle is not covered by the warranty. It is therefore
essential that the supplied fitting instructions for the roof rack system are ob-
served.
■ Ensure that the boot lid does not hit the roof load when opened.
■ The height of the vehicle changes after mounting a roof luggage rack system
and the load that is secured to it. Compare the vehicle height with available clear-
ances, such as underpasses and garage doors. ■ Always remove the roof luggage rack system before entering an automated car
wash.
■ Ensure the roof aerial is not impaired by the secured load. For the sake of the environment
The increased aerodynamic drag results in a higher fuel consumption. Note
If the vehicle is not factory-equipped with a roof rack, it can be purchased from
the
ŠKODA Original Accessories. Ð Cup holders
Fig. 57
Cup holder
Two beverage containers can be placed into the recesses A
» Fig. 57.
One beverage container can be placed into the recess B
.
WARNING
■ Never put hot beverage containers in the cup holder. If the vehicle moves,
they may spill - risk of scalding!
■ Do not use any cups or beakers which are made of brittle material (e.g. glass,
porcelain). This could lead to injuries in the event of an accident. CAUTION
Do not leave open beverage containers in the cup holder during the journey.
There is a risk of spilling e.g. when braking which may cause damage to the elec-
trical components or seat upholstery. Ð
59
Seats and Stowage