Brake SKODA SUPERB 2014 2.G / (B6/3T) User Guide
[x] Cancel search | Manufacturer: SKODA, Model Year: 2014, Model line: SUPERB, Model: SKODA SUPERB 2014 2.G / (B6/3T)Pages: 246, PDF Size: 17.16 MB
Page 40 of 246
Airbag systemRead and observe
on page 33 first.
If the warning light
illuminates , there is a fault in the airbag system.
The following message is shown in the MAXI DOT display. Error: Airbag
The functionality of the airbag system is monitored electronically even if one
of the airbags is switched off.
If a front, side or head airbag or belt tensioner has been switched off using
the vehicle system tester:
› The warning
illuminates for approx. 4 seconds after switching on the igni-
tion and then flashes again for approx. 12 seconds.
The following message is shown in the MAXI DOT display. Airbag/belt tensioner deactivated.
If the air bag was switched off using the key-operated switch on the side of
the dash panel on the passenger side:
› The indicator light
illuminates for around 4 seconds after the ignition has
been switched on;
› The deactivated air bag is indicated by the illumination of the warning
light » page 20
in the middle of the dash panel .
WARNINGWhen a fault in the airbag system occurs, there is a risk of the system not
being triggered in the event of an accident. Therefore, this must be
checked immediately by a specialized company.
Tyre inflation pressure
Read and observe
on page 33 first.
The warning light
illuminates , if there is a substantial drop in inflation pres-
sure in one of the tyres.
An audible signal sounds as a warning signal.
›
Check and adjust the pressure in all tyres » page 194, Service life of tyres .
If the indicator light
flashes , there is a fault in the tyre pressure monitoring
system.
› Stop the car, turn the ignition off and on again.
If the warning light
flashes again after re-starting the engine, then the help
of a professional service provider must be sought immediately.
Further information » page 196, Tyre pressure monitor .
Note
The warning light illuminates after the ignition is switched on if the vehi-
cle's battery has been disconnected and reconnected. If the warning light
does not go out after moving a short distance, this means there is an error in
the system. Seek assistance from a specialist garage immediately.
Windscreen washer fluid level
Read and observe
on page 33 first.
If the windscreen washer fluid level is too low, the warning light
illumi-
nates .
The following message is shown in the MAXI DOT display. Top up wash fluid!
Top up with liquid » page 184, Windscreen washer system .
Pads
Read and observe
on page 33 first.
If the indicator light
is illuminated , the brake pads are worn.
The following message is shown in the MAXI DOT display. Check brake wear!
Seek assistance from a specialist garage immediately.
Turn signal system
Read and observe
on page 33 first.
Either the left or right
warning light
flashes depending on the position of
the turn signal lever.
If there is a fault in the turn signal system, the warning light flashes at twice
its normal rate.
38Operation
Page 41 of 246
Switching off the hazard warning light system is switched on will cause all of
the turn signal lights as well as both warning lights to flash.
Low beam
Read and observe
on page 33 first.
The warning light
illuminates when low beam is selected.
Fog lights
Read and observe
on page 33 first.
The warning light
illuminates when the fog lights are operating.
Cruise control system
Read and observe
on page 33 first.
The warning light
illuminates when the cruise control is active.
Selector lever lock / starter (system KESSY)
Read and observe
on page 33 first.
If the warning light
illuminates , operate the brake pedal. This is necessary
to move the selector lever from position P and N » page 143 or to start the en-
gine in vehicles with the KESSY system » page 139.
Main beam
Read and observe
on page 33 first.
The warning light
illuminates when the main beam is selected or when the
headlight flasher is operated.
Information system
Driver information system
Introduction
This chapter contains information on the following subjects:
Using the information system
40
Display a low temperature
40
Gear recommendation
40
Door, boot or engine compartment warning
41
The information system provides the driver with alerts and messages about
individual vehicle systems. This information and advice is shown in the instru-
ment cluster display or indicated by the illumination of the corresponding indi-
cator light in the instrument cluster.
The information system provides the following information and instructions (depending on vehicle equipment).
› Data relating to the multi-function display (MFD)
» page 41.
› Data relating to the Maxi DOT display
» page 44.
› Service interval display
» page 46.
› Auto Check Control
» page 31.
› Selector lever positions for an automatic gearbox
» page 142.
WARNINGConcentrate fully at all times on your driving! As the driver, you are fully re-
sponsible for the operation of your vehicle.39Information system
Page 50 of 246
Unlocking and opening
Unlocking and locking
Introduction
This chapter contains information on the following subjects:
Vehicle key
49
Unlock/lock with remote control
49
Unlocking / locking - KESSY
50
Information message
51
Parking the vehicle
51
Safe securing
51
Individual settings
52
Locking/unlocking the vehicle from the inside
52
Child safety lock
53
Opening/closing a door
53
Your car is equipped with a central locking system.
The central locking system allows you to lock and unlock all doors, the fuel fill-
er flap and tailgate at the same time based on the current setting 1)
.
The safe securing system » page 51 is integrated in the central locking sys-
tem. Once the car is locked from the outside, the door locks 2)
are automatically
blocked by the safe securing system »
.
The following takes place after unlocking 1)
.
› The doors, the boot lid and the fuel filler flap are unlocked.
› The interior light, which is switched by the door contact, comes on.
› The safe securing system is switched off 2)
.
› The indicator light in the driver door stops flashing.
› The anti-theft alarm system is deactivated.
The following takes place after locking 1)
.
› The doors, the boot lid and the fuel filler flap are locked.
› The interior lights switched by the door contact come on.
› The safe securing system is switched on 2)
.
› The indicator light in the driver door begins flashing.
› The anti-theft alarm system is activated.
Displaying an error If the indicator light in the driver's door initially flashes quickly for around 2
seconds, and then lights up for 30 seconds without interruption before flash-
ing again slowly, you will need to seek the assistance of a specialist garage.WARNING■ Never leave the key in the vehicle when you exit the vehicle. Unauthor-
ized persons, such as children, for example, could lock the car, turn on the
ignition or start the engine - there is a danger of injury and accidents!■
When leaving the vehicle, never leave persons who are not completely in-
dependent, such as children, unattended in the vehicle. The children might,
for example, release the handbrake or take the vehicle out of gear. The ve-
hicle could then start to move – risk of injury and accidents! These individu-
als might also not be able to leave the vehicle on their own or to help
themselves. Can be fatal at very high or very low temperatures!
■
If the car is locked from the outside and the safelock system is switched
on, there must not be any person in the car as it is then not possible to
open either a door or a window from the inside. The locked doors make it
more difficult for rescuers to get into the vehicle in an emergency – risk to
life.
Note
■ When leaving the vehicle, always check if it is locked.■In the event of an accident in which the airbags are deployed, the locked
doors are automatically unlocked in order to enable rescuers to gain access to
the vehicle.■
Upon failure of the central locking system the key can be used only to unlock
and lock the driver's door. The other doors and the boot lid can be emergency
locked or released. ■ Emergency locking of the door » page 212.
■ Emergency unlocking of the boot lid » page 212.
1)
Depending on the individual setting » page 52 .
2)
This function is only enabled in certain countries.
48Operation
Page 58 of 246
Opening›Press the button in the handle at the lower edge of the boot lid 1 » Fig. 37
and lift the boot lid.
Closing›
Pull down and strike the lid with the handle
2
» Fig. 37 .
The small boot lid can also be opened by pressing the symbol
button on the
remote control key » page 49.
TwinDoor - open / close large boot
Fig. 38
Handle of boot lid/opened large boot lid
Read and observe
and on page 55 first.
After unlocking the vehicle, the boot lid can be opened with the button in the
handle above the number plate.
Opening
›
Press the button in the handle at the lower edge of the tailgate
1
» Fig. 38 .
›
Wait until the brake light
2
in the rear window flashes twice and then lift
the lid.
Closing
›
Pull down and strike the lid with the handle
3
» Fig. 38 .
Open / close (Superb Combi)Fig. 39
Boot lid handle/opening the boot lid
Fig. 40
Handle in the inner panelling of
the boot lid
Read and observe and on page 55 first.
After unlocking the vehicle, the boot lid can be opened with the button in the
handle above the number plate.
Opening
›
Press the handle
A
» Fig. 39 and raise the lid in the direction of the arrow
B
.
Closing
›
Pull the lid down with the handle
C
» Fig. 40 and close with a slight swing.
Delayed locking of the boot lid
Read and observe
and on page 55 first.
If the boot lid is unlocked with the symbol button on the remote control
key, then the door is automatically locked after closing.
56Operation
Page 87 of 246
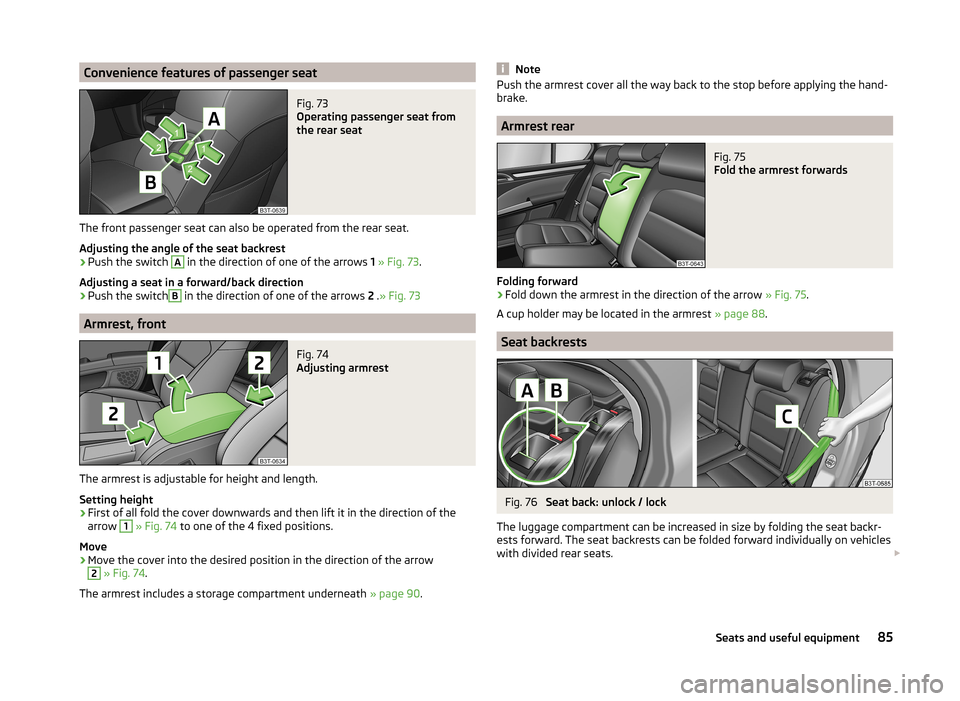
Convenience features of passenger seatFig. 73
Operating passenger seat from
the rear seat
The front passenger seat can also be operated from the rear seat.
Adjusting the angle of the seat backrest
›
Push the switch
A
in the direction of one of the arrows 1 » Fig. 73 .
Adjusting a seat in a forward/back direction
›
Push the switch
B
in the direction of one of the arrows 2 .» Fig. 73
Armrest, front
Fig. 74
Adjusting armrest
The armrest is adjustable for height and length.
Setting height
›
First of all fold the cover downwards and then lift it in the direction of the
arrow
1
» Fig. 74 to one of the 4 fixed positions.
Move
›
Move the cover into the desired position in the direction of the arrow
2
» Fig. 74 .
The armrest includes a storage compartment underneath » page 90.
NotePush the armrest cover all the way back to the stop before applying the hand-
brake.
Armrest rear
Fig. 75
Fold the armrest forwards
Folding forward
›
Fold down the armrest in the direction of the arrow » Fig. 75.
A cup holder may be located in the armrest » page 88.
Seat backrests
Fig. 76
Seat back: unlock / lock
The luggage compartment can be increased in size by folding the seat backr-
ests forward. The seat backrests can be folded forward individually on vehicles
with divided rear seats.
85Seats and useful equipment
Page 89 of 246
Storage compartment on the passenger side92Storage compartment under the passenger seat92
Clothes hook
92
Storage pockets on the front seats
93
Storage compartment for umbrella
93
Storage compartment in rear centre console
93
Storage compartment in the rear armrest
94
Rear seat backrest with long-cargo channel
94
Removable ski bag
95WARNING■Do not place anything on the dash panel. These objects might slide or fall
down when driving (when accelerating or cornering) and may distract you
from concentrating on the traffic – there is the risk of an accident.■
When driving, ensure that no objects from the centre console or from oth-
er storage compartments can get into the driver's footwell. You would not
be able to brake, operate the clutch pedal or accelerate - danger of causing
an accident!
■
No objects should be placed in the storage compartments nor in the
drinks holders; the vehicle occupants could be endangered if there is sud-
den braking or the vehicle collides with something.
■
Ash and cigarette or cigar stubs must only be discarded in ashtrays!
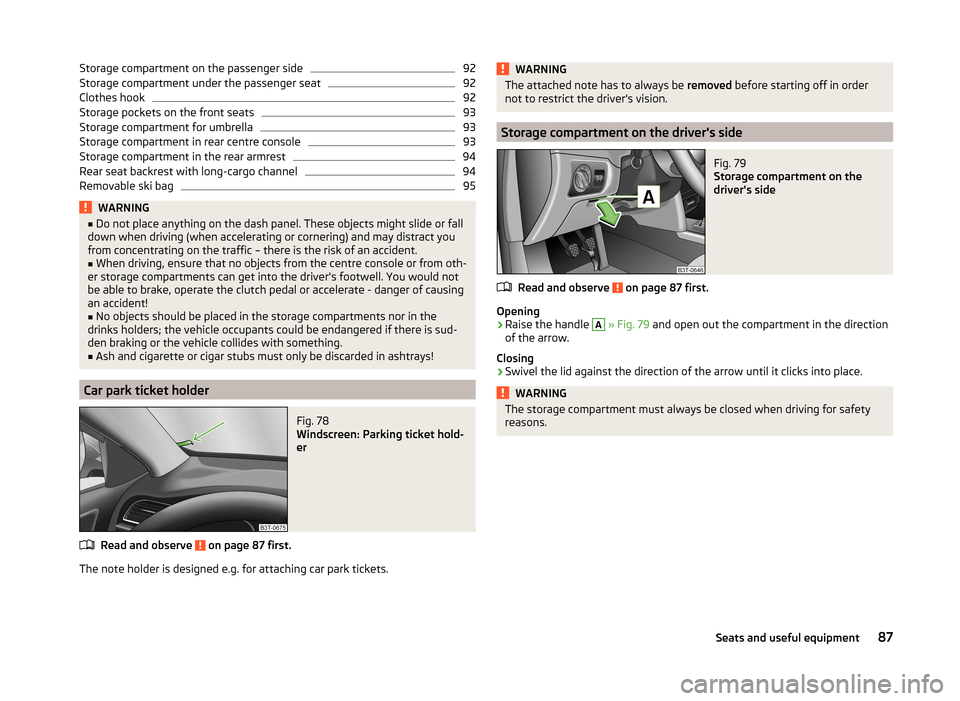
Car park ticket holder
Fig. 78
Windscreen: Parking ticket hold-
er
Read and observe on page 87 first.
The note holder is designed e.g. for attaching car park tickets.
WARNINGThe attached note has to always be removed before starting off in order
not to restrict the driver's vision.
Storage compartment on the driver's side
Fig. 79
Storage compartment on the
driver's side
Read and observe on page 87 first.
Opening
›
Raise the handle
A
» Fig. 79 and open out the compartment in the direction
of the arrow.
Closing
›
Swivel the lid against the direction of the arrow until it clicks into place.
WARNINGThe storage compartment must always be closed when driving for safety
reasons.87Seats and useful equipment
Page 137 of 246
Driving
Starting-off and Driving
Starting and stopping the engine using the key
Introduction
This chapter contains information on the following subjects:
Electronic immobilizer
136
Ignition Switch
136
Starting the engine
136
Stopping the engine
137
Starting and stopping the engine on vehicles with the KESSY sys-
tem » page 137 .
The engine can only be started using a correctly coded original key.
The engine running noises may louder at first be louder for a short time after
starting the cold engine. This is quite normal and is not an operating problem.
WARNING■ When the vehicle is travelling with the engine off, the ignition key must
always be in position 2 » Fig. 133 on page 136 (ignition switched on). This
position is confirmed by the appearance of certain indicator lamps in the in-
strument cluster. ■If the key is not in position 2,
it could unexpectedly lock the steering -
danger of accident!
■
Only pull the ignition key from the ignition lock when the vehicle has
come to a complete stop (by applying the handbrake). Otherwise, the steer-
ing could be blocked – risk of accident!
■
Never leave the key in the vehicle when you exit the vehicle. Unauthor-
ized persons, such as children, for example, could lock the car, turn on the
ignition or start the engine - there is a danger of injury and accidents!
■
Never leave the vehicle unattended with the engine running - there is
risk of accident, damage or theft!
■
Never switch off the engine before the vehicle is stationary – risk of acci-
dent!
WARNING■ Never leave the engine running in unventilated or closed rooms. The ex-
haust gases from the engine contain substances such as odourless and col-
ourless carbon monoxide (a poisonous gas) – risk to life! ■Carbon monoxide can cause unconsciousness and death.■
Do not leave any items (e.g. cloths or tools) in the engine compartment.
This presents a fire hazard and the risk of engine damage.
■
Never cover the engine with additional insulation material (e.g. with a
cover) – risk of fire!
CAUTION
■ The starter must only be operated when the engine is not running and the
vehicle is at a standstill. The starter or engine can be damaged if the starter is
activated when the engine is running 3
» Fig. 133 on page 136 .
■
Do not tow start the engine – there is a risk of damaging the engine and the
catalytic converter. The battery from another vehicle can be used as a jump-
start aid » page 207 , Jump-starting .
CAUTION
■
Avoid high engine revolutions, full throttle and high engine loads before the
engine has reached its operating temperature – risk of damaging the engine!■
Do not switch the engine off immediately at the end of your journey after the
engine has been operated over a prolonged period at high loads but leave it to
run at an idling speed for about 1 minute. This prevents any possible accumula-
tion of heat when the engine is switched off.
For the sake of the environment
Do not warm up the engine while the vehicle is stationary. If possible, start
your journey as soon as the engine has started. Through this the engine rea-
ches its operating temperature more rapidly and the pollutant emissions are
lower.
Note
After switching off the ignition, the radiator fan may intermittently continue to
operate for approx. 10 minutes.135Starting-off and Driving
Page 138 of 246
Electronic immobilizerRead and observe
and on page 135 first.
An electronic chip is integrated in the head of the key. The immobiliser is deac-
tivated with the aid of this chip when the key is inserted in the ignition lock.
The electronic immobiliser is automatically activated when the ignition key is
withdrawn from the lock.
The engine will not start if a non-authorized ignition key is used.
The following message is shown in the information cluster display. Immobilizer active.
IMMOBILISER
Ignition Switch
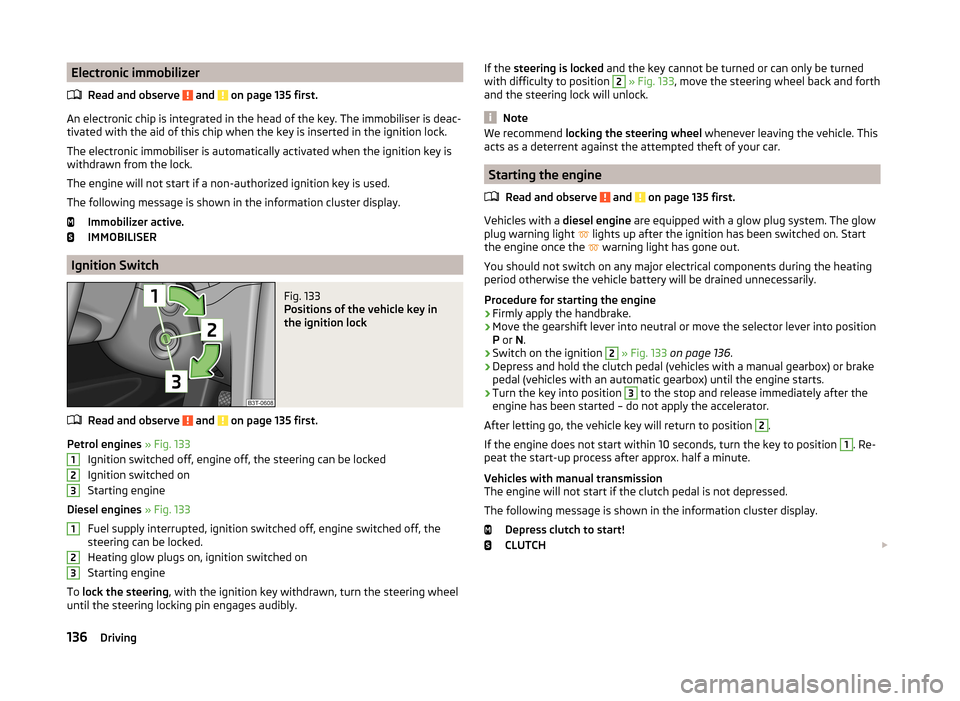
Fig. 133
Positions of the vehicle key in
the ignition lock
Read and observe and on page 135 first.
Petrol engines » Fig. 133
Ignition switched off, engine off, the steering can be locked
Ignition switched on
Starting engine
Diesel engines » Fig. 133
Fuel supply interrupted, ignition switched off, engine switched off, the
steering can be locked.
Heating glow plugs on, ignition switched on
Starting engine
To lock the steering , with the ignition key withdrawn, turn the steering wheel
until the steering locking pin engages audibly.
123123If the steering is locked and the key cannot be turned or can only be turned
with difficulty to position 2 » Fig. 133 , move the steering wheel back and forth
and the steering lock will unlock.
Note
We recommend locking the steering wheel whenever leaving the vehicle. This
acts as a deterrent against the attempted theft of your car.
Starting the engine
Read and observe
and on page 135 first.
Vehicles with a diesel engine are equipped with a glow plug system. The glow
plug warning light lights up after the ignition has been switched on. Start
the engine once the warning light has gone out.
You should not switch on any major electrical components during the heating
period otherwise the vehicle battery will be drained unnecessarily.
Procedure for starting the engine
›
Firmly apply the handbrake.
›
Move the gearshift lever into neutral or move the selector lever into position
P or N.
›
Switch on the ignition
2
» Fig. 133 on page 136 .
›
Depress and hold the clutch pedal (vehicles with a manual gearbox) or brake
pedal (vehicles with an automatic gearbox) until the engine starts.
›
Turn the key into position
3
to the stop and release immediately after the
engine has been started – do not apply the accelerator.
After letting go, the vehicle key will return to position
2
.
If the engine does not start within 10 seconds, turn the key to position
1
. Re-
peat the start-up process after approx. half a minute.
Vehicles with manual transmission
The engine will not start if the clutch pedal is not depressed.
The following message is shown in the information cluster display. Depress clutch to start!
CLUTCH
136Driving
Page 139 of 246
Vehicles with automatic transmission1)
The engine will not start if the brake pedal is not depressed.
The following message is shown in the information cluster display. Depress brake to start!
BRAKE
CAUTION
■ If the engine does not start up after a second attempt, one of the following
fuses may be defective. ■ Petrol engine - fuse for the electric fuel pump.
■ Diesel engine - fuse for the control unit for glow plugs or glow plug relay
and fuel pump.■
Check the fuse and replace if necessary » page 215, or seek assistance from
a specialist garage.
Stopping the engine
Read and observe
and on page 135 first.
Switch off the engine by turning the ignition key to position
1
» Fig. 133 on
page 136 .
For vehicles with automatic transmission, the ignition key can only be removed
if the selector lever is in position P.
Starting and stopping the engine - KESSY
Introduction
This chapter contains information on the following subjects:
Steering lock / unlock
138
Ignition on/off
138
Starting the engine
139
Switching off the engine
139
Emergency start-up of the engine
139
Emergency ignition shutoff system
140The KESSY system (Keyless Entry Exit System, hereinafter referred to only as
system) allows the switching on or switching off of the ignition and starting or
stopping of the engine without the active use of the key.
A key must be in the vehicle to unlock the steering, switch on the ignition and
start the vehicle. When travelling the key must be in the vehicle.
The engine running noises may louder at first be louder for a short time after starting the cold engine. This is quite normal and is not an operating problem.WARNING■ Never leave the key in the vehicle when you exit the vehicle. Unauthor-
ized persons, such as children, for example, could lock the car, turn on the
ignition or start the engine - there is a danger of injury and accidents!■
Never leave the vehicle unattended with the engine running - there is a
risk of theft etc!
■
Never switch off the engine before the vehicle is stationary – risk of acci-
dent!
WARNING■ Never leave the engine running in unventilated or closed rooms. The ex-
haust gases from the engine contain substances such as odourless and col-
ourless carbon monoxide (a poisonous gas) – risk to life! ■Carbon monoxide can cause unconsciousness and death.
CAUTION
■ The system can recognize the valid key, even if it has been forgotten, for ex-
ample, in the front of the vehicle roof D » Fig. 32 on page 50 - There is danger
of loss or damage to the key! It is therefore not always necessary to know
where the key is.■
The starter must only be operated when the engine is not running and the
vehicle is at a standstill. The starter or engine may be damaged if the starter is
activated when the engine is running.
■
Do not tow start the engine – there is a risk of damaging the engine and the
catalytic converter. The battery from another vehicle can be used as a jump-
start aid » page 207 , Jump-starting .
1)
Applies to vehicles with START-STOP system.
137Starting-off and Driving
Page 140 of 246
CAUTION■Avoid high engine revolutions, full throttle and high engine loads before the
engine has reached its operating temperature – risk of damaging the engine!■
Do not switch the engine off immediately at the end of your journey after the
engine has been operated over a prolonged period at high loads but leave it to
run at an idling speed for about 1 minute. This prevents any possible accumula-
tion of heat when the engine is switched off.
For the sake of the environment
Do not warm up the engine while the vehicle is stationary. If possible, start
your journey as soon as the engine has started. Through this the engine rea-
ches its operating temperature more rapidly and the pollutant emissions are
lower.
Note
■ The system is protected against inadvertently switching off the engine while
driving, this means that the engine can only be switched off in an emergen-
cy » page 140 .■
After switching off the ignition, the radiator fan may intermittently continue
to operate for approx. 10 minutes.
■
Under certain circumstances (e.g. after switching off the ignition and opening
the driver's door), the steering is enabled only when the ignition is switched on
or the engine is started.
Steering lock / unlock
Fig. 134
Starter button
Read and observe and on page 137 first.
The steering lock (steering lock) deters attempted theft of your vehicle.
Locking
›
Stop the vehicle.
› Switch off the engine or the ignition by pressing the starter button
» Fig. 134.›Open the driver door.
The steering is locked automatically.
If the driver's door is opened and the ignition is switched off afterwards, the
steering is only locked after the vehicle is locked.
Unlocking›
Open the driver's door and get into the vehicle.
›
Close the driver's door.
The steering is unlocked within 2 seconds.
If the system does not unlock the steering at the first time (for example when
the front wheels are in contact with an obstacle), then two more unlocking at-
tempts are performed automatically.
If the steering is still not unlocked, then the following message is displayed on the display of the instrument cluster.
Move the steering wheel!
MOVE STEERING WHEEL
Slightly move the steering wheel and the system will make up to 3 more at-
tempts to unlock after 2 seconds. At the same time, the indicator light flash-
es.
If the steering is still not unlocked, to try to eliminate the possible cause and
then repeat the unlocking attempt.
Ignition on/off
Read and observe
and on page 137 first.
›
Press the starter button » Fig. 134 on page 138 briefly.
The ignition is switched on or off.
On vehicles fitted with a manual gearbox, the clutch pedal must not be de-
pressed while switching the ignition on or off, otherwise the system would try
to start.
On vehicles fitted with a automatic gearbox, the brake pedal must not be de-
pressed while switching the ignition on or off, otherwise the system would try
to start.
138Driving