change time SKODA YETI 2014 1.G / 5L User Guide
[x] Cancel search | Manufacturer: SKODA, Model Year: 2014, Model line: YETI, Model: SKODA YETI 2014 1.G / 5LPages: 248, PDF Size: 29.49 MB
Page 114 of 248

Switching on and off directlyFig. 114
Button for switching on/off the system directly on the operating
part of the air conditioning/Climatronic
Read and observe
and on page 110 first.
The auxiliary heating can be directly switched on or off at any time using the
button
» Fig. 114 on the operating part of the air-conditioning system , on the
operating part of the Climatronic system or via the radio remote con-
trol » page 111 .
If the auxiliary heating has not already been switched off, it switches off auto-
matically after the running time set in the Running time menu.
After switching off the auxiliary heating, the coolant pump still runs for a short
period.
System settings
Read and observe
and on page 110 first.
The following menu items can be selected from the Aux. heating menu item in
the MAXI DOT display (depending on the vehicle equipment). ■ Day of the wk. - set the current day of the week
■ Running time - Set the required running time in 5 minute increments. The
running time can be 10 to 60 minutes.
■ Mode - Set the desired heating/ventilation mode
■ Starting time 1 , Starting time 2 , Starting time 3 - for each pre-set time, the
day and the time (hour and minute) can be set for switching on the auxiliary
heating. An empty position can be found between Sunday and Monday when
selecting the day. If this empty position is selected, the activation is per-
formed without taking into account the day.
■ Activate - Activate pre-set mode
■ Deactivate - Deactivate pre-set mode
■ Factory settings - Restore factory settings
■ Back - return to main menu.
Only one programmed pre-set time can be active.
The last programmed pre-set time remains active.
After the auxiliary heating activates at the set time, it is necessary to pre-set a
time again.
If the pre-set menu is closed by selecting the Back menu item or if no changes
are made on the display for more than 10 seconds, the set values are stored,
but the pre-set time is not activated.
An indicator light on the button is illuminated when the system is running.
The running system deactivates after expiration of the operating period or can
be deactivated earlier by pressing the button to directly switch on/off the aux-
iliary heating or by using the radio remote control.
Radio remote control
Fig. 115
Radio remote control of the aux-
iliary heating
Read and observe and on page 110 first.
Radio remote control » Fig. 115
Aerial
Warning light
Switch on the auxiliary heating
Switch off the auxiliary heating
The transmitter and the battery are housed in the housing of the remote con-
trol. The receiver is located in the interior of the vehicle.
AB111Heating and air conditioning
Page 121 of 248
Call register
The following menu items can be selected in the Call register menu item.
■ Missed calls - List of missed calls
■ Dialled numbers - List of dialled numbers
■ Received calls - list of received calls
Voice mailbox
In the Voice mailbox menu item, you can set the number of the voice mailbox
and then dial the number.
Bluetooth
The following menu items can be selected from the Bluetooth menu item.
■ User - Overview of the stored telephones
■ New user - Search for new mobile phones that are in the reception range
■ Visibility - Switches on the visibility of the hands-free system for other devi-
ces
■ Media player - Playback via Bluetooth ®
■ Active device - Connected device
■ Connected devices - List of paired devices
■ Search - Device search
■ Phone name - option to change the name of the phone (default SKODA_BT)
Settings
The following menu items can be selected from the Settings menu item.
■ Phone book - Phonebook
■ Update - Update the phone book
■ List - Arrange the entries in the phone book
■ Surname - Arrange according to surname
■ Surname - Sorted by contact name
■ Ring tone - Ring tone setting
Back
Return in the Start menu of the telephone.Universal telephone preinstallation GSM IIl
Introduction
Only vehicles with the Blues and Swing radios can have the GSM II universal
phone installation kit.
This chapter contains information on the following subjects:
Connecting the phone to the hands-free system
119
Telephone operation in the MAXI DOT display
119
Internet connection via Bluetooth ®
121
The GSM II universal phone installation kit offers comfort controls of the mo-
bile phone via the multifunction steering wheel or the factory installed voice
command system.
The universal telephone pre-installation GSM III comprises the following func-
tions.
› Phone Phonebook
» page 116.
› Convenience operation via the multifunction steering wheel
» page 114.
› Telephone operation in the MAXI DOT display
» page 119.
› Voice control of the telephone
» page 123.
› Music playback from the telephone or other multimedia units
» page 125.
› Internet connection
» page 121.
› Display of SMS messages
» page 120.
All communication between a telephone and the hands-free system of your vehicle can only be established with the help of the following profiles of Blue-
tooth ®
technology.
rSAP - Remote SIM access profile
After connecting the telephone with the hands-free system via the rSAP pro-
file, the telephone deregisters from the GSM network, and communication
with the network is only enabled by the hands-free system via the vehicle's
external aerial. In the telephone only the interface for Bluetooth ®
remains ac-
tive. In this case, you can only use the mobile phone to disconnect from the
hands-free system, deactivate the Bluetooth ®
connection or dial the emergen-
cy number 112 (only valid in some countries).
HFP - Hands Free Profile
After connecting the telephone with the hands-free system via the HFP pro-
file, the telephone continues to use its GMS module and the internal antenna
to communicate with the GSM network.
118Using the system
Page 123 of 248
■Media player - Media player
■ Active device - Connected device
■ Connected devices - List of paired devices
■ Search - Device search
■ Visibility - Visibility on/off
■ SOS - Emergency call
If a telephone is paired with the hands-free system, the following menu items
can be selected in the Phone menu.
Phone book
The Phone book menu item lists the contacts downloaded from the telephone
memory and the mobile phone SIM card.
The following functions are available for each phone contact.
■ Display a phone number
■ Voice tag - Voice tag for the contact
■ Play - Play a voice tag
■ Record - Record a voice contact
Dial number
Any telephone number can be entered in the Dial number menu item. The re-
quired digits must be selected one after the other using the adjustment wheel,
and then confirmed by pressing the adjustment wheel. You can select digits
0-9 , symbols +,
, #
and the Delete, Call and Back functions.
Call register
The following menu items can be selected in the Call register menu item.
■ Missed calls - List of missed calls
■ Received calls - list of received calls
■ Dialled numbers - List of dialled numbers
■ Delete lists - Delete call registers
Voice mailbox
In the Voice mailbox menu item, you can set or save the number of the voice
mailbox and then dial the number. The required digits must be selected one
after the other using the adjustment wheel, and then confirmed by pressing
the adjustment wheel. You can select digits 0-9, symbols +,
, #
and the De-
lete , Call , Store and Back functions.Messages 1)
A list of received text messages is displayed in the Messages menu item. After
calling a message, the following functions appear.
■ Show - Display text message
■ Read - The system reads out the selected text message through the vehi-
cle's speakers
■ Send time - Display message send time
■ Callback - Dial the phone number of the sender of the text message
■ Copy - Copy the received text message to the SIM card
■ Delete - Delete the message
Bluetooth
The following menu items can be selected from the Bluetooth menu item.
■ User - Overview of the stored telephones
■ Connect - Connection with the telephone
■ Disconnect - Disconnection of telephone
■ Rename - Rename the telephone
■ Delete - Delete the telephone
■ New user - Search for new mobile phones that are in the reception range
■ Visibility - Switches on the visibility of the hands-free system for other devi-
ces
■ Media player - Media player
■ Active device - Connected device
■ Connected devices - List of paired devices
■ Connect - Connection with the device
■ Rename - Rename the device
■ Delete - Delete the device
■ Authorisation - Authorise the device
■ Search - Search for available media players
■ Visibility - Switch on the visibility of the hands-free system for media play-
ers in the vicinity
■ Modem - overview of the active and paired devices for the connection to the
internet
■ Active device - Connected device
■ Connected devices - List of paired devices
■ Phone name - option to change the name of the phone (default SKODA_BT)
Wi-Fi
Wi-Fi menu item » page 123, Use WLAN network in MAXI DOT display .1)
Only applies when connecting the telephone to the hands-free system via the rSAP profile.
120Using the system
Page 124 of 248
Settings
The following menu items can be selected from the Settings menu item.
■ Phone book - Phonebook
■ Update - Import phone book
■ Select memory - Select memory with phone contacts
■ SIM & phone - Download the contacts of the SIM card and the phone
■ SIM card - Download the contacts from the SIM card
■ Phone - Initial setting to also import contacts from the SIM card; it is nec-
essary to switch to the SIM & phone menu item
■ List - Arrange the entries in the phone book
■ Surname - Arrange according to surname
■ Surname - Sort by contact name
■ Own number - Optionally display your own telephone number on the display
of the device of the person you are calling (this function is network-depend-
ent)
■ Network depnd. - Network-dependent own number display
■ Yes - Allow display of your own number
■ No - Prohibit display of your own number
■ Signal settings - Signal settings
■ Ring tone - Ring tone setting
■ Volume - Signal volume settings
■ Turn vol. up - Increase volume
■ Turn vol. down - Decrease volume
■ Phone settings - Phone settings
■ Select operator - Select operator
■ Automatic - Automatic operator selection
■ Manual - Manual operator selection
■ Network mode - Network mode
■ UMTS - UMTS
■ GSM - GSM
■ Automatic - automatic
■ SIM mode - Applies to telephones with the rSAP profile that simultaneously
support the operation of two SIM cards - there is an option to choose which
SIM card to connect to the hands-free system
■ SIM mode 1 - SIM 1 is connected to the hands-free system
■ SIM mode 2 - SIM 2 is connected to the hands-free system
■ Phone mode - Toggle between rSAP and HFP mode
■ Premium - rSAP mode
■ Hands-free - HFP mode
■ Off time - Set the off time in increments of 5 min■
Access point - Set the Internet access point
■ APN - Change the access point name
■ User name - User Name
■ Password - Password
■ Switch off ph. - Switch off the hands-free system (the mobile phone remains
paired)
Back
Return to the main menu in the MAXI DOT display.
Internet connection via Bluetooth ®
A notebook can, for example, be connected to the Internet via the hands-free
system.
The control unit of the hands-free system supports the GPRS, EDGE and
UMTS/3G technologies.
An Internet can only be established via a telephone which is connected via the rSAP profile.
The procedure for connecting to the Internet can vary depending on the type
and version of the operating system as well as the type of the device to be
connected. Successfully connecting to the internet requires appropriate
knowledge of the operating system for connecting the device .
Call sequence
›
Connect the mobile phone with the hands-free system .
›
Set the access point in the Phone - Settings - Access point menu (depending
on the operator, usually “Internet”).
›
Switch on the visibility of the hands-free system for other devices in the
Phone - Bluetooth - Visibility menu.
›
Use the device that is to be connected to search for available Bluetooth ®
de-
vices.
›
Select the hands-free system (as standard “SKODA_BT”) from the list of found devices.
›
Enter the password on the device being connected and follow any instruc-
tions given on this device or in the MAXI DOTdisplay.
›
Enter the desired Internet address in the Internet browser. The operating system requests the entry of the telephone number for the internet access
(depending on the operator, usually “*99#”).
121Communication and multimedia
Page 126 of 248
Use WLAN network in MAXI DOT display
When a Wi-Fi network is switched on, the following menu items are displayed
when the Wi-Fi menu item is selected:
■ Off - Switch off the WLAN network (depending on the context)
■ Device list - Display a list of external devices
■ Active device - Display a list of active devices
■ Block - Block device connections
■ Known devices - Display list of known devices
■ Rename - Rename the device
■ Block - Block device connections
■ Device blocked - Display list of blocked devices
■ Unblock - Remove the connection block
■ Delete lists - Delete device lists
■ Known devices - Delete list of known devices
■ Device blocked - Delete list of blocked devices
■ Both lists - Delete both device lists
■ Password - Use of password to log on to the WLAN network
■ Show - Display a password to log on to the WLAN network
■ Generate - Generate a new password to log on to the WLAN network
■ Wi-Fi Name - Use of WLAN network name
■ Show - Display the WLAN network name
■ Rename - Rename the WLAN network
■ WPS config. - Wi-Fi network connection using WPS
■ Pushbutton - Automatic connection
■ WPS PIN - PIN entry for the connection
■ Data counter - Display information about the volume of data transferred
■ Current connection - display of the volume of data transferred during the
current connection
■ Total - Display of the total volume of data transferred
■ Reset - Resetting of the information about the volume of data transferred
■ Settings - WLAN network settings
■ Access point - Access point settings
■ Settings - Access point management
■ APN - Change the access point name
■ User name - User Name
■ Password - Password
■ Reset - Reset access point factory settings
■ Prioritisation - Set the connection priority
■ Calls - Set the connection priority for calls
■ Data - Set the connection priority for data transfer■
Encryption - Set the encryption
■ WPA2 - Enable WPA 2 encryption
■ Open - No encryption
■ Visibility - Set the WLAN network visibility
■ Visible - WLAN network is visible to other devices
■ Invisible - WLAN network is not visible to other devices
■ Data roaming - Set the data roaming
■ No roaming - Data roaming is not allowed
■ Allow - Data roaming is allowed
■ Always ask - Question setting for data roaming
■ Wi-Fi Channel - Select WLAN network channels (preferably set to channel
11) ■ Channel 1 ... Channel 11 - Display the WLAN network channels
■ Reset - Reset Wi-Fi network factory settings
Voice control
Introduction
This chapter applies only to vehicles with the GSM II or GSM III universal phone
installation kit.
This chapter contains information on the following subjects:
Dialogue
123
Voice commands - GSM II
124
Voice commands - GSM III
125
Dialogue
Fig. 119
Multifunction steering wheel
123Communication and multimedia
Page 128 of 248
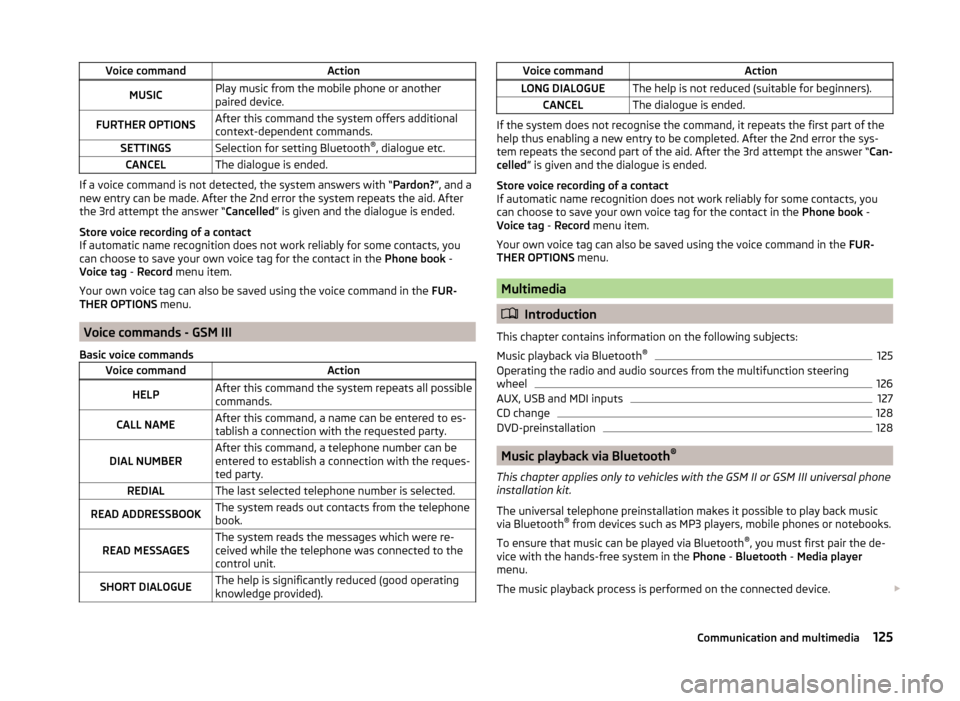
Voice commandActionMUSICPlay music from the mobile phone or another
paired device.FURTHER OPTIONSAfter this command the system offers additional
context-dependent commands.SETTINGSSelection for setting Bluetooth ®
, dialogue etc.CANCELThe dialogue is ended.
If a voice command is not detected, the system answers with “ Pardon?”, and a
new entry can be made. After the 2nd error the system repeats the aid. After
the 3rd attempt the answer “ Cancelled” is given and the dialogue is ended.
Store voice recording of a contact
If automatic name recognition does not work reliably for some contacts, you
can choose to save your own voice tag for the contact in the Phone book -
Voice tag - Record menu item.
Your own voice tag can also be saved using the voice command in the FUR-
THER OPTIONS menu.
Voice commands - GSM III
Basic voice commands
Voice commandActionHELPAfter this command the system repeats all possible
commands.CALL NAMEAfter this command, a name can be entered to es-
tablish a connection with the requested party.DIAL NUMBERAfter this command, a telephone number can be
entered to establish a connection with the reques-
ted party.REDIALThe last selected telephone number is selected.READ ADDRESSBOOKThe system reads out contacts from the telephone
book.READ MESSAGESThe system reads the messages which were re-
ceived while the telephone was connected to the
control unit.SHORT DIALOGUEThe help is significantly reduced (good operating
knowledge provided).Voice commandActionLONG DIALOGUEThe help is not reduced (suitable for beginners).CANCELThe dialogue is ended.
If the system does not recognise the command, it repeats the first part of the
help thus enabling a new entry to be completed. After the 2nd error the sys-
tem repeats the second part of the aid. After the 3rd attempt the answer “ Can-
celled ” is given and the dialogue is ended.
Store voice recording of a contact
If automatic name recognition does not work reliably for some contacts, you
can choose to save your own voice tag for the contact in the Phone book -
Voice tag - Record menu item.
Your own voice tag can also be saved using the voice command in the FUR-
THER OPTIONS menu.
Multimedia
Introduction
This chapter contains information on the following subjects:
Music playback via Bluetooth ®
125
Operating the radio and audio sources from the multifunction steering
wheel
126
AUX, USB and MDI inputs
127
CD change
128
DVD-preinstallation
128
Music playback via Bluetooth ®
This chapter applies only to vehicles with the GSM II or GSM III universal phone
installation kit.
The universal telephone preinstallation makes it possible to play back music
via Bluetooth ®
from devices such as MP3 players, mobile phones or notebooks.
To ensure that music can be played via Bluetooth ®
, you must first pair the de-
vice with the hands-free system in the Phone - Bluetooth - Media player
menu.
The music playback process is performed on the connected device.
125Communication and multimedia
Page 132 of 248
WARNING■If there are passengers on both of the rear seats, the DVD player holder
must not be used on its own (without the DVD player) - risk of injury!■
The inclination of the holder can be adjusted to three preset positions. Be
careful not to injure fingers between the holder and the backrest when
changes to the position of the DVD player holder are made.
■
The DVD player holder must not be used when the rear seat backrest or
the rear seat is folded forward or has been removed completely.
Note
Follow the instructions given in the operating instructions of the DVD player
holder/DVD player.
SmartGate
Introduction
This chapter contains information on the following subjects:
Connection with SmartGate
129
Smart Gate website
130
Password Management
130
SmartGate is a system which transmits vehicle data via Wi-Fi.
The ŠKODA applications installed in a connected communications device (e.g.
phone, tablet, notebook) 1)
offer the possibility to further process the received
data.
Available applications and further information can be found on the ŠKODA
website..
WARNING■ The national legal regulations for using mobile communication devices in
a vehicle must be observed.■
Do not fit the equipment or mounts to be connected to airbag covers or
within the immediate deployment range of the airbags.
■
Never leave a connected device in the deployment area of an airbag, on a
seat, on the dash panel or any another area, from which it can be thrown
during a sudden braking manoeuvre, an accident or a collision - risk of in-
jury.
Note
The Wi-Fi range is limited to the interior of the vehicle.
Connection with SmartGate
Read and observe
on page 129 first.
For a successful connection the following conditions must be met. Wi-Fi is turned on in the device to be connected.
The ignition is switched on.
Connect
›
Can enable the connected device to search for available Wi-Fi networks (see
operating instructions for the connected device).
›
In the found networks menu, select the connection to the
“SmartGate_ ... ”network 2)
.
›
Enter the password (the password is preset at the factory to the complete
Vehicle Identification Number - enter capital letters).
Disconnecting the connection
The connection to SmartGate can be ended in the following ways.
›
By disconnecting the connected device from SmartGate.
›
By turning off the Wi-Fi in the connected device.
›
By switching off the ignition and removing the key for more than 5 s (for ve-
hicles with starter button - by turning off the engine and opening the driver's
door).
1)
The applications support communications devices with the Android operating system version 4.0.x and
later and iOS 7.xx and higher.
2)
The last six symbols of the VIN vehicle identification number of your vehicle are displayed at position ....
129Communication and multimedia
Page 133 of 248
Automatic connection
The connection to SmartGate is automatically restored under the following
conditions.
Wi-Fi is turned on in the device to be connected.
The ignition is switched on.
The device to be connected stores the password required for the connec-
tion check.
Connection problems
If the connection fails, check the following points.
› Are the conditions for a successful connection fulfilled?
› Is SmartGate available in the list of available Wi-Fi networks?
› Has the password required for the connection check been entered?
› Is the password is required for the connection check correct?
› Is the device to be connected still connected to another Wi-Fi network?
If the above items are ok but the connection still fails, contact a ŠKODA part-
ner.
Note
Up to four devices can be connected to SmartGate at a time.
Smart Gate website
Read and observe
on page 129 first.
There is a special website for the SmartGate system.
The following address must be entered in the web browser of the connected
device.
HTTP://192.168.123.1
This website contains information about the vehicle, the Wi-Fi connection and
SmartGate.
In the Configuration area the Wi-Fi connection settings can be adjusted.
Save the setting changes
The setting changes are only applied after performing the following steps.
› The changes are saved by pressing the “Save” button.
› SmartGate is restarted by pressing the “Reboot ”button.
Password Management
Read and observe
on page 129 first.
Passwords can be managed in the connected device on the SmartGate web-site » page 130 , Smart Gate website .
The changes are applied after saving and restarting SmartGate » page 130,
Save the setting changes .
Change password
›
Enter a new password in the Configuration area in menu option WPA / WPA2 key.
The password must be 8-17 characters without diaktritica or special characters
(for example, -, / , etc.).
Connection option without entering a password
›
In the Configuration area set the value Open in the menu item Security .
Forgot password
If you have forgotten your password, SmartGate must be reset to factory set-
tings in a specialized workshop.
130Using the system
Page 142 of 248
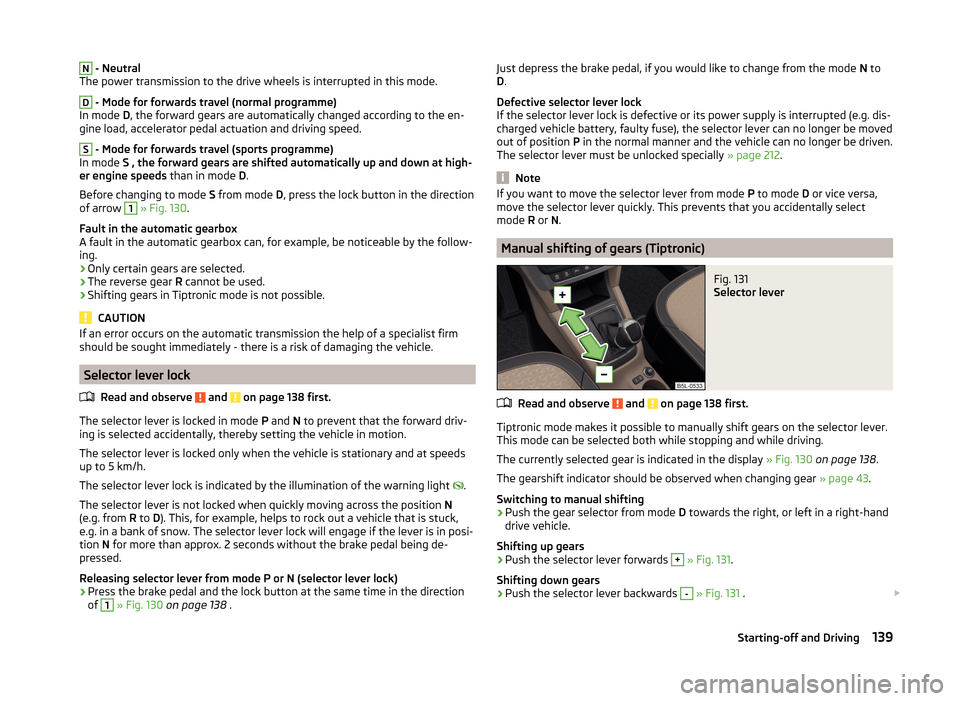
N - Neutral
The power transmission to the drive wheels is interrupted in this mode.D
- Mode for forwards travel (normal programme)
In mode D, the forward gears are automatically changed according to the en-
gine load, accelerator pedal actuation and driving speed.
S
- Mode for forwards travel (sports programme)
In mode S , the forward gears are shifted automatically up and down at high-
er engine speeds than in mode D.
Before changing to mode S from mode D, press the lock button in the direction
of arrow
1
» Fig. 130 .
Fault in the automatic gearbox
A fault in the automatic gearbox can, for example, be noticeable by the follow-
ing.
› Only certain gears are selected.
› The reverse gear
R cannot be used.
› Shifting gears in Tiptronic mode is not possible.
CAUTION
If an error occurs on the automatic transmission the help of a specialist firm
should be sought immediately - there is a risk of damaging the vehicle.
Selector lever lock
Read and observe
and on page 138 first.
The selector lever is locked in mode P and N to prevent that the forward driv-
ing is selected accidentally, thereby setting the vehicle in motion.
The selector lever is locked only when the vehicle is stationary and at speeds
up to 5 km/h.
The selector lever lock is indicated by the illumination of the warning light .
The selector lever is not locked when quickly moving across the position N
(e.g. from R to D). This, for example, helps to rock out a vehicle that is stuck,
e.g. in a bank of snow. The selector lever lock will engage if the lever is in posi-
tion N for more than approx. 2 seconds without the brake pedal being de-
pressed.
Releasing selector lever from mode P or N (selector lever lock)
›
Press the brake pedal and the lock button at the same time in the direction
of
1
» Fig. 130 on page 138 .
Just depress the brake pedal, if you would like to change from the mode N to
D .
Defective selector lever lock If the selector lever lock is defective or its power supply is interrupted (e.g. dis-
charged vehicle battery, faulty fuse), the selector lever can no longer be moved
out of position P in the normal manner and the vehicle can no longer be driven.
The selector lever must be unlocked specially » page 212.
Note
If you want to move the selector lever from mode P to mode D or vice versa,
move the selector lever quickly. This prevents that you accidentally select
mode R or N.
Manual shifting of gears (Tiptronic)
Fig. 131
Selector lever
Read and observe and on page 138 first.
Tiptronic mode makes it possible to manually shift gears on the selector lever.
This mode can be selected both while stopping and while driving.
The currently selected gear is indicated in the display » Fig. 130 on page 138 .
The gearshift indicator should be observed when changing gear » page 43.
Switching to manual shifting
›
Push the gear selector from mode D towards the right, or left in a right-hand
drive vehicle.
Shifting up gears
›
Push the selector lever forwards
+
» Fig. 131 .
Shifting down gears
›
Push the selector lever backwards
-
» Fig. 131 .
139Starting-off and Driving
Page 155 of 248
If suitable parking space is found, its parameters are stored until another suit-
able parking space has been found or until a distance of 10 m had been driven
after finding the parking space.
If the driver changes the parking mode while searching for a parking space, the
symbol button must be pressed again.
Note
If the symbol
(km / h) is shown in the display , the vehicle speed should be
reduced below 40 km / hr (parallel parking) or below 20 km / hr (Transverse
parking) .
Parking
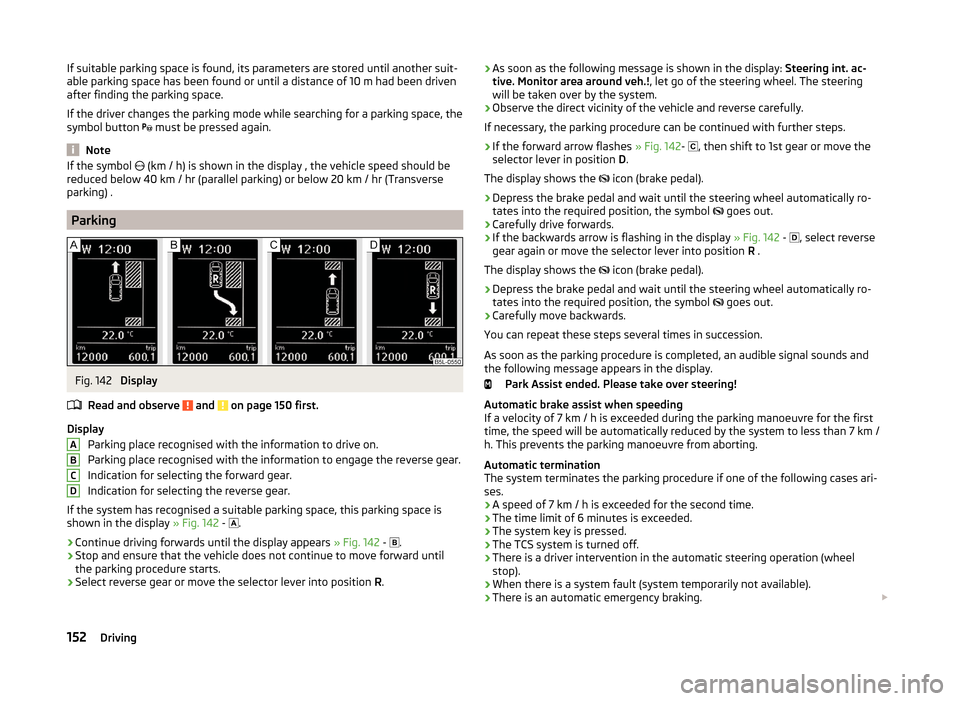
Fig. 142
Display
Read and observe
and on page 150 first.
Display Parking place recognised with the information to drive on.
Parking place recognised with the information to engage the reverse gear.
Indication for selecting the forward gear.
Indication for selecting the reverse gear.
If the system has recognised a suitable parking space, this parking space is
shown in the display » Fig. 142 -
.
›
Continue driving forwards until the display appears
» Fig. 142 -
.
›
Stop and ensure that the vehicle does not continue to move forward until
the parking procedure starts.
›
Select reverse gear or move the selector lever into position R.
ABCD› As soon as the following message is shown in the display:
Steering int. ac-
tive. Monitor area around veh.! , let go of the steering wheel. The steering
will be taken over by the system.›
Observe the direct vicinity of the vehicle and reverse carefully.
If necessary, the parking procedure can be continued with further steps.
›
If the forward arrow flashes » Fig. 142-
, then shift to 1st gear or move the
selector lever in position D.
The display shows the
icon (brake pedal).
›
Depress the brake pedal and wait until the steering wheel automatically ro-
tates into the required position, the symbol
goes out.
›
Carefully drive forwards.
›
If the backwards arrow is flashing in the display » Fig. 142 -
, select reverse
gear again or move the selector lever into position R .
The display shows the icon (brake pedal).
›
Depress the brake pedal and wait until the steering wheel automatically ro-
tates into the required position, the symbol goes out.
›
Carefully move backwards.
You can repeat these steps several times in succession.
As soon as the parking procedure is completed, an audible signal sounds and
the following message appears in the display.
Park Assist ended. Please take over steering!
Automatic brake assist when speeding
If a velocity of 7 km / h is exceeded during the parking manoeuvre for the first
time, the speed will be automatically reduced by the system to less than 7 km /
h. This prevents the parking manoeuvre from aborting.
Automatic termination
The system terminates the parking procedure if one of the following cases ari-
ses.
› A speed of 7 km / h is exceeded for the second time.
› The time limit of 6 minutes is exceeded.
› The system key is pressed.
› The TCS system is turned off.
› There is a driver intervention in the automatic steering operation (wheel
stop).
› When there is a system fault (system temporarily not available).
› There is an automatic emergency braking.
152Driving