warning light SKODA YETI 2016 1.G / 5L Repair Manual
[x] Cancel search | Manufacturer: SKODA, Model Year: 2016, Model line: YETI, Model: SKODA YETI 2016 1.G / 5LPages: 200, PDF Size: 28.98 MB
Page 140 of 200
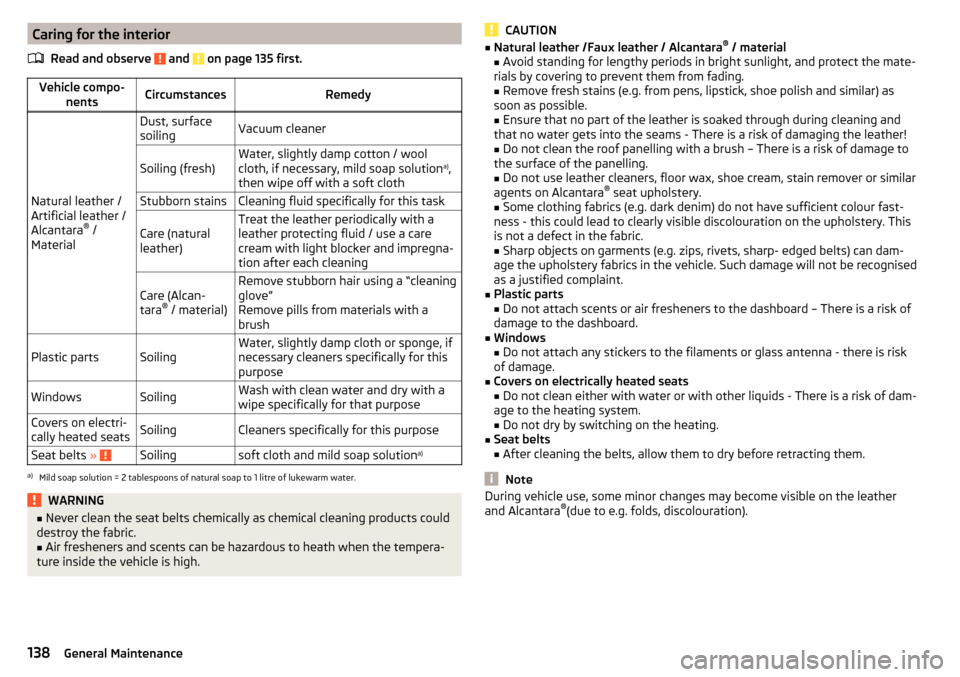
Caring for the interiorRead and observe
and on page 135 first.
Vehicle compo- nentsCircumstancesRemedy
Natural leather /
Artificial leather /
Alcantara ®
/
Material
Dust, surface
soilingVacuum cleanerSoiling (fresh)Water, slightly damp cotton / wool
cloth, if necessary, mild soap solution a)
,
then wipe off with a soft clothStubborn stainsCleaning fluid specifically for this taskCare (natural
leather)Treat the leather periodically with a
leather protecting fluid / use a care
cream with light blocker and impregna-
tion after each cleaningCare (Alcan-
tara ®
/ material)Remove stubborn hair using a “cleaning
glove”
Remove pills from materials with a
brushPlastic partsSoilingWater, slightly damp cloth or sponge, if
necessary cleaners specifically for this
purposeWindowsSoilingWash with clean water and dry with a
wipe specifically for that purposeCovers on electri-
cally heated seatsSoilingCleaners specifically for this purposeSeat belts » Soilingsoft cloth and mild soap solution a)a)
Mild soap solution = 2 tablespoons of natural soap to 1 litre of lukewarm water.
WARNING■
Never clean the seat belts chemically as chemical cleaning products could
destroy the fabric.■
Air fresheners and scents can be hazardous to heath when the tempera-
ture inside the vehicle is high.
CAUTION■ Natural leather /Faux leather / Alcantara ®
/ material
■ Avoid standing for lengthy periods in bright sunlight, and protect the mate-
rials by covering to prevent them from fading.
■ Remove fresh stains (e.g. from pens, lipstick, shoe polish and similar) as
soon as possible.
■ Ensure that no part of the leather is soaked through during cleaning and
that no water gets into the seams - There is a risk of damaging the leather!
■ Do not clean the roof panelling with a brush – There is a risk of damage to
the surface of the panelling. ■ Do not use leather cleaners, floor wax, shoe cream, stain remover or similar
agents on Alcantara ®
seat upholstery.
■ Some clothing fabrics (e.g. dark denim) do not have sufficient colour fast-
ness - this could lead to clearly visible discolouration on the upholstery. This
is not a defect in the fabric. ■ Sharp objects on garments (e.g. zips, rivets, sharp- edged belts) can dam-
age the upholstery fabrics in the vehicle. Such damage will not be recognised
as a justified complaint.■
Plastic parts ■ Do not attach scents or air fresheners to the dashboard – There is a risk of
damage to the dashboard.
■
Windows
■ Do not attach any stickers to the filaments or glass antenna - there is risk
of damage.
■
Covers on electrically heated seats ■ Do not clean either with water or with other liquids - There is a risk of dam-
age to the heating system. ■ Do not dry by switching on the heating.
■
Seat belts
■ After cleaning the belts, allow them to dry before retracting them.
Note
During vehicle use, some minor changes may become visible on the leather
and Alcantara ®
(due to e.g. folds, discolouration).138General Maintenance
Page 145 of 200
WARNING (Continued)■Firmly apply the handbrake.■For vehicles with manual transmission the lever into the neutral position.
For vehicles with automatic transmission , place the selector lever in the P
position.■
Allow the engine to cool.
■
Never open the bonnet if you can see steam or coolant flowing out of the
engine compartment – There is a risk of scalding! Wait until the steam or
coolant has stopped escaping.
WARNINGInformation for working in the engine room■Keep everyone away from the engine compartment.■
Do not touch any hot engine parts – risk of burns!
■
Never touch the radiator fan. The radiator fan may still turn suddenly
about 10 minutes after switching off the ignition!
■
Do not smoke in the vicinity of the engine and avoid the use of open
flames or sparks.
■
Do not leave any items (e.g. cloths or tools) in the engine compartment.
This presents a fire hazard and the risk of engine damage.
■
Read and observe the information and warning instructions on the fluid
containers.
WARNINGInformation for working in the engine compartment with the engine run-
ning■
If it is necessary to work on the engine with the engine running, beware
of rotating engine parts and electrical plants - There is a risk to life!
■
Never touch the electric wiring on the ignition system.
■
Avoid short circuits in the electrical system, particularly on the vehicle's
battery.
CAUTION
Only refill using fluids with the proper specification - There is a risk of damage
to the vehicle!
Note
■ Fluids with the proper specifications can be purchased from the ŠKODA Origi-
nal Accessories or from the ŠKODA Genuine Parts ranges.■
We recommend you have the operating fluids replaced by a specialist garage.
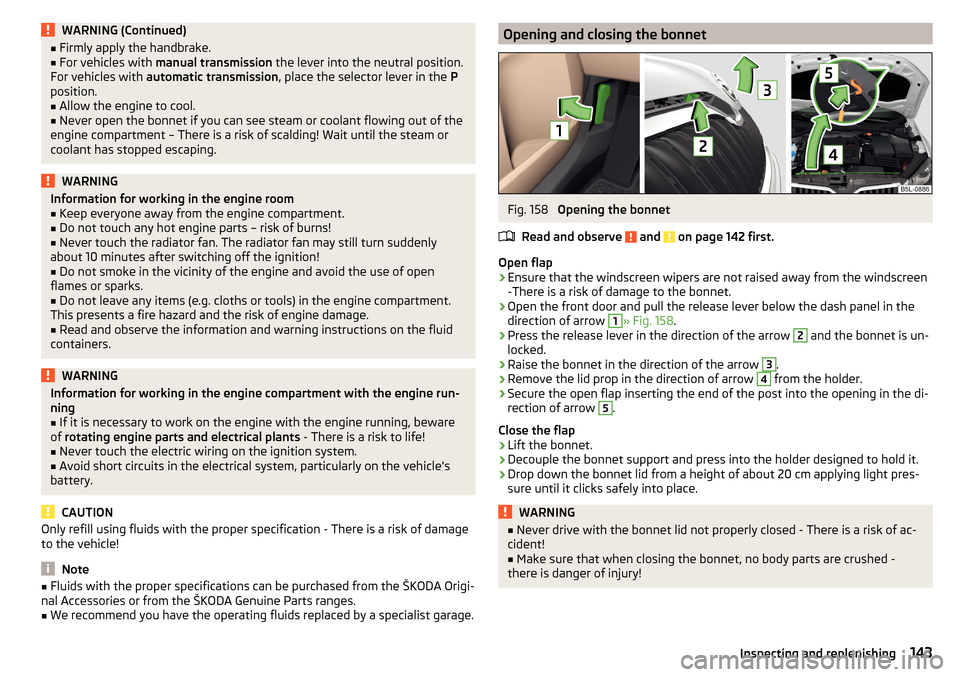
Opening and closing the bonnetFig. 158
Opening the bonnet
Read and observe
and on page 142 first.
Open flap
›
Ensure that the windscreen wipers are not raised away from the windscreen
-There is a risk of damage to the bonnet.
›
Open the front door and pull the release lever below the dash panel in the
direction of arrow
1
» Fig. 158 .
›
Press the release lever in the direction of the arrow
2
and the bonnet is un-
locked.
›
Raise the bonnet in the direction of the arrow
3
.
›
Remove the lid prop in the direction of arrow
4
from the holder.
›
Secure the open flap inserting the end of the post into the opening in the di-
rection of arrow
5
.
Close the flap
›
Lift the bonnet.
›
Decouple the bonnet support and press into the holder designed to hold it.
›
Drop down the bonnet lid from a height of about 20 cm applying light pres-
sure until it clicks safely into place.
WARNING■ Never drive with the bonnet lid not properly closed - There is a risk of ac-
cident!■
Make sure that when closing the bonnet, no body parts are crushed -
there is danger of injury!
143Inspecting and replenishing
Page 148 of 200
CAUTION■The oil level must never be below range A » Fig. 161 – risk of damage to the
engine as well as to the exhaust system.■
If a top up with oil is not possible or the oil level is above range
A
,
Stop
driving! Switch off the engine and seek assistance from a specialist garage.
Note
Too low engine oil level is shown in the instrument cluster by the warning
light illuminating and also indicated by the message » page 33. Nevertheless,
we recommend checking the oil level on a regular basis using the dipstick.
Coolant
Introduction
This chapter contains information on the following subjects:
Checking and refilling
146
The coolant helps to keep the engine temperature down, and consists of wa- ter and coolant additive (with additives that protect the cooling system against
corrosion and prevent furring).
The proportion of coolant additive in the coolant must be 40 to 60 %.
The correct mix of water and coolant additive should be checked and if neces-
sary corrected by a specialist garage.
WARNING■ The following instructions must be followed at all times when working on
the engine compartment » page 142.■
Never open the end cover of the coolant expansion reservoir while the
engine is still warm. The cooling system is pressurised -There is a risk of
scalding or injury from splashes of coolant!
■
To protect against the coolant splashing, cover the cap with a cloth when
opening.
■
Coolant and coolant fumes are harmful - avoid contact with the coolant. If
the coolant comes into contact with the eye or skin, wash the affected area
with plenty of water for several minutes, and where appropriate seek medi-
cal help.
CAUTIONDo not cover the radiator and install any parts (e.g auxiliary lights.) in front of
the air intakes - There is a risk of the engine overheating.
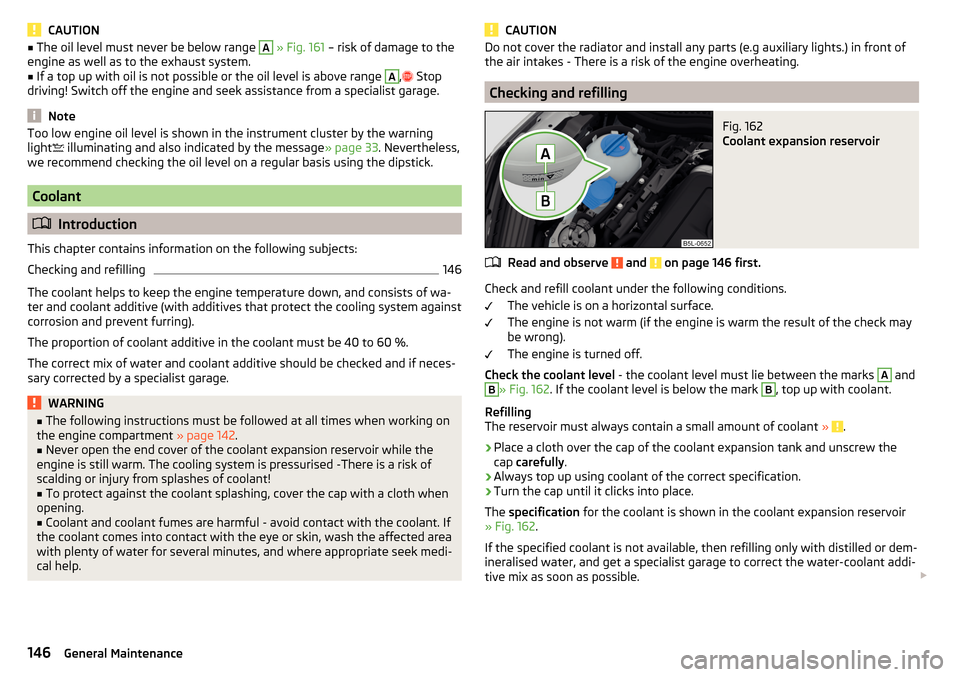
Checking and refilling
Fig. 162
Coolant expansion reservoir
Read and observe and on page 146 first.
Check and refill coolant under the following conditions.
The vehicle is on a horizontal surface.
The engine is not warm (if the engine is warm the result of the check may
be wrong).
The engine is turned off.
Check the coolant level - the coolant level must lie between the marks
A
and
B
» Fig. 162. If the coolant level is below the mark
B
, top up with coolant.
Refilling
The reservoir must always contain a small amount of coolant »
.
›
Place a cloth over the cap of the coolant expansion tank and unscrew the
cap carefully .
›
Always top up using coolant of the correct specification.
›
Turn the cap until it clicks into place.
The specification for the coolant is shown in the coolant expansion reservoir
» Fig. 162 .
If the specified coolant is not available, then refilling only with distilled or dem-
ineralised water, and get a specialist garage to correct the water-coolant addi-
tive mix as soon as possible.
146General Maintenance
Page 149 of 200
CAUTION■If the expansion tank is empty, do not top up with coolant. The system could
aerate - There is a risk of engine damage! Stop driving! Switch off the en-
gine and seek assistance from a specialist garage.■
Do not fill the coolant above the mark
A
» Fig. 162 . The coolant could, when
heated, be expelled from the cooling system - There is a risk of damage to the
engine parts.
■
If it is not possible to add coolant,
stop driving! Switch off the engine and
seek assistance from a specialist garage.
■
A coolant additive which does not correspond to the correct specification can
reduce the anti-corrosion effect of the cooling system - risk of damage to the
cooling system and the engine.
■
If non-distilled (non-demineralised) water has been used to top up, the cool-
ant should be replaced by a specialist garage - There is a risk of engine dam-
age.
■
A loss of coolant indicates leaks in the cooling system -There is a risk of en-
gine damage. Top up with coolant and then seek assistance from a specialist
garage.
Note
Too low coolant level is indicated in the instrument cluster by the warning
light and shown by the message » page 32. We still recommend inspecting
the coolant level directly at the reservoir from time to time.
Brake fluid
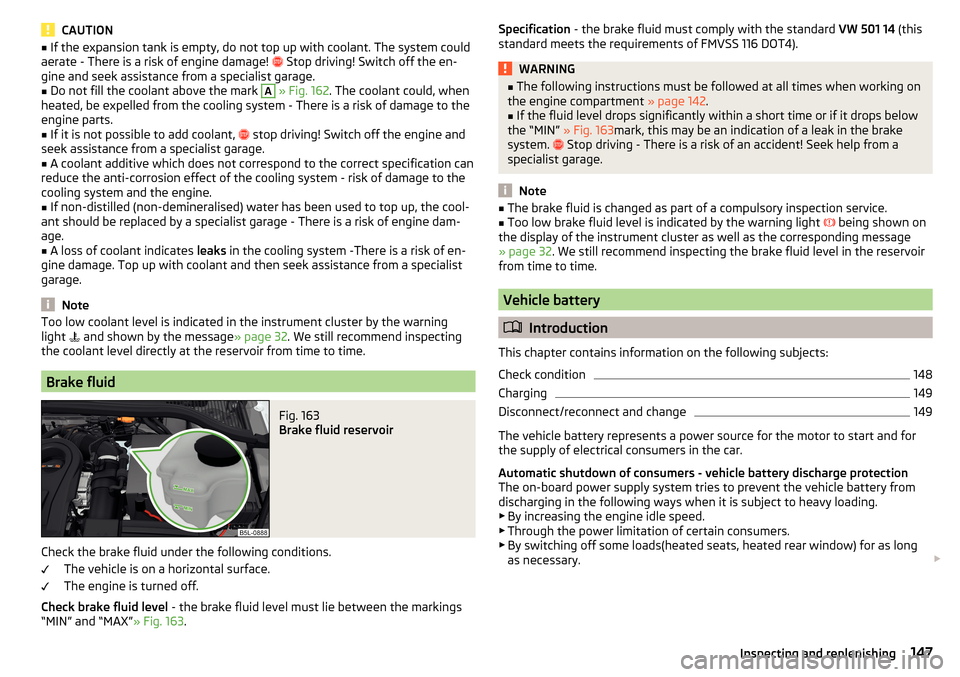
Fig. 163
Brake fluid reservoir
Check the brake fluid under the following conditions.
The vehicle is on a horizontal surface.
The engine is turned off.
Check brake fluid level - the brake fluid level must lie between the markings
“MIN” and “MAX” » Fig. 163.
Specification - the brake fluid must comply with the standard VW 501 14 (this
standard meets the requirements of FMVSS 116 DOT4).WARNING■ The following instructions must be followed at all times when working on
the engine compartment » page 142.■
If the fluid level drops significantly within a short time or if it drops below
the “MIN” » Fig. 163mark, this may be an indication of a leak in the brake
system.
Stop driving - There is a risk of an accident! Seek help from a
specialist garage.
Note
■ The brake fluid is changed as part of a compulsory inspection service.■Too low brake fluid level is indicated by the warning light being shown on
the display of the instrument cluster as well as the corresponding message
» page 32 . We still recommend inspecting the brake fluid level in the reservoir
from time to time.
Vehicle battery
Introduction
This chapter contains information on the following subjects:
Check condition
148
Charging
149
Disconnect/reconnect and change
149
The vehicle battery represents a power source for the motor to start and for the supply of electrical consumers in the car.
Automatic shutdown of consumers - vehicle battery discharge protection
The on-board power supply system tries to prevent the vehicle battery from
discharging in the following ways when it is subject to heavy loading. ▶ By increasing the engine idle speed.
▶ Through the power limitation of certain consumers.
▶ By switching off some loads(heated seats, heated rear window) for as long
as necessary.
147Inspecting and replenishing
Page 150 of 200
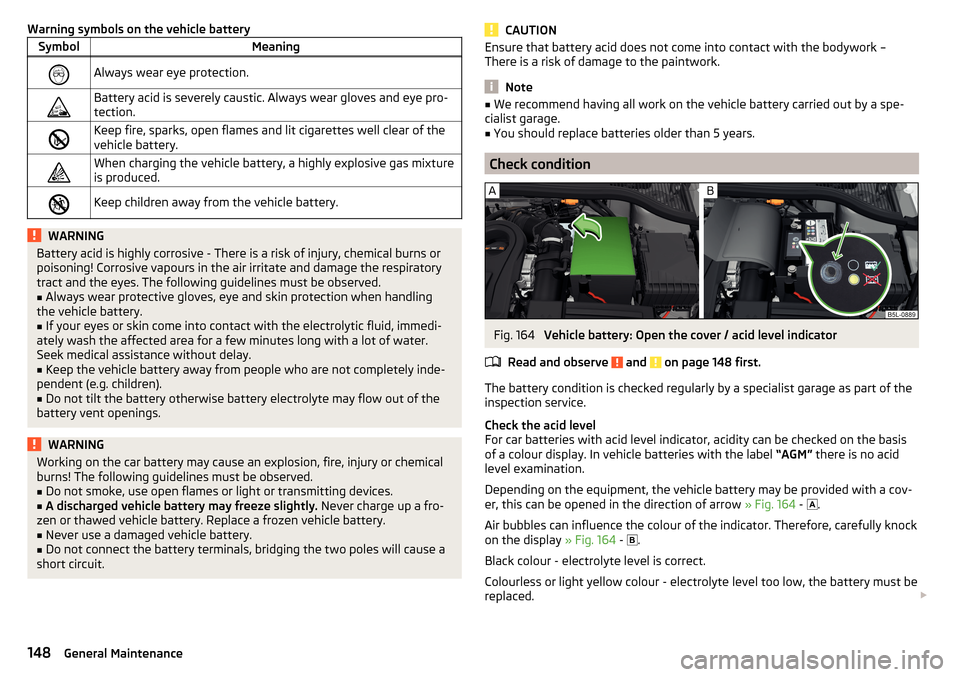
Warning symbols on the vehicle batterySymbolMeaningAlways wear eye protection.Battery acid is severely caustic. Always wear gloves and eye pro-
tection.Keep fire, sparks, open flames and lit cigarettes well clear of the
vehicle battery.When charging the vehicle battery, a highly explosive gas mixture
is produced.Keep children away from the vehicle battery.WARNINGBattery acid is highly corrosive - There is a risk of injury, chemical burns or
poisoning! Corrosive vapours in the air irritate and damage the respiratory
tract and the eyes. The following guidelines must be observed.■
Always wear protective gloves, eye and skin protection when handling
the vehicle battery.
■
If your eyes or skin come into contact with the electrolytic fluid, immedi-
ately wash the affected area for a few minutes long with a lot of water.
Seek medical assistance without delay.
■
Keep the vehicle battery away from people who are not completely inde-
pendent (e.g. children).
■
Do not tilt the battery otherwise battery electrolyte may flow out of the
battery vent openings.
WARNINGWorking on the car battery may cause an explosion, fire, injury or chemical
burns! The following guidelines must be observed.■
Do not smoke, use open flames or light or transmitting devices.
■
A discharged vehicle battery may freeze slightly. Never charge up a fro-
zen or thawed vehicle battery. Replace a frozen vehicle battery.
■
Never use a damaged vehicle battery.
■
Do not connect the battery terminals, bridging the two poles will cause a
short circuit.
CAUTIONEnsure that battery acid does not come into contact with the bodywork –
There is a risk of damage to the paintwork.
Note
■ We recommend having all work on the vehicle battery carried out by a spe-
cialist garage.■
You should replace batteries older than 5 years.
Check condition
Fig. 164
Vehicle battery: Open the cover / acid level indicator
Read and observe
and on page 148 first.
The battery condition is checked regularly by a specialist garage as part of the
inspection service.
Check the acid level
For car batteries with acid level indicator, acidity can be checked on the basis
of a colour display. In vehicle batteries with the label “AGM” there is no acid
level examination.
Depending on the equipment, the vehicle battery may be provided with a cov-
er, this can be opened in the direction of arrow » Fig. 164 -
.
Air bubbles can influence the colour of the indicator. Therefore, carefully knock
on the display » Fig. 164 -
.
Black colour - electrolyte level is correct.
Colourless or light yellow colour - electrolyte level too low, the battery must be replaced.
148General Maintenance
Page 153 of 200
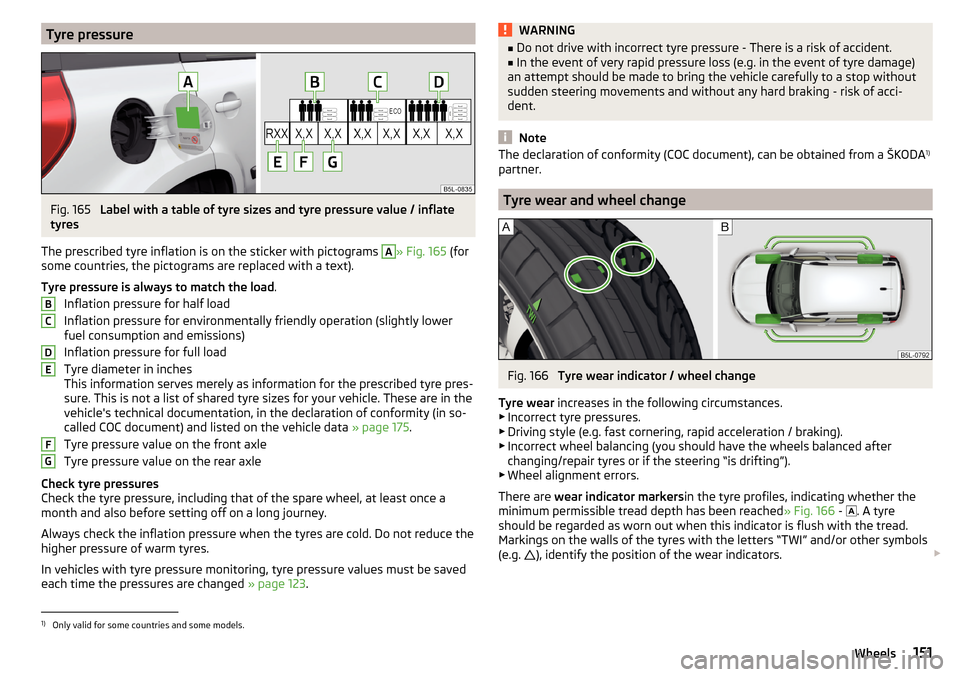
Tyre pressureFig. 165
Label with a table of tyre sizes and tyre pressure value / inflate
tyres
The prescribed tyre inflation is on the sticker with pictograms
A
» Fig. 165 (for
some countries, the pictograms are replaced with a text).
Tyre pressure is always to match the load .
Inflation pressure for half load
Inflation pressure for environmentally friendly operation (slightly lower
fuel consumption and emissions)
Inflation pressure for full load
Tyre diameter in inches
This information serves merely as information for the prescribed tyre pres-
sure. This is not a list of shared tyre sizes for your vehicle. These are in the
vehicle's technical documentation, in the declaration of conformity (in so-
called COC document) and listed on the vehicle data » page 175.
Tyre pressure value on the front axle
Tyre pressure value on the rear axle
Check tyre pressures
Check the tyre pressure, including that of the spare wheel, at least once a
month and also before setting off on a long journey.
Always check the inflation pressure when the tyres are cold. Do not reduce the
higher pressure of warm tyres.
In vehicles with tyre pressure monitoring, tyre pressure values must be saved
each time the pressures are changed » page 123.
BCDEFGWARNING■
Do not drive with incorrect tyre pressure - There is a risk of accident.■In the event of very rapid pressure loss (e.g. in the event of tyre damage)
an attempt should be made to bring the vehicle carefully to a stop without
sudden steering movements and without any hard braking - risk of acci-
dent.
Note
The declaration of conformity (COC document), can be obtained from a ŠKODA 1)
partner.
Tyre wear and wheel change
Fig. 166
Tyre wear indicator / wheel change
Tyre wear increases in the following circumstances.
▶ Incorrect tyre pressures.
▶ Driving style (e.g. fast cornering, rapid acceleration / braking).
▶ Incorrect wheel balancing (you should have the wheels balanced after
changing/repair tyres or if the steering “is drifting”).
▶ Wheel alignment errors.
There are wear indicator markers in the tyre profiles, indicating whether the
minimum permissible tread depth has been reached » Fig. 166 -
. A tyre
should be regarded as worn out when this indicator is flush with the tread.
Markings on the walls of the tyres with the letters “TWI” and/or other symbols (e.g.
), identify the position of the wear indicators.
1)
Only valid for some countries and some models.
151Wheels
Page 157 of 200
WARNINGAlways properly secure the fire extinguisher - there is a risk of injury in the
event of sudden braking or a vehicle collision.
Vehicle tool kit
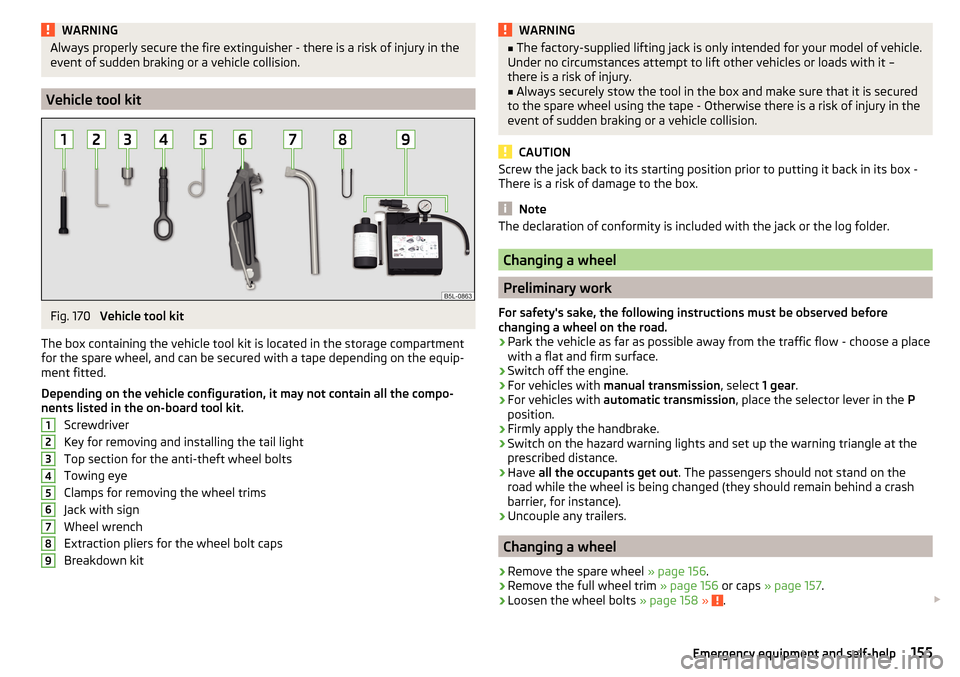
Fig. 170
Vehicle tool kit
The box containing the vehicle tool kit is located in the storage compartment
for the spare wheel, and can be secured with a tape depending on the equip-
ment fitted.
Depending on the vehicle configuration, it may not contain all the compo-
nents listed in the on-board tool kit.
Screwdriver
Key for removing and installing the tail light
Top section for the anti-theft wheel bolts
Towing eye
Clamps for removing the wheel trims
Jack with sign
Wheel wrench
Extraction pliers for the wheel bolt caps
Breakdown kit
123456789WARNING■ The factory-supplied lifting jack is only intended for your model of vehicle.
Under no circumstances attempt to lift other vehicles or loads with it –
there is a risk of injury.■
Always securely stow the tool in the box and make sure that it is secured
to the spare wheel using the tape - Otherwise there is a risk of injury in the
event of sudden braking or a vehicle collision.
CAUTION
Screw the jack back to its starting position prior to putting it back in its box -
There is a risk of damage to the box.
Note
The declaration of conformity is included with the jack or the log folder.
Changing a wheel
Preliminary work
For safety's sake, the following instructions must be observed before
changing a wheel on the road.
›
Park the vehicle as far as possible away from the traffic flow - choose a place
with a flat and firm surface.
›
Switch off the engine.
›
For vehicles with manual transmission , select 1 gear.
›
For vehicles with automatic transmission , place the selector lever in the P
position.
›
Firmly apply the handbrake.
›
Switch on the hazard warning lights and set up the warning triangle at the
prescribed distance.
›
Have all the occupants get out . The passengers should not stand on the
road while the wheel is being changed (they should remain behind a crash
barrier, for instance).
›
Uncouple any trailers.
Changing a wheel
›
Remove the spare wheel » page 156.
›
Remove the full wheel trim » page 156 or caps » page 157 .
›
Loosen the wheel bolts » page 158 » .
155Emergency equipment and self-help
Page 158 of 200
›Jack up the vehicle
» page 158 until the wheel that needs changing is clear of
the ground.›
Unscrew the wheel bolts and place them on a clean surface (cloth, paper,
etc.).
›
Remove the wheel carefully.
›
Attach the spare wheel and slightly screw on the wheel bolts.
›
Lower the vehicle.
›
Tighten the wheel bolts opposite each other using the wheel wrench (“pull- ing crossways”) » page 158.
›
Replace the wheel trim » page 156 and caps » page 157 .
When fitting unidirectional tyres, ensure that the direction of rotation is cor-
rect » page 150 .
All bolts must be clean and must turn easily. If screws are corroded and diffi-
cult to move, these must be replaced.
WARNING■ Undo the wheel bolts just a little (about one turn), provided the vehicle
has not yet been jacked up. Otherwise the wheel could come loose and fall
off – risk of injury.■
Under no circumstances must the bolts be greased or oiled - cause an ac-
cident.
Subsequent steps
After changing the wheel, the following work must be carried out.
›
Stow the replaced wheel in the well under the floor covering of the luggage
compartment and secure with a locking screw.
›
Stow the vehicle tool kit in the space provided.
›
Check tyre pressure on the mounted wheel and adjust if necessary and, with
vehicles with tyre pressure monitoring, save the tyre pressure values in the
system » page 123 .
›
Have the tightening torque of the wheel bolts checked as soon as possible.
The prescribed tightening torque is 120 Nm.
Replace the damaged wheel or consult a specialist garage about repair op-
tions.
WARNINGTightening torque which is too high can damage the threads and this can
result in permanent deformation of the contact surfaces on the rim. Where
tightening torque is too low, the wheels may become loose while driving -
There is a risk of an accident. Therefore drive cautiously and only at a mod-
erate speed until the tightening torque has been checked.
Removing /stowing the spare wheel
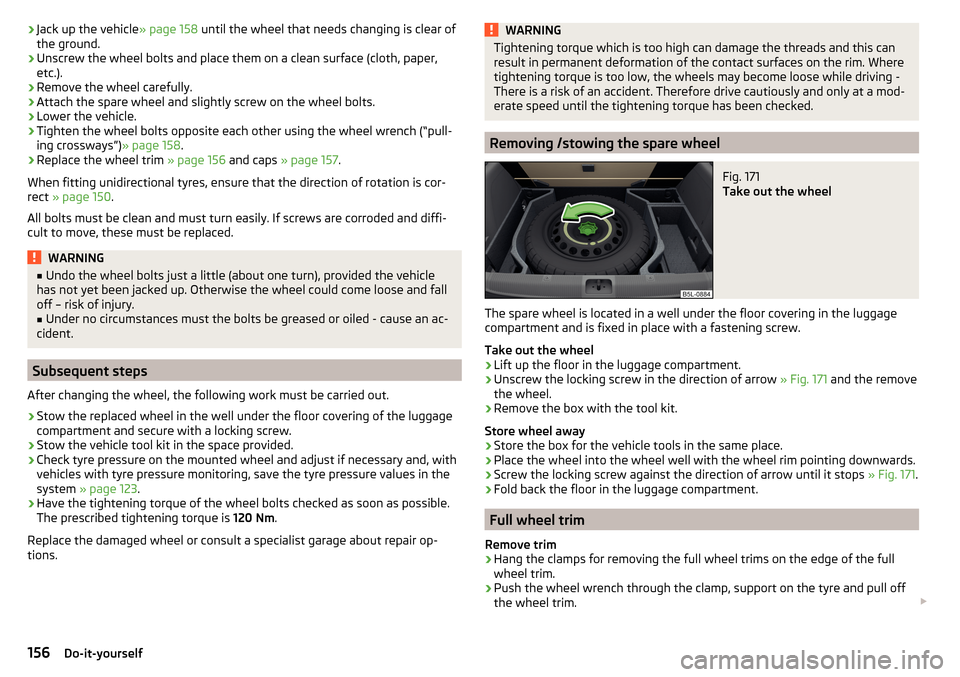
Fig. 171
Take out the wheel
The spare wheel is located in a well under the floor covering in the luggage
compartment and is fixed in place with a fastening screw.
Take out the wheel
›
Lift up the floor in the luggage compartment.
›
Unscrew the locking screw in the direction of arrow » Fig. 171 and the remove
the wheel.
›
Remove the box with the tool kit.
Store wheel away
›
Store the box for the vehicle tools in the same place.
›
Place the wheel into the wheel well with the wheel rim pointing downwards.
›
Screw the locking screw against the direction of arrow until it stops » Fig. 171.
›
Fold back the floor in the luggage compartment.
Full wheel trim
Remove trim
›
Hang the clamps for removing the full wheel trims on the edge of the full
wheel trim.
›
Push the wheel wrench through the clamp, support on the tyre and pull off
the wheel trim.
156Do-it-yourself
Page 162 of 200
Preparing to use the breakdown kitRead and observe
on page 159 first.
For safety's sake, the following instructions must be observed before
undertaking a wheel repair on a road.
›
Park the vehicle as far as possible away from the traffic flow - choose a place
with a flat and firm surface.
›
Switch off the engine.
›
For vehicles with manual transmission , select 1. gear.
›
For vehicles with automatic transmission , place the selector lever in the P
position.
›
Firmly apply the handbrake.
›
Switch on the hazard warning lights and set up the warning triangle at the
prescribed distance.
›
Have all the occupants get out . While the repair is being carried out, the pas-
sengers should not stand on the road (instead they should remain behind a
crash barrier, for instance).
›
Uncouple any trailers.
Sealing and inflating tyres
Read and observe
on page 159 first.
Sealing
›
Unscrew the valve cap from the damaged tyre.
›
Insert the valve remover
2
» Fig. 177 on page 159 on the valve insert, so that
the valve insert fits into the slot of the valve remover.
›
Unscrew the valve insert and place it on a clean base (rag, paper etc.).
›
Forcefully shake bottle
10
» Fig. 177 on page 159 several times.
›
Firmly screw the inflation hose
3
onto the tyre inflater bottle
10
. The film on
the bottle cap is pierced.
›
Remove the plug from the inflation hose
3
and insert the bottle onto the
tyre valve.
›
Hold the bottle
10
with the bottom facing upwards and fill all of the sealing
agent from the tyre inflator bottle into the tyre.
›
Remove the filler plug from the tyre valve.
›
Screw in the valve insert with the valve remover
2
.
Inflating
›
Screw the tyre inflation hose
8
» Fig. 177 on page 159 firmly onto the tyre
valve.
› For vehicles with
manual transmission , set the lever in the neutral position.›On vehicles with automatic transmission , place the selector lever in the P
position.›
Check that the screw for the tire pressure reduction
6
is closed.
›
Start the engine.
›
Plug the connector
4
into 12 volt socket » page 79.
›
Switch on the air compressor with the ON and OFF switch
9
.
›
Once tyre inflation pressure of 2.0-2.5 bar has been reached, turn off the air
compressor. Maximum run time of 6 minutes » .
›
If you cannot reach an air pressure of 2.0 - 2.5 bar, unscrew the tyre inflation
hose
8
from the tyre valve.
›
Drive the vehicle 10 metres forwards or backwards to allow the sealing agent
to “distribute” in the tyre.
›
Firmly screw the tyre inflation hose
8
back onto the tyre valve and repeat
the inflation process.
›
Stick the sticker
1
» Fig. 177 on page 159 on the dashboard in the driver's
field of view.
At a tyre inflation pressure of 2.0–2.5 bar, the journey can be continued at a
maximum speed of 80 km/h or 50 mph.
WARNING■ If the tire does not inflate at least. 2.0 bar, the damage is too great. The
sealing agent cannot be used to seal the tyre. Stop driving! Seek help
from a specialist garage.■
The tyre inflation hose and air compressor may get hot as the tyre is be-
ing inflated – risk of burning.
CAUTION
Switch off the air compressor if it has been running for as much as 6 minutes –
There is a risk of damage to the compressor! Allow the air compressor to cool a
few minutes before switching it on again.
Information on driving with repaired tyres
Read and observe
on page 159 first.
The inflation pressure of the repaired tyre must be checked after driving for 10
minutes.
If the tyre inflation pressure is 1.3 bar or less
›
The tyre cannot be properly sealed with the breakdown kit.
Stop driving!
Seek help from a specialist garage.
160Do-it-yourself
Page 164 of 200
WARNING■Never clamp the jump cable to the negative terminal of the discharged
battery -There is a risk of an explosion.■
The non-insulated parts of the terminal clamps must never touch each
other – risk of short circuit!
■
The jump-start cable connected to the positive terminal of the battery
must not come into contact with electrically conducting parts of the vehicle
– risk of short circuit!
■
Position the jump cables so that they cannot be caught in rotating parts
in the engine compartment - danger of injuries and the risk of vehicle dam-
age.
Towing the vehicle
Information about the towing process
Fig. 179
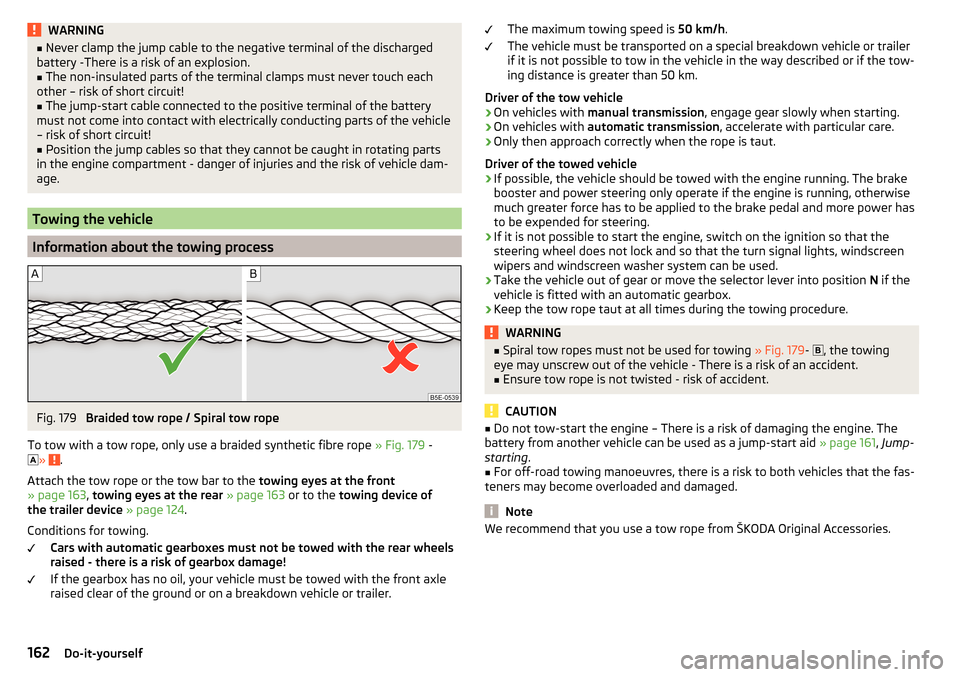
Braided tow rope / Spiral tow rope
To tow with a tow rope, only use a braided synthetic fibre rope » Fig. 179 -
»
.
Attach the tow rope or the tow bar to the towing eyes at the front
» page 163 , towing eyes at the rear » page 163 or to the towing device of
the trailer device » page 124 .
Conditions for towing. Cars with automatic gearboxes must not be towed with the rear wheels
raised - there is a risk of gearbox damage!
If the gearbox has no oil, your vehicle must be towed with the front axle
raised clear of the ground or on a breakdown vehicle or trailer.
The maximum towing speed is 50 km/h.
The vehicle must be transported on a special breakdown vehicle or trailer
if it is not possible to tow in the vehicle in the way described or if the tow-
ing distance is greater than 50 km.
Driver of the tow vehicle›
On vehicles with manual transmission , engage gear slowly when starting.
›
On vehicles with automatic transmission , accelerate with particular care.
›
Only then approach correctly when the rope is taut.
Driver of the towed vehicle
›
If possible, the vehicle should be towed with the engine running. The brake
booster and power steering only operate if the engine is running, otherwise
much greater force has to be applied to the brake pedal and more power has
to be expended for steering.
›
If it is not possible to start the engine, switch on the ignition so that the
steering wheel does not lock and so that the turn signal lights, windscreen
wipers and windscreen washer system can be used.
›
Take the vehicle out of gear or move the selector lever into position N if the
vehicle is fitted with an automatic gearbox.
›
Keep the tow rope taut at all times during the towing procedure.
WARNING■ Spiral tow ropes must not be used for towing » Fig. 179- , the towing
eye may unscrew out of the vehicle - There is a risk of an accident.■
Ensure tow rope is not twisted - risk of accident.
CAUTION
■ Do not tow-start the engine – There is a risk of damaging the engine. The
battery from another vehicle can be used as a jump-start aid » page 161, Jump-
starting .■
For off-road towing manoeuvres, there is a risk to both vehicles that the fas-
teners may become overloaded and damaged.
Note
We recommend that you use a tow rope from ŠKODA Original Accessories.162Do-it-yourself