window SUBARU CROSSTREK 2021 Getting Started Guide
[x] Cancel search | Manufacturer: SUBARU, Model Year: 2021, Model line: CROSSTREK, Model: SUBARU CROSSTREK 2021Pages: 124, PDF Size: 34.1 MB
Page 3 of 124
PURPOSE OF THIS GUIDE
WELCOME................. 4
IMPORTANT SAFETY
INFORMATION.............. 4
OWNER’S RESOURCES....... 4
IN CASE OF EMERGENCY..... 5
TOWING YOUR ALL-WHEEL
DRIVE SUBARU............. 6
ENTRY AND EXIT
KEYLESS ENTRY............ 7
KEYLESS ACCESS WITH PUSH
BUTTON START............. 8
INSTRUMENT PANEL........10
GETTING COMFORTABLE
SEATING...................12
TILT AND TELESCOPIC STEERING
COLUMN...................14
POWER EXTERIOR MIRRORS . . 14
REAR VIEW MIRROR.........15
POWER WINDOWS..........16
POWER MOONROOF........16
CLIMATE CONTROL..........17
ACCESSORY CONNECTIONS . . 20
CONTROLS
INSTRUMENT PANEL SWITCHES
(LOWER LEFT)..............21
AUDIO CONTROLS...........21CRUISE CONTROL...........22
ADVANCED ADAPTIVE CRUISE
CONTROL.................22
I/SET SWITCH...............23
INFO SWITCH...............23
LIGHT CONTROLS...........24
TURN SIGNALS.............25
WINDSHIELD WIPERS........25
REAR WINDOW WIPER.......26
OVERHEAD CONSOLE........26
GAUGES AND WARNING
LIGHTS
COMBINATION METER.......28
WARNING AND INDICATOR
LIGHTS....................29
OPERATING THE VEHICLE
IGNITION SWITCH...........30
PUSH-BUTTON IGNITION
SWITCH...................30
STARTING THE VEHICLE......30
DRIVING THE VEHICLE.......31
AUTO START–STOP.........33
X-MODE
®..................35
TURNING OFF THE VEHICLE...36
REFUELING
FUEL FILLER LID............37
FUEL......................37
FUEL CAPACITY.............37
TABLE OF CONTENTS
Page 7 of 124
IN CASE OF EMERGENCY
SUBARU STARLINK®Safety and Security(subscription required)
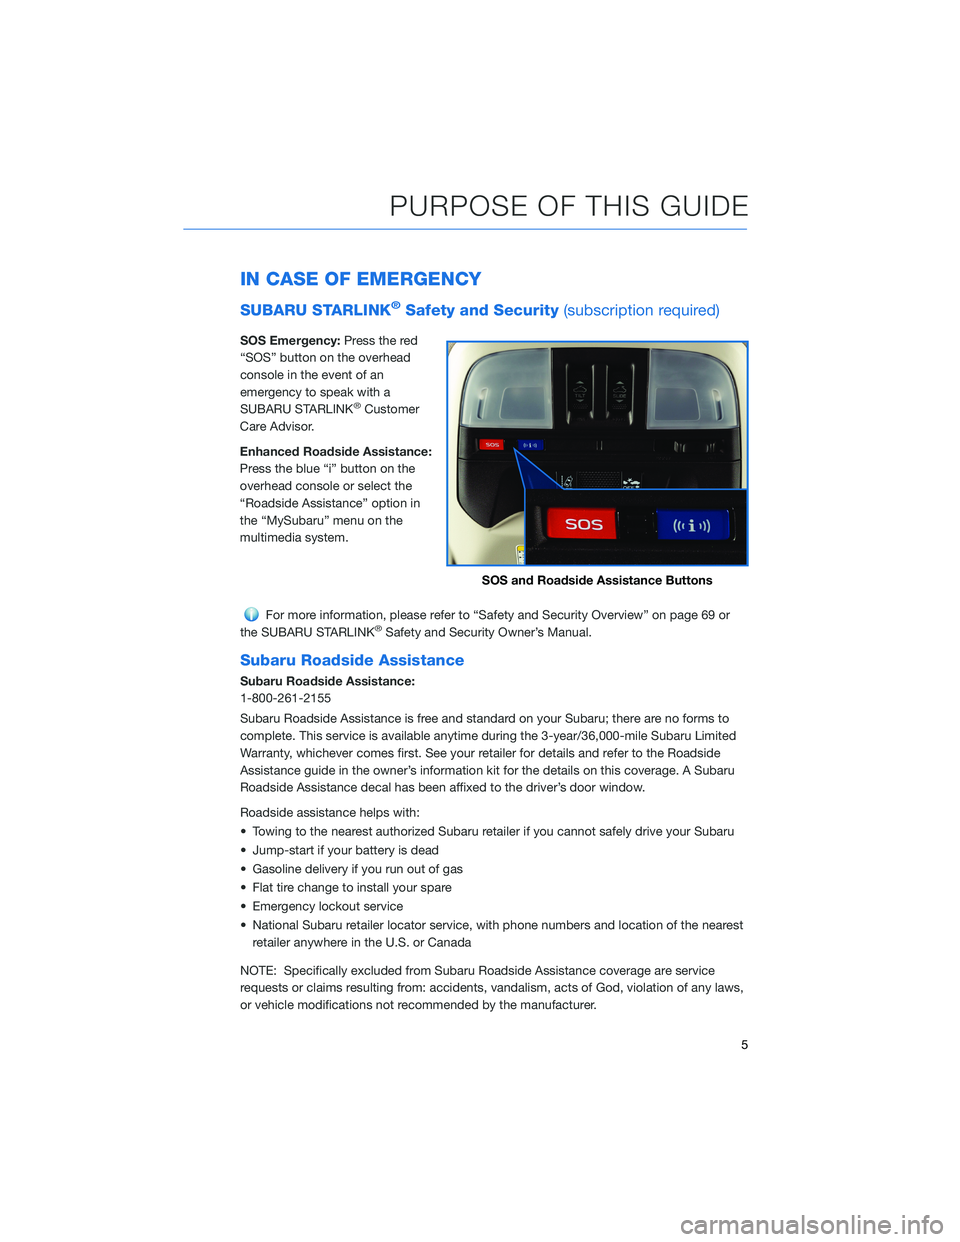
SOS Emergency:Press the red
“SOS” button on the overhead
console in the event of an
emergency to speak with a
SUBARU STARLINK
®Customer
Care Advisor.
Enhanced Roadside Assistance:
Press the blue “i” button on the
overhead console or select the
“Roadside Assistance” option in
the “MySubaru” menu on the
multimedia system.
For more information, please refer to “Safety and Security Overview” on page 69 or
the SUBARU STARLINK®Safety and Security Owner’s Manual.
Subaru Roadside Assistance
Subaru Roadside Assistance:
1-800-261-2155
Subaru Roadside Assistance is free and standard on your Subaru; there are no forms to
complete. This service is available anytime during the 3-year/36,000-mile Subaru Limited
Warranty, whichever comes first. See your retailer for details and refer to the Roadside
Assistance guide in the owner’s information kit for the details on this coverage. A Subaru
Roadside Assistance decal has been affixed to the driver’s door window.
Roadside assistance helps with:
• Towing to the nearest authorized Subaru retailer if you cannot safely drive your Subaru
• Jump-start if your battery is dead
• Gasoline delivery if you run out of gas
• Flat tire change to install your spare
• Emergency lockout service
• National Subaru retailer locator service, with phone numbers and location of the nearest
retailer anywhere in the U.S. or Canada
NOTE: Specifically excluded from Subaru Roadside Assistance coverage are service
requests or claims resulting from: accidents, vandalism, acts of God, violation of any laws,
or vehicle modifications not recommended by the manufacturer.
SOS and Roadside Assistance Buttons
PURPOSE OF THIS GUIDE
5
Page 12 of 124
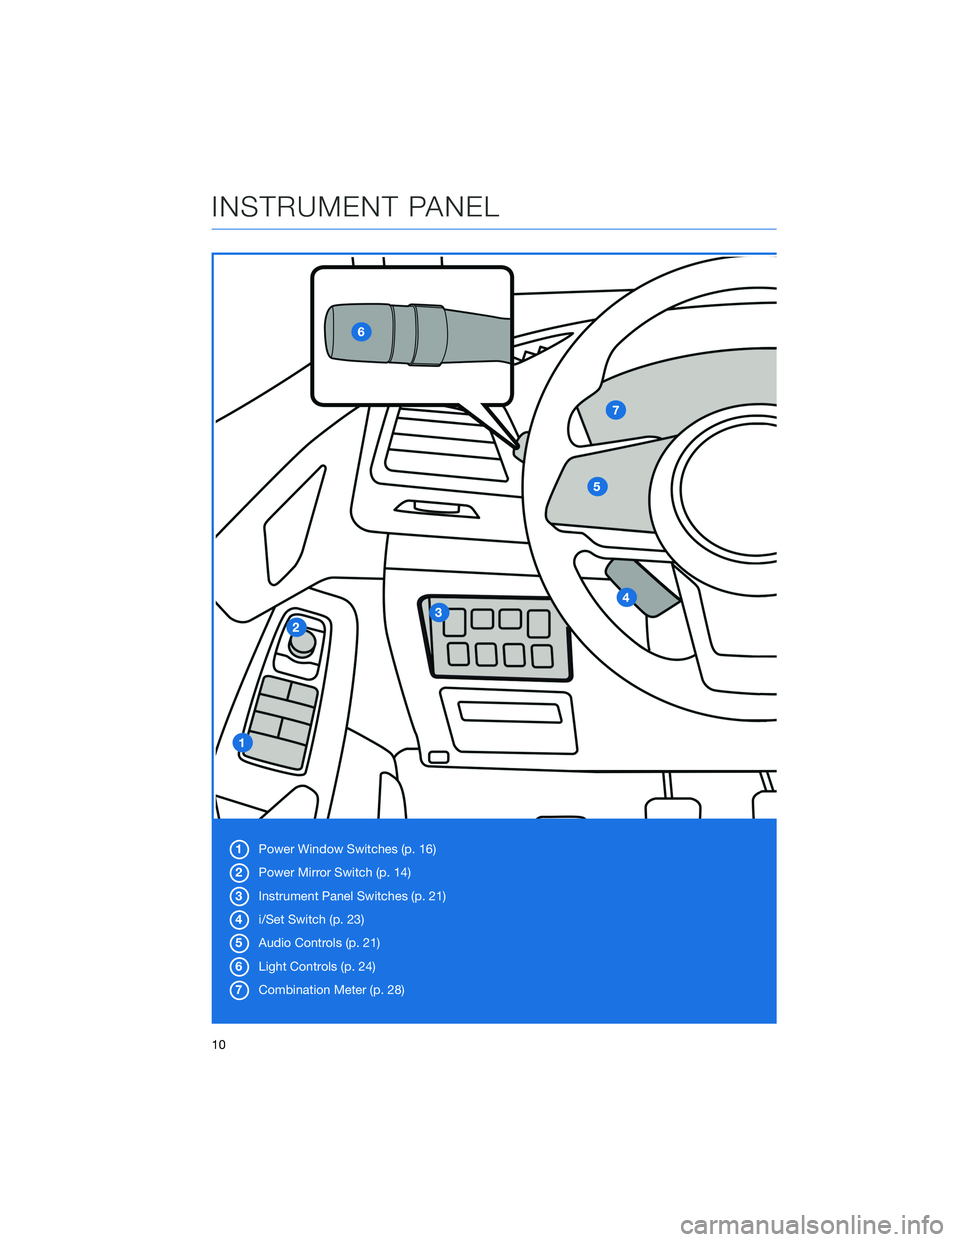
1Power Window Switches (p. 16)
2Power Mirror Switch (p. 14)
3Instrument Panel Switches (p. 21)
4i/Set Switch (p. 23)
5Audio Controls (p. 21)
6Light Controls (p. 24)
7Combination Meter (p. 28)
INSTRUMENT PANEL
10
Page 18 of 124
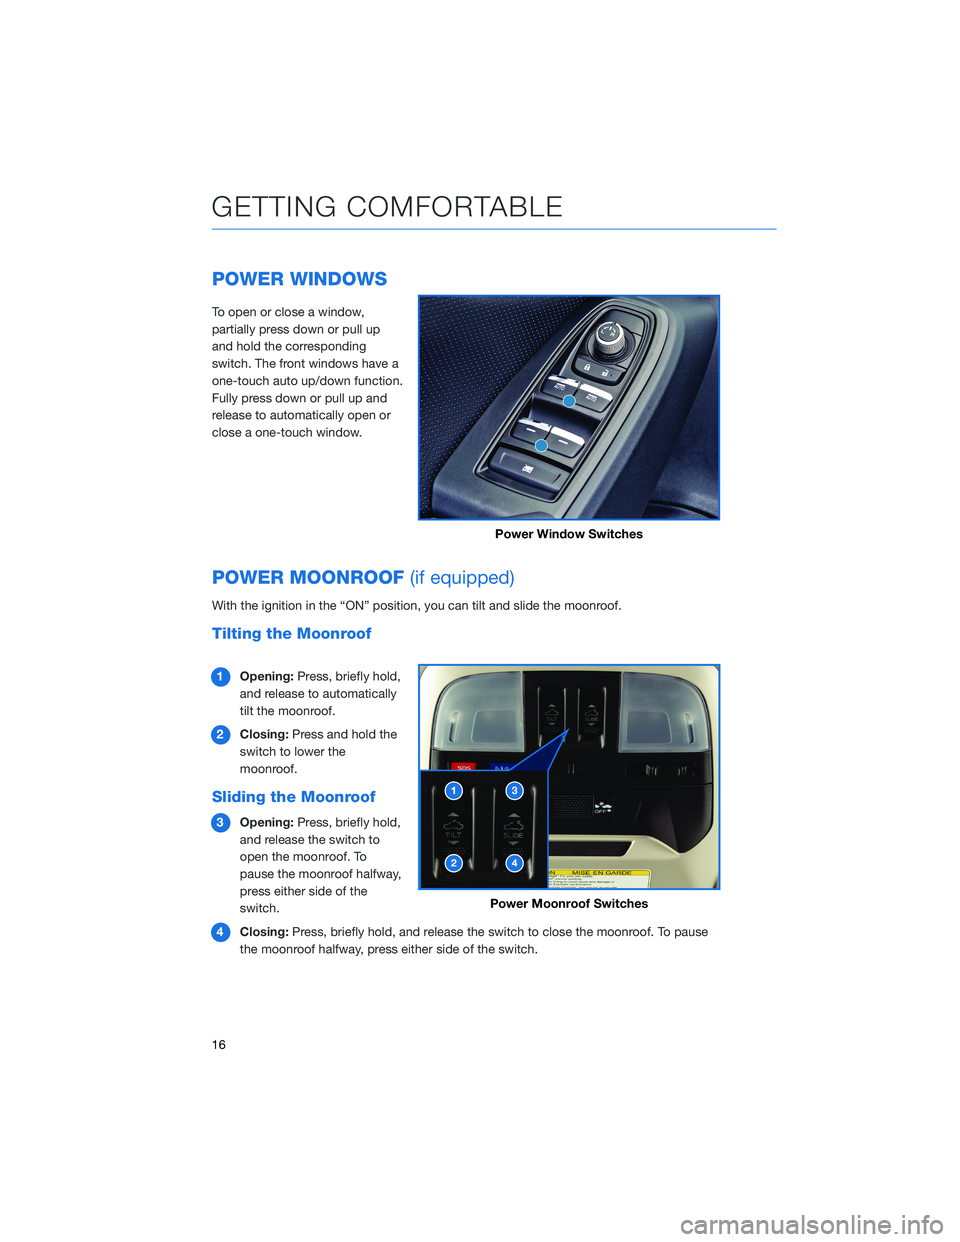
POWER WINDOWS
To open or close a window,
partially press down or pull up
and hold the corresponding
switch. The front windows have a
one-touch auto up/down function.
Fully press down or pull up and
release to automatically open or
close a one-touch window.
POWER MOONROOF(if equipped)
With the ignition in the “ON” position, you can tilt and slide the moonroof.
Tilting the Moonroof
1Opening:Press, briefly hold,
and release to automatically
tilt the moonroof.
2Closing:Press and hold the
switch to lower the
moonroof.
Sliding the Moonroof
3Opening:Press, briefly hold,
and release the switch to
open the moonroof. To
pause the moonroof halfway,
press either side of the
switch.
4Closing:Press, briefly hold, and release the switch to close the moonroof. To pause
the moonroof halfway, press either side of the switch.
Power Window Switches
Power Moonroof Switches
GETTING COMFORTABLE
16
Page 19 of 124
CLIMATE CONTROL
Automatic Climate Control
Set your desired temperature and let the system automatically make the adjustments for
you. At any time, you can manually take control of the climate settings.
Operation in Automatic Mode
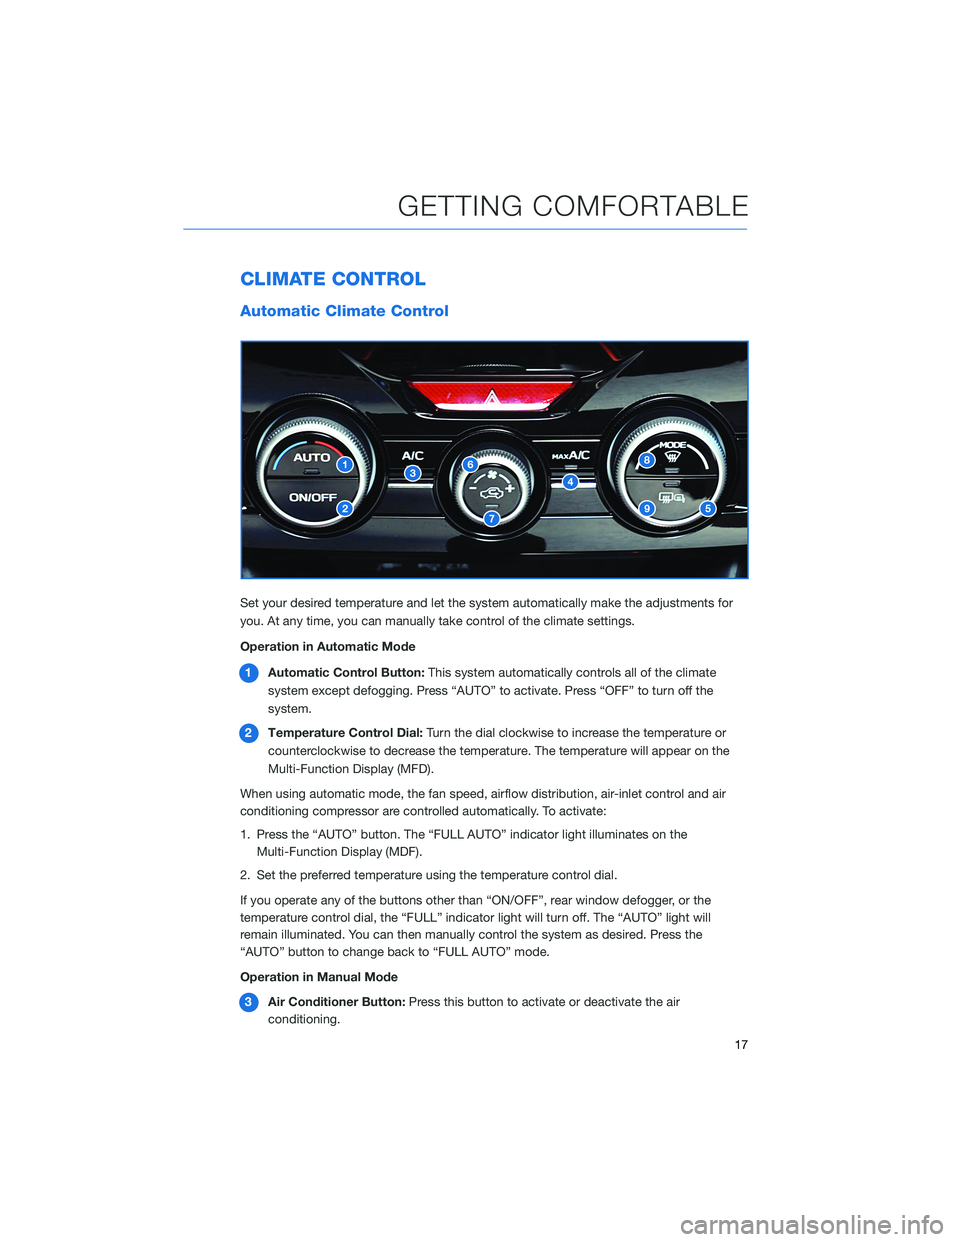
1Automatic Control Button:This system automatically controls all of the climate
system except defogging. Press “AUTO” to activate. Press “OFF” to turn off the
system.
2Temperature Control Dial:Turn the dial clockwise to increase the temperature or
counterclockwise to decrease the temperature. The temperature will appear on the
Multi-Function Display (MFD).
When using automatic mode, the fan speed, airflow distribution, air-inlet control and air
conditioning compressor are controlled automatically. To activate:
1. Press the “AUTO” button. The “FULL AUTO” indicator light illuminates on the
Multi-Function Display (MDF).
2. Set the preferred temperature using the temperature control dial.
If you operate any of the buttons other than “ON/OFF”, rear window defogger, or the
temperature control dial, the “FULL” indicator light will turn off. The “AUTO” light will
remain illuminated. You can then manually control the system as desired. Press the
“AUTO” button to change back to “FULL AUTO” mode.
Operation in Manual Mode
3Air Conditioner Button:Press this button to activate or deactivate the air
conditioning.
GETTING COMFORTABLE
17
Page 20 of 124
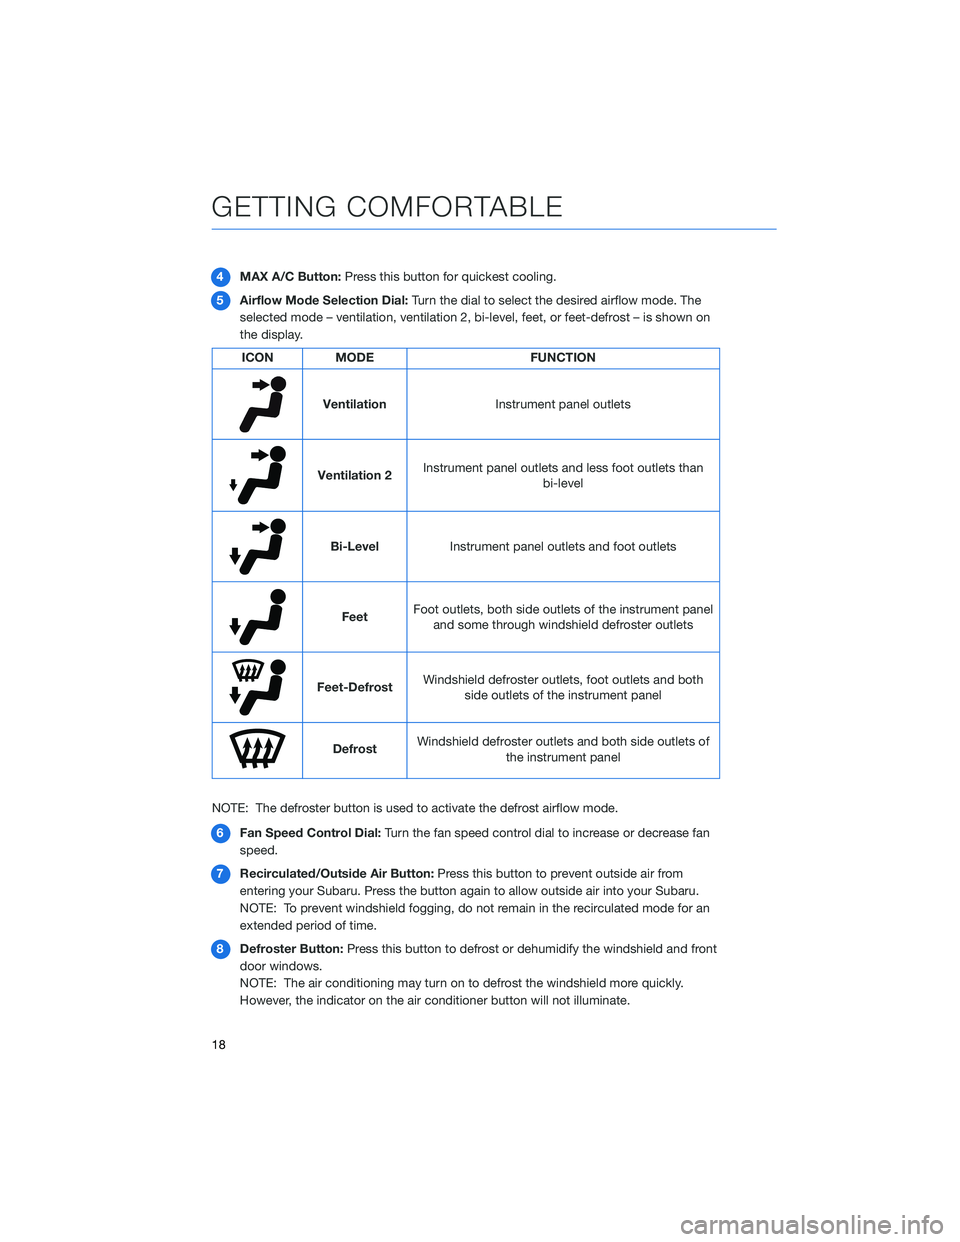
4MAX A/C Button:Press this button for quickest cooling.
5Airflow Mode Selection Dial:Turn the dial to select the desired airflow mode. The
selected mode – ventilation, ventilation 2, bi-level, feet, or feet-defrost – is shown on
the display.
ICON MODE FUNCTION
Ventilation
Instrument panel outlets
Ventilation 2Instrument panel outlets and less foot outlets than
bi-level
Bi-Level
Instrument panel outlets and foot outlets
FeetFoot outlets, both side outlets of the instrument panel
and some through windshield defroster outlets
Feet-DefrostWindshield defroster outlets, foot outlets and both
side outlets of the instrument panel
DefrostWindshield defroster outlets and both side outlets of
the instrument panel
NOTE: The defroster button is used to activate the defrost airflow mode.
6Fan Speed Control Dial:Turn the fan speed control dial to increase or decrease fan
speed.
7Recirculated/Outside Air Button:Press this button to prevent outside air from
entering your Subaru. Press the button again to allow outside air into your Subaru.
NOTE: To prevent windshield fogging, do not remain in the recirculated mode for an
extended period of time.
8Defroster Button:Press this button to defrost or dehumidify the windshield and front
door windows.
NOTE: The air conditioning may turn on to defrost the windshield more quickly.
However, the indicator on the air conditioner button will not illuminate.
GETTING COMFORTABLE
18
Page 21 of 124
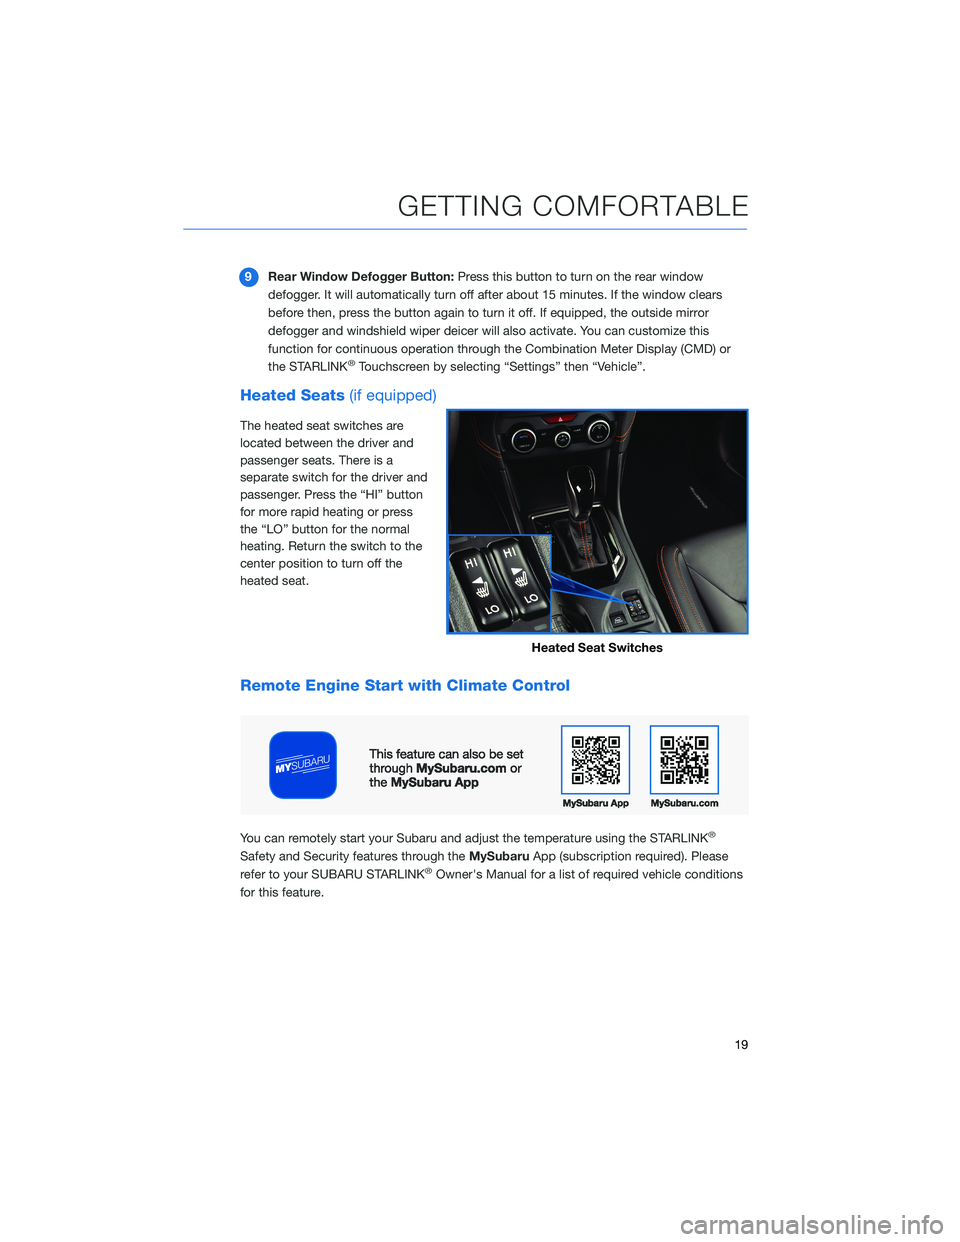
9Rear Window Defogger Button:Press this button to turn on the rear window
defogger. It will automatically turn off after about 15 minutes. If the window clears
before then, press the button again to turn it off. If equipped, the outside mirror
defogger and windshield wiper deicer will also activate. You can customize this
function for continuous operation through the Combination Meter Display (CMD) or
the STARLINK
®Touchscreen by selecting “Settings” then “Vehicle”.
Heated Seats(if equipped)
The heated seat switches are
located between the driver and
passenger seats. There is a
separate switch for the driver and
passenger. Press the “HI” button
for more rapid heating or press
the “LO” button for the normal
heating. Return the switch to the
center position to turn off the
heated seat.
Remote Engine Start with Climate Control
You can remotely start your Subaru and adjust the temperature using the STARLINK®
Safety and Security features through theMySubaruApp (subscription required). Please
refer to your SUBARU STARLINK®Owner's Manual for a list of required vehicle conditions
for this feature.
Heated Seat Switches
GETTING COMFORTABLE
19
Page 28 of 124
REAR WINDOW WIPER
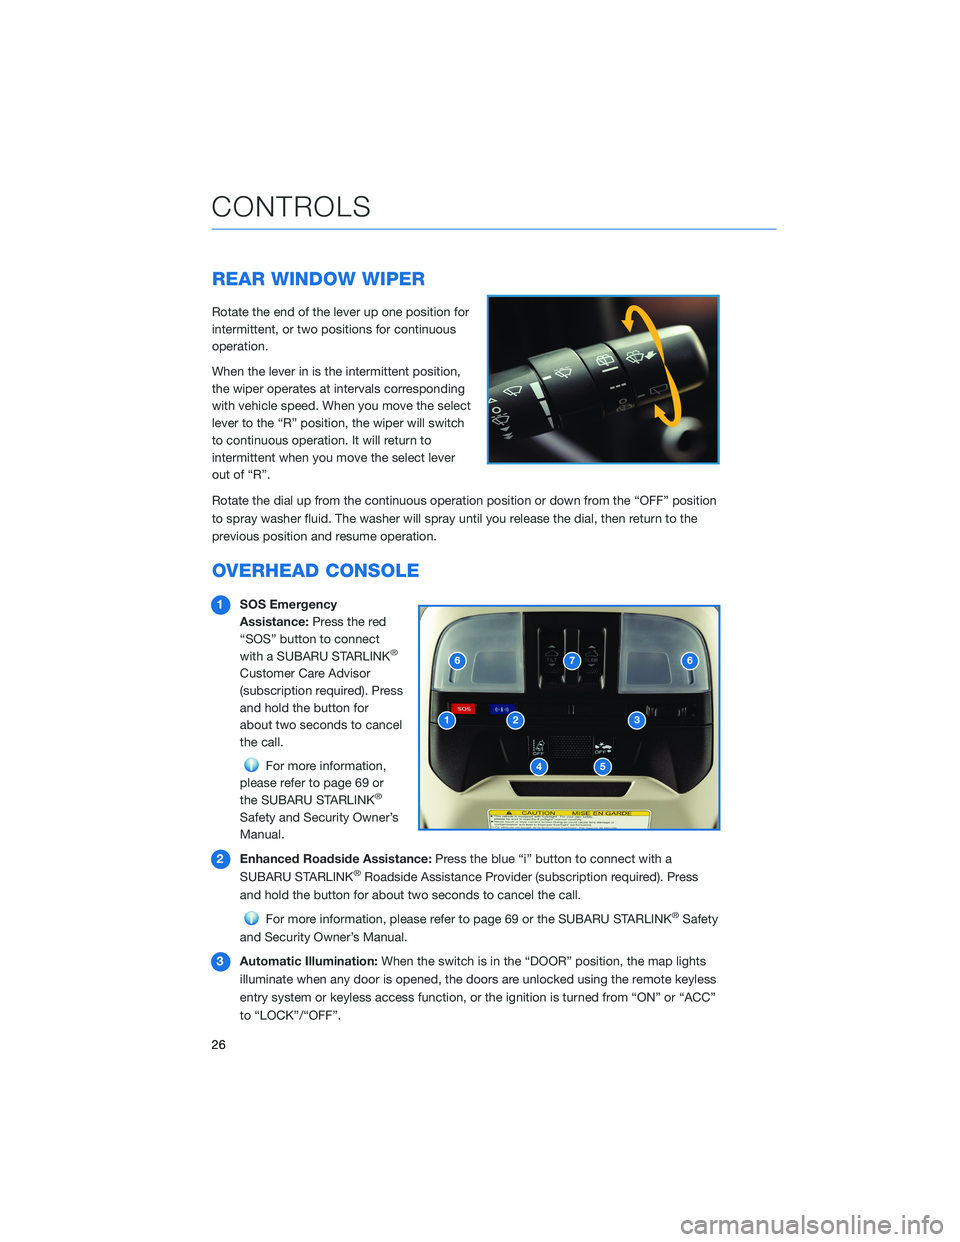
Rotate the end of the lever up one position for
intermittent, or two positions for continuous
operation.
When the lever in is the intermittent position,
the wiper operates at intervals corresponding
with vehicle speed. When you move the select
lever to the “R” position, the wiper will switch
to continuous operation. It will return to
intermittent when you move the select lever
out of “R”.
Rotate the dial up from the continuous operation position or down from the “OFF” position
to spray washer fluid. The washer will spray until you release the dial, then return to the
previous position and resume operation.
OVERHEAD CONSOLE
1SOS Emergency
Assistance:Press the red
“SOS” button to connect
with a SUBARU STARLINK
®
Customer Care Advisor
(subscription required). Press
and hold the button for
about two seconds to cancel
the call.
For more information,
please refer to page 69 or
the SUBARU STARLINK
®
Safety and Security Owner’s
Manual.
2Enhanced Roadside Assistance:Press the blue “i” button to connect with a
SUBARU STARLINK
®Roadside Assistance Provider (subscription required). Press
and hold the button for about two seconds to cancel the call.
For more information, please refer to page 69 or the SUBARU STARLINK®Safety
and Security Owner’s Manual.
3Automatic Illumination:When the switch is in the “DOOR” position, the map lights
illuminate when any door is opened, the doors are unlocked using the remote keyless
entry system or keyless access function, or the ignition is turned from “ON” or “ACC”
to “LOCK”/“OFF”.
CONTROLS
26
Page 38 of 124
Hill Descent Control (HDC)
This function helps maintain a constant vehicle speed when driving down steep hills or
declines. HDC is automatically engaged with X-MODE®and functions with the select lever
in the “D” or “R” position.
TURNING OFF THE VEHICLE
Without Push-button Ignition
To stop the engine:
1. Stop your Subaru completely.
2. Move the select lever to the “P” position or set the parking brake for manual
transmission vehicles.
3. Turn the ignition switch to “OFF”.
NOTE: The front windows will remain active for about 40 seconds and the SUBARU
STARLINK
®Multimedia System will remain on for about three minutes or until a door is
opened, whichever occurs first.
With Push-button Ignition
To stop the engine:
1. Stop your Subaru completely.
2. Move the select lever to the “P” position or set the parking brake for manual
transmission vehicles.
3. Press the ignition switch.
NOTE: The front windows will remain active for about 40 seconds and the SUBARU
STARLINK
®Multimedia System will remain on for about three minutes or until a door is
opened, whichever occurs first.
OPERATING THE VEHICLE
36
Page 54 of 124
VOICE RECOGNITION
With SUBARU STARLINK®, simple voice commands can control
features like navigation, entertainment, phone calls, and, on select
models, climate control. A microphone is located in the overhead
console; however, you do not need to speak directly into it to
activate the voice command features.
Visit
www.subaru.com/engineering/starlink/multimedia.htmlfor more
information.
Press the Voice Recognition "talk" button on the steering wheel to
start the voice recognition system. Press and hold the button to
cancel the system.
For help with what features are available with voice recognition, press the "Help" button on
the screen or press the voice recognition button and say "Help".
Tips
The system may not recognize the voice command due to various types of interference.
Some causes for voice command interference are:
• The command is spoken too quickly or at a low or high volume.
• The command is incorrect or unclear.
• The window is open, the climate control system is set on high, or the ventilation is
directed toward the microphone.
• Passengers are talking while the command is spoken.
In some cases, you may not be able to use voice commands if the system cannot properly
recognize the command. For example, the command is incorrect or unclear.
NOTE: The system is designed to recognize a variety of commands, but certain words,
accents or speech patterns may be difficult for the system to recognize.
Google Assistant:May not work with all devices or may not be compatible with the audio
system.
Siri Eyes Free:Press and hold the Voice Recognition Button when your phone is
connected via bluetooth for Siri Eyes Free.
STARLINK OVERVIEW
52