security light SUBARU TRIBECA 2009 1.G Service User Guide
[x] Cancel search | Manufacturer: SUBARU, Model Year: 2009, Model line: TRIBECA, Model: SUBARU TRIBECA 2009 1.GPages: 2453, PDF Size: 46.32 MB
Page 474 of 2453
![SUBARU TRIBECA 2009 1.G Service User Guide LAN(diag)-18
Subaru Select Monitor
LAN SYSTEM (DIAGNOSTICS)
5. CONFIRMATION OF CURRENT SETTING
1) On the «Main Menu» display screen, select the {Each System Check} and press the [YES] key.
2) On the SUBARU TRIBECA 2009 1.G Service User Guide LAN(diag)-18
Subaru Select Monitor
LAN SYSTEM (DIAGNOSTICS)
5. CONFIRMATION OF CURRENT SETTING
1) On the «Main Menu» display screen, select the {Each System Check} and press the [YES] key.
2) On the](/img/17/7322/w960_7322-473.png)
LAN(diag)-18
Subaru Select Monitor
LAN SYSTEM (DIAGNOSTICS)
5. CONFIRMATION OF CURRENT SETTING
1) On the «Main Menu» display screen, select the {Each System Check} and press the [YES] key.
2) On the «System Selection Menu» display screen, select the {Integ. Unit mode} and press the [YES] key.
3) On the «Integ. unit mode failure diag» display screen, select the {Current Data Display & Save} and press
the [YES] key.
4) On the «Current Data Display & Save» display screen, select the {12 Data Display} and press the [YES]
key.
5) Using the scroll key, scroll the display screen up or down until the desired data is shown.
6) Display the following item and record the settings.
Required items for new registration (Except for system not equipped)
Item Item to confirm Remarks
Key No. to register 1 2 3 4 Registered ID type
Off delay OFF Long Normal Short Setting for lighting off time
Auto-lock 60, 50 40, 30, 20 OFF Not suppor ted by Nor th Amer ican specifications (Unit sec.)
Rr defogger op. mode Normal ContinuousNormal: Off at 15 minutes of operation
Continuous: Operations from switch on to off
Wiper deicer op. mode Normal Continuous
Normal: Off at 15 minutes of operation
Continuous: Operations from switch ON to OFF, repeats ON
for 15 minutes, OFF for 2 minutes
Security Alarm Setup ON OFFON: Warning device operation possible
OFF: Warning device does not operate
Impact Sensor Setup ON OFF
ON: Impact sensor operation possible
OFF: Impact sensor does not operate
Tu r n O F F f o r v e h i c l e s n o t e q u i p p e d w i t h a n I m p a c t S e n s o r
Alarm monitor delay set-
tingON OFF
ON: Monitor after a fixed period of time from reception of the
keyless lock signal
OFF: Monitor after reception of the keyless lock signal
Lockout prevention ON OFFON: Lockout prevention operation
OFF: Lockout prevention not operated
Impact Sensor Yes No
Ye s : I m p a c t s e n s o r e q u i p p e d
No: Impact sensor not equipped
Always set to no for vehicles not equipped with the impact sen-
sor.
Siren setting Yes No
Ye s : V e h i c l e e q u i p p e d w i t h s i r e n
No: Vehicle not equipped with siren
The horn does not honk when the warning operates if the vehi-
cle not equipped with a siren is set to ‘Yes’.
Answer-back buzzer
setupON OFFON: Answer-back buzzer operation possible
OFF: Answer-back buzzer not operated
Hazard answer-back
setupON OFFON: Hazard answer-back buzzer operation possible
OFF: Hazard answer-back buzzer not operated
Automatic locking setup ON OFF Not suppor ted by Nor th Amer ican specifications
Ans.-back Buzzer Yes NoYe s : V e h i c l e e q u i p p e d w i t h a n s w e r - b a c k b u z z e r
No: Vehicle not equipped with answer-back buzzer
Auto locking Yes No Not suppor ted by Nor th Amer ican specifications
Door open warning (pre-
vention of batter y run-
out)
Ye s N o
Ye s : D o o r i n t e r l o c k e d r o o m l i g h t g o e s o f f w h e n o n f o r 1 0 m i n -
utes consecutively when door is open.
No: Room light remains illuminated until door is closed.
A/C ECM setting Yes No Model with auto A/C (Set to ‘Yes’)
P/W ECM setting Yes No Not supported by North American specifications
Center display failure Yes NoYe s : V e h i c l e e q u i p p e d w i t h M F D a n d n a v i g a t i o n d i s p l a y
No: Vehicle not equipped with MFD nor navigation display
Wiper deicer Yes NoYe s : V e h i c l e e q u i p p e d w i t h w i p e r d e i c e r
No: Vehicle not equipped with wiper deicer
Rear fog light setting Yes No Not supported by North American specifications
Fac t or y in i ti a l s et t i ng Fa ct o r y M ar ke tDo not change to the factory mode. Set to market when using
normally.
Page 479 of 2453
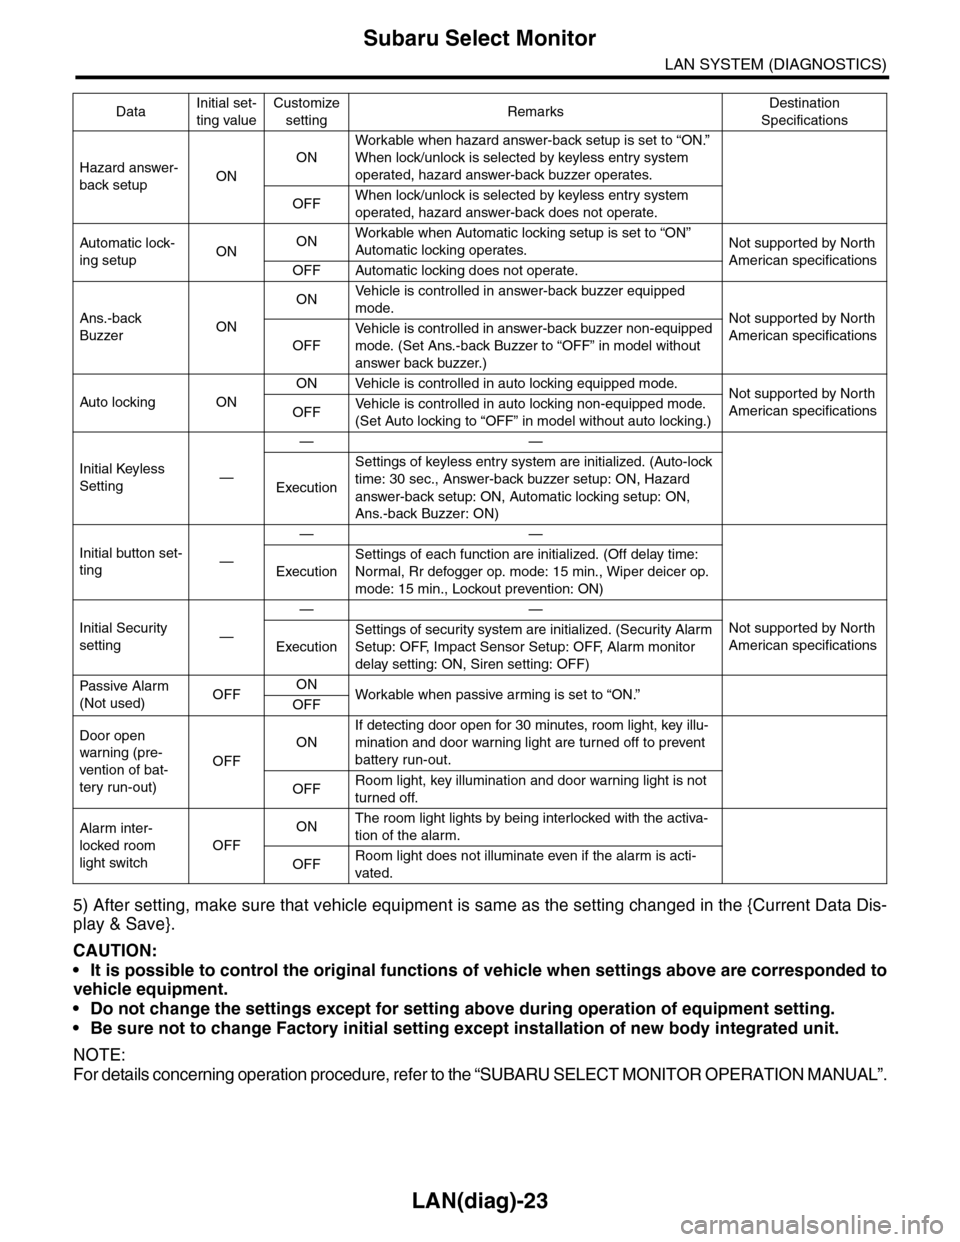
LAN(diag)-23
Subaru Select Monitor
LAN SYSTEM (DIAGNOSTICS)
5) After setting, make sure that vehicle equipment is same as the setting changed in the {Current Data Dis-
play & Save}.
CAUTION:
•It is possible to control the original functions of vehicle when settings above are corresponded to
vehicle equipment.
•Do not change the settings except for setting above during operation of equipment setting.
•Be sure not to change Factory initial setting except installation of new body integrated unit.
NOTE:
For details concerning operation procedure, refer to the “SUBARU SELECT MONITOR OPERATION MANUAL”.
Hazard answer-
back setupON
ON
Workable when hazard answer-back setup is set to “ON.”
When lock/unlock is selected by keyless entry system
operated, hazard answer-back buzzer operates.
OFFWhen lock/unlock is selected by keyless entry system
operated, hazard answer-back does not operate.
Automatic lock-
ing setupONONWorkable when Automatic locking setup is set to “ON”
Automatic locking operates.Not supported by North
American specificationsOFF Automatic locking does not operate.
Ans.-back
BuzzerON
ONVe h i c l e i s c o n t r o l l e d i n a n sw e r - b a c k b u z z e r e q u i p p e d
mode.Not supported by North
American specificationsOFF
Ve h i c l e i s c o n t r o l l e d i n a n sw e r - b a c k b u z z e r n o n - e q u i p p e d
mode. (Set Ans.-back Buzzer to “OFF” in model without
answer back buzzer.)
Auto locking ON
ON Vehicle is controlled in auto locking equipped mode.Not supported by North
American specificationsOFFVe h i c l e i s c o n t r o l l e d i n a u t o l o c k i n g n o n - e q u i p p e d m o d e .
(Set Auto locking to “OFF” in model without auto locking.)
Initial Keyless
Setting—
——
Execution
Settings of keyless entry system are initialized. (Auto-lock
time: 30 sec., Answer-back buzzer setup: ON, Hazard
answer-back setup: ON, Automatic locking setup: ON,
Ans.-back Buzzer: ON)
Initial button set-
ting—
——
Execution
Settings of each function are initialized. (Off delay time:
Normal, Rr defogger op. mode: 15 min., Wiper deicer op.
mode: 15 min., Lockout prevention: ON)
Initial Security
setting—
——
Not supported by North
American specificationsExecution
Settings of security system are initialized. (Security Alarm
Setup: OFF, Impact Sensor Setup: OFF, Alarm monitor
delay setting: ON, Siren setting: OFF)
Passive Alar m
(Not used)OFFONWorkable when passive ar ming is set to “ON.”
OFF
Door open
warning (pre-
vention of bat-
tery run-out)
OFF
ON
If detecting door open for 30 minutes, room light, key illu-
mination and door warning light are turned off to prevent
battery run-out.
OFFRoom light, key illumination and door warning light is not
turned off.
Alarm inter-
locked room
light switch
OFF
ONThe room light lights by being interlocked with the activa-
tion of the alarm.
OFFRoom light does not illuminate even if the alarm is acti-
vated.
DataInitial set-
ting value
Customize
settingRemarksDestination
Specifications
Page 533 of 2453
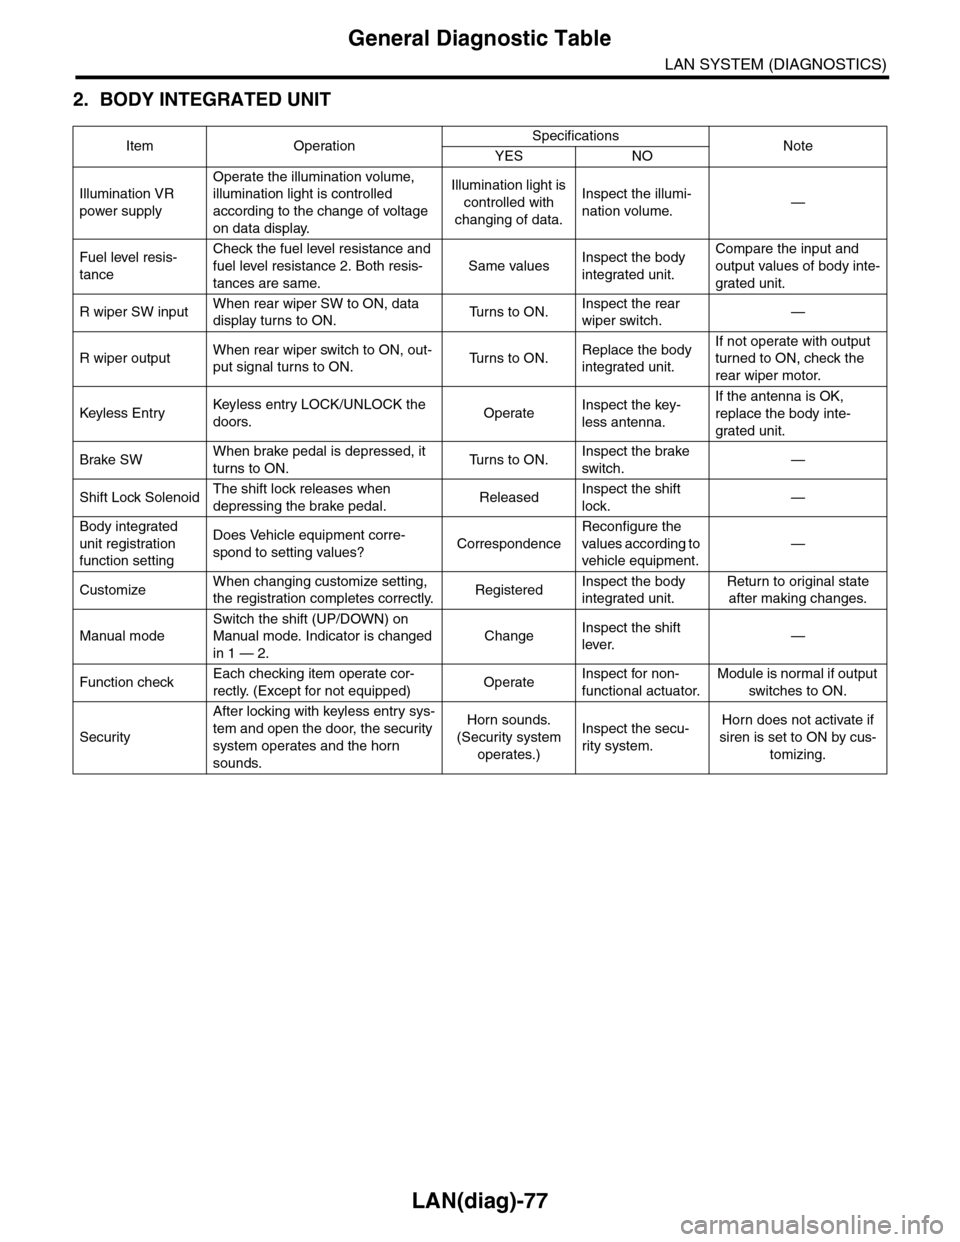
LAN(diag)-77
General Diagnostic Table
LAN SYSTEM (DIAGNOSTICS)
2. BODY INTEGRATED UNIT
Item OperationSpecificationsNoteYES NO
Illumination VR
power supply
Operate the illumination volume,
illumination light is controlled
according to the change of voltage
on data display.
Illumination light is
controlled with
changing of data.
Inspect the illumi-
nation volume.—
Fuel level resis-
tance
Check the fuel level resistance and
fuel level resistance 2. Both resis-
tances are same.
Same valuesInspect the body
integrated unit.
Compare the input and
output values of body inte-
grated unit.
R wiper SW inputWhen rear wiper SW to ON, data
display turns to ON.Tu r n s t o O N .Inspect the rear
wiper switch.—
R wiper outputWhen rear wiper switch to ON, out-
put signal turns to ON.Tu r n s t o O N .Replace the body
integrated unit.
If not operate with output
turned to ON, check the
rear wiper motor.
Keyless Entr yKeyless entr y LOCK/UNLOCK the
doors.OperateInspect the key-
less antenna.
If the antenna is OK,
replace the body inte-
grated unit.
Brake SWWhen brake pedal is depressed, it
turns to ON.Tu r n s t o O N .Inspect the brake
switch.—
Shift Lock SolenoidThe shift lock releases when
depressing the brake pedal.ReleasedInspect the shift
lock.—
Body integrated
unit registration
function setting
Does Vehicle equipment corre-
spond to setting values?Correspondence
Reconfigure the
values according to
vehicle equipment.
—
CustomizeWhen changing customize setting,
the registration completes correctly.RegisteredInspect the body
integrated unit.
Return to original state
after making changes.
Manual mode
Switch the shift (UP/DOWN) on
Manual mode. Indicator is changed
in 1 — 2.
ChangeInspect the shift
lever.—
Function checkEach checking item operate cor-
rectly. (Except for not equipped)OperateInspect for non-
functional actuator.
Module is normal if output
switches to ON.
Security
After locking with keyless entry sys-
tem and open the door, the security
system operates and the horn
sounds.
Horn sounds.
(Security system
operates.)
Inspect the secu-
rity system.
Horn does not activate if
siren is set to ON by cus-
tomizing.
Page 634 of 2453
SL-5
General Description
SECURITY AND LOCKS
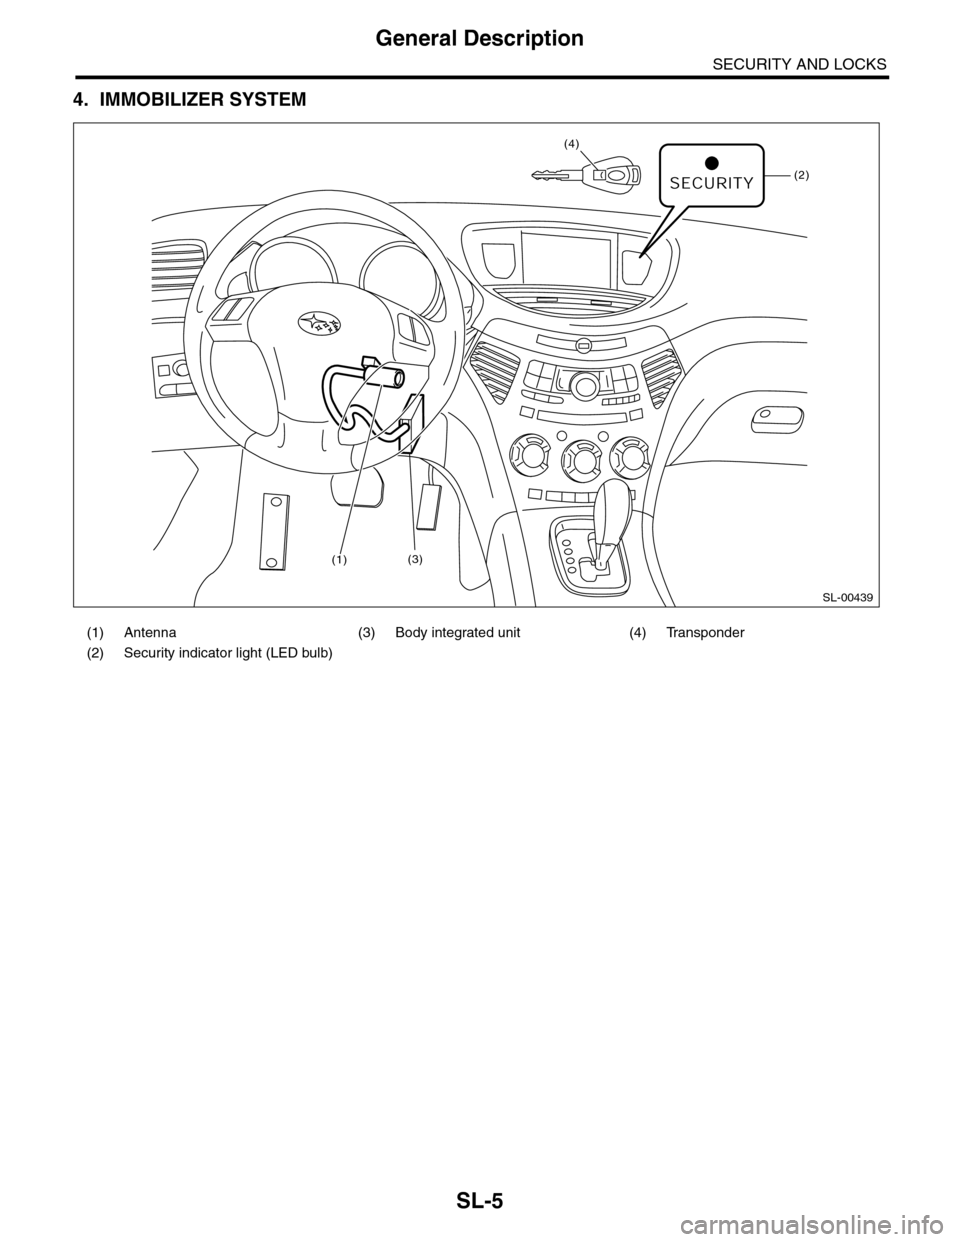
4. IMMOBILIZER SYSTEM
(1) Antenna (3) Body integrated unit (4) Transponder
(2) Security indicator light (LED bulb)
SL-00439
(2)
(4)
(1)(3)
Page 641 of 2453
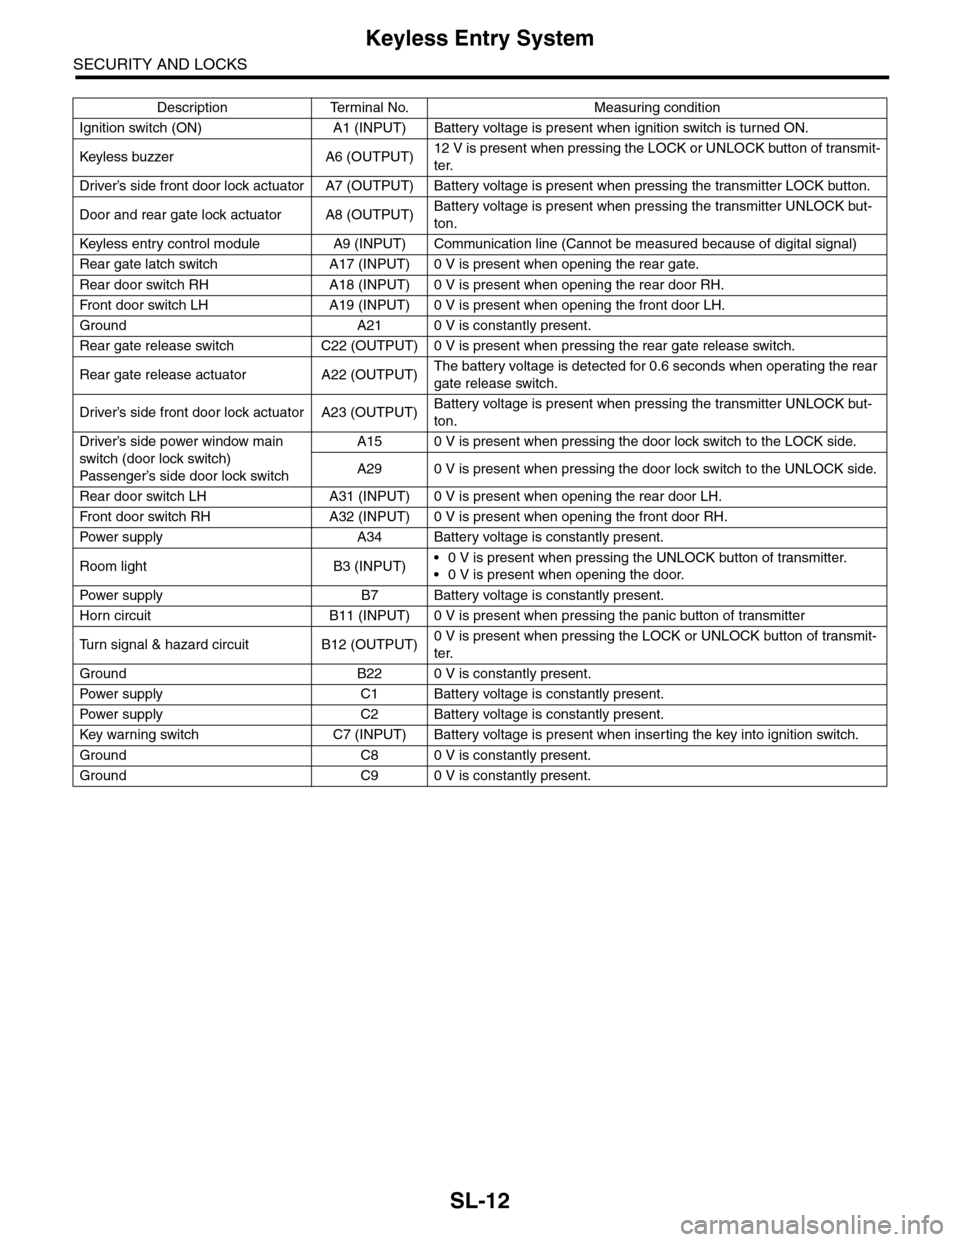
SL-12
Keyless Entry System
SECURITY AND LOCKS
Description Terminal No. Measuring condition
Ignition switch (ON) A1 (INPUT) Battery voltage is present when ignition switch is turned ON.
Keyless buzzer A6 (OUTPU T)12 V is present when pressing the LOCK or UNLOCK button of transmit-
ter.
Driver’s side front door lock actuator A7 (OUTPUT) Battery voltage is present when pressing the transmitter LOCK button.
Door and rear gate lock actuator A8 (OUTPUT)Battery voltage is present when pressing the transmitter UNLOCK but-
ton.
Keyless entr y control module A9 (INPUT) Communication line (Cannot be measured because of digital signal)
Rear gate latch switch A17 (INPUT) 0 V is present when opening the rear gate.
Rear door switch RH A18 (INPUT) 0 V is present when opening the rear door RH.
Fr o nt d oo r swi tc h L H A 19 ( I NP UT ) 0 V i s pr e se n t wh e n o p en in g th e f r o n t d oo r L H.
Ground A21 0 V is constantly present.
Rear gate release switch C22 (OUTPUT) 0 V is present when pressing the rear gate release switch.
Rear gate release actuator A22 (OUTPUT)The battery voltage is detected for 0.6 seconds when operating the rear
gate release switch.
Driver’s side front door lock actuator A23 (OUTPUT)Battery voltage is present when pressing the transmitter UNLOCK but-
ton.
Driver’s side power window main
switch (door lock switch)
Passenger’s side door lock sw itch
A15 0 V is present when pressing the door lock switch to the LOCK side.
A29 0 V is present when pressing the door lock switch to the UNLOCK side.
Rear door switch LH A31 (INPUT) 0 V is present when opening the rear door LH.
Fr o nt d oo r swi tc h RH A 32 ( I NP UT ) 0 V i s pr e se n t wh e n o p en in g th e f r o n t d oo r RH.
Pow er s up p ly A 34 B at t e r y vol t ag e i s c on s ta n tl y p r e se nt .
Room light B3 (INPUT)•0 V is present when pressing the UNLOCK button of transmitter.
•0 V is present when opening the door.
Pow er s up p ly B 7 B at t e r y vol t ag e i s c on s ta n tl y p r e se nt .
Horn circuit B11 (INPUT) 0 V is present when pressing the panic button of transmitter
Tu r n s i g n a l & h a z a r d c i r c u i t B 1 2 ( O U T P U T )0 V is present when pressing the LOCK or UNLOCK button of transmit-
ter.
Ground B22 0 V is constantly present.
Pow er s up p ly C 1 B at t e r y vol t ag e i s c on s ta n tl y p r e se nt .
Pow er s up p ly C 2 B at t e r y vol t ag e i s c on s ta n tl y p r e se nt .
Key war ning switch C7 (INPUT) Batter y voltage is present when inser ting the key into ignition switch.
Ground C8 0 V is constantly present.
Ground C9 0 V is constantly present.
Page 643 of 2453
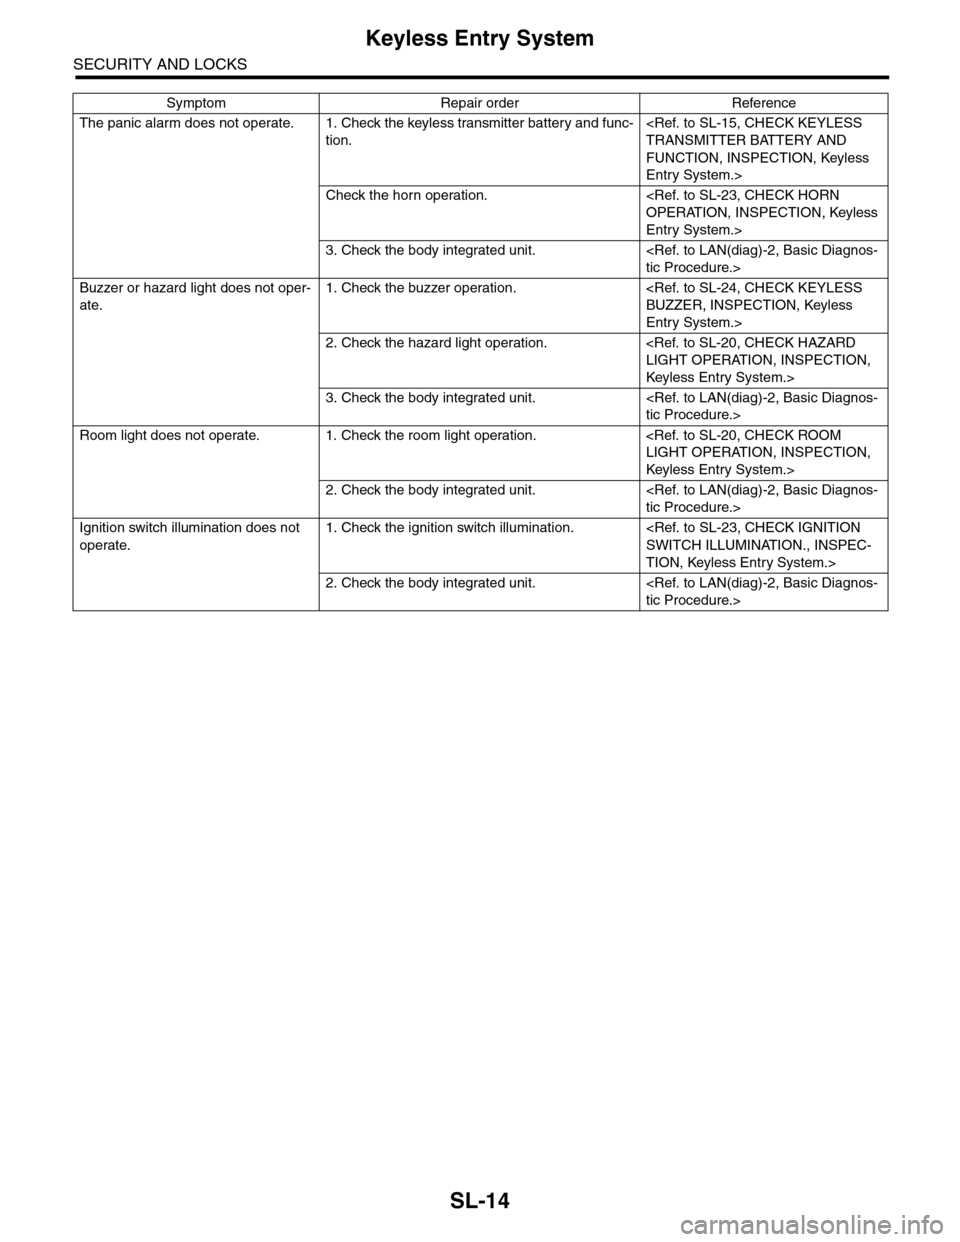
SL-14
Keyless Entry System
SECURITY AND LOCKS
The panic alarm does not operate. 1. Check the keyless transmitter batter y and func-
tion.
FUNCTION, INSPECTION, Keyless
Entry System.>
Check the horn operation.
Entry System.>
3. Check the body integrated unit.
Buzzer or hazard light does not oper-
ate.
1. Check the buzzer operation.
Entry System.>
2. Check the hazard light operation.
Keyless Entr y System.>
3. Check the body integrated unit.
Room light does not operate. 1. Check the room light operation.
Keyless Entr y System.>
2. Check the body integrated unit.
Ignition switch illumination does not
operate.
1. Check the ignition switch illumination.
TION, Keyless Entry System.>
2. Check the body integrated unit.
Symptom Repair order Reference
Page 649 of 2453
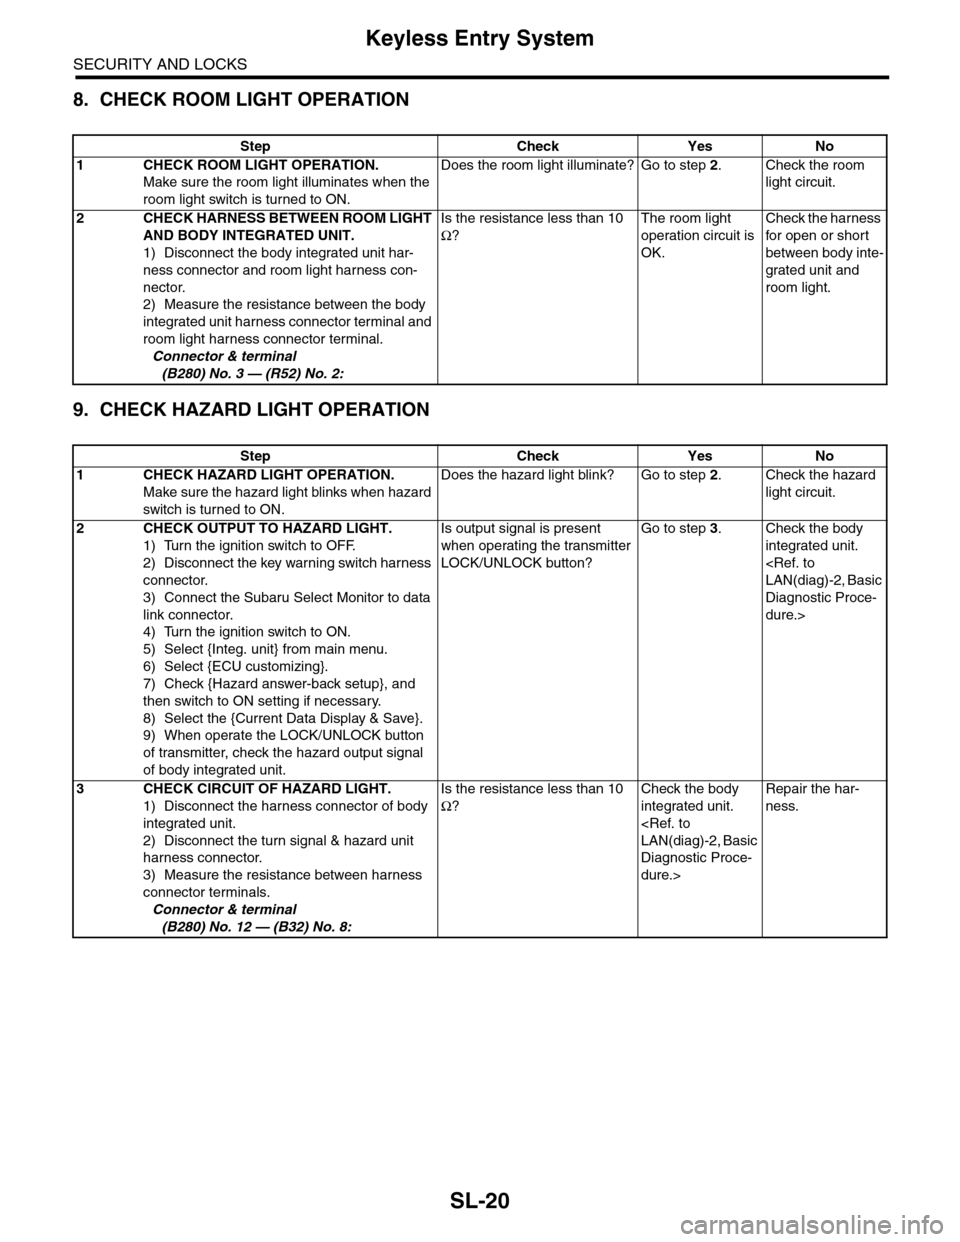
SL-20
Keyless Entry System
SECURITY AND LOCKS
8. CHECK ROOM LIGHT OPERATION
9. CHECK HAZARD LIGHT OPERATION
Step Check Yes No
1CHECK ROOM LIGHT OPERATION.
Make sure the room light illuminates when the
room light switch is turned to ON.
Does the room light illuminate? Go to step 2.Check the room
light circuit.
2CHECK HARNESS BETWEEN ROOM LIGHT
AND BODY INTEGRATED UNIT.
1) Disconnect the body integrated unit har-
ness connector and room light harness con-
nector.
2) Measure the resistance between the body
integrated unit harness connector terminal and
room light harness connector terminal.
Connector & terminal
(B280) No. 3 — (R52) No. 2:
Is the resistance less than 10
Ω?
The room light
operation circuit is
OK.
Check the harness
for open or shor t
between body inte-
grated unit and
room light.
Step Check Yes No
1CHECK HAZARD LIGHT OPERATION.
Make sure the hazard light blinks when hazard
switch is turned to ON.
Does the hazard light blink? Go to step 2.Check the hazard
light circuit.
2CHECK OUTPUT TO HAZARD LIGHT.
1) Turn the ignition switch to OFF.
2) Disconnect the key warning switch harness
connector.
3) Connect the Subaru Select Monitor to data
link connector.
4) Turn the ignition switch to ON.
5) Select {Integ. unit} from main menu.
6) Select {ECU customizing}.
7) Check {Hazard answer-back setup}, and
then switch to ON setting if necessary.
8) Select the {Current Data Display & Save}.
9) When operate the LOCK/UNLOCK button
of transmitter, check the hazard output signal
of body integrated unit.
Is output signal is present
when operating the transmitter
LOCK/UNLOCK button?
Go to step 3.Check the body
integrated unit.
Diagnostic Proce-
dure.>
3CHECK CIRCUIT OF HAZARD LIGHT.
1) Disconnect the harness connector of body
integrated unit.
2) Disconnect the turn signal & hazard unit
harness connector.
3) Measure the resistance between harness
connector terminals.
Connector & terminal
(B280) No. 12 — (B32) No. 8:
Is the resistance less than 10
Ω?
Check the body
integrated unit.
Diagnostic Proce-
dure.>
Repair the har-
ness.
Page 650 of 2453
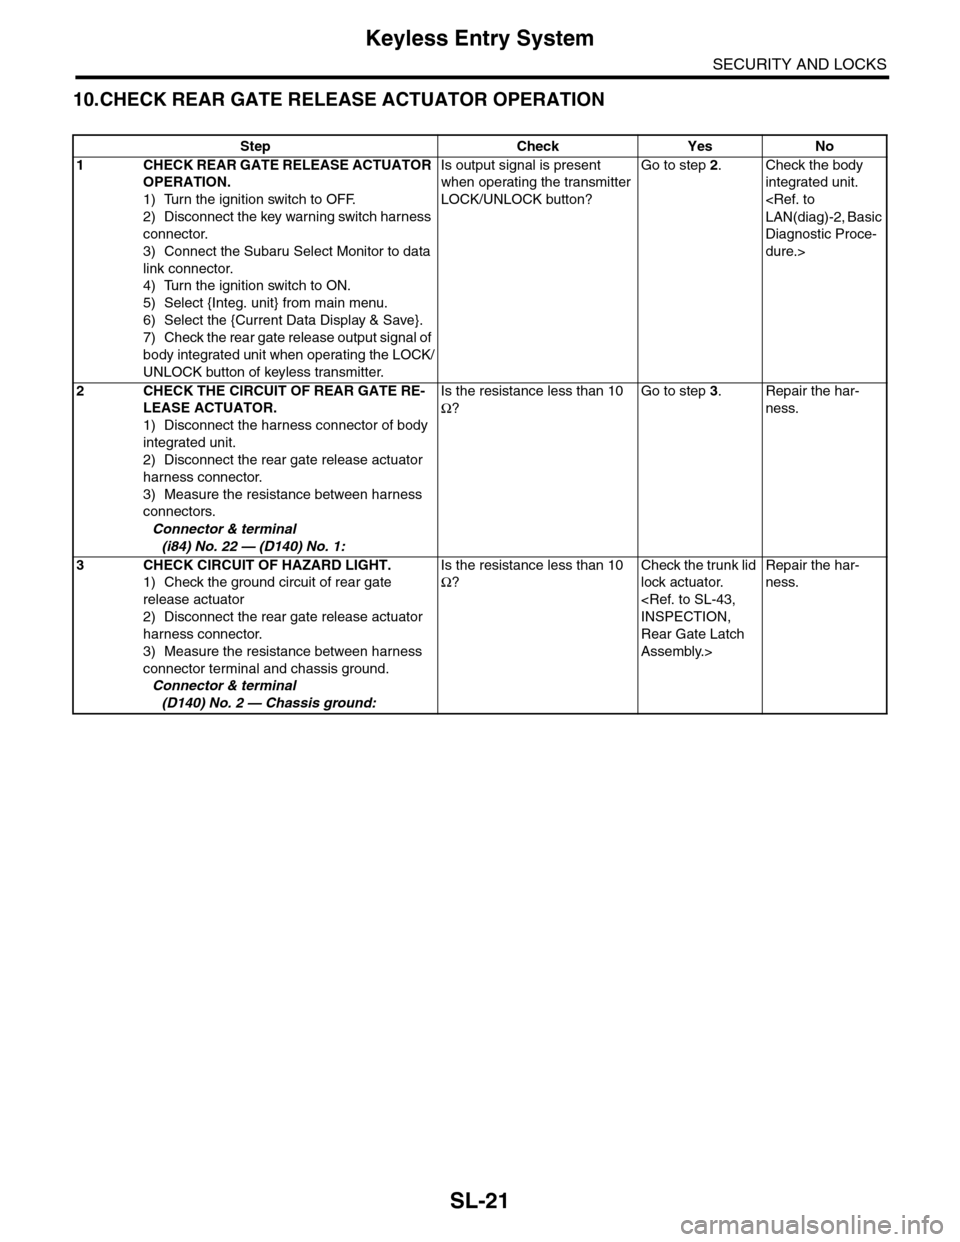
SL-21
Keyless Entry System
SECURITY AND LOCKS
10.CHECK REAR GATE RELEASE ACTUATOR OPERATION
Step Check Yes No
1CHECK REAR GATE RELEASE ACTUATOR
OPERATION.
1) Turn the ignition switch to OFF.
2) Disconnect the key warning switch harness
connector.
3) Connect the Subaru Select Monitor to data
link connector.
4) Turn the ignition switch to ON.
5) Select {Integ. unit} from main menu.
6) Select the {Current Data Display & Save}.
7) Check the rear gate release output signal of
body integrated unit when operating the LOCK/
UNLOCK button of keyless transmitter.
Is output signal is present
when operating the transmitter
LOCK/UNLOCK button?
Go to step 2.Check the body
integrated unit.
Diagnostic Proce-
dure.>
2CHECK THE CIRCUIT OF REAR GATE RE-
LEASE ACTUATOR.
1) Disconnect the harness connector of body
integrated unit.
2) Disconnect the rear gate release actuator
harness connector.
3) Measure the resistance between harness
connectors.
Connector & terminal
(i84) No. 22 — (D140) No. 1:
Is the resistance less than 10
Ω?
Go to step 3.Repair the har-
ness.
3CHECK CIRCUIT OF HAZARD LIGHT.
1) Check the ground circuit of rear gate
release actuator
2) Disconnect the rear gate release actuator
harness connector.
3) Measure the resistance between harness
connector terminal and chassis ground.
Connector & terminal
(D140) No. 2 — Chassis ground:
Is the resistance less than 10
Ω?
Check the trunk lid
lock actuator.
Rear Gate Latch
Assembly.>
Repair the har-
ness.
Page 655 of 2453
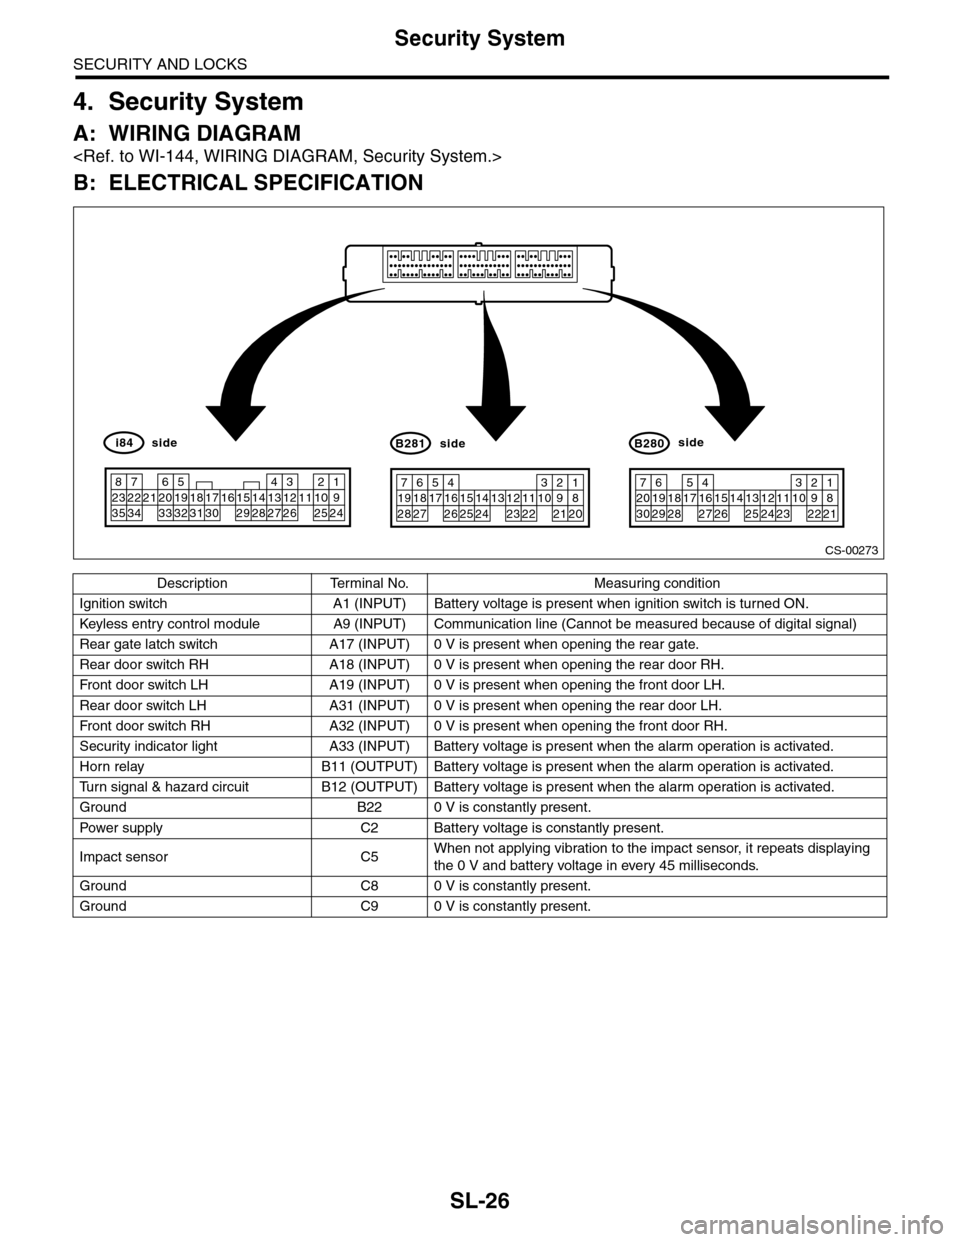
SL-26
Security System
SECURITY AND LOCKS
4. Security System
A: WIRING DIAGRAM
B: ELECTRICAL SPECIFICATION
Description Terminal No. Measuring condition
Ignition switch A1 (INPUT) Battery voltage is present when ignition switch is turned ON.
Keyless entr y control module A9 (INPUT) Communication line (Cannot be measured because of digital signal)
Rear gate latch switch A17 (INPUT) 0 V is present when opening the rear gate.
Rear door switch RH A18 (INPUT) 0 V is present when opening the rear door RH.
Fr o nt d oo r swi tc h L H A 19 ( I NP UT ) 0 V i s pr e se n t wh e n o p en in g th e f r o n t d oo r L H.
Rear door switch LH A31 (INPUT) 0 V is present when opening the rear door LH.
Fr o nt d oo r swi tc h RH A 32 ( I NP UT ) 0 V i s pr e se n t wh e n o p en in g th e f r o n t d oo r RH.
Security indicator light A33 (INPUT) Battery voltage is present when the alarm operation is activated.
Horn relay B11 (OUTPUT) Battery voltage is present when the alarm operation is activated.
Tu r n s i g n a l & h a z a r d c i r c u i t B 1 2 ( O U T P U T ) B a t t e r y v o l t a g e i s p r e s e n t w h e n t h e a l a r m o p e r a t i o n i s a c t i v a t e d .
Ground B22 0 V is constantly present.
Pow er s up p ly C 2 B at t e r y vol t ag e i s c on s ta n tl y p r e se nt .
Impact sensor C5When not applying vibration to the impact sensor, it repeats displaying
the 0 V and battery voltage in every 45 milliseconds.
Ground C8 0 V is constantly present.
Ground C9 0 V is constantly present.
CS-00273
71928
61827
51741626152514241312231122
3102921
1820
B281side
72030
619291828
51741627152614132512241123
3102922
1821
B280side
82335
722342162033
51932183117301615291428
41327
312261121025
1924
i84side
Page 656 of 2453
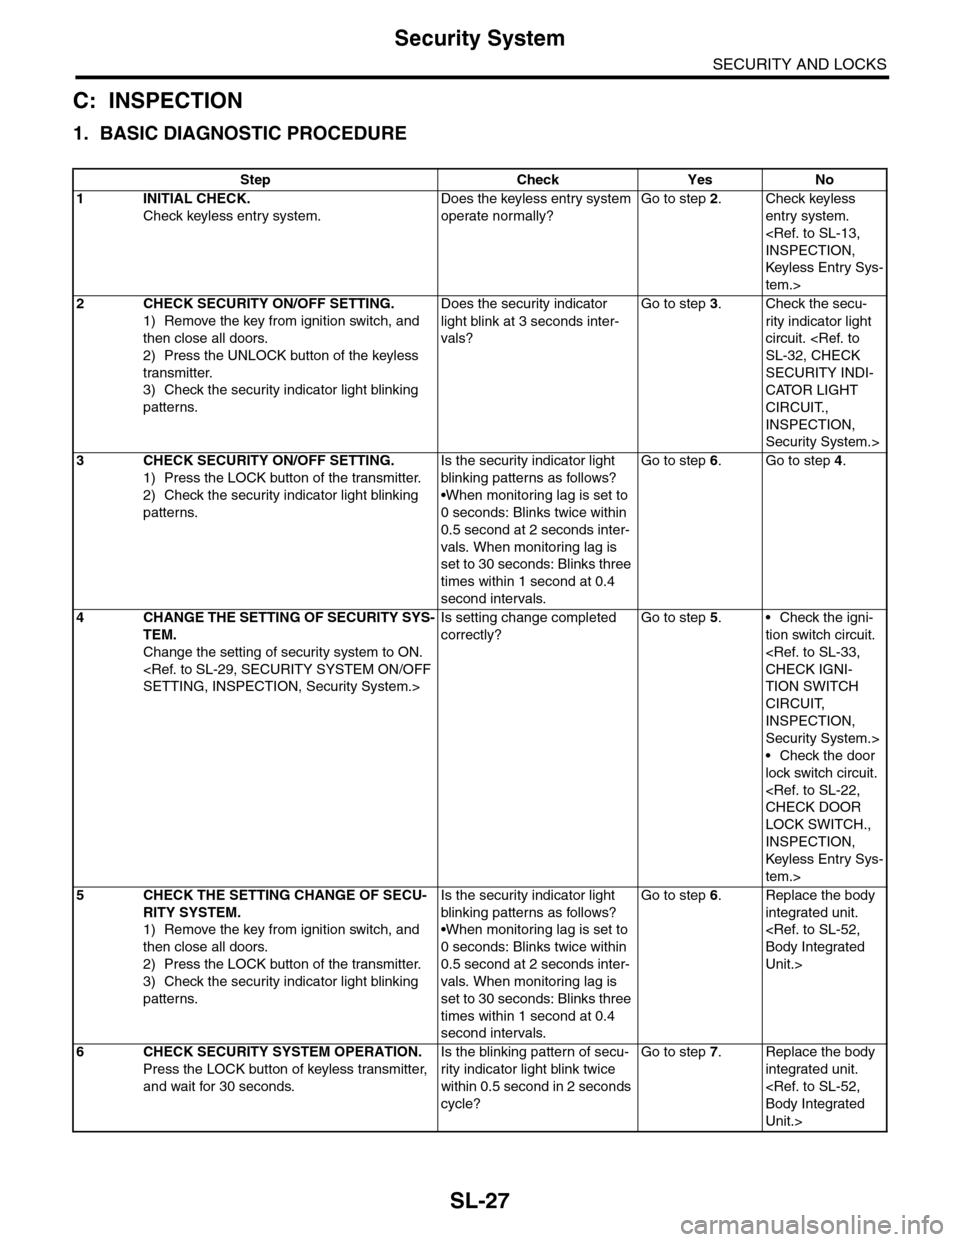
SL-27
Security System
SECURITY AND LOCKS
C: INSPECTION
1. BASIC DIAGNOSTIC PROCEDURE
Step Check Yes No
1 INITIAL CHECK.
Check keyless entry system.
Does the keyless entry system
operate normally?
Go to step 2.Check keyless
entry system.
Keyless Entr y Sys-
tem.>
2CHECK SECURITY ON/OFF SETTING.
1) Remove the key from ignition switch, and
then close all doors.
2) Press the UNLOCK button of the keyless
transmitter.
3) Check the security indicator light blinking
patterns.
Does the security indicator
light blink at 3 seconds inter-
vals?
Go to step 3.Check the secu-
rity indicator light
circuit.
SECURITY INDI-
CATOR LIGHT
CIRCUIT.,
INSPECTION,
Security System.>
3CHECK SECURITY ON/OFF SETTING.
1) Press the LOCK button of the transmitter.
2) Check the security indicator light blinking
patterns.
Is the security indicator light
blinking patterns as follows?
•When monitoring lag is set to
0 seconds: Blinks twice within
0.5 second at 2 seconds inter-
vals. When monitoring lag is
set to 30 seconds: Blinks three
times within 1 second at 0.4
second intervals.
Go to step 6.Go to step 4.
4CHANGE THE SETTING OF SECURITY SYS-
TEM.
Change the setting of security system to ON.
Is setting change completed
correctly?
Go to step 5.•Check the igni-
tion switch circuit.
TION SWITCH
CIRCUIT,
INSPECTION,
Security System.>
•Check the door
lock switch circuit.
LOCK SWITCH.,
INSPECTION,
Keyless Entr y Sys-
tem.>
5CHECK THE SETTING CHANGE OF SECU-
RITY SYSTEM.
1) Remove the key from ignition switch, and
then close all doors.
2) Press the LOCK button of the transmitter.
3) Check the security indicator light blinking
patterns.
Is the security indicator light
blinking patterns as follows?
•When monitoring lag is set to
0 seconds: Blinks twice within
0.5 second at 2 seconds inter-
vals. When monitoring lag is
set to 30 seconds: Blinks three
times within 1 second at 0.4
second intervals.
Go to step 6.Replace the body
integrated unit.
Unit.>
6CHECK SECURITY SYSTEM OPERATION.
Press the LOCK button of keyless transmitter,
and wait for 30 seconds.
Is the blinking pattern of secu-
rity indicator light blink twice
within 0.5 second in 2 seconds
cycle?
Go to step 7.Replace the body
integrated unit.
Unit.>