relay SUZUKI GRAND VITARA 1999 2.G Owner's Manual
[x] Cancel search | Manufacturer: SUZUKI, Model Year: 1999, Model line: GRAND VITARA, Model: SUZUKI GRAND VITARA 1999 2.GPages: 656, PDF Size: 14.31 MB
Page 166 of 656
ENGINE GENERAL INFORMATION AND DIAGNOSIS (H27 ENGINE) 6-1-5
Fuel Pressure Relief Procedure
After making sure that engine is cold, relief fuel pressure as fol-
lows.
1) Place transmission gear shift lever in “Neutral” (shift selector
lever to “P” range for A/T vehicle), set parking brake, and
block drive wheels.
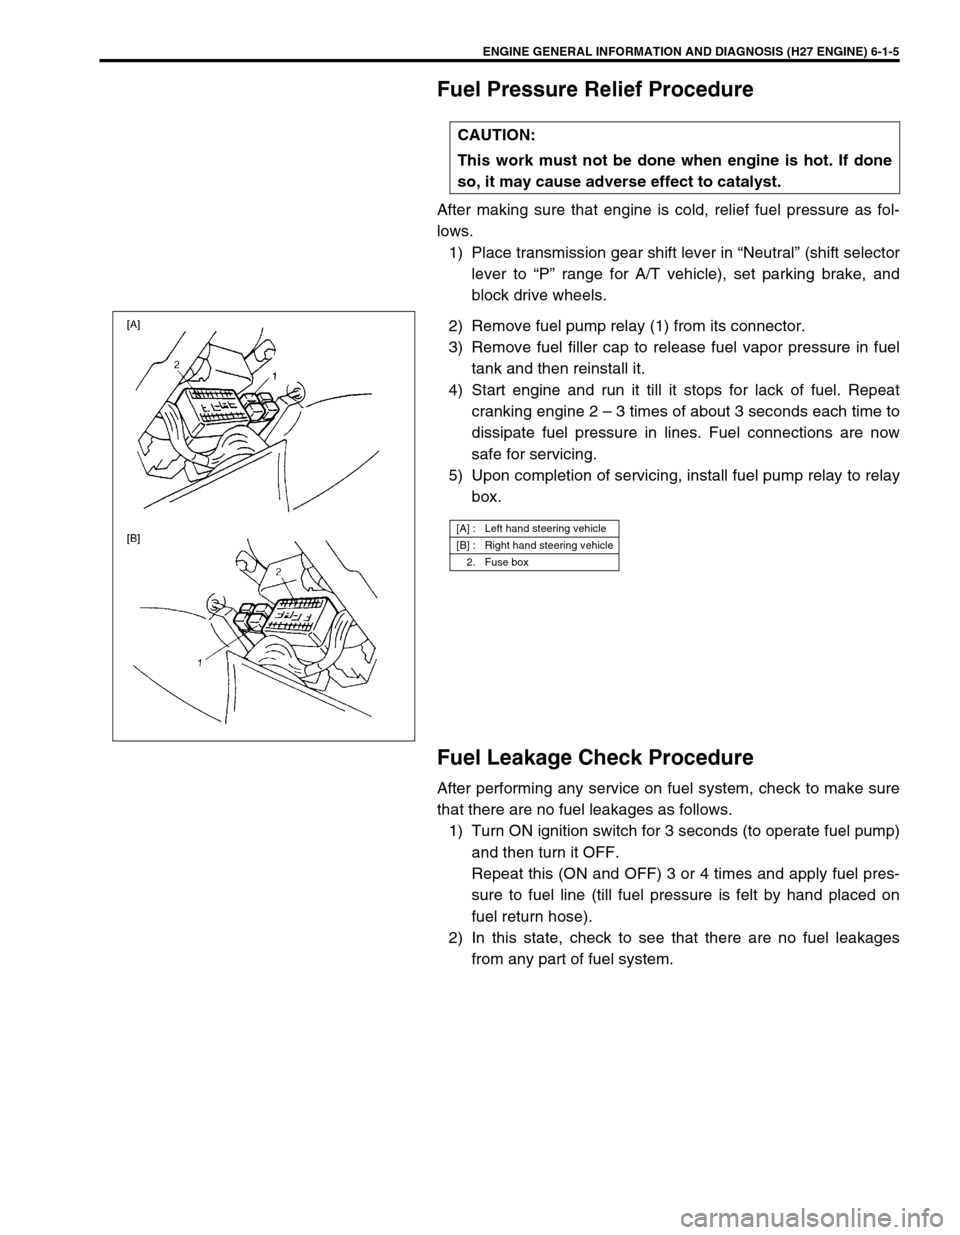
2) Remove fuel pump relay (1) from its connector.
3) Remove fuel filler cap to release fuel vapor pressure in fuel
tank and then reinstall it.
4) Start engine and run it till it stops for lack of fuel. Repeat
cranking engine 2 – 3 times of about 3 seconds each time to
dissipate fuel pressure in lines. Fuel connections are now
safe for servicing.
5) Upon completion of servicing, install fuel pump relay to relay
box.
Fuel Leakage Check Procedure
After performing any service on fuel system, check to make sure
that there are no fuel leakages as follows.
1) Turn ON ignition switch for 3 seconds (to operate fuel pump)
and then turn it OFF.
Repeat this (ON and OFF) 3 or 4 times and apply fuel pres-
sure to fuel line (till fuel pressure is felt by hand placed on
fuel return hose).
2) In this state, check to see that there are no fuel leakages
from any part of fuel system. CAUTION:
This work must not be done when engine is hot. If done
so, it may cause adverse effect to catalyst.
[A] : Left hand steering vehicle
[B] : Right hand steering vehicle
2. Fuse box
Page 171 of 656
6-1-10 ENGINE GENERAL INFORMATION AND DIAGNOSIS (H27 ENGINE)
DATA LINK CONNECTOR (DLC)
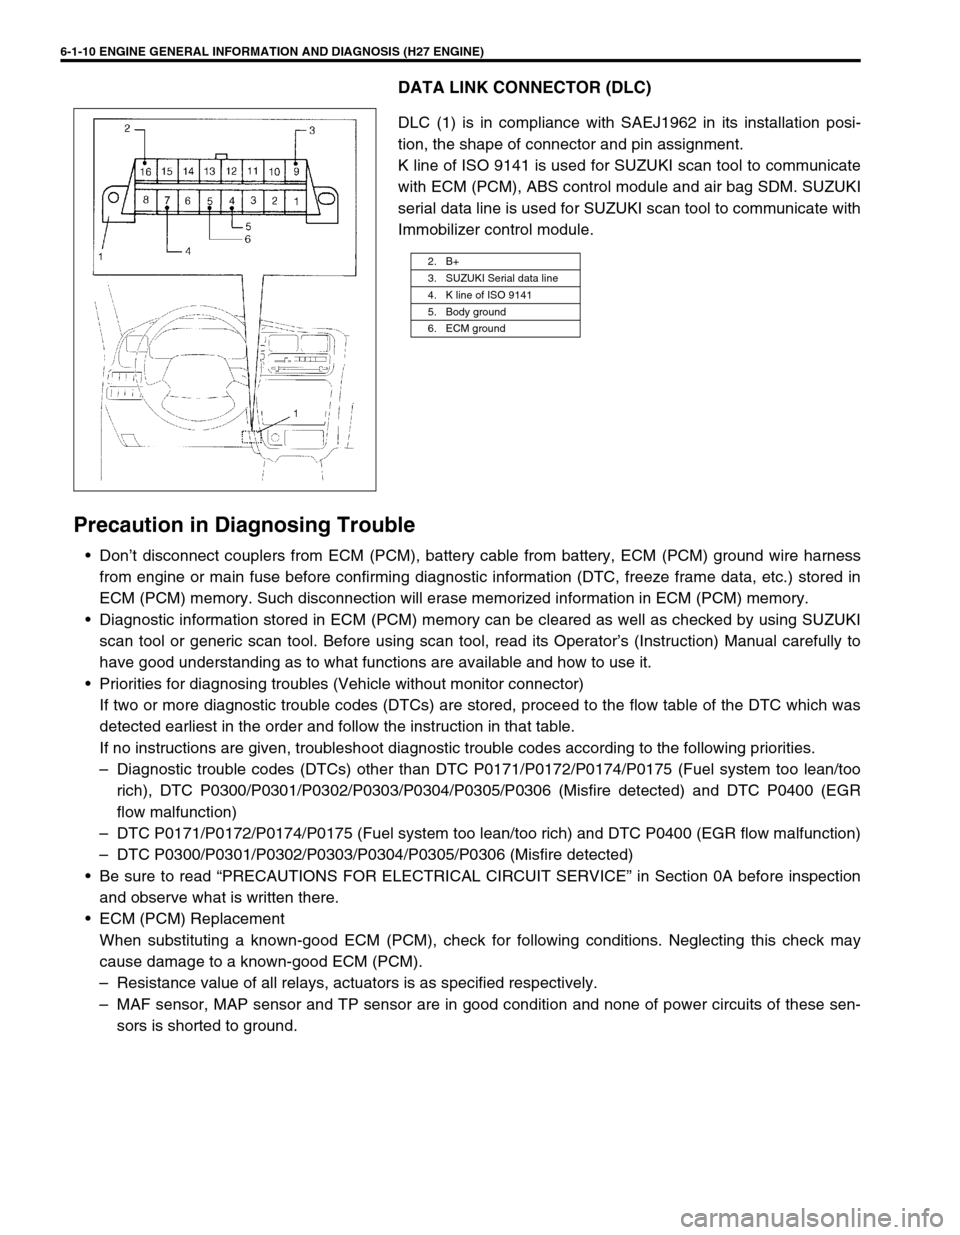
DLC (1) is in compliance with SAEJ1962 in its installation posi-
tion, the shape of connector and pin assignment.
K line of ISO 9141 is used for SUZUKI scan tool to communicate
with ECM (PCM), ABS control module and air bag SDM. SUZUKI
serial data line is used for SUZUKI scan tool to communicate with
Immobilizer control module.
Precaution in Diagnosing Trouble
• Don’t disconnect couplers from ECM (PCM), battery cable from battery, ECM (PCM) ground wire harness
from engine or main fuse before confirming diagnostic information (DTC, freeze frame data, etc.) stored in
ECM (PCM) memory. Such disconnection will erase memorized information in ECM (PCM) memory.
• Diagnostic information stored in ECM (PCM) memory can be cleared as well as checked by using SUZUKI
scan tool or generic scan tool. Before using scan tool, read its Operator’s (Instruction) Manual carefully to
have good understanding as to what functions are available and how to use it.
• Priorities for diagnosing troubles (Vehicle without monitor connector)
If two or more diagnostic trouble codes (DTCs) are stored, proceed to the flow table of the DTC which was
detected earliest in the order and follow the instruction in that table.
If no instructions are given, troubleshoot diagnostic trouble codes according to the following priorities.
– Diagnostic trouble codes (DTCs) other than DTC P0171/P0172/P0174/P0175 (Fuel system too lean/too
rich), DTC P0300/P0301/P0302/P0303/P0304/P0305/P0306 (Misfire detected) and DTC P0400 (EGR
flow malfunction)
– DTC P0171/P0172/P0174/P0175 (Fuel system too lean/too rich) and DTC P0400 (EGR flow malfunction)
– DTC P0300/P0301/P0302/P0303/P0304/P0305/P0306 (Misfire detected)
• Be sure to read “PRECAUTIONS FOR ELECTRICAL CIRCUIT SERVICE” in Section 0A before inspection
and observe what is written there.
• ECM (PCM) Replacement
When substituting a known-good ECM (PCM), check for following conditions. Neglecting this check may
cause damage to a known-good ECM (PCM).
– Resistance value of all relays, actuators is as specified respectively.
– MAF sensor, MAP sensor and TP sensor are in good condition and none of power circuits of these sen-
sors is shorted to ground.
2. B+
3. SUZUKI Serial data line
4. K line of ISO 9141
5. Body ground
6. ECM ground
Page 188 of 656
ENGINE GENERAL INFORMATION AND DIAGNOSIS (H27 ENGINE) 6-1-27
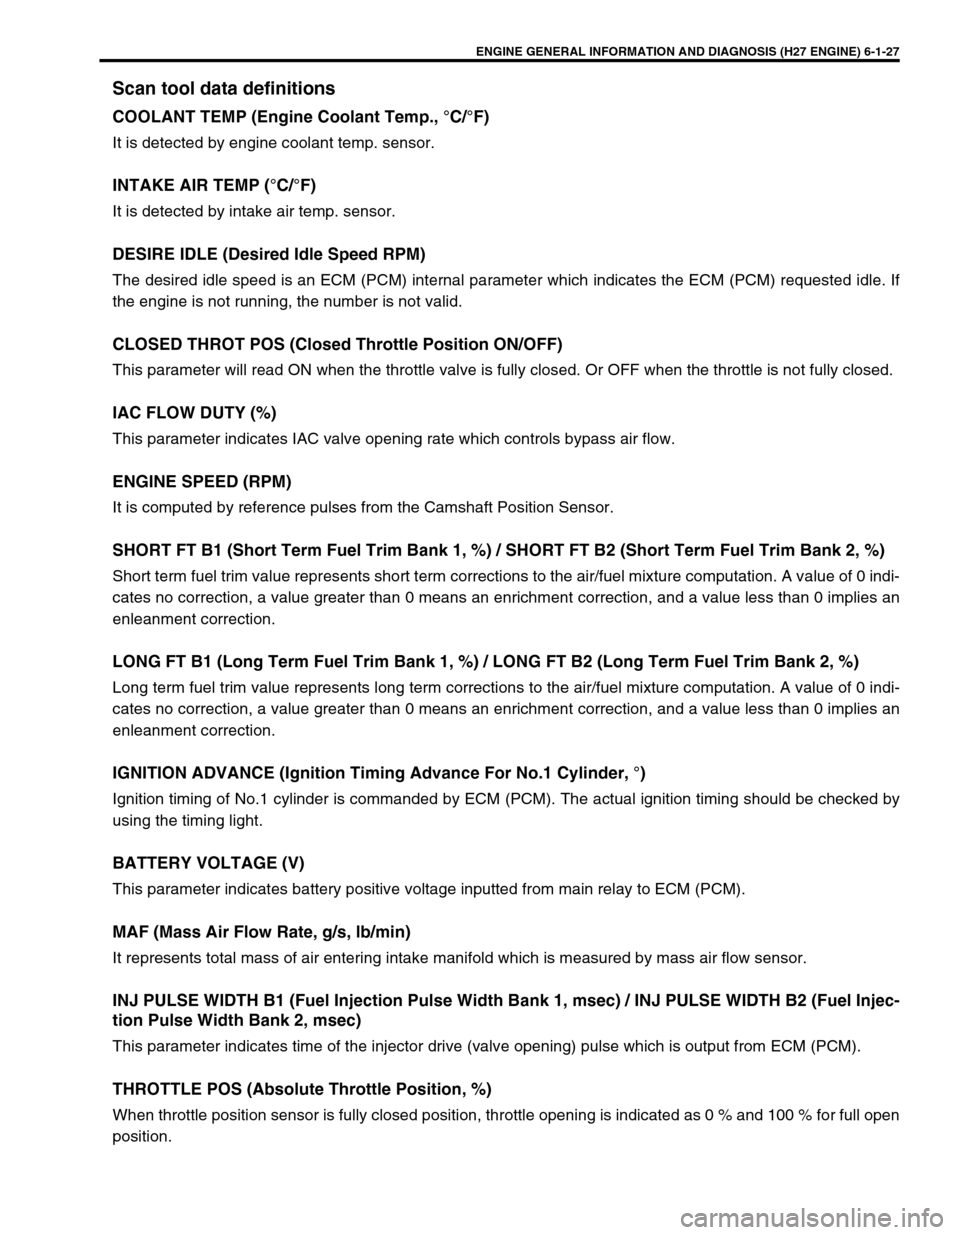
Scan tool data definitions
COOLANT TEMP (Engine Coolant Temp., °C/°F)
It is detected by engine coolant temp. sensor.
INTAKE AIR TEMP (°C/°F)
It is detected by intake air temp. sensor.
DESIRE IDLE (Desired Idle Speed RPM)
The desired idle speed is an ECM (PCM) internal parameter which indicates the ECM (PCM) requested idle. If
the engine is not running, the number is not valid.
CLOSED THROT POS (Closed Throttle Position ON/OFF)
This parameter will read ON when the throttle valve is fully closed. Or OFF when the throttle is not fully closed.
IAC FLOW DUTY (%)
This parameter indicates IAC valve opening rate which controls bypass air flow.
ENGINE SPEED (RPM)
It is computed by reference pulses from the Camshaft Position Sensor.
SHORT FT B1 (Short Term Fuel Trim Bank 1, %) / SHORT FT B2 (Short Term Fuel Trim Bank 2, %)
Short term fuel trim value represents short term corrections to the air/fuel mixture computation. A value of 0 indi-
cates no correction, a value greater than 0 means an enrichment correction, and a value less than 0 implies an
enleanment correction.
LONG FT B1 (Long Term Fuel Trim Bank 1, %) / LONG FT B2 (Long Term Fuel Trim Bank 2, %)
Long term fuel trim value represents long term corrections to the air/fuel mixture computation. A value of 0 indi-
cates no correction, a value greater than 0 means an enrichment correction, and a value less than 0 implies an
enleanment correction.
IGNITION ADVANCE (Ignition Timing Advance For No.1 Cylinder, °)
Ignition timing of No.1 cylinder is commanded by ECM (PCM). The actual ignition timing should be checked by
using the timing light.
BATTERY VOLTAGE (V)
This parameter indicates battery positive voltage inputted from main relay to ECM (PCM).
MAF (Mass Air Flow Rate, g/s, lb/min)
It represents total mass of air entering intake manifold which is measured by mass air flow sensor.
INJ PULSE WIDTH B1 (Fuel Injection Pulse Width Bank 1, msec) / INJ PULSE WIDTH B2 (Fuel Injec-
tion Pulse Width Bank 2, msec)
This parameter indicates time of the injector drive (valve opening) pulse which is output from ECM (PCM).
THROTTLE POS (Absolute Throttle Position, %)
When throttle position sensor is fully closed position, throttle opening is indicated as 0 % and 100 % for full open
position.
Page 198 of 656
ENGINE GENERAL INFORMATION AND DIAGNOSIS (H27 ENGINE) 6-1-37
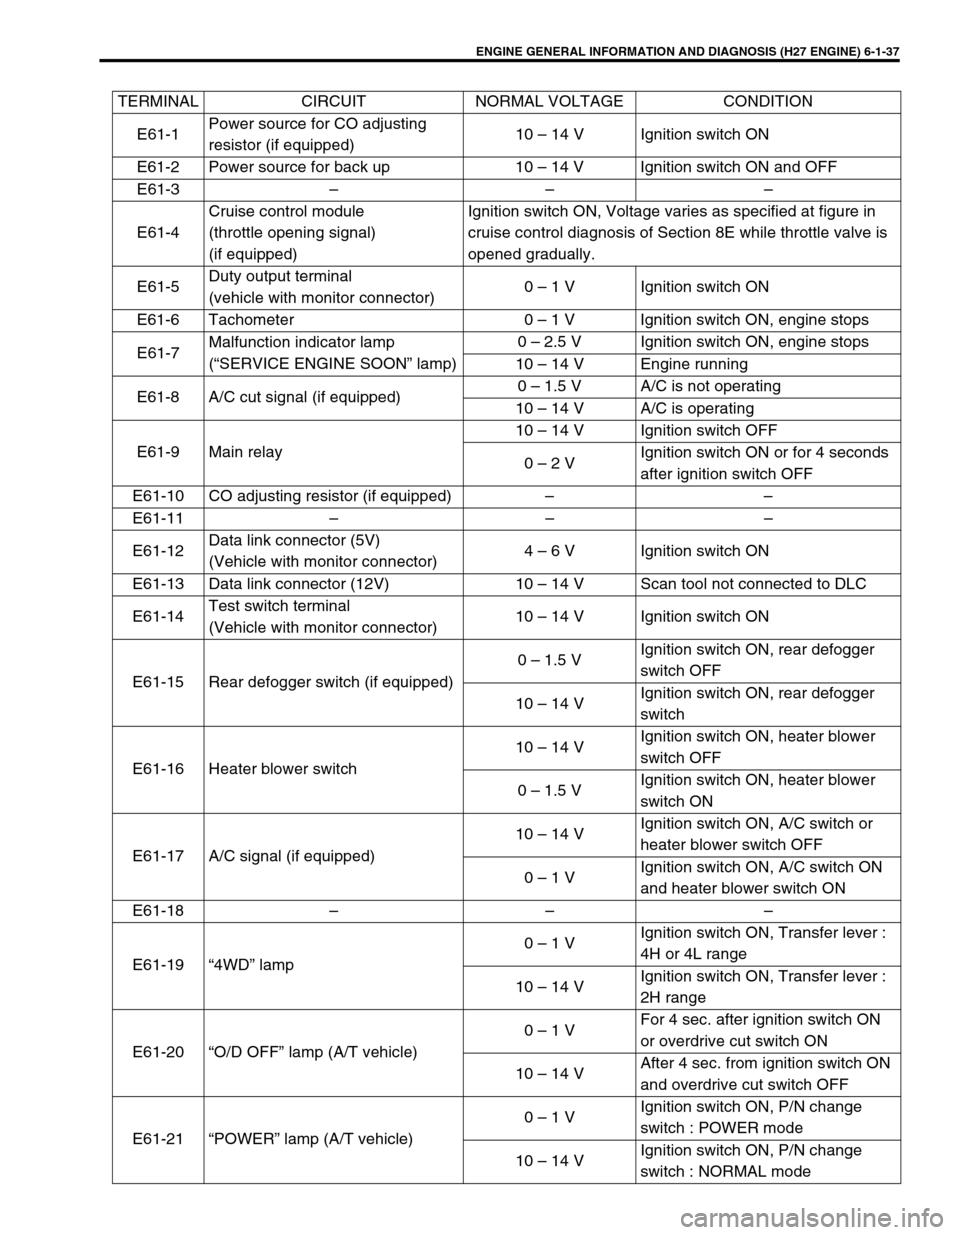
TERMINAL CIRCUIT NORMAL VOLTAGE CONDITION
E61-1Power source for CO adjusting
resistor (if equipped)10 – 14 V Ignition switch ON
E61-2 Power source for back up 10 – 14 V Ignition switch ON and OFF
E61-3 – – –
E61-4Cruise control module
(throttle opening signal)
(if equipped)Ignition switch ON, Voltage varies as specified at figure in
cruise control diagnosis of Section 8E while throttle valve is
opened gradually.
E61-5Duty output terminal
(vehicle with monitor connector)0 – 1 V Ignition switch ON
E61-6 Tachometer 0 – 1 V Ignition switch ON, engine stops
E61-7Malfunction indicator lamp
(“SERVICE ENGINE SOON” lamp)0 – 2.5 V Ignition switch ON, engine stops
10 – 14 V Engine running
E61-8 A/C cut signal (if equipped)0 – 1.5 V A/C is not operating
10 – 14 V A/C is operating
E61-9 Main relay10 – 14 V Ignition switch OFF
0 – 2 VIgnition switch ON or for 4 seconds
after ignition switch OFF
E61-10 CO adjusting resistor (if equipped) – –
E61-11 – – –
E61-12Data link connector (5V)
(Vehicle with monitor connector)4 – 6 V Ignition switch ON
E61-13 Data link connector (12V) 10 – 14 V Scan tool not connected to DLC
E61-14Test switch terminal
(Vehicle with monitor connector)10 – 14 V Ignition switch ON
E61-15 Rear defogger switch (if equipped)0 – 1.5 VIgnition switch ON, rear defogger
switch OFF
10 – 14 VIgnition switch ON, rear defogger
switch
E61-16 Heater blower switch10 – 14 VIgnition switch ON, heater blower
switch OFF
0 – 1.5 VIgnition switch ON, heater blower
switch ON
E61-17 A/C signal (if equipped)10 – 14 VIgnition switch ON, A/C switch or
heater blower switch OFF
0 – 1 VIgnition switch ON, A/C switch ON
and heater blower switch ON
E61-18 – – –
E61-19 “4WD” lamp0 – 1 VIgnition switch ON, Transfer lever :
4H or 4L range
10 – 14 VIgnition switch ON, Transfer lever :
2H range
E61-20 “O/D OFF” lamp (A/T vehicle)0 – 1 VFor 4 sec. after ignition switch ON
or overdrive cut switch ON
10 – 14 VAfter 4 sec. from ignition switch ON
and overdrive cut switch OFF
E61-21 “POWER” lamp (A/T vehicle)0 – 1 VIgnition switch ON, P/N change
switch : POWER mode
10 – 14 VIgnition switch ON, P/N change
switch : NORMAL mode
Page 199 of 656
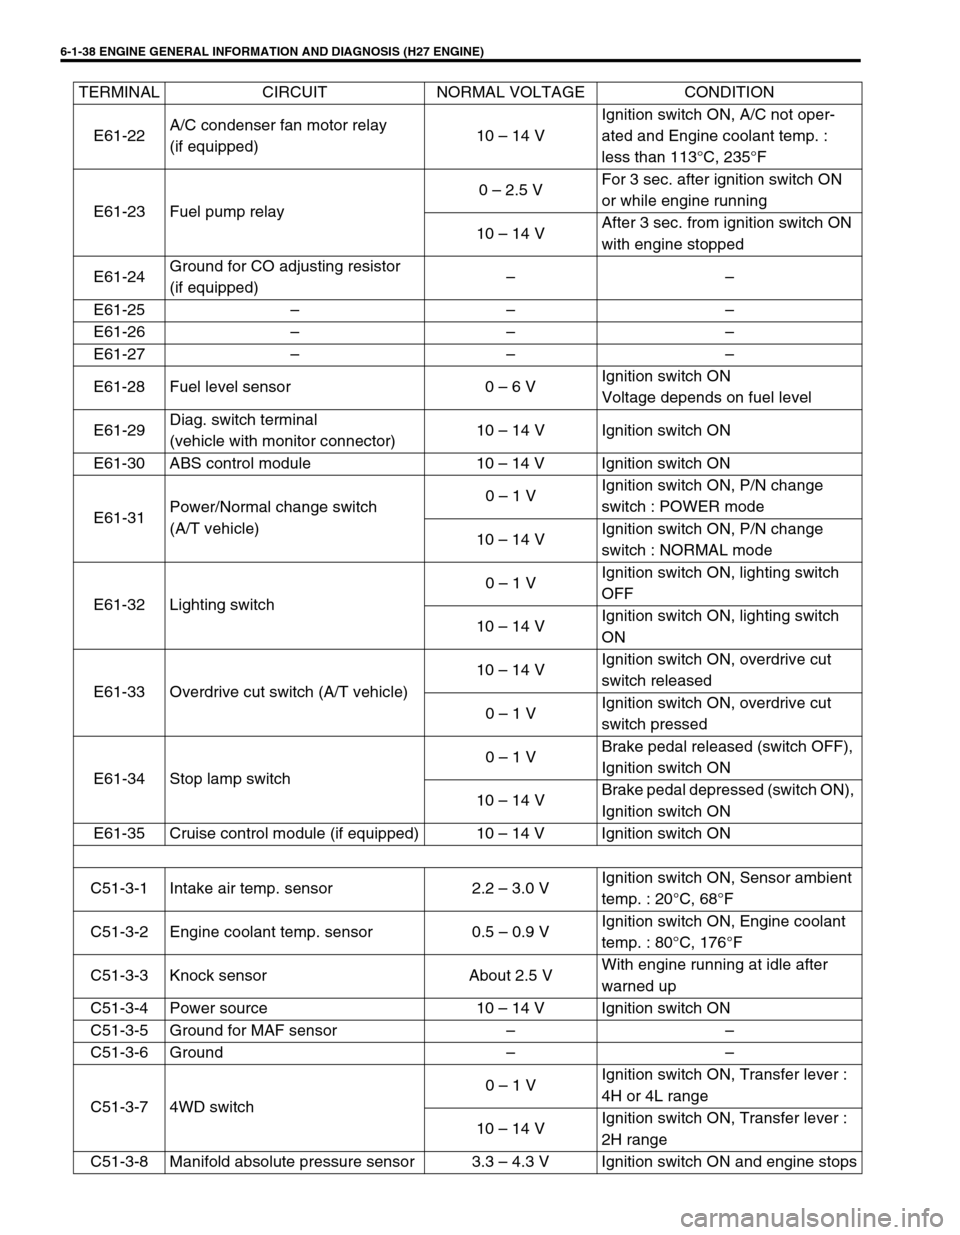
6-1-38 ENGINE GENERAL INFORMATION AND DIAGNOSIS (H27 ENGINE)
E61-22A/C condenser fan motor relay
(if equipped)10 – 14 VIgnition switch ON, A/C not oper-
ated and Engine coolant temp. :
less than 113°C, 235°F
E61-23 Fuel pump relay0 – 2.5 VFor 3 sec. after ignition switch ON
or while engine running
10 – 14 VAfter 3 sec. from ignition switch ON
with engine stopped
E61-24Ground for CO adjusting resistor
(if equipped)––
E61-25 – – –
E61-26 – – –
E61-27 – – –
E61-28 Fuel level sensor 0 – 6 VIgnition switch ON
Voltage depends on fuel level
E61-29Diag. switch terminal
(vehicle with monitor connector)10 – 14 V Ignition switch ON
E61-30 ABS control module 10 – 14 V Ignition switch ON
E61-31Power/Normal change switch
(A/T vehicle)0 – 1 VIgnition switch ON, P/N change
switch : POWER mode
10 – 14 VIgnition switch ON, P/N change
switch : NORMAL mode
E61-32 Lighting switch0 – 1 VIgnition switch ON, lighting switch
OFF
10 – 14 VIgnition switch ON, lighting switch
ON
E61-33 Overdrive cut switch (A/T vehicle)10 – 14 VIgnition switch ON, overdrive cut
switch released
0 – 1 VIgnition switch ON, overdrive cut
switch pressed
E61-34 Stop lamp switch0 – 1 VBrake pedal released (switch OFF),
Ignition switch ON
10 – 14 VBrake pedal depressed (switch ON),
Ignition switch ON
E61-35 Cruise control module (if equipped) 10 – 14 V Ignition switch ON
C51-3-1 Intake air temp. sensor 2.2 – 3.0 VIgnition switch ON, Sensor ambient
temp. : 20°C, 68°F
C51-3-2 Engine coolant temp. sensor 0.5 – 0.9 VIgnition switch ON, Engine coolant
temp. : 80°C, 176°F
C51-3-3 Knock sensor About 2.5 VWith engine running at idle after
warned up
C51-3-4 Power source 10 – 14 V Ignition switch ON
C51-3-5 Ground for MAF sensor – –
C51-3-6 Ground – –
C51-3-7 4WD switch0 – 1 VIgnition switch ON, Transfer lever :
4H or 4L range
10 – 14 VIgnition switch ON, Transfer lever :
2H range
C51-3-8 Manifold absolute pressure sensor 3.3 – 4.3 V Ignition switch ON and engine stops TERMINAL CIRCUIT NORMAL VOLTAGE CONDITION
Page 203 of 656
6-1-42 ENGINE GENERAL INFORMATION AND DIAGNOSIS (H27 ENGINE)
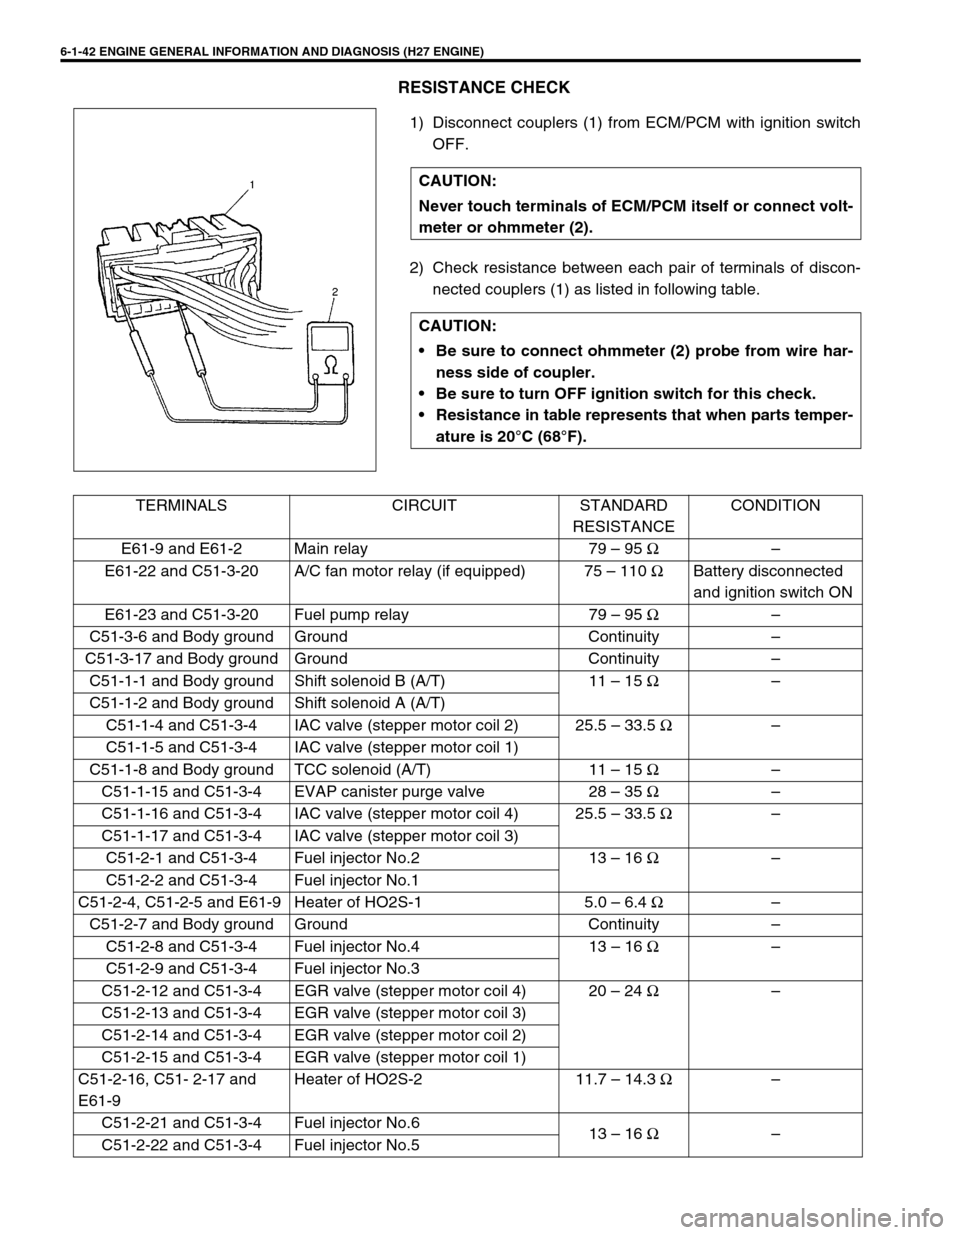
RESISTANCE CHECK
1) Disconnect couplers (1) from ECM/PCM with ignition switch
OFF.
2) Check resistance between each pair of terminals of discon-
nected couplers (1) as listed in following table. CAUTION:
Never touch terminals of ECM/PCM itself or connect volt-
meter or ohmmeter (2).
CAUTION:
Be sure to connect ohmmeter (2) probe from wire har-
ness side of coupler.
Be sure to turn OFF ignition switch for this check.
Resistance in table represents that when parts temper-
ature is 20°C (68°F).
TERMINALS CIRCUIT STANDARD
RESISTANCECONDITION
E61-9 and E61-2 Main relay 79 – 95 Ω–
E61-22 and C51-3-20 A/C fan motor relay (if equipped) 75 – 110 ΩBattery disconnected
and ignition switch ON
E61-23 and C51-3-20 Fuel pump relay 79 – 95 Ω–
C51-3-6 and Body ground Ground Continuity –
C51-3-17 and Body ground Ground Continuity –
C51-1-1 and Body ground Shift solenoid B (A/T) 11 – 15 Ω–
C51-1-2 and Body ground Shift solenoid A (A/T)
C51-1-4 and C51-3-4 IAC valve (stepper motor coil 2) 25.5 – 33.5 Ω–
C51-1-5 and C51-3-4 IAC valve (stepper motor coil 1)
C51-1-8 and Body ground TCC solenoid (A/T) 11 – 15 Ω–
C51-1-15 and C51-3-4 EVAP canister purge valve 28 – 35 Ω–
C51-1-16 and C51-3-4 IAC valve (stepper motor coil 4) 25.5 – 33.5 Ω–
C51-1-17 and C51-3-4 IAC valve (stepper motor coil 3)
C51-2-1 and C51-3-4 Fuel injector No.2 13 – 16 Ω–
C51-2-2 and C51-3-4 Fuel injector No.1
C51-2-4, C51-2-5 and E61-9 Heater of HO2S-1 5.0 – 6.4 Ω–
C51-2-7 and Body ground Ground Continuity –
C51-2-8 and C51-3-4 Fuel injector No.4 13 – 16 Ω–
C51-2-9 and C51-3-4 Fuel injector No.3
C51-2-12 and C51-3-4 EGR valve (stepper motor coil 4) 20 – 24 Ω–
C51-2-13 and C51-3-4 EGR valve (stepper motor coil 3)
C51-2-14 and C51-3-4 EGR valve (stepper motor coil 2)
C51-2-15 and C51-3-4 EGR valve (stepper motor coil 1)
C51-2-16, C51- 2-17 and
E61-9Heater of HO2S-2 11.7 – 14.3 Ω–
C51-2-21 and C51-3-4 Fuel injector No.6
13 – 16 Ω–
C51-2-22 and C51-3-4 Fuel injector No.5
Page 204 of 656
ENGINE GENERAL INFORMATION AND DIAGNOSIS (H27 ENGINE) 6-1-43
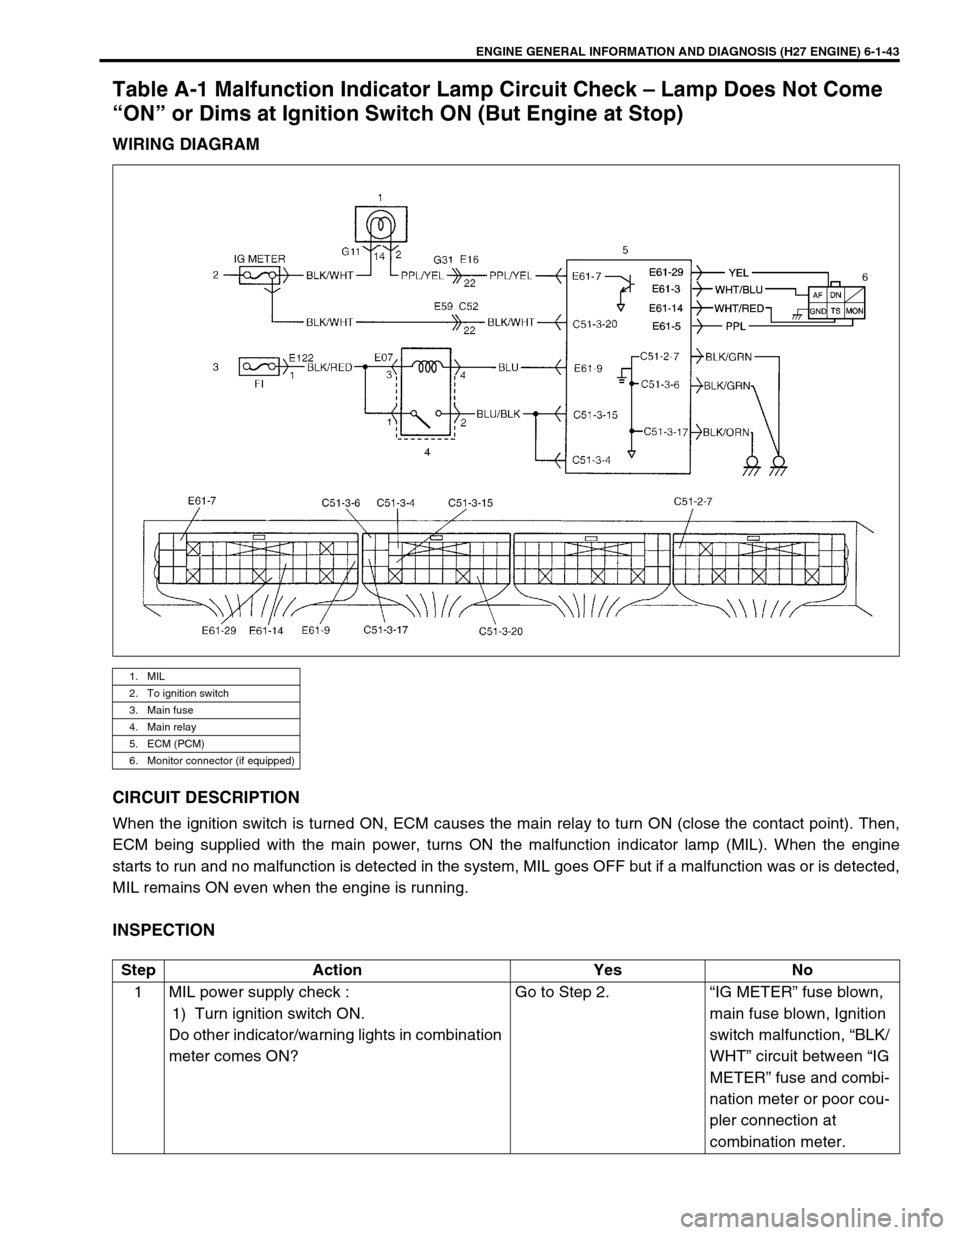
Table A-1 Malfunction Indicator Lamp Circuit Check – Lamp Does Not Come
“ON” or Dims at Ignition Switch ON (But Engine at Stop)
WIRING DIAGRAM
CIRCUIT DESCRIPTION
When the ignition switch is turned ON, ECM causes the main relay to turn ON (close the contact point). Then,
ECM being supplied with the main power, turns ON the malfunction indicator lamp (MIL). When the engine
starts to run and no malfunction is detected in the system, MIL goes OFF but if a malfunction was or is detected,
MIL remains ON even when the engine is running.
INSPECTION
1. MIL
2. To ignition switch
3. Main fuse
4. Main relay
5. ECM (PCM)
6. Monitor connector (if equipped)
Step Action Yes No
1 MIL power supply check :
1) Turn ignition switch ON.
Do other indicator/warning lights in combination
meter comes ON?Go to Step 2. “IG METER” fuse blown,
main fuse blown, Ignition
switch malfunction, “BLK/
WHT” circuit between “IG
METER” fuse and combi-
nation meter or poor cou-
pler connection at
combination meter.
Page 207 of 656
6-1-46 ENGINE GENERAL INFORMATION AND DIAGNOSIS (H27 ENGINE)
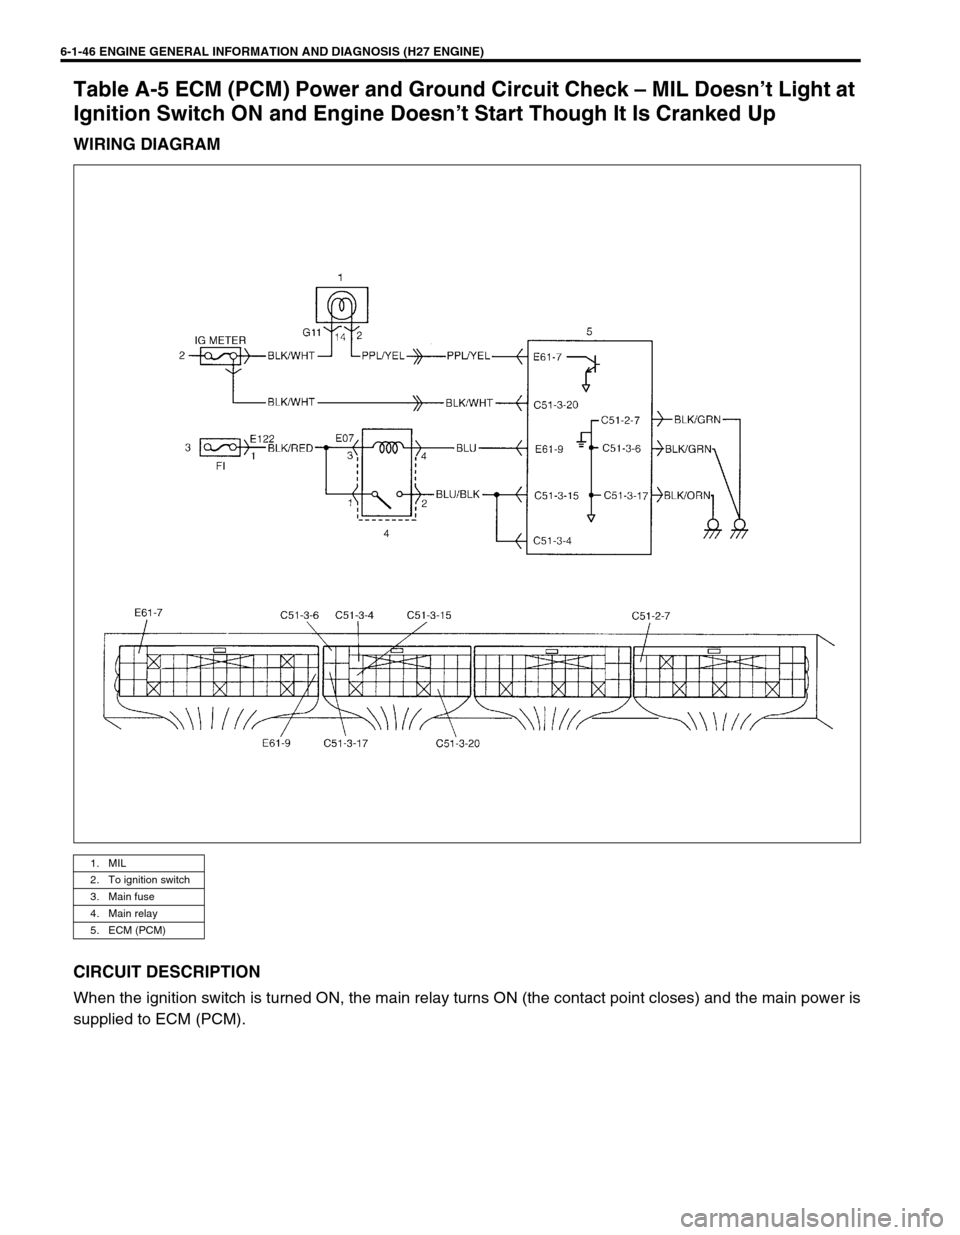
Table A-5 ECM (PCM) Power and Ground Circuit Check – MIL Doesn’t Light at
Ignition Switch ON and Engine Doesn’t Start Though It Is Cranked Up
WIRING DIAGRAM
CIRCUIT DESCRIPTION
When the ignition switch is turned ON, the main relay turns ON (the contact point closes) and the main power is
supplied to ECM (PCM).
1. MIL
2. To ignition switch
3. Main fuse
4. Main relay
5. ECM (PCM)
Page 208 of 656
ENGINE GENERAL INFORMATION AND DIAGNOSIS (H27 ENGINE) 6-1-47
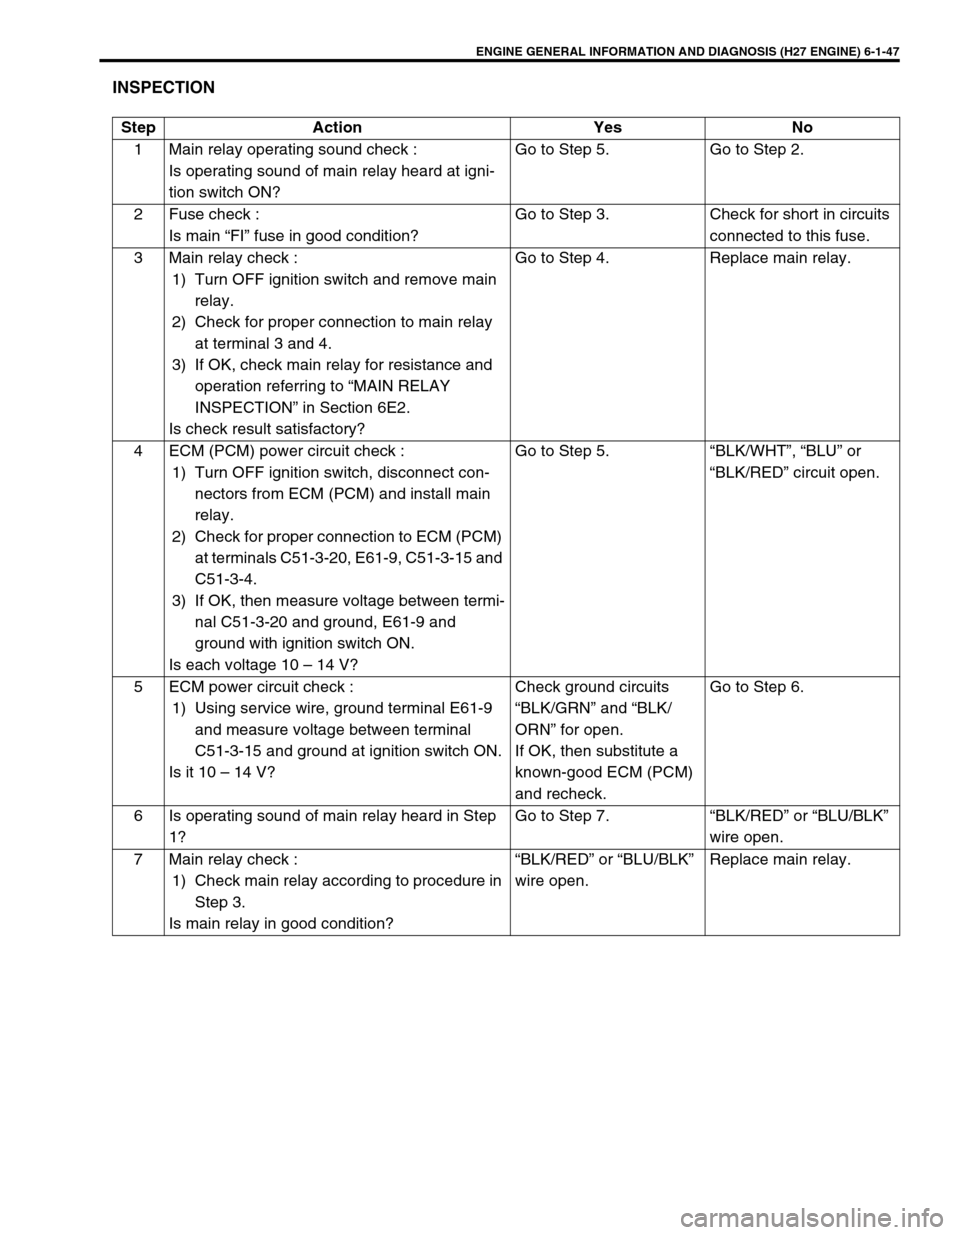
INSPECTION
Step Action Yes No
1 Main relay operating sound check :
Is operating sound of main relay heard at igni-
tion switch ON?Go to Step 5. Go to Step 2.
2 Fuse check :
Is main “FI” fuse in good condition?Go to Step 3. Check for short in circuits
connected to this fuse.
3 Main relay check :
1) Turn OFF ignition switch and remove main
relay.
2) Check for proper connection to main relay
at terminal 3 and 4.
3) If OK, check main relay for resistance and
operation referring to “MAIN RELAY
INSPECTION” in Section 6E2.
Is check result satisfactory?Go to Step 4. Replace main relay.
4 ECM (PCM) power circuit check :
1) Turn OFF ignition switch, disconnect con-
nectors from ECM (PCM) and install main
relay.
2) Check for proper connection to ECM (PCM)
at terminals C51-3-20, E61-9, C51-3-15 and
C51-3-4.
3) If OK, then measure voltage between termi-
nal C51-3-20 and ground, E61-9 and
ground with ignition switch ON.
Is each voltage 10 – 14 V?Go to Step 5. “BLK/WHT”, “BLU” or
“BLK/RED” circuit open.
5 ECM power circuit check :
1) Using service wire, ground terminal E61-9
and measure voltage between terminal
C51-3-15 and ground at ignition switch ON.
Is it 10 – 14 V?Check ground circuits
“BLK/GRN” and “BLK/
ORN” for open.
If OK, then substitute a
known-good ECM (PCM)
and recheck.Go to Step 6.
6 Is operating sound of main relay heard in Step
1?Go to Step 7. “BLK/RED” or “BLU/BLK”
wire open.
7 Main relay check :
1) Check main relay according to procedure in
Step 3.
Is main relay in good condition?“BLK/RED” or “BLU/BLK”
wire open.Replace main relay.
Page 209 of 656
6-1-48 ENGINE GENERAL INFORMATION AND DIAGNOSIS (H27 ENGINE)
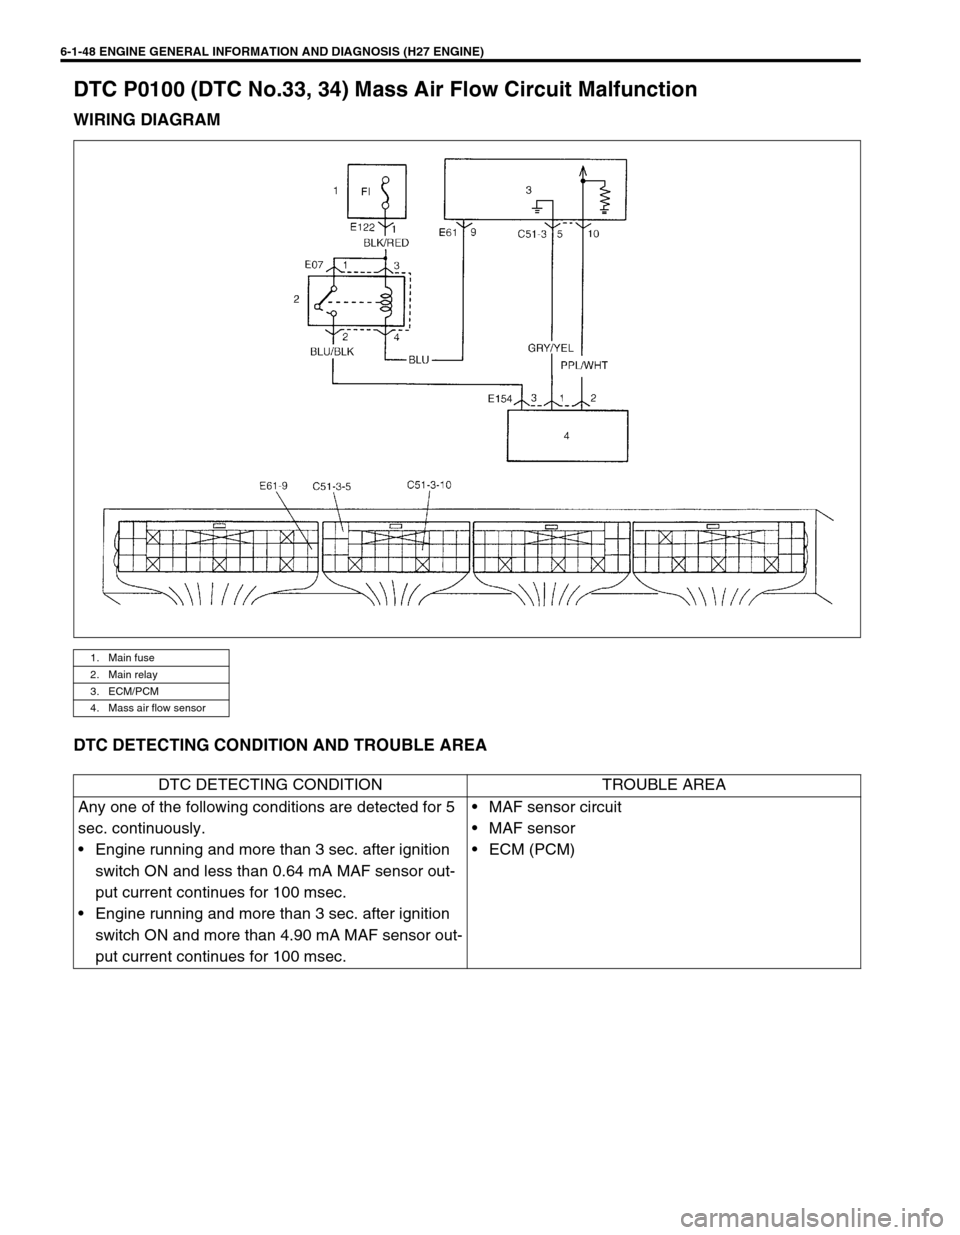
DTC P0100 (DTC No.33, 34) Mass Air Flow Circuit Malfunction
WIRING DIAGRAM
DTC DETECTING CONDITION AND TROUBLE AREA
1. Main fuse
2. Main relay
3. ECM/PCM
4. Mass air flow sensor
DTC DETECTING CONDITION TROUBLE AREA
Any one of the following conditions are detected for 5
sec. continuously.
• Engine running and more than 3 sec. after ignition
switch ON and less than 0.64 mA MAF sensor out-
put current continues for 100 msec.
• Engine running and more than 3 sec. after ignition
switch ON and more than 4.90 mA MAF sensor out-
put current continues for 100 msec.• MAF sensor circuit
• MAF sensor
• ECM (PCM)