Speed SUZUKI JIMNY 2005 3.G Service User Guide
[x] Cancel search | Manufacturer: SUZUKI, Model Year: 2005, Model line: JIMNY, Model: SUZUKI JIMNY 2005 3.GPages: 687, PDF Size: 13.38 MB
Page 116 of 687
Downloaded from www.Manualslib.com manuals search engine STEERING, SUSPENSION, WHEELS AND TIRES 3-7
Radial Tire Lead
“Lead” is the deviation of the vehicle from a straight path on a level rod even with no pressure on the steering
wheel.
Lead is usually caused by:
1) Incorrect alignment.
2) Uneven brake adjustment.
3) Tire construction.
The way in which a tire is built can produce lead in a vehicle. An example of this is placement of the belt. Off
center belts on radial tires can cause the tire to develop a side force while rolling straight down the road. If one
side of the tire has a little larger diameter than the other, the tire will tend to roll to one side. This will develop a
side force which can produce vehicle lead.
The procedure in above figure (Lead Diagnosis) should be used to make sure that front alignment is not mis-
taken for tire lead.
1) Part of the lead diagnosis procedure is different from the proper tire rotation pattern currently in the owner
and service manuals. If a medium to high mileage tire is moved to the other side of the vehicle, be sure to
check that ride roughness has not developed.
2) Rear tires will not cause lead.
Vibration Diagnosis
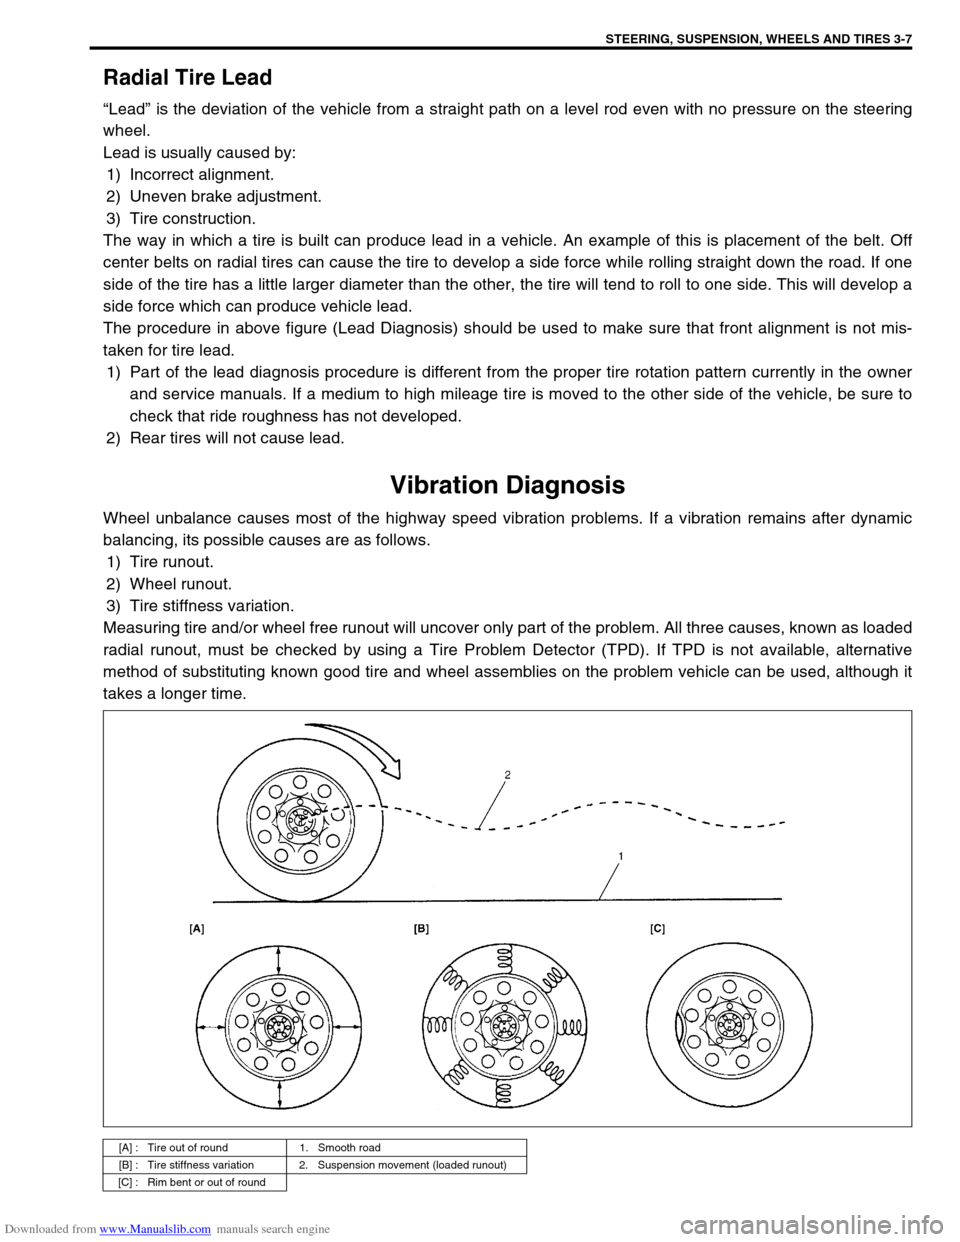
Wheel unbalance causes most of the highway speed vibration problems. If a vibration remains after dynamic
balancing, its possible causes are as follows.
1) Tire runout.
2) Wheel runout.
3) Tire stiffness variation.
Measuring tire and/or wheel free runout will uncover only part of the problem. All three causes, known as loaded
radial runout, must be checked by using a Tire Problem Detector (TPD). If TPD is not available, alternative
method of substituting known good tire and wheel assemblies on the problem vehicle can be used, although it
takes a longer time.
[A] : Tire out of round 1. Smooth road
[B] : Tire stiffness variation 2. Suspension movement (loaded runout)
[C] : Rim bent or out of round
Page 134 of 687

Downloaded from www.Manualslib.com manuals search engine POWER STEERING (P/S) SYSTEM (If equipped) 3B1-3
Diagnosis
Diagnosis Table
Condition Possible Cause Correction
Steering wheel feels
heavy
(at low speed)Fluid deteriorated, low viscosity, different type of
fluid mixedChange fluid.
Pipes or hoses deformed, air entering through
jointCorrect or replace.
Insufficient air bleeding from piping Bleed air.
Belt worn, lacking in tension Adjust belt tension or replace belt
as necessary.
Tire inflation pressure too low Inflate tire.
Wheel alignment out of adjustment Adjust front wheel alignment.
Steering wheel installed improperly (twisted) Install steering wheel correctly.
Hydraulic pressure failing to rise (See NOTE
“A”.)Replace P/S pump.
Slow hydraulic pressure rise (See NOTE “A”.)
Steering wheel feels
heavy momentarily
when turning it to the
left or right.Air drawn in due to insufficient amount of fluid Add fluid and bleed air.
Slipping belt Adjust belt tension or replace belt
as necessary.
No idle-up (See NOTE
“B”.)Defective pressure switch Replace pressure switch
(terminal set).
NOTE:
“A” : Be sure to warm up engine fully before performing this check. Pump vanes are sometimes
hard to come out where temperature is low.
“B” : Acceptable if idling speed does not drop.
Condition Possible Cause Correction
Steering wheel returns
slowly from turns.
(See NOTE “C”.)Dust or foreign object mixed in fluid Change fluid.
Deformed pipes or hoses Correct or replace.
Steering column installed improperly Install correctly.
Wheel alignment maladjusted Adjust.
Linkage or joints not operating smoothly Correct.
Vehicle pulls to one
side during straight
driving.Low or uneven tire inflation pressure Inflate tire (s) as necessary.
Wheel alignment maladjusted Adjust.
Defective spool valve Replace gear box assembly.
Steering wheel play is
large and vehicle wan-
ders.Loose steering shaft nut Retighten.
Loose linkage or joint Retighten.
Loose gear box fixing bolt Retighten.
Front wheel bearing worn Replace.
Fluid leakage
Loose joints of hydraulic pressure pipes and
hosesRetighten.
Deformed or damaged pipes or hoses Correct or replace.
Gear box Replace gear box assembly.
Page 136 of 687
Downloaded from www.Manualslib.com manuals search engine POWER STEERING (P/S) SYSTEM (If equipped) 3B1-5
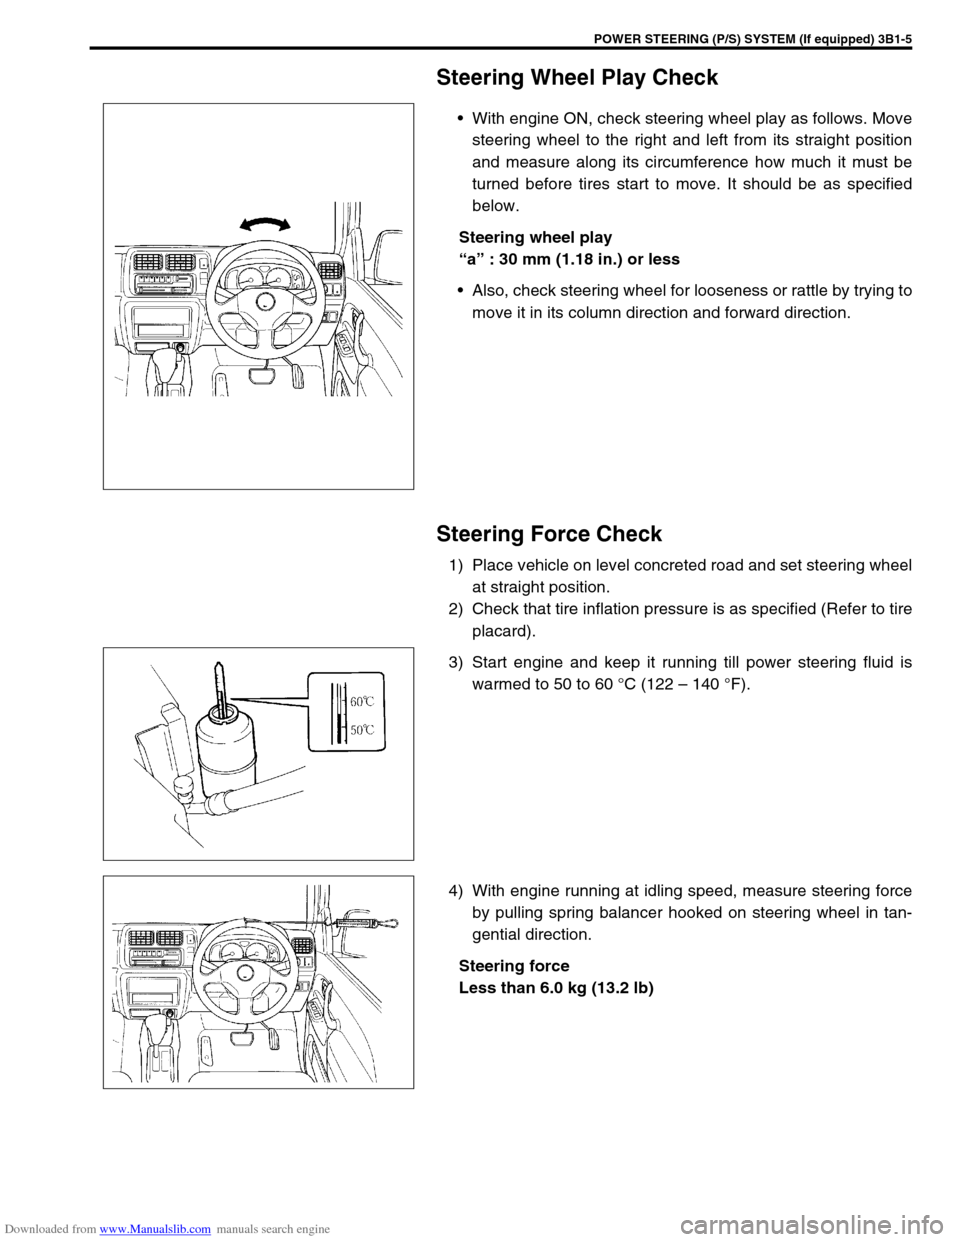
Steering Wheel Play Check
With engine ON, check steering wheel play as follows. Move
steering wheel to the right and left from its straight position
and measure along its circumference how much it must be
turned before tires start to move. It should be as specified
below.
Steering wheel play
“a” : 30 mm (1.18 in.) or less
Also, check steering wheel for looseness or rattle by trying to
move it in its column direction and forward direction.
Steering Force Check
1) Place vehicle on level concreted road and set steering wheel
at straight position.
2) Check that tire inflation pressure is as specified (Refer to tire
placard).
3) Start engine and keep it running till power steering fluid is
warmed to 50 to 60 °C (122 – 140 °F).
4) With engine running at idling speed, measure steering force
by pulling spring balancer hooked on steering wheel in tan-
gential direction.
Steering force
Less than 6.0 kg (13.2 lb)
Page 138 of 687
Downloaded from www.Manualslib.com manuals search engine POWER STEERING (P/S) SYSTEM (If equipped) 3B1-7
Idle-Up System Check
1) Warm up engine to normal operating temperature.
2) Turn A/C switch OFF, if equipped.
3) Turn steering wheel fully and check idle speed.
Engine idle speed drops a little momentarily when steering wheel is turned fully but returns to its specified
level immediately. If power steering pressure switch connector is connected, check the same with that con-
nector disconnected. Momentary drop of engine idle speed should be less when it is connected than when
disconnected.
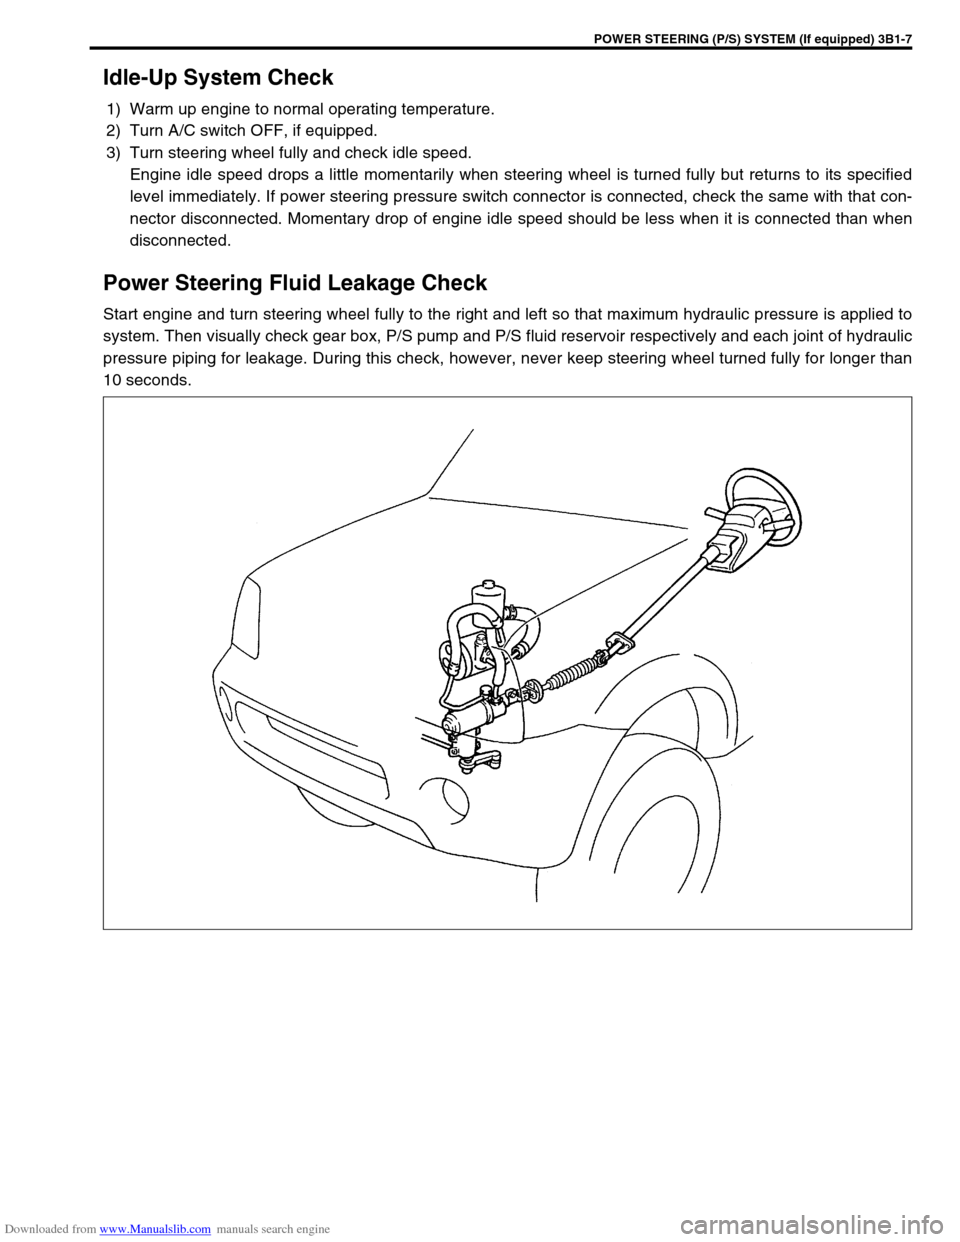
Power Steering Fluid Leakage Check
Start engine and turn steering wheel fully to the right and left so that maximum hydraulic pressure is applied to
system. Then visually check gear box, P/S pump and P/S fluid reservoir respectively and each joint of hydraulic
pressure piping for leakage. During this check, however, never keep steering wheel turned fully for longer than
10 seconds.
Page 139 of 687
Downloaded from www.Manualslib.com manuals search engine 3B1-8 POWER STEERING (P/S) SYSTEM (If equipped)
Air Bleeding Procedure
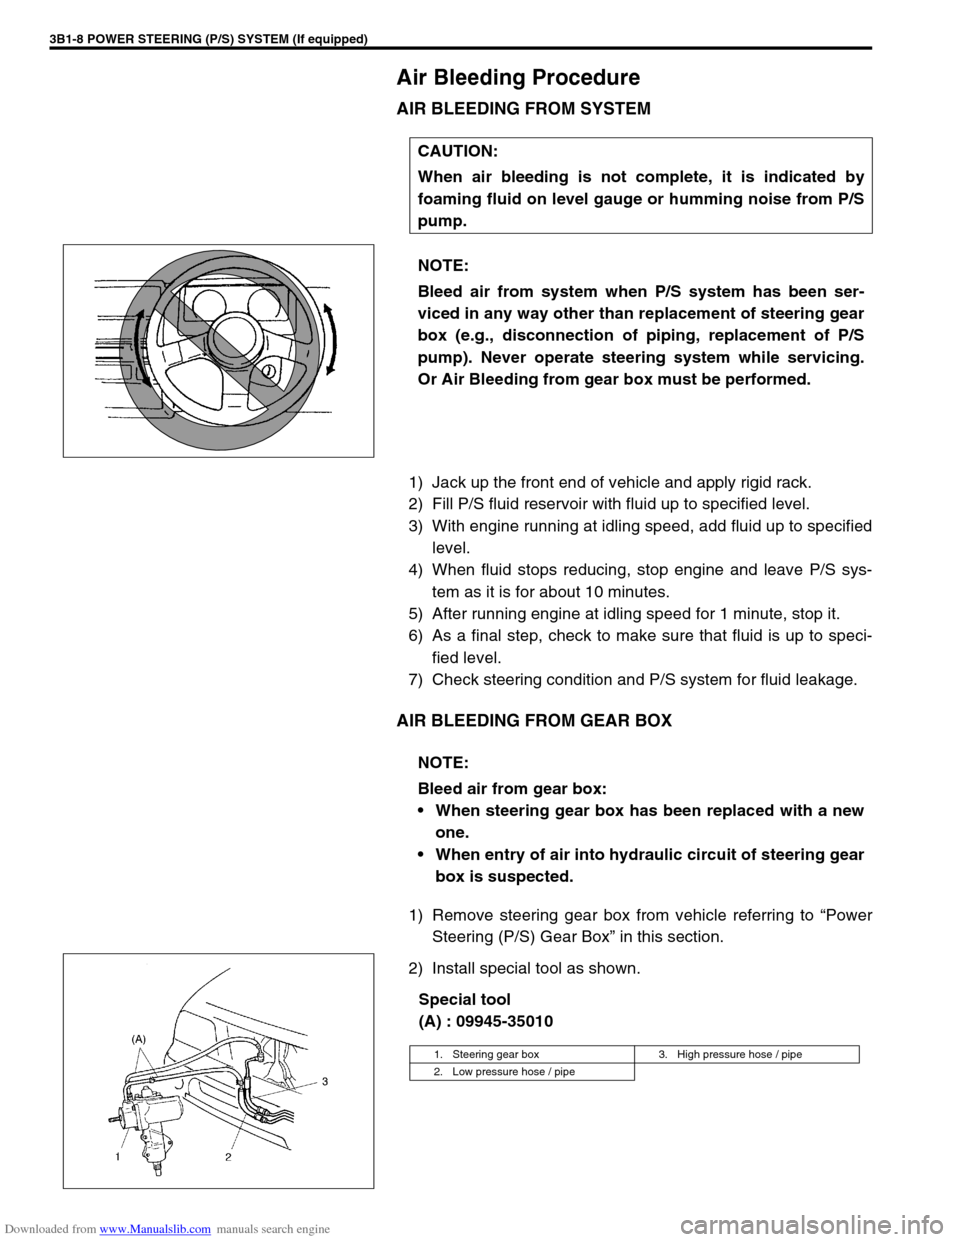
AIR BLEEDING FROM SYSTEM
1) Jack up the front end of vehicle and apply rigid rack.
2) Fill P/S fluid reservoir with fluid up to specified level.
3) With engine running at idling speed, add fluid up to specified
level.
4) When fluid stops reducing, stop engine and leave P/S sys-
tem as it is for about 10 minutes.
5) After running engine at idling speed for 1 minute, stop it.
6) As a final step, check to make sure that fluid is up to speci-
fied level.
7) Check steering condition and P/S system for fluid leakage.
AIR BLEEDING FROM GEAR BOX
1) Remove steering gear box from vehicle referring to “Power
Steering (P/S) Gear Box” in this section.
2) Install special tool as shown.
Special tool
(A) : 09945-35010 CAUTION:
When air bleeding is not complete, it is indicated by
foaming fluid on level gauge or humming noise from P/S
pump.
NOTE:
Bleed air from system when P/S system has been ser-
viced in any way other than replacement of steering gear
box (e.g., disconnection of piping, replacement of P/S
pump). Never operate steering system while servicing.
Or Air Bleeding from gear box must be performed.
NOTE:
Bleed air from gear box:
When steering gear box has been replaced with a new
one.
When entry of air into hydraulic circuit of steering gear
box is suspected.
1. Steering gear box 3. High pressure hose / pipe
2. Low pressure hose / pipe
Page 140 of 687
Downloaded from www.Manualslib.com manuals search engine POWER STEERING (P/S) SYSTEM (If equipped) 3B1-9
3) After running engine at idling speed for 3 to 5 seconds, stop
it and add fluid up to specified level. Repeat this step a few
times.
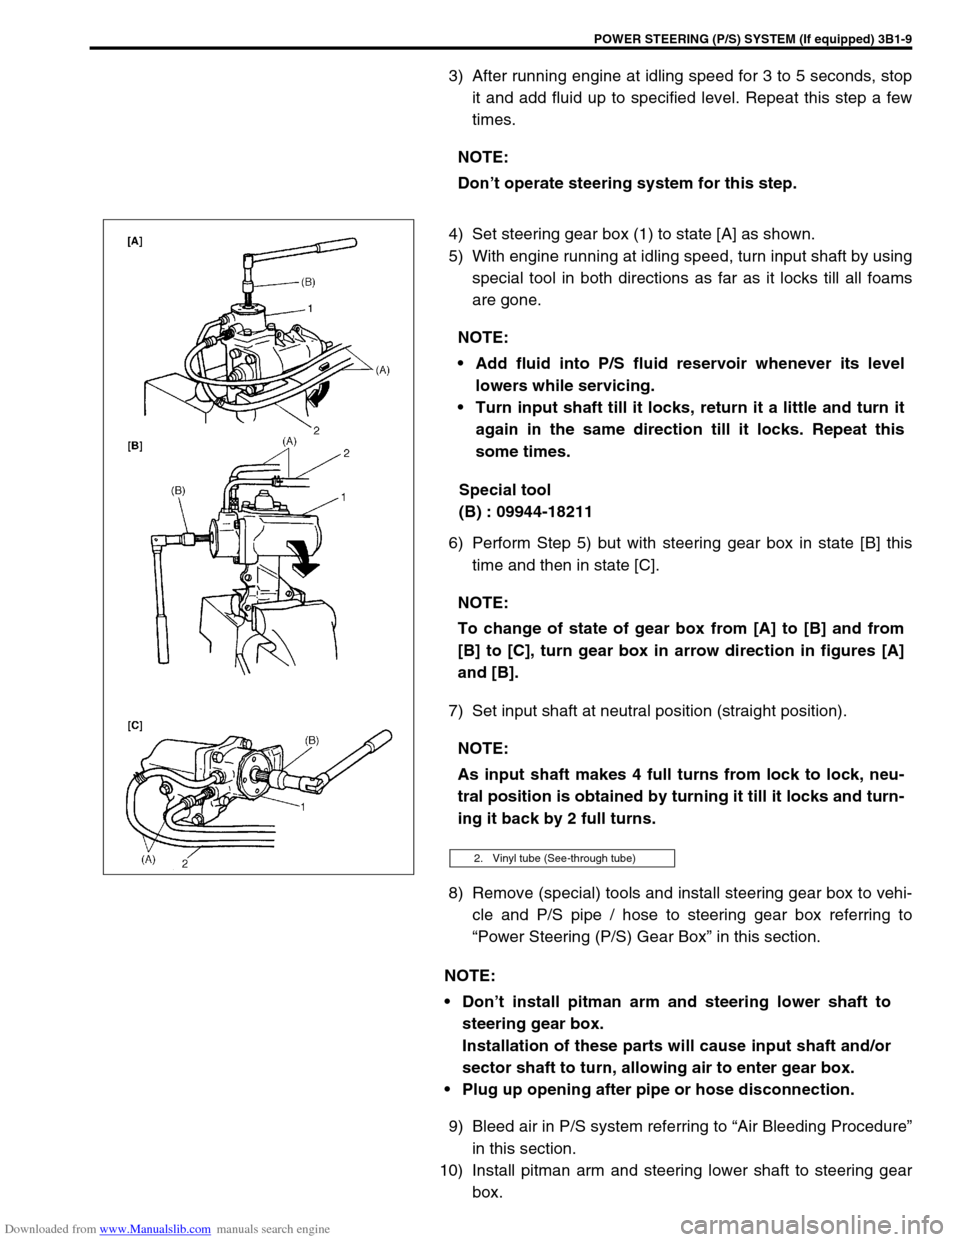
4) Set steering gear box (1) to state [A] as shown.
5) With engine running at idling speed, turn input shaft by using
special tool in both directions as far as it locks till all foams
are gone.
Special tool
(B) : 09944-18211
6) Perform Step 5) but with steering gear box in state [B] this
time and then in state [C].
7) Set input shaft at neutral position (straight position).
8) Remove (special) tools and install steering gear box to vehi-
cle and P/S pipe / hose to steering gear box referring to
“Power Steering (P/S) Gear Box” in this section.
9) Bleed air in P/S system referring to “Air Bleeding Procedure”
in this section.
10) Install pitman arm and steering lower shaft to steering gear
box. NOTE:
Don’t operate steering system for this step.
NOTE:
Add fluid into P/S fluid reservoir whenever its level
lowers while servicing.
Turn input shaft till it locks, return it a little and turn it
again in the same direction till it locks. Repeat this
some times.
NOTE:
To change of state of gear box from [A] to [B] and from
[B] to [C], turn gear box in arrow direction in figures [A]
and [B].
NOTE:
As input shaft makes 4 full turns from lock to lock, neu-
tral position is obtained by turning it till it locks and turn-
ing it back by 2 full turns.
2. Vinyl tube (See-through tube)
NOTE:
Don’t install pitman arm and steering lower shaft to
steering gear box.
Installation of these parts will cause input shaft and/or
sector shaft to turn, allowing air to enter gear box.
Plug up opening after pipe or hose disconnection.
Page 141 of 687
Downloaded from www.Manualslib.com manuals search engine 3B1-10 POWER STEERING (P/S) SYSTEM (If equipped)
Hydraulic Pressure In P/S Circuit Check
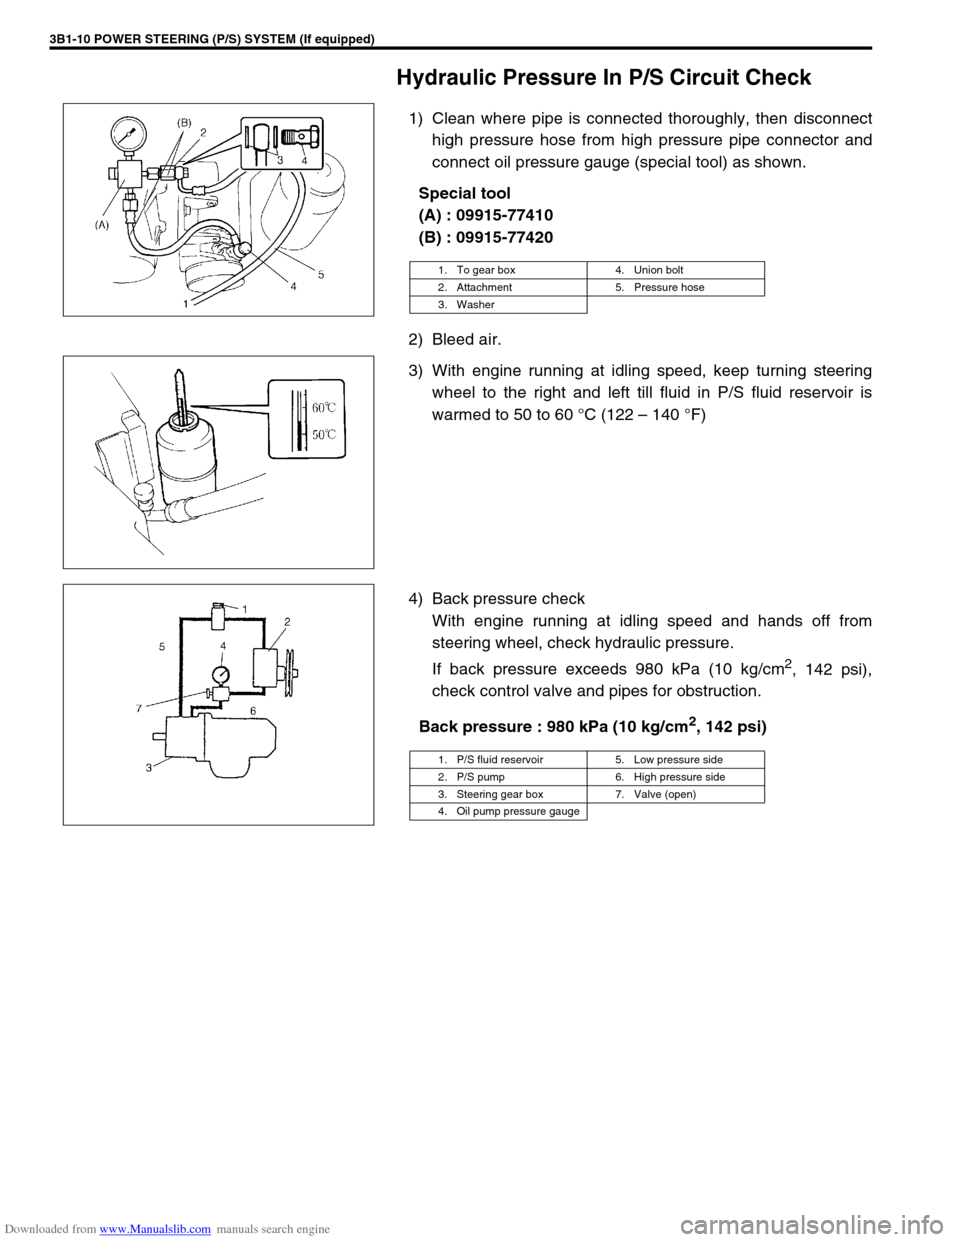
1) Clean where pipe is connected thoroughly, then disconnect
high pressure hose from high pressure pipe connector and
connect oil pressure gauge (special tool) as shown.
Special tool
(A) : 09915-77410
(B) : 09915-77420
2) Bleed air.
3) With engine running at idling speed, keep turning steering
wheel to the right and left till fluid in P/S fluid reservoir is
warmed to 50 to 60 °C (122 – 140 °F)
4) Back pressure check
With engine running at idling speed and hands off from
steering wheel, check hydraulic pressure.
If back pressure exceeds 980 kPa (10 kg/cm
2, 142 psi),
check control valve and pipes for obstruction.
Back pressure : 980 kPa (10 kg/cm
2, 142 psi)
1. To gear box 4. Union bolt
2. Attachment 5. Pressure hose
3. Washer
1. P/S fluid reservoir 5. Low pressure side
2. P/S pump 6. High pressure side
3. Steering gear box 7. Valve (open)
4. Oil pump pressure gauge
Page 142 of 687
Downloaded from www.Manualslib.com manuals search engine POWER STEERING (P/S) SYSTEM (If equipped) 3B1-11
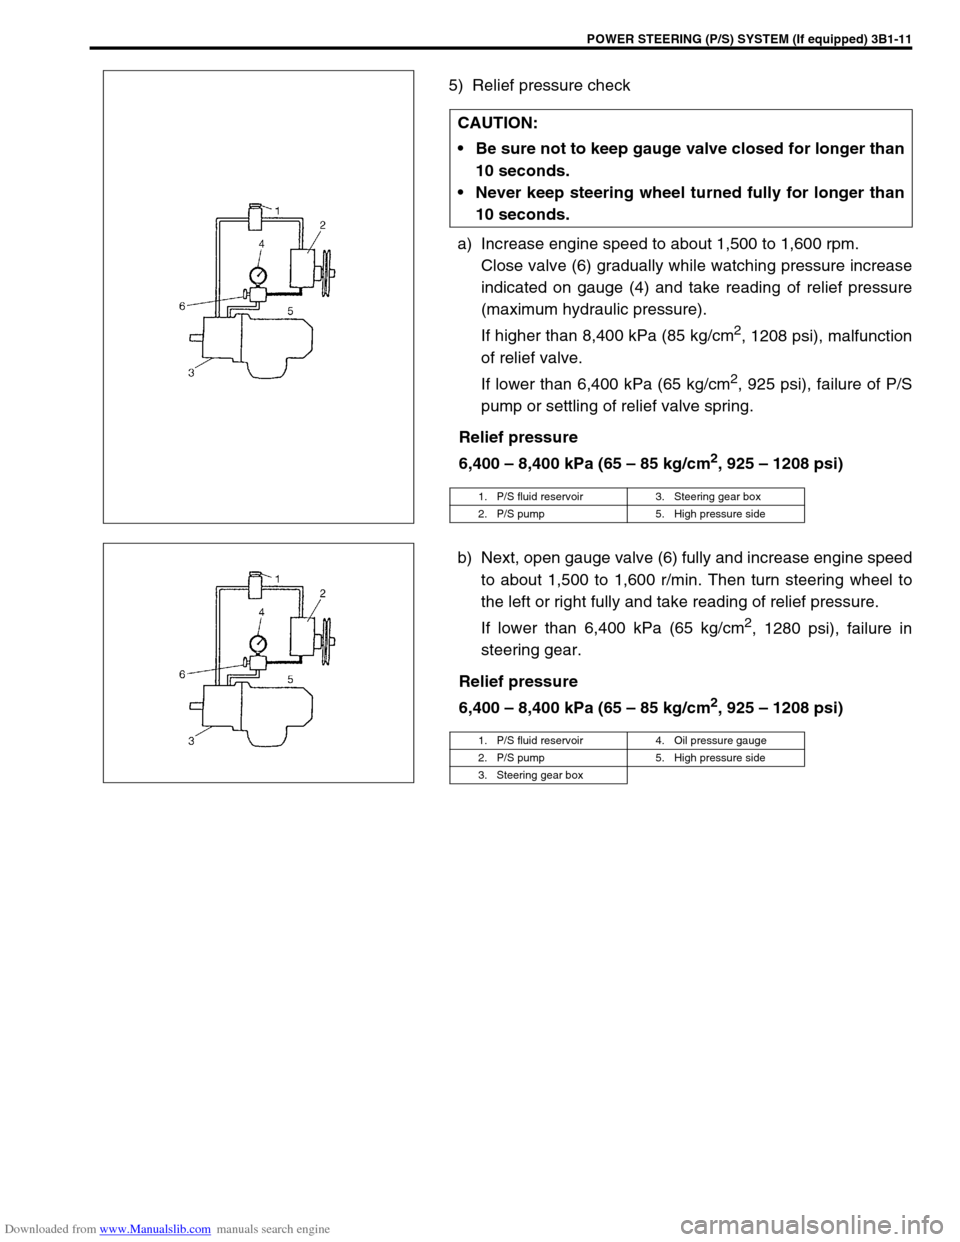
5) Relief pressure check
a) Increase engine speed to about 1,500 to 1,600 rpm.
Close valve (6) gradually while watching pressure increase
indicated on gauge (4) and take reading of relief pressure
(maximum hydraulic pressure).
If higher than 8,400 kPa (85 kg/cm
2, 1208 psi), malfunction
of relief valve.
If lower than 6,400 kPa (65 kg/cm
2, 925 psi), failure of P/S
pump or settling of relief valve spring.
Relief pressure
6,400 – 8,400 kPa (65 – 85 kg/cm
2, 925 – 1208 psi)
b) Next, open gauge valve (6) fully and increase engine speed
to about 1,500 to 1,600 r/min. Then turn steering wheel to
the left or right fully and take reading of relief pressure.
If lower than 6,400 kPa (65 kg/cm
2, 1280 psi), failure in
steering gear.
Relief pressure
6,400 – 8,400 kPa (65 – 85 kg/cm
2, 925 – 1208 psi) CAUTION:
Be sure not to keep gauge valve closed for longer than
10 seconds.
Never keep steering wheel turned fully for longer than
10 seconds.
1. P/S fluid reservoir 3. Steering gear box
2. P/S pump 5. High pressure side
1. P/S fluid reservoir 4. Oil pressure gauge
2. P/S pump 5. High pressure side
3. Steering gear box
Page 179 of 687
Downloaded from www.Manualslib.com manuals search engine 3D-6 FRONT SUSPENSION
OPERATION
2WD
→ 4WD
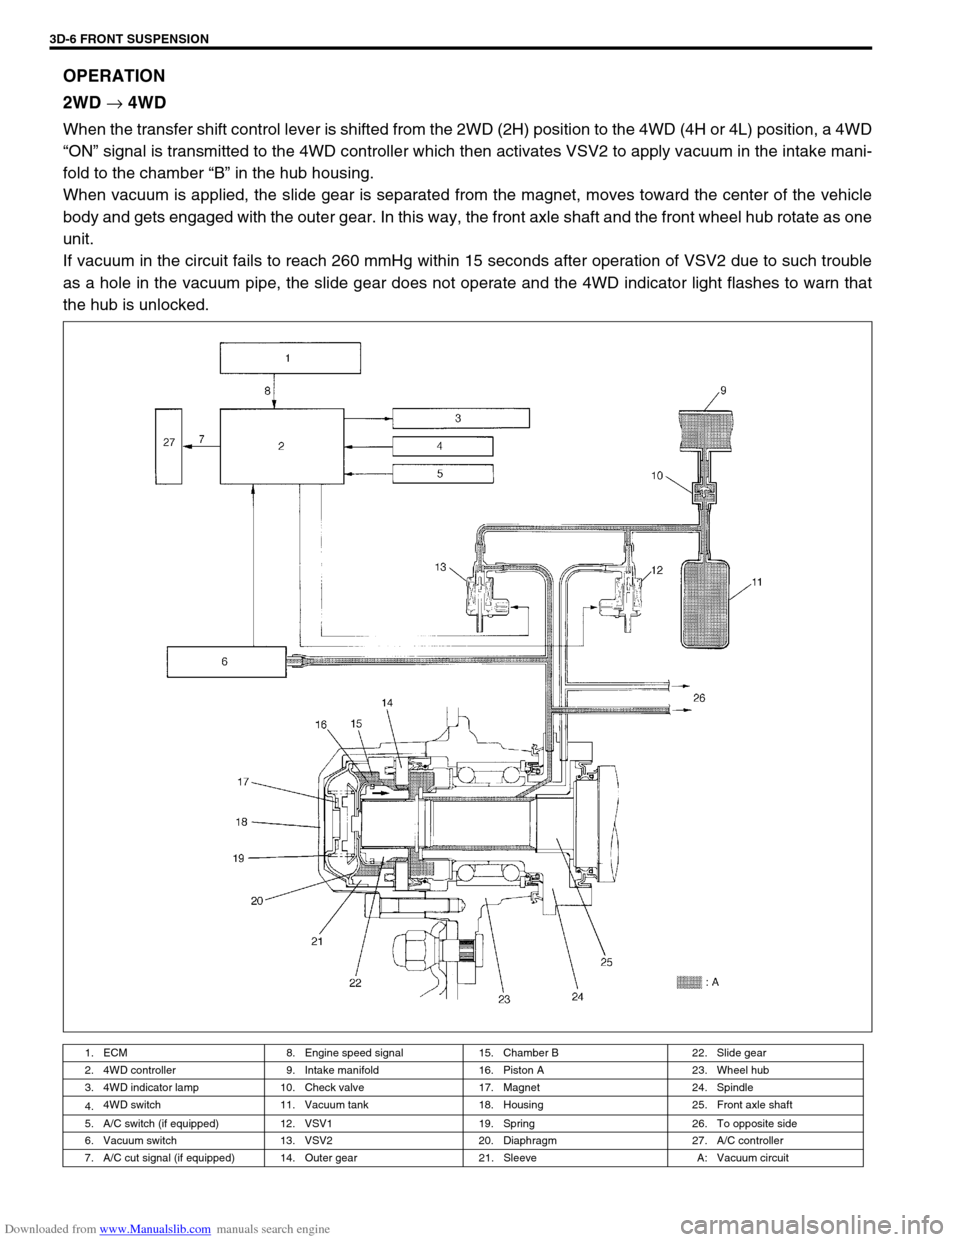
When the transfer shift control lever is shifted from the 2WD (2H) position to the 4WD (4H or 4L) position, a 4WD
“ON” signal is transmitted to the 4WD controller which then activates VSV2 to apply vacuum in the intake mani-
fold to the chamber “B” in the hub housing.
When vacuum is applied, the slide gear is separated from the magnet, moves toward the center of the vehicle
body and gets engaged with the outer gear. In this way, the front axle shaft and the front wheel hub rotate as one
unit.
If vacuum in the circuit fails to reach 260 mmHg within 15 seconds after operation of VSV2 due to such trouble
as a hole in the vacuum pipe, the slide gear does not operate and the 4WD indicator light flashes to warn that
the hub is unlocked.
1. ECM 8. Engine speed signal 15. Chamber B 22. Slide gear
2. 4WD controller 9. Intake manifold 16. Piston A 23. Wheel hub
3. 4WD indicator lamp 10. Check valve 17. Magnet 24. Spindle
4.4WD switch 11. Vacuum tank 18. Housing 25. Front axle shaft
5. A/C switch (if equipped) 12. VSV1 19. Spring 26. To opposite side
6. Vacuum switch 13. VSV2 20. Diaphragm 27. A/C controller
7. A/C cut signal (if equipped) 14. Outer gear 21. Sleeve A: Vacuum circuit
Page 180 of 687
Downloaded from www.Manualslib.com manuals search engine FRONT SUSPENSION 3D-7
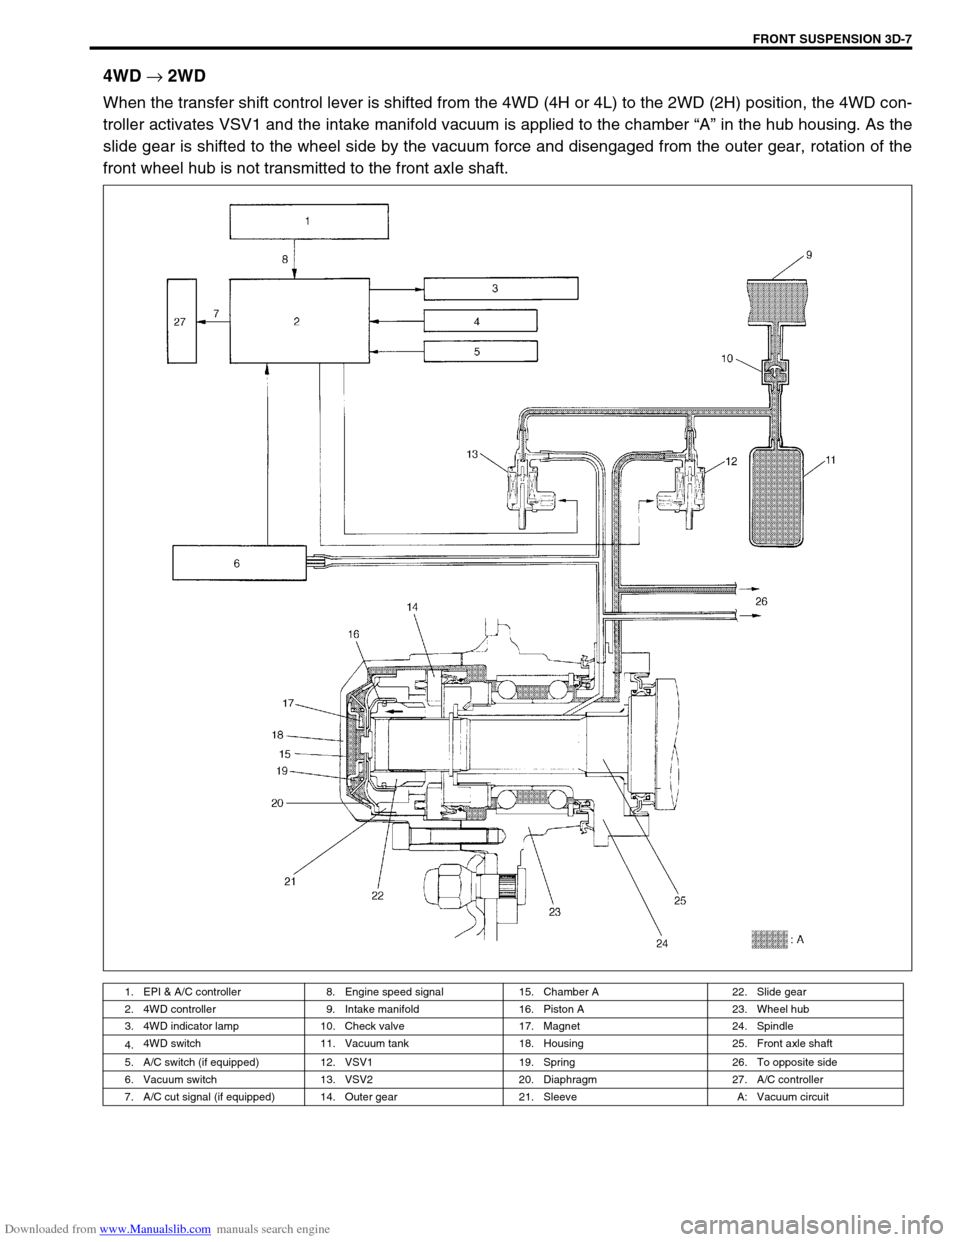
4WD
→ 2WD
When the transfer shift control lever is shifted from the 4WD (4H or 4L) to the 2WD (2H) position, the 4WD con-
troller activates VSV1 and the intake manifold vacuum is applied to the chamber “A” in the hub housing. As the
slide gear is shifted to the wheel side by the vacuum force and disengaged from the outer gear, rotation of the
front wheel hub is not transmitted to the front axle shaft.
1. EPI & A/C controller 8. Engine speed signal 15. Chamber A 22. Slide gear
2. 4WD controller 9. Intake manifold 16. Piston A 23. Wheel hub
3. 4WD indicator lamp 10. Check valve 17. Magnet 24. Spindle
4.4WD switch 11. Vacuum tank 18. Housing 25. Front axle shaft
5. A/C switch (if equipped) 12. VSV1 19. Spring 26. To opposite side
6. Vacuum switch 13. VSV2 20. Diaphragm 27. A/C controller
7. A/C cut signal (if equipped) 14. Outer gear 21. Sleeve A: Vacuum circuit