warning light TESLA MODEL 3 2020 Owner's Manuals
[x] Cancel search | Manufacturer: TESLA, Model Year: 2020, Model line: MODEL 3, Model: TESLA MODEL 3 2020Pages: 220, PDF Size: 9.65 MB
Page 2 of 220
Contents
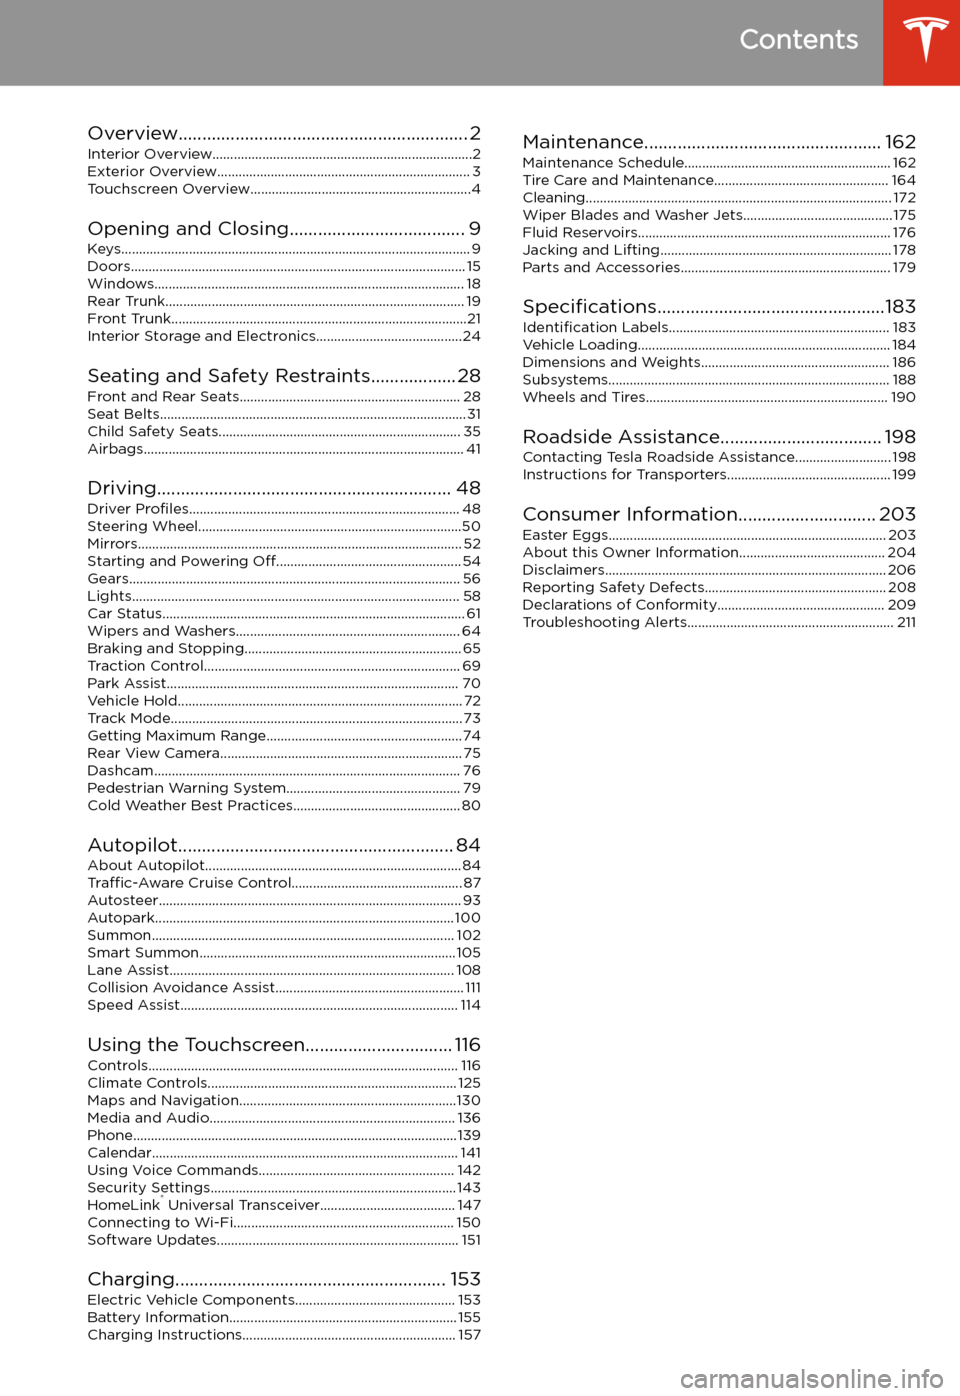
Overview............................................................. 2
Interior Overview.........................................................................2
Exterior Overview....................................................................... 3
Touchscreen Overview..............................................................4
Opening and Closing..................................... 9
Keys.................................................................................................. 9 Doors.............................................................................................. 15Windows....................................................................................... 18Rear Trunk.................................................................................... 19 Front Trunk...................................................................................21Interior Storage and Electronics.........................................24
Seating and Safety Restraints.................. 28 Front and Rear Seats.............................................................. 28Seat Belts...................................................................................... 31 Child Safety Seats.................................................................... 35Airbags.......................................................................................... 41
Driving.............................................................. 48 Driver Profiles ............................................................................ 48
Steering Wheel..........................................................................50 Mirrors........................................................................................... 52Starting and Powering Off.................................................... 54
Gears............................................................................................. 56 Lights............................................................................................ 58Car Status..................................................................................... 61 Wipers and Washers............................................................... 64Braking and Stopping............................................................. 65Traction Control........................................................................ 69Park Assist.................................................................................. 70Vehicle Hold................................................................................ 72 Track Mode.................................................................................. 73Getting Maximum Range.......................................................74Rear View Camera.................................................................... 75
Dashcam...................................................................................... 76
Pedestrian Warning System................................................. 79 Cold Weather Best Practices............................................... 80
Autopilot.......................................................... 84 About Autopilot........................................................................ 84Traffic-Aware Cruise Control................................................ 87
Autosteer..................................................................................... 93 Autopark.................................................................................... 100 Summon..................................................................................... 102Smart Summon........................................................................ 105Lane Assist................................................................................ 108Collision Avoidance Assist..................................................... 111 Speed Assist.............................................................................. 114
Using the Touchscreen............................... 116 Controls....................................................................................... 116Climate Controls...................................................................... 125 Maps and Navigation.............................................................130Media and Audio..................................................................... 136Phone...........................................................................................139 Calendar...................................................................................... 141Using Voice Commands....................................................... 142 Security Settings..................................................................... 143HomeLink
Page 3 of 220
Overview
Interior Overview
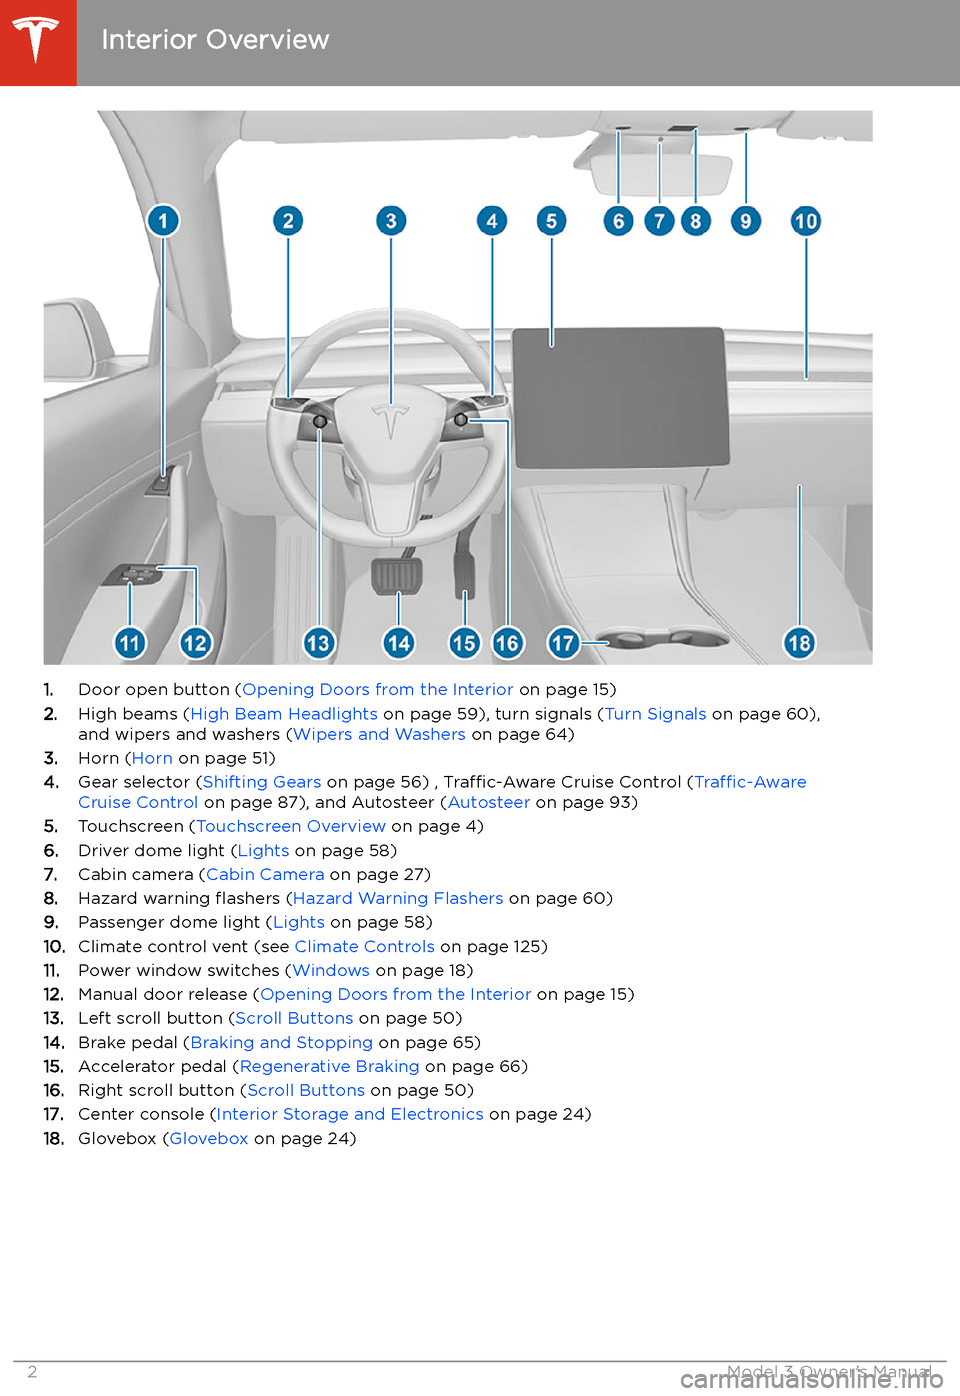
1. Door open button ( Opening Doors from the Interior on page 15)
2. High beams ( High Beam Headlights on page 59), turn signals ( Turn Signals on page 60),
and wipers and washers ( Wipers and Washers on page 64)
3. Horn ( Horn on page 51)
4. Gear selector ( Shifting Gears on page 56) , Traffic-Aware Cruise Control ( Traffic-Aware
Cruise Control on page 87), and Autosteer ( Autosteer on page 93)
5. Touchscreen ( Touchscreen Overview on page 4)
6. Driver dome light ( Lights on page 58)
7. Cabin camera ( Cabin Camera on page 27)
8. Hazard warning
Page 5 of 220
Touchscreen Overview
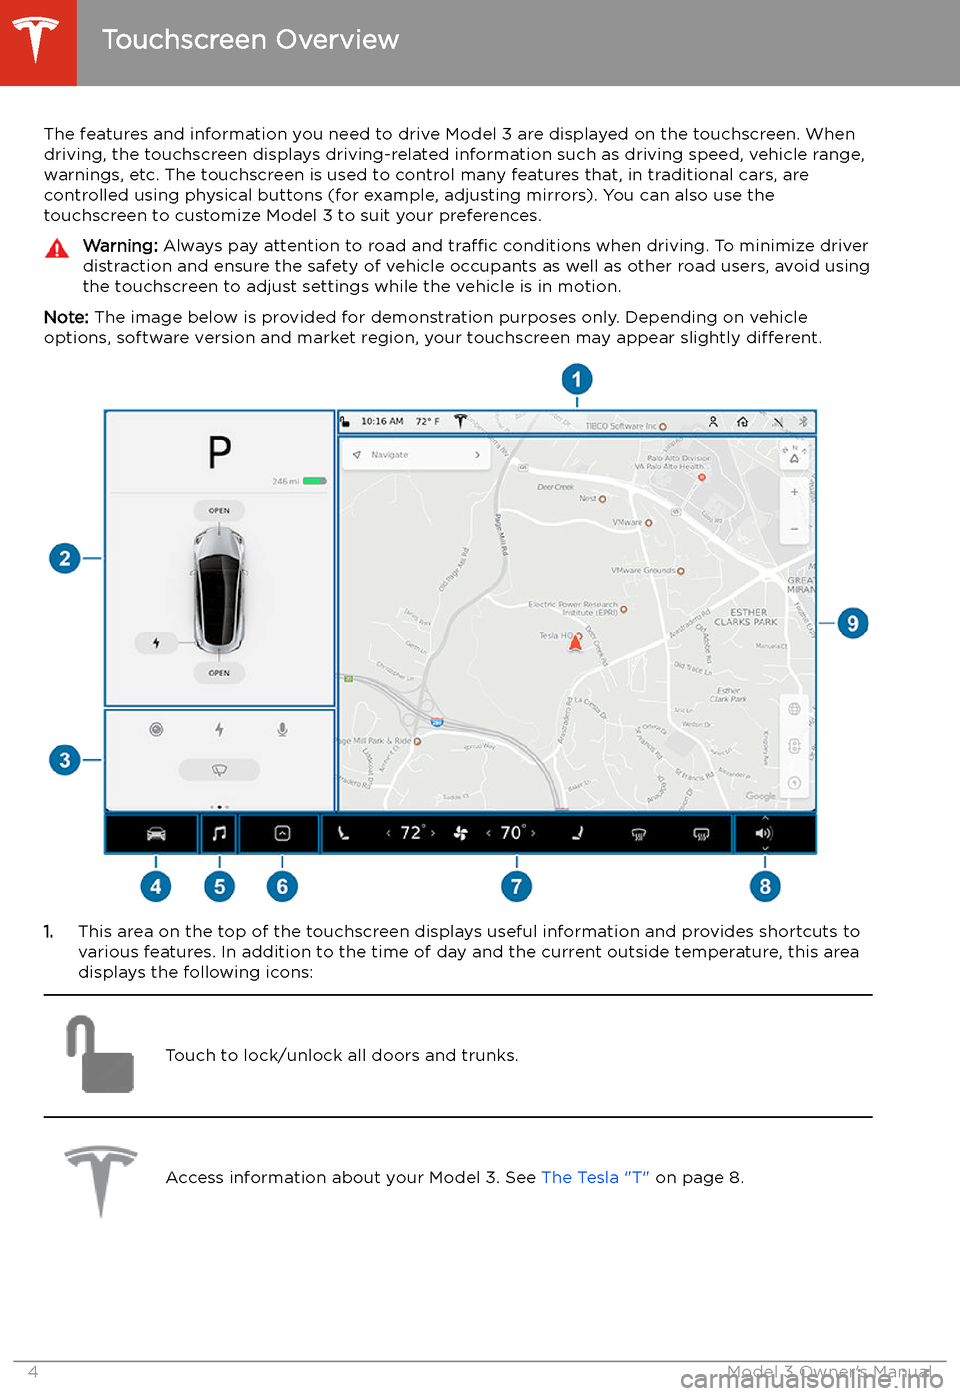
The features and information you need to drive Model 3 are displayed on the touchscreen. When
driving, the touchscreen displays driving-related information such as driving speed, vehicle range, warnings, etc. The touchscreen is used to control many features that, in traditional cars, arecontrolled using physical buttons (for example, adjusting mirrors). You can also use the
touchscreen to customize Model 3 to suit your preferences.
Warning: Always pay attention to road and traffic conditions when driving. To minimize driver
distraction and ensure the safety of vehicle occupants as well as other road users, avoid using
the touchscreen to adjust settings while the vehicle is in motion.
Note: The image below is provided for demonstration purposes only. Depending on vehicle
options, software version and market region, your touchscreen may appear slightly different.
1.This area on the top of the touchscreen displays useful information and provides shortcuts to
various features. In addition to the time of day and the current outside temperature, this area displays the following icons:
Touch to lock/unlock all doors and trunks.Access information about your Model 3. See The Tesla "T" on page 8.Touchscreen Overview
4Model 3 Owner
Page 7 of 220
2.Car Status. This area dynamically displays the current status of Model 3 as you drive, park,
open doors, turn lights on, etc. Monitor this area when driving as it displays important
information such as driving speed and warning messages (see Car Status on page 61). When
the car is in Park, you can open the trunks or charge port door.
3. Cards. This area automatically updates to display information such as incoming calls, seat belt
reminders, current state of the wipers, etc. It also provides easy access to the rear view camera (see Rear View Camera on page 75), charging status (see Charging Instructions on
page 157), voice commands (see Using Voice Commands on page 142), wiper controls (see
Wipers on page 64), and seat belt reminders (see Seat Belt Reminders on page 31). Swipe
to the right or left to access:
Page 21 of 220
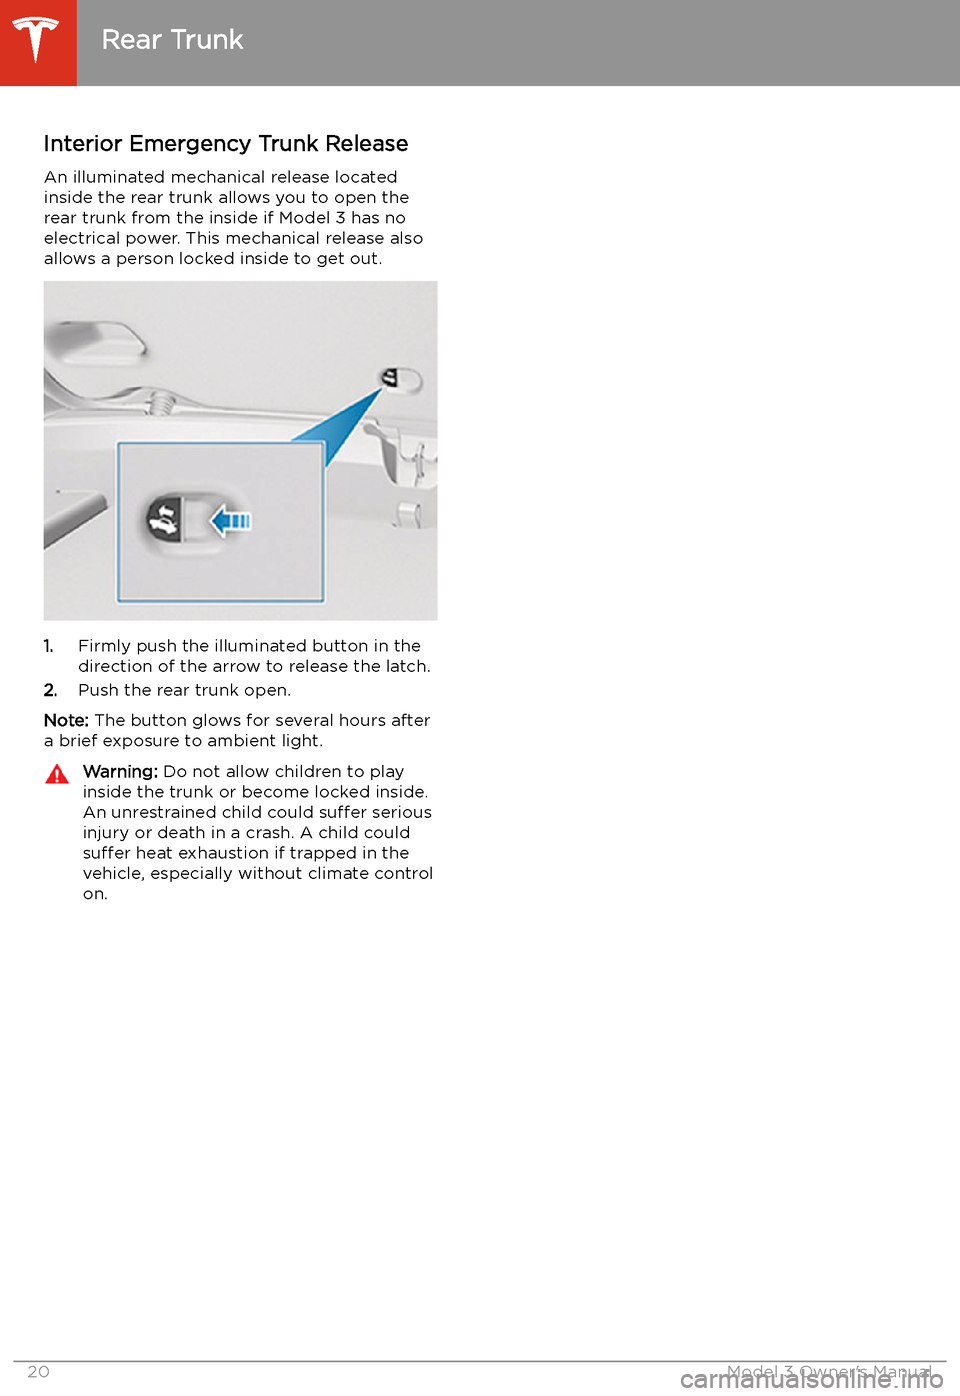
Interior Emergency Trunk ReleaseAn illuminated mechanical release located
inside the rear trunk allows you to open the rear trunk from the inside if Model 3 has no
electrical power. This mechanical release also
allows a person locked inside to get out.
1. Firmly push the illuminated button in the
direction of the arrow to release the latch.
2. Push the rear trunk open.
Note: The button glows for several hours after
a brief exposure to ambient light.
Warning: Do not allow children to play
inside the trunk or become locked inside.
An unrestrained child could suffer serious
injury or death in a crash. A child could
suffer heat exhaustion if trapped in the
vehicle, especially without climate control
on.
Rear Trunk
20Model 3 Owner
Page 22 of 220
Front Trunk
Opening
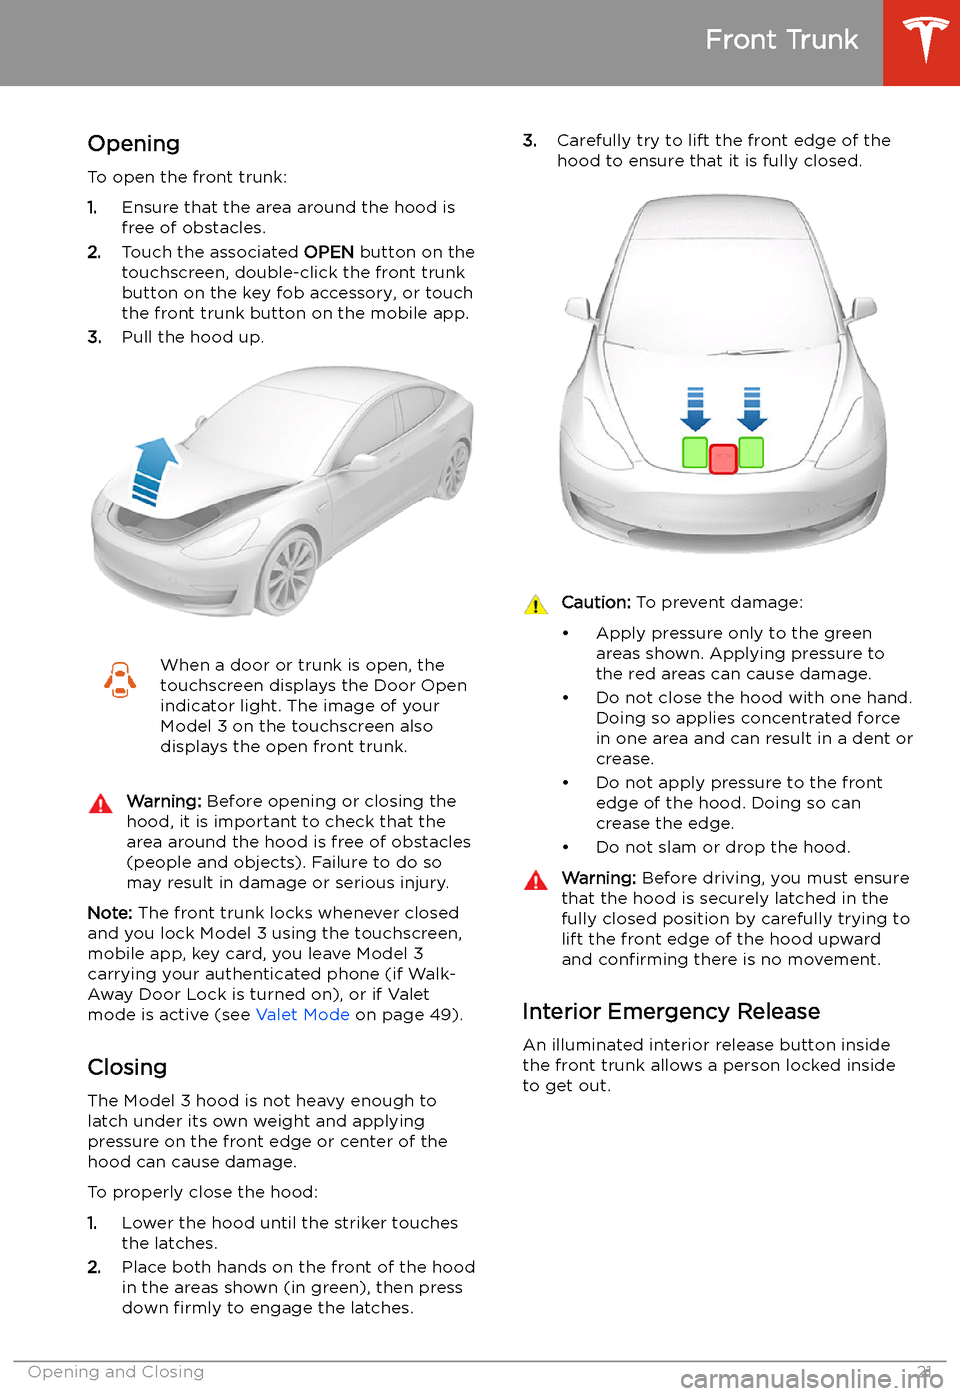
To open the front trunk:
1. Ensure that the area around the hood is
free of obstacles.
2. Touch the associated OPEN button on the
touchscreen, double-click the front trunk
button on the key fob accessory, or touch
the front trunk button on the mobile app.
3. Pull the hood up.
When a door or trunk is open, the
touchscreen displays the Door Open indicator light. The image of your
Model 3 on the touchscreen also
displays the open front trunk.Warning: Before opening or closing the
hood, it is important to check that the area around the hood is free of obstacles
(people and objects). Failure to do so
may result in damage or serious injury.
Note: The front trunk locks whenever closed
and you lock Model 3 using the touchscreen,
mobile app, key card, you leave Model 3
carrying your authenticated phone (if Walk-
Away Door Lock is turned on), or if Valet
mode is active (see Valet Mode on page 49).
Closing The Model 3 hood is not heavy enough to
latch under its own weight and applying
pressure on the front edge or center of the
hood can cause damage.
To properly close the hood:
1. Lower the hood until the striker touches
the latches.
2. Place both hands on the front of the hood
in the areas shown (in green), then press
down firmly to engage the latches.
3.
Carefully try to lift the front edge of the
hood to ensure that it is fully closed.Caution: To prevent damage:
Page 23 of 220
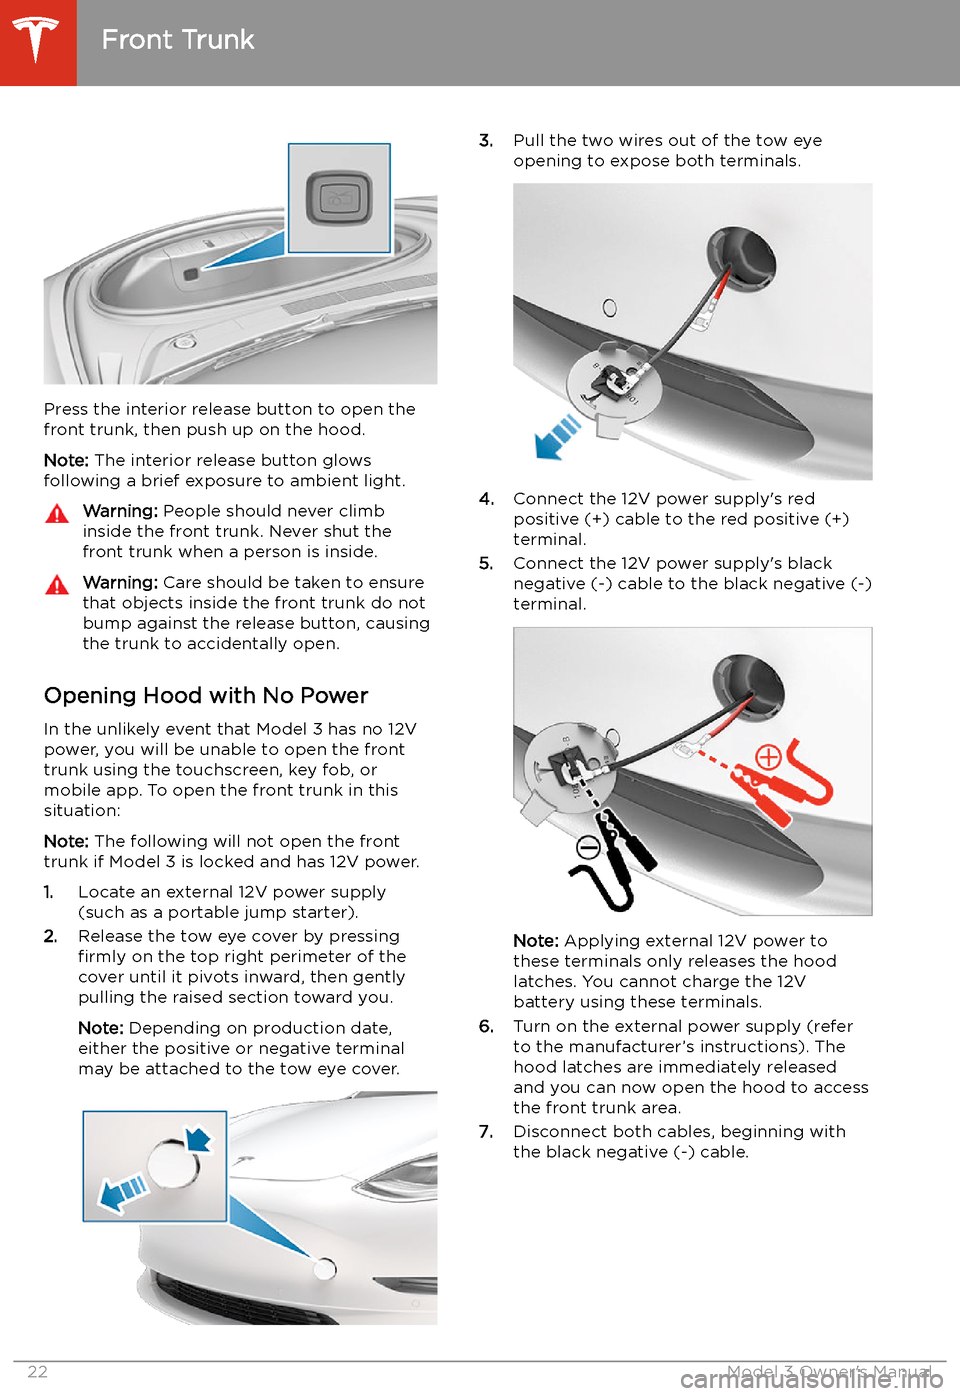
Press the interior release button to open the
front trunk, then push up on the hood.
Note: The interior release button glows
following a brief exposure to ambient light.
Warning: People should never climb
inside the front trunk. Never shut the
front trunk when a person is inside.Warning: Care should be taken to ensure
that objects inside the front trunk do not
bump against the release button, causing the trunk to accidentally open.
Opening Hood with No Power
In the unlikely event that Model 3 has no 12V power, you will be unable to open the front
trunk using the touchscreen, key fob, or
mobile app. To open the front trunk in this situation:
Note: The following will not open the front
trunk if Model 3 is locked and has 12V power.
1. Locate an external 12V power supply
(such as a portable jump starter).
2. Release the tow eye cover by pressing
firmly on the top right perimeter of the
cover until it pivots inward, then gently pulling the raised section toward you.
Note: Depending on production date,
either the positive or negative terminal
may be attached to the tow eye cover.
3. Pull the two wires out of the tow eye
opening to expose both terminals.
4. Connect the 12V power supply
Page 25 of 220
Interior Storage and Electronics
Glovebox
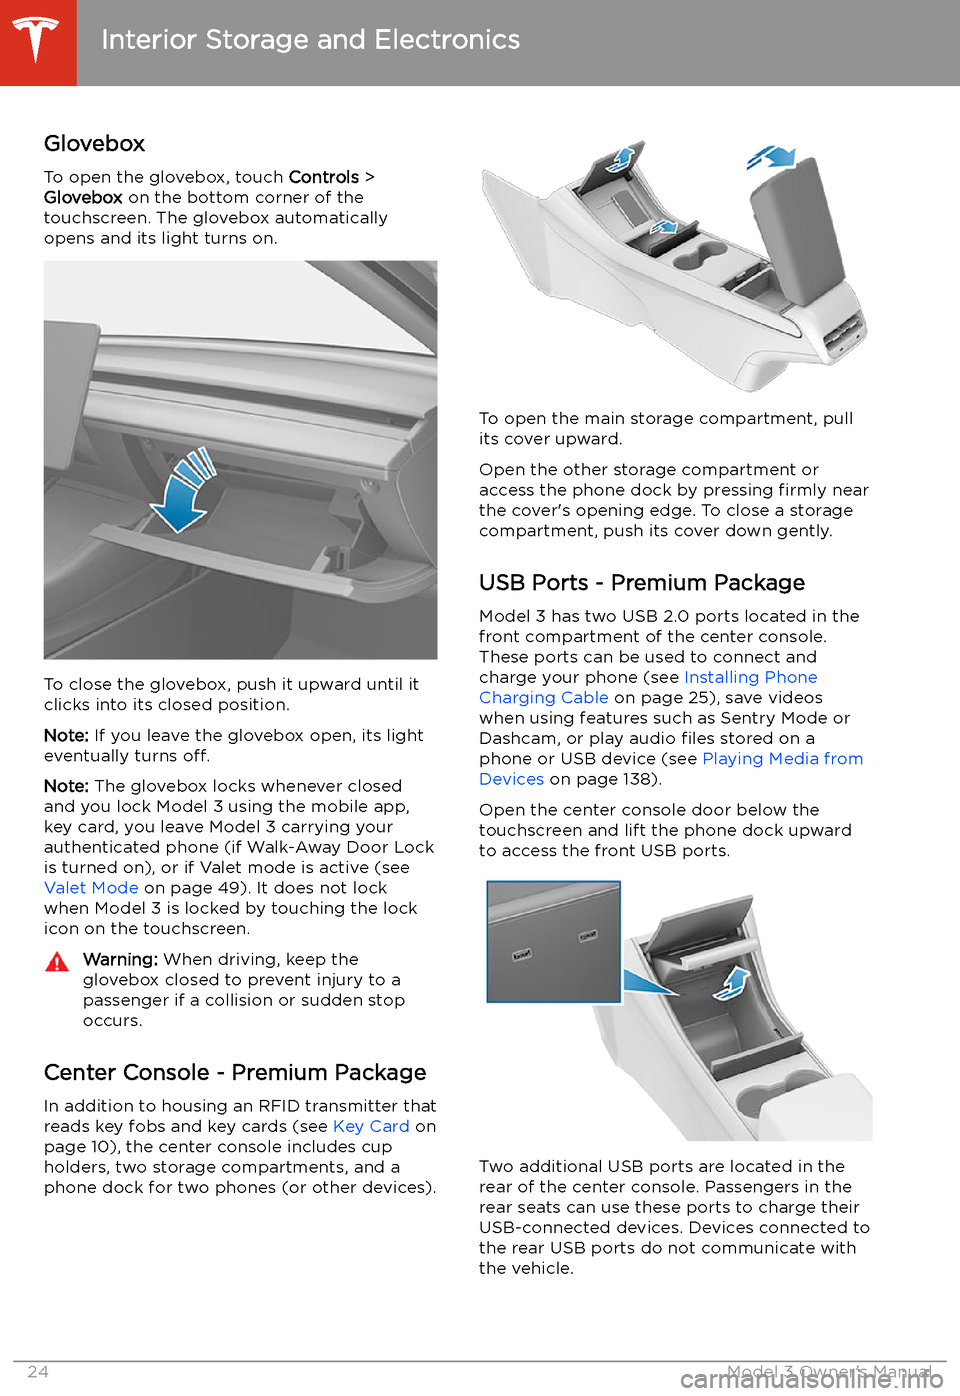
To open the glovebox, touch Controls >
Glovebox on the bottom corner of the
touchscreen. The glovebox automatically
opens and its light turns on.
To close the glovebox, push it upward until it
clicks into its closed position.
Note: If you leave the glovebox open, its light
eventually turns off.
Note: The glovebox locks whenever closed
and you lock Model 3 using the mobile app,
key card, you leave Model 3 carrying your authenticated phone (if Walk-Away Door Lock
is turned on), or if Valet mode is active (see Valet Mode on page 49). It does not lock
when Model 3 is locked by touching the lock
icon on the touchscreen.
Warning: When driving, keep the
glovebox closed to prevent injury to a
passenger if a collision or sudden stop occurs.
Center Console - Premium Package
In addition to housing an RFID transmitter that reads key fobs and key cards (see Key Card on
page 10), the center console includes cup
holders, two storage compartments, and a
phone dock for two phones (or other devices).
To open the main storage compartment, pull its cover upward.
Open the other storage compartment or
access the phone dock by pressing firmly near
the cover
Page 40 of 220
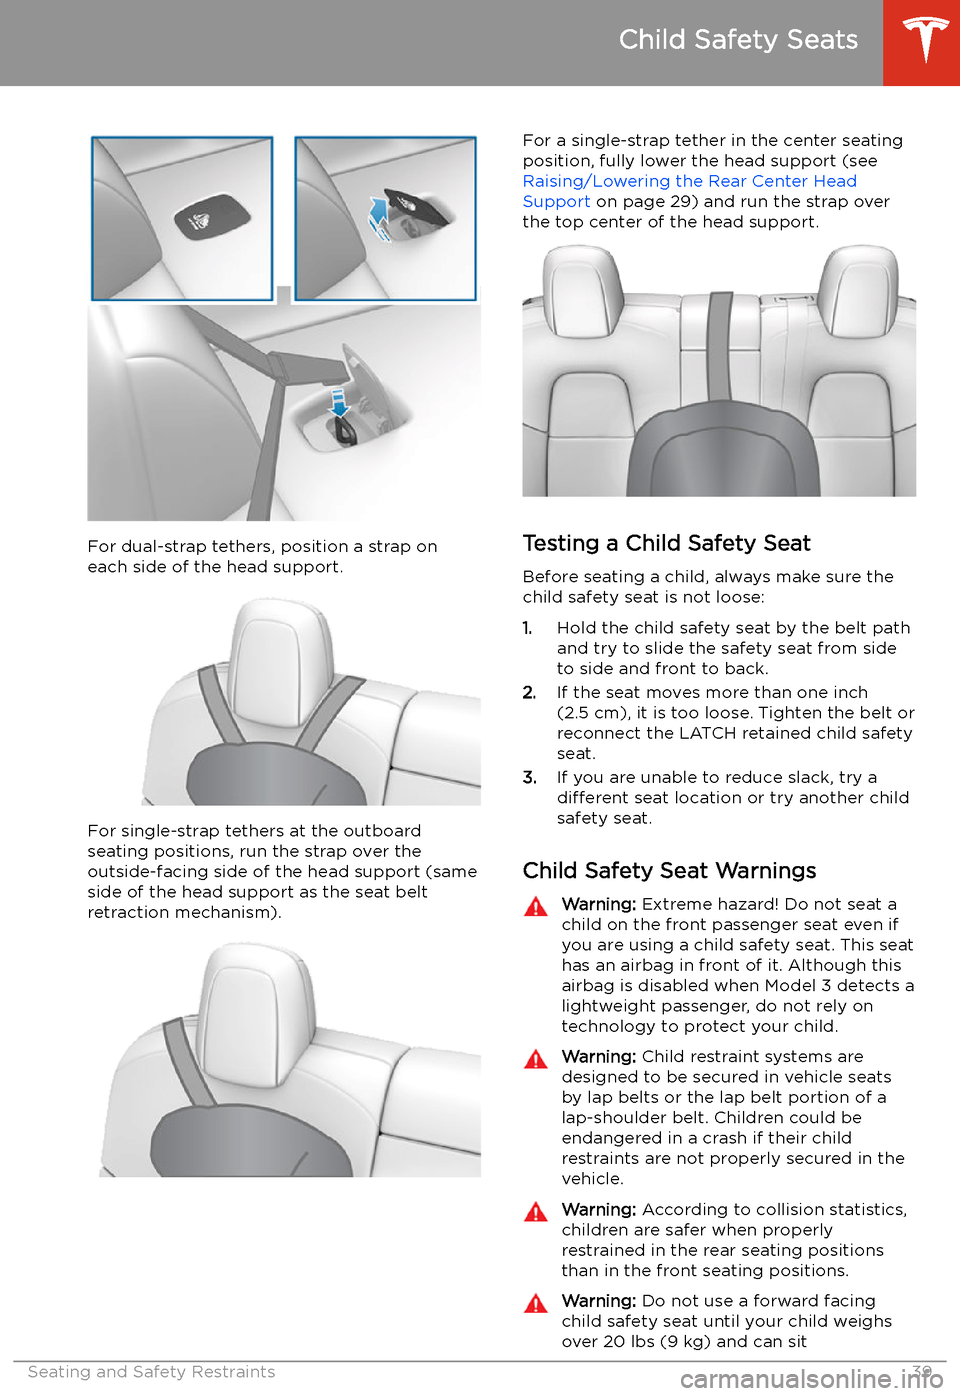
For dual-strap tethers, position a strap oneach side of the head support.
For single-strap tethers at the outboard
seating positions, run the strap over the outside-facing side of the head support (sameside of the head support as the seat belt
retraction mechanism).
For a single-strap tether in the center seating
position, fully lower the head support (see Raising/Lowering the Rear Center HeadSupport on page 29) and run the strap over
the top center of the head support.
Testing a Child Safety Seat
Before seating a child, always make sure the
child safety seat is not loose:
1. Hold the child safety seat by the belt path
and try to slide the safety seat from side
to side and front to back.
2. If the seat moves more than one inch
(2.5 cm), it is too loose. Tighten the belt or
reconnect the LATCH retained child safety
seat.
3. If you are unable to reduce slack, try a
different seat location or try another child
safety seat.
Child Safety Seat Warnings
Warning: Extreme hazard! Do not seat a
child on the front passenger seat even if
you are using a child safety seat. This seat
has an airbag in front of it. Although this airbag is disabled when Model 3 detects a
lightweight passenger, do not rely on technology to protect your child.Warning: Child restraint systems are
designed to be secured in vehicle seats
by lap belts or the lap belt portion of a lap-shoulder belt. Children could be
endangered in a crash if their child restraints are not properly secured in the
vehicle.Warning: According to collision statistics,
children are safer when properly
restrained in the rear seating positions
than in the front seating positions.Warning: Do not use a forward facing
child safety seat until your child weighs
over 20 lbs (9 kg) and can sit
Child Safety Seats
Seating and Safety Restraints39
Page 67 of 220
Caution: If the brakes are not functioning
properly, stop the vehicle as soon as safety permits and contact Tesla Service.
See Park on page 56 for information on
using the Park button to stop the vehicle
in case of emergency.Warning: Always maintain a safe driving
distance from the vehicle in front of you
and be cautious in hazardous driving
conditions. Do not rely on brake disc
wiping or hydraulic fade compensation to act as a substitute for adequate braking.
Regenerative Braking
Whenever Model 3 is moving and your foot is
off the accelerator, regenerative braking slows
down Model 3 and feeds any surplus energy back to the Battery.
By anticipating your stops and reducing or
removing pressure from the accelerator pedal
to slow down, you can take advantage of regenerative braking to increase driving range.
Of course, this is no substitute for regular braking when needed for safety.
Note: If regenerative braking is aggressively
slowing Model 3 (such as when your foot is
completely off the accelerator pedal at
highway speeds), the brake lights turn on to
alert others that you are slowing down.
Note: Installing winter tires with aggressive
compound and tread design may result in
temporarily-reduced regenerative braking
power. However, your vehicle is designed to continuously recalibrate itself, and after changing tires it will increasingly restore
regenerative braking power after some
moderate-torque straight-line accelerations.
For most drivers this occurs after a short
period of normal driving, but drivers who
normally accelerate lightly may need to use
slightly harder accelerations while the
recalibration is in progress.
Warning: In snowy or icy conditions
Model 3 may experience traction loss
during regenerative braking, particularly
when in the Standard setting and/or not
using winter tires. Tesla recommends
using the Low setting (see To Set the
Regenerative Braking Level on page 66)
in snowy or icy conditions to help maintain vehicle stability.The amount of energy fed back to the Battery
using regenerative braking can depend on the
current state of the Battery and the charge
level setting that you are using. For example,
regenerative braking may be limited if the Battery is already fully charged or if the
ambient temperature is too cold.
Note: If regenerative braking is limited, a
dashed line displays on the energy bar (see
Driving Status on page 63).
To Set the Regenerative Braking Level
You can use the touchscreen to change the
level of regenerative braking:
1. Touch Controls > Driving > Regenerative
Braking .
2. Choose from two levels: