Tire TOYOTA AYGO X 2022 (in English) Owner's Guide
[x] Cancel search | Manufacturer: TOYOTA, Model Year: 2022, Model line: AYGO X, Model: TOYOTA AYGO X 2022Pages: 494, PDF Size: 92.53 MB
Page 271 of 494
269
6
Owner's Manual_Europe_M99V08_en
6-3. Do-it-yourself maintenance
Maintenance and care
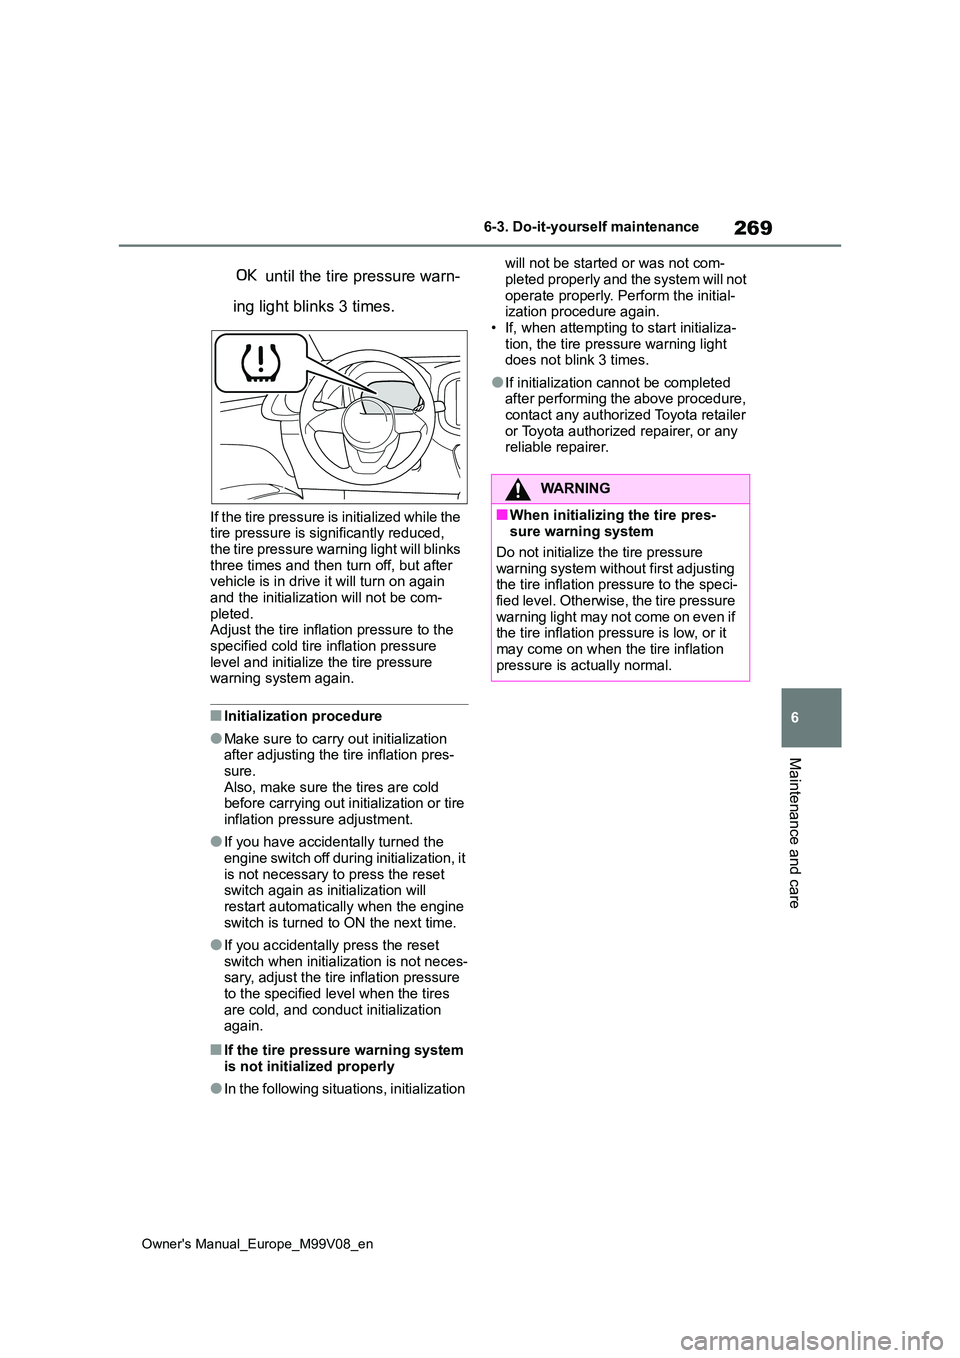
until the tire pressure warn-
ing light blinks 3 times.
If the tire pressure is initialized while the tire pressure is significantly reduced,
the tire pressure warning light will blinks three times and then turn off, but after vehicle is in drive it will turn on again
and the initialization will not be com- pleted.Adjust the tire inflation pressure to the
specified cold tire inflation pressure level and initialize the tire pressure warning system again.
■Initialization procedure
●Make sure to carry out initialization after adjusting the tire inflation pres-
sure. Also, make sure the tires are cold before carrying out initialization or tire
inflation pressure adjustment.
●If you have accidentally turned the
engine switch off during initialization, it is not necessary to press the reset switch again as initialization will
restart automatically when the engine switch is turned to ON the next time.
●If you accidentally press the reset switch when initialization is not neces-sary, adjust the tire inflation pressure
to the specified level when the tires are cold, and conduct initialization again.
■If the tire pressure warning system
is not initialized properly
●In the following situations, initialization
will not be started or was not com-
pleted properly and the system will not operate properly. Perform the initial-ization procedure again.
• If, when attempting to start initializa- tion, the tire pressure warning light does not blink 3 times.
●If initialization cannot be completed after performing the above procedure,
contact any authorized Toyota retailer or Toyota authorized repairer, or any reliable repairer.
WARNING
■When initializing the tire pres-sure warning system
Do not initialize the tire pressure
warning system without first adjusting the tire inflation pressure to the speci-fied level. Otherwise, the tire pressure
warning light may not come on even if the tire inflation pressure is low, or it may come on when the tire inflation
pressure is actually normal.
Page 272 of 494
270
Owner's Manual_Europe_M99V08_en
6-3. Do-it-yourself maintenance
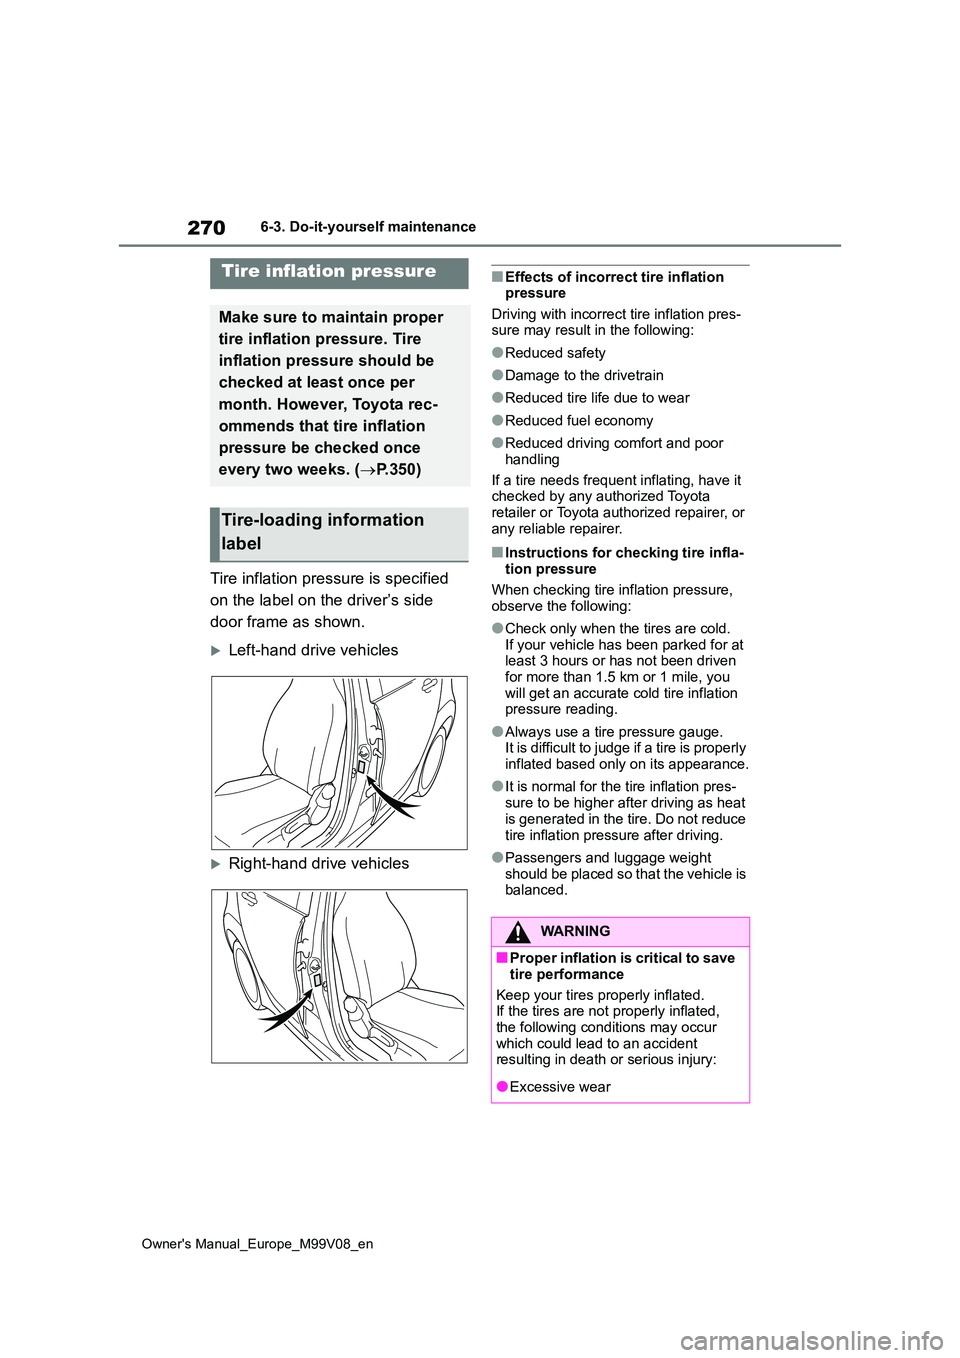
Tire inflation pressure is specified
on the label on the driver’s side
door frame as shown.
Left-hand drive vehicles
Right-hand drive vehicles
■Effects of incorrect tire inflation pressure
Driving with incorrect tire inflation pres- sure may result in the following:
●Reduced safety
●Damage to the drivetrain
●Reduced tire life due to wear
●Reduced fuel economy
●Reduced driving comfort and poor
handling
If a tire needs frequent inflating, have it checked by any authorized Toyota
retailer or Toyota authorized repairer, or any reliable repairer.
■Instructions for checking tire infla-tion pressure
When checking tire inflation pressure, observe the following:
●Check only when the tires are cold.If your vehicle has been parked for at least 3 hours or has not been driven
for more than 1.5 km or 1 mile, you will get an accurate cold tire inflation pressure reading.
●Always use a tire pressure gauge.It is difficult to judge if a tire is properly
inflated based only on its appearance.
●It is normal for the tire inflation pres-
sure to be higher after driving as heat is generated in the tire. Do not reduce
tire inflation pressure after driving.
●Passengers and luggage weight
should be placed so that the vehicle is balanced.
Tire inflation pressure
Make sure to maintain proper
tire inflation pressure. Tire
inflation pressure should be
checked at least once per
month. However, Toyota rec-
ommends that tire inflation
pressure be checked once
every two weeks. ( P.350)
Tire-loading information
label
WARNING
■Proper inflation is critical to save
tire performance
Keep your tires properly inflated. If the tires are not properly inflated,
the following conditions may occur which could lead to an accident resulting in death or serious injury:
●Excessive wear
Page 273 of 494
271
6
Owner's Manual_Europe_M99V08_en
6-3. Do-it-yourself maintenance
Maintenance and care
When replacing wheels, care
should be taken to ensure that they
are equivalent to those removed in
load capacity, diameter, rim width
and inset*.
Replacement wheels are available
at any authorized Toyota retailer or
Toyota authorized repairer, or any
reliable repairer.
*: Conventionally referred to as offset.
Toyota does not recommend using
the following:
Wheels of different sizes or types
Used wheels
Bent wheels that have been
straightened
■When removing the wheel orna- ment (vehicles with a wheel cap clip)
Remove the wheel ornament using the
wheel cap clip*.*: The wheel cap clip is installed in
under the luggage compartment.
WARNING
●Uneven wear
●Poor handling
●Possibility of blowouts resulting
from overheated tires
●Air leaking from between tire and
wheel
●Wheel deformation and/or tire dam-
age
●Greater possibility of tire damage
while driving (due to road hazards, expansion joints, sharp edges on the road, etc.)
NOTICE
■When inspecting and adjusting tire inflation pressure
B e s ur e t o pu t th e t i r e v al ve ca ps ba ck
on. If a valve cap is not installed, dirt or moisture may get into the valve and
cause an air leak, resulting in decreased tire inflation pressure.
Wheels
If a wheel is bent, cracked or
heavily corroded, it should be
replaced. Otherwise, the tire
may separate from the wheel
or cause a loss of handling
control.
Wheel selection
Page 274 of 494
272
Owner's Manual_Europe_M99V08_en
6-3. Do-it-yourself maintenance
Use only Toyota wheel bolts and
wheel bolt wrenches designed
for use with your aluminum
wheels.
When rotating, repairing or
changing your tires, check that
the wheel bolts are still tight after
driving 1600 km (1000 miles).
Be careful not to damage the
aluminum wheels when using
tire chains.
Use only Toyota genuine balance
weights or equivalent and a plas-
tic or rubber hammer when bal-
ancing your wheels.
WARNING
■When replacing wheels
●Do not use wheels that are a differ-
ent size from those recommended in the Owner’s Manual, as this may result in a loss of handling control.
●Never use an inner tube in a leak-ing wheel which is designed for a
tubeless tire. Doing so may result in an accident, causing death or serious injury.
■Use of defective wheels prohib-ited
Do not use cracked or deformed wheels. Doing so could cause the tire to leak air during driving, possibly
causing an accident.
NOTICE
■Replacing tire pressure warning valves and transmitters
●Because tire repair or replacement
may affect the tire pressure warning valves and transmitters, make sure to have tires serviced by any autho-
rized Toyota retailer or Toyota authorized repairer, or any reliable repairer. In addition, make sure to
purchase your tire pressure warn- ing valves and transmitters at any authorized Toyota retailer or Toyota
authorized repairer, or any reliable repairer.
●Ensure that only genuine Toyota wheels are used on your vehicle.Tire pressure warning valves and
transmitters may not work properly with non-genuine wheels.
Aluminum wheel precau-
tions (if equipped)
Page 278 of 494
276
Owner's Manual_Europe_M99V08_en
6-3. Do-it-yourself maintenance
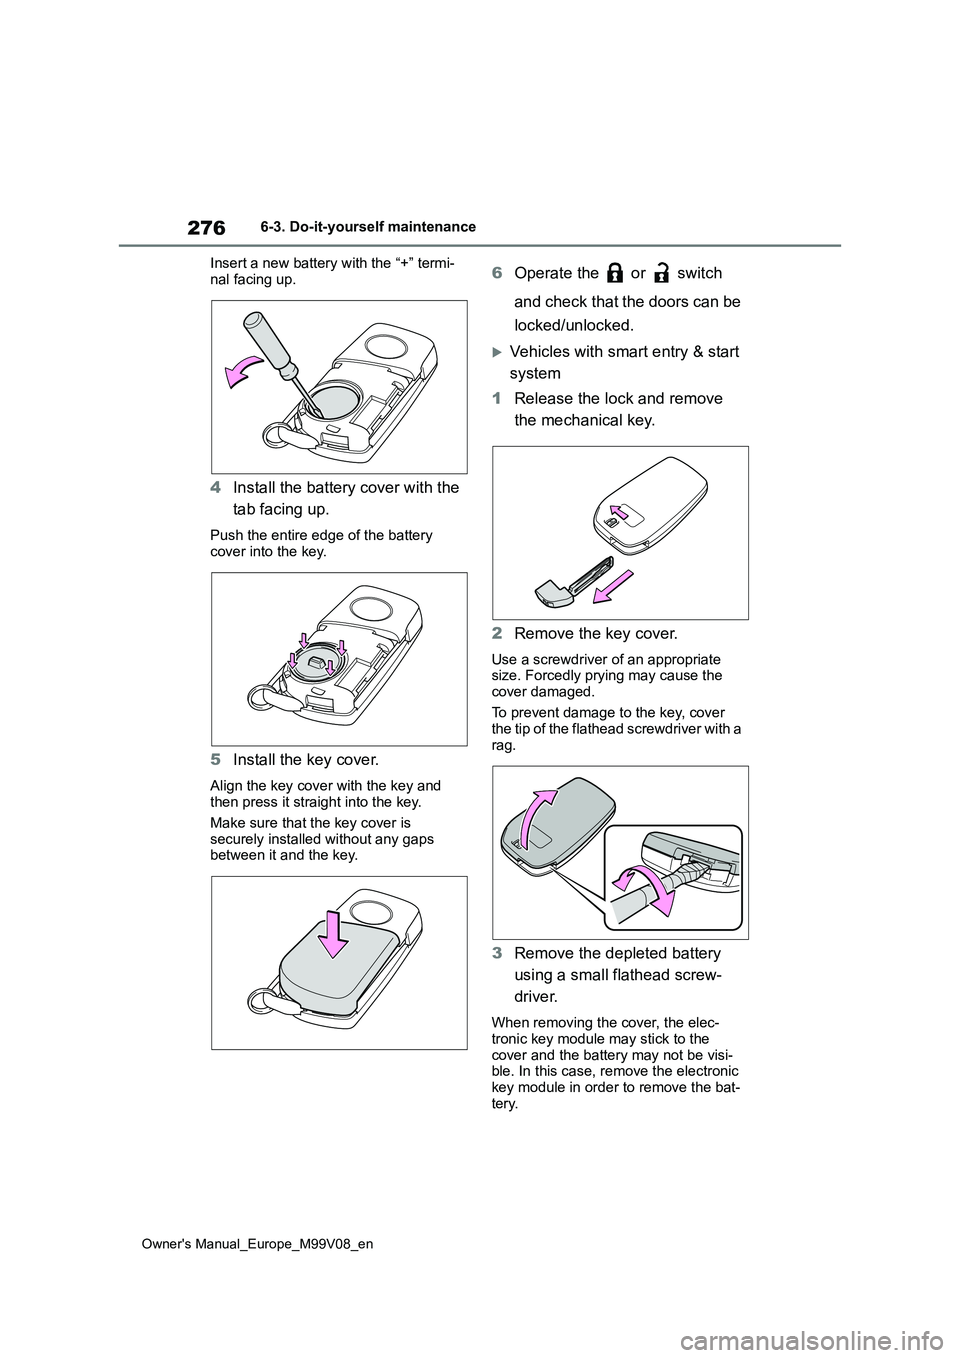
Insert a new battery with the “+” termi-
nal facing up.
4 Install the battery cover with the
tab facing up.
Push the entire edge of the battery
cover into the key.
5 Install the key cover.
Align the key cover with the key and then press it straight into the key.
Make sure that the key cover is
securely installed without any gaps between it and the key.
6 Operate the or switch
and check that the doors can be
locked/unlocked.
Vehicles with smart entry & start
system
1 Release the lock and remove
the mechanical key.
2 Remove the key cover.
Use a screwdriver of an appropriate size. Forcedly prying may cause the
cover damaged.
To prevent damage to the key, cover the tip of the flathead screwdriver with a
rag.
3 Remove the depleted battery
using a small flathead screw-
driver.
When removing the cover, the elec- tronic key module may stick to the
cover and the battery may not be visi- ble. In this case, remove the electronic key module in order to remove the bat-
tery.
Page 297 of 494
7
295
Owner's Manual_Europe_M99V08_en
7
When trouble arises
When trouble arises
7-1. Essential information
Emergency flashers .......... 296
If your vehicle has to be
stopped in an emergency 296
If the vehicle is submerged or
water on the road is rising
....................................... 297
7-2. Steps to take in an emer-
gency
If your vehicle needs to be
towed .............................. 299
If you think something is wrong
....................................... 302
Fuel pump shut off system 303
If a warning light turns on or a
warning buzzer sounds... 304
If a warning message is dis-
played ............................. 311
If you have a flat tire (vehicles
with an emergency tire punc-
ture repair kit) ................. 313
If you have a flat tire (vehicles
with a spare tire) ............. 324
If the engine will not start .. 332
If you lose your keys ......... 333
If the electronic key does not
operate properly (vehicles
with smart entry & start sys-
tem) ................................ 334
If the vehicle battery is dis-
charged .......................... 335
If your vehicle overheats... 339
If the vehicle becomes stuck
....................................... 341
Page 302 of 494
300
Owner's Manual_Europe_M99V08_en
7-2. Steps to take in an emergency
When using a flat-bed truck to
transport the vehicle, use tire strap-
ping belts. Refer to the owner’s
manual of the flat-bed truck for the
tire strapping method.
In order to suppress vehicle move-
ment during transportation, set the
parking brake and turn the engine
switch off.
If a tow truck is not available in an
emergency, your vehicle may be
temporarily towed using cables or
chains secured to the emergency
towing eyelets. This should only be
attempted on hard surfaced roads
for at most 80 km (50 miles) at
under 30 km/h (18 mph).
A driver must be in the vehicle to
steer and operate the brakes. The
vehicle’s wheels, drivetrain, axles,
steering and brakes must be in
good condition.
For vehicles with Multidrive, only
the front towing eyelets may be
used.
To have your vehicle towed by
another vehicle, the towing eyelet
must be installed to your vehicle.
Install the towing eyelet using the
following procedure.
WARNING
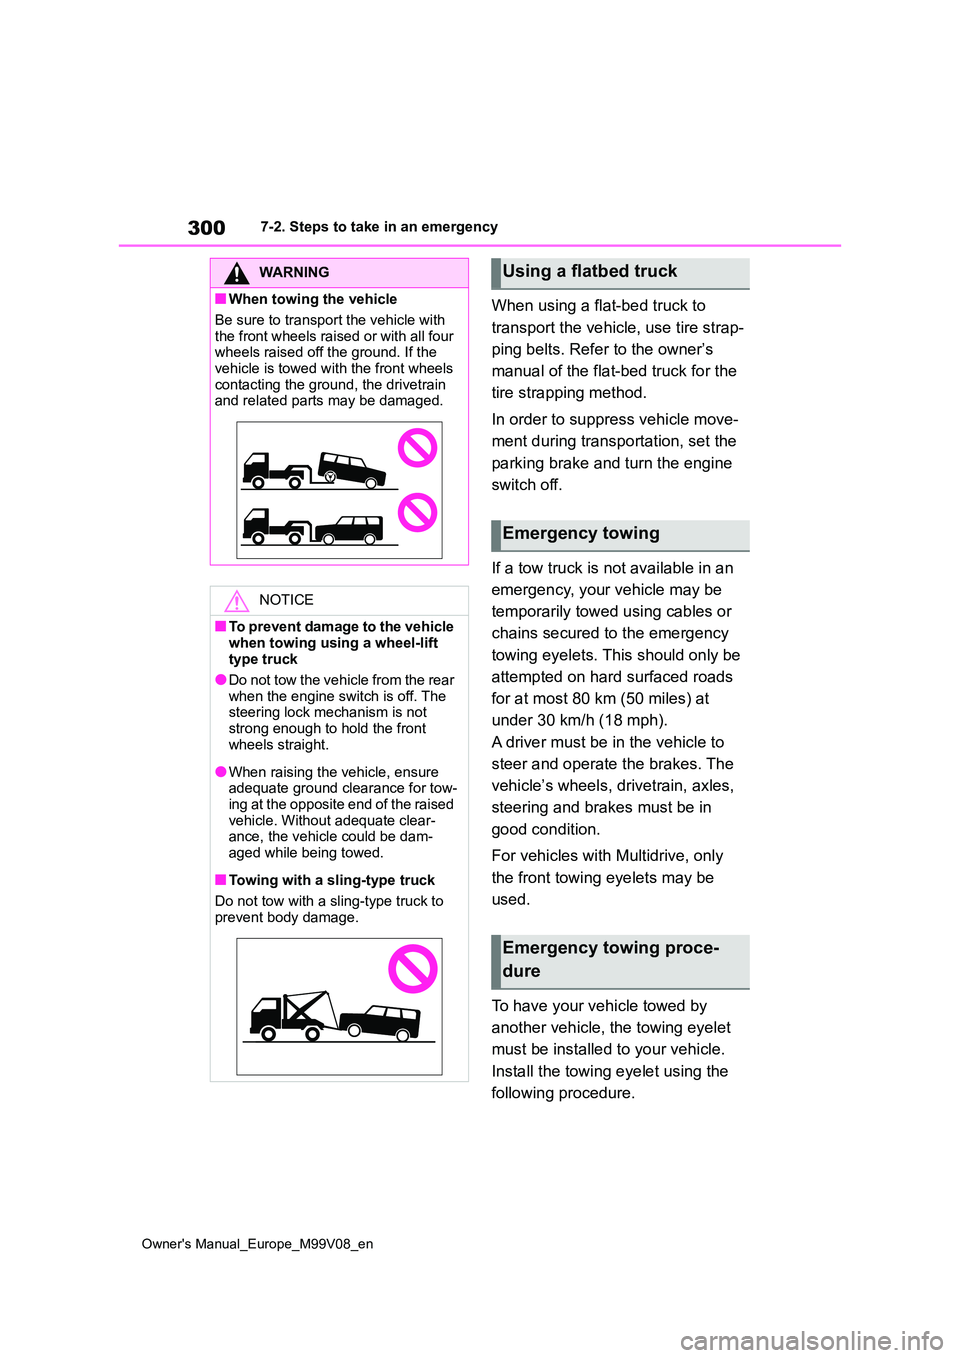
■When towing the vehicle
Be sure to transport the vehicle with
the front wheels raised or with all four wheels raised off the ground. If the vehicle is towed with the front wheels
contacting the ground, the drivetrain and related parts may be damaged.
NOTICE
■To prevent damage to the vehicle
when towing using a wheel-lift type truck
●Do not tow the vehicle from the rear
when the engine switch is off. The steering lock mechanism is not strong enough to hold the front
wheels straight.
●When raising the vehicle, ensure adequate ground clearance for tow-ing at the opposite end of the raised
vehicle. Without adequate clear- ance, the vehicle could be dam-aged while being towed.
■Towing with a sling-type truck
Do not tow with a sling-type truck to
prevent body damage.
Using a flatbed truck
Emergency towing
Emergency towing proce-
dure
Page 304 of 494
302
Owner's Manual_Europe_M99V08_en
7-2. Steps to take in an emergency
Fluid leaks under the vehicle.
(Water dripping from the air con-
ditioning after use is normal.)
Flat-looking tires or uneven tire
wear
High engine coolant tempera-
ture warning light comes on
Changes in exhaust sound
Excessive tire squeal when cor-
nering
Strange noises related to the
suspension system
Pinging or other noises related to
the engine
Engine missing, stumbling or
running roughly
Appreciable loss of power
Vehicle pulls heavily to one side
WARNING
Observe the following precautions. Failure to do so may result in death or
serious injury.
■While towing
●When towing using cables or chains, avoid sudden starts, etc. which place excessive stress on the
towing eyelets, cables or chains. The towing eyelets, cables or chains may become damaged, bro-
ken debris may hit people, and cause serious damage.
●Do not turn the engine switch off.There is a possibility that the steer-ing wheel is locked and cannot be
operated.
■Installing towing eyelets to the
vehicle
Make sure that towing eyelets are installed securely.
If not securely installed, towing eye- lets may come loose during towing.
NOTICE
■To prevent damage to the vehicle during emergency towing
Do not secure cables or chains to the suspension components.
■When towing a vehicle equipped with the Stop & Start system
If it is necessary to tow the vehicle
with all four wheels on the ground, perform the following procedure before towing the vehicle in order to
protect the system. Turn the engine switch off and then start the engine or turn the engine switch to ON.
If you think something is
wrong
If you notice any of the follow-
ing symptoms, your vehicle
probably needs adjustment or
repair. Contact any authorized
Toyota retailer or Toyota autho-
rized repairer, or any reliable
repairer as soon as possible.
Visible symptoms
Audible symptoms
Operational symptoms
Page 309 of 494
307
7
Owner's Manual_Europe_M99V08_en
7-2. Steps to take in an emergency
When trouble arises
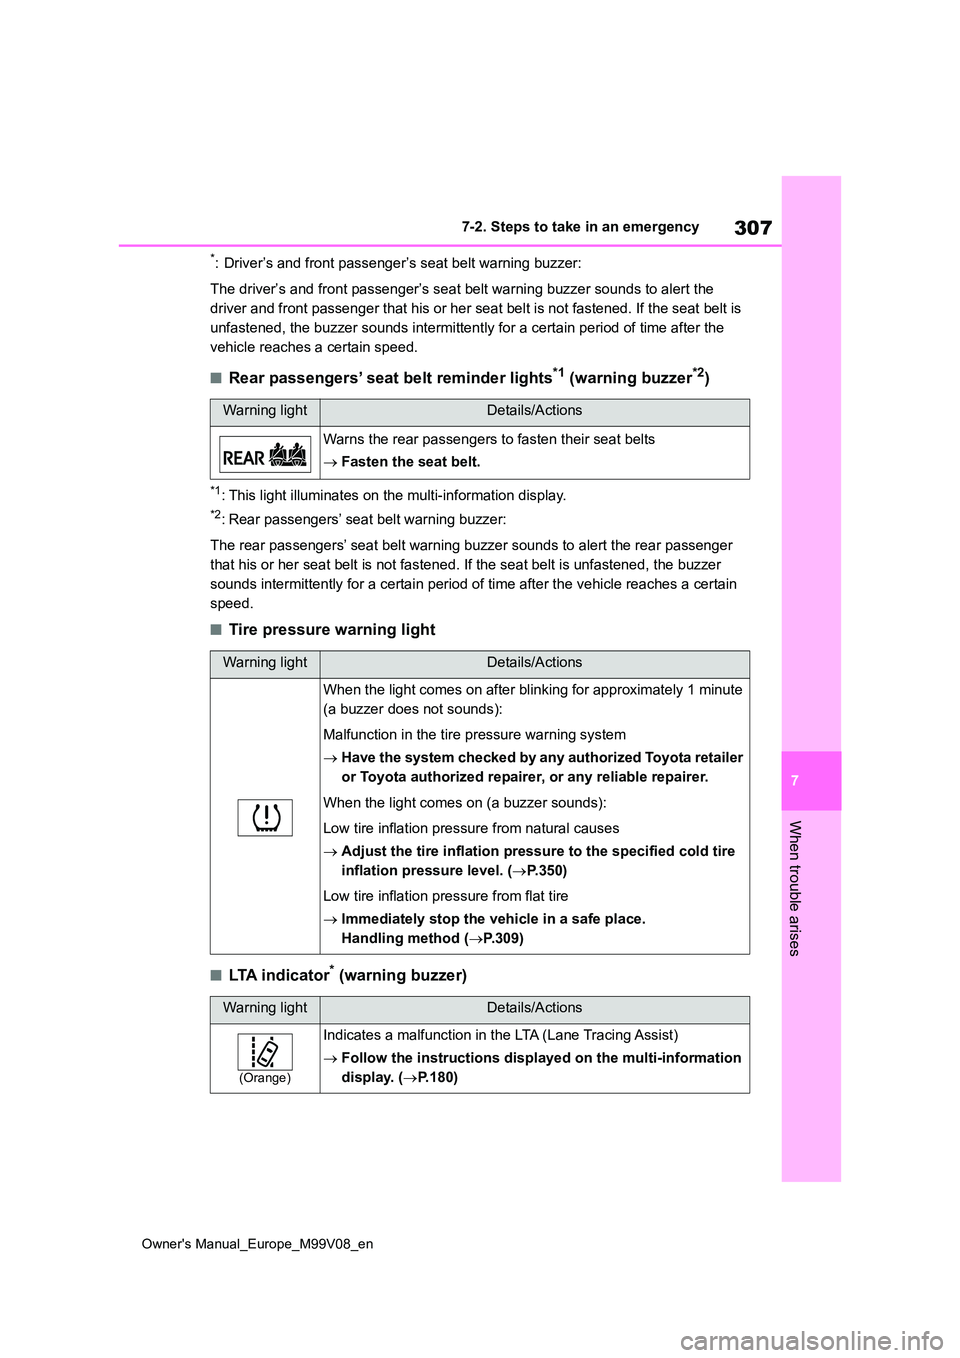
*: Driver’s and front passenger’s seat belt warning buzzer:
The driver’s and front passenger’s seat belt warning buzzer sou nds to alert the
driver and front passenger that his or her seat belt is not fas tened. If the seat belt is
unfastened, the buzzer sounds intermittently for a certain peri od of time after the
vehicle reaches a certain speed.
■Rear passengers’ seat belt reminder lights*1 (warning buzzer*2)
*1: This light illuminates on the multi-information display.
*2: Rear passengers’ seat belt warning buzzer:
The rear passengers’ seat belt warning buzzer sounds to alert t he rear passenger
that his or her seat belt is not fastened. If the seat belt is unfastened, the buzzer
sounds intermittently for a certain period of time after the ve hicle reaches a certain
speed.
■Tire pressure warning light
■LTA indicator* (warning buzzer)
Warning lightDetails/Actions
Warns the rear passengers to fasten their seat belts
Fasten the seat belt.
Warning lightDetails/Actions
When the light comes on after blinking for approximately 1 minute
(a buzzer does not sounds):
Malfunction in the tire pressure warning system
Have the system checked by any authorized Toyota retailer
or Toyota authorized repairer, or any reliable repairer.
When the light comes on (a buzzer sounds):
Low tire inflation pressure from natural causes
Adjust the tire inflation pressure to the specified cold tire
inflation pressure level. ( P.350)
Low tire inflation pressure from flat tire
Immediately stop the vehicle in a safe place.
Handling method ( P.309)
Warning lightDetails/Actions
(Orange)
Indicates a malfunction in the LTA (Lane Tracing Assist)
Follow the instructions displayed on the multi-information
display. ( P.180)
Page 311 of 494
309
7
Owner's Manual_Europe_M99V08_en
7-2. Steps to take in an emergency
When trouble arises
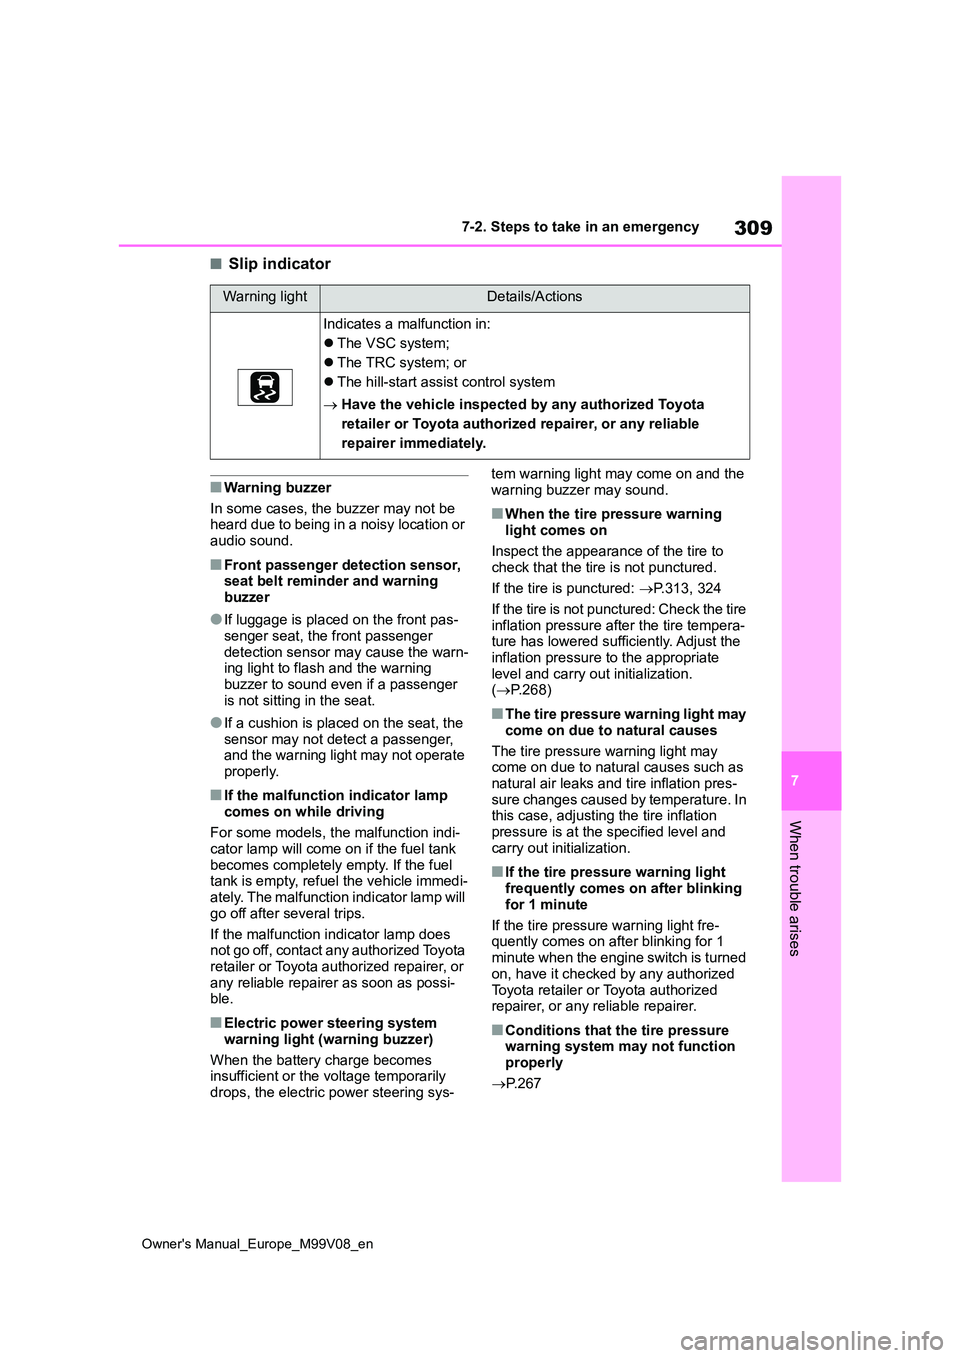
■Slip indicator
■Warning buzzer
In some cases, the buzzer may not be heard due to being in a noisy location or
audio sound.
■Front passenger detection sensor, seat belt reminder and warning buzzer
●If luggage is placed on the front pas-senger seat, the front passenger
detection sensor may cause the warn- ing light to flash and the warning buzzer to sound even if a passenger
is not sitting in the seat.
●If a cushion is placed on the seat, the
sensor may not detect a passenger, and the warning light may not operate properly.
■If the malfunction indicator lamp
comes on while driving
For some models, the malfunction indi- cator lamp will come on if the fuel tank
becomes completely empty. If the fuel tank is empty, refuel the vehicle immedi-ately. The malfunction indicator lamp will
go off after several trips.
If the malfunction indicator lamp does not go off, contact any authorized Toyota
retailer or Toyota authorized repairer, or any reliable repairer as soon as possi-ble.
■Electric power steering system
warning light (warning buzzer)
When the battery charge becomes insufficient or the voltage temporarily
drops, the electric power steering sys-
tem warning light may come on and the warning buzzer may sound.
■When the tire pressure warning light comes on
Inspect the appearance of the tire to check that the tire is not punctured.
If the tire is punctured: P.313, 324
If the tire is not punctured: Check the tire inflation pressure after the tire tempera-ture has lowered sufficiently. Adjust the
inflation pressure to the appropriate level and carry out initialization. ( P.268)
■The tire pressure warning light may
come on due to natural causes
The tire pressure warning light may come on due to natural causes such as
natural air leaks and tire inflation pres- sure changes caused by temperature. In this case, adjusting the tire inflation
pressure is at the specified level and carry out initialization.
■If the tire pressure warning light frequently comes on after blinking
for 1 minute
If the tire pressure warning light fre- quently comes on after blinking for 1
minute when the engine switch is turned on, have it checked by any authorized
Toyota retailer or Toyota authorized repairer, or any reliable repairer.
■Conditions that the tire pressure warning system may not function
properly
P. 2 6 7
Warning lightDetails/Actions
Indicates a malfunction in:
The VSC system;
The TRC system; or
The hill-start assist control system
Have the vehicle inspected by any authorized Toyota
retailer or Toyota authorized repairer, or any reliable
repairer immediately.