manual transmission TOYOTA CAMRY V20 1986 Service Information
[x] Cancel search | Manufacturer: TOYOTA, Model Year: 1986, Model line: CAMRY V20, Model: TOYOTA CAMRY V20 1986Pages: 2389, PDF Size: 84.44 MB
Page 1937 of 2389
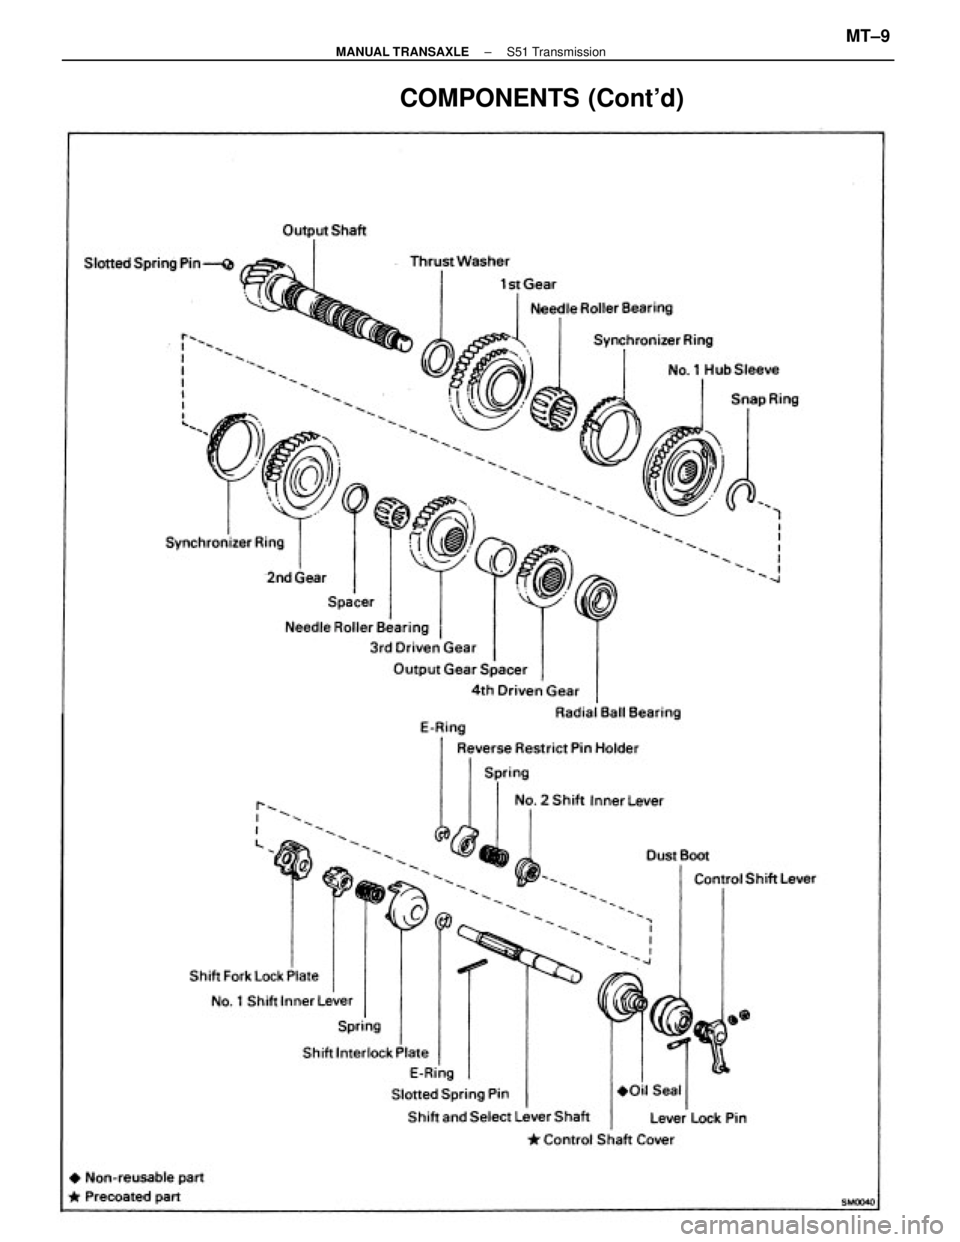
COMPONENTS (Cont'd)
± MANUAL TRANSAXLES51 TransmissionMT±9
Page 1938 of 2389
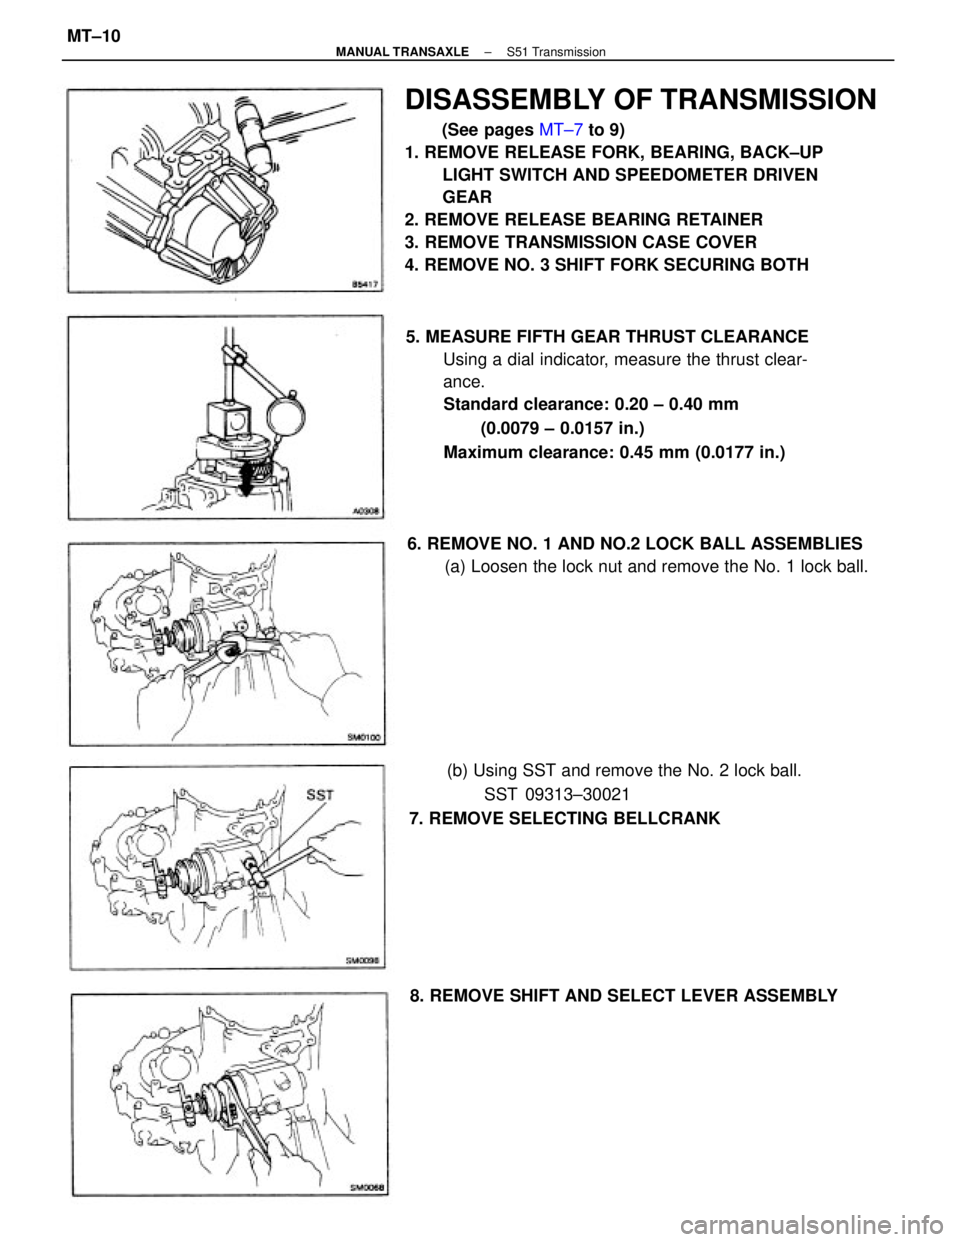
DISASSEMBLY OF TRANSMISSION
(See pages MT±7 to 9)
1. REMOVE RELEASE FORK, BEARING, BACK±UP
LIGHT SWITCH AND SPEEDOMETER DRIVEN
GEAR
2. REMOVE RELEASE BEARING RETAINER
3. REMOVE TRANSMISSION CASE COVER
4. REMOVE NO. 3 SHIFT FORK SECURING BOTH
5. MEASURE FIFTH GEAR THRUST CLEARANCE
Using a dial indicator, measure the thrust clear-
ance.
Standard clearance: 0.20 ± 0.40 mm
(0.0079 ± 0.0157 in.)
Maximum clearance: 0.45 mm (0.0177 in.)
(b) Using SST and remove the No. 2 lock ball.
SST 09313±30021
7. REMOVE SELECTING BELLCRANK 6. REMOVE NO. 1 AND NO.2 LOCK BALL ASSEMBLIES
(a) Loosen the lock nut and remove the No. 1 lock ball.
8. REMOVE SHIFT AND SELECT LEVER ASSEMBLY
± MANUAL TRANSAXLES51 TransmissionMT±10
Page 1939 of 2389
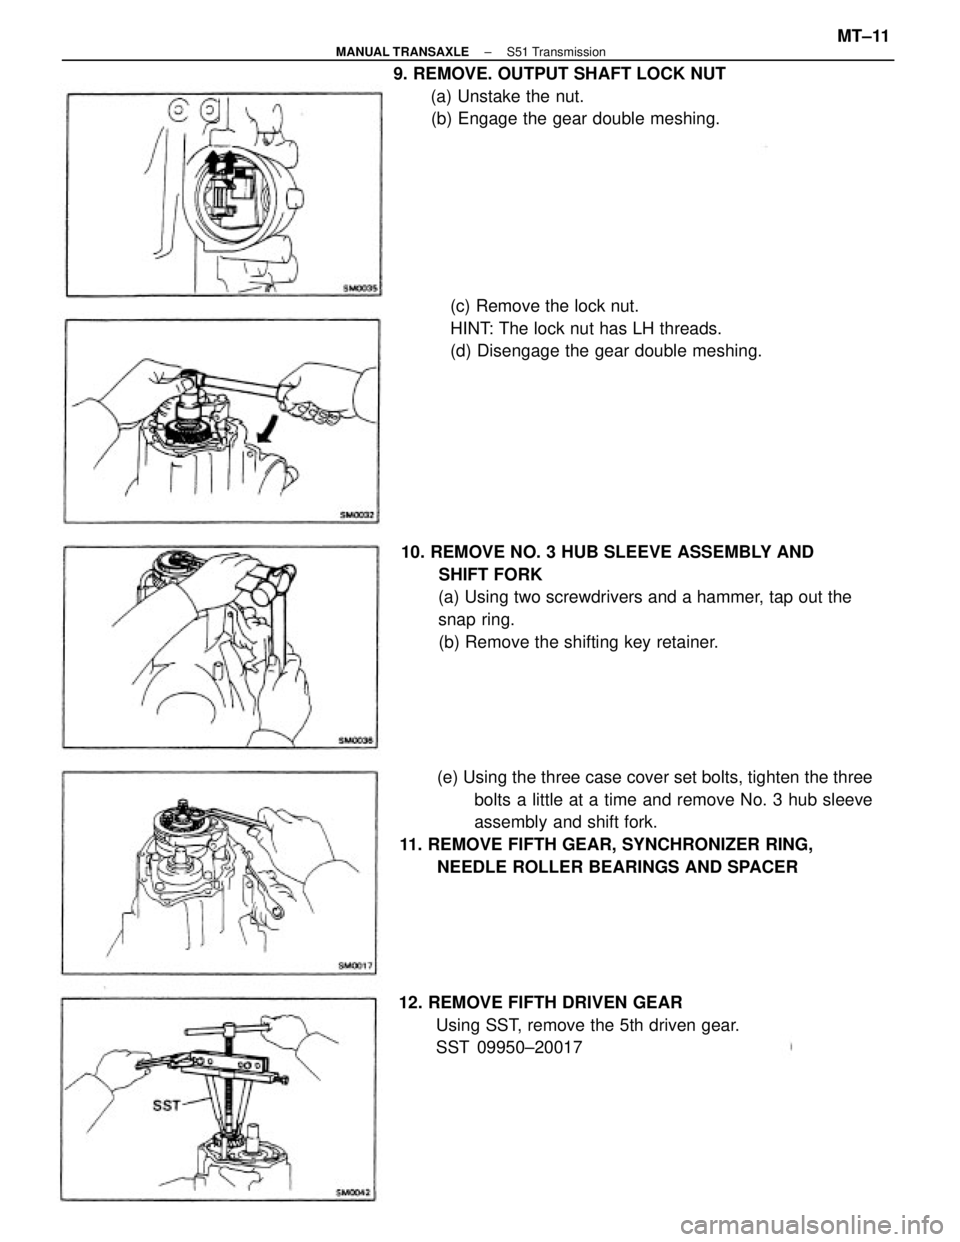
(e) Using the three case cover set bolts, tighten the three
bolts a little at a time and remove No. 3 hub sleeve
assembly and shift fork.
11. REMOVE FIFTH GEAR, SYNCHRONIZER RING,
NEEDLE ROLLER BEARINGS AND SPACER 10. REMOVE NO. 3 HUB SLEEVE ASSEMBLY AND
SHIFT FORK
(a) Using two screwdrivers and a hammer, tap out the
snap ring.
(b) Remove the shifting key retainer. 9. REMOVE. OUTPUT SHAFT LOCK NUT
(a) Unstake the nut.
(b) Engage the gear double meshing.
(c) Remove the lock nut.
HINT: The lock nut has LH threads.
(d) Disengage the gear double meshing.
12. REMOVE FIFTH DRIVEN GEAR
Using SST, remove the 5th driven gear.
SST 09950±20017
± MANUAL TRANSAXLES51 TransmissionMT±11
Page 1940 of 2389
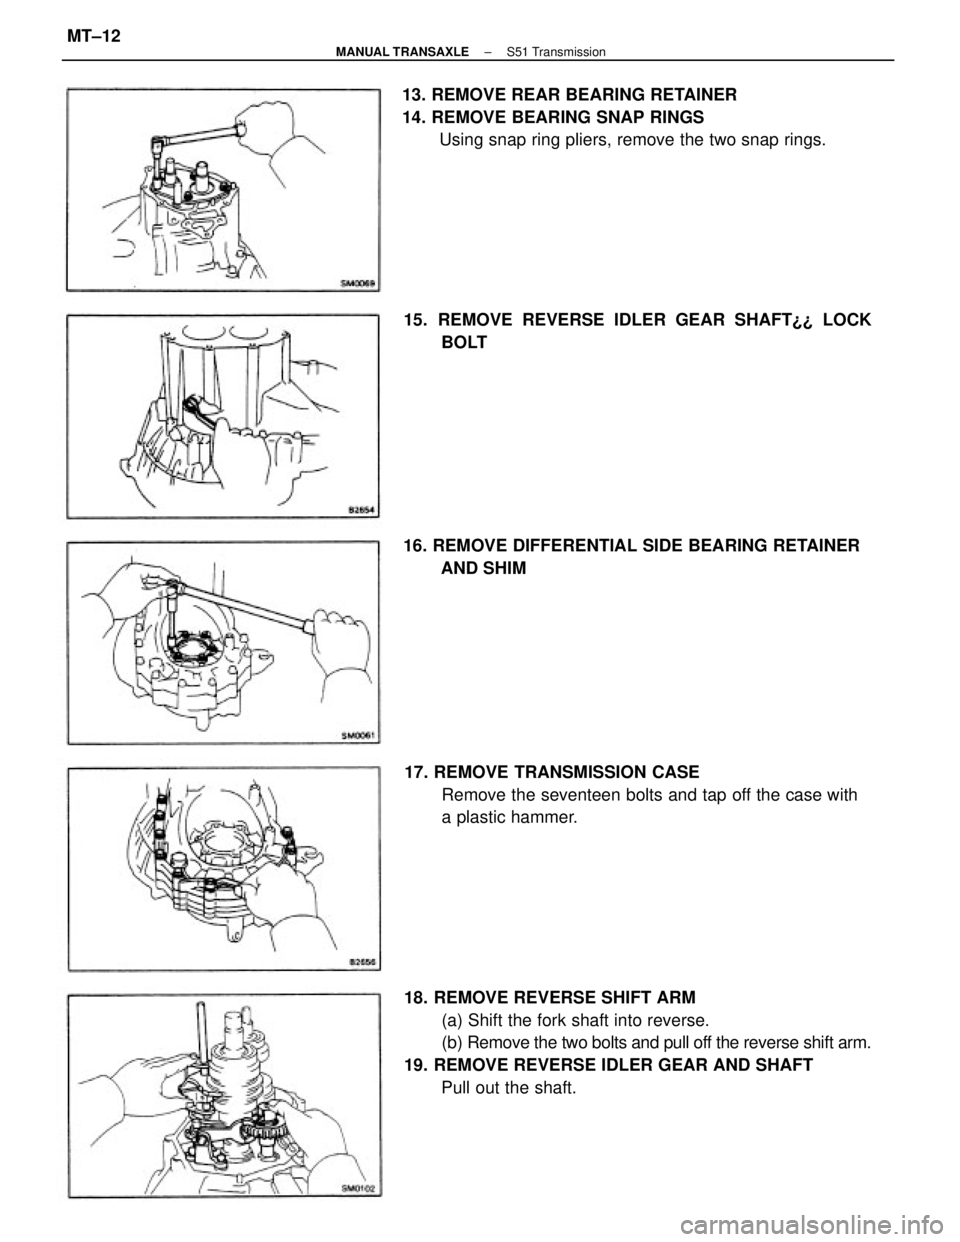
18. REMOVE REVERSE SHIFT ARM
(a) Shift the fork shaft into reverse.
(b) Remove the two bolts and pull off the reverse shift arm.
19. REMOVE REVERSE IDLER GEAR AND SHAFT
Pull out the shaft. 13. REMOVE REAR BEARING RETAINER
14. REMOVE BEARING SNAP RINGS
Using snap ring pliers, remove the two snap rings.
17. REMOVE TRANSMISSION CASE
Remove the seventeen bolts and tap off the case with
a plastic hammer. 16. REMOVE DIFFERENTIAL SIDE BEARING RETAINER
AND SHIM 15. REMOVE REVERSE IDLER GEAR SHAFT¿¿ LOCK
BOLT
± MANUAL TRANSAXLES51 TransmissionMT±12
Page 1941 of 2389
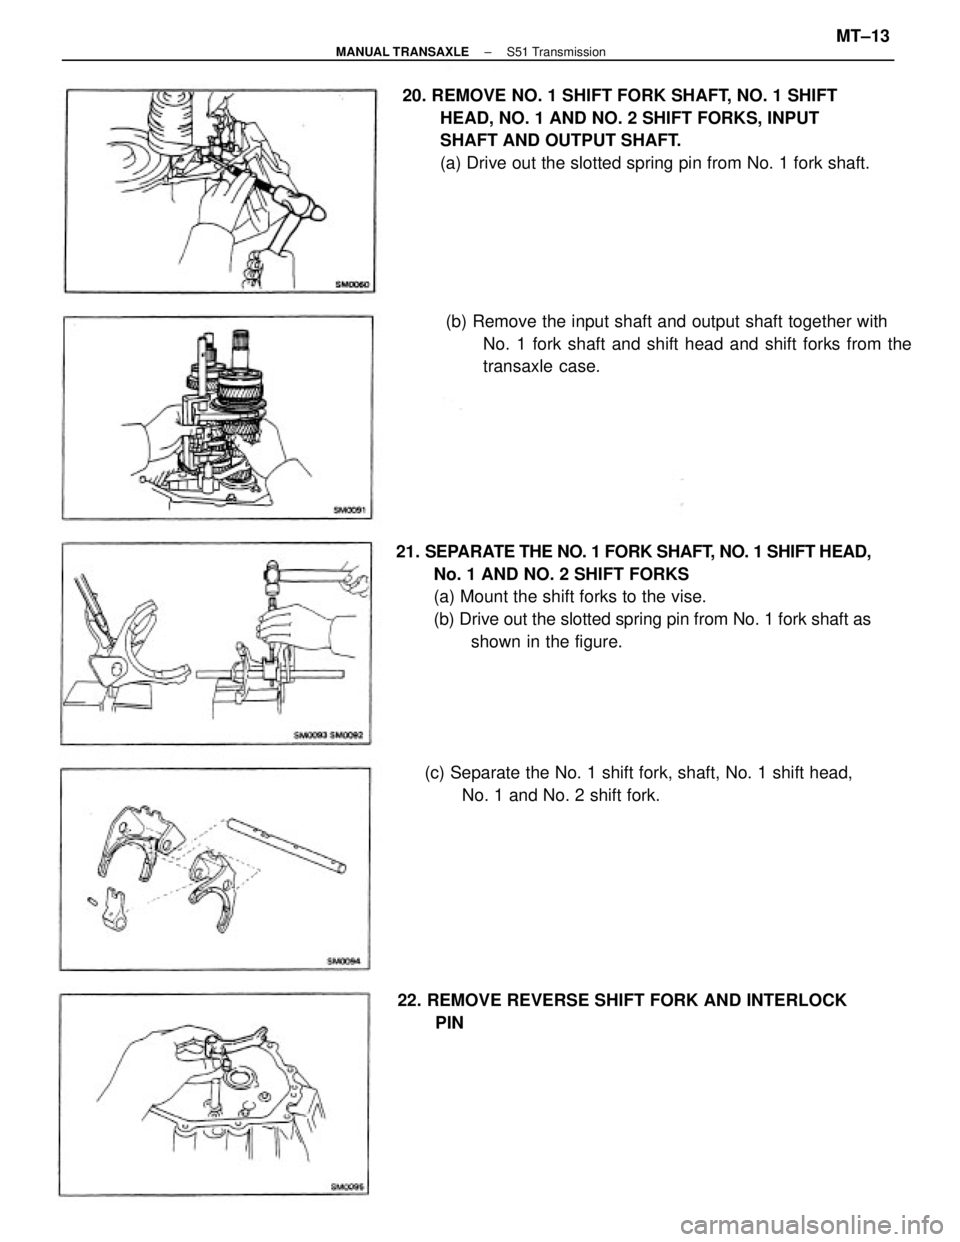
21. SEPARATE THE NO. 1 FORK SHAFT, NO. 1 SHIFT HEAD,
No. 1 AND NO. 2 SHIFT FORKS
(a) Mount the shift forks to the vise.
(b) Drive out the slotted spring pin from No. 1 fork shaft as
shown in the figure. 20. REMOVE NO. 1 SHIFT FORK SHAFT, NO. 1 SHIFT
HEAD, NO. 1 AND NO. 2 SHIFT FORKS, INPUT
SHAFT AND OUTPUT SHAFT.
(a) Drive out the slotted spring pin from No. 1 fork shaft.
(b) Remove the input shaft and output shaft together with
No. 1 fork shaft and shift head and shift forks from the
transaxle case.
22. REMOVE REVERSE SHIFT FORK AND INTERLOCK
PIN (c) Separate the No. 1 shift fork, shaft, No. 1 shift head,
No. 1 and No. 2 shift fork.
± MANUAL TRANSAXLES51 TransmissionMT±13
Page 1942 of 2389
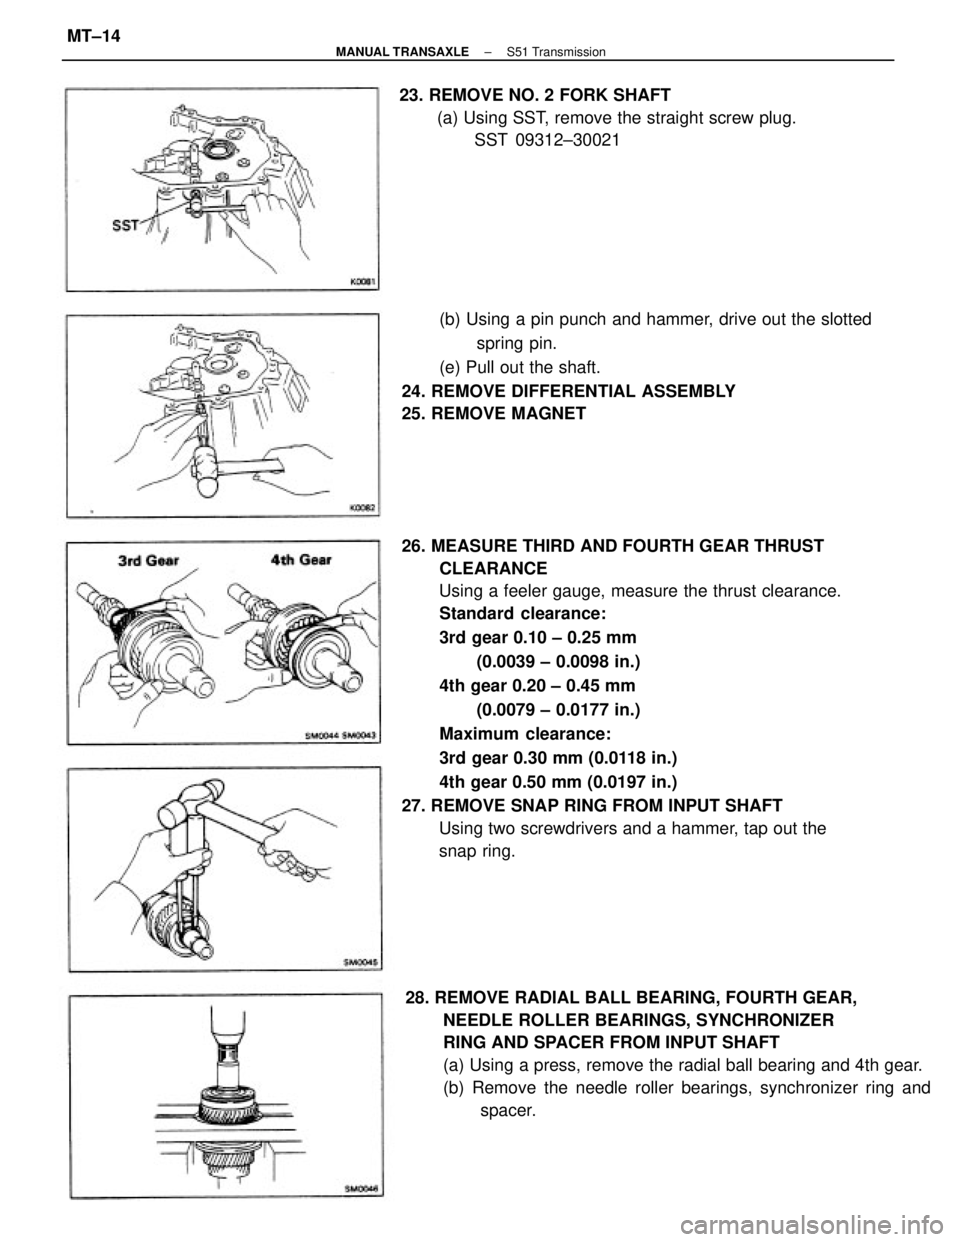
26. MEASURE THIRD AND FOURTH GEAR THRUST
CLEARANCE
Using a feeler gauge, measure the thrust clearance.
Standard clearance:
3rd gear 0.10 ± 0.25 mm
(0.0039 ± 0.0098 in.)
4th gear 0.20 ± 0.45 mm
(0.0079 ± 0.0177 in.)
Maximum clearance:
3rd gear 0.30 mm (0.0118 in.)
4th gear 0.50 mm (0.0197 in.)
27. REMOVE SNAP RING FROM INPUT SHAFT
Using two screwdrivers and a hammer, tap out the
snap ring.
28. REMOVE RADIAL BALL BEARING, FOURTH GEAR,
NEEDLE ROLLER BEARINGS, SYNCHRONIZER
RING AND SPACER FROM INPUT SHAFT
(a) Using a press, remove the radial ball bearing and 4th gear.
(b) Remove the needle roller bearings, synchronizer ring and
spacer. (b) Using a pin punch and hammer, drive out the slotted
spring pin.
(e) Pull out the shaft.
24. REMOVE DIFFERENTIAL ASSEMBLY
25. REMOVE MAGNET 23. REMOVE NO. 2 FORK SHAFT
(a) Using SST, remove the straight screw plug.
SST 09312±30021
± MANUAL TRANSAXLES51 TransmissionMT±14
Page 1943 of 2389
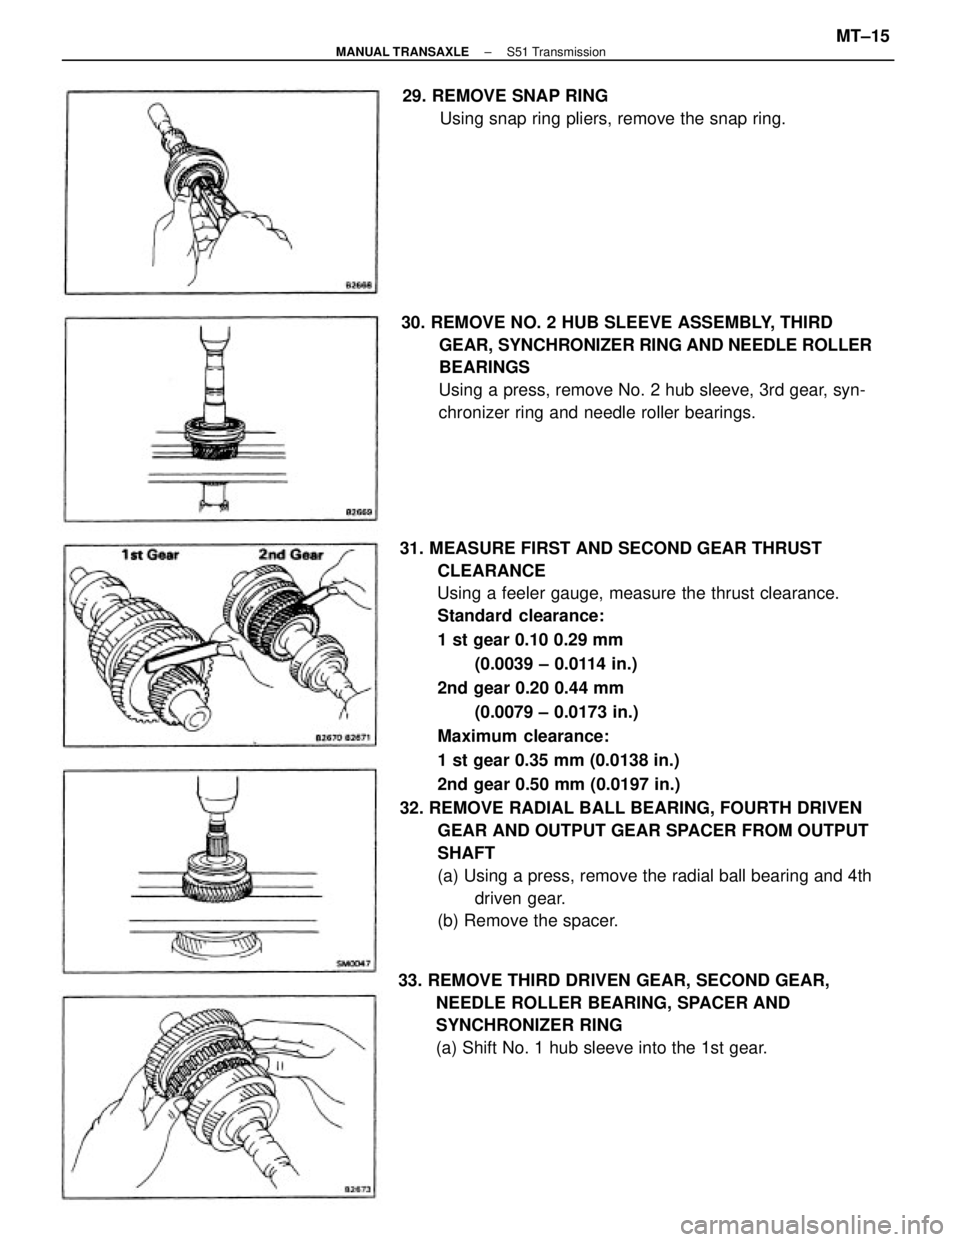
31. MEASURE FIRST AND SECOND GEAR THRUST
CLEARANCE
Using a feeler gauge, measure the thrust clearance.
Standard clearance:
1 st gear 0.10 0.29 mm
(0.0039 ± 0.0114 in.)
2nd gear 0.20 0.44 mm
(0.0079 ± 0.0173 in.)
Maximum clearance:
1 st gear 0.35 mm (0.0138 in.)
2nd gear 0.50 mm (0.0197 in.)
32. REMOVE RADIAL BALL BEARING, FOURTH DRIVEN
GEAR AND OUTPUT GEAR SPACER FROM OUTPUT
SHAFT
(a) Using a press, remove the radial ball bearing and 4th
driven gear.
(b) Remove the spacer. 30. REMOVE NO. 2 HUB SLEEVE ASSEMBLY, THIRD
GEAR, SYNCHRONIZER RING AND NEEDLE ROLLER
BEARINGS
Using a press, remove No. 2 hub sleeve, 3rd gear, syn-
chronizer ring and needle roller bearings.
33. REMOVE THIRD DRIVEN GEAR, SECOND GEAR,
NEEDLE ROLLER BEARING, SPACER AND
SYNCHRONIZER RING
(a) Shift No. 1 hub sleeve into the 1st gear. 29. REMOVE SNAP RING
Using snap ring pliers, remove the snap ring.
± MANUAL TRANSAXLES51 TransmissionMT±15
Page 1944 of 2389
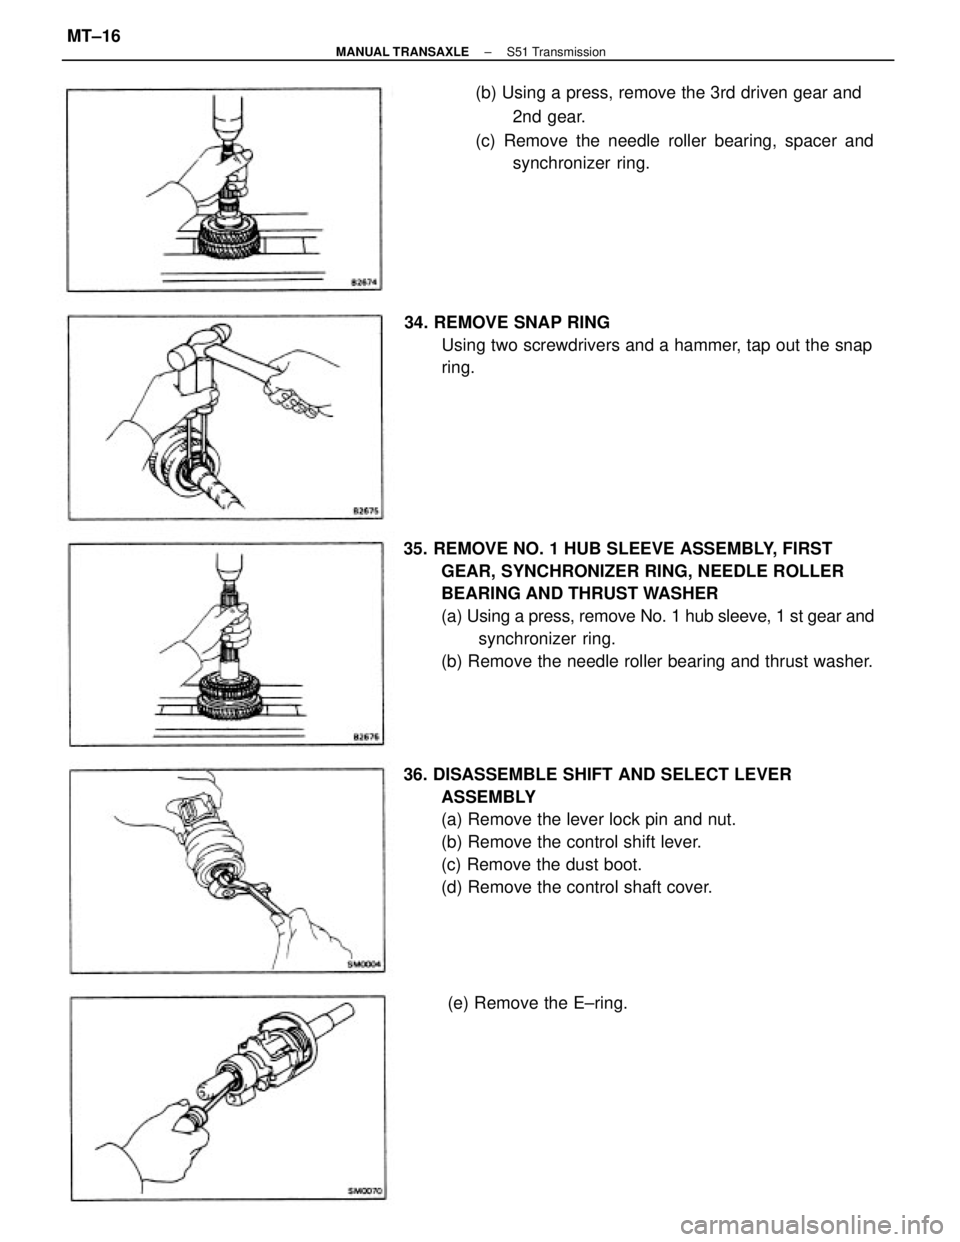
35. REMOVE NO. 1 HUB SLEEVE ASSEMBLY, FIRST
GEAR, SYNCHRONIZER RING, NEEDLE ROLLER
BEARING AND THRUST WASHER
(a) Using a press, remove No. 1 hub sleeve, 1 st gear and
synchronizer ring.
(b) Remove the needle roller bearing and thrust washer.
36. DISASSEMBLE SHIFT AND SELECT LEVER
ASSEMBLY
(a) Remove the lever lock pin and nut.
(b) Remove the control shift lever.
(c) Remove the dust boot.
(d) Remove the control shaft cover.(b) Using a press, remove the 3rd driven gear and
2nd gear.
(c) Remove the needle roller bearing, spacer and
synchronizer ring.
34. REMOVE SNAP RING
Using two screwdrivers and a hammer, tap out the snap
ring.
(e) Remove the E±ring.
± MANUAL TRANSAXLES51 TransmissionMT±16
Page 1945 of 2389
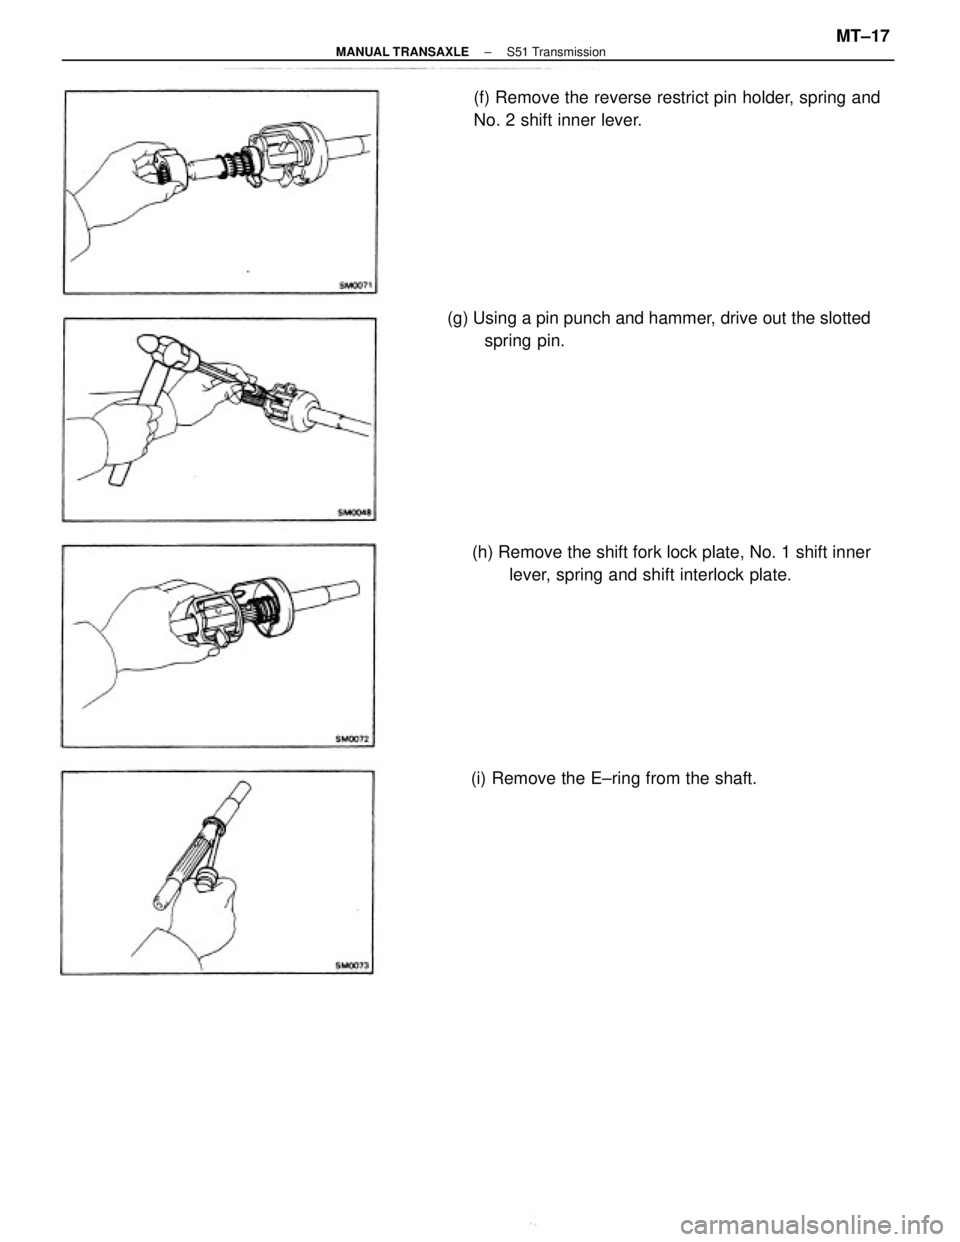
(g) Using a pin punch and hammer, drive out the slotted
spring pin.
(h) Remove the shift fork lock plate, No. 1 shift inner
lever, spring and shift interlock plate. (f) Remove the reverse restrict pin holder, spring and
No. 2 shift inner lever.
(i) Remove the E±ring from the shaft.
± MANUAL TRANSAXLES51 TransmissionMT±17
Page 1946 of 2389
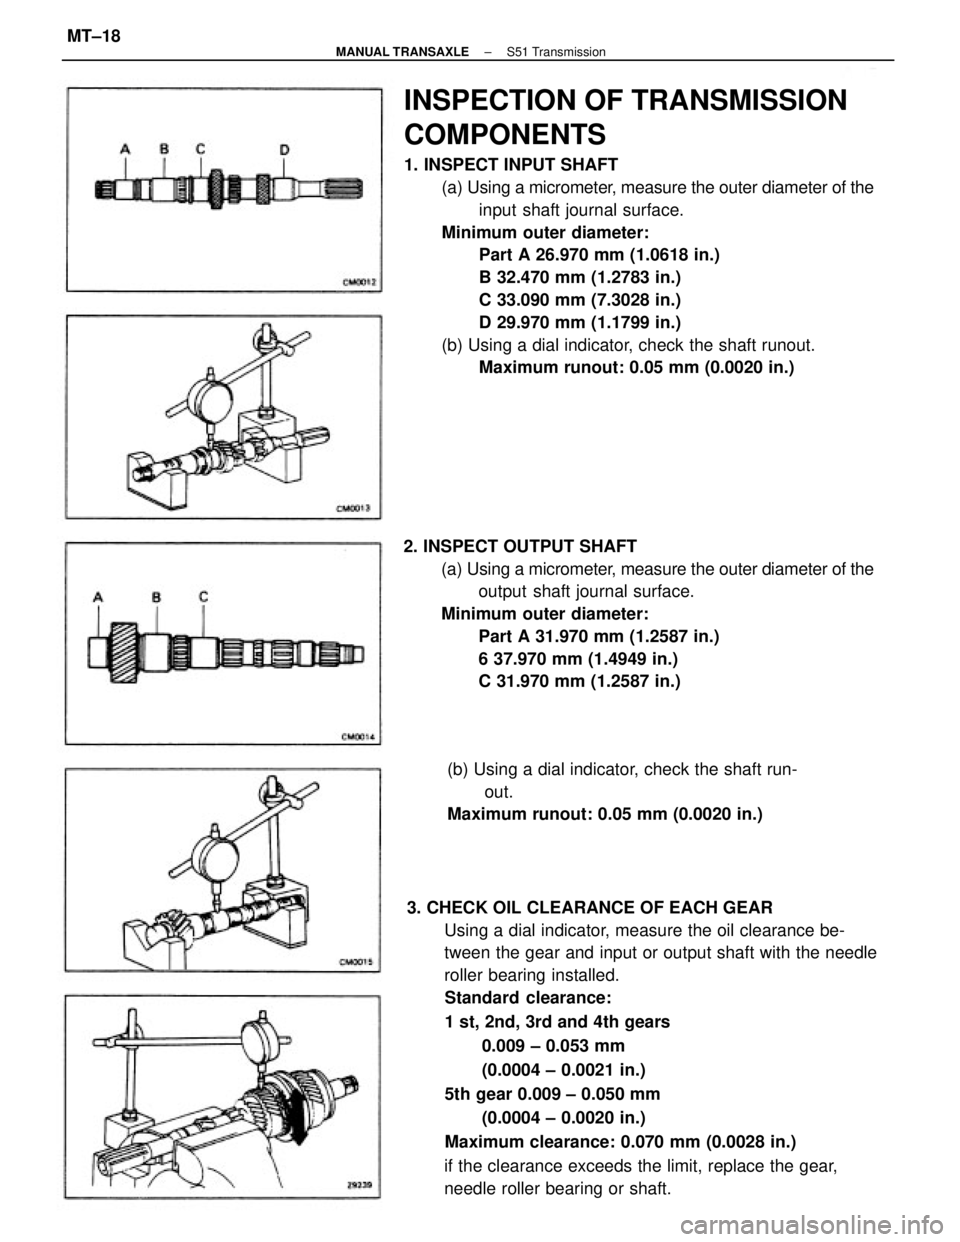
3. CHECK OIL CLEARANCE OF EACH GEAR
Using a dial indicator, measure the oil clearance be-
tween the gear and input or output shaft with the needle
roller bearing installed.
Standard clearance:
1 st, 2nd, 3rd and 4th gears
0.009 ± 0.053 mm
(0.0004 ± 0.0021 in.)
5th gear 0.009 ± 0.050 mm
(0.0004 ± 0.0020 in.)
Maximum clearance: 0.070 mm (0.0028 in.)
if the clearance exceeds the limit, replace the gear,
needle roller bearing or shaft.
INSPECTION OF TRANSMISSION
COMPONENTS
1. INSPECT INPUT SHAFT
(a) Using a micrometer, measure the outer diameter of the
input shaft journal surface.
Minimum outer diameter:
Part A 26.970 mm (1.0618 in.)
B 32.470 mm (1.2783 in.)
C 33.090 mm (7.3028 in.)
D 29.970 mm (1.1799 in.)
(b) Using a dial indicator, check the shaft runout.
Maximum runout: 0.05 mm (0.0020 in.)
2. INSPECT OUTPUT SHAFT
(a) Using a micrometer, measure the outer diameter of the
output shaft journal surface.
Minimum outer diameter:
Part A 31.970 mm (1.2587 in.)
6 37.970 mm (1.4949 in.)
C 31.970 mm (1.2587 in.)
(b) Using a dial indicator, check the shaft run-
out.
Maximum runout: 0.05 mm (0.0020 in.)
± MANUAL TRANSAXLES51 TransmissionMT±18