engine TOYOTA COROLLA 2020 Owners Manual (in English)
[x] Cancel search | Manufacturer: TOYOTA, Model Year: 2020, Model line: COROLLA, Model: TOYOTA COROLLA 2020Pages: 588, PDF Size: 13.49 MB
Page 441 of 588
4417-3. Do-it-yourself maintenance
COROLLA_U
7
Maintenance and care
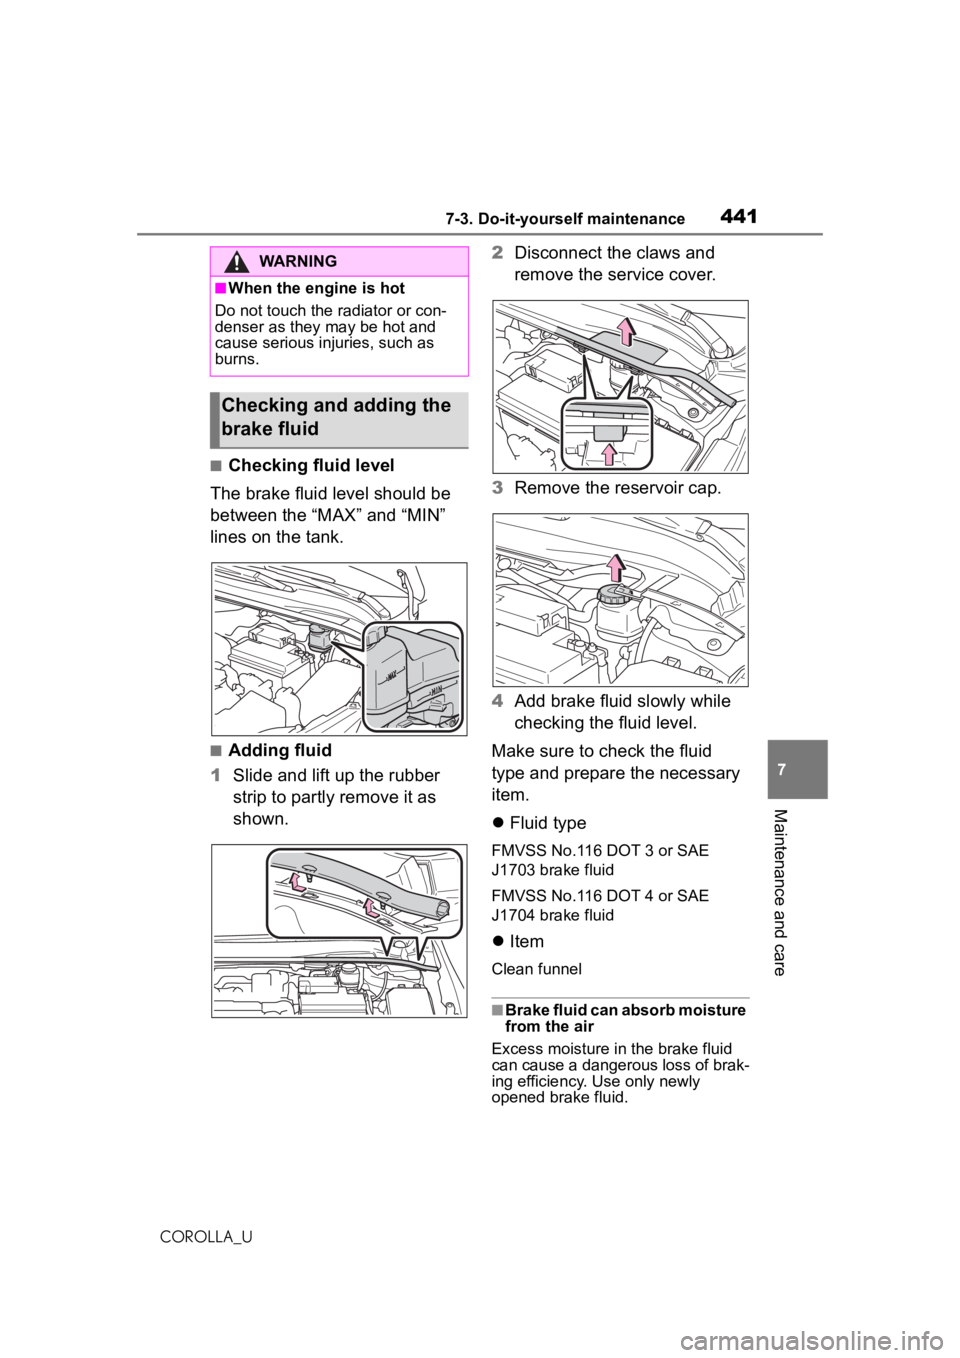
■Checking fluid level
The brake fluid level should be
between the “MAX” and “MIN”
lines on the tank.
■Adding fluid
1 Slide and lift up the rubber
strip to partly remove it as
shown. 2
Disconnect the claws and
remove the service cover.
3 Remove the reservoir cap.
4 Add brake fluid slowly while
checking the fluid level.
Make sure to check the fluid
type and prepare the necessary
item.
Fluid type
FMVSS No.116 DOT 3 or SAE
J1703 brake fluid
FMVSS No.116 DOT 4 or SAE
J1704 brake fluid
Item
Clean funnel
■Brake fluid can absorb moisture
from the air
Excess moisture in the brake fluid
can cause a dangerous loss of brak-
ing efficiency. Use only newly
opened brake fluid.
WARNING
■When the engine is hot
Do not touch the radiator or con-
denser as they may be hot and
cause serious injuries, such as
burns.
Checking and adding the
brake fluid
Page 442 of 588
4427-3. Do-it-yourself maintenance
COROLLA_U
Check the battery as follows.
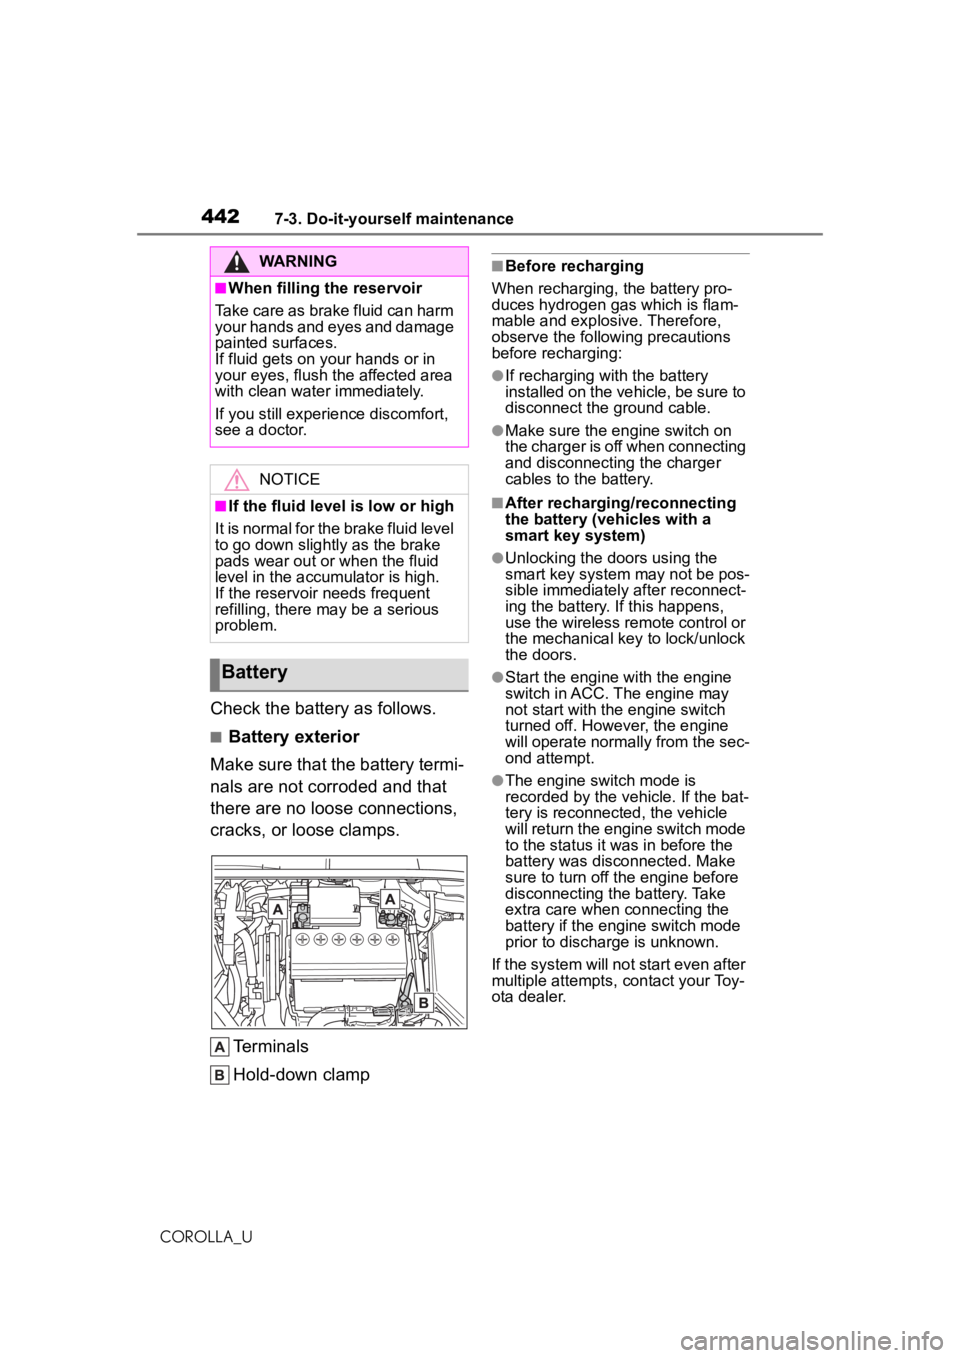
■Battery exterior
Make sure that the battery termi-
nals are not corroded and that
there are no loose connections,
cracks, or loose clamps.
Terminals
Hold-down clamp
■Before recharging
When recharging, the battery pro-
duces hydrogen gas which is flam-
mable and explosive. Therefore,
observe the following precautions
before recharging:
●If recharging with the battery
installed on the vehicle, be sure to
disconnect the ground cable.
●Make sure the engine switch on
the charger is off when connecting
and disconnecting the charger
cables to the battery.
■After recharging/reconnecting
the battery (vehicles with a
smart key system)
●Unlocking the doors using the
smart key system may not be pos-
sible immediately after reconnect-
ing the battery. If this happens,
use the wireless remote control or
the mechanical key to lock/unlock
the doors.
●Start the engine with the engine
switch in ACC. The engine may
not start with the engine switch
turned off. However, the engine
will operate normally from the sec-
ond attempt.
●The engine switch mode is
recorded by the vehicle. If the bat-
tery is reconnected, the vehicle
will return the engine switch mode
to the status it was in before the
battery was disconnected. Make
sure to turn off the engine before
disconnecting the battery. Take
extra care when connecting the
battery if the engine switch mode
prior to discharge is unknown.
If the system will no t start even after
multiple attempts, contact your Toy-
ota dealer.
WARNING
■When filling the reservoir
Take care as brake fluid can harm
your hands and eyes and damage
painted surfaces.
If fluid gets on your hands or in
your eyes, flush the affected area
with clean water immediately.
If you still experience discomfort,
see a doctor.
NOTICE
■If the fluid level is low or high
It is normal for the brake fluid level
to go down slightly as the brake
pads wear out or when the fluid
level in the accumulator is high.
If the reservoir needs frequent
refilling, there may be a serious
problem.
Battery
Page 443 of 588
4437-3. Do-it-yourself maintenance
COROLLA_U
7
Maintenance and care
Add washer fluid in the following
situations:
A washer does not work.
The warning message
appears on the multi-informa-
tion display.
WARNING
■Chemicals in the battery
The battery contains poisonous
and corrosive sulfuric acid and
may produce hydrogen gas which
is flammable and explosive. To
reduce the risk of death or serious
injury, take the following precau-
tions while working on or near the
battery:
●Do not cause sparks by touch-
ing the battery terminals with
tools.
●Do not smoke or light a match
near the battery.
●Avoid contact with eyes, skin
and clothes.
●Never inhale or swallow electro-
lyte.
●Wear protective safety glasses
when working near the battery.
●Keep children away from the
battery.
■Where to safely charge the
battery
Always charge the battery in an
open area. Do not charge the bat-
tery in a garage or closed room
where there is insu fficient ventila-
tion.
■Emergency measures regard-
ing electrolyte
●If electrolyte gets in your eyes
Flush your eyes with clean
water for at least 15 minutes
and get immediate medical
attention. If possible, continue
to apply water with a sponge or
cloth while traveling to the near-
est medical facility.
●If electrolyte gets on your skin
Wash the affected area thor-
oughly. If you feel pain or burn-
ing, get medical attention
immediately.
●If electrolyte gets on your
clothes
It can soak through clothing on
to your skin. Immediately take
off the clothing and follow the
procedure above if necessary.
●If you accidentally swallow elec-
trolyte
Drink a large quantity of water
or milk. Get emergency medical
attention immediately.
■When disconnecting the bat-
tery
Do not disconnect the negative (-)
terminal on the body side. The
disconnected negative (-) terminal
may touch the positive (+) termi-
nal, which may cause a short and
result in death or serious injury.
NOTICE
■When recharging the battery
Never recharge the battery while
the engine is running. Also, be
sure all accessories are turned
off.
Adding the washer fluid
Page 444 of 588
4447-3. Do-it-yourself maintenance
COROLLA_U
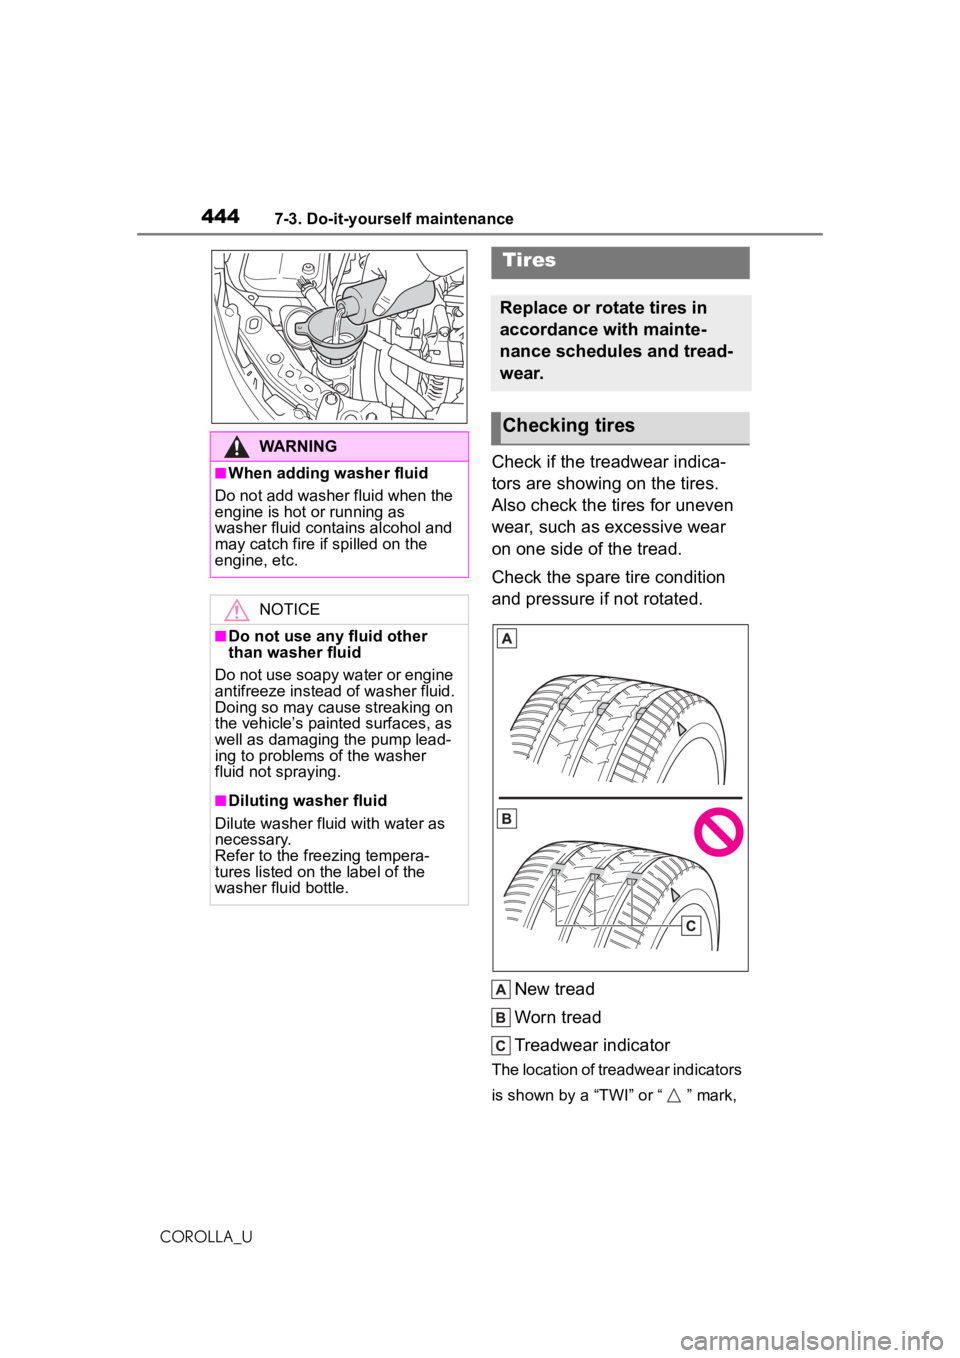
Check if the treadwear indica-
tors are showing on the tires.
Also check the tires for uneven
wear, such as excessive wear
on one side of the tread.
Check the spare tire condition
and pressure if not rotated.New tread
Worn tread
Treadwear indicator
The location of treadwear indicators
is shown by a “TWI” or “ ” mark,
WARNING
■When adding washer fluid
Do not add washer fluid when the
engine is hot or running as
washer fluid contains alcohol and
may catch fire if spilled on the
engine, etc.
NOTICE
■Do not use any fluid other
than washer fluid
Do not use soapy water or engine
antifreeze instead of washer fluid.
Doing so may cause streaking on
the vehicle’s painted surfaces, as
well as damaging the pump lead-
ing to problems of the washer
fluid not spraying.
■Diluting washer fluid
Dilute washer fluid with water as
necessary.
Refer to the freezing tempera-
tures listed on the label of the
washer fluid bottle.
Tires
Replace or rotate tires in
accordance with mainte-
nance schedules and tread-
wear.
Checking tires
Page 450 of 588
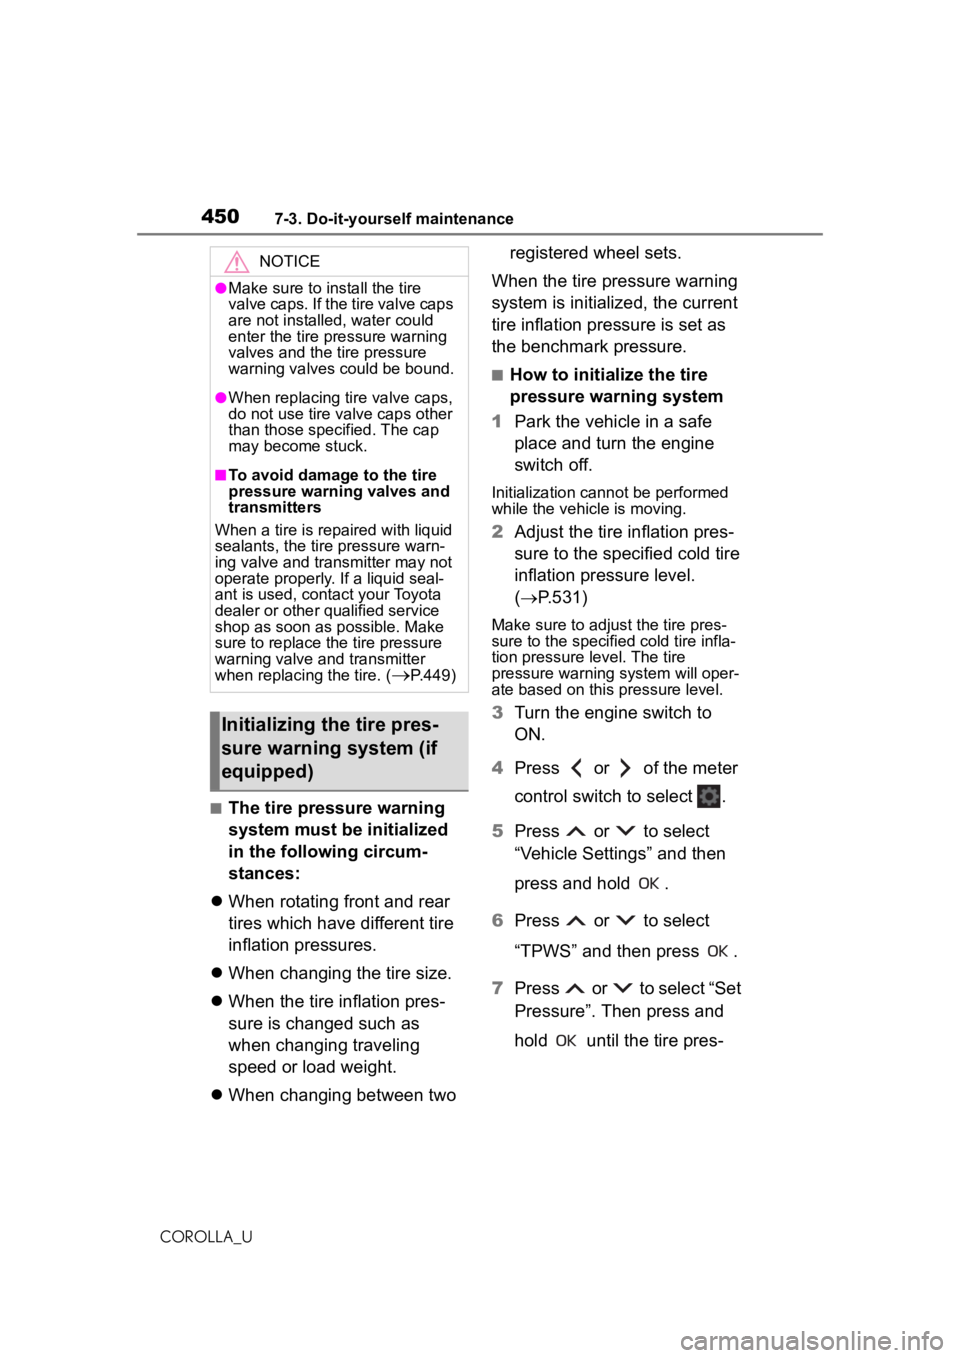
4507-3. Do-it-yourself maintenance
COROLLA_U
■The tire pressure warning
system must be initialized
in the following circum-
stances:
When rotating front and rear
tires which have different tire
inflation pressures.
When changing the tire size.
When the tire inflation pres-
sure is changed such as
when changing traveling
speed or load weight.
When changing between two registered wheel sets.
When the tire pressure warning
system is initialized, the current
tire inflation pressure is set as
the benchmark pressure.
■How to initialize the tire
pressure warning system
1 Park the vehicle in a safe
place and turn the engine
switch off.
Initialization cannot be performed
while the vehicle is moving.
2Adjust the tire inflation pres-
sure to the specified cold tire
inflation pressure level.
( P.531)
Make sure to adjust the tire pres-
sure to the specified cold tire infla-
tion pressure level. The tire
pressure warning system will oper-
ate based on this pressure level.
3Turn the engine switch to
ON.
4 Press or of the meter
control switch to select .
5 Press or to select
“Vehicle Settings” and then
press and hold .
6 Press or to select
“TPWS” and then press .
7 Press or to select “Set
Pressure”. Then press and
hold until the tire pres-
NOTICE
●Make sure to in stall the tire
valve caps. If the tire valve caps
are not installed, water could
enter the tire pressure warning
valves and the tire pressure
warning valves could be bound.
●When replacing tire valve caps,
do not use tire valve caps other
than those specified. The cap
may become stuck.
■To avoid damage to the tire
pressure warning valves and
transmitters
When a tire is repaired with liquid
sealants, the tire pressure warn-
ing valve and transmitter may not
operate properly. If a liquid seal-
ant is used, contact your Toyota
dealer or other qualified service
shop as soon as possible. Make
sure to replace the tire pressure
warning valve and transmitter
when replacing the tire. (
P.449)
Initializing the tire pres-
sure warning system (if
equipped)
Page 451 of 588
4517-3. Do-it-yourself maintenance
COROLLA_U
7
Maintenance and care
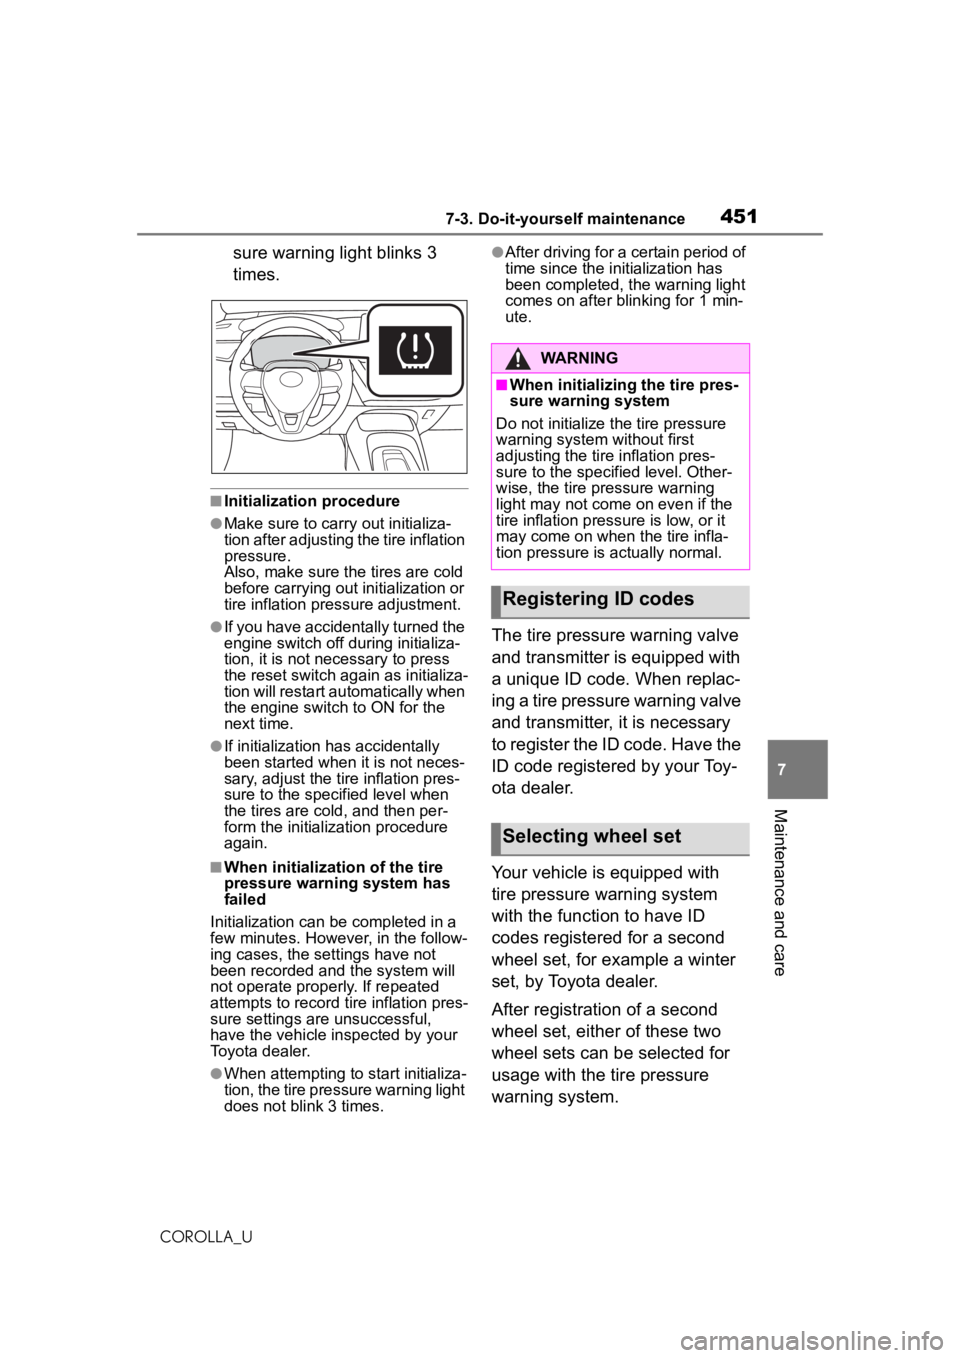
sure warning light blinks 3
times.
■Initialization procedure
●Make sure to carry out initializa-
tion after adjusting the tire inflation
pressure.
Also, make sure the tires are cold
before carrying ou t initialization or
tire inflation pressure adjustment.
●If you have accidentally turned the
engine switch off during initializa-
tion, it is not necessary to press
the reset switch again as initializa-
tion will restart aut omatically when
the engine switch to ON for the
next time.
●If initialization has accidentally
been started when it is not neces-
sary, adjust the tire inflation pres-
sure to the specified level when
the tires are cold, and then per-
form the initialization procedure
again.
■When initialization of the tire
pressure warning system has
failed
Initialization can be completed in a
few minutes. However, in the follow-
ing cases, the settings have not
been recorded and the system will
not operate properly. If repeated
attempts to record tire inflation pres-
sure settings are unsuccessful,
have the vehicle inspected by your
Toyota dealer.
●When attempting to start initializa-
tion, the tire pressure warning light
does not blink 3 times.
●After driving for a certain period of
time since the initialization has
been completed, the warning light
comes on after blinking for 1 min-
ute.
The tire pressure warning valve
and transmitter is equipped with
a unique ID code. When replac-
ing a tire pressure warning valve
and transmitter, it is necessary
to register the ID code. Have the
ID code registered by your Toy-
ota dealer.
Your vehicle is equipped with
tire pressure warning system
with the function to have ID
codes registered for a second
wheel set, for example a winter
set, by Toyota dealer.
After registration of a second
wheel set, either of these two
wheel sets can be selected for
usage with the tire pressure
warning system.
WARNING
■When initializing the tire pres-
sure warning system
Do not initialize the tire pressure
warning system without first
adjusting the tire inflation pres-
sure to the specified level. Other-
wise, the tire pressure warning
light may not come on even if the
tire inflation pressure is low, or it
may come on when the tire infla-
tion pressure is actually normal.
Registering ID codes
Selecting wheel set
Page 457 of 588
4577-3. Do-it-yourself maintenance
COROLLA_U
7
Maintenance and care
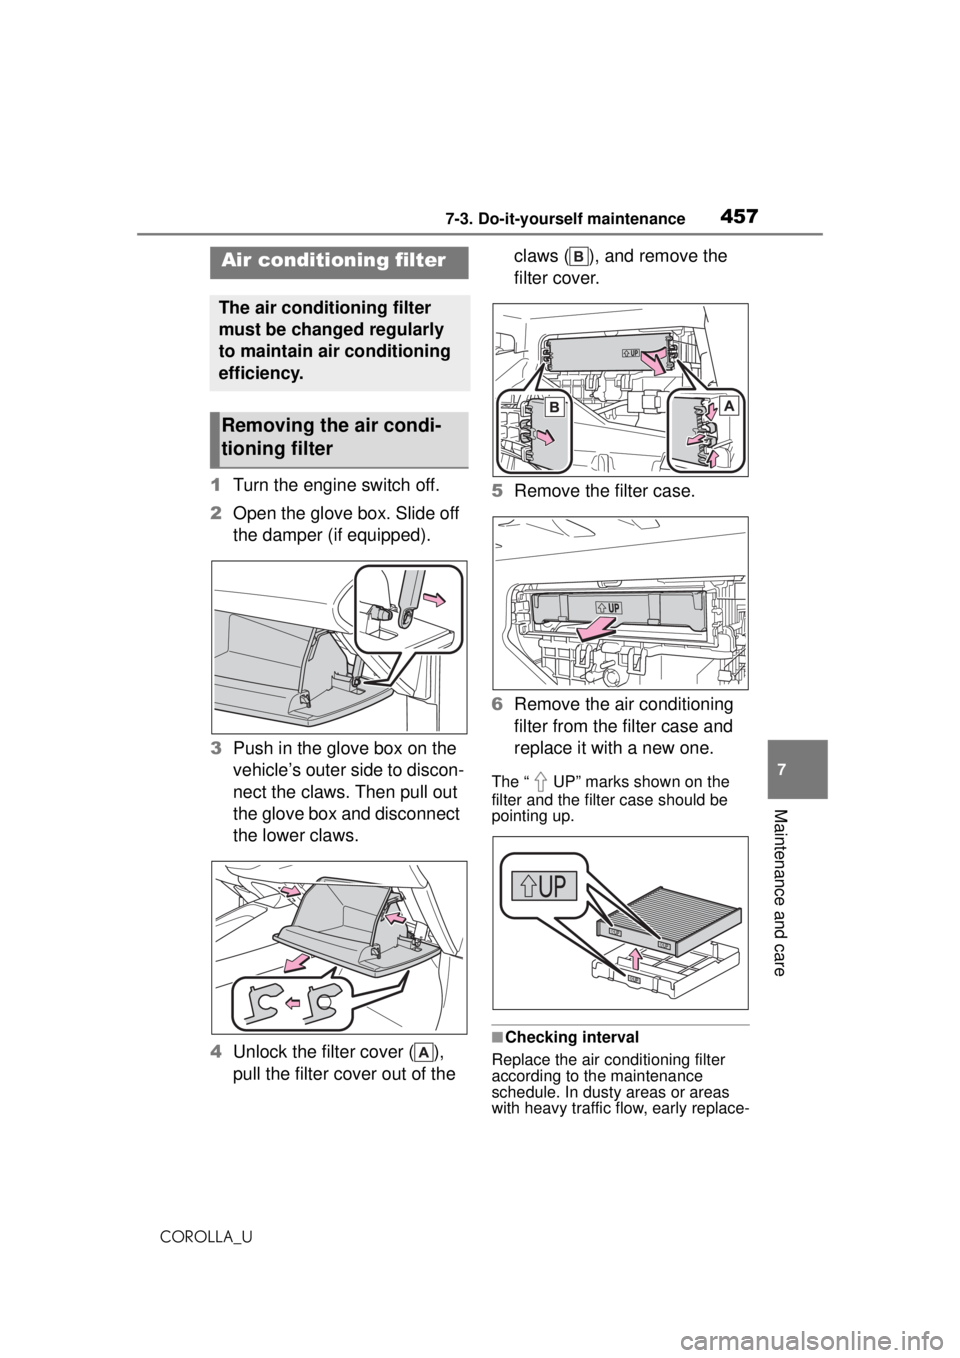
1 Turn the engine switch off.
2 Open the glove box. Slide off
the damper (if equipped).
3 Push in the glove box on the
vehicle’s outer side to discon-
nect the claws. Then pull out
the glove box and disconnect
the lower claws.
4 Unlock the filter cover ( ),
pull the filter cover out of the claws ( ), and remove the
filter cover.
5 Remove the filter case.
6 Remove the air conditioning
filter from the filter case and
replace it with a new one.
The “ UP” marks shown on the
filter and the filter case should be
pointing up.
■Checking interval
Replace the air conditioning filter
according to the maintenance
schedule. In dusty areas or areas
with heavy traffic flow, early replace-
Air condition ing filter
The air conditioning filter
must be changed regularly
to maintain air conditioning
efficiency.
Removing the air condi-
tioning filter
Page 461 of 588
4617-3. Do-it-yourself maintenance
COROLLA_U
7
Maintenance and care
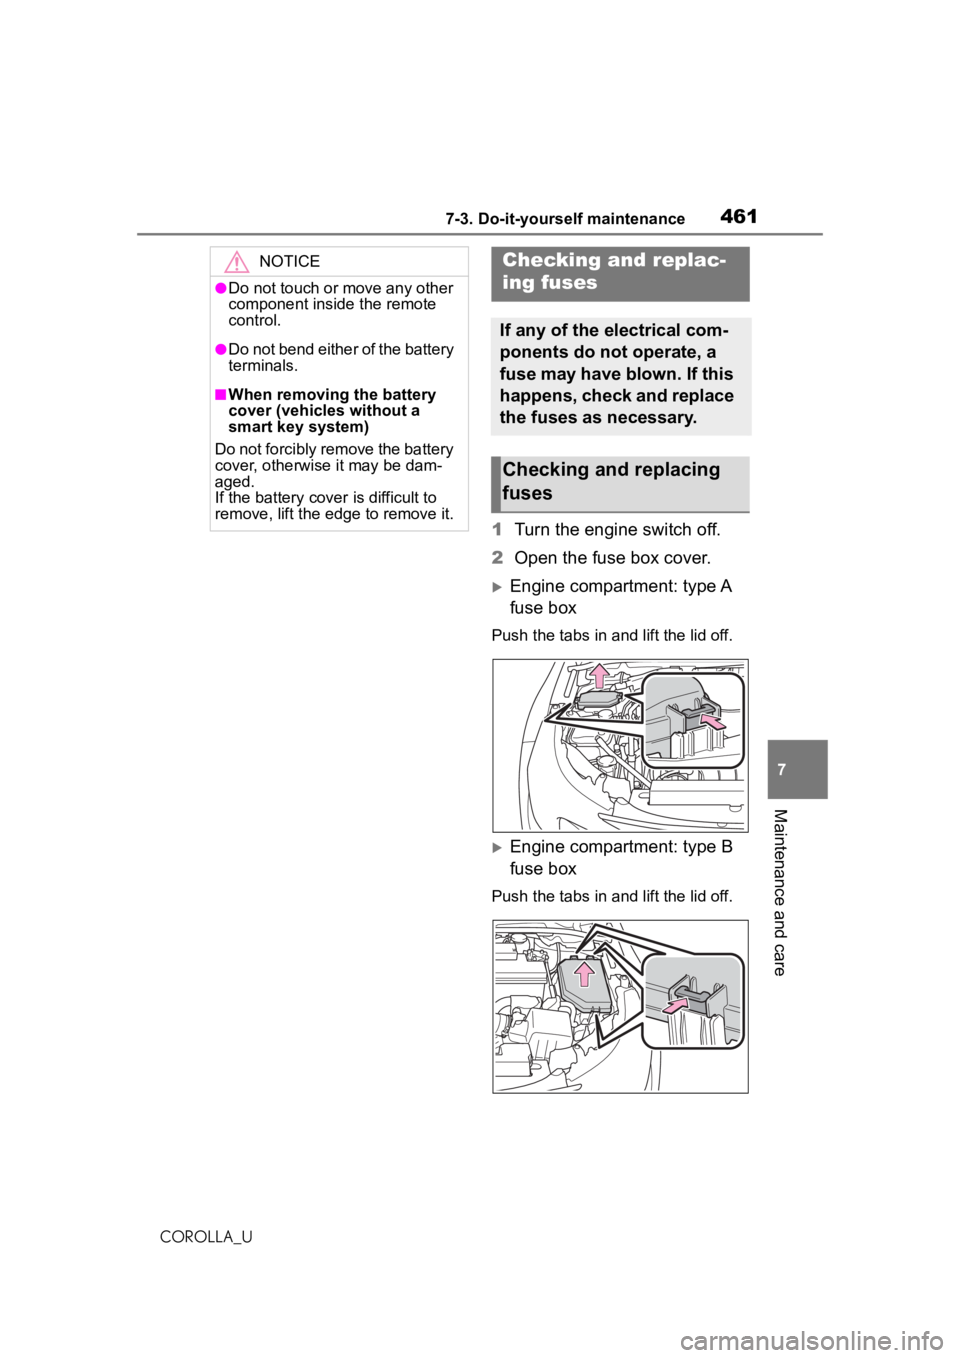
1 Turn the engine switch off.
2 Open the fuse box cover.
Engine compartment: type A
fuse box
Push the tabs in and lift the lid off.
Engine compartment: type B
fuse box
Push the tabs in and lift the lid off.
NOTICE
●Do not touch or move any other
component inside the remote
control.
●Do not bend either of the battery
terminals.
■When removing the battery
cover (vehicles without a
smart key system)
Do not forcibly remove the battery
cover, otherwise it may be dam-
aged.
If the battery cover is difficult to
remove, lift the edge to remove it.
Checking a nd replac-
ing fuses
If any of the electrical com-
ponents do not operate, a
fuse may have blown. If this
happens, check and replace
the fuses as necessary.
Checking and replacing
fuses
Page 471 of 588

471
COROLLA_U
8
8
When trouble arises
When trouble arises
.8-1. Essential informationEmergency flashers .... 472
If your vehicle has to be stopped in an emergency.................................. 472
If the vehicle is trapped in rising water ................ 474
8-2. Steps to take in an emer- gency
If your vehicle needs to be towed......................... 475
If you think something is wrong ........................ 479
Fuel pump shut off system .................................. 480
If a warning light turns on or a warning buzzer sounds.................................. 481
If a warning message is dis- played........................ 490
If you have a flat tire (vehi- cles without spare tire).................................. 493
If you have a flat tire (vehi- cles with a spare tire)
.................................. 503
If the engine will not start .................................. 511
If you lose your keys ... 513
If the electronic key does not operate properly .. 513
If the vehicle battery is dis- charged ..................... 515If your vehicle overheats
.................................. 519
If the vehicle becomes stuck .................................. 521
Page 472 of 588
4728-1. Essential information
COROLLA_U
8-1.Essential information
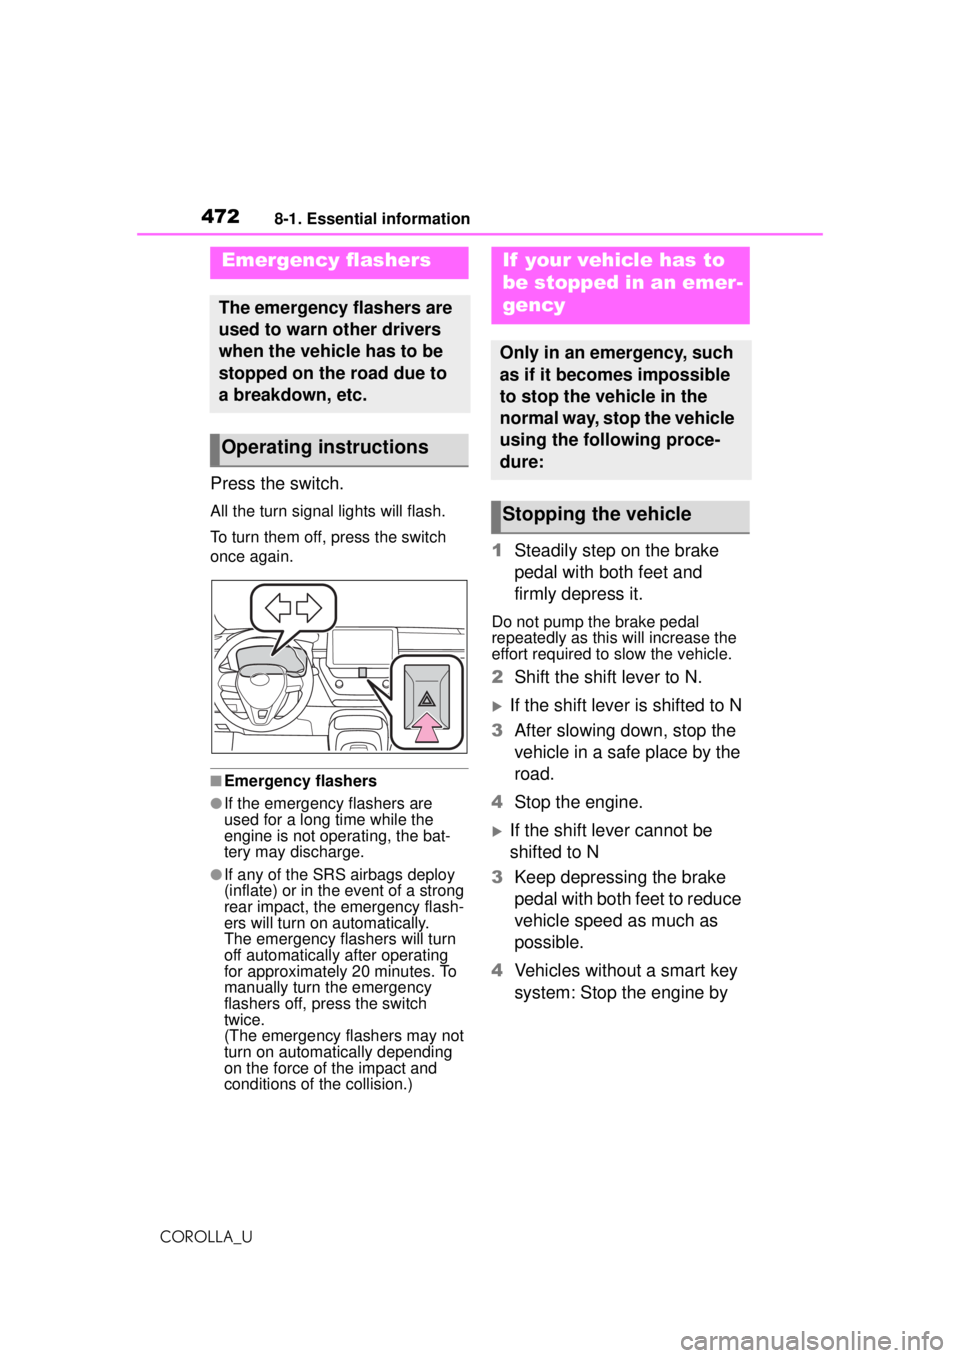
Press the switch.
All the turn signal lights will flash.
To turn them off, press the switch
once again.
■Emergency flashers
●If the emergency flashers are
used for a long time while the
engine is not operating, the bat-
tery may discharge.
●If any of the SRS airbags deploy
(inflate) or in the event of a strong
rear impact, the emergency flash-
ers will turn on automatically.
The emergency flashers will turn
off automatically after operating
for approximately 20 minutes. To
manually turn the emergency
flashers off, press the switch
twice.
(The emergency flashers may not
turn on automatically depending
on the force of the impact and
conditions of the collision.)
1Steadily step on the brake
pedal with both feet and
firmly depress it.
Do not pump the brake pedal
repeatedly as this will increase the
effort required to slow the vehicle.
2Shift the shift lever to N.
If the shift lever is shifted to N
3 After slowing down, stop the
vehicle in a safe place by the
road.
4 Stop the engine.
If the shift lever cannot be
shifted to N
3 Keep depressing the brake
pedal with both feet to reduce
vehicle speed as much as
possible.
4 Vehicles without a smart key
system: Stop the engine by
Emergency flashers
The emergency flashers are
used to warn other drivers
when the vehicle has to be
stopped on the road due to
a breakdown, etc.
Operating instructions
If your vehicle has to
be stopped in an emer-
gency
Only in an emergency, such
as if it becomes impossible
to stop the vehicle in the
normal way, stop the vehicle
using the following proce-
dure:
Stopping the vehicle