clock TOYOTA COROLLA 2021 (in English) User Guide
[x] Cancel search | Manufacturer: TOYOTA, Model Year: 2021, Model line: COROLLA, Model: TOYOTA COROLLA 2021Pages: 624, PDF Size: 20.3 MB
Page 321 of 624
3215-4. Other settings
5
Audio
COROLLA_U
5-4.Other settings
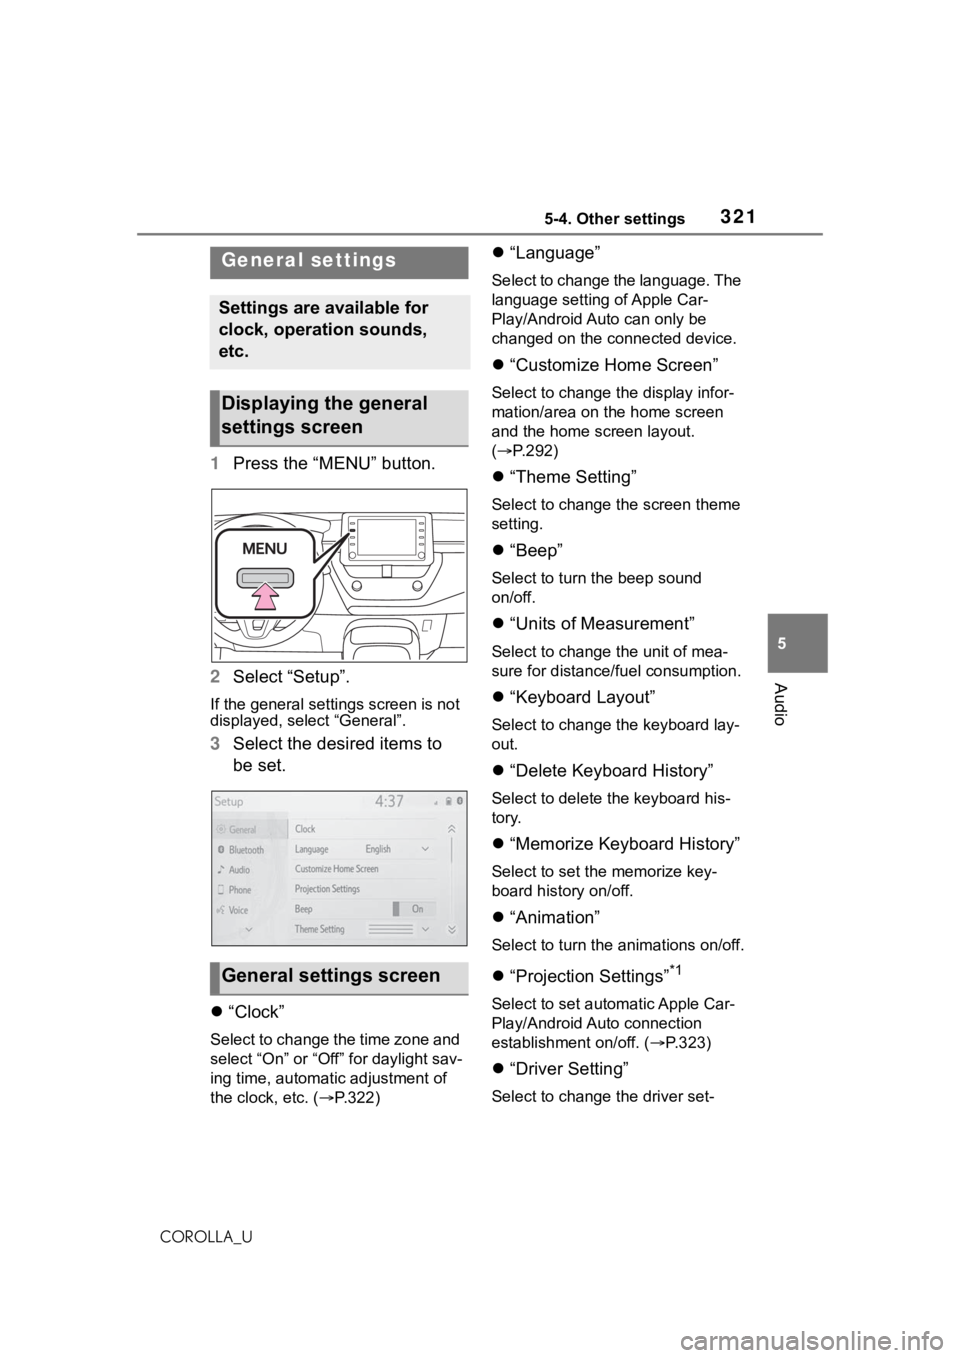
1Press the “MENU” button.
2 Select “Setup”.
If the general settings screen is not
displayed, select “General”.
3Select the desired items to
be set.
“Clock”
Select to change the time zone and
select “On” or “Off” for daylight sav-
ing time, automatic adjustment of
the clock, etc. ( P.322)
“Language”
Select to change the language. The
language setting of Apple Car-
Play/Android Auto can only be
changed on the connected device.
“Customize Home Screen”
Select to change the display infor-
mation/area on the home screen
and the home screen layout.
( P.292)
“Theme Setting”
Select to change the screen theme
setting.
“Beep”
Select to turn the beep sound
on/off.
“Units of Measurement”
Select to change the unit of mea-
sure for distance/fuel consumption.
“Keyboard Layout”
Select to change the keyboard lay-
out.
“Delete Keyboard History”
Select to delete the keyboard his-
tory.
“Memorize Keyboard History”
Select to set the memorize key-
board history on/off.
“Animation”
Select to turn the animations on/off.
“Projection Settings”*1
Select to set automatic Apple Car-
Play/Android Auto connection
establishment on/off. ( P.323)
“Driver Setting”
Select to change the driver set-
General settings
Settings are available for
clock, operation sounds,
etc.
Displaying the general
settings screen
General settings screen
Page 322 of 624
3225-4. Other settings
COROLLA_Utings. (
P.323)
“Delete Personal Data”
Select to delete personal data.
( P.324)
“Software Update”
Select to update software versions.
For details, contact your Toyota
dealer.
“Software Update Setting”*2
Select to set software update set-
ting. ( P.324)
“Gracenote Database
Update”
Select to update Gracenote® data-
base versions. For details, contact
your Toyota dealer.
“Software Information”
Select to display the software infor-
mation. Notices related to third
party software used in this product
are enlisted. (This includes instruc-
tions for obtaining such software,
where applicable.)
“SW Sensitivity Level”
Select to change the capacitive
touch screen button sensitivity to 1
(low), 2 (medium), or 3 (high).
*1: This function is not made avail- able in some countries or areas.
*2: If equipped
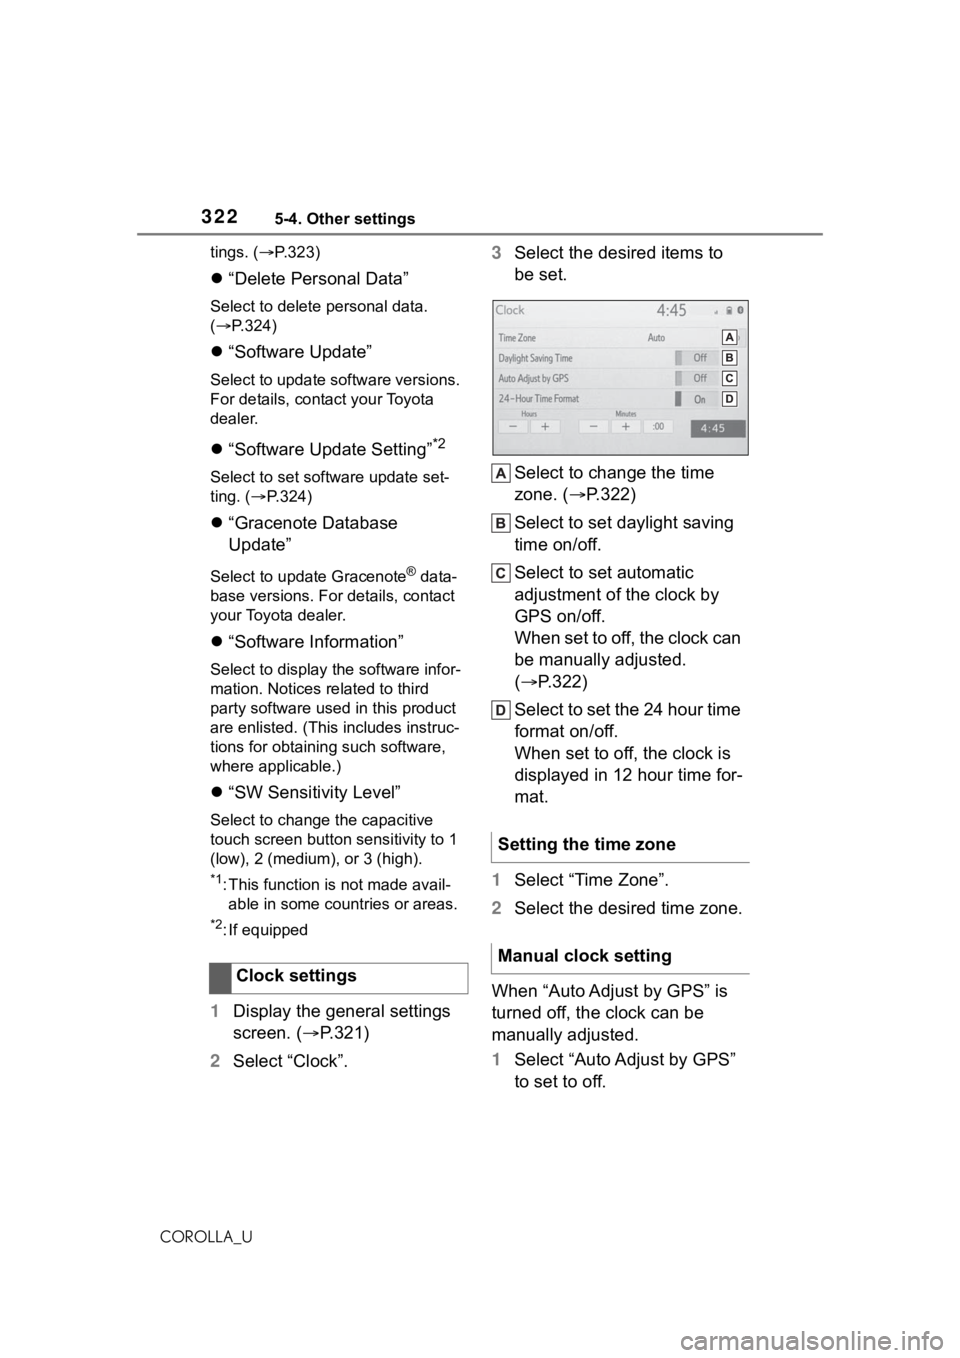
1 Display the general settings
screen. ( P.321)
2 Select “Clock”. 3
Select the desired items to
be set.
Select to change the time
zone. ( P.322)
Select to set daylight saving
time on/off.
Select to set automatic
adjustment of the clock by
GPS on/off.
When set to off, the clock can
be manually adjusted.
( P.322)
Select to set the 24 hour time
format on/off.
When set to off, the clock is
displayed in 12 hour time for-
mat.
1 Select “Time Zone”.
2 Select the desired time zone.
When “Auto Adjust by GPS” is
turned off, the clock can be
manually adjusted.
1 Select “Auto Adjust by GPS”
to set to off.
Clock settings
Setting the time zone
Manual clock setting
Page 323 of 624
3235-4. Other settings
5
Audio
COROLLA_U
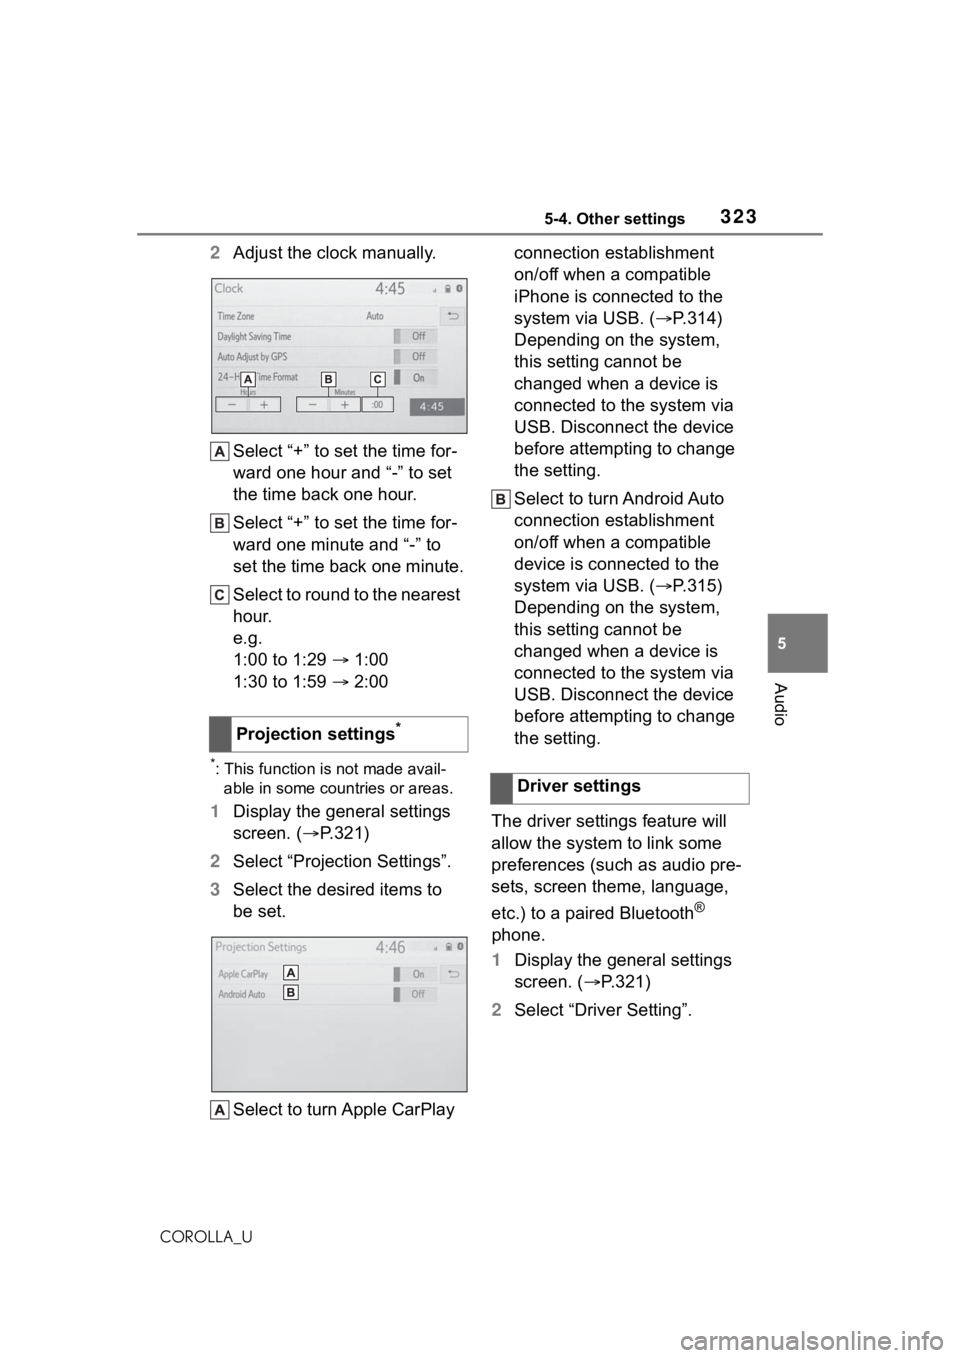
2Adjust the clock manually.
Select “+” to set the time for-
ward one hour and “-” to set
the time back one hour.
Select “+” to set the time for-
ward one minute and “-” to
set the time back one minute.
Select to round to the nearest
hour.
e.g.
1:00 to 1:29 1:00
1:30 to 1:59 2:00
*: This function is not made avail-
able in some countries or areas.
1 Display the general settings
screen. ( P.321)
2 Select “Projection Settings”.
3 Select the desired items to
be set.
Select to turn Apple CarPlay connection establishment
on/off when a compatible
iPhone is connected to the
system via USB. (
P.314)
Depending on the system,
this setting cannot be
changed when a device is
connected to the system via
USB. Disconnect the device
before attempting to change
the setting.
Select to turn Android Auto
connection establishment
on/off when a compatible
device is connected to the
system via USB. ( P.315)
Depending on the system,
this setting cannot be
changed when a device is
connected to the system via
USB. Disconnect the device
before attempting to change
the setting.
The driver settings feature will
allow the system to link some
preferences (such as audio pre-
sets, screen theme, language,
etc.) to a paired Bluetooth
®
phone.
1 Display the general settings
screen. ( P.321)
2 Select “Driver Setting”.
Projection settings
*
Driver settings
Page 416 of 624
4166-1. Using the air conditioning system and defogger
COROLLA_U
6-1.Using the air conditioning system and defogger
*: If equipped
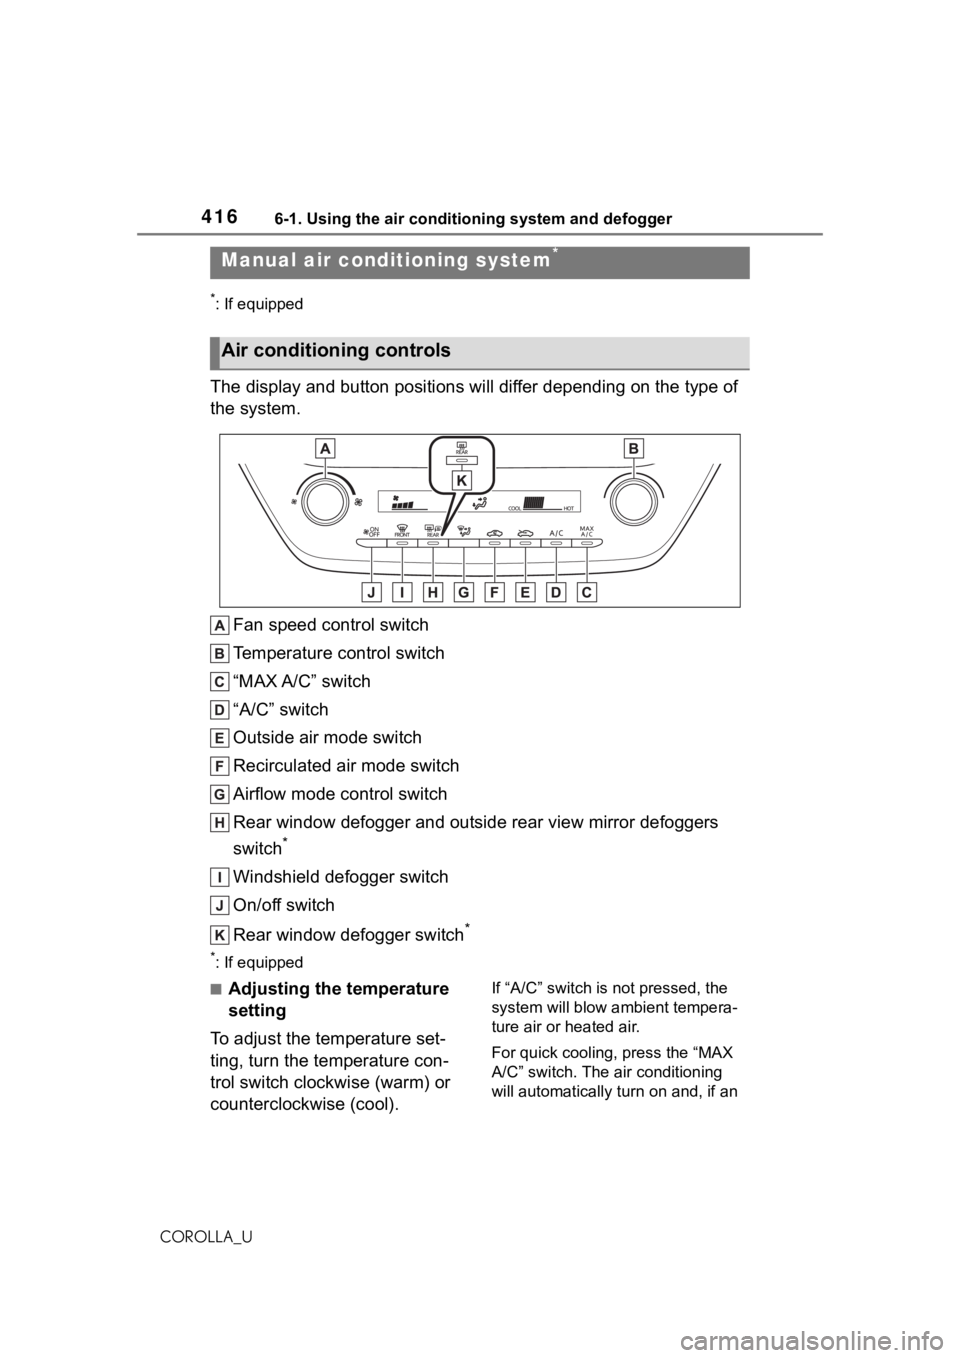
The display and button positions will differ depending on the type of
the system.
Fan speed control switch
Temperature control switch
“MAX A/C” switch
“A/C” switch
Outside air mode switch
Recirculated air mode switch
Airflow mode control switch
Rear window defogger and outside rear view mirror defoggers
switch
*
Windshield defogger switch
On/off switch
Rear window defogger switch
*
*: If equipped
■Adjusting the temperature
setting
To adjust the temperature set-
ting, turn the temperature con-
trol switch clockwise (warm) or
counterclockwise (cool).If “A/C” switch is not pressed, the
system will blow ambient tempera-
ture air or heated air.
For quick cooling, press the “MAX
A/C” switch. The air conditioning
will automatically turn on and, if an
Manual air conditioning system*
Air conditioning controls
Page 417 of 624
4176-1. Using the air conditioning system and defogger
6
Interior features
COROLLA_Uair outlet position or is
selected, the system will be set to
recirculated air mode. While “MAX
A/C” is selected, it is not possible to
turn off the air conditioning.
■Fan speed setting
To adjust the fan speed, turn the
fan speed control switch clock-
wise (increase) or counterclock-
wise (decrease).
Pressing the on/off switch to turns
off the fan.
When the fan is o ff, pressing the
on/off switch or turning the fan
speed control switch clockwise will
turn on the fan.
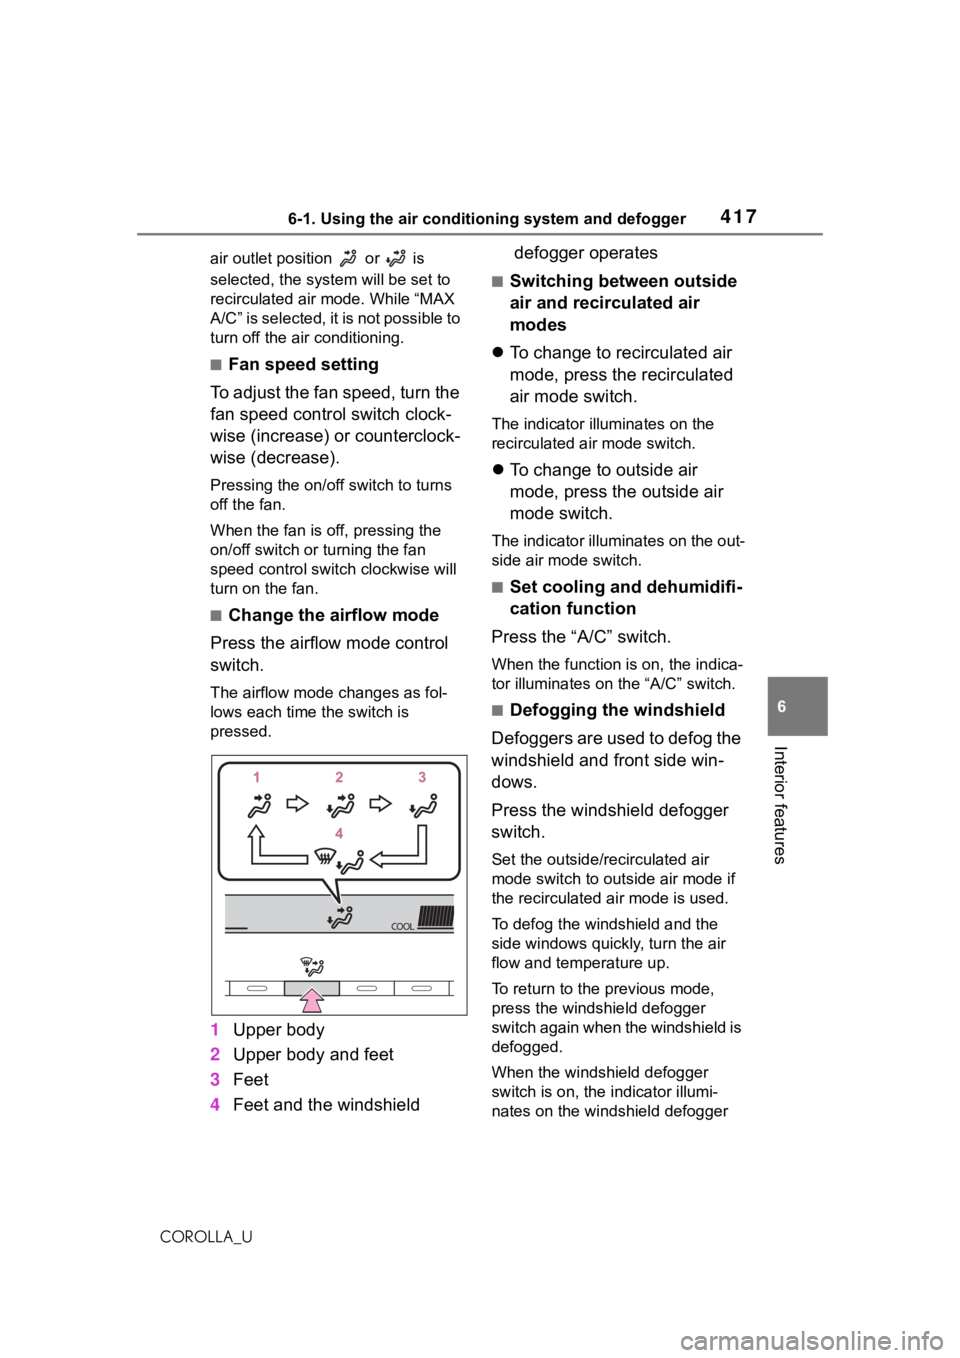
■Change the airflow mode
Press the airflow mode control
switch.
The airflow mode changes as fol-
lows each time the switch is
pressed.
1 Upper body
2 Upper body and feet
3 Feet
4 Feet and the windshield defogger operates
■Switching between outside
air and recirculated air
modes
To change to recirculated air
mode, press the recirculated
air mode switch.
The indicator illuminates on the
recirculated air mode switch.
To change to outside air
mode, press the outside air
mode switch.
The indicator illuminates on the out-
side air mode switch.
■Set cooling and dehumidifi-
cation function
Press the “A/C” switch.
When the function is on, the indica-
tor illuminates on the “A/C” switch.
■Defogging the windshield
Defoggers are used to defog the
windshield and front side win-
dows.
Press the windshield defogger
switch.
Set the outside/recirculated air
mode switch to outside air mode if
the recirculated air mode is used.
To defog the windshield and the
side windows quickly, turn the air
flow and temperature up.
To return to the previous mode,
press the windshield defogger
switch again when the windshield is
defogged.
When the windshield defogger
switch is on, the indicator illumi-
nates on the windshield defogger
Page 421 of 624
4216-1. Using the air conditioning system and defogger
6
Interior features
COROLLA_U
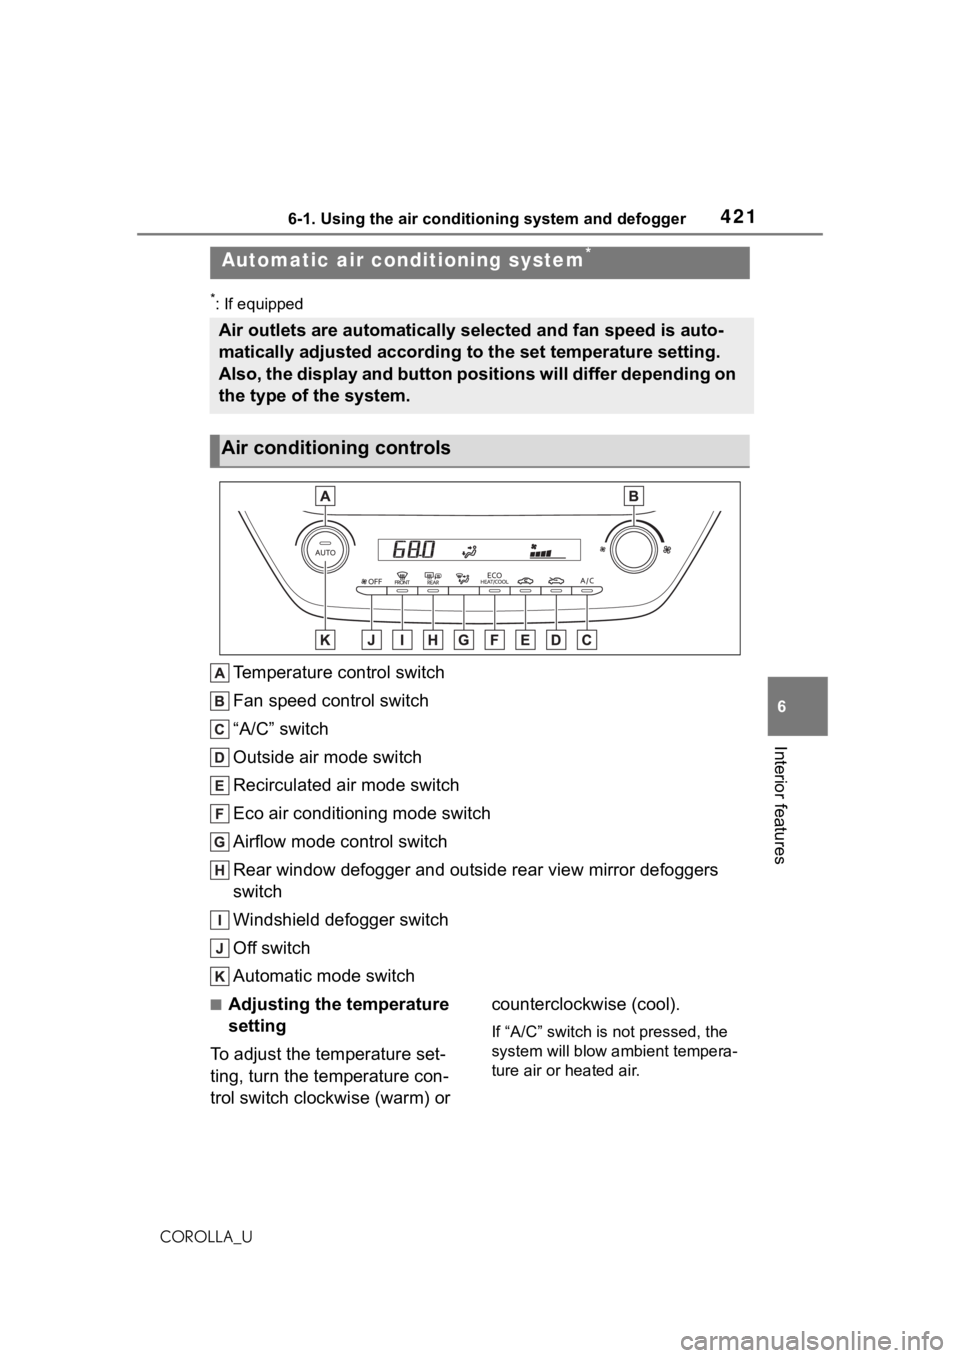
*: If equipped
Temperature control switch
Fan speed control switch
“A/C” switch
Outside air mode switch
Recirculated air mode switch
Eco air conditioning mode switch
Airflow mode control switch
Rear window defogger and outside rear view mirror defoggers
switch
Windshield defogger switch
Off switch
Automatic mode switch
■Adjusting the temperature
setting
To adjust the temperature set-
ting, turn the temperature con-
trol switch clockwise (warm) or counterclockwise (cool).
If “A/C” switch is not pressed, the
system will blow ambient tempera-
ture air or heated air.
Automatic air conditioning system*
Air outlets are automatically selected and fan speed is auto-
matically adjusted according to the set temperature setting.
Also, the display and button positions will differ depending on
the type of the system.
Air conditioning controls
Page 422 of 624
4226-1. Using the air conditioning system and defogger
COROLLA_U
■Setting the fan speed
To adjust the fan speed, turn the
fan speed control switch clock-
wise (increase) or counterclock-
wise (decrease).
Pressing the off switch to turns off
the fan.
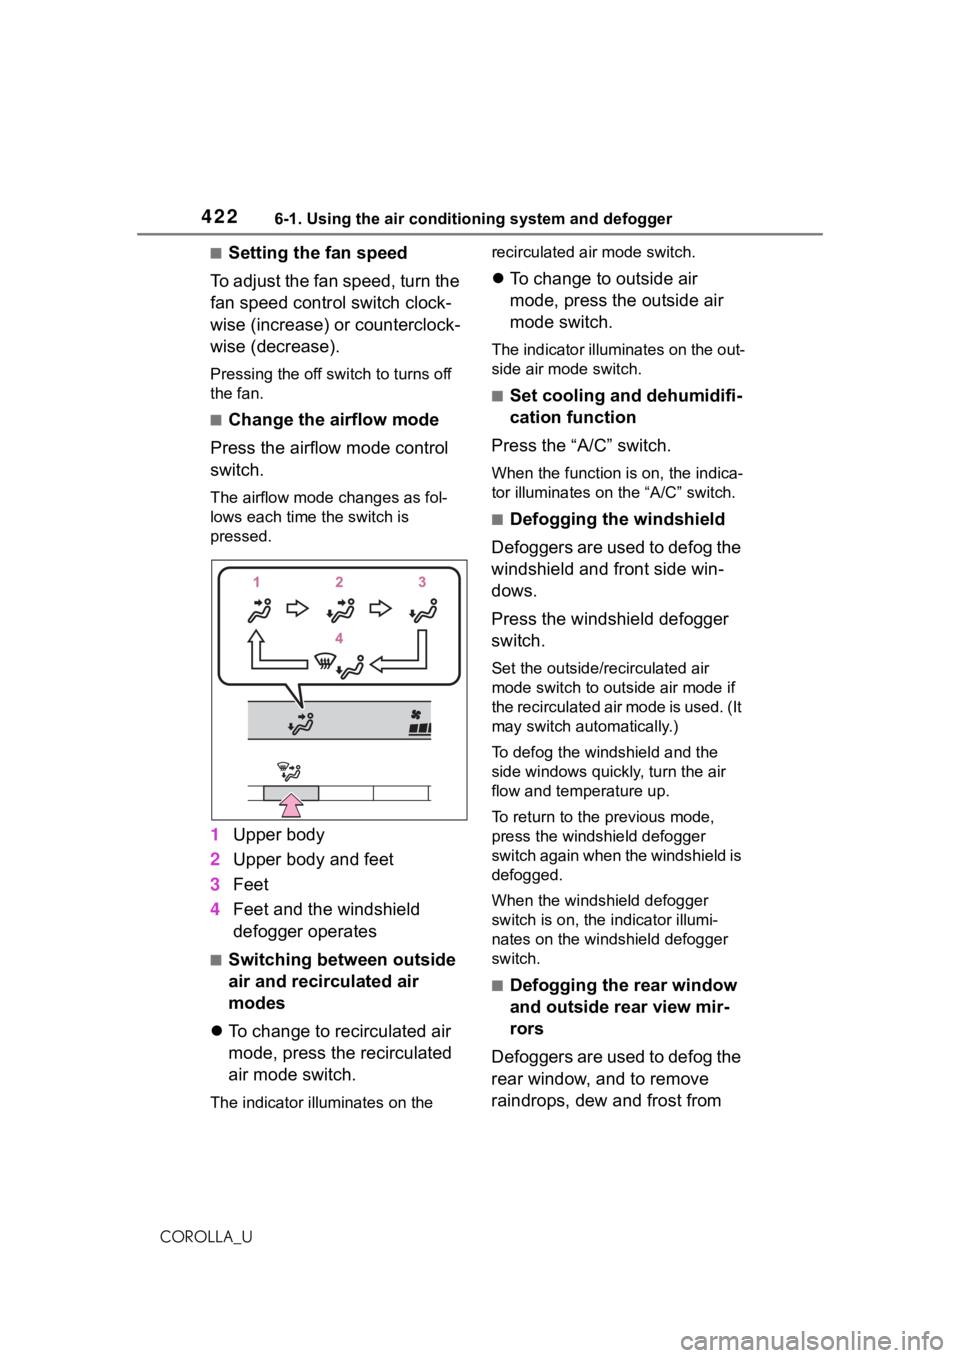
■Change the airflow mode
Press the airflow mode control
switch.
The airflow mode changes as fol-
lows each time the switch is
pressed.
1 Upper body
2 Upper body and feet
3 Feet
4 Feet and the windshield
defogger operates
■Switching between outside
air and recirculated air
modes
To change to recirculated air
mode, press the recirculated
air mode switch.
The indicator illu minates on the recirculated air mode switch.
To change to outside air
mode, press the outside air
mode switch.
The indicator illuminates on the out-
side air mode switch.
■Set cooling and dehumidifi-
cation function
Press the “A/C” switch.
When the function is on, the indica-
tor illuminates on the “A/C” switch.
■Defogging the windshield
Defoggers are used to defog the
windshield and front side win-
dows.
Press the windshield defogger
switch.
Set the outside/recirculated air
mode switch to outside air mode if
the recirculated air mode is used. (It
may switch automatically.)
To defog the windshield and the
side windows quickly, turn the air
flow and temperature up.
To return to the previous mode,
press the windshield defogger
switch again when the windshield is
defogged.
When the windshield defogger
switch is on, the indicator illumi-
nates on the windshield defogger
switch.
■Defogging the rear window
and outside rear view mir-
rors
Defoggers are used to defog the
rear window, and to remove
raindrops, dew and frost from
Page 469 of 624
4697-3. Do-it-yourself maintenance
7
Maintenance and care
COROLLA_U
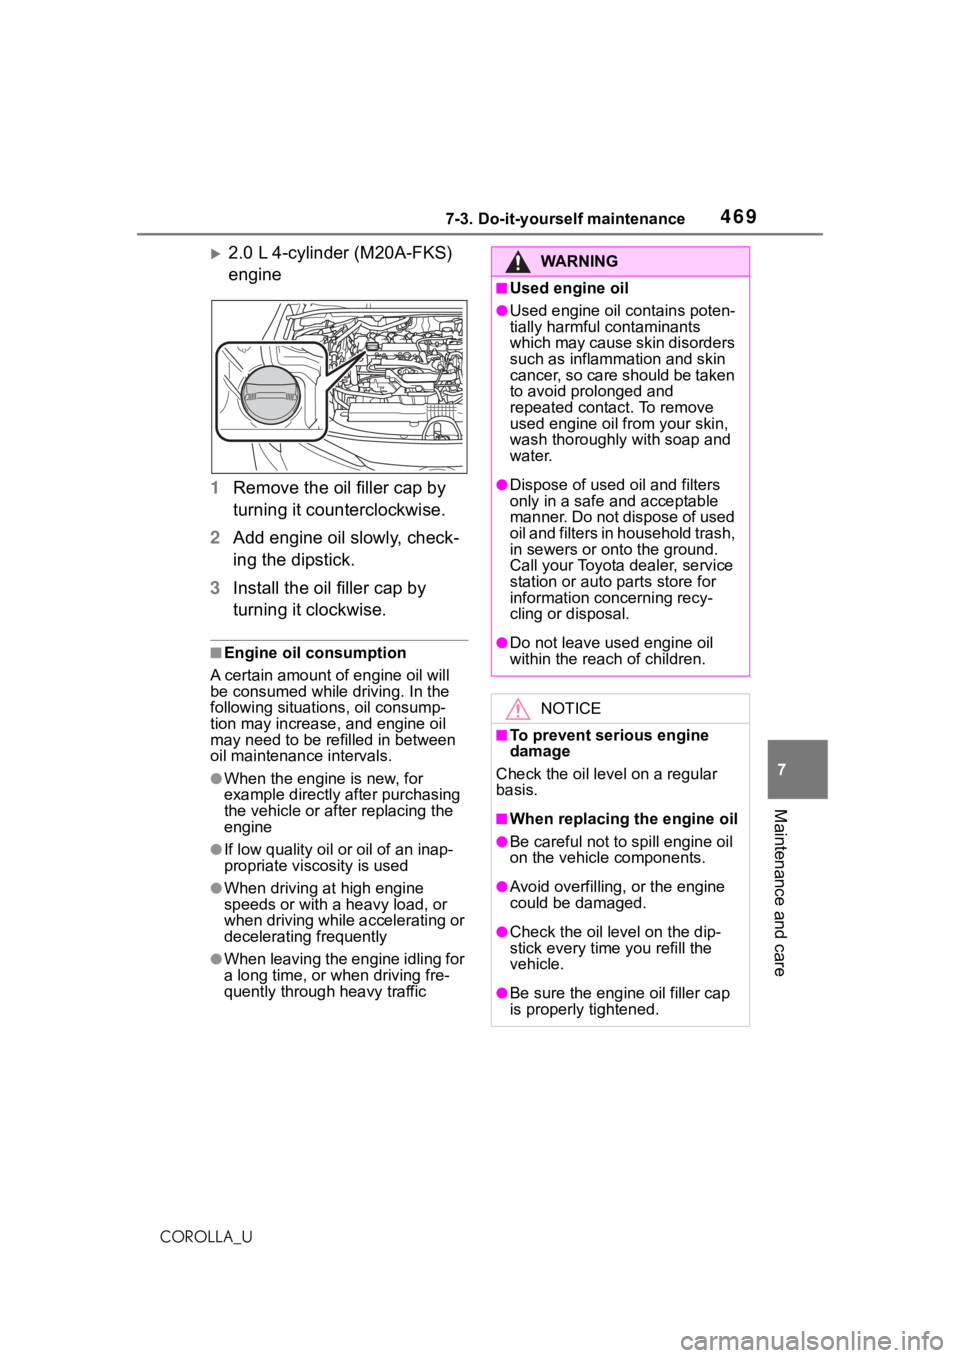
2.0 L 4-cylinder (M20A-FKS)
engine
1 Remove the oil filler cap by
turning it counterclockwise.
2 Add engine oil slowly, check-
ing the dipstick.
3 Install the oil filler cap by
turning it clockwise.
■Engine oil consumption
A certain amount of engine oil will
be consumed while driving. In the
following situatio ns, oil consump-
tion may increase, and engine oil
may need to be refilled in between
oil maintenance intervals.
●When the engine is new, for
example directly after purchasing
the vehicle or after replacing the
engine
●If low quality oil or oil of an inap-
propriate viscosity is used
●When driving at high engine
speeds or with a heavy load, or
when driving while accelerating or
decelerating frequently
●When leaving the engine idling for
a long time, or wh en driving fre-
quently through heavy traffic
WA R N I N G
■Used engine oil
●Used engine oil contains poten-
tially harmful contaminants
which may cause skin disorders
such as inflammation and skin
cancer, so care should be taken
to avoid prolonged and
repeated contact. To remove
used engine oil from your skin,
wash thoroughly with soap and
water.
●Dispose of used o il and filters
only in a safe and acceptable
manner. Do not dispose of used
oil and filters in h ousehold trash,
in sewers or onto the ground.
Call your Toyota dealer, service
station or auto parts store for
information concerning recy-
cling or disposal.
●Do not leave used engine oil
within the reach of children.
NOTICE
■To prevent serious engine
damage
Check the oil le vel on a regular
basis.
■When replacing the engine oil
●Be careful not to spill engine oil
on the vehicle components.
●Avoid overfilling, or the engine
could be damaged.
●Check the oil level on the dip-
stick every time you refill the
vehicle.
●Be sure the engin e oil filler cap
is properly tightened.
Page 496 of 624
4967-3. Do-it-yourself maintenance
COROLLA_U
■LED light bulbs
The lights other th an the front turn
signal lights/parking lights (vehicles
without side turn sig nal lights), front
side marker lights, rear turn signal
lights, rear side marker lights (bulb
type) and back-up lights consist of a
number of LEDs. If any of the LEDs
burn out, take your vehicle to your
Toyota dealer to have the light
replaced.
■Condensation build-up on the
inside of the lens
In certain situatio ns, such as when
driving in the rain or when washing
the vehicle, condensation may form
on the inner side of the headlight
lens and other li ghts. As each light
has a ventilation hole, moist air may
enter. If the ambient temperature is
low, condensation may form tempo-
rarily, but it will di ssipate as the
inside of the light i s warmed up. As
the condensation is due to a phe-
nomenon similar to windows fogging
in the rain, it doe s not indicate a
malfunction.
Contact your Toyota dealer for more
information in the following situa-
tions:
●Large drops of water have built up
on the inside of the lens.
●Water has built up inside the
headlight.
■When replacing light bulbs
P. 4 9 4
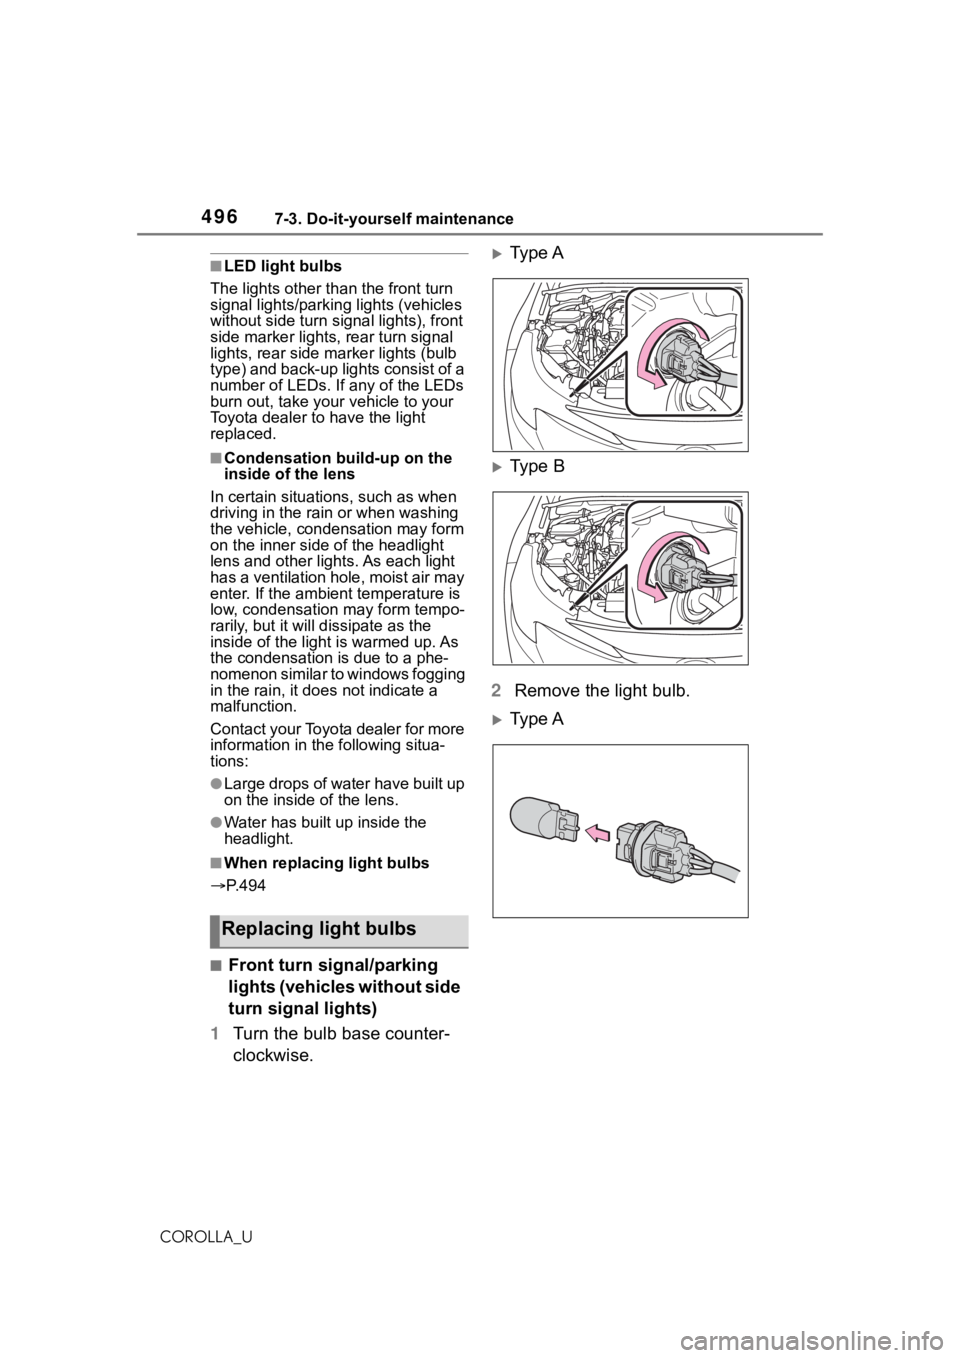
■Front turn signal/parking
lights (vehicles without side
turn signal lights)
1 Turn the bulb base counter-
clockwise.
Type A
Type B
2 Remove the light bulb.
Type A
Replacing light bulbs
Page 497 of 624
4977-3. Do-it-yourself maintenance
7
Maintenance and care
COROLLA_U
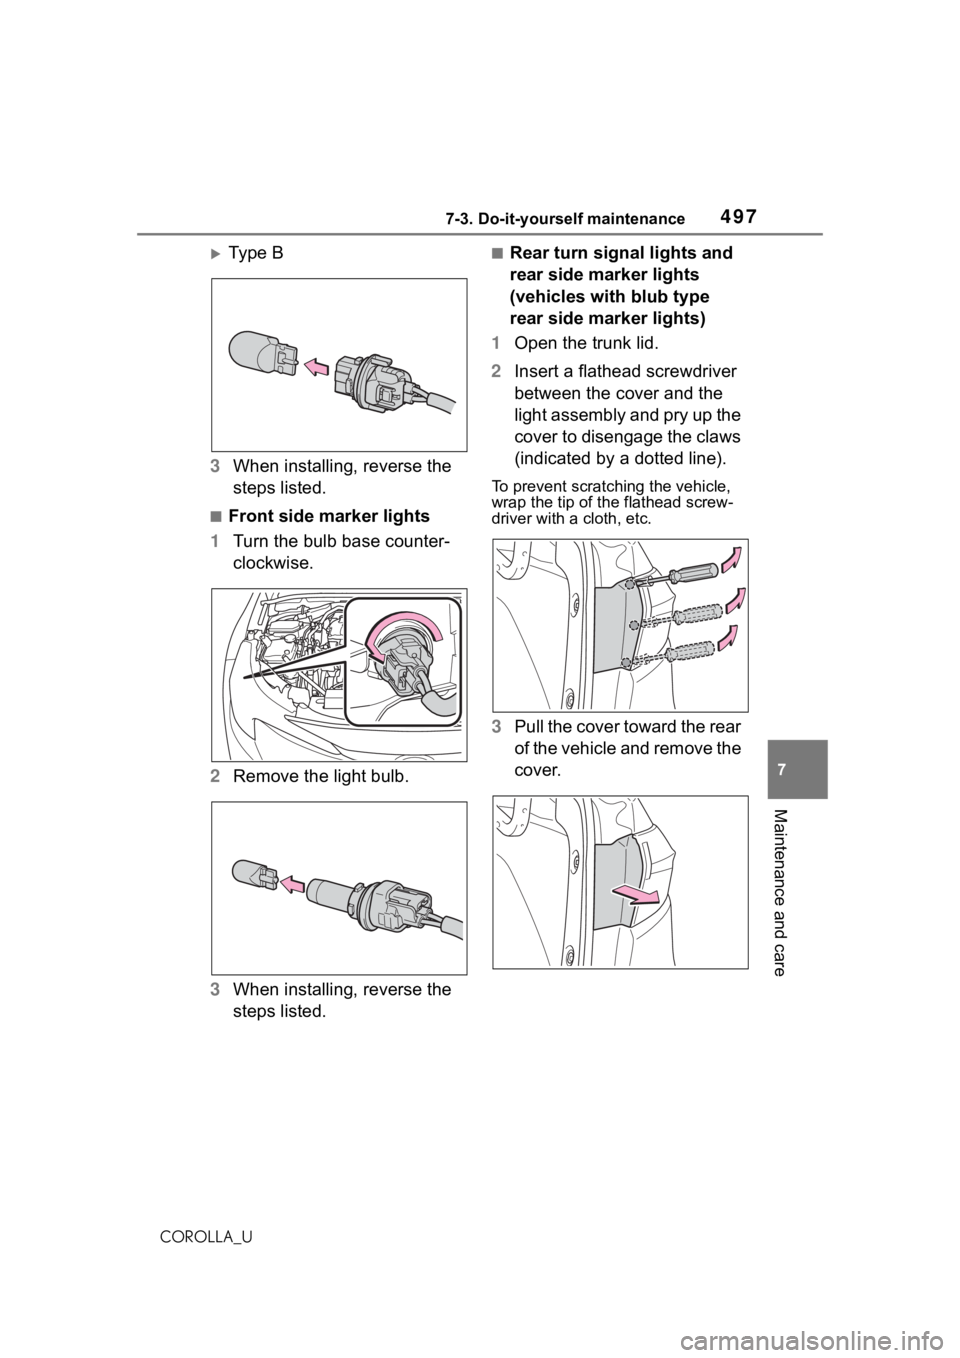
Ty p e B
3 When installing, reverse the
steps listed.
■Front side marker lights
1 Turn the bulb base counter-
clockwise.
2 Remove the light bulb.
3 When installing, reverse the
steps listed.
■Rear turn signal lights and
rear side marker lights
(vehicles with blub type
rear side marker lights)
1 Open the trunk lid.
2 Insert a flathead screwdriver
between the cover and the
light assembly and pry up the
cover to disengage the claws
(indicated by a dotted line).
To prevent scratching the vehicle,
wrap the tip of th e flathead screw-
driver with a cloth, etc.
3Pull the cover toward the rear
of the vehicle and remove the
cover.