clock TOYOTA COROLLA HATCHBACK 2020 (in English) User Guide
[x] Cancel search | Manufacturer: TOYOTA, Model Year: 2020, Model line: COROLLA HATCHBACK, Model: TOYOTA COROLLA HATCHBACK 2020Pages: 572, PDF Size: 13.8 MB
Page 291 of 572
2915-4. Other settings
COROLLA H/B_U
5
Audio
Select to change the driver set-
tings. ( P.292)
“Delete Personal Data”
Select to delete personal data.
( P.293)
“Software Update”
Select to update software versions.
For details, contact your Toyota
dealer.
“Software Update Setting”*2
Select to set software update set-
ting. ( P.293)
“Gracenote Database
Update”
Select to update Gracenote® data-
base versions. For details, contact
your Toyota dealer.
“Software Information”
Select to display the software infor-
mation. Notices related to third
party software used in this product
are enlisted. (This includes instruc-
tions for obtaining such software,
where applicable.)
“SW Sensitivity Level”
Select to change the capacitive
touch screen button sensitivity to 1
(low), 2 (medium), or 3 (high).
*1: This function is not made avail- able in some countries or areas.
*2: If equipped
1 Display the general settings
screen. ( P.290)
2 Select “Clock”. 3
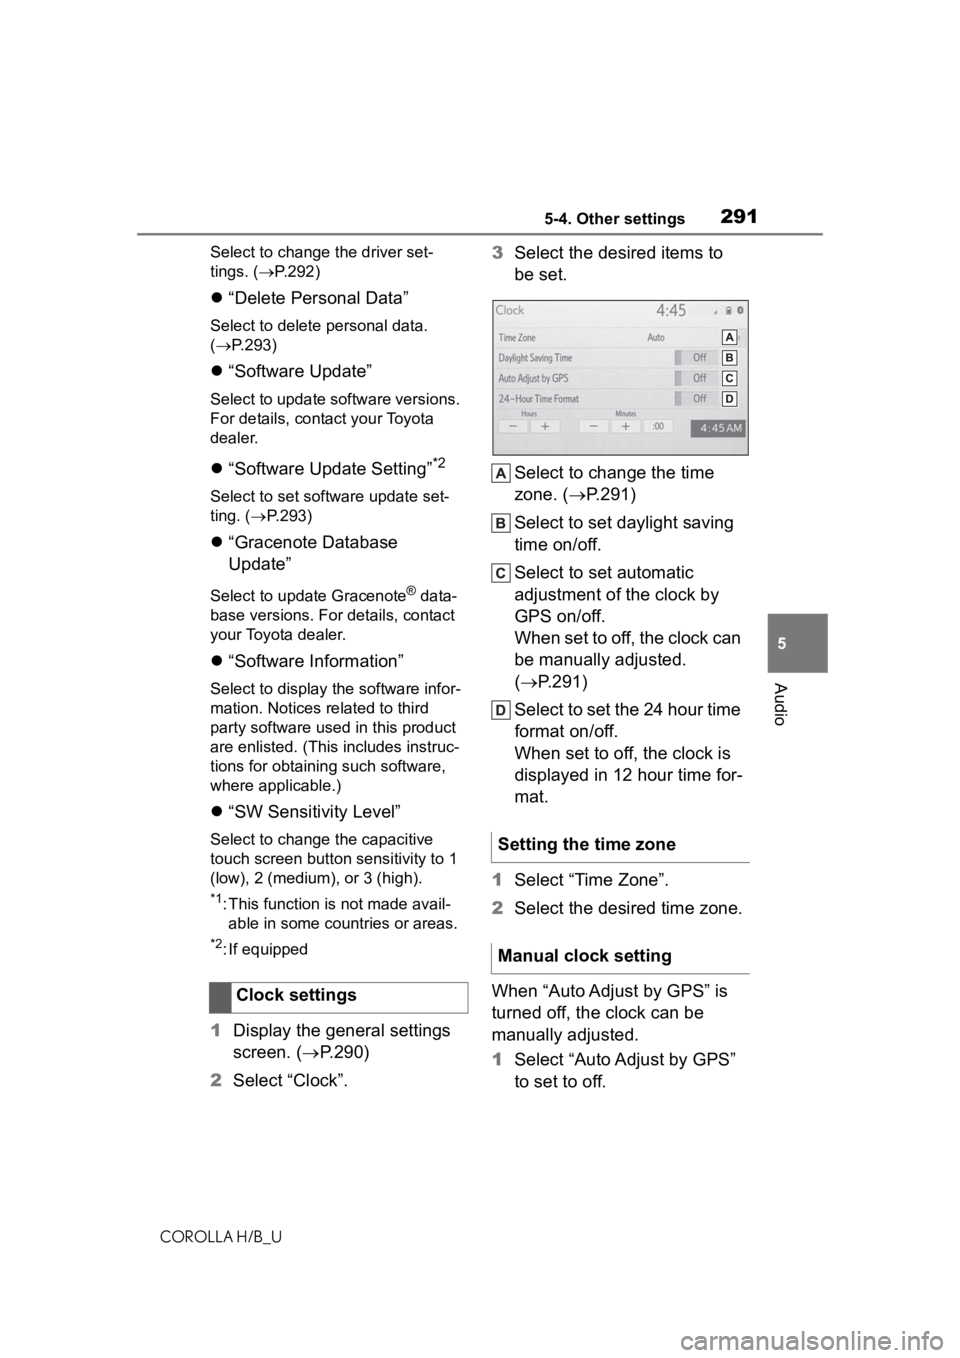
Select the desired items to
be set.
Select to change the time
zone. ( P.291)
Select to set daylight saving
time on/off.
Select to set automatic
adjustment of the clock by
GPS on/off.
When set to off, the clock can
be manually adjusted.
( P.291)
Select to set the 24 hour time
format on/off.
When set to off, the clock is
displayed in 12 hour time for-
mat.
1 Select “Time Zone”.
2 Select the desired time zone.
When “Auto Adjust by GPS” is
turned off, the clock can be
manually adjusted.
1 Select “Auto Adjust by GPS”
to set to off.
Clock settings
Setting the time zone
Manual clock setting
Page 292 of 572
2925-4. Other settings
COROLLA H/B_U
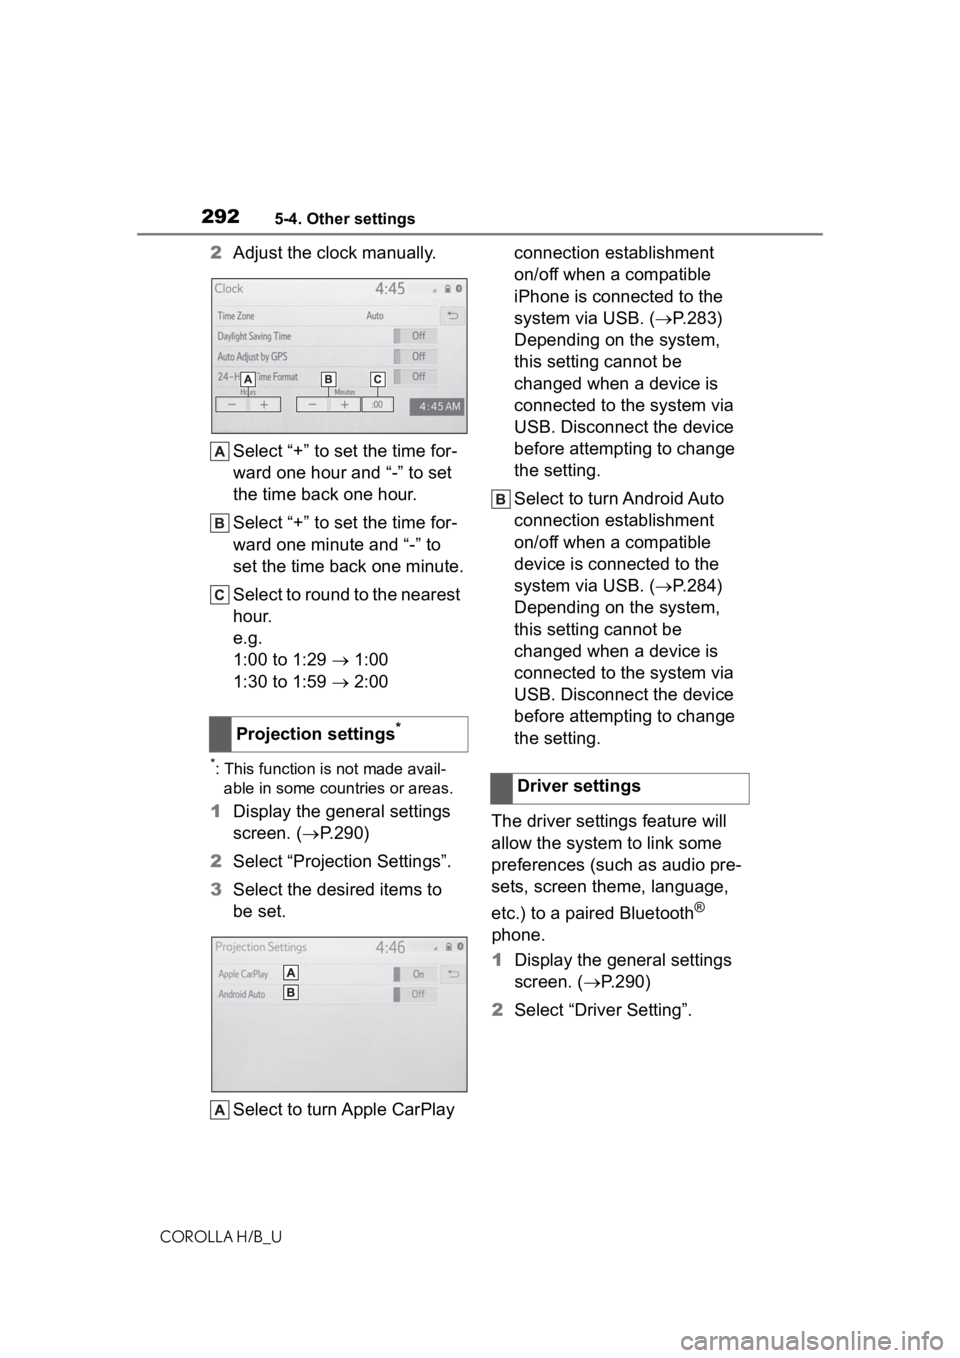
2Adjust the clock manually.
Select “+” to set the time for-
ward one hour and “-” to set
the time back one hour.
Select “+” to set the time for-
ward one minute and “-” to
set the time back one minute.
Select to round to the nearest
hour.
e.g.
1:00 to 1:29 1:00
1:30 to 1:59 2:00
*: This function is not made avail-
able in some countries or areas.
1 Display the general settings
screen. ( P.290)
2 Select “Projection Settings”.
3 Select the desired items to
be set.
Select to turn Apple CarPlay connection establishment
on/off when a compatible
iPhone is connected to the
system via USB. (
P.283)
Depending on the system,
this setting cannot be
changed when a device is
connected to the system via
USB. Disconnect the device
before attempting to change
the setting.
Select to turn Android Auto
connection establishment
on/off when a compatible
device is connected to the
system via USB. ( P.284)
Depending on the system,
this setting cannot be
changed when a device is
connected to the system via
USB. Disconnect the device
before attempting to change
the setting.
The driver settings feature will
allow the system to link some
preferences (such as audio pre-
sets, screen theme, language,
etc.) to a paired Bluetooth
®
phone.
1 Display the general settings
screen. ( P.290)
2 Select “Driver Setting”.
Projection settings
*
Driver settings
Page 387 of 572
3876-1. Using the air conditioning system and defogger
COROLLA H/B_U
6
Interior features
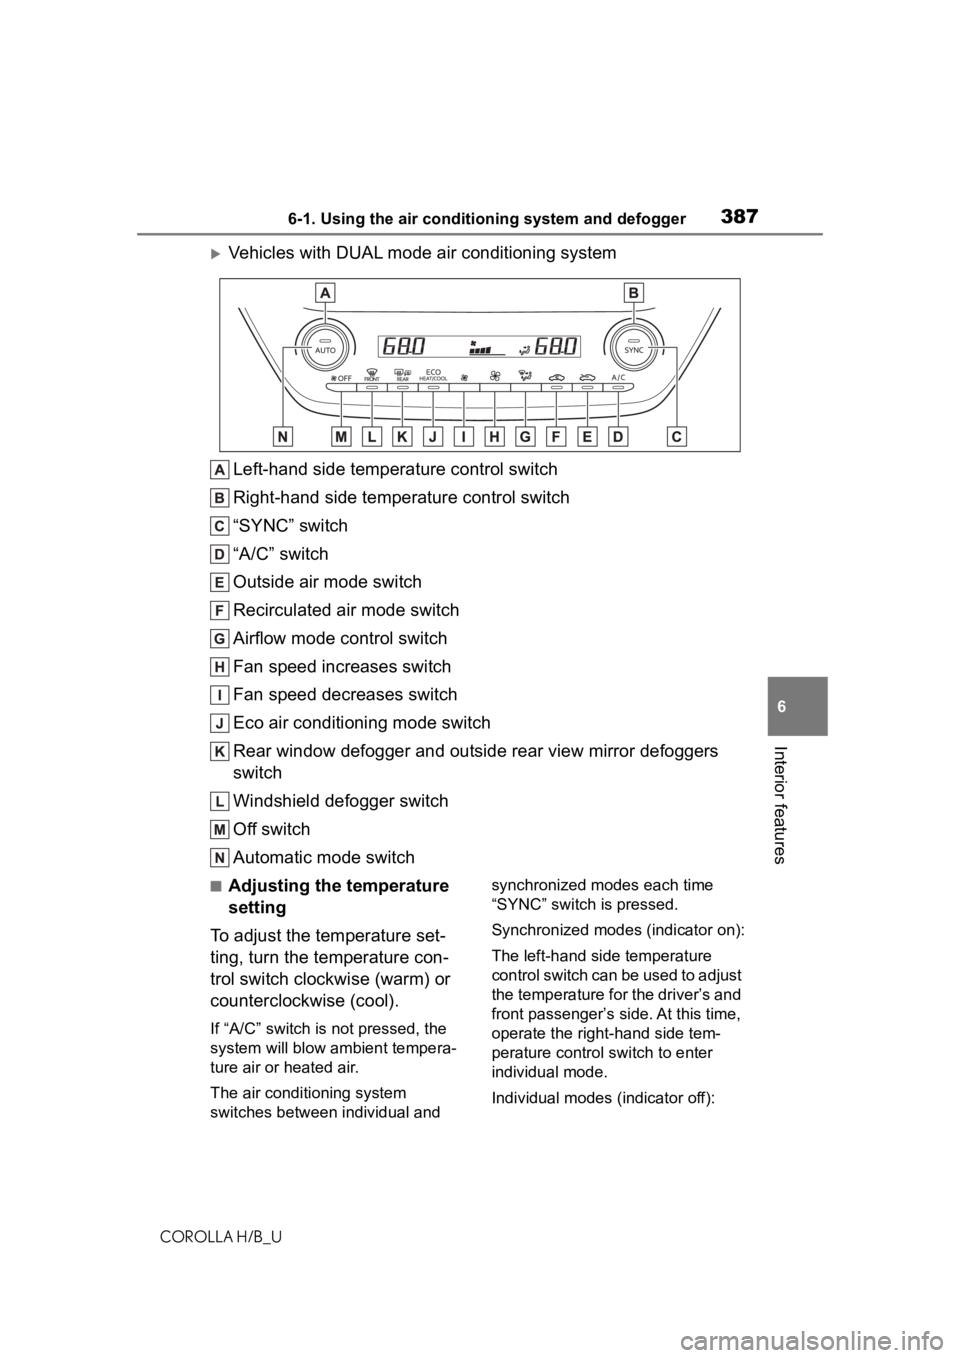
Vehicles with DUAL mode air conditioning system Left-hand side temperature control switch
Right-hand side temperature control switch
“SYNC” switch
“A/C” switch
Outside air mode switch
Recirculated air mode switch
Airflow mode control switch
Fan speed increases switch
Fan speed decreases switch
Eco air conditioning mode switch
Rear window defogger and outside rear view mirror defoggers
switch
Windshield defogger switch
Off switch
Automatic mode switch
■Adjusting the temperature
setting
To adjust the temperature set-
ting, turn the temperature con-
trol switch clockwise (warm) or
counterclockwise (cool).
If “A/C” switch is not pressed, the
system will blow a mbient tempera-
ture air or heated air.
The air conditioning system
switches between individual and synchronized modes each time
“SYNC” switch is pressed.
Synchronized modes (indicator on):
The left-hand side temperature
control switch can be used to adjust
the temperature for the driver’s and
front passenger’s side. At this time,
operate the right-hand side tem-
perature control switch to enter
individual mode.
Individual modes (indicator off):
Page 388 of 572
3886-1. Using the air conditioning system and defogger
COROLLA H/B_UThe temperature for the driver’s
and front passenger’s side can be
adjusted separately.
■Setting the fan speed
Vehicles without DUAL mode
air conditioning system
To adjust the fan speed, turn the
fan speed control switch clock-
wise (increase) or counterclock-
wise (decrease).
Pressing the off switch to turns off
the fan.
Vehicles with DUAL mode air
conditioning system
Operate the fan speed
increases switch to increase the
fan speed and the fan speed
decrease switch to decrease the
fan speed.
Pressing the off switch to turns off
the fan.
■Change the airflow mode
Press the airflow mode control
switch.
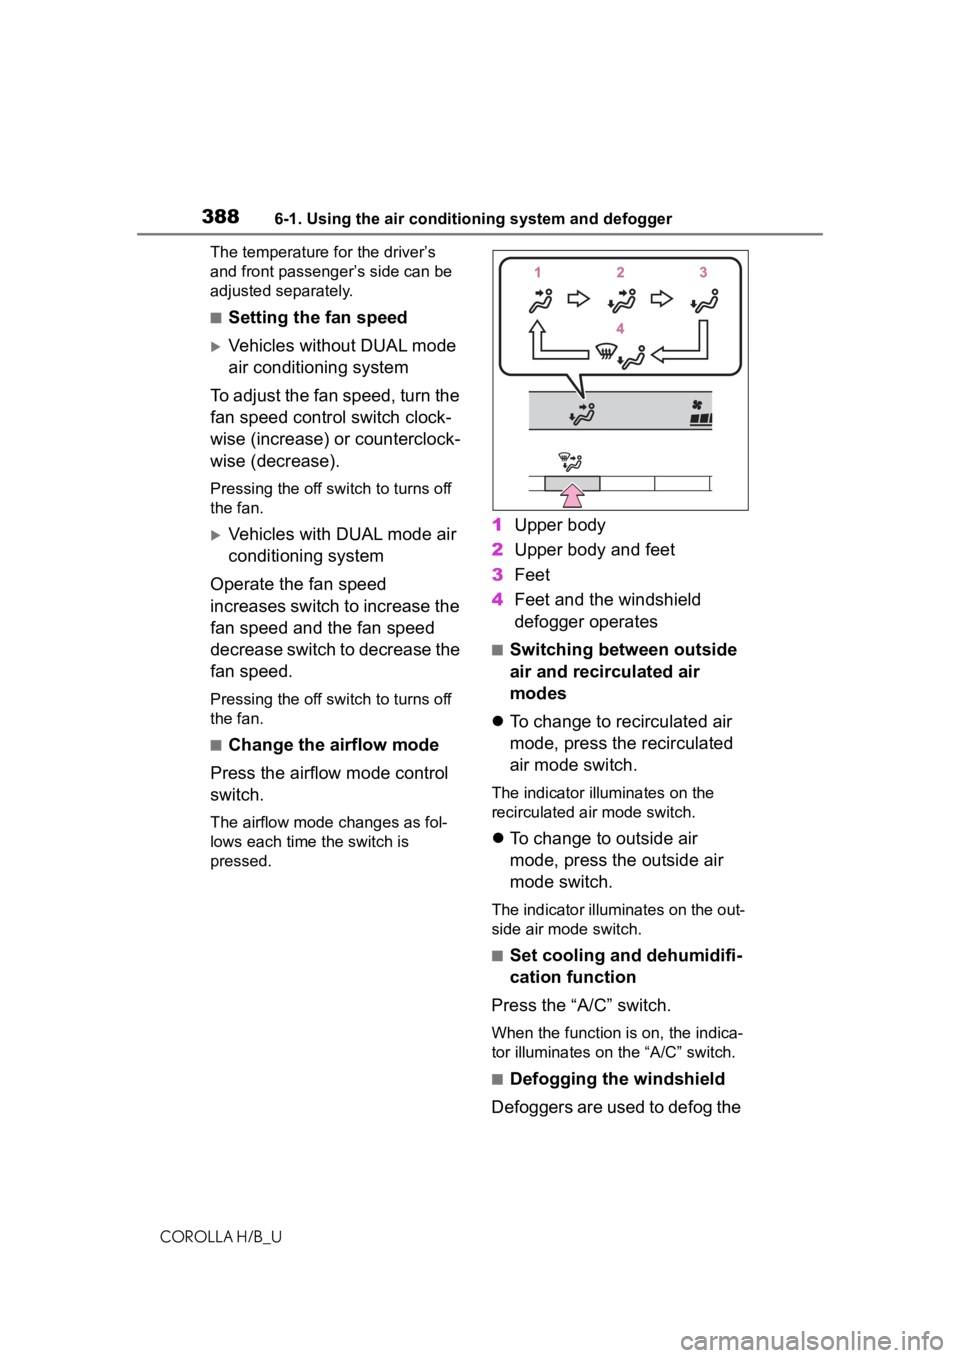
The airflow mode changes as fol-
lows each time the switch is
pressed.
1 Upper body
2 Upper body and feet
3 Feet
4 Feet and the windshield
defogger operates
■Switching between outside
air and recirculated air
modes
To change to recirculated air
mode, press the recirculated
air mode switch.
The indicator illuminates on the
recirculated air mode switch.
To change to outside air
mode, press the outside air
mode switch.
The indicator illuminates on the out-
side air mode switch.
■Set cooling and dehumidifi-
cation function
Press the “A/C” switch.
When the function is on, the indica-
tor illuminates on the “A/C” switch.
■Defogging the windshield
Defoggers are used to defog the
Page 430 of 572
4307-3. Do-it-yourself maintenance
COROLLA H/B_U
more than 5 minutes for the
oil to drain back into the bot-
tom of the engine.
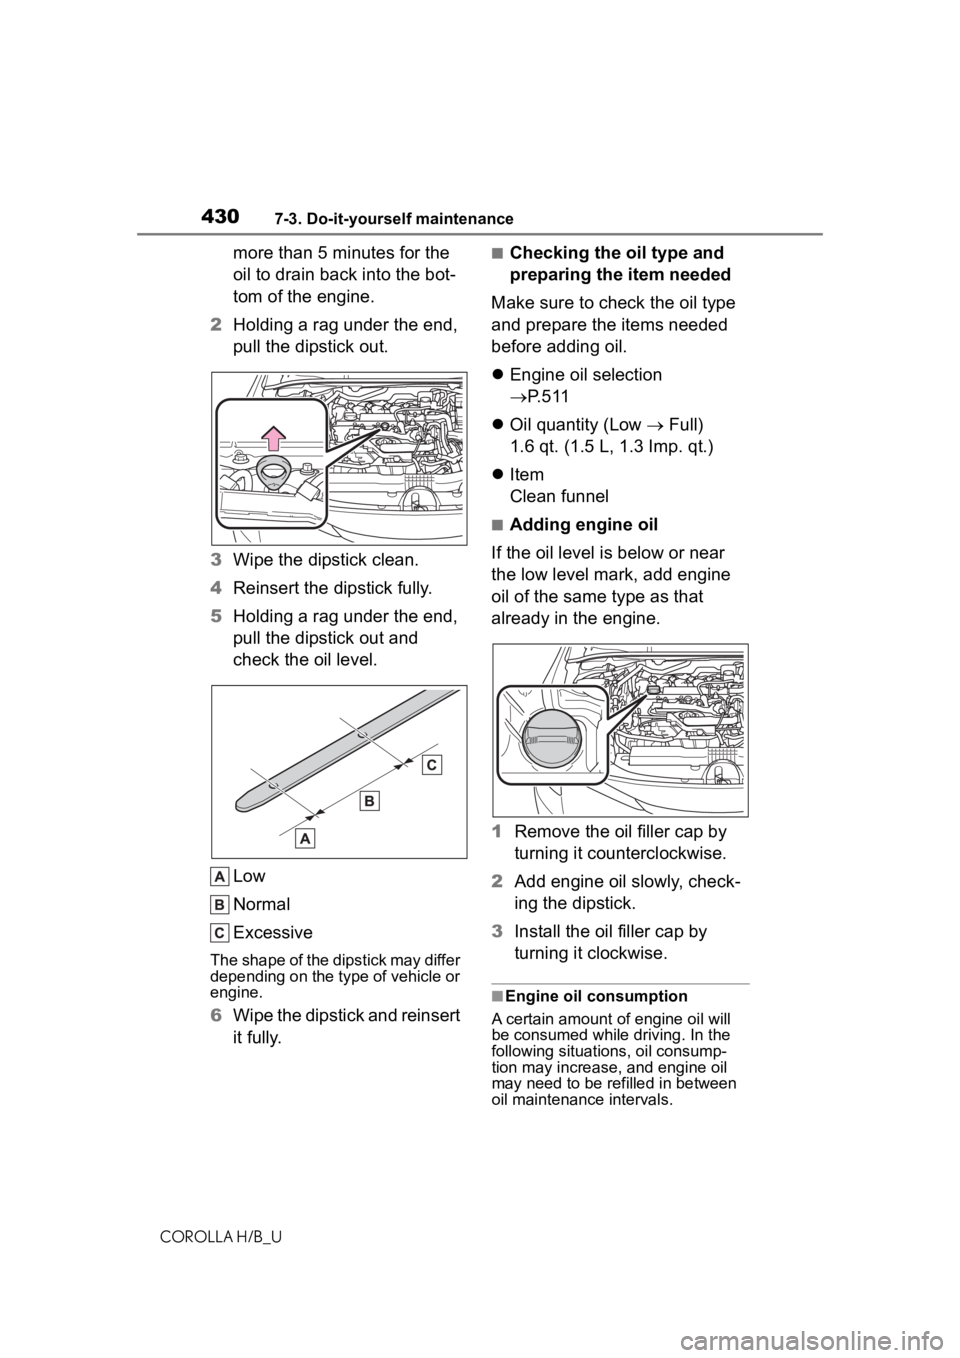
2 Holding a rag under the end,
pull the dipstick out.
3 Wipe the dipstick clean.
4 Reinsert the dipstick fully.
5 Holding a rag under the end,
pull the dipstick out and
check the oil level.
Low
Normal
Excessive
The shape of the dipstick may differ
depending on the type of vehicle or
engine.
6Wipe the dipstick and reinsert
it fully.
■Checking the oil type and
preparing the item needed
Make sure to check the oil type
and prepare the items needed
before adding oil.
Engine oil selection
P. 5 1 1
Oil quantity (Low Full)
1.6 qt. (1.5 L, 1.3 Imp. qt.)
Item
Clean funnel
■Adding engine oil
If the oil level is below or near
the low level mark, add engine
oil of the same type as that
already in the engine.
1 Remove the oil filler cap by
turning it counterclockwise.
2 Add engine oil slowly, check-
ing the dipstick.
3 Install the oil filler cap by
turning it clockwise.
■Engine oil consumption
A certain amount of engine oil will
be consumed while driving. In the
following situatio ns, oil consump-
tion may increase, and engine oil
may need to be refilled in between
oil maintenance intervals.
Page 456 of 572
4567-3. Do-it-yourself maintenance
COROLLA H/B_Uon the inside of the lens.
●Water has built up inside the
headlight.
■When replacing light bulbs
P. 4 5 4
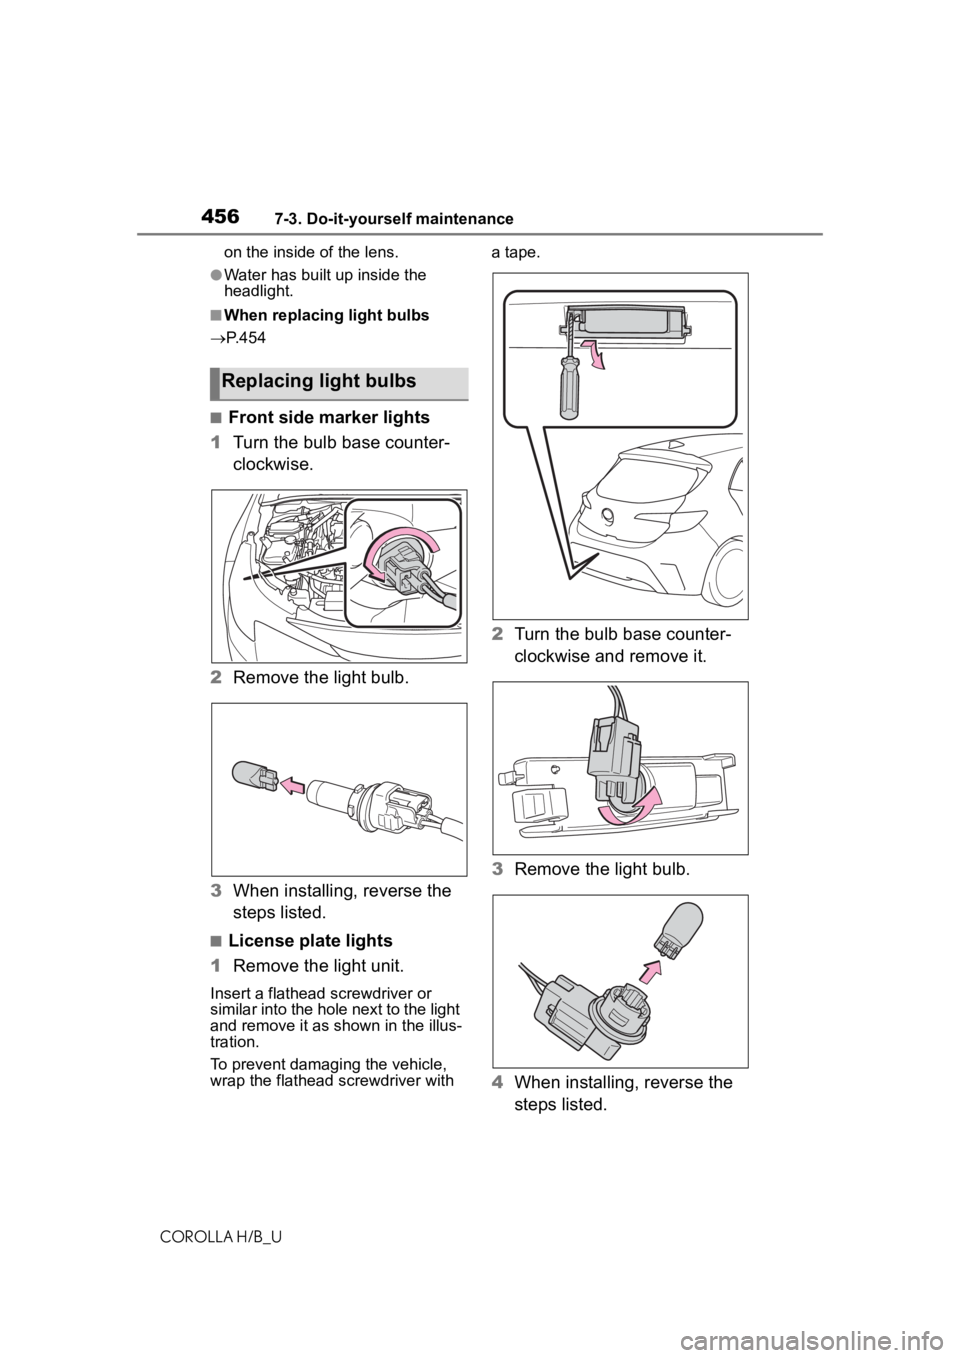
■Front side marker lights
1 Turn the bulb base counter-
clockwise.
2 Remove the light bulb.
3 When installing, reverse the
steps listed.
■License plate lights
1 Remove the light unit.
Insert a flathead screwdriver or
similar into the hole next to the light
and remove it as shown in the illus-
tration.
To prevent damagin g the vehicle,
wrap the flathead screwdriver with a tape.
2
Turn the bulb base counter-
clockwise and remove it.
3 Remove the light bulb.
4 When installing, reverse the
steps listed.
Replacing light bulbs
Page 483 of 572
4838-2. Steps to take in an emergency
COROLLA H/B_U
8
When trouble arises
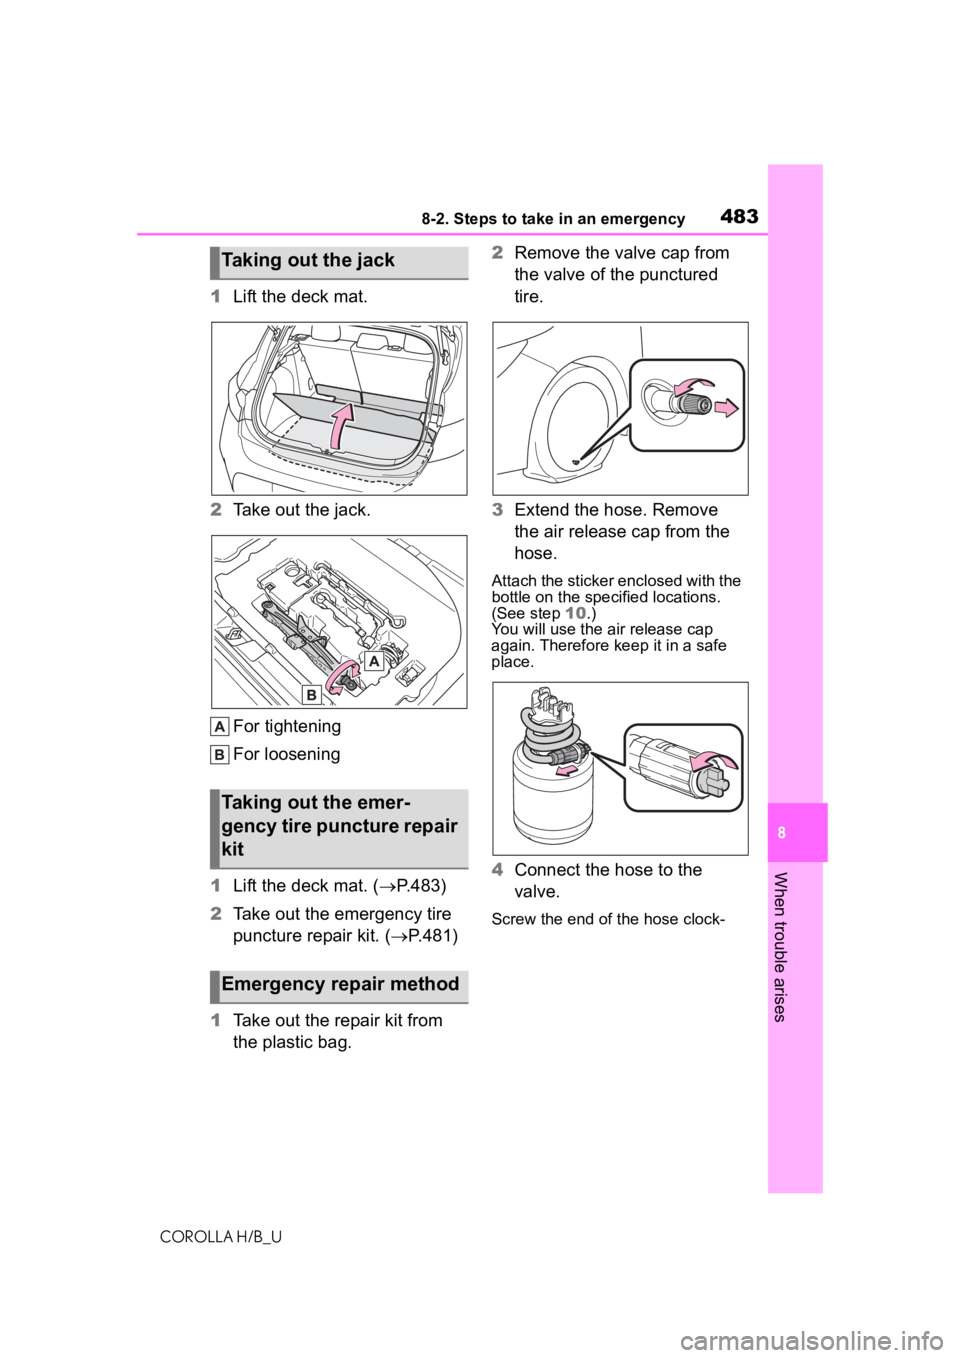
1 Lift the deck mat.
2 Take out the jack.
For tightening
For loosening
1 Lift the deck mat. ( P.483)
2 Take out the emergency tire
puncture repair kit. ( P.481)
1 Take out the repair kit from
the plastic bag. 2
Remove the valve cap from
the valve of the punctured
tire.
3 Extend the hose. Remove
the air release cap from the
hose.
Attach the sticker enclosed with the
bottle on the spec ified locations.
(See step 10.)
You will use the air release cap
again. Therefore keep it in a safe
place.
4 Connect the hose to the
valve.
Screw the end of the hose clock-
Taking out the jack
Taking out the emer-
gency tire puncture repair
kit
Emergency repair method
Page 557 of 572
557Alphabetical Index
COROLLA H/B_U
Child safety Airbag precautions ................. 34
Battery precautions ...... 434, 505
Child restraint system............. 47
Heated steering wheel and seat
heater precautions ............. 393
How your child should wear the seat belt................................ 26
Power window lock switch.... 127
Power window precautions .. 126
Rear door child-protectors.... 104
Removed electronic key battery precautions......................... 451
Seat belt extender precautions ............................................. 26
Seat belt precautions ............. 44
Child-protectors ..................... 104
Cleaning Aluminum wheels ................. 414
Exterior ................................. 414
Interior .................................. 416
Radar sensor........................ 173
Seat belts ............................. 416
Clock ............... 74, 76, 78, 81, 291
Coat hooks .............................. 411
Command list ......................... 337
Condenser .............................. 432
Console box ............................ 399
Consumption screen................ 93
Continuously variable transmis- sion ........................................ 147If the shift lever cannot be shifted from P................................. 148
M mode ................................ 150
Paddle shift switches.... 149, 150
Cooling system ...................... 431 Engine overheating ............. 506
Cruise control Dynamic radar cruise control 214
Dynamic radar cruise control with full-speed range .......... 204
Cup holders ............................ 398 Current fuel consumption........84
Curtain shield airbags ..............29
Customizable featu
res ...........531
D
Daytime running light system160
DCM .................................377, 378
Defogger
Outside rear view mirrors .....389
Rear window.........................389
Windshield ............................388
Dimensions .............................510
Dinghy towing .........................141
Display Dynamic radar cruise control 214
Dynamic radar cruise control with full-speed range ..........204
Head-up display .....................89
LDA (Lane Departure Alert with steering control)..................201
LTA (Lane-Tracing Assist) .....192
Multi-information display.........82
Warning message.................477
Display change button .......75, 80
Distance until next engine oil change .....................................80
Do-it-yourself maintenance ...420
Door lock Back door .............................105
Side doors ............................101
Smart key system .................108
Wireless remote control..........99
Doors Automatic door locking and unlocking system ................104
Back door .............................105
Door glasses ........................125
Door lock ......................101, 105
Open door warning buzzer .102, 104
Outside rear view mirrors .....123
Rear door child-protectors ....104
Page 562 of 572
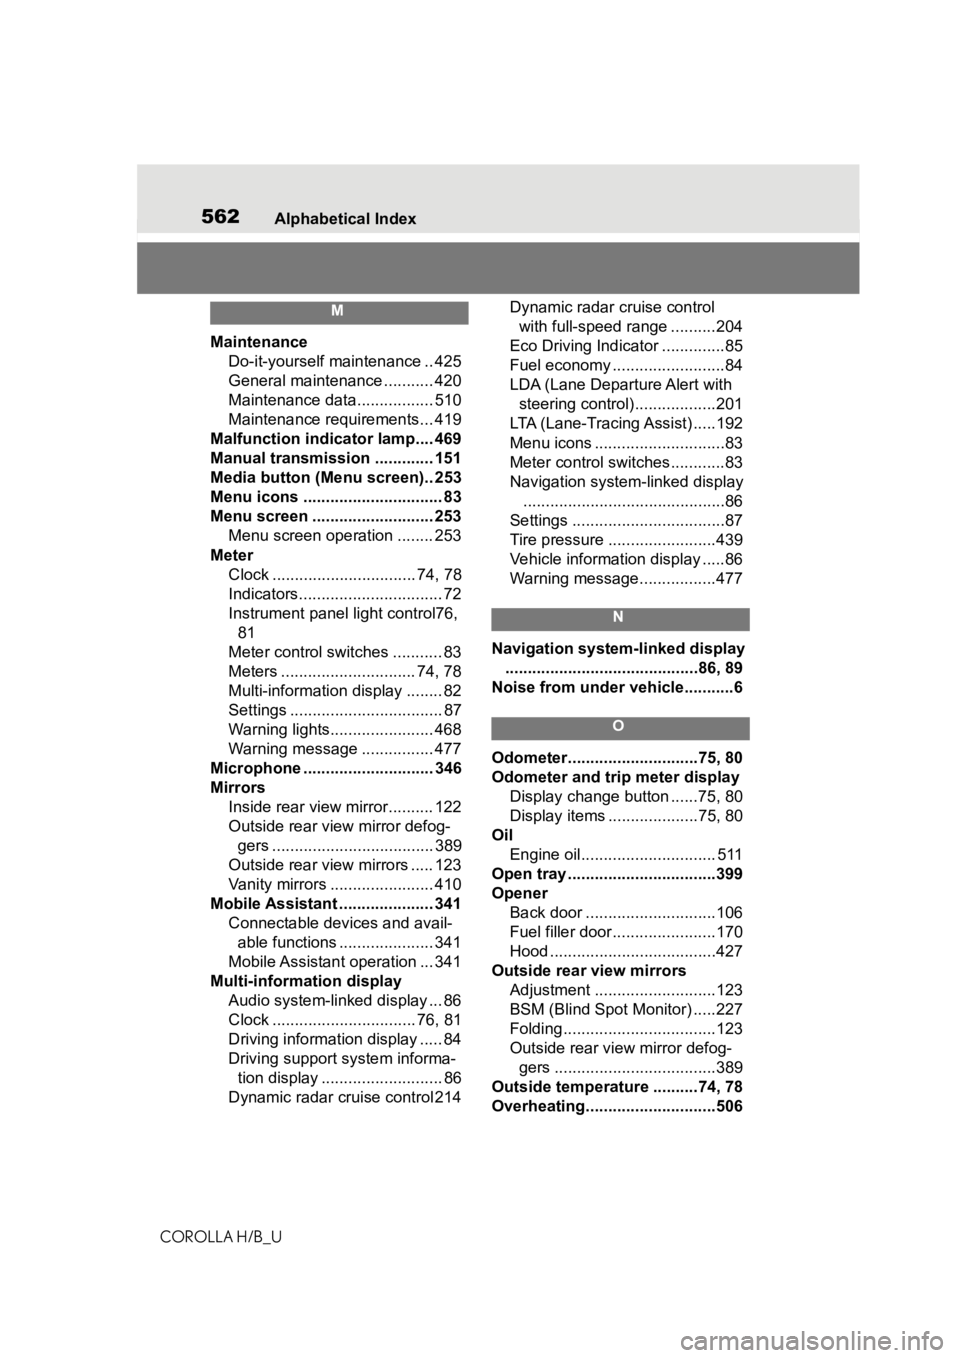
562Alphabetical Index
COROLLA H/B_U
M
Maintenance Do-it-yourself maintenance .. 425
General maintenance ........... 420
Maintenance data................. 510
Maintenance requirements... 419
Malfunction indicator lamp.... 469
Manual transmission ............. 151
Media button (Menu screen).. 253
Menu icons ............................... 83
Menu screen ........................... 253 Menu screen operation ........ 253
Meter Clock ................................ 74, 78
Indicators................................ 72
Instrument panel light control76, 81
Meter control switches ........... 83
Meters .............................. 74, 78
Multi-information display ........ 82
Settings .................................. 87
Warning lights....................... 468
Warning message ................ 477
Microphone ............................. 346
Mirrors Inside rear view mirror.......... 122
Outside rear view mirror defog-gers .................................... 389
Outside rear view mirrors ..... 123
Vanity mirrors ....................... 410
Mobile Assistant ..................... 341 Connectable devices and avail-able functions ..................... 341
Mobile Assistant operation ... 341
Multi-information display Audio system-linked display ... 86
Clock ................................ 76, 81
Driving informatio n display ..... 84
Driving support system informa- tion display ........................... 86
Dynamic radar cruise control 214 Dynamic radar cruise control
with full-speed range ..........204
Eco Driving Indicator ..............85
Fuel economy .........................84
LDA (Lane Departure Alert with steering control)..................201
LTA (Lane-Tracing Assist) .....192
Menu icons .............................83
Meter control switches............83
Navigation system-linked display .............................................86
Settings ..................................87
Tire pressure ...... ..................439
Vehicle information display .....86
Warning message.................477
N
Navigation system-linked display ...........................................86, 89
Noise from under ve hicle...........6
O
Odometer.............................75, 80
Odometer and trip meter display
Display change button ......75, 80
Display items ....................75, 80
Oil Engine oil.............................. 511
Open tray .................................399
Opener Back door .............................106
Fuel filler door.......................170
Hood .....................................427
Outside rear view mirrors Adjustment ...........................123
BSM (Blind Spot M onitor) .....227
Folding..................................123
Outside rear view mirror defog- gers ....................................389
Outside temperatur e ..........74, 78
Overheating.............................506