tire size TOYOTA COROLLA HATCHBACK 2023 User Guide
[x] Cancel search | Manufacturer: TOYOTA, Model Year: 2023, Model line: COROLLA HATCHBACK, Model: TOYOTA COROLLA HATCHBACK 2023Pages: 436, PDF Size: 8.72 MB
Page 286 of 436

2866-3. Do-it-yourself maintenance
4Press or to select
“Vehicle Settings” and then
press and hold .
5 Press or to select
“TPWS setting” and then
press .
6 Press or to select
“Pressure unit setting”.
7 Press or to select the
desired unit and then press
.
7-inch display
1 Park the vehicle in a safe
place and turn the engine
switch off.
Changing the unit cannot be per-
formed while the vehicle is moving.
2Turn the engine switch to
ON.
3 Select of the multi-infor-
mation display and then
press .
4 Press or to select
“Vehicle Settings” and then
press and hold .
5 Press or to select
“TPWS setting” and then
press .
6 Press or to select
“Pressure unit setting”. 7
Press or to select the
desired unit and then press
.
■Routine tire inflation pressure
checks
The tire pressure warning system
does not replace routine tire inflation
pressure checks . Make sure to
check tire inflation pressure as part
of your routine o f daily vehicle
checks.
■Tire inflation pressure
●It may take a few minutes to dis-
play the tire inflation pressure
after the engine switch is turned to
ON. It may also take a few min-
utes to display the tire inflation
pressure after infl ation pressure
has been adjusted.
●Tire inflation pressure changes
with temperature.
The displayed values may also be
different from the values mea-
sured using a tire pressure gauge.
■Situations in which the tire
pressure warning system may
not operate properly
●In the following cases, the tire
pressure warning system may not
operate properly.
• If non-genuine Toyota wheels are used.
• A tire has been replaced with a
tire that is not an OE (Original
Equipment) tire.
• A tire has been replaced with a
tire that is not of the specified size.
• Tire chains, etc. are equipped.
• An auxiliary-support ed run-flat tire
is equipped.
• If a window tint that affects the radio wave signals is installed.
• If there is a lot of snow or ice on the vehicle, particularly around the
wheels or wheel housings.
• If the tire inflation pressure is extremely higher than the speci-
fied level.
Page 290 of 436
2906-3. Do-it-yourself maintenance
position registration may take lon-
ger than usual to b e completed or
may not be possible.
• Vehicle is not driven at approxi- mately 25 mph ( 40 km/h) or more
• Vehicle is driven on unpaved
roads
• If wheel position registration does not complete afte r driving for 1
hour or more, park the vehicle in a
safe place for approximately 15
minutes and then drive the vehicle
again.
●If the vehicle is reversed during
wheel position registration, all
data collected until then will be
cleared. Perform driving again.
In the following situations, it will
be necessary to perform the tire
inflation pressure setting proce-
dure of the tire pressure warning
system.
When the specified tire infla-
tion pressure has changed,
such as due to carried load,
etc.
When the tire inflation pres-
sure is changed such as
when the tire size is changed.
If the tire inflation pressure has
been adjusted to the specified
level, perform the t ire inflation set-
ting procedure by selecting speci-
fied inflation pressure on the
multi-information display.
When the tire inflation pressure is
to be other than specified, such as
when tires other th an the specified
size are used, etc., set the tire infla-
tion pressure using the current
pressure. Make sure to adjust the tire inflation pressure of each tire to
the appropriate level before per-
forming tire press
ure setting. The
tire pressure warning system oper-
ates based on this tire inflation
pressure.
■Setting by selecting a spec-
ified tire inflation pressure
4.2-inch display
1 Park the vehicle in a safe
place and then start the
engine.
The tire inflation pressure cannot
be set while the ve hicle is moving.
2Select of the multi-infor-
mation display and then
press .
3 Press or to select
“Vehicle Settings” and then
press and hold .
4 Press or to select
“TPWS setting” and then
press .
5 Press or to select
“Tire Pressure Setting” and
then press .
6 Press or to select
“Setting by Specified Pres-
sure” and then press .
7 Select the desired tire pres-
sures, then press .
The tire pressure warning light will
slowly blink 3 times.
After setting the tire inflation pres-
Setting the tire pressure
Page 299 of 436
2996-3. Do-it-yourself maintenance
6
Maintenance and care
sage indicating that the change
could not be completed will be dis-
played.
Check which wheel set is installed
and perform the change procedure
again from the beginning.
9 If the specified tire inflation
pressure of the wheel set
installed differs from that of
the previous set, it will be
necessary to perform the tire
inflation pressure setting pro-
cedure of the tire pressure
warning system. ( P.290)
If the specified tire inflation pres-
sure is the same, i t will not be nec-
essary to perform the tire inflation
pressure setting procedure.
10 Register the position of each
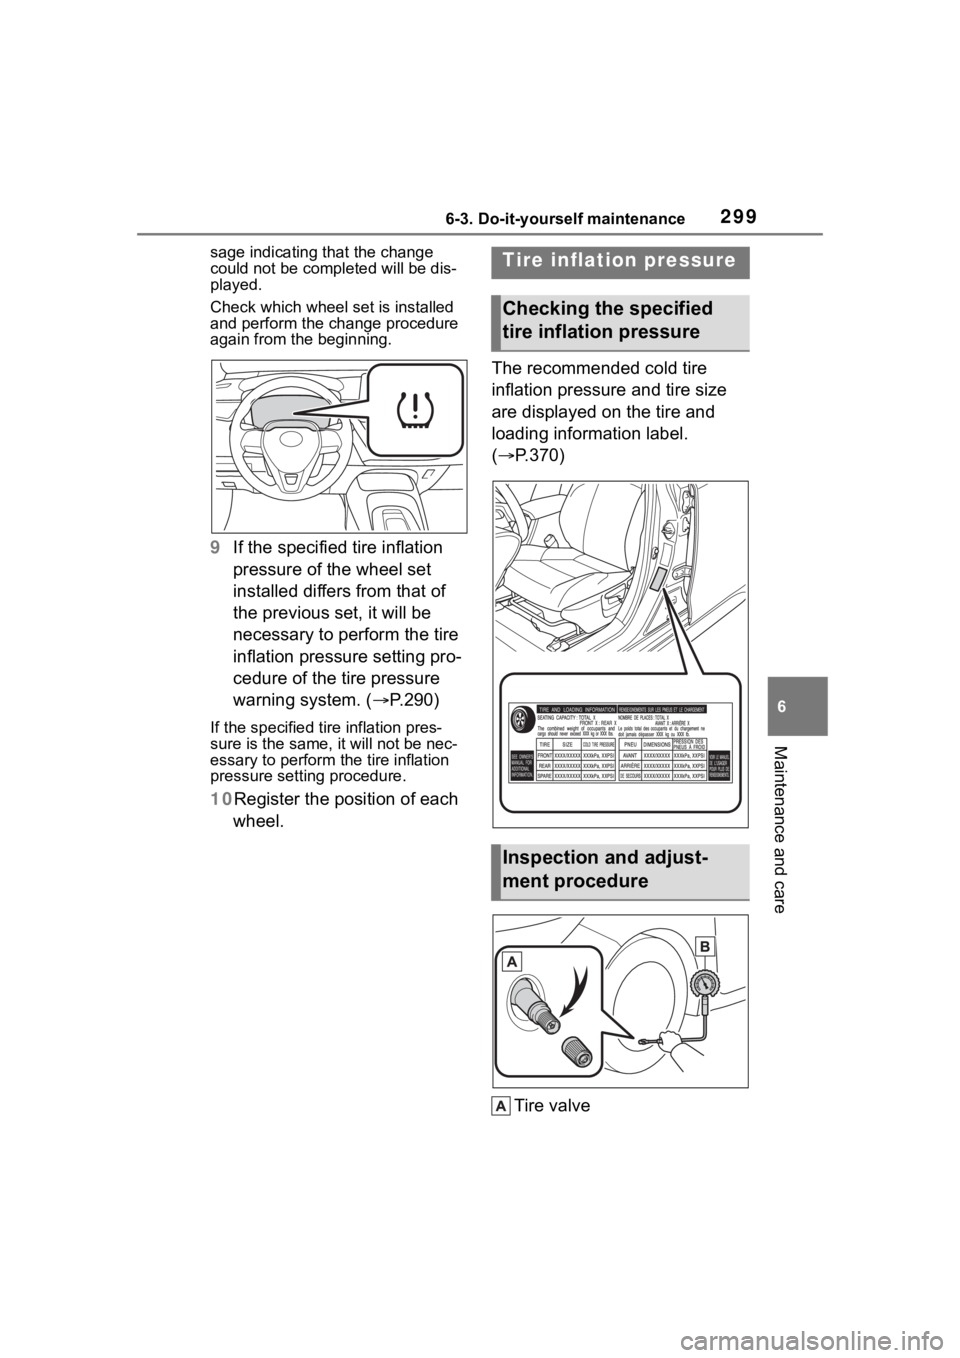
wheel. The recommended cold tire
inflation pressure and tire size
are displayed on the tire and
loading information label.
(
P.370)
Tire valve
Tire inflation pressure
Checking the specified
tire inflation pressure
Inspection and adjust-
ment procedure
Page 301 of 436
3016-3. Do-it-yourself maintenance
6
Maintenance and care
When replacing wheels, care
should be taken to ensure that
they are equivalent to those
removed in load capacity, diam-
eter, rim width and inset
*.
Replacement wheels are avail-
able at your Toyota dealer.
*: Conventionally referred to as off- set.
Toyota does not recommend
using the following:
Wheels of different sizes or
types
Used wheels
Bent wheels that have been
straightened
■When replacing wheels
The wheels of your vehicle are
equipped with tire pressure warning
valves and transmitters that allow
the tire pressure warning system to
provide advance warning in the
event of a loss in tire inflation pres-
sure. Whenever wheels are
replaced, the tire pressure warning
valves and transmitters must be
installed. ( P.287)
WARNING
●Greater possibility of tire dam-
age while driving (due to road
hazards, expansion joints,
sharp edges on the road, etc.)
NOTICE
■When inspecting and adjust-
ing tire inflation pressure
Be sure to put the tire valve caps
back on.
If a valve cap is not installed, dirt
or moisture may get into the valve
and cause an air leak, resulting in
decreased tire inflation pressure.
Wheels
If a wheel is bent, cracked or
heavily corroded, it should
be replaced. Otherwise, the
tire may separate from the
wheel or cause a loss of
handling control.
Wheel selection
Page 302 of 436
3026-3. Do-it-yourself maintenance
Use only Toyota wheel nuts
and wheel nut wrenches
designed for use with your
aluminum wheels.
When rotating, repairing or
changing your tires, check
that the wheel nuts are still
tight after driving 1000 miles
(1600 km).
Be careful not to damage the
aluminum wheels when using
tire chains.
Use only Toyota genuine bal-
ance weights or equivalent
and a plastic or rubber ham-
mer when balancing your
wheels.
WARNING
■When replacing wheels
●Do not use wheels that are a dif-
ferent size from those recom-
mended in the Owner’s Manual,
as this may result in a loss of
handling control.
●Never use an inner tube in a
leaking wheel which is designed
for a tubeless tire.
Doing so may result in an acci-
dent, causing death or serious
injury.
■When installing the wheel
nuts
●Be sure to install the wheel nuts
with the tapered ends facing
inward. ( P.351) Installing the
nuts with the tapered ends fac-
ing outward can cause the
wheel to break a nd eventually
cause the wheel to come off
while driving, which could lead
to an accident resulting in death
or serious injury.
●Never use oil or grease on the
wheel bolts or wheel nuts.
Oil and grease may cause the
wheel nuts to be excessively
tightened, leading to bolt or disc
wheel damage. In addition, the
oil or grease can cause the
wheel nuts to loosen and the
wheel may fall off, causing an
accident and resulting in death
or serious injury. Remove any
oil or grease from the wheel
bolts or wheel nuts.
■Use of defective wheels pro-
hibited
Do not use cracked or deformed
wheels. Doing so could cause the
tire to leak air during driving, pos-
sibly causing an accident.
NOTICE
■Replacing tire pressure warn-
ing valves and transmitters
●Because tire repair or replace-
ment may affect the tire pres-
sure warning valves and
transmitters, make sure to have
tires serviced by your Toyota
dealer or other qualified service
shop. In additio n, make sure to
purchase your tire pressure
warning valves and transmit-
ters at your Toyota dealer.
●Ensure that only genuine Toyota
wheels are used on your vehi-
cle.
Tire pressure warning valves
and transmitters may not work
properly with non-genuine
wheels.
Aluminum wheel precau-
tions
Page 329 of 436
3297-2. Steps to take in an emergency
7
When trouble arises
WARNING
■If a blowout or sudden air
leakage should occur
The tire pressure warning system
may not activate immediately.
■Maintenance of the tires
Each tire, including the spare (if
provided), should be checked
monthly when cold and inflated to
the inflation pressure recom-
mended by the vehicle manufac-
turer on the vehicle placard or tire
inflation pressure label (tire and
load information label). (If your
vehicle has tires of a different size
than the size indicated on the
vehicle placard or tire inflation
pressure label [tire and load infor-
mation label], you should deter-
mine the proper tire inflation
pressure for those tires.)
As an added safe ty feature, your
vehicle has been equipped with a
tire pressure m onitoring system
(TPMS-tire pressure warning sys-
tem) that illuminates a low tire
pressure telltale (tire pressure
warning light) when one or more
of your tires is significantly
under-inflated. Accordingly, when
the low tire pressure telltale (tire
pressure warning light) illumi-
nates, you should stop and check
your tires as soon as possible,
and inflate them to the proper
pressure. Driving on a signifi-
cantly under-inflated tire causes
the tire to overheat and can lead
to tire failure. Under-inflation also
reduces fuel efficiency and tire
tread life, and may affect the vehi-
cle’s handling and stopping ability.
Please note that the TPMS (tire
pressure warning system) is not a
substitute for proper tire mainte-
nance, and it is the driver’s
responsibility to m aintain correct
tire pressure, even if under-infla-
tion has not reached the level to
trigger illumination of the TPMS
low tire pressure te lltale (tire pres-
sure warning light).
Your vehicle has also been
equipped with a TPMS (tire pres-
sure warning system) malfunc-
tion indicator to indicate when the
system is not operating properly.
The TPMS (tire pressure warning
system) malfunction indicator is
combined with the low tire pres-
sure telltale (tire pressure warning
light). When the system detects a
malfunction, the te lltale will flash
for approximately one minute and
then remain continuously illumi-
nated. This sequence will con-
tinue upon subsequent vehicle
start-ups as long as the malfunc-
tion exists. When the malfunction
indicator is illuminated, the sys-
tem may not be ab le to detect or
signal low tire pressure as
intended.
TPMS (tire pressure warning sys-
tem) malfunctions may occur for a
variety of reasons, including the
installation of replacement or
alternate tires or wheels on the
vehicle that prevent the TPMS
(tire pressure warning system)
from functioning properly. Always
check the TPMS (tire pressure
warning system) malfunction tell-
tale after replacing one or more
tires or wheels on your vehicle to
ensure that the replacement or
alternate tires and wheels allow
the TPMS (tire pressure warning
system) to continue to function
properly.
Page 337 of 436
3377-2. Steps to take in an emergency
7
When trouble arises
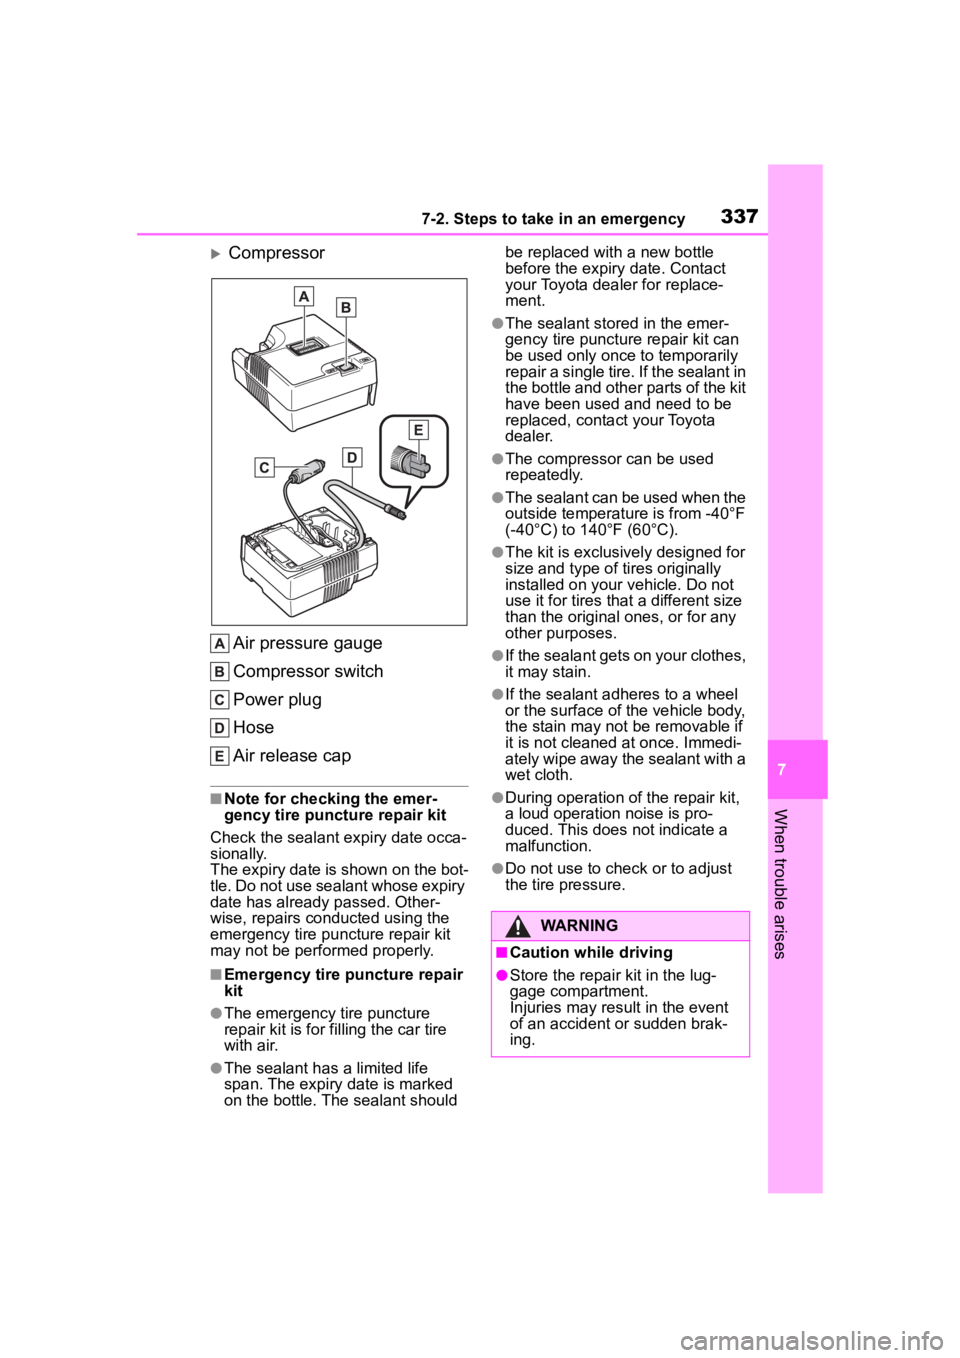
Compressor
Air pressure gauge
Compressor switch
Power plug
Hose
Air release cap
■Note for checking the emer-
gency tire puncture repair kit
Check the sealant expiry date occa-
sionally.
The expiry date is shown on the bot-
tle. Do not use sealant whose expiry
date has already passed. Other-
wise, repairs conducted using the
emergency tire puncture repair kit
may not be performed properly.
■Emergency tire puncture repair
kit
●The emergency tire puncture
repair kit is for filling the car tire
with air.
●The sealant has a limited life
span. The expiry date is marked
on the bottle. The sealant should be replaced with
a new bottle
before the expiry date. Contact
your Toyota dealer for replace-
ment.
●The sealant stored in the emer-
gency tire puncture repair kit can
be used only once to temporarily
repair a single tire. If the sealant in
the bottle and other parts of the kit
have been used and need to be
replaced, contact your Toyota
dealer.
●The compressor can be used
repeatedly.
●The sealant can be used when the
outside temperature is from -40°F
(-40°C) to 140°F (60°C).
●The kit is exclusi vely designed for
size and type of ti res originally
installed on your vehicle. Do not
use it for tires that a different size
than the original ones, or for any
other purposes.
●If the sealant gets on your clothes,
it may stain.
●If the sealant adhe res to a wheel
or the surface of the vehicle body,
the stain may not be removable if
it is not cleaned at once. Immedi-
ately wipe away the sealant with a
wet cloth.
●During operation of the repair kit,
a loud operation noise is pro-
duced. This does not indicate a
malfunction.
●Do not use to check or to adjust
the tire pressure.
WARNING
■Caution while driving
●Store the repair kit in the lug-
gage compartment.
Injuries may result in the event
of an accident or sudden brak-
ing.
Page 338 of 436
3387-2. Steps to take in an emergency
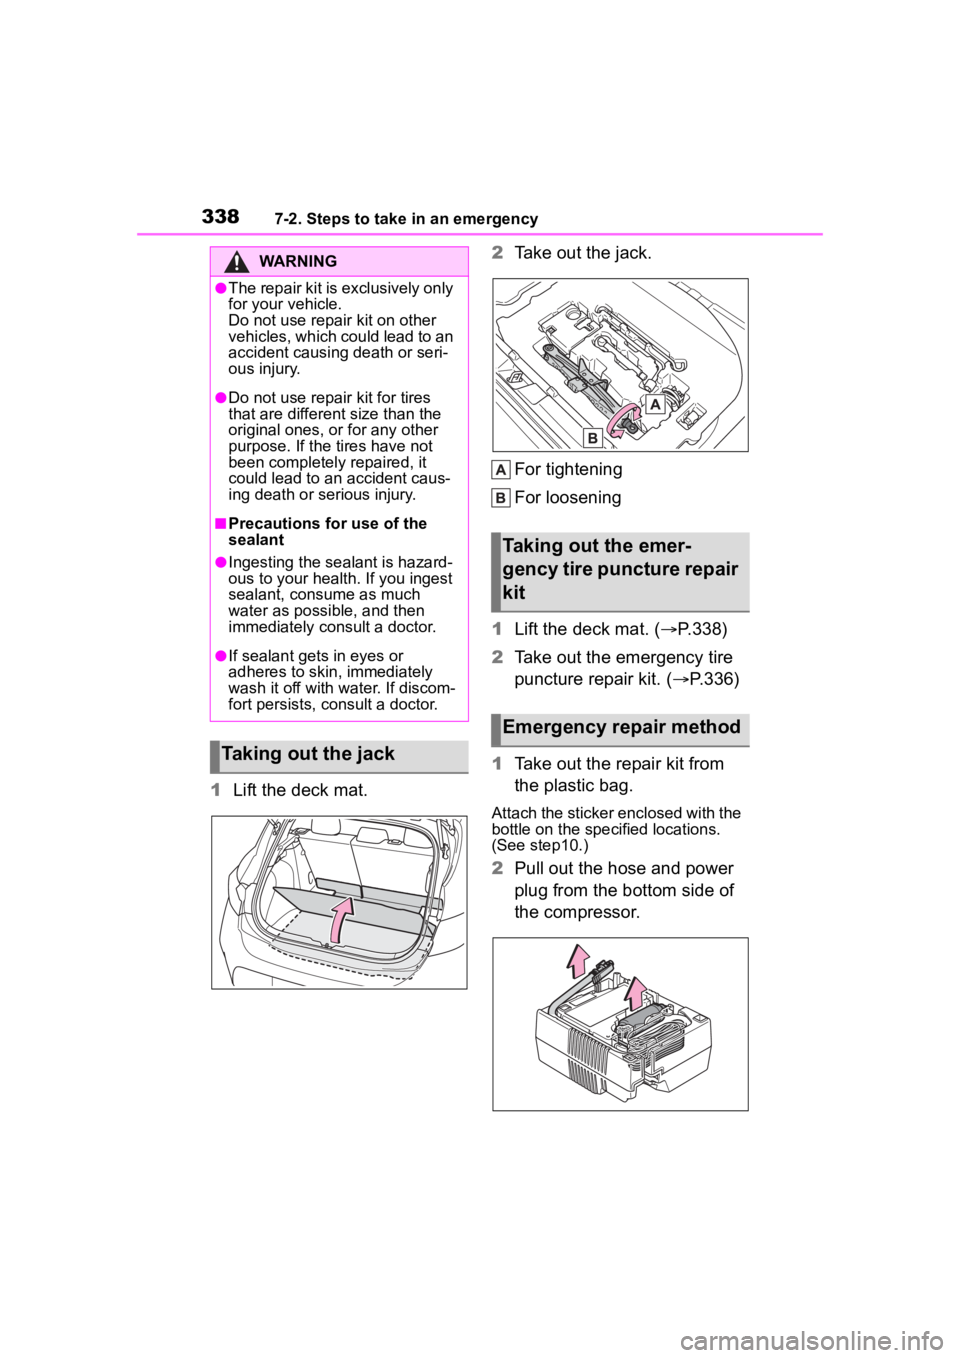
1Lift the deck mat. 2
Take out the jack.
For tightening
For loosening
1 Lift the deck mat. ( P.338)
2 Take out the emergency tire
puncture repair kit. ( P.336)
1 Take out the repair kit from
the plastic bag.
Attach the sticker enclosed with the
bottle on the spec ified locations.
(See step10.)
2 Pull out the hose and power
plug from the bottom side of
the compressor.
WARNING
●The repair kit is exclusively only
for your vehicle.
Do not use repair kit on other
vehicles, which could lead to an
accident causing death or seri-
ous injury.
●Do not use repair kit for tires
that are different size than the
original ones, or for any other
purpose. If the tires have not
been completely repaired, it
could lead to an accident caus-
ing death or serious injury.
■Precautions for use of the
sealant
●Ingesting the sealant is hazard-
ous to your health. If you ingest
sealant, consume as much
water as possible, and then
immediately consult a doctor.
●If sealant gets in eyes or
adheres to skin, immediately
wash it off with water. If discom-
fort persists, consult a doctor.
Taking out the jack
Taking out the emer-
gency tire puncture repair
kit
Emergency repair method
Page 370 of 436
3708-1. Specifications
*1: Minimum pedal clearance when depressed with a force of 67.4 lbf (300
N, 30.6 kgf) while the engine is running.
When performing the brake pedal i nspection, also be sure to check that
the brake system warning light is not illuminated when the engi ne is run-
ning. (If the brake system warning light is illuminated, refer to P.320.)
*2: Make sure to confirm that the brake warning light (yellow) doe s not illumi-
nate. (If the brake warning light illuminates, refer to P.320.)
15-inch tires
NOTICE
■Continuously variable transmission fluid type
Using continuously variable tran smission fluid other than the above type
may cause abnormal noise or vibration, or damage the continuous ly vari-
able transmission of your vehicle.
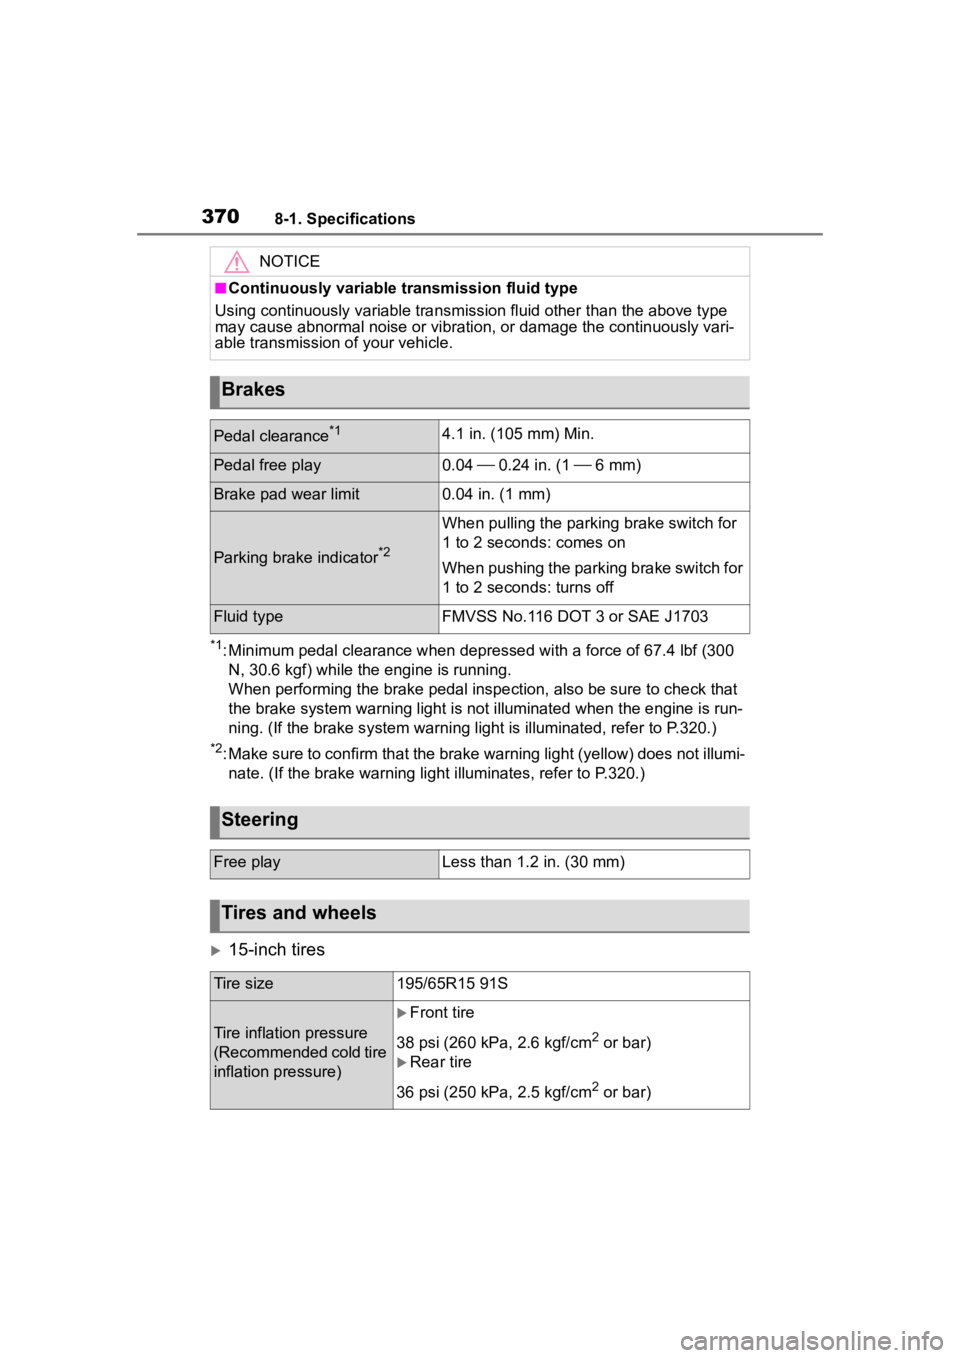
Brakes
Pedal clearance*14.1 in. (105 mm) Min.
Pedal free play0.04 0.24 in. (1 6 mm)
Brake pad wear limit0.04 in. (1 mm)
Parking brake indicator*2
When pulling th e parking brake switch for
1 to 2 seconds: comes on
When pushing the parking brake switch for
1 to 2 seconds: turns off
Fluid typeFMVSS No.116 DOT 3 or SAE J1703
Steering
Free playLess than 1.2 in. (30 mm)
Tires and wheels
Tire size195/65R15 91S
Tire inflation pressure
(Recommended cold tire
inflation pressure)
Front tire
38 psi (260 kPa, 2.6 kgf/cm
2 or bar)
Rear tire
36 psi (250 kPa, 2.5 kgf/cm
2 or bar)
Page 371 of 436
3718-1. Specifications
8
Vehicle specifications
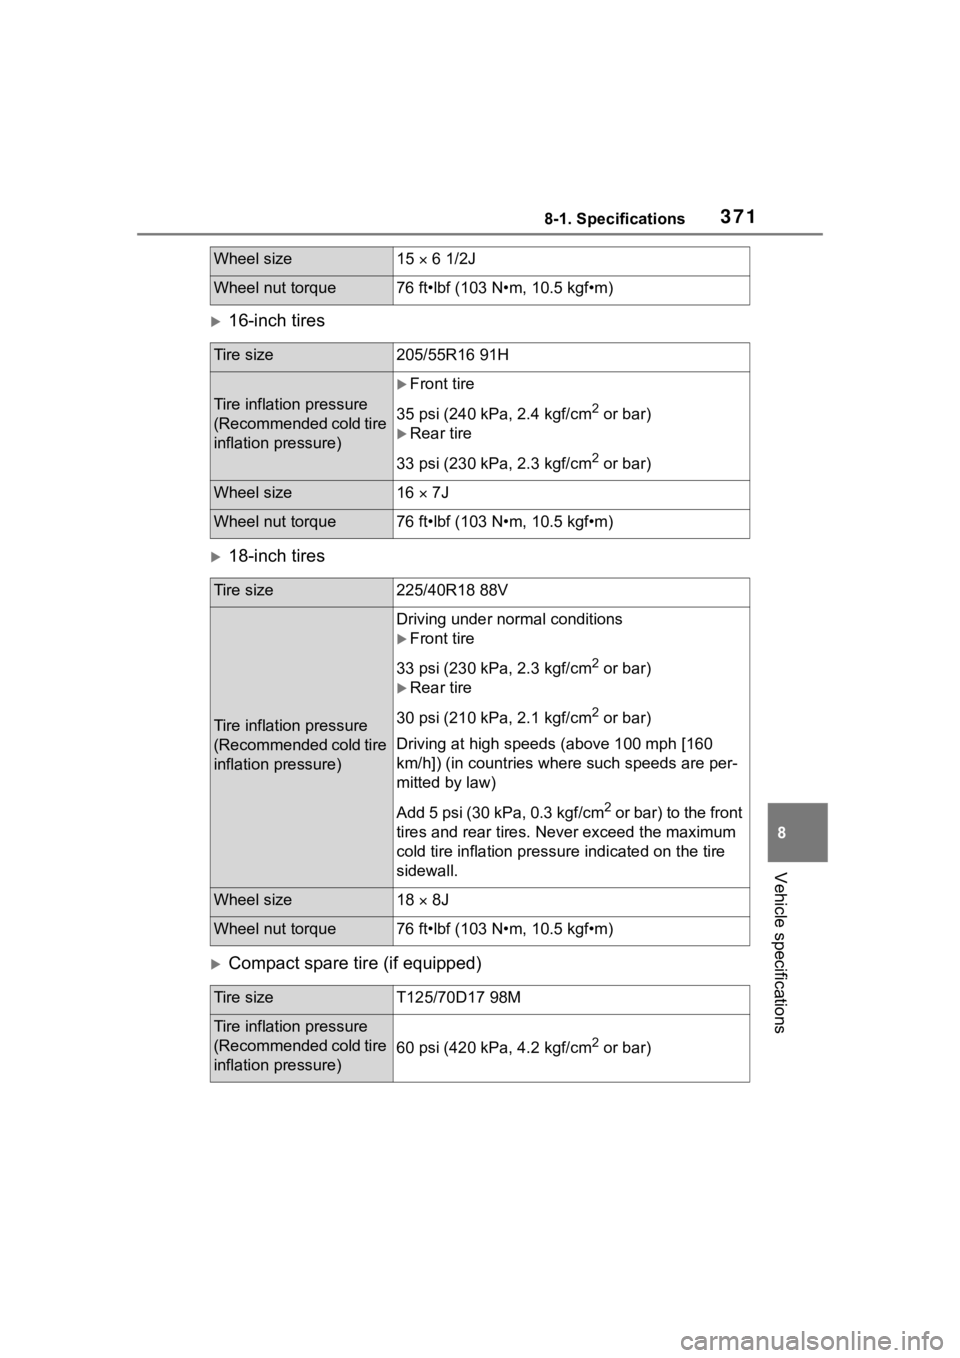
16-inch tires
18-inch tires
Compact spare tire (if equipped)
Wheel size15 6 1/2J
Wheel nut torque76 ft•lbf (103 N•m, 10.5 kgf•m)
Tire size205/55R16 91H
Tire inflation pressure
(Recommended cold tire
inflation pressure)
Front tire
35 psi (240 kPa, 2.4 kgf/cm
2 or bar)
Rear tire
33 psi (230 kPa, 2.3 kgf/cm
2 or bar)
Wheel size16 7J
Wheel nut torque76 ft•lbf (103 N•m, 10.5 kgf•m)
Tire size225/40R18 88V
Tire inflation pressure
(Recommended cold tire
inflation pressure)
Driving under nor mal conditions
Front tire
33 psi (230 kPa, 2.3 kgf/cm
2 or bar)
Rear tire
30 psi (210 kPa, 2.1 kgf/cm
2 or bar)
Driving at high speeds (above 100 mph [160
km/h]) (in countries wher e such speeds are per-
mitted by law)
Add 5 psi (30 kPa, 0.3 kgf/cm
2 or bar) to the front
tires and rear tires. Never exceed the maximum
cold tire inflation pressu re indicated on the tire
sidewall.
Wheel size18 8J
Wheel nut torque76 ft•lbf (103 N•m, 10.5 kgf•m)
Tire sizeT125/70D17 98M
Tire inflation pressure
(Recommended cold tire
inflation pressure)
60 psi (420 kPa, 4.2 kgf/cm2 or bar)