TOYOTA GR SUPRA 2022 Owners Manual
Manufacturer: TOYOTA, Model Year: 2022, Model line: GR SUPRA, Model: TOYOTA GR SUPRA 2022Pages: 356, PDF Size: 39.14 MB
Page 121 of 356
1213-1. CONTROLS
3
CONTROLS
a speed of approx. 2 mph/3
km/h the parking brake is set.
1Switch on drive-ready state.
2 Press the switch while
the brake is pressed or selec-
tor lever position P is set.
The LED and indicator light go out.
The parking brake is released.
The parking brake is released
automatically when you drive
away.
The LED and indicator light go
out.
In the event of a failure or mal-
function of the parking brake:
Secure the vehicle against roll-
ing away, for instance with a
wheel chock, after existing the
vehicle.
To reestablish parking brake
functionality after a power fail-
ure:
1 Switch on standby state. 2
Pull the switch while
stepping on the brake pedal
or selector lever position P is
set and then push.
This process may take a few
seconds. Any sounds associ-
ated with this are normal.
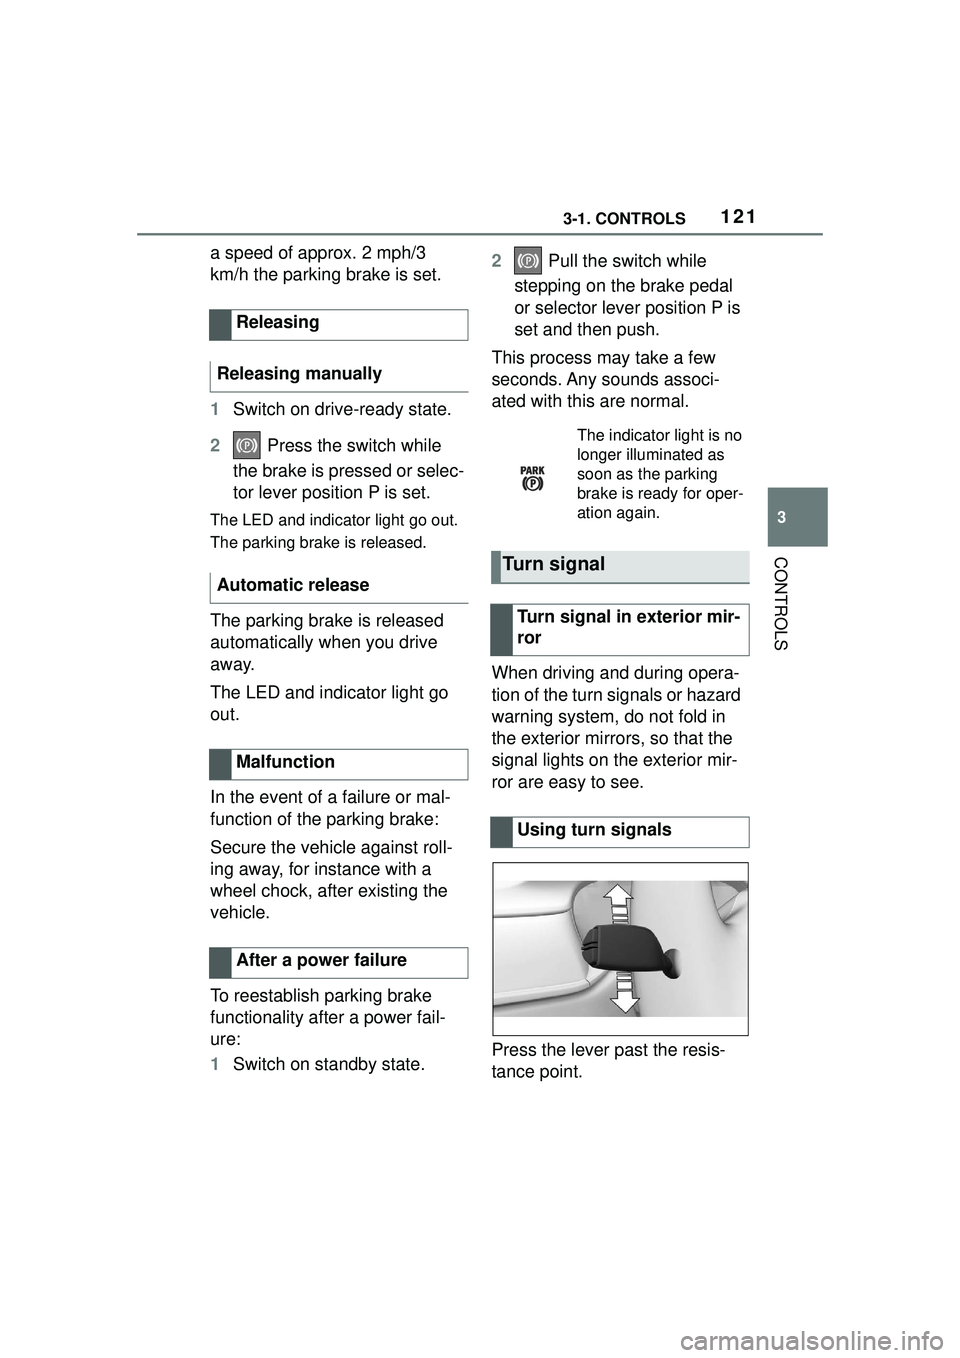
When driving and during opera-
tion of the turn signals or hazard
warning system, do not fold in
the exterior mirrors, so that the
signal lights on the exterior mir-
ror are easy to see.
Press the lever past the resis-
tance point.
Releasing
Releasing manually
Automatic release
Malfunction
After a power failure
The indicator light is no
longer illuminated as
soon as the parking
brake is ready for oper-
ation again.
Turn signal
Turn signal in exterior mir-
ror
Using turn signals
Page 122 of 356
1223-1. CONTROLS
Lightly tap the lever up or down.
The triple turn signal duration
can be adjusted.
Via Toyota Supra Command:
1"My Vehicle"
2 "Vehicle settings"
3 "Exterior lighting"
4 "One-touch turn signal"
5 Select the desired setting.
Press the lever to the resistance
point and hold it there for as
long as you want the turn signal
to flash.
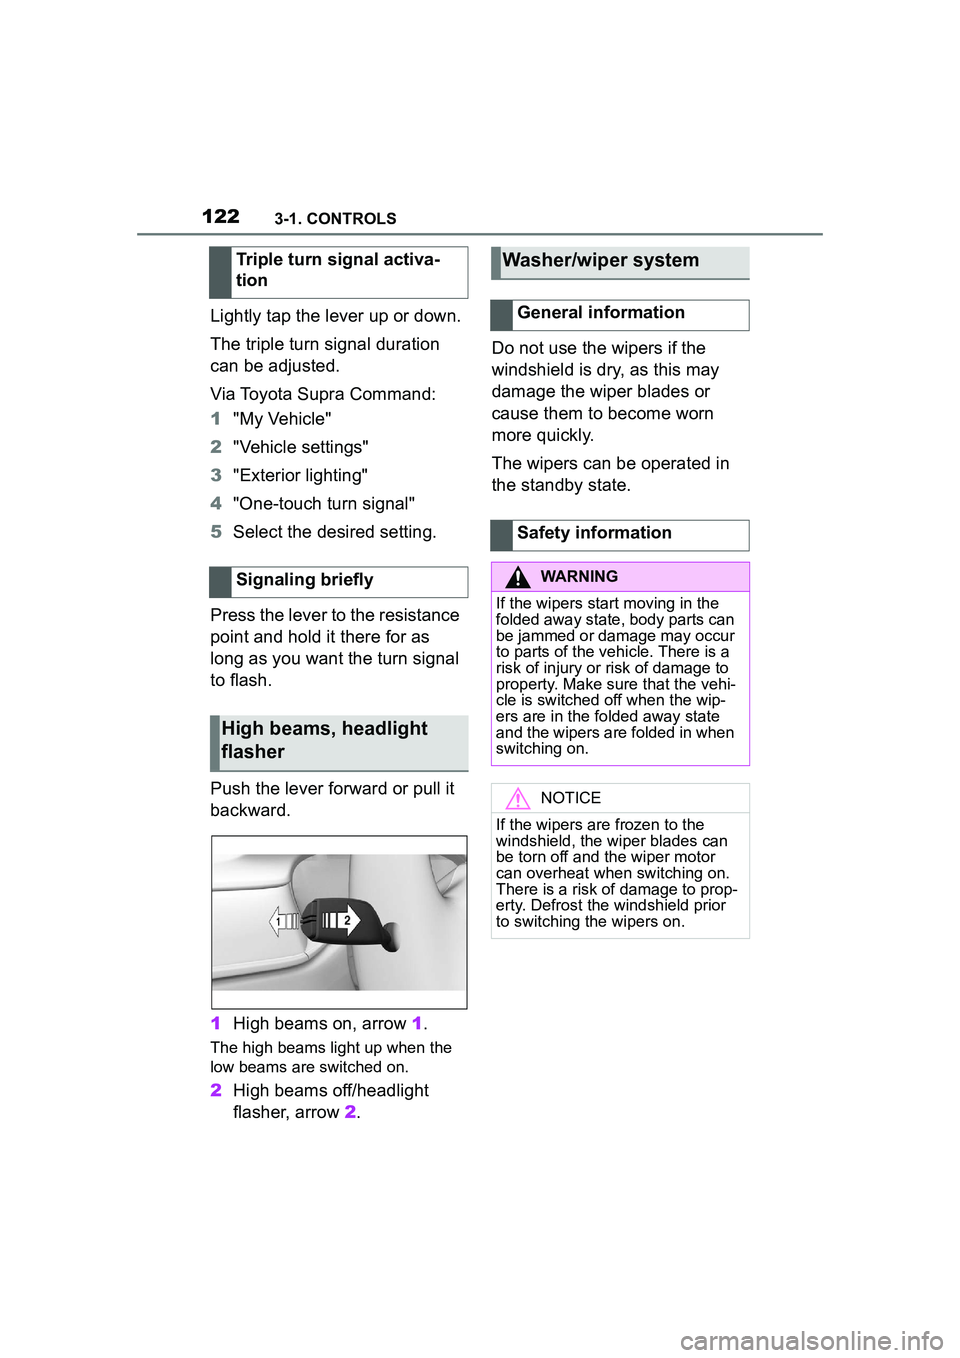
Push the lever forward or pull it
backward.
1 High beams on, arrow 1.
The high beams light up when the
low beams are switched on.
2High beams off/headlight
flasher, arrow 2. Do not use the wipers if the
windshield is dry, as this may
damage the wiper blades or
cause them to become worn
more quickly.
The wipers can be operated in
the standby state.
Triple turn signal activa-
tion
Signaling briefly
High beams, headlight
flasher
Washer/wiper system
General information
Safety information
WARNING
If the wipers start moving in the
folded away state, body parts can
be jammed or damage may occur
to parts of the vehicle. There is a
risk of injury or risk of damage to
property. Make sure that the vehi-
cle is switched off when the wip-
ers are in the folded away state
and the wipers are folded in when
switching on.
NOTICE
If the wipers are frozen to the
windshield, the wiper blades can
be torn off and the wiper motor
can overheat when switching on.
There is a risk of damage to prop-
erty. Defrost the windshield prior
to switching the wipers on.
Page 123 of 356
1233-1. CONTROLS
3
CONTROLS
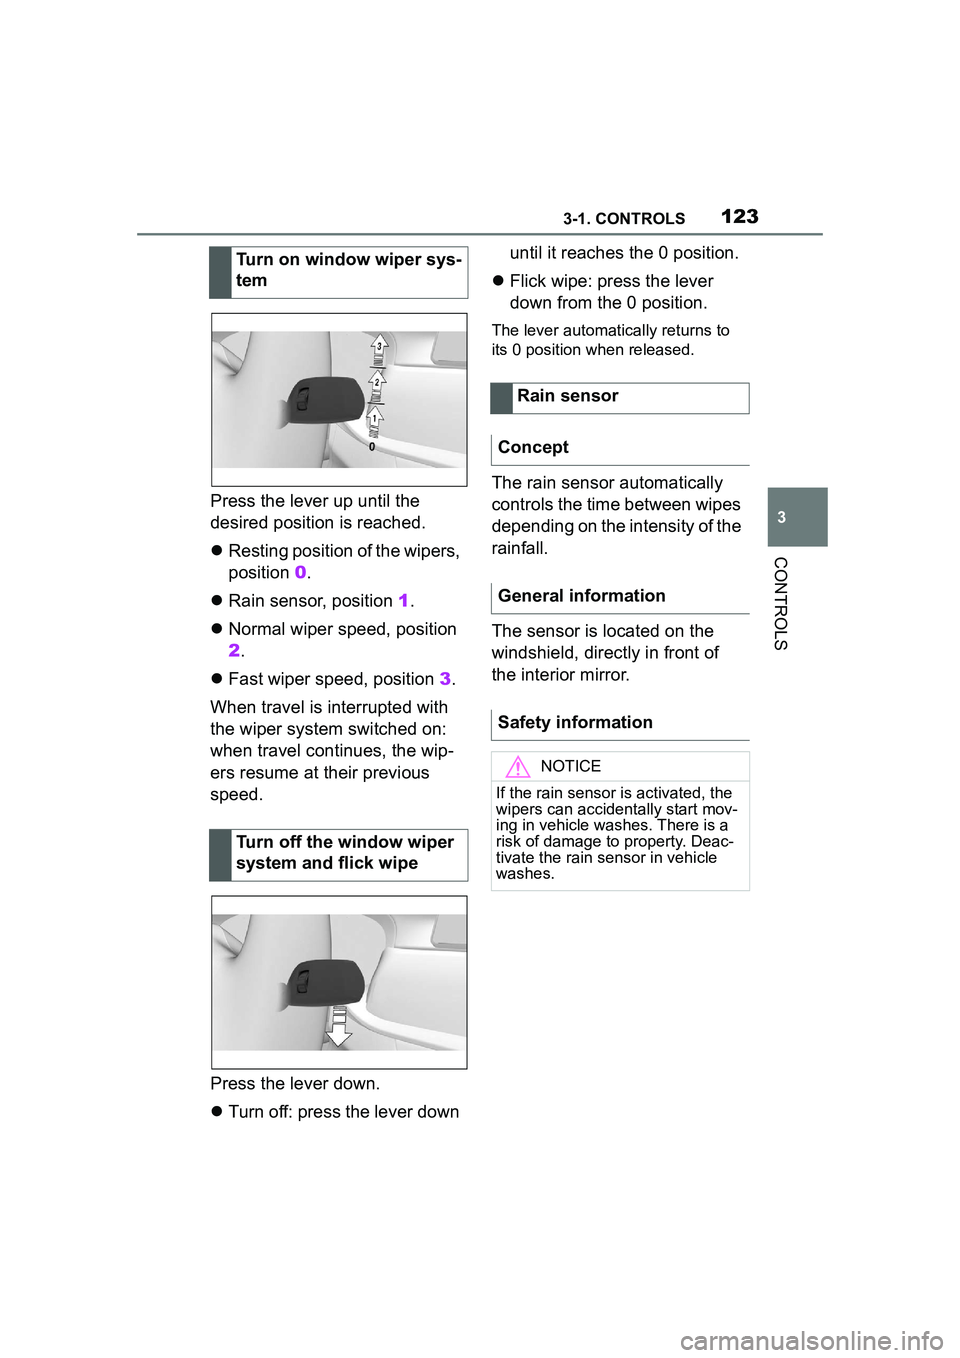
Press the lever up until the
desired position is reached.
Resting position of the wipers,
position 0 .
Rain sensor, position 1.
Normal wiper speed, position
2.
Fast wiper speed, position 3.
When travel is interrupted with
the wiper system switched on:
when travel continues, the wip-
ers resume at their previous
speed.
Press the lever down.
Turn off: press the lever down until it reaches the 0 position.
Flick wipe: press the lever
down from the 0 position.
The lever automati cally returns to
its 0 position when released.
The rain sensor automatically
controls the time between wipes
depending on the intensity of the
rainfall.
The sensor is located on the
windshield, directly in front of
the interior mirror.
Turn on window wiper sys-
tem
Turn off the window wiper
system and flick wipe
Rain sensor
Concept
General information
Safety information
NOTICE
If the rain sensor is activated, the
wipers can accidentally start mov-
ing in vehicle washes. There is a
risk of damage to property. Deac-
tivate the rain sensor in vehicle
washes.
Page 124 of 356
1243-1. CONTROLS
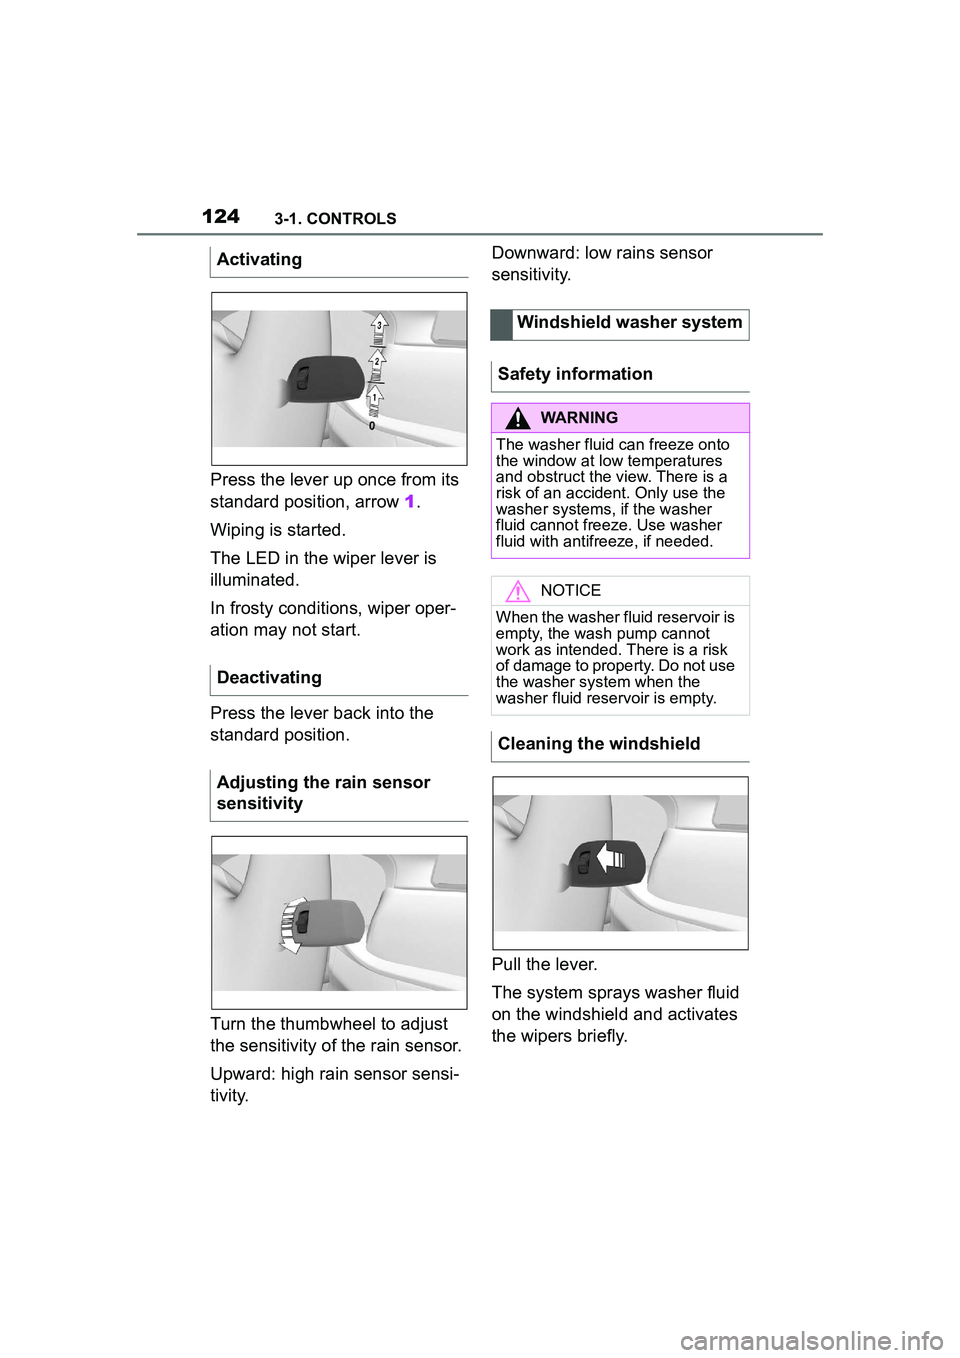
Press the lever up once from its
standard position, arrow 1.
Wiping is started.
The LED in the wiper lever is
illuminated.
In frosty conditions, wiper oper-
ation may not start.
Press the lever back into the
standard position.
Turn the thumbwheel to adjust
the sensitivity of the rain sensor.
Upward: high rain sensor sensi-
tivity. Downward: low rains sensor
sensitivity.
Pull the lever.
The system sprays washer fluid
on the windshield and activates
the wipers briefly.
Activating
Deactivating
Adjusting the rain sensor
sensitivity
Windshield washer system
Safety information
WARNING
The washer fluid can freeze onto
the window at low temperatures
and obstruct the view. There is a
risk of an accident. Only use the
washer systems, if the washer
fluid cannot freeze. Use washer
fluid with antifreeze, if needed.
NOTICE
When the washer fluid reservoir is
empty, the wash pump cannot
work as intended. There is a risk
of damage to property. Do not use
the washer system when the
washer fluid reservoir is empty.
Cleaning the windshield
Page 125 of 356
1253-1. CONTROLS
3
CONTROLS
The windshield washer nozzles
are automatically heated while
standby state is switched on.
In the fold-out position, the wip-
ers can be folded out from the
windshield, which is important,
for instance, when changing the
wiper blades or for folding away
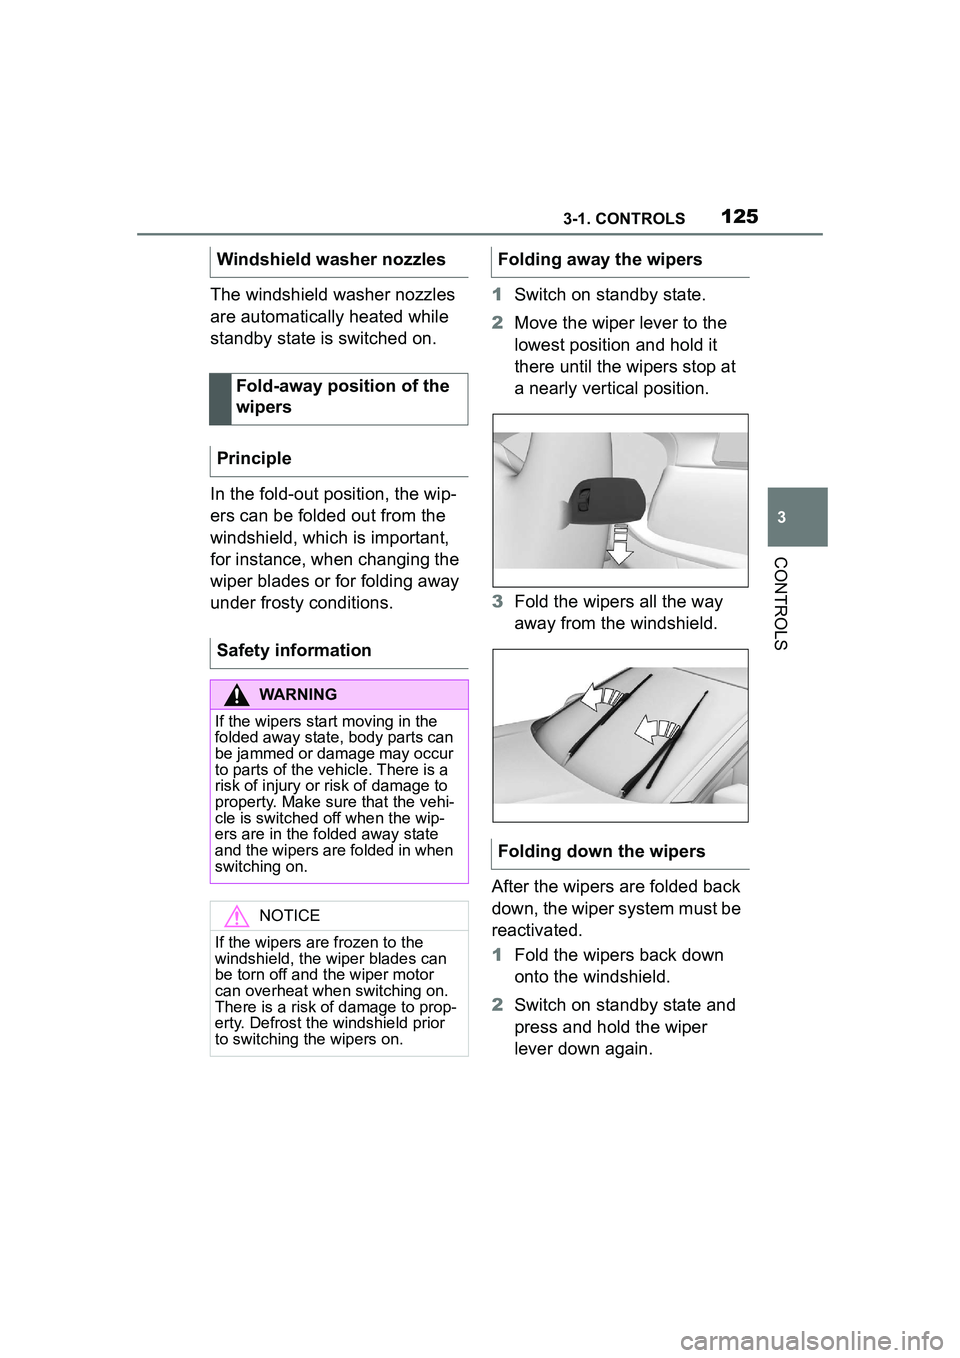
under frosty conditions.1
Switch on standby state.
2 Move the wiper lever to the
lowest position and hold it
there until the wipers stop at
a nearly vertical position.
3 Fold the wipers all the way
away from the windshield.
After the wipers are folded back
down, the wiper system must be
reactivated.
1 Fold the wipers back down
onto the windshield.
2 Switch on standby state and
press and hold the wiper
lever down again.
Windshield washer nozzles
Fold-away position of the
wipers
Principle
Safety information
WARNING
If the wipers start moving in the
folded away state, body parts can
be jammed or damage may occur
to parts of the vehicle. There is a
risk of injury or risk of damage to
property. Make sure that the vehi-
cle is switched off when the wip-
ers are in the folded away state
and the wipers are folded in when
switching on.
NOTICE
If the wipers are frozen to the
windshield, the wiper blades can
be torn off and the wiper motor
can overheat when switching on.
There is a risk of damage to prop-
erty. Defrost the windshield prior
to switching the wipers on.
Folding away the wipers
Folding down the wipers
Page 126 of 356
1263-1. CONTROLS
3Wipers return to their resting
position and are ready again
for operation.
The Automatic transmission
combines the functions of man-
ual shifting, if needed.
Selector lever position for nor-
mal vehicle operation. All gears
for forward travel are activated
automatically. Engage selector lever position R
only when the vehicle is station-
ary.
The vehicle may be pushed or
roll without power, for instance
in vehicle washes, refer to page
128, in selector lever position N.
Selector lever position, for
instance for parking the vehicle.
The transmission blocks the
drive wheels in selector lever
position P.
Engage selector lever position P
only when the vehicle is station-
ary.
■P is engaged automatically
Selector lever position P is
engaged automatically in situa-
tions such as the following:
After the drive-ready state is
switched off and selector
lever position R, D or M is
engaged.
After the standby state has
been switched off when selec-
tor lever position N is
engaged.
If the driver's safety belt is
unbuckled, the driver's door is
opened, and the brake pedal
is not pressed while the vehi-
Automatic transmission
Concept
Safety information
WARNING
An unsecured vehicle can begin
to move and possibly roll away.
There is a risk of an accident.
Before exiting, secure the vehicle
against rolling.
In order to ensure that the vehicle
is secured against rolling away,
follow the following:
●Set the parking brake.
●On uphill grades or on a down-
hill slope, turn the front wheels
in the direction of the curb.
●On uphill grades or on a down-
hill slope, also secure the vehi-
cle, for instance with a wheel
chock.
Selector lever positions
Drive mode D
Reverse R
Neutral N
Parking position P
Page 127 of 356
1273-1. CONTROLS
3
CONTROLS
cle is stationary and selector
lever position D, M or R is
engaged.
To prevent the vehicle from
creeping after you select a drive
mode, maintain pressure on the
brake pedal until you are ready
to start.
Only when the drive-ready state
is switched on and the brake
pedal is depressed is it possible
to change from selector lever
position P to another selector
lever position.
The selection lever position P
cannot be changed until all tech-
nical requirements are met.
A selector lever lock prevents
the following faulty operation:
Unintentional shifting into
selector lever position R.
Unintentional shifting from
selector lever position P into
another selector lever posi-
tion.
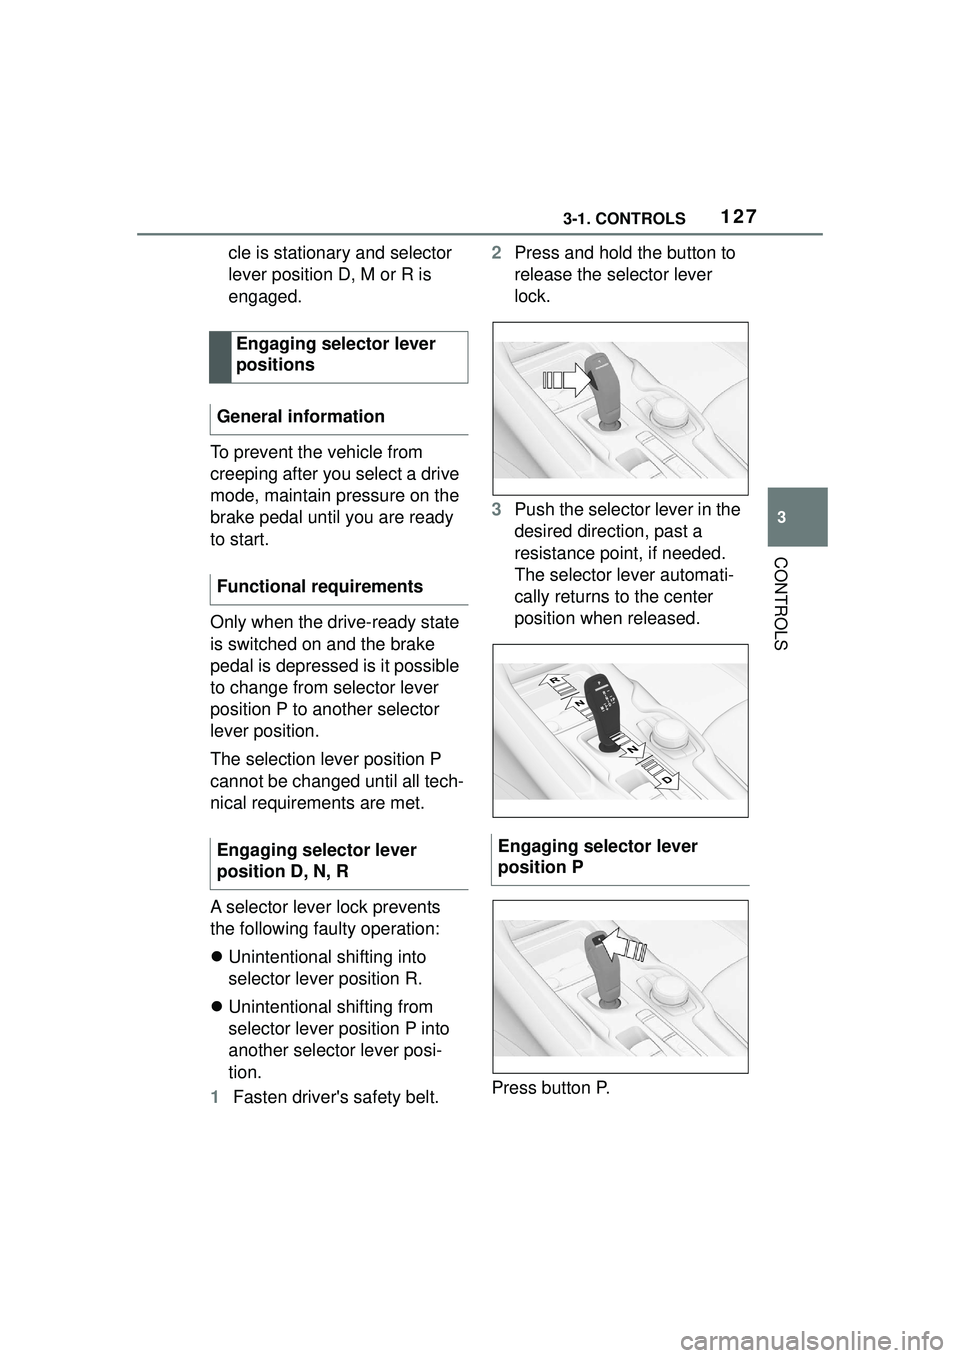
1 Fasten driver's safety belt. 2
Press and hold the button to
release the selector lever
lock.
3 Push the selector lever in the
desired direction, past a
resistance point, if needed.
The selector lever automati-
cally returns to the center
position when released.
Press button P.
Engaging selector lever
positions
General information
Functional requirements
Engaging selector lever
position D, N, R
Engaging selector lever
position P
Page 128 of 356
1283-1. CONTROLS
In some situations, the vehicle is
to roll without its own power for
a short distance, for instance in
a vehicle wash, or be pushed.
1Switch on drive-ready state
while pressing on the brake
pedal.
2 If necessary, release the
parking brake.
3 Depress the brake pedal.
4 Touch the selector lever lock
and engage selector lever
position N.
5 Switch off drive-ready state.
In this way, standby state remains
switched on, and a vehicle mes-
sage is displayed.
The vehicle can roll.
Irrespective of standby state, the
selector lever position P is auto-
matically engaged after approx.
35 minutes.
If there is a malfunction, you may not be able to change the
selector lever position.
Electronically unlock the trans-
mission lock, if needed, refer to
page 130.
Kickdown is used to achieve
maximum driving performance.
Step on the accelerator pedal
beyond the resistance point at
the full throttle position.
Manual gear-shifting is possible
in manual mode.
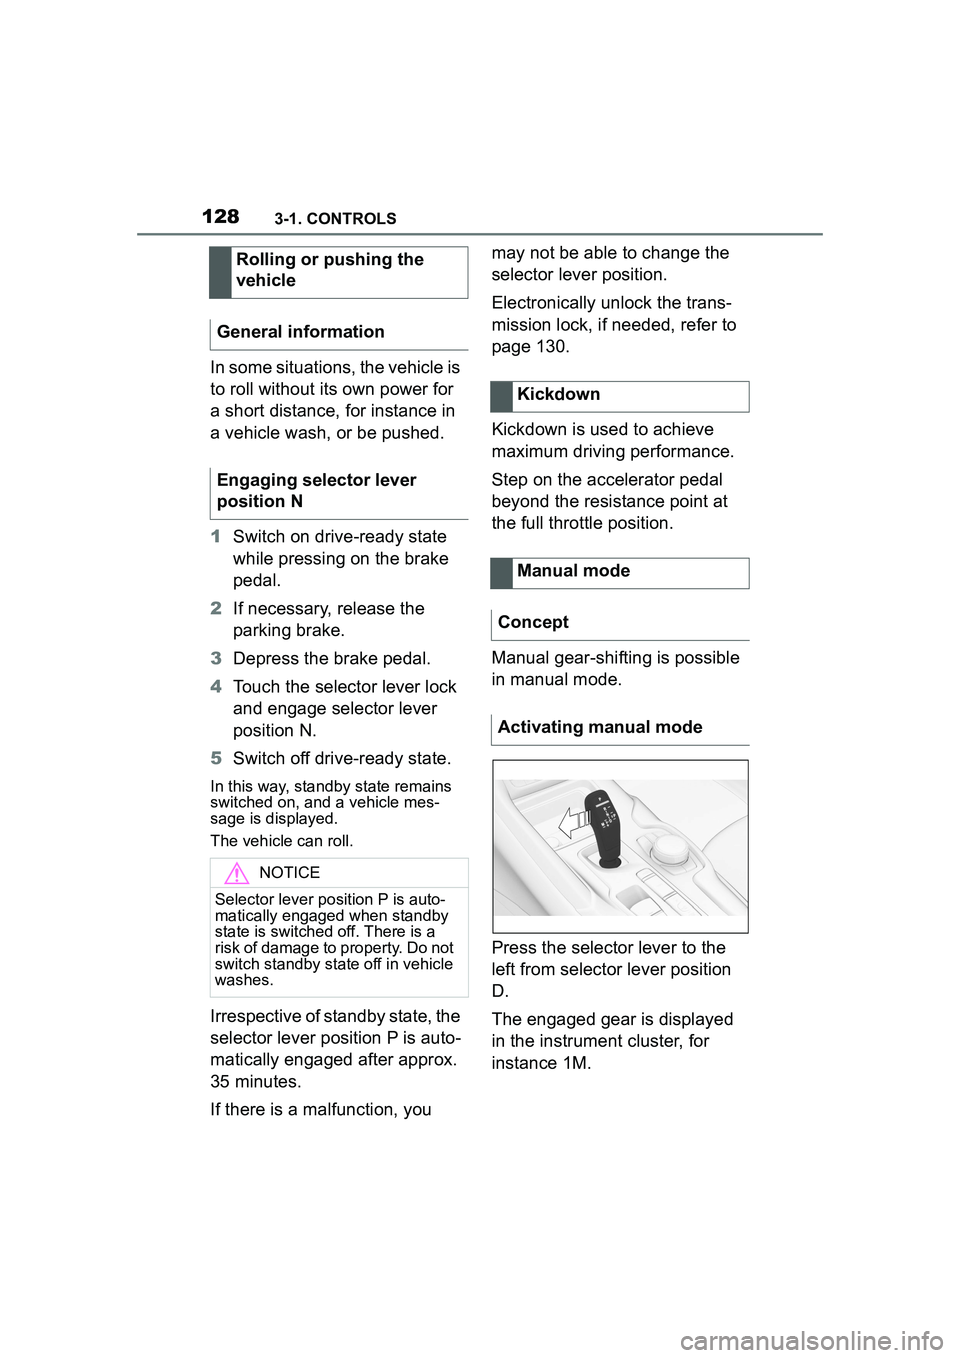
Press the selector lever to the
left from selector lever position
D.
The engaged gear is displayed
in the instrument cluster, for
instance 1M.
Rolling or pushing the
vehicle
General information
Engaging selector lever
position N
NOTICE
Selector lever pos ition P is auto-
matically engaged when standby
state is switched off. There is a
risk of damage to property. Do not
switch standby state off in vehicle
washes.
Kickdown
Manual mode
Concept
Activating manual mode
Page 129 of 356
1293-1. CONTROLS
3
CONTROLS
To shift down: press the
selector lever forward.
To shift up: pull the selector
lever rearwards.
Push the selector lever to the
right.
D is displayed in the instrument
cluster.
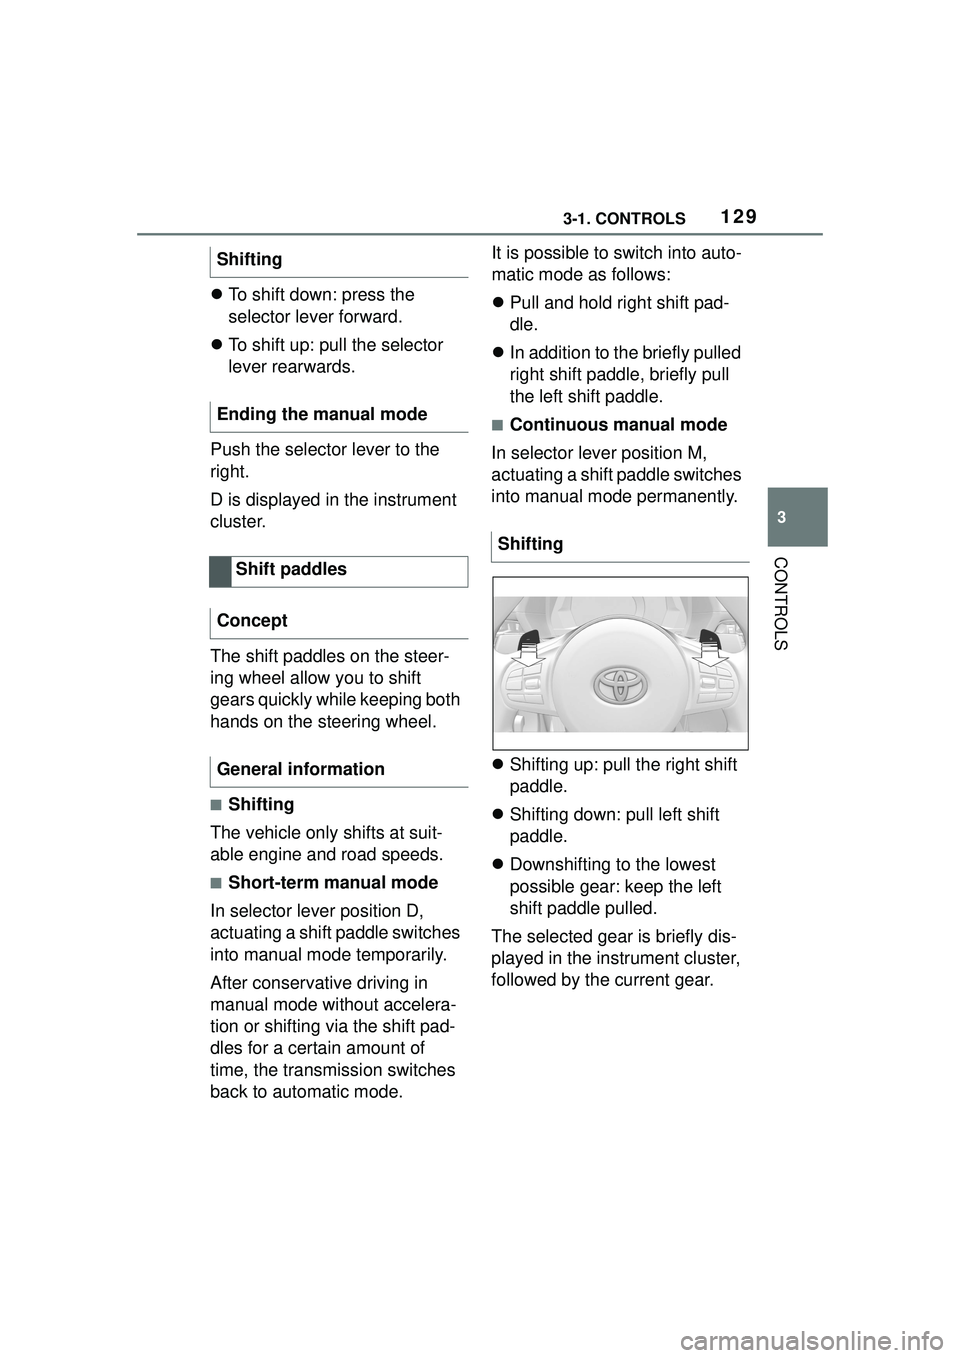
The shift paddles on the steer-
ing wheel allow you to shift
gears quickly while keeping both
hands on the steering wheel.
■Shifting
The vehicle only shifts at suit-
able engine and road speeds.
■Short-term manual mode
In selector lever position D,
actuating a shift paddle switches
into manual mode temporarily.
After conservative driving in
manual mode without accelera-
tion or shifting via the shift pad-
dles for a certain amount of
time, the transmission switches
back to automatic mode. It is possible to switch into auto-
matic mode as follows:
Pull and hold right shift pad-
dle.
In addition to the briefly pulled
right shift paddle, briefly pull
the left shift paddle.
■Continuous manual mode
In selector lever position M,
actuating a shift paddle switches
into manual mode permanently.
Shifting up: pull the right shift
paddle.
Shifting down: pull left shift
paddle.
Downshifting to the lowest
possible gear: keep the left
shift paddle pulled.
The selected gear is briefly dis-
played in the instrument cluster,
followed by the current gear.
Shifting
Ending the manual mode
Shift paddles
Concept
General information
Shifting
Page 130 of 356
1303-1. CONTROLS
Electronically unlock the trans-
mission lock to maneuver vehi-
cle from a danger area.
Unlocking is possible, if the
starter can spin the engine.
Before unlocking the transmis-
sion lock, set the parking brake
to prevent the vehicle from roll-
ing away.
1Press and hold down brake
pedal.
2 Press the Start/Stop button.
The starter must audibly
start. Hold the Start/Stop but-
ton pressed.
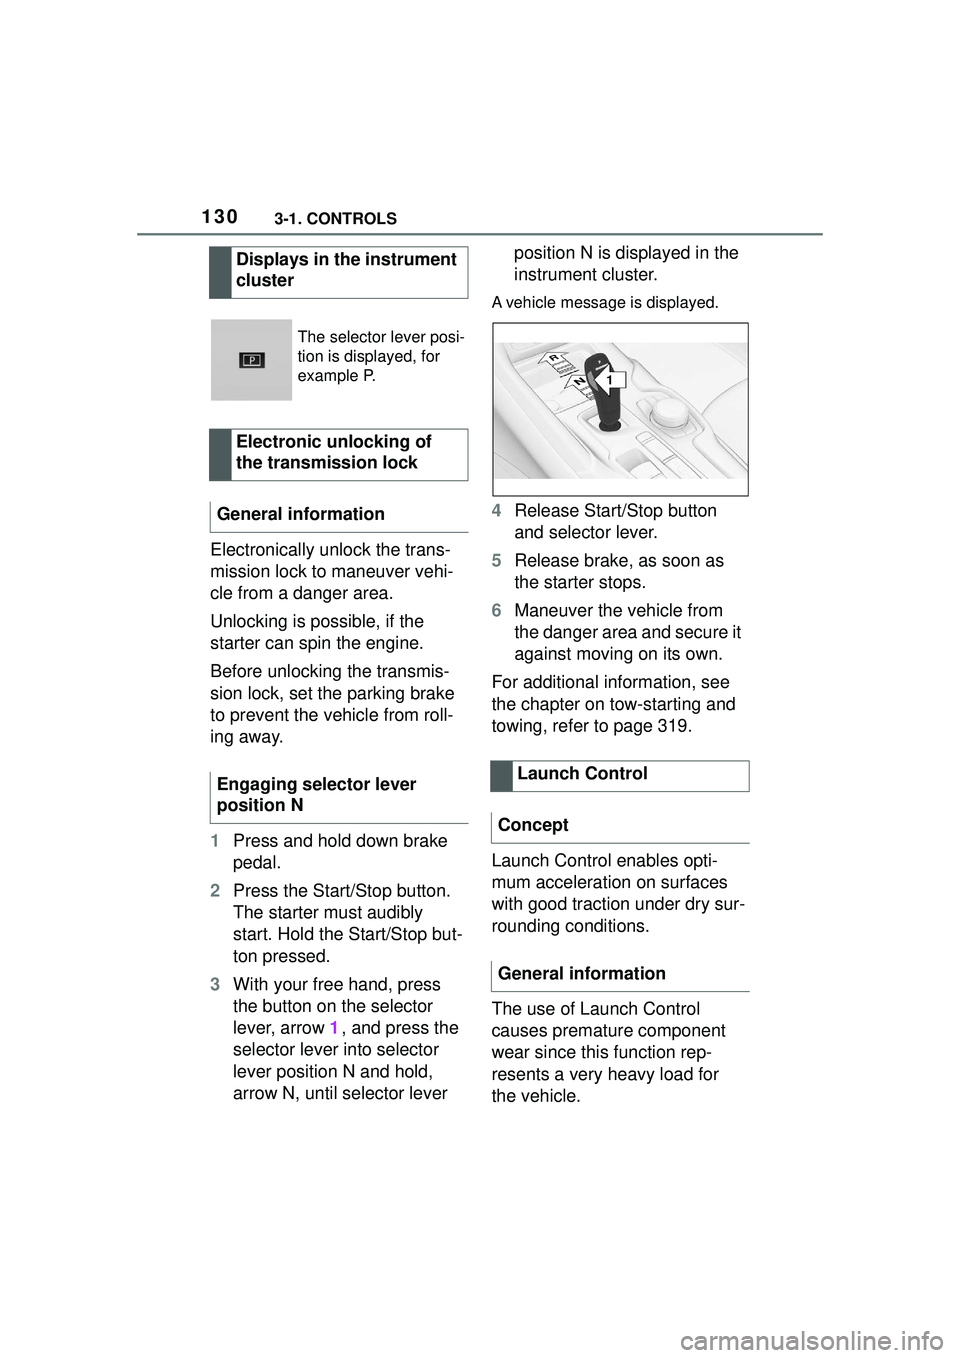
3 With your free hand, press
the button on the selector
lever, arrow 1, and press the
selector lever into selector
lever position N and hold,
arrow N, until selector lever position N is displayed in the
instrument cluster.
A vehicle message is displayed.
4
Release Start/Stop button
and selector lever.
5 Release brake, as soon as
the starter stops.
6 Maneuver the vehicle from
the danger area and secure it
against moving on its own.
For additional information, see
the chapter on tow-starting and
towing, refer to page 319.
Launch Control enables opti-
mum acceleration on surfaces
with good traction under dry sur-
rounding conditions.
The use of Launch Control
causes premature component
wear since this function rep-
resents a very heavy load for
the vehicle.
Displays in the instrument
cluster
The selector lever posi-
tion is displayed, for
example P.
Electronic unlocking of
the transmission lock
General information
Engaging selector lever
position N
Launch Control
Concept
General information
1
R
N