check engine light TOYOTA GR86 2022 (in English) User Guide
[x] Cancel search | Manufacturer: TOYOTA, Model Year: 2022, Model line: GR86, Model: TOYOTA GR86 2022Pages: 582, PDF Size: 86.38 MB
Page 137 of 582
135
4
4-1. Before driving
Driving
WA R N I N G
●Do not leave a door or window
open if the curved glass is coated
with a metallized film such as a sil- ver-colored one. Reflected sunlight
may cause the glass to act as a
lens, causing a fire.
●Always apply the parking brake,
shift the shift lever to P (vehicles
with an automatic transmission), stop the engine and lock the vehi-
cle.
Do not leave the vehicle unat- tended while the engine is running.
If the vehicle is parked with the shift
lever in P but the parking brake is not set, the vehicl e may start to
move, possibly leading to an acci-
dent.
●Do not touch the exhaust pipes
while the engine is running or immediately after turning the engine
off.
Doing so may cause burns.
■When taking a nap in the vehicle
Always turn the engine off. Otherwise, if you accidentally move the shift lever
or depress the accelerator pedal, this
could cause an accident or fire due to engine overheating. Additionally, if the
vehicle is parked in a poorly ventilated
area, exhaust gases may collect and enter the vehicle, leading to death or
a serious health hazard.
■When braking
●When the brakes are wet, drive
more cautiously. Braking distance increases when
the brakes are wet, and this may
cause one side of the vehicle to brake differently than the other
side. Also, the parking brake may
not securely hold the vehicle.
●If the brake booster device does not operate, do not follow other vehi-
cles closely and avoid hills or sharp
turns that require braking. In this case, braking is still possible,
but the brake pedal should be
depressed more firmly than usual. Also, the braking distance will
increase. Have your brakes fixed
immediately.
●Do not pump the brake pedal if the
engine stalls. Each push on the brake pedal uses
up the reserve for the
power-assisted brakes.
●The brake system consists of 2 indi-
vidual hydraulic systems; if one of the systems fails, the other will still
operate. In this case, the brake
pedal should be depressed more firmly than usual and the braking
distance will increase. Have your
brakes fixed immediately.
■If the vehicle becomes stuck
Do not spin the wheels excessively when any of the tires is up in the air,
or the vehicle is stuck in sand, mud,
etc. This may damage the driveline components or propel the vehicle for-
ward or backward, causing an acci-
dent.
NOTICE
■Pre-driving check
Trapping small animals in the cooling
fan and belts of the engine may result
in a malfunction. Check that no small animal enters the engine compart-
ment and under the vehicle before
starting the engine.
Page 143 of 582
141
4
4-2. Driving procedures
Driving
Automatic transmission
1 Stop the vehicle completely.
2 Set the parking brake (P.151),
and shift the shift lever to P.
Check the parking brake indicator is
illuminated.
3 Press the engine switch.
The engine will stop, and the meter dis-
play will be extinguished.
4 Release the brake pedal and
check that “ACCESSORY” or
“IGNITION ON” is not shown on
the meters.
Manual transmission
1 Stop the vehicle completely.
2 Set the parking brake. (P.151)
Check the parking brake indicator is illuminated.
3 Shift the shift lever to N.
( P.147)
4 Press the engine switch.
The engine will stop, and the meter dis-
play will be extinguished.
5 Release the brake pedal and
check that “ACCESSORY” or
“IGNITION ON” is not shown on
the meters.
Modes can be changed by pressing
the engine switch with brake pedal
(automatic transmission) or clutch
pedal (manual transmission)
released. (The mode changes each
NOTICE
■Symptoms indicating a malfunc-
tion with the engine switch
If the engine switch seems to be oper- ating somewhat differently than usual,
such as the switch sticking slightly,
there may be a malfunction. Contact any authorized Toyota retailer or
Toyota authorized repairer, or any reli-
able repairer immediately.
Stopping the engine
WA R N I N G
■Stopping the engine in an emer-
gency
If you want to stop the engine in an
emergency while driving the vehicle,
press and hold the engine switch for
more than 2 seconds, or press it briefly 3 times or more in succession.
( P.326)
However, do not touch the engine switch while driving except in an
emergency. Turning the engine off
while driving will not cause loss of steering or braking control, but the
power assist to these systems will be
lost. This will make it more difficult to steer and brake, so you should pull
over and stop the vehicle as soon as
it is safe to do so.
●If the engine switch is operated
while the vehicle is running, a warn- ing message will be shown on the
multi-information display and a
buzzer sounds.
●Vehicles with an automatic trans-
mission: To restart the engine after performing an emergency shut-
down, shift the shift lever to N and
then press the engine switch.
●Vehicles with a manual transmis-
sion: To restart the engine after per- forming an emergency shutdown,
depress the clutch pedal and then
press the engine switch.
Changing engine switch
modes
Page 152 of 582
1504-2. Driving procedures
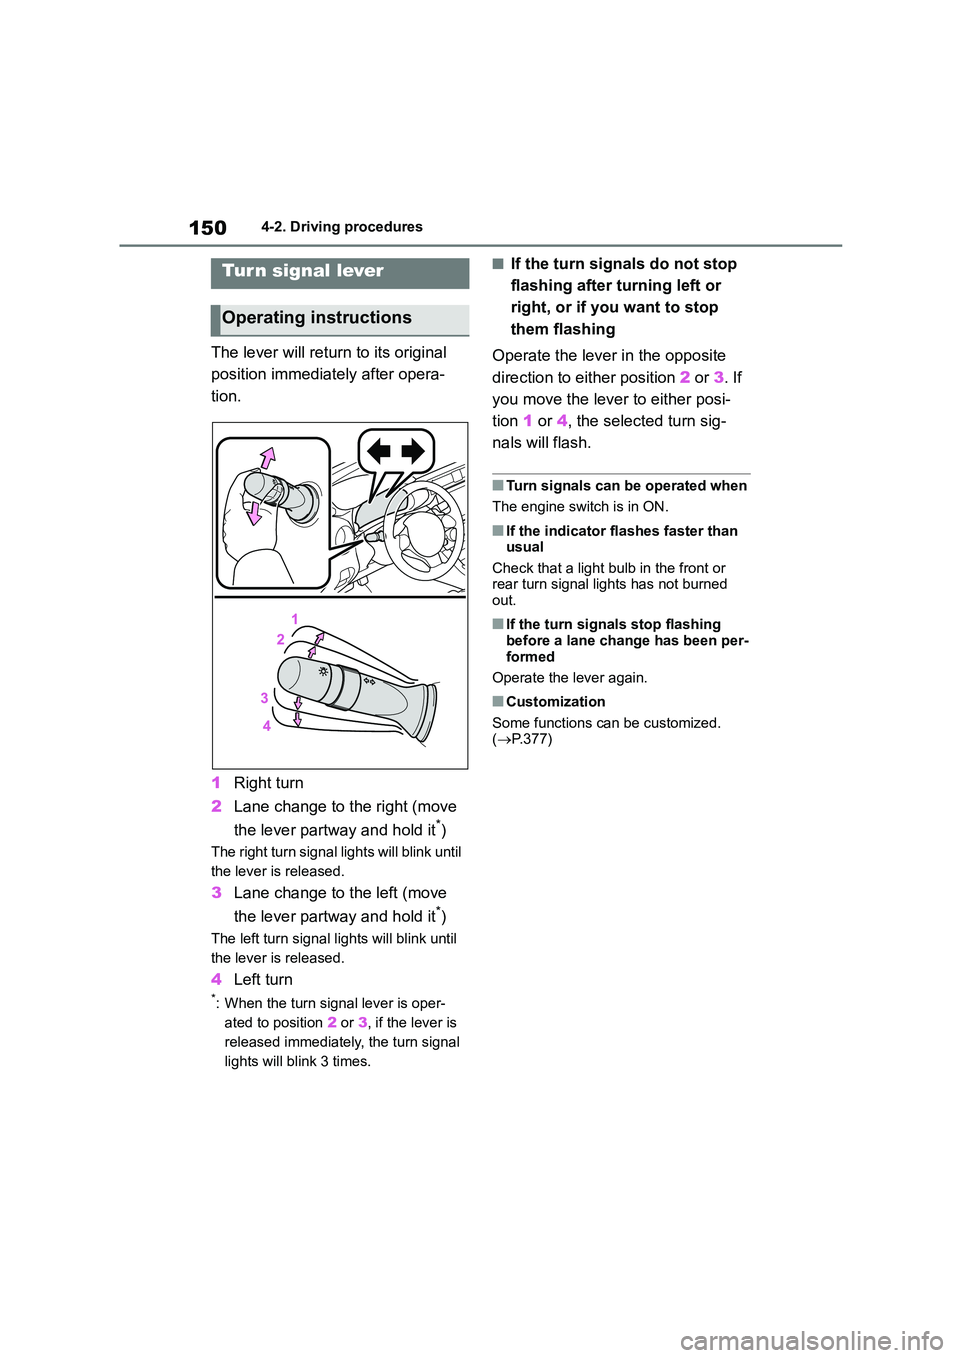
The lever will return to its original
position immediately after opera-
tion.
1 Right turn
2 Lane change to the right (move
the lever partway and hold it*)
The right turn signal lights will blink until
the lever is released.
3 Lane change to the left (move
the lever partway and hold it*)
The left turn signal lights will blink until
the lever is released.
4 Left turn
*: When the turn signal lever is oper-
ated to position 2 or 3, if the lever is
released immediately, the turn signal
lights will blink 3 times.
■If the turn signals do not stop
flashing after turning left or
right, or if you want to stop
them flashing
Operate the lever in the opposite
direction to either position 2 or 3. If
you move the lever to either posi-
tion 1 or 4, the selected turn sig-
nals will flash.
■Turn signals can be operated when
The engine switch is in ON.
■If the indicator flashes faster than usual
Check that a light bulb in the front or
rear turn signal lights has not burned out.
■If the turn signals stop flashing
before a lane change has been per-
formed
Operate the lever again.
■Customization
Some functions can be customized.
( P.377)
Turn signal lever
Operating instructions
Page 163 of 582
161
4
4-3. Operating the lights and wipers
Driving
■The windshield wiper and washer can be operated when
The engine switch is in ON.
■If no windshield washer fluid
sprays
Check that the washer nozzles are not
blocked if there is washer fluid in the
windshield washer fluid reservoir.
WA R N I N G
■Caution regarding the use of washer fluid
When it is cold, do not use the washer
fluid until the windshield becomes warm. The fluid may freeze on the
windshield and cause low visibility.
This may lead to an accident, result- ing in death or serious injury.
NOTICE
■When the washer fluid tank is
empty
Do not operate the switch continually
as the washer fluid pump may over-
heat.
■When a nozzle becomes blocked
In this case, contact any authorized Toyota retailer or Toyota authorized
repairer, or any reliable repairer.
Do not try to clear it with a pin or other object. The nozzle will be damaged.
Page 230 of 582
2284-6. Using other driving systems
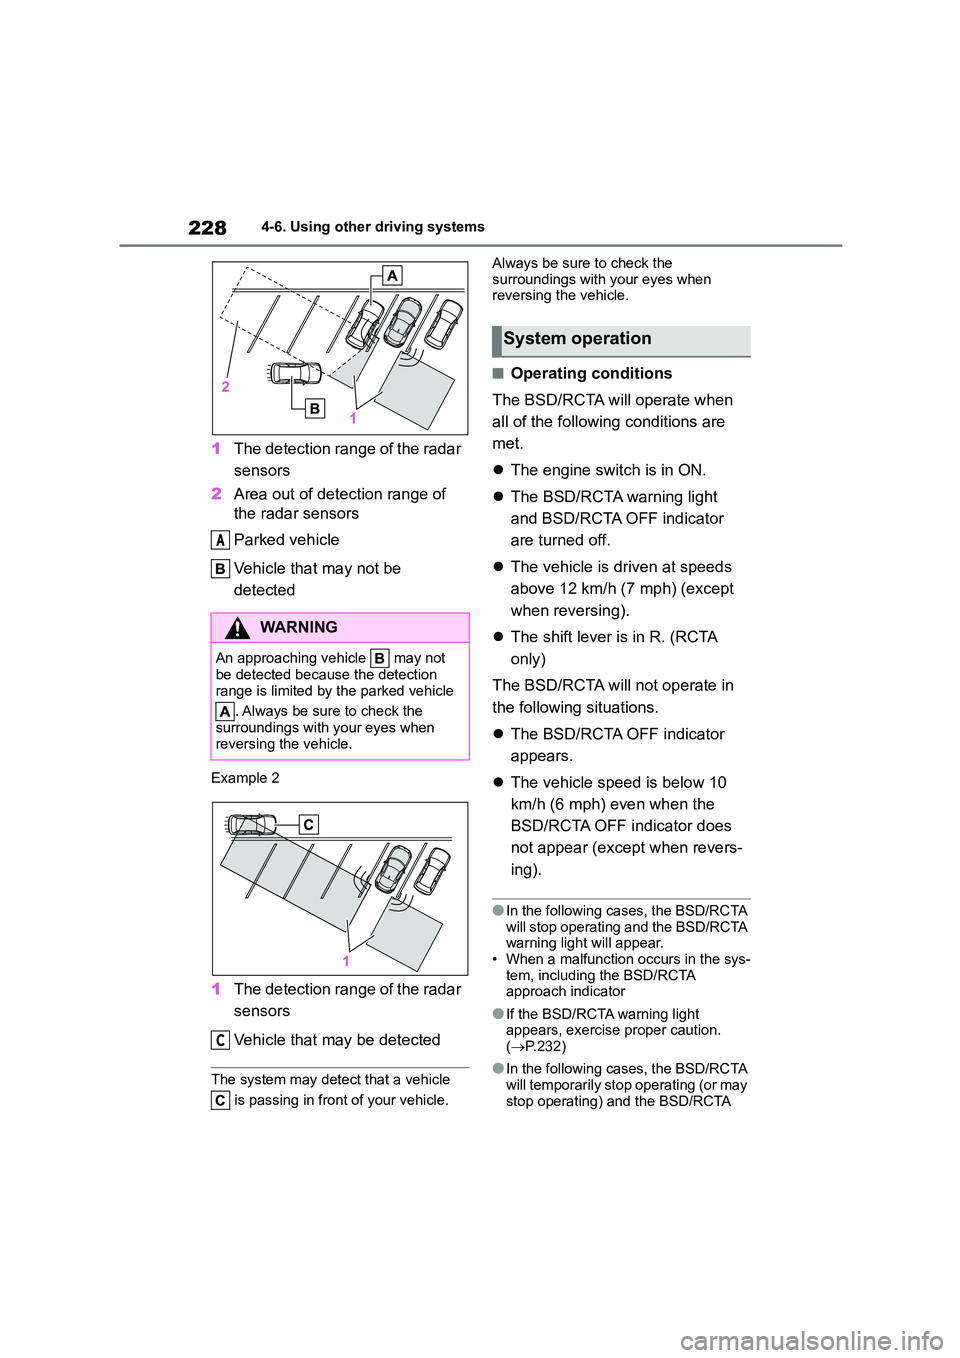
1The detection range of the radar
sensors
2 Area out of detection range of
the radar sensors
Parked vehicle
Vehicle that may not be
detected
Example 2
1 The detection range of the radar
sensors
Vehicle that may be detected
The system may detect that a vehicle
is passing in front of your vehicle.
Always be sure to check the
surroundings with your eyes when reversing the vehicle.
■Operating conditions
The BSD/RCTA will operate when
all of the following conditions are
met.
The engine switch is in ON.
The BSD/RCTA warning light
and BSD/RCTA OFF indicator
are turned off.
The vehicle is driven at speeds
above 12 km/h (7 mph) (except
when reversing).
The shift lever is in R. (RCTA
only)
The BSD/RCTA will not operate in
the following situations.
The BSD/RCTA OFF indicator
appears.
The vehicle speed is below 10
km/h (6 mph) even when the
BSD/RCTA OFF indicator does
not appear (except when revers-
ing).
●In the following cases, the BSD/RCTA
will stop operating and the BSD/RCTA warning light will appear.
• When a malfunction occurs in the sys-
tem, including the BSD/RCTA approach indicator
●If the BSD/RCTA warning light appears, exercise proper caution.
( P.232)
●In the following cases, the BSD/RCTA
will temporarily stop operating (or may
stop operating) and the BSD/RCTA
WA R N I N G
An approaching vehicle may not
be detected because the detection
range is limited by the parked vehicle
. Always be sure to check the
surroundings with your eyes when
reversing the vehicle.
A
C
System operation
Page 246 of 582
2444-6. Using other driving systems
●Do not wipe the camera with alcohol,
benzine or paint thinner.
Otherwise, discolora tion may occur. To remove contamination, wipe the
camera with a cloth moistened with a
diluted neutral detergent. Then wipe it with a soft, dry cloth.
●When waxing the vehicle, be careful not to apply the wax to the camera. If
it comes in contact with the camera,
moisten a clean cloth with a diluted neutral detergent to remove the wax.
●The camera lens has a hard coating to help prevent scratches. However,
when washing the vehicle or cleaning
the camera lens, be careful not to
scratch the camera lens. Do not use a washing brush directly on the camera
lens. The image quality of the rear
view camera may deteriorate.
●Strong light shined on the camera lens
may develop vertical lines around the light source. This is not a malfunction.
●Under the fluorescent light, the display
may flicker. However, this is not a mal-
function.
●The image of the rear view camera
may be slightly different from the actual color of the objects.
●If there is a malfunction on the multi-media system screen, refer to “Multi-
media owner’s manual”.
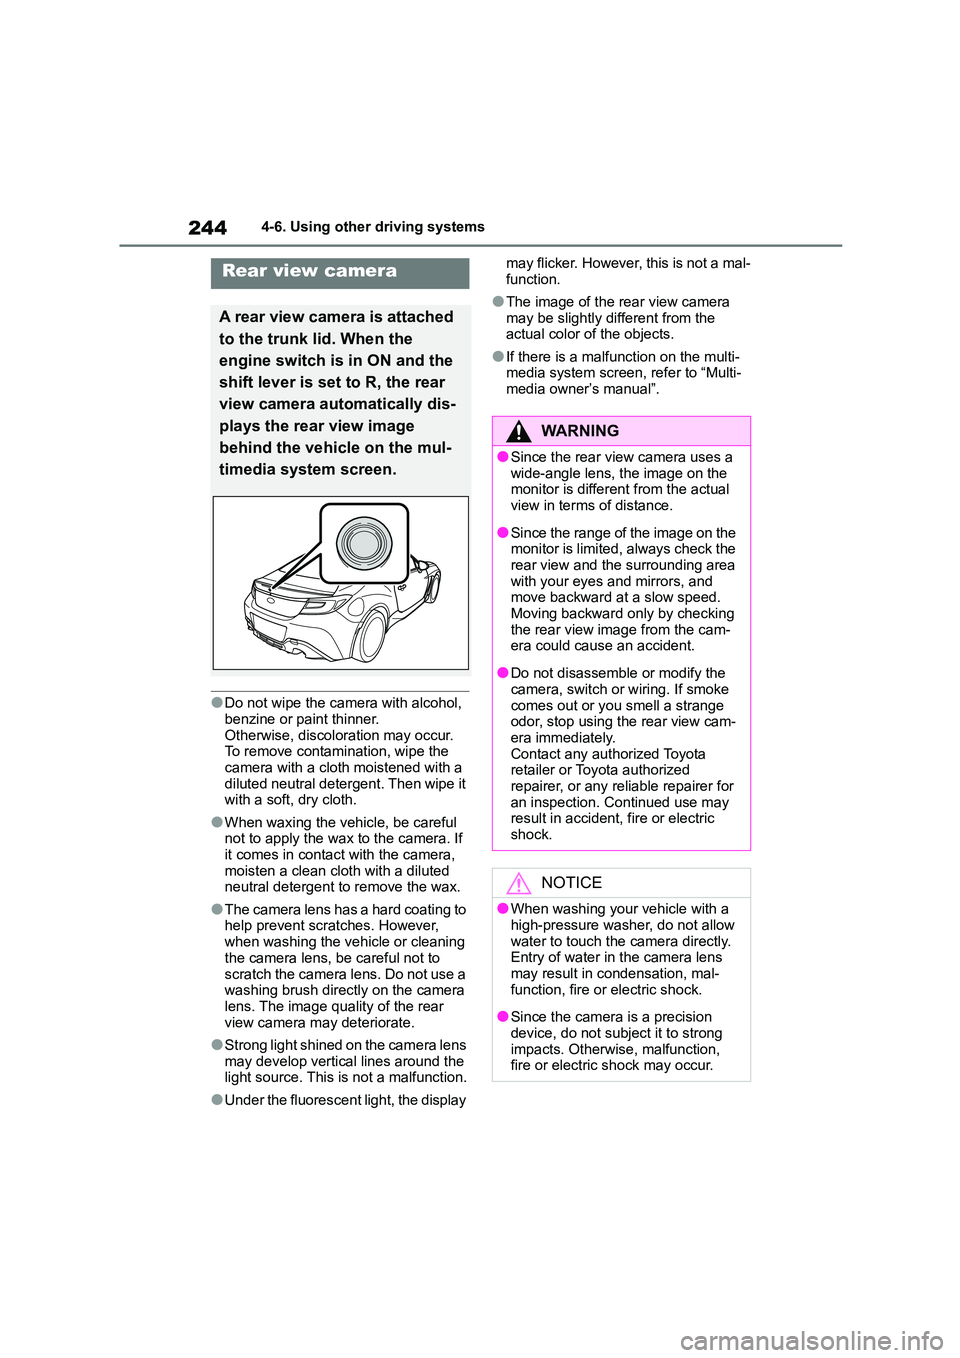
Rear view camera
A rear view camera is attached
to the trunk lid. When the
engine switch is in ON and the
shift lever is set to R, the rear
view camera automatically dis-
plays the rear view image
behind the vehicle on the mul-
timedia system screen.
WA R N I N G
●Since the rear view camera uses a
wide-angle lens, the image on the monitor is different from the actual
view in terms of distance.
●Since the range of the image on the
monitor is limited, always check the
rear view and the surrounding area with your eyes and mirrors, and
move backward at a slow speed.
Moving backward only by checking the rear view image from the cam-
era could cause an accident.
●Do not disassemble or modify the
camera, switch or wiring. If smoke
comes out or you smell a strange odor, stop using the rear view cam-
era immediately.
Contact any authorized Toyota retailer or Toyota authorized
repairer, or any reliable repairer for
an inspection. Continued use may result in accident, fire or electric
shock.
NOTICE
●When washing your vehicle with a high-pressure washer, do not allow
water to touch the camera directly.
Entry of water in the camera lens may result in condensation, mal-
function, fire or electric shock.
●Since the camera is a precision
device, do not subject it to strong
impacts. Otherwise, malfunction, fire or electric shock may occur.
Page 255 of 582
253
4
4-6. Using other driving systems
Driving
Use snow mode for accelerating and
driving on slippery road surfaces such
as snow.
The snow mode indi cator comes on.
■Sport mode
●In sport mode, lower gears are used and gears change at a higher engine
speed.
●In the following situations, it may not
be possible to change to sport mode.
When the mode cannot be changed to sport mode, a buzzer will sound and a
message will be displayed on the
multi-information display. • When the Adaptive Cruise Control or
Conventional Cruise Control is operat-
ing • When the engine is cold
■Snow mode
To prevent slipping, 1st gear cannot be
selected when in snow mode.
■Automatic deactivation of sport mode and snow mode
In the following situations, the driving
mode is automatically deactivated:
●When the engine is turned off after
driving in sport mode or snow mode.
●When the Adaptive Cruise Control or
Conventional Cruise Control is acti-
vated while driving in sport mode.
●When in sport mode and stop-
ping/starting off is automatically per- formed in second gear. ( P.144)
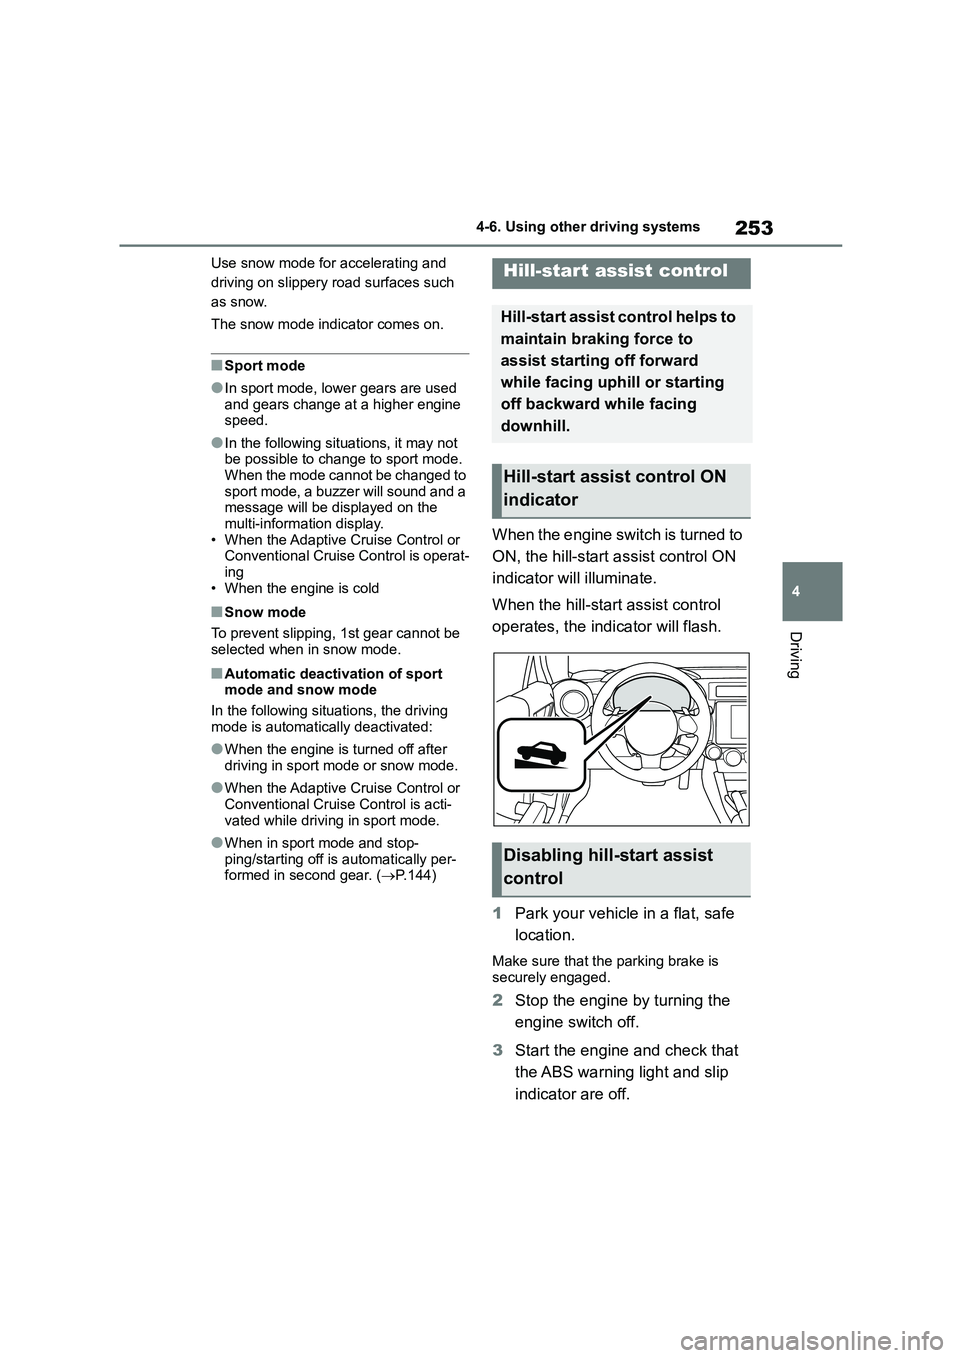
When the engine switch is turned to
ON, the hill-start as sist control ON
indicator will illuminate.
When the hill-start assist control
operates, the indicator will flash.
1 Park your vehicle in a flat, safe
location.
Make sure that the parking brake is
securely engaged.
2 Stop the engine by turning the
engine switch off.
3 Start the engine and check that
the ABS warning light and slip
indicator are off.
Hill-start assist control
Hill-start assist control helps to
maintain braking force to
assist starting off forward
while facing uphill or starting
off backward while facing
downhill.
Hill-start assist control ON
indicator
Disabling hill-start assist
control
Page 256 of 582
2544-6. Using other driving systems
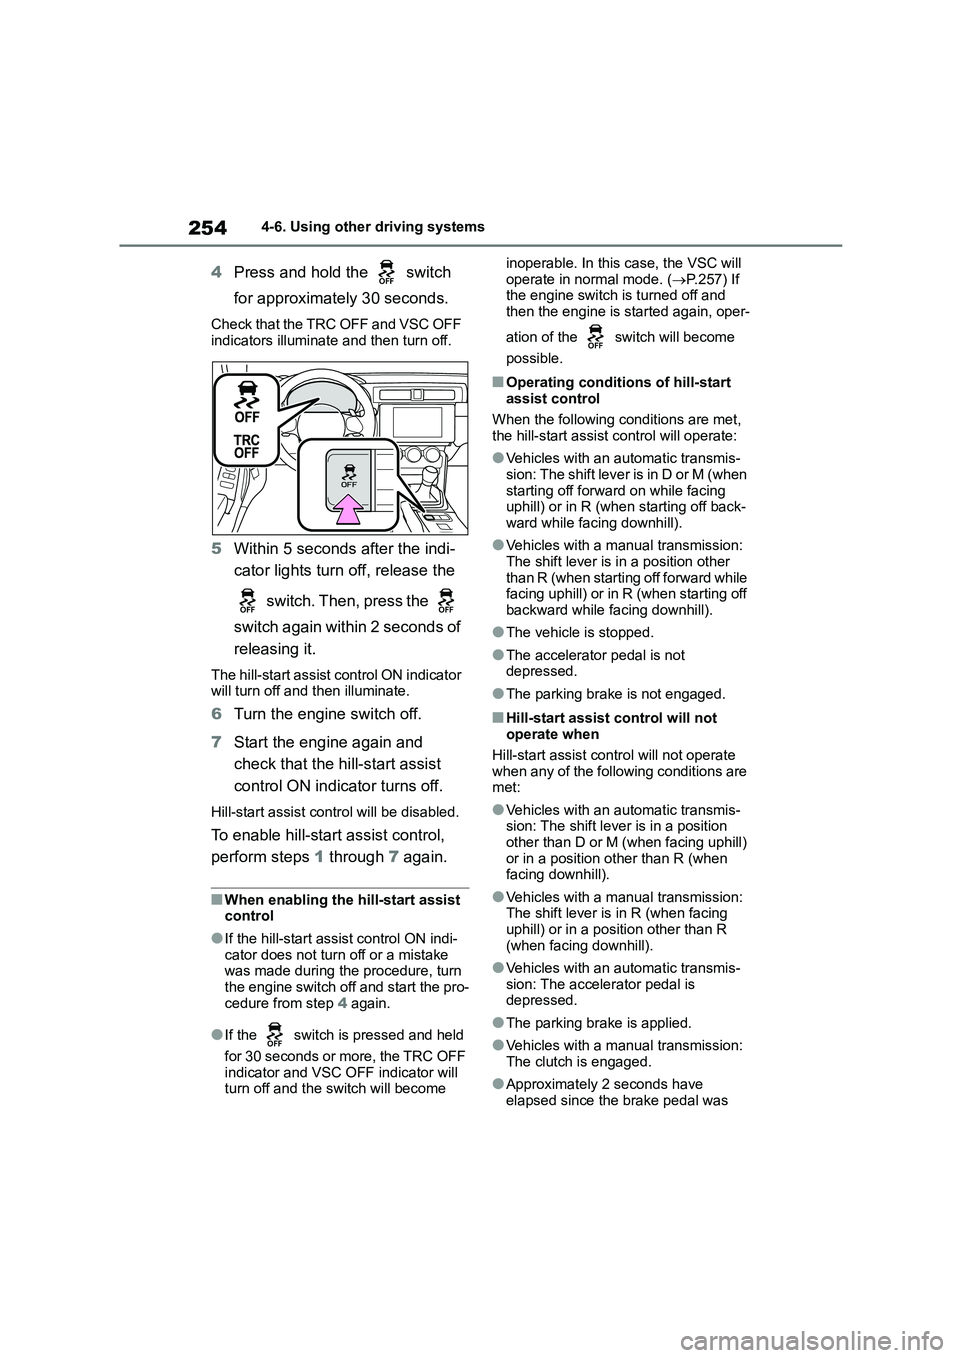
4Press and hold the switch
for approximately 30 seconds.
Check that the TRC OFF and VSC OFF
indicators illuminate and then turn off.
5 Within 5 seconds after the indi-
cator lights turn off, release the
switch. Then, press the
switch again within 2 seconds of
releasing it.
The hill-start assist control ON indicator will turn off and then illuminate.
6 Turn the engine switch off.
7 Start the engine again and
check that the hill-start assist
control ON indicator turns off.
Hill-start assist control will be disabled.
To enable hill-star t assist control,
perform steps 1 through 7 again.
■When enabling the hill-start assist control
●If the hill-start assi st control ON indi-
cator does not turn off or a mistake was made during the procedure, turn
the engine switch off and start the pro-
cedure from step 4 again.
●If the switch is pressed and held
for 30 seconds or more, the TRC OFF indicator and VSC OFF indicator will
turn off and the switch will become
inoperable. In this case, the VSC will
operate in normal mode. ( P.257) If the engine switch is turned off and
then the engine is started again, oper-
ation of the switch will become
possible.
■Operating conditions of hill-start
assist control
When the following conditions are met, the hill-start assist control will operate:
●Vehicles with an automatic transmis-sion: The shift lever is in D or M (when
starting off forward on while facing
uphill) or in R (when starting off back- ward while facing downhill).
●Vehicles with a manual transmission: The shift lever is in a position other
than R (when starting off forward while
facing uphill) or in R (when starting off backward while facing downhill).
●The vehicle is stopped.
●The accelerator pedal is not
depressed.
●The parking brake is not engaged.
■Hill-start assist control will not
operate when
Hill-start assist control will not operate
when any of the following conditions are
met:
●Vehicles with an automatic transmis-
sion: The shift lever is in a position other than D or M (when facing uphill)
or in a position other than R (when
facing downhill).
●Vehicles with a manual transmission:
The shift lever is in R (when facing uphill) or in a position other than R
(when facing downhill).
●Vehicles with an automatic transmis- sion: The accelerator pedal is
depressed.
●The parking brake is applied.
●Vehicles with a manual transmission: The clutch is engaged.
●Approximately 2 seconds have elapsed since the brake pedal was
Page 283 of 582
6
281
6
Maintenance and care
Maintenance and care
.6-1. Maintenance and care
Cleaning and protecting the
vehicle exterior ............... 282
Cleaning and protecting the
vehicle interior ................ 285
Cleaning and protecting the
Ultrasuede®area ............. 287
6-2. Maintenance
Maintenance requirements
....................................... 289
6-3. Do-it-yourself maintenance
Do-it-yourself service precau-
tions ................................ 291
Hood ................................. 293
Positioning a floor jack ...... 294
Engine compartment ........ 295
Tires .................................. 301
Replacing the tire.............. 308
Tire inflation pressure ....... 312
Wheels.............................. 313
Air conditioning filter ......... 314
Electronic key battery ....... 316
Checking and replacing fuses
....................................... 319
Light bulbs ........................ 321
Page 302 of 582
3006-3. Do-it-yourself maintenance
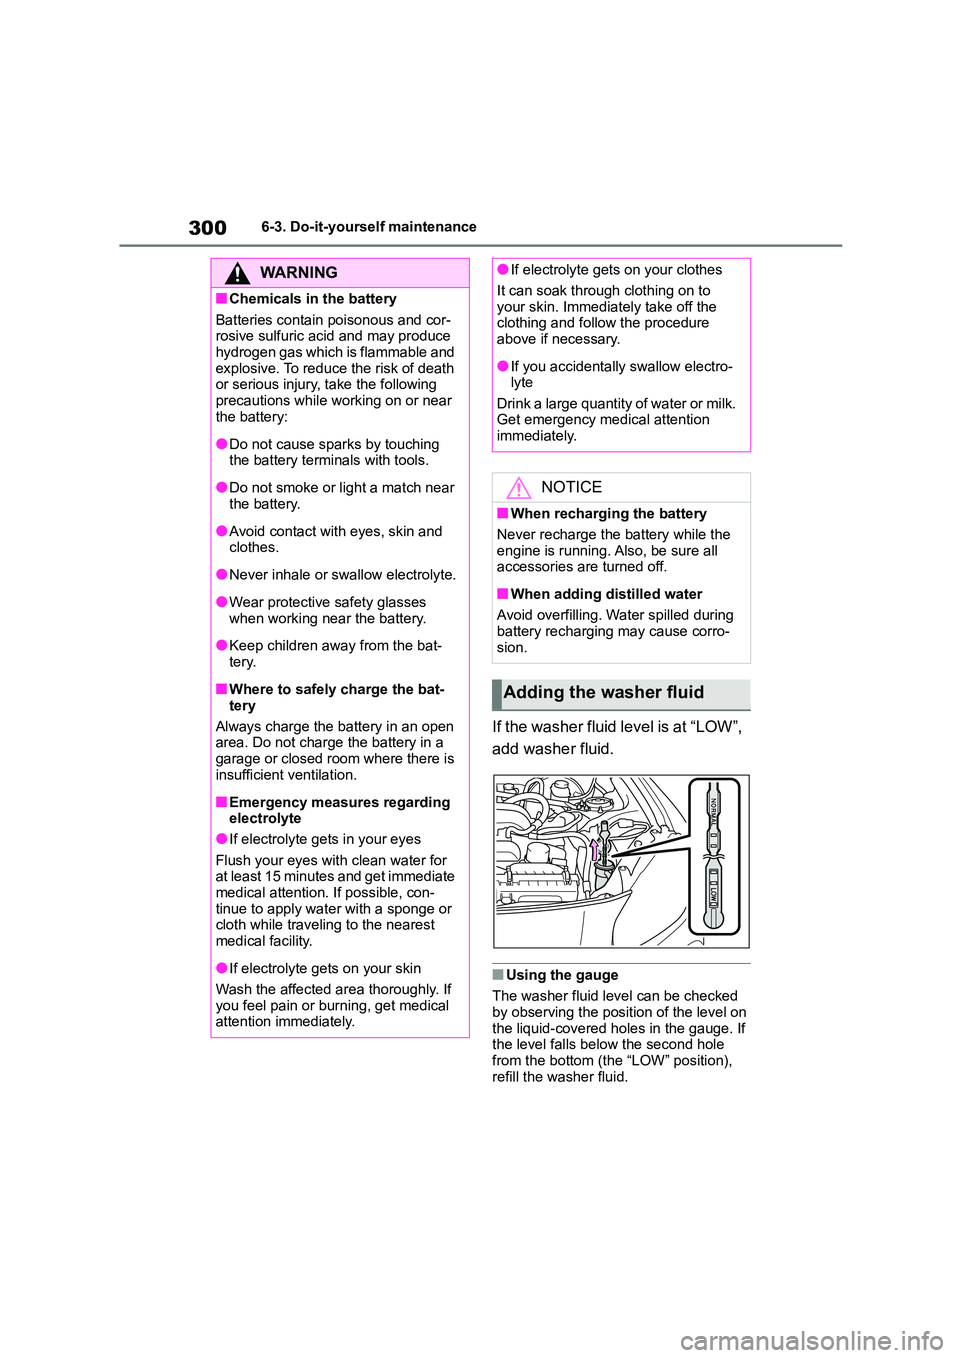
If the washer fluid level is at “LOW”,
add washer fluid.
■Using the gauge
The washer fluid level can be checked
by observing the position of the level on
the liquid-covered holes in the gauge. If the level falls below the second hole
from the bottom (the “LOW” position),
refill the washer fluid.
WA R N I N G
■Chemicals in the battery
Batteries contain poisonous and cor-
rosive sulfuric acid and may produce hydrogen gas which is flammable and
explosive. To reduce the risk of death
or serious injury, take the following precautions while working on or near
the battery:
●Do not cause sparks by touching the battery terminals with tools.
●Do not smoke or light a match near the battery.
●Avoid contact with eyes, skin and clothes.
●Never inhale or swallow electrolyte.
●Wear protective safety glasses
when working near the battery.
●Keep children away from the bat-
tery.
■Where to safely charge the bat-
tery
Always charge the battery in an open
area. Do not charge the battery in a
garage or closed room where there is insufficient ventilation.
■Emergency measures regarding electrolyte
●If electrolyte gets in your eyes
Flush your eyes with clean water for at least 15 minutes and get immediate
medical attention. If possible, con-
tinue to apply water with a sponge or cloth while traveling to the nearest
medical facility.
●If electrolyte gets on your skin
Wash the affected area thoroughly. If
you feel pain or burning, get medical attention immediately.
●If electrolyte gets on your clothes
It can soak through clothing on to
your skin. Immediately take off the
clothing and follow the procedure above if necessary.
●If you accidentally swallow electro-lyte
Drink a large quantity of water or milk.
Get emergency medical attention immediately.
NOTICE
■When recharging the battery
Never recharge the battery while the
engine is running. Also, be sure all accessories are turned off.
■When adding distilled water
Avoid overfilling. Water spilled during
battery recharging may cause corro-
sion.
Adding the washer fluid