ESP TOYOTA HIGHLANDER 2013 XU50 / 3.G Owner's Manual
[x] Cancel search | Manufacturer: TOYOTA, Model Year: 2013, Model line: HIGHLANDER, Model: TOYOTA HIGHLANDER 2013 XU50 / 3.GPages: 684, PDF Size: 15.42 MB
Page 300 of 684
300 3-2. Using the audio system
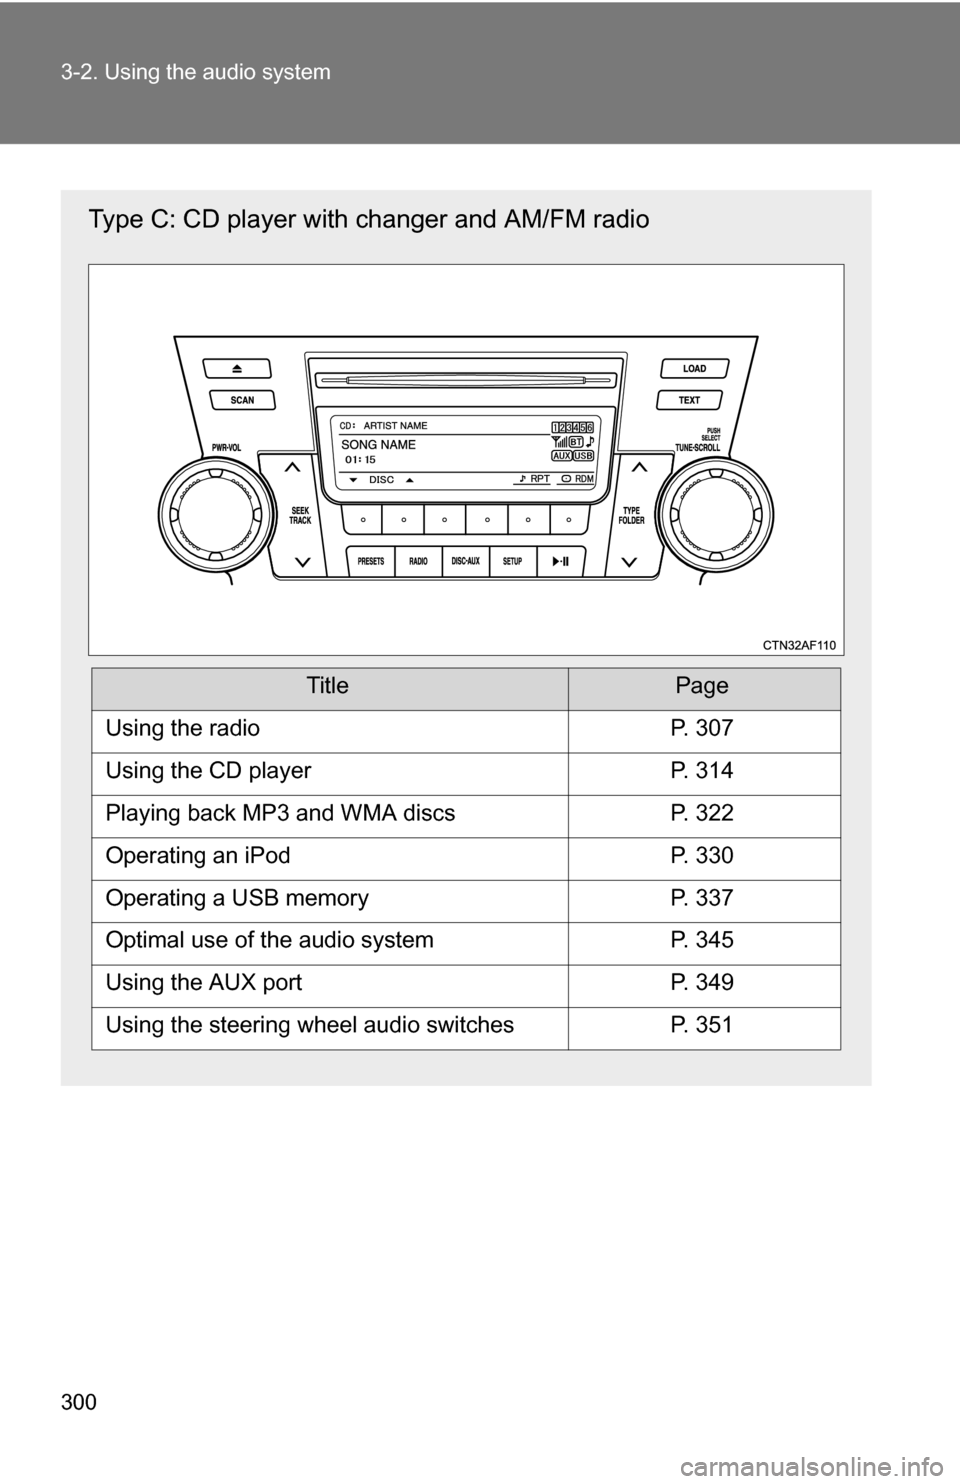
Type C: CD player with changer and AM/FM radio
TitlePage
Using the radioP. 307
Using the CD playerP. 314
Playing back MP3 and WMA discsP. 322
Operating an iPodP. 330
Operating a USB memoryP. 337
Optimal use of the audio systemP. 345
Using the AUX portP. 349
Using the steering wheel audio switchesP. 351
Page 302 of 684
302 3-2. Using the audio system
Language settings (type B and C)The language used for all voice guidance, voice recognition and mes-
sages may be changed. Press .
Press (MORE).
Press (LANG).
Press the that corresponds to the desired language.
For vehicles sold in the U.S.A.“ENG” (English) or “ESP” (Spanish)
For vehicles sold in Canada “ENG” (English) or “FRAN” (French)
■Using cellular phones
Interference may be heard through the audio system's speakers if a cellular
phone is being used inside or close to the vehicle while the audio syste\
m is
operating.
STEP1
STEP2
STEP3
STEP4
Page 303 of 684
303
3-2. Using the audio system
3
Interior features
■
Trademark owned by SRS Labs, Inc. (if equipped)
The audio systems utilize SRS FOCUS
® and SRS TruBass® audio
enhancement technologies, under license from SRS Labs, Inc., in all modes
except AM radio mode.
FOCUS, TruBass, SRS and
symbol are trademarks of SRS Labs,
Inc.
FOCUS and TruBass technologies are incorporated under license from
SRS Labs, Inc.
TruBass
® enhances the perception of bass frequencies to provide deep, rich
bass response from any size speaker.
SRS FOCUS
® raises the audio image from non-optimally placed speakers
up to the natural listening height at ear level.
Page 305 of 684
305
3-2. Using the audio system
3
Interior features
CAUTION
FCC Warning:
Changes or modifications not expressly approved by the party responsible
for compliance could void the user’s authority to operate the equipment.
This device complies with Part 15 of the FCC Rules. Operation is subject to
the following two conditions: (1) this device may not cause harmful interfer-
ence, and (2) this device must accept any interference received, including
interference that may cause undesired operation.
This equipment complies with FCC radiation exposure limits set forth for an
uncontrolled environment and meets
the FCC radio frequency (RF) Expo-
sure Guidelines in Supplement C to OET65. This equipment has very low
levels of RF energy that it deemed to comply without maximum permissive
exposure evaluation (MPE). But it is desirable that it should be installed and
operated keeping the radiator at least 20cm or more away from person’s
body (excluding extremities: hands, wrists, feet and ankles).
NOTE: This equipment has been tested and found to comply with the limits
for a Class B digital device, pursuant to Part 15 of the FCC Rules. These lim-
its are designed to provide reasonable protection against harmful interfer-
ence in a residential installation. This equipment generates, uses and can
radiate radio frequency energy and, if not installed and used in accordance
with the instructions, may cause harmful interference to radio communica-
tions. However, there is no guarantee that interference will not occur in a
particular installation.
If this equipment does cause harmful interference to radio or television
reception, which can be determined by turning the equipment off and on, the
user is encouraged to try to correct the interference by one or more of the
following measures:
- Reorient or relocate the receiving antenna.
- Increase the separation between the equipment and receiver.
- Connect the equipment into an outlet on a circuit different from that to which the receiver is connected.
- Consult the dealer or an experienced radio/TV technician for help.
This transmitter must not be co-located or operated in conjunction with any
other antenna or transmitter.
Page 311 of 684
311
3-2. Using the audio system
3
Interior features
■
When the battery is disconnected
All preset stations are erased. (type A only)
■ Reception sensitivity
●Type B and C Cargo loaded on the roof luggage carrier, especially
metal objects, may adversely affect the reception of XM
® Satellite Radio.
● Maintaining perfect radio reception at all times is difficult due to the con-
tinually changing position of the antenna, differences in signal strength
and surrounding objects, such as trains and transmitters.
● Pole type antenna The radio antenna is mounted on the right-side
front fender. The antenna can be removed from the base by turning it.
● Print type antenna The radio antenna is mounted inside the left-side
rear quarter window. To maintain clear radio reception, do not attach
metallic window tinting or other metallic objects to the antenna wire
mounted inside the left-side rear quarter window.
■ XM
® Satellite Radio (type B and C)
An XM
® Satellite Radio is a tuner designed exclusively to receive broadcasts
provided under a separate subscription. Availability is limited to the 48 con-
tiguous states and 10 Canadian provinces.
● XM
® subscriptions
For detailed information about XM® Satellite Radio or to subscribe:
U.S.A.
Visit on the web at www.xmradio.com
or call 1-800-967-2346.
Canada
Visit on the web at www.xmradio.ca
or call 1-877-438-9677.
● Radio ID
You will need the radio ID when activating XM
® service or reporting a
problem. Select “CH000” using , and the receiver's 8-character ID
number will appear.
● Satellite tuner
The tuner supports only Audio Services (Music and Talk) and the accom-
panying Text Information of XM
® Satellite Radio.
Page 332 of 684
332 3-2. Using the audio system
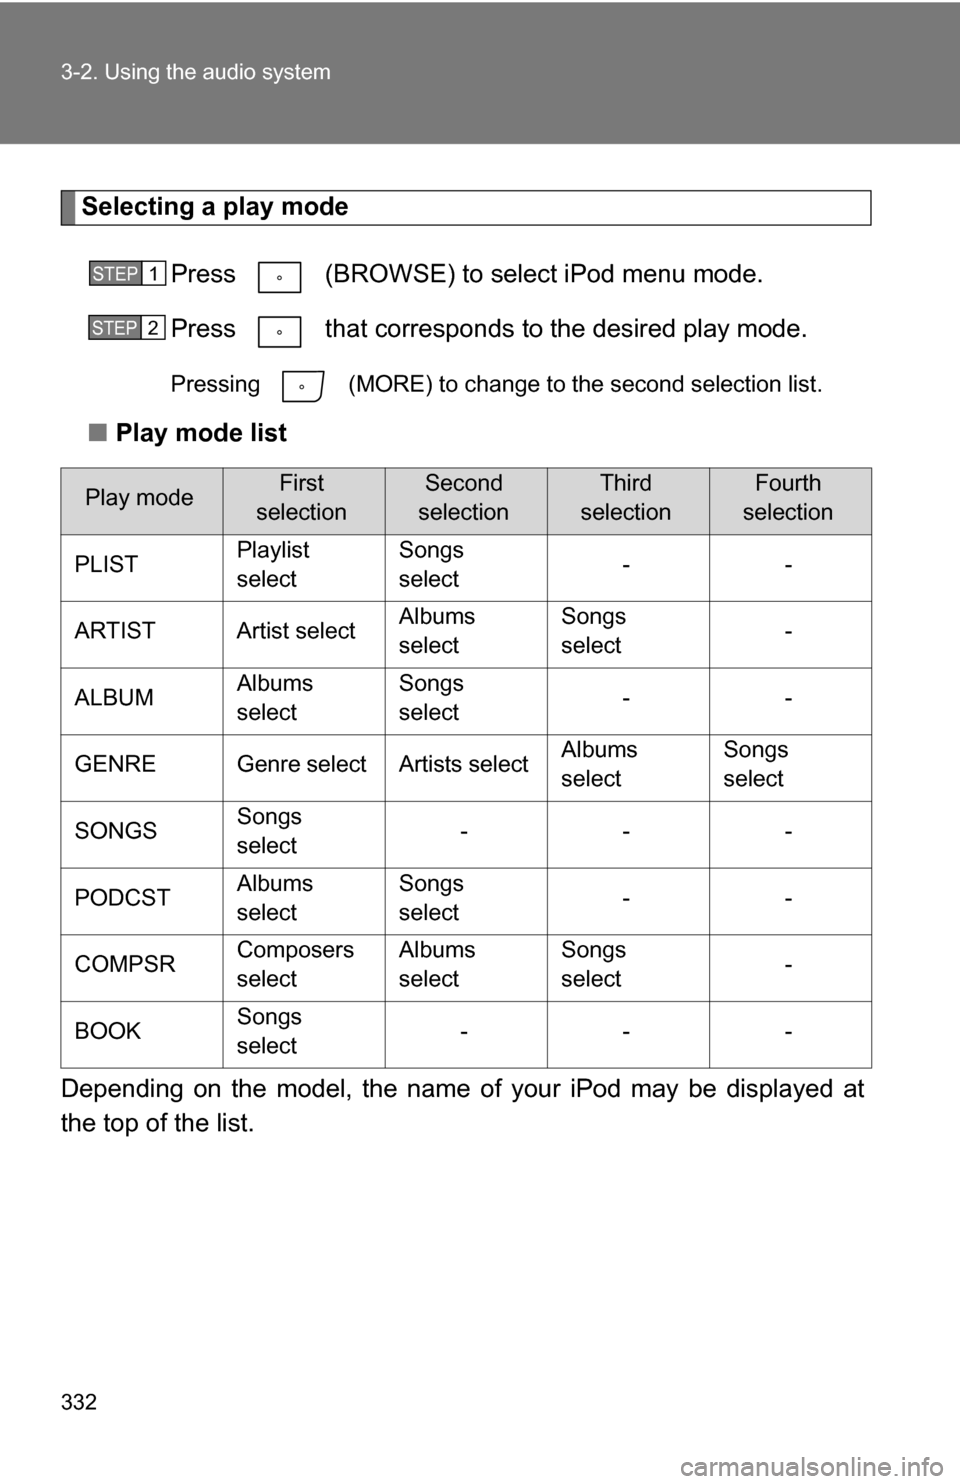
Selecting a play modePress (BROWSE) to select iPod menu mode.
Press that corresponds to the desired play mode.
Pressing (MORE) to change to the second selection list.
■Play mode list
Depending on the model, the name of your iPod may be displayed at
the top of the list.
Play modeFirst
selectionSecond
selectionThird
selectionFourth
selection
PLIST Playlist
selectSongs
select
--
ARTIST Artist select Albums
selectSongs
select
-
ALBUM Albums
selectSongs
select
--
GENRE Genre select Artists select Albums
selectSongs
select
SONGS Songs
select ---
PODCST Albums
selectSongs
select
--
COMPSR Composers
selectAlbums
select Songs
select
-
BOOK Songs
select ---
STEP1
STEP2
Page 335 of 684
335
3-2. Using the audio system
3
Interior features
Switching the display
Press .
Each time is pressed, the display changes in the following order:
Track title Track title/Artist name Track title/Album name Track
title/Elapsed time
■ About iPod
●Apple is not responsible for the operation of this device or its compliance
with safety and regulatory standards.
● iPod is a trademark of Apple Inc., registered in the U.S. and other coun-
tries.
■ iPod functions
●When an iPod is connected and the audio source is changed to iPod
mode, the iPod will resume play from the same point in which it was last
used.
● Depending on the iPod that is connected to the system, certain functions
may not be available. Disconnecting the device and reconnecting it once
again may resolve some malfunctions.
■ iPod problems
To resolve most problems encountered when using your iPod, disconnect
your iPod from the vehicle iPod connection and reset it.
For instructions on how to reset your iPod, refer to your iPod Owner's Man-
ual.
■ Error messages
“iPod ERROR”: This indicates a problem in the iPod, inside the
USB box or the connection between them.
“NO SONGS”: This indicates that there is no music data in the iPod.
“UPDATE YOUR iPod”: This indicates that the version of the iPod is not compatible.
Page 340 of 684
340 3-2. Using the audio system
Fast-forwarding and rewinding filesPress and hold “
” or “ ” on .
Random playback
■ Playing files from a folder in random order
Press (RDM).
To cancel, press the button twice.
■Playing all the files from a USB memory in random order
Press (RDM) twice.
To cancel, press the button again.
Repeat play
■ Repeating a file
Press (RPT).
To cancel, press the button twice.
■Repeating all the files in a folder
Press (RPT) twice.
To cancel, press the button again.
Switching the display
Press .
Each time is pressed, the display changes in the following order:
Track title Track title/Artist name Track title/Album name Track
title/Elapsed time
Page 341 of 684
341
3-2. Using the audio system
3
Interior features
■
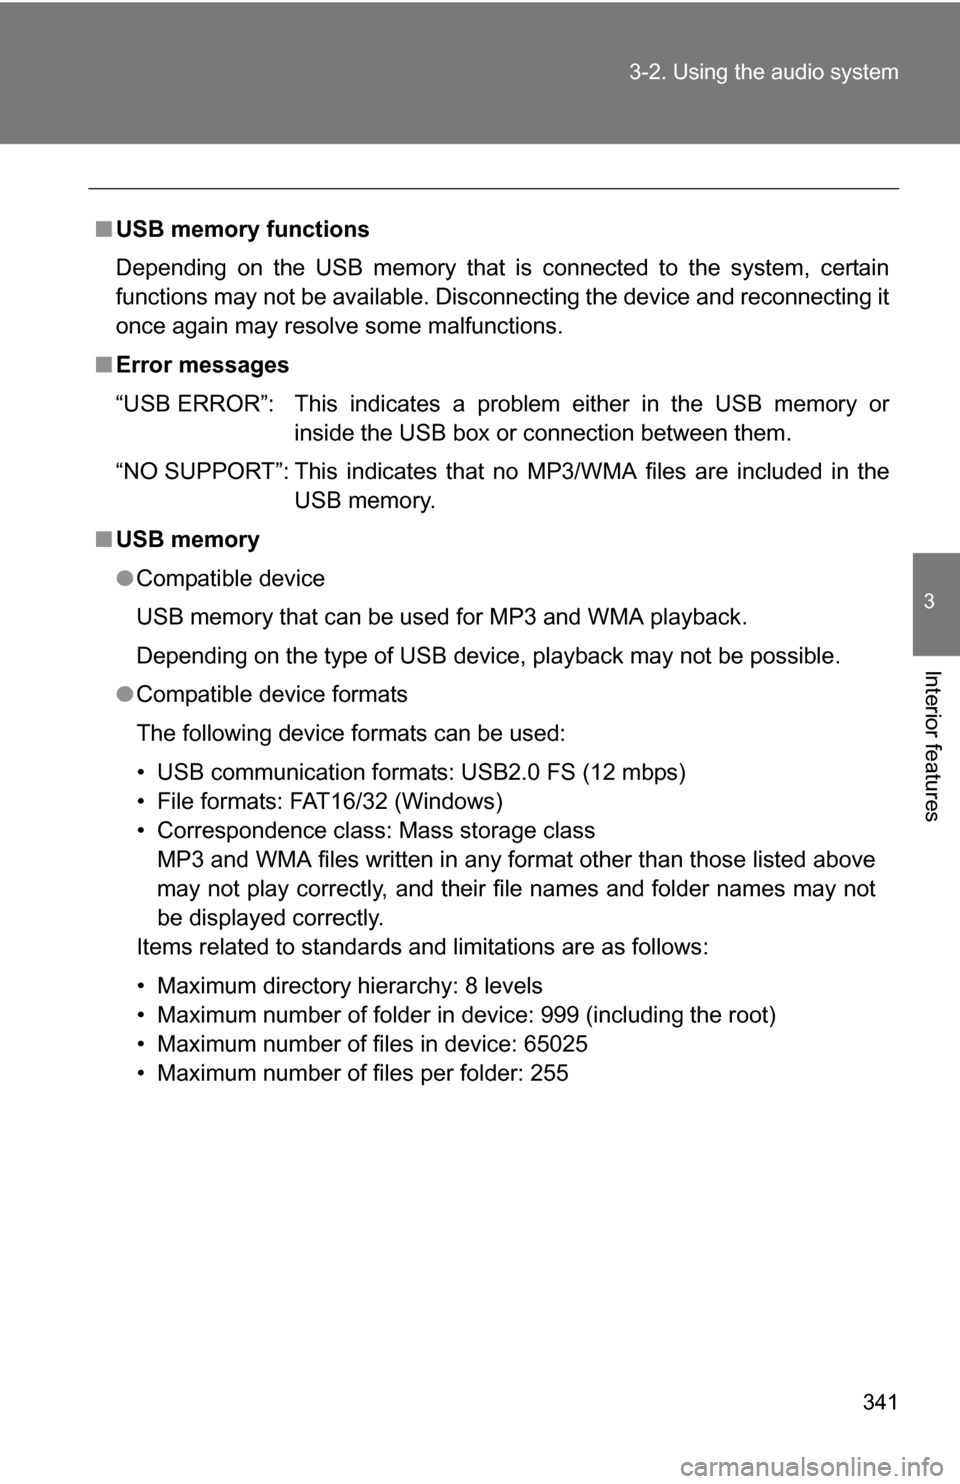
USB memory functions
Depending on the USB memory that is connected to the system, certain
functions may not be available. Disconnecting the device and reconnecting it
once again may resolve some malfunctions.
■ Error messages
“USB ERROR”: This indicates a problem either in the USB memory or
inside the USB box or connection between them.
“NO SUPPORT”: This indicates that no MP3/WMA files are included in the USB memory.
■ USB memory
●Compatible device
USB memory that can be used for MP3 and WMA playback.
Depending on the type of USB device, playback may not be possible.
● Compatible device formats
The following device formats can be used:
• USB communication formats: USB2.0 FS (12 mbps)
• File formats: FAT16/32 (Windows)
• Correspondence class: Mass storage class
MP3 and WMA files written in any format other than those listed above
may not play correctly, and their file names and folder names may not
be displayed correctly.
Items related to standards and limitations are as follows:
• Maximum directory hierarchy: 8 levels
• Maximum number of folder in device: 999 (including the root)
• Maximum number of files in device: 65025
• Maximum number of files per folder: 255
Page 346 of 684
346 3-2. Using the audio system
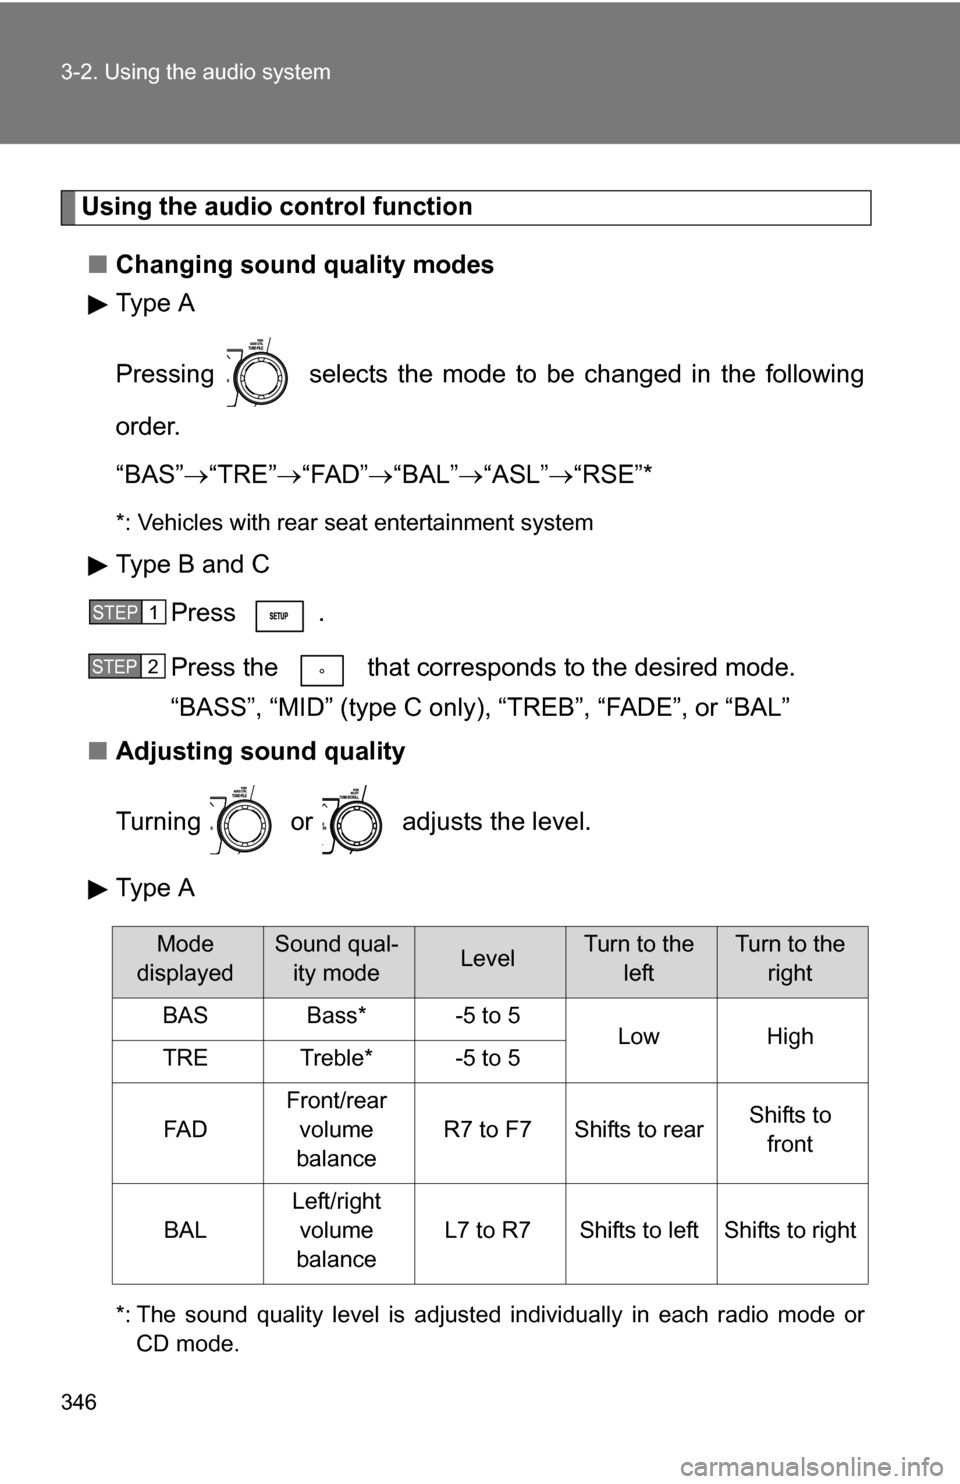
Using the audio control function■ Changing sound quality modes
Type A
Pressing selects the mode to be changed in the following
order.
“BAS” “TRE” “FAD” “BAL” “ASL” “RSE”*
*: Vehicles with rear seat entertainment system
Type B and C
Press .
Press the that corresponds to the desired mode.
“BASS”, “MID” (type C only), “TREB”, “FADE”, or “BAL”
■ Adjusting sound quality
Turning or adjusts the level.
Type A
*: The sound quality level is adjusted individually in each radio mode or
CD mode.
STEP1
STEP2
Mode
displayedSound qual- ity modeLevelTurn to the leftTurn to the right
BASBass*-5 to 5LowHighTRETreble*-5 to 5
FA D
Front/rear volume
balance
R7 to F7Shifts to rearShifts to front
BAL
Left/right volume
balance
L7 to R7Shifts to leftShifts to right