TOYOTA HIGHLANDER 2014 XU50 / 3.G Quick Reference Guide
Manufacturer: TOYOTA, Model Year: 2014, Model line: HIGHLANDER, Model: TOYOTA HIGHLANDER 2014 XU50 / 3.GPages: 19, PDF Size: 2.1 MB
Page 1 of 19

2014
Highlander
Quick Reference Guide
Page 2 of 19
OVERVIEW
FEATURES/OPERATIONS
SAFETY AND EMERGENCY FEATURES
1
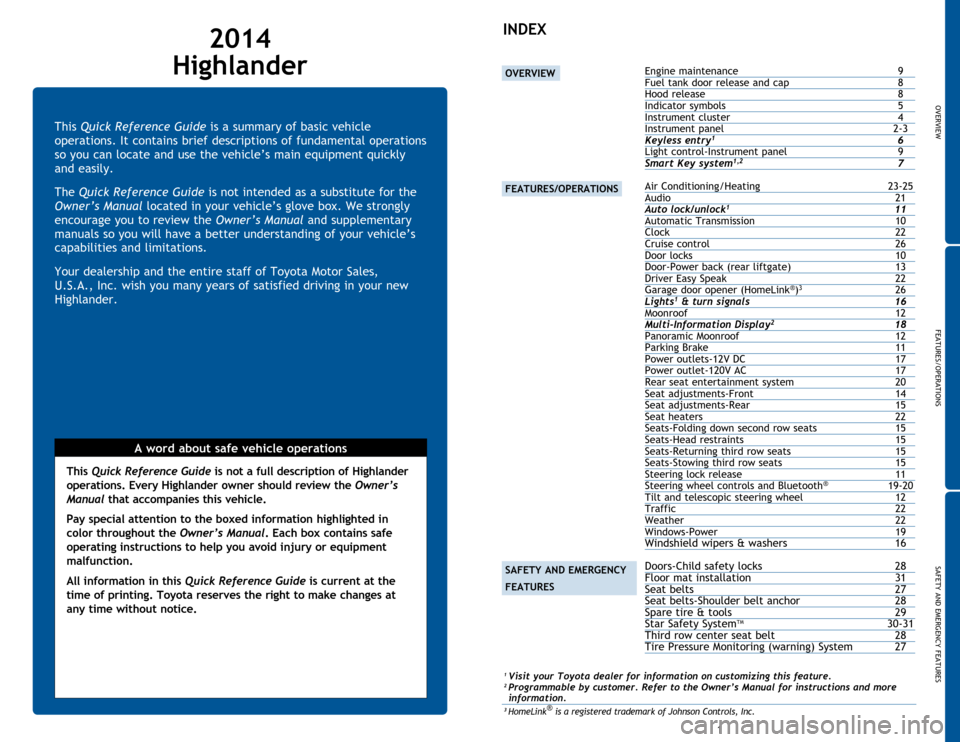
This Quick Reference Guide is a summary of basic vehicle
operations. It contains brief descriptions of fundamental operations
so you can locate and use the vehicle’s main equipment quickly
and easily.
The Quick Reference Guide is not intended as a substitute for the
Owner’s Manual located in your vehicle’s glove box. We strongly
encourage you to review the Owner’s Manual and supplementary
manuals so you will have a better understanding of your vehicle’s
capabilities and limitations.
Your dealership and the entire staff of Toyota Motor Sales,
U.S.A., Inc. wish you many years of satisfied driving in your new
Highlander.
A word about safe vehicle operations
This Quick Reference Guide is not a full description of Highlander
operations. Every Highlander owner should review the Owner’s
Manual that accompanies this vehicle.
Pay special attention to the boxed information highlighted in
color throughout the Owner’s Manual. Each box contains safe
operating instructions to help you avoid injury or equipment
malfunction.
All information in this Quick Reference Guide is current at the
time of printing. Toyota reserves the right to make changes at
any time without notice.
2014
Highlander
INDEX
Engine maintenance 9
Fuel tank door release and cap 8
Hood release 8
Indicator symbols 5
Instrument cluster 4
Instrument panel 2-3
Keyless entry
1 6
Light control-Instrument panel 9
Smart Key system
1,2 7
Air Conditioning/Heating 23-25
Audio 21
Auto lock/unlock
1 11
Automatic Transmission 10
Clock 22
Cruise control 26
Door locks 10
Door-Power back (rear liftgate) 13
Driver Easy Speak 22
Garage door opener (HomeLink
®)3 26
Lights
1 & turn signals 16
Moonroof 12
Multi-Information Display
2 18
Panoramic Moonroof 12
Parking Brake 11
Power outlets-12V DC 17
Power outlet-120V AC 17
Rear seat entertainment system 20
Seat adjustments-Front 14
Seat adjustments-Rear 15
Seat heaters 22
Seats-Folding down second row seats 15
Seats-Head restraints 15
Seats-Returning third row seats 15
Seats-Stowing third row seats 15
Steering lock release 11
Steering wheel controls and Bluetooth
® 19-20
Tilt and telescopic steering wheel 12
Traffic 22
Weather 22
Windows-Power 19
Windshield wipers & washers 16
Doors-Child safety locks 28
Floor mat installation 31
Seat belts 27
Seat belts-Shoulder belt anchor 28
Spare tire & tools 29
Star Safety System
TM 30-31
Third row center seat belt 28
Tire Pressure Monitoring (warning) System 27
1 Visit your Toyota dealer for information on customizing this feature.2 Programmable by customer. Refer to the Owner’s Manual for instructions and more
information.
3 HomeLink® is a registered trademark of Johnson Controls, Inc.
OVERVIEW
FEATURES/OPERATIONS
SAFETY AND EMERGENCY
FEATURES
Page 3 of 19
OVERVIEW
FEATURES/OPERATIONS
SAFETY AND EMERGENCY FEATURES
23
OVERVIEW
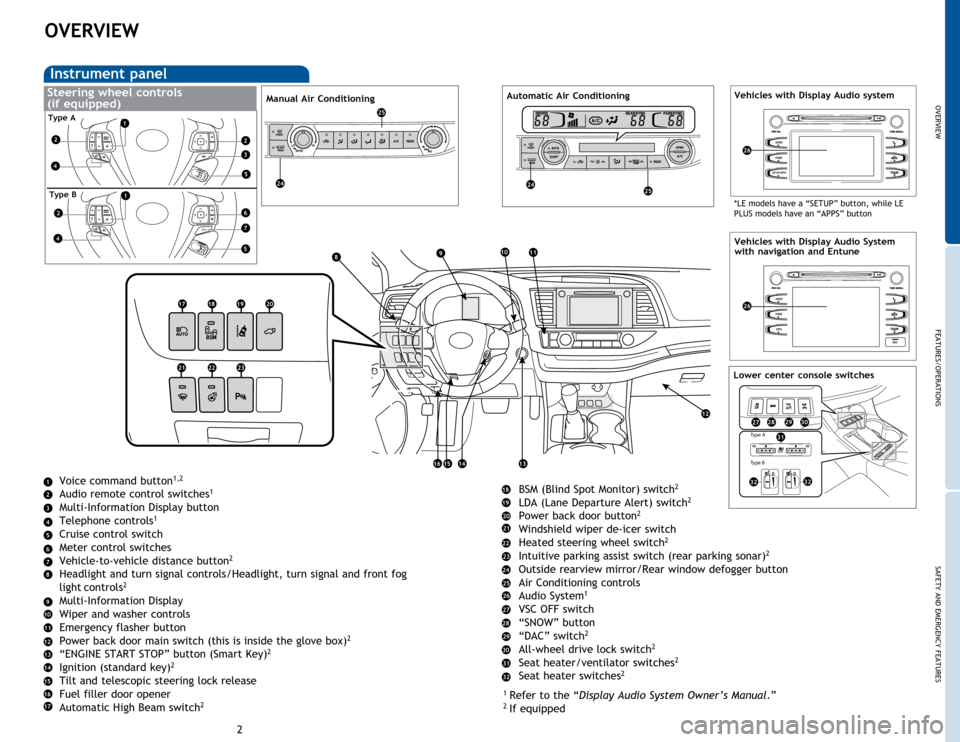
Instrument panel
HOME
SETUP/APPS*
AUDIO
Voice command button1,2
Audio remote control switches1
Multi-Information Display button
Telephone controls1
Cruise control switch
Meter control switches
Vehicle-to-vehicle distance button
2
Headlight and turn signal controls/Headlight, turn signal and front fog
light controls2
Multi-Information Display
Wiper and washer controls
Emergency flasher button
Power back door main switch (this is inside the glove box)
2
“ENGINE START STOP” button (Smart Key)2
Ignition (standard key)2
Tilt and telescopic steering lock release
Fuel filler door opener
Automatic High Beam switch
2
BSM (Blind Spot Monitor) switch2
LDA (Lane Departure Alert) switch2
Power back door button2
Windshield wiper de-icer switch
Heated steering wheel switch2
Intuitive parking assist switch (rear parking sonar)2
Outside rearview mirror/Rear window defogger button
Air Conditioning controls
Audio System
1
VSC OFF switch
“SNOW” button
“DAC” switch
2
All-wheel drive lock switch2
Seat heater/ventilator switches2
Seat heater switches2
1
Refer to the “Display Audio System Owner’s Manual .”2
If equipped
Vehicles with Display Audio systemSteering wheel controls
(if equipped)Manual Air ConditioningAutomatic Air Conditioning
Vehicles with Display Audio System
with navigation and Entune
HOME
APPS
AUDIO
NAV
Type A
Ty pe B
Type A
Type B
4
4
1
1
2
2
2
3
5
5
1
2
3
4
5
6
7
6
7
8910
8
9
12
13141516
10
11
12
13
14
15
11
16
17181920
212223
17
18
19
20
21
22
23
2424
25
25
24
25
26
26
26
Lower center console switches
27282930
31
3232
27
28
29
30
31
32
*LE models have a “SETUP” button, while LE
PLUS models have an “APPS” button
Page 4 of 19
OVERVIEW
FEATURES/OPERATIONS
SAFETY AND EMERGENCY FEATURES
45
OVERVIEW
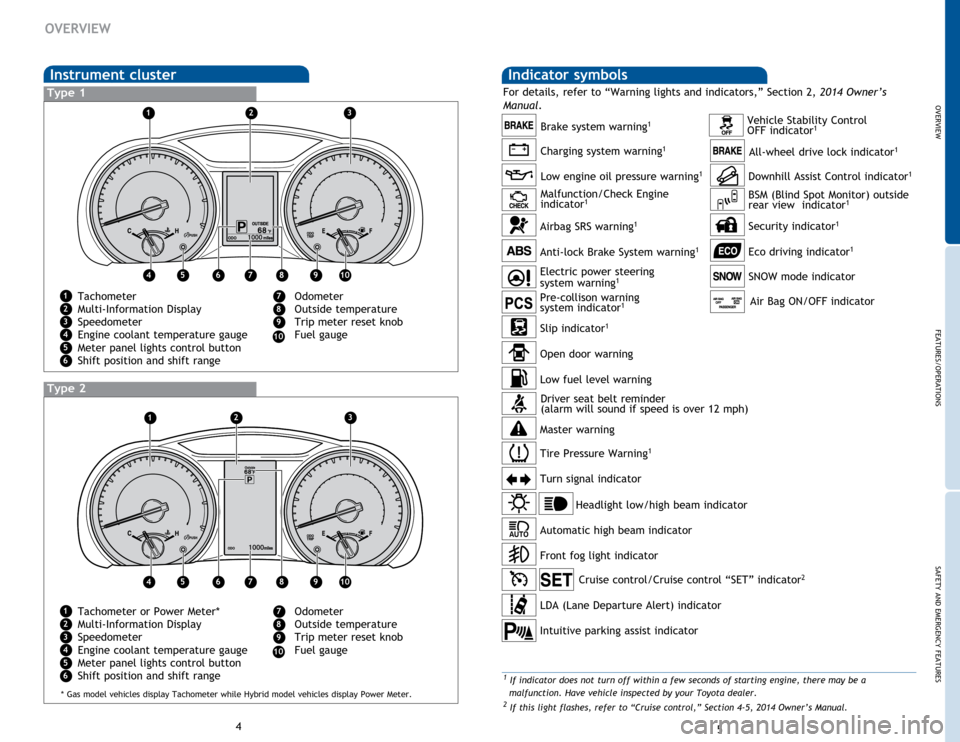
Indicator symbols Instrument cluster
Tachometer
Multi-Information Display
Speedometer
Engine coolant temperature gauge
Meter panel lights control button
Shift position and shift range
Charging system warning1
Brake system warning1
1 If indicator does not turn off within a few seconds of starting engine, there may be a
malfunction. Have vehicle inspected by your Toyota dealer.
2 If this light flashes, refer to “Cruise control,” Section 4-5, 2014 Owner’s Manual.
Anti-lock Brake System warning1
Headlight low/high beam indicator
Turn signal indicator Vehicle Stability Control
OFF indicator
1
SNOW mode indicator
Cruise control/Cruise control “SET” indicator2
Tire Pressure Warning1
Open door warning
Airbag SRS warning1
Master warning
Driver seat belt reminder
(alarm will sound if speed is over 12 mph)
Low engine oil pressure warning1
Malfunction/Check Engine
indicator1
Pre-collison warning
system indicator1
Low fuel level warning
Electric power steering
system warning1
Front fog light indicator
Downhill Assist Control indicator1
Slip indicator1
For details, refer to “Warning lights and indicators,” Section 2,
2014 Owner’s
Manual .Type 1
Type 2
1
1
23
23
1
2
3
4567
4
5
6
7
8
9
8910
Odometer
Outside temperature
Trip meter reset knob
Fuel gauge
10
Tachometer or Power Meter*
Multi-Information Display
Speedometer
Engine coolant temperature gauge
Meter panel lights control button
Shift position and shift range1
2
3
4
5
6
7
8
9
Odometer
Outside temperature
Trip meter reset knob
Fuel gauge
10
45678910
Automatic high beam indicator
LDA (Lane Departure Alert) indicator
Intuitive parking assist indicator
All-wheel drive lock indicator1
BSM (Blind Spot Monitor) outside
rear view indicator1
Security indicator1
Eco driving indicator1
Air Bag ON/OFF indicator
* Gas model vehicles display Tachometer while Hybrid model vehicles display Power Meter.
Page 5 of 19
Power liftgate operation
Without Smart Key system
OVERVIEW
FEATURES/OPERATIONS
SAFETY AND EMERGENCY FEATURES
67
OVERVIEW
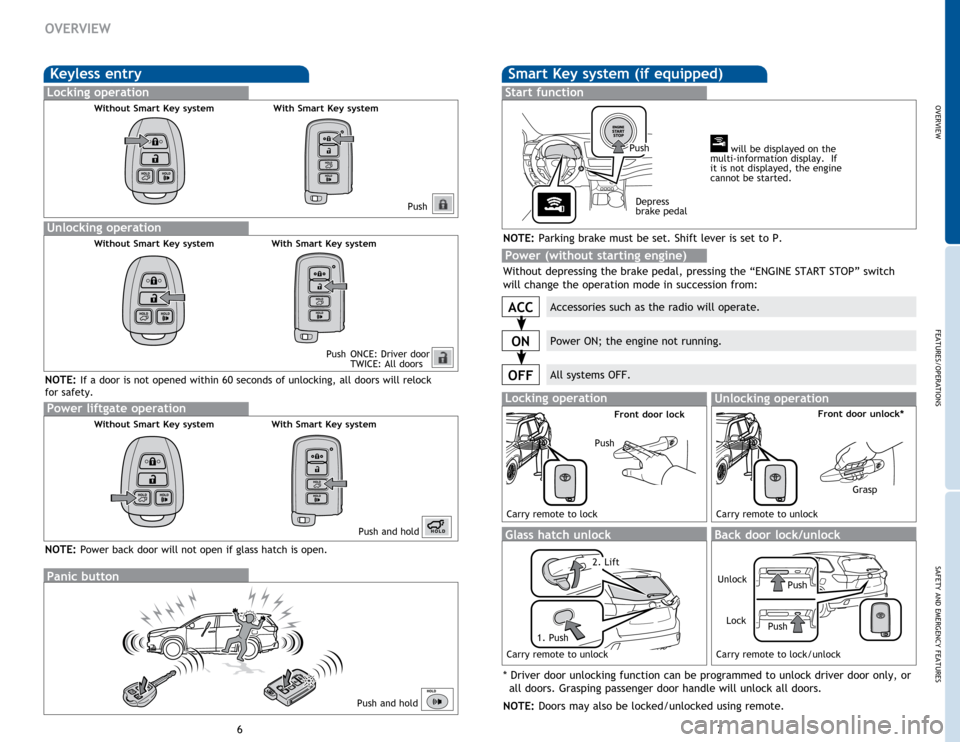
Keyless entry
Push
Push ONCE: Driver door
TWICE: All doors
Locking operation
Unlocking operation
Without Smart Key system With Smart Key system
Without Smart Key systemWith Smart Key system
Smart Key system (if equipped)
Start function
Accessories such as the radio will operate.
Power ON; the engine not running.
All systems OFF.
ACC
ON
OFF
NOTE: Parking brake must be set. Shift lever is set to P.
Push
Depress
brake pedal will be displayed on the
multi-information display. If
it is not displayed, the engine
cannot be started.
Without depressing the brake pedal, pressing the “ENGINE START STOP” switch
will change the operation mode in succession from:
Power (without starting engine)
Panic button
Push and hold
Push and hold
NOTE: If a door is not opened within 60 seconds of unlocking, all doors will relock
for safety.
* Driver door unlocking function can be programmed to unlock driver door only, or
all doors. Grasping passenger door handle will unlock all doors.
NOTE: Doors may also be locked/unlocked using remote.
Glass hatch unlock
Locking operationUnlocking operation
Carry remote to lock Carry remote to unlock
Front door lockFront door unlock*
Push
Grasp
1. Push
Back door lock/unlock
Push
Lock
Push
Unlock
Carry remote to unlock Carry remote to lock/unlock
With Smart Key system
NOTE: Power back door will not open if glass hatch is open.
2. Lift
Page 6 of 19
OVERVIEW
FEATURES/OPERATIONS
SAFETY AND EMERGENCY FEATURES
89
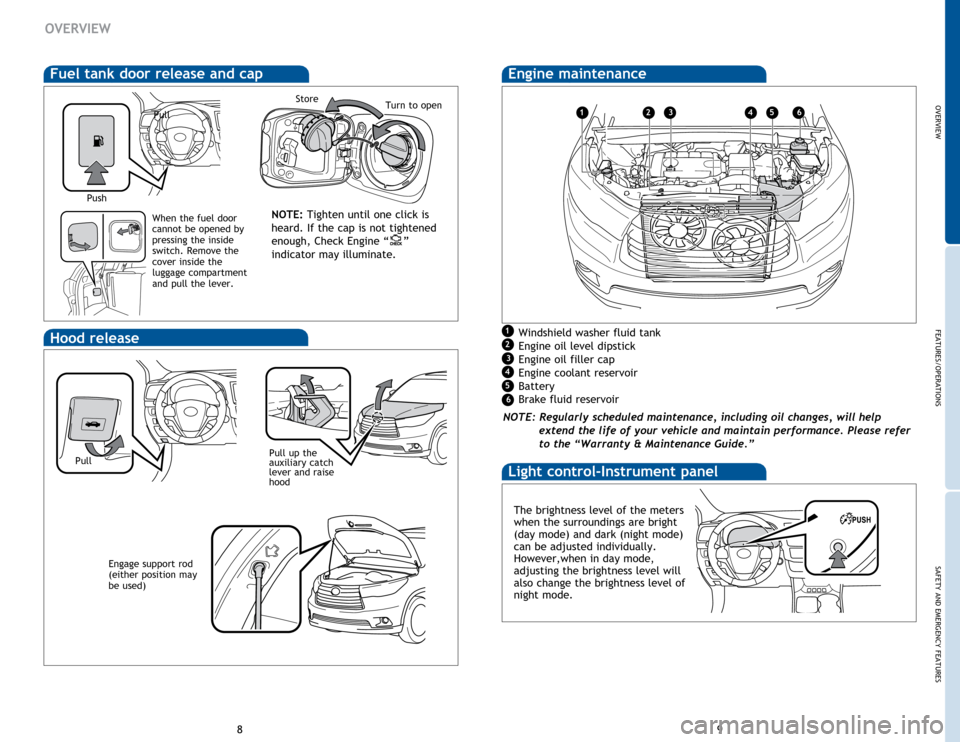
Hood release
Fuel tank door release and cap
NOTE: Tighten until one click is
heard. If the cap is not tightened
enough, Check Engine “
”
indicator may illuminate.
PullTurn to openStore
Windshield washer fluid tank
Engine oil level dipstick
Engine oil filler cap
Engine coolant reservoir
Battery
Brake fluid reservoir
NOTE: Regularly scheduled maintenance, including oil changes, will help extend the life of your vehicle and maintain performance. Please refer
to the “Warranty & Maintenance Guide.”
Engine maintenance
Light control-Instrument panel
The brightness level of the meters
when the surroundings are bright
(day mode) and dark (night mode)
can be adjusted individually.
However,when in day mode,
adjusting the brightness level will
also change the brightness level of
night mode.
Engage support rod
(either position may
be used)
OVERVIEW
PullPush
When the fuel door
cannot be opened by
pressing the inside
switch. Remove the
cover inside the
luggage compartment
and pull the lever.
Pull up the
auxiliary catch
lever and raise
hood
123
1
2
3
4
4
56
5
6
Page 7 of 19
OVERVIEW
FEATURES/OPERATIONS
SAFETY AND EMERGENCY FEATURES
11
10
FEATURES/OPERATIONS
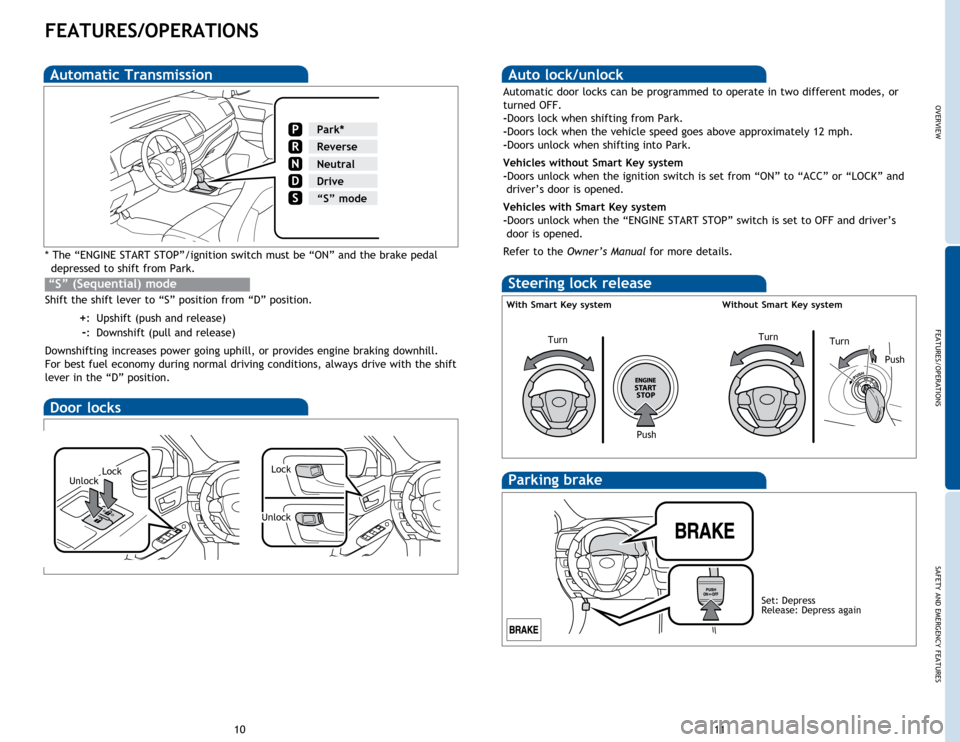
Automatic Transmission
* The “ENGINE START STOP”/ignition switch must be “ON” and the brake pedal
depressed to shift from Park.
Shift the shift lever to “S” position from “D” position.
+: Upshift (push and release)
-: Downshift (pull and release)
Downshifting increases power going uphill, or provides engine braking downhill.
For best fuel economy during normal driving conditions, always drive with the shift
lever in the “D” position.
“S” (Sequential) mode
Park*
Reverse
Neutral
Drive
N
“S” mode
Steering lock release
Turn
Turn
Door locks
With Smart Key system Without Smart Key system
Push
Push
Turn
Auto lock/unlock
Automatic door locks can be programmed to operate in two different modes, or
turned OFF.
-Doors lock when shifting from Park.
-Doors lock when the vehicle speed goes above approximately 12 mph.
-Doors unlock when shifting into Park.
Vehicles without Smart Key system
-Doors unlock when the ignition switch is set from “ON” to “ACC” or “LOCK” and
driver’s door is opened.
Vehicles with Smart Key system
-Doors unlock when the “ENGINE START STOP” switch is set to OFF and driver’s door is opened.
Refer to the Owner’s Manual for more details.
Parking brakeLockUnlock
Set: Depress
Release: Depress again
Unlock
Lock
Page 8 of 19
OVERVIEW
FEATURES/OPERATIONS
SAFETY AND EMERGENCY FEATURES
1213
FEATURES/OPERATIONS
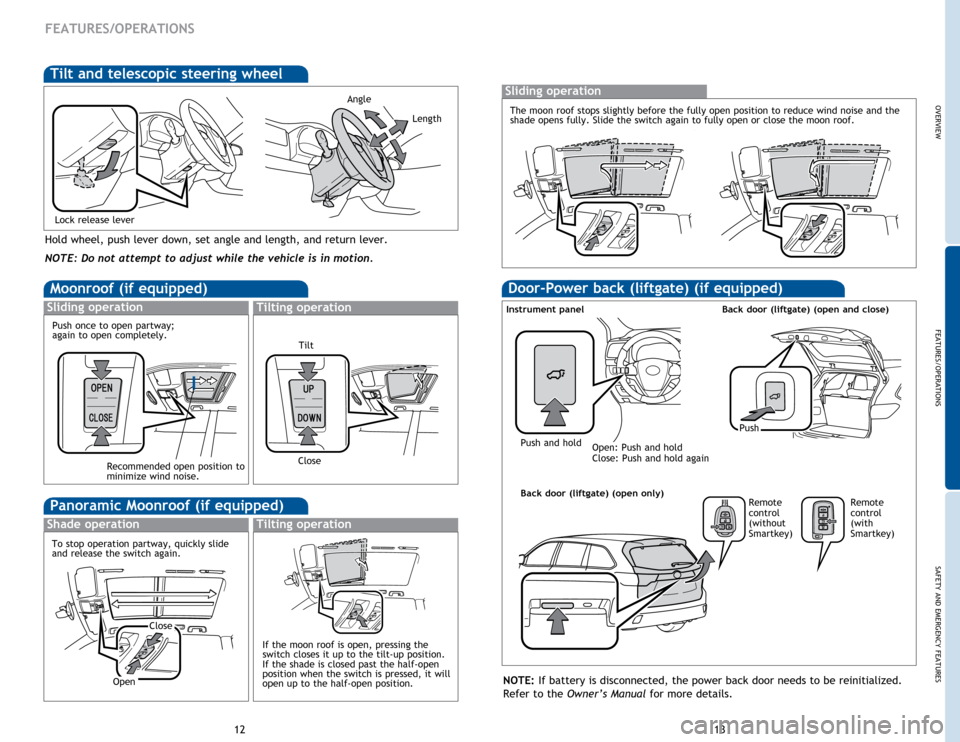
Hold wheel, push lever down, set angle and length, and return lever.
Angle
Length
Lock release lever
NOTE: Do not attempt to adjust while the vehicle is in motion.
Tilt and telescopic steering wheel
Moonroof (if equipped)
Sliding operationTilting operation
Tilt
Close
Door-Power back (liftgate) (if equipped)
Push
Push and hold
Instrument panel Back door (liftgate) (open and close)
Open: Push and hold
Close: Push and hold again
NOTE: If battery is disconnected, the power back door needs to be reinitialized.
Refer to the Owner’s Manual for more details.
Recommended open position to
minimize wind noise.
Push once to open partway;
again to open completely.
Panoramic Moonroof (if equipped)
Shade operationTilting operation
If the moon roof is open, pressing the
switch closes it up to the tilt-up position.
If the shade is closed past the half-open
position when the switch is pressed, it will
open up to the half-open position.
To stop operation partway, quickly slide
and release the switch again.
Close
Open
Sliding operation
The moon roof stops slightly before the fully open position to reduce wind noise and the
shade opens fully. Slide the switch again to fully open or close the moon roof.
Back door (liftgate) (open only)Remote
control
(without
Smartkey)Remote
control
(with
Smartkey)
Page 9 of 19
OVERVIEW
FEATURES/OPERATIONS
SAFETY AND EMERGENCY FEATURES
14
FEATURES/OPERATIONS
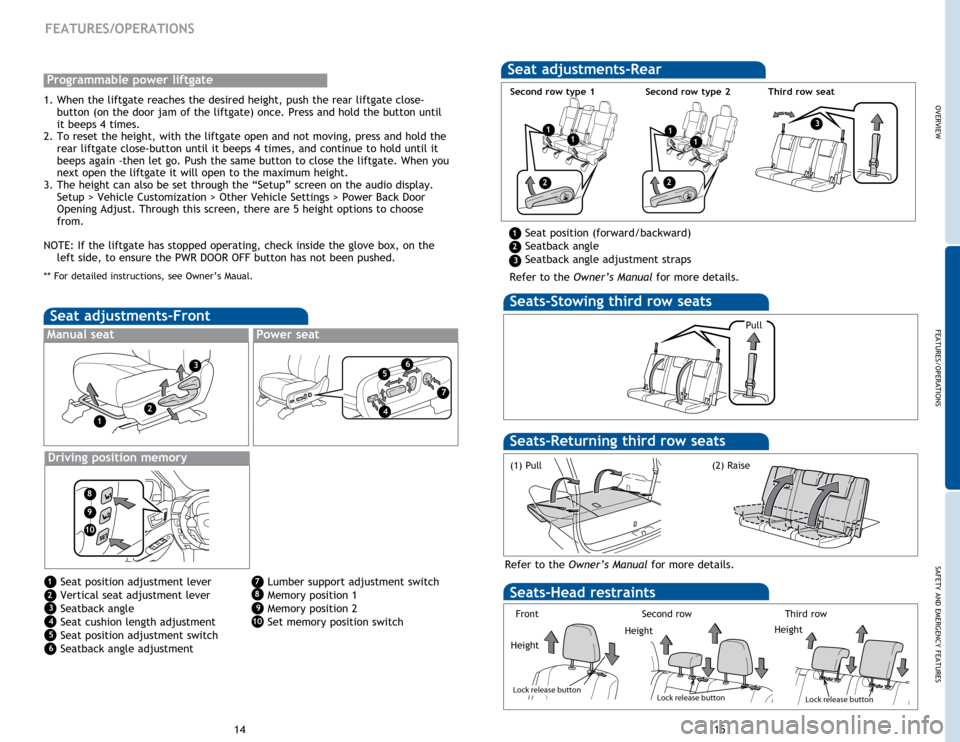
Seats-Head restraints
Lock release button
Lock release button
Lock release button
Pull
Height
Seats -Stowing third row seats
Refer to the Owner’s Manual for more details.
Seats -Returning third row seats
(1) Pull
Seat adjustments-Rear
Seat position (forward/backward)
Seatback angle
Seatback angle adjustment straps
Refer to the Owner’s Manual for more details.
Seat adjustments-Front
Seat position adjustment lever
Vertical seat adjustment lever
Seatback angle
Seat cushion length adjustment
Seat position adjustment switch
Seatback angle adjustment
Manual seatPower seat
Driving position memory
1
2
3
1
2
3
4
4
5
5
6
6
Lumber support adjustment switch
Memory position 1
Memory position 2
Set memory position switch7
8
9
10
7
8
9
10
Second row type 1 Second row type 2
1111
22
1
2
3
3
(2) Raise
Lock release button
Lock release button
Lock release button
Lock release button
Lock release button
Lock release button
FrontSecond rowThird row
Height Height
15
Third row seatProgrammable power liftgate
1. When the liftgate reaches the desired height, push the rear liftgate close-
button (on the door jam of the liftgate) once. Press and hold the button until
it beeps 4 times.
2. To reset the height, with the liftgate open and not moving, press and hold the rear liftgate close-button until it beeps 4 times, and continue to hold until it
beeps again -then let go. Push the same button to close the liftgate. When you
next open the liftgate it will open to the maximum height.
3. The height can also be set through the “Setup” screen on the audio display. Setup > Vehicle Customization > Other Vehicle Settings > Power Back Door
Opening Adjust. Through this screen, there are 5 height options to choose
from.
NOTE: If the liftgate has stopped operating, check inside the glove box, on the left side, to ensure the PWR DOOR OFF button has not been pushed.
** For detailed instructions, see Owner’s Maual.
Page 10 of 19
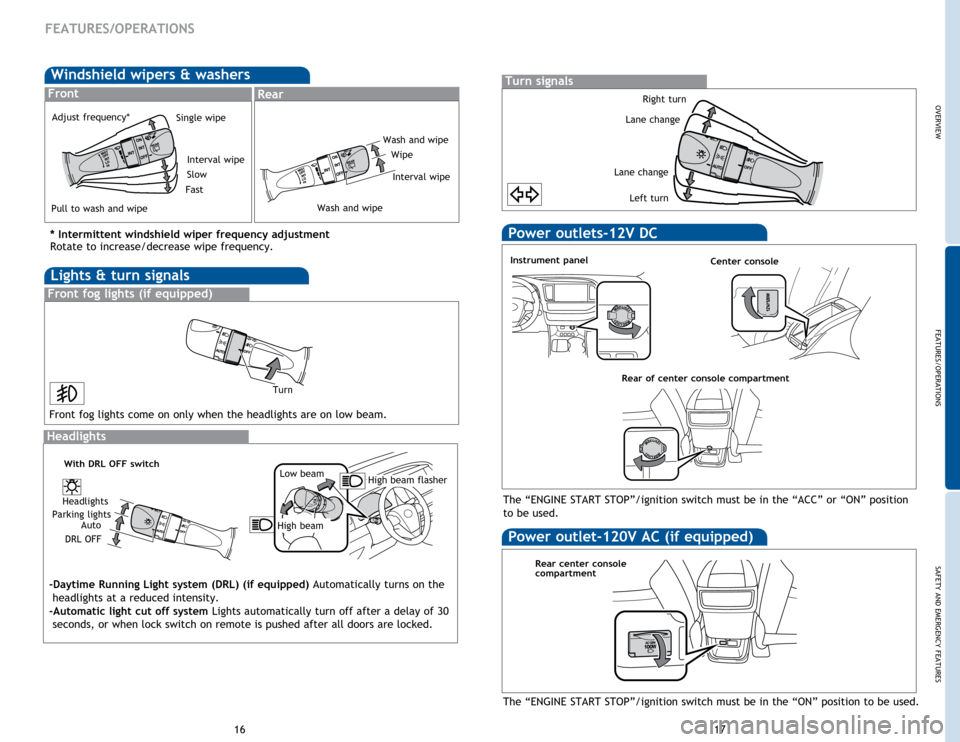
Windshield wipers & washers
FrontRear
* Intermittent windshield wiper frequency adjustment
Rotate to increase/decrease wipe frequency.
Interval wipe
Single wipe
Slow
Fast
Pull to wash and wipe Adjust frequency*
OVERVIEW
FEATURES/OPERATIONS
SAFETY AND EMERGENCY FEATURES
16
17
Lights & turn signals
Front fog lights (if equipped)
Front fog lights come on only when the headlights are on low beam.
Power outlets-12V DC
Rear of center console compartment
Instrument panel
The “ENGINE START STOP”/ignition switch must be in the “ACC” or “ON” position
to be used.
Power outlet-120V AC (if equipped)
Rear center console
compartment
Center console
The “ENGINE START STOP”/ignition switch must be in the “ON” position to be used.
FEATURES/OPERATIONS
Headlights
-Daytime Running Light system (DRL) (if equipped)
Automatically turns on the
headlights at a reduced intensity.
-Automatic light cut off system Lights automatically turn off after a delay of 30 seconds, or when lock switch on remote is pushed after all doors are locked.
High beam flasher
Low beam
High beam
Headlights
Parking lights Auto
DRL OFF
With DRL OFF switch
Turn
Turn signals
Right turn
Lane change
Lane change Left turn
Wash and wipeWipe
Interval wipe
Wash and wipe