buttons TOYOTA iM 2016 Accessories, Audio & Navigation (in English)
[x] Cancel search | Manufacturer: TOYOTA, Model Year: 2016, Model line: iM, Model: TOYOTA iM 2016Pages: 164, PDF Size: 6.21 MB
Page 10 of 164
1. QUICK G UIDE
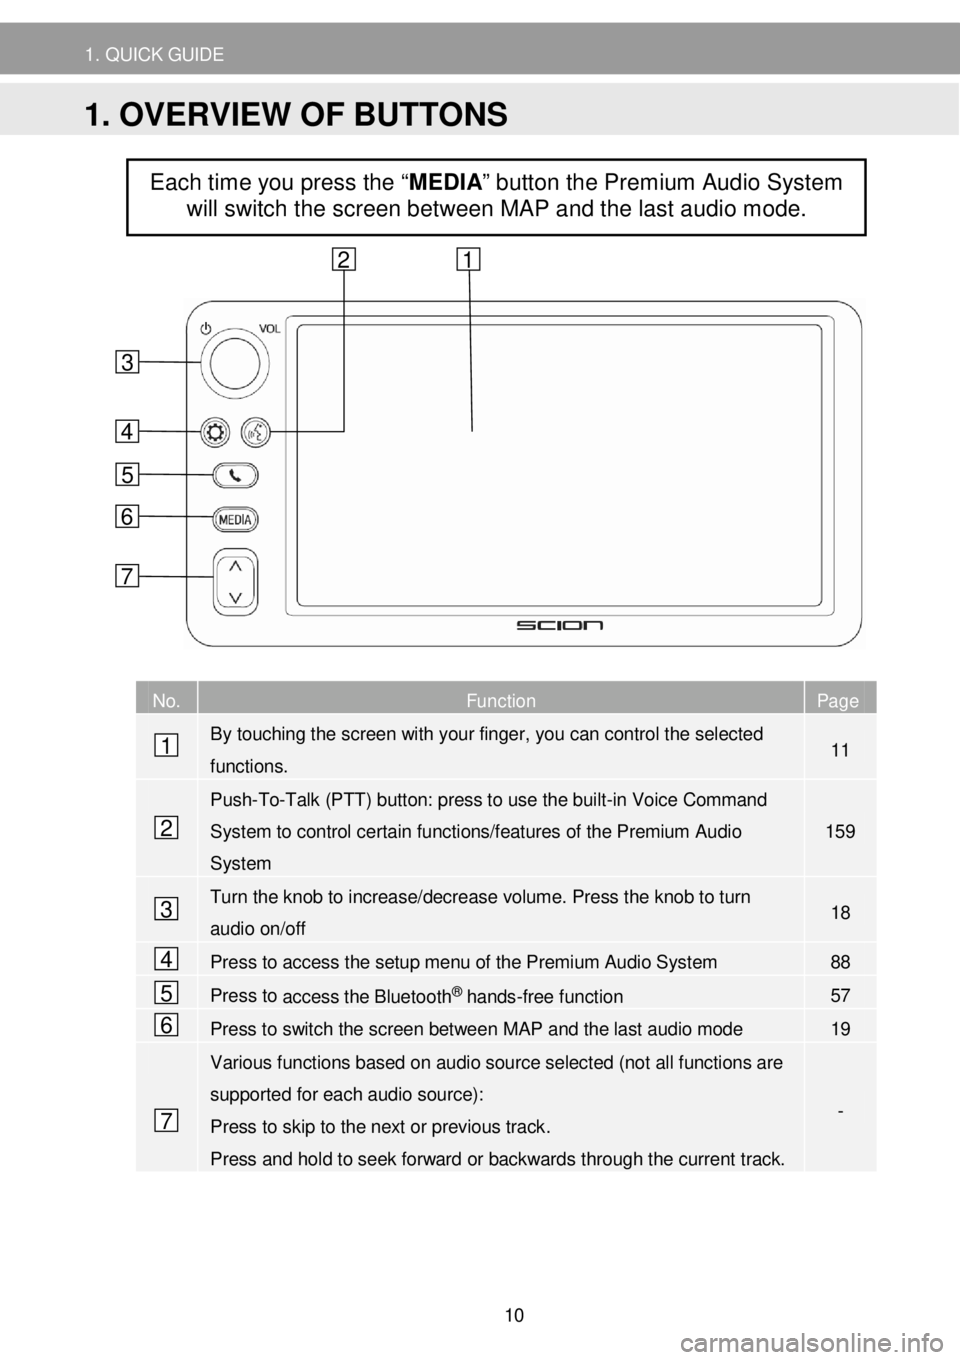
N o. Function Page
By touching the screen with your finger, you can control the selected
functions. 11
Push-To-Talk (PTT) button: press to use the built-in Voice Command
System to control certain functions/features of the Premium Audio
System
1 59
Turn the knob to increase/decrease volume. Press the knob to turn
audio on/off 18
Press to access the setup menu of the Premium Audio System 88
Press to access the Bluetooth® hands-free function 57
Press to switch the screen between MAP and the last audio mode 19
Various functions based on audio source selected (not all functions are
supported for each audio source):
Press to skip to the next or previous track .
Press and hold to seek forward or backwards through the current track.
-
Each time you press the “MEDIA” button the Premium Audio System
will switch the screen between MAP and the last audio mode.
4
6
5
1
2
7
3
6
5
4
3
1 2
7
1. OVERVIEW OF BUTTONS
10
Page 12 of 164
2. CONTROLS AND FEATURES
This
system is operat ed mainly by the
s creen buttons.
When a screen button is select ed, a
beep sounds. (To set beep sound,
→P.90.)
NOTICE
T o prev ent dam agi ng th e s cre en, ligh tly
to uch th e scr een button s with you r
fi nger .
D o no t us e ob jec ts o th er t h a n y o ur f in ger
t o touc h t h e scre en.
Wi pe off fin gerpri nts usi ng a glas s
c le aning clo th . D o not us e chem ica l
c leane rs to cle an th e scre en, as th ey
ma y d am age t h e to uch scree n.
T o preve nt th e bat te ry from be in g
d ischarg ed, d o no t lea ve th e sy ste m o n
l o nge r th an ne cessar y whe n th e e ngi ne
is not ru nni ng.
INFORM ATION
If th e syst em does no t re spo nd to a
t o uc h o n a s cree n b utto n, m ove y o ur
f inger away from the scr ee n an d th en
t o uc h it aga in.
Grayed out s cre en bu tton s ca nno t b e
operat ed.
The displ aye d i mag e ma y be come
dark er and mov in g i mage s may be
s lig htly dis tor te d whe n th e dis pla y is
co ld .
Unde r ex tr e mel y co ld cond itio ns, the
screen ma y n ot b e di spl aye d an d the
da ta inpu t by a user ma y be de le ted.
A lso , th e scree n button s ma y be
h arder t ha n usua l t o d epress.
Wh en yo u loo k at th e scre en
t hrou gh po lari ze d ma terial such as
po lari zed sun gla sses, t h e scre en m ay
b e d ar k a nd har d to see . If so , look
a t th e scr een fr om d if f erent angl es,
ad jus t th e scr een sett in gs ( → P.93 ), or
t ak e o ff you r sung lasse s.
Sele ct to re tur n to th e
p re vi ous scree n.
12
Page 15 of 164
2. CONTROLS AND FEATURES
AUTOMATIC TEXT
SCROLLING
Entries that are too long to fit in the
current field are scr olled automatically
from right to left.
This function is not available while
driving.
INFORM ATION
Th is fu nc tio n c a n b e turned on or of f
through the Premium Audio Setup
menu. ( → P.9 0)
C H ARACTER JUMP B UTTONS
IN LIS TS
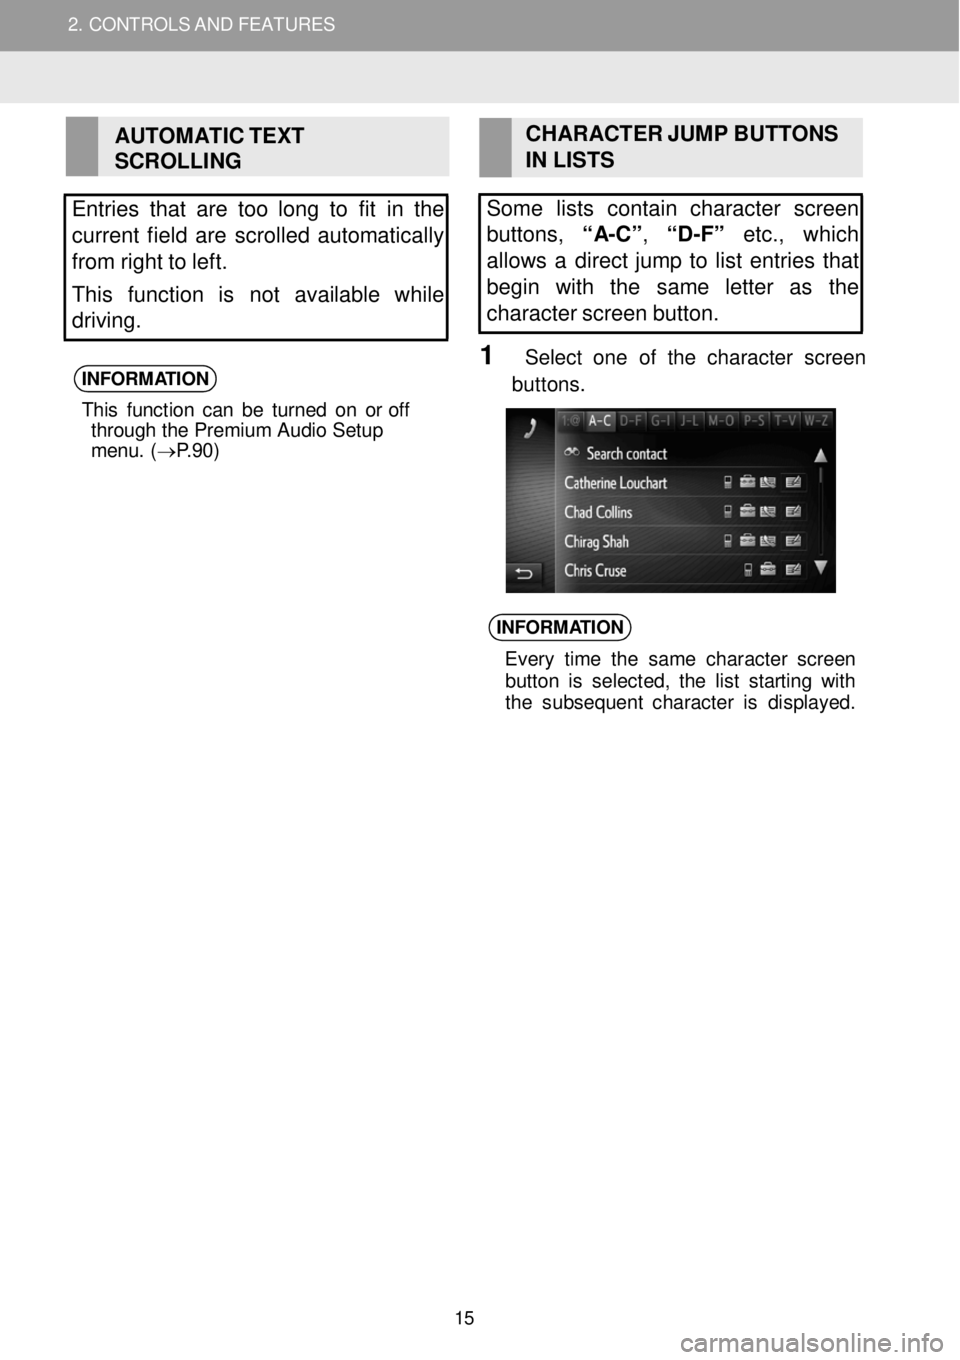
Some lists co ntain character screen
buttons, “A-C” , “D -F” etc., which
al low s a direct jump to list entries that
begin with th e same letter as the
character screen button.
1 Se le ct o ne of the ch ara cter screen
b uttons.
INFORM ATION
Every tim e th e sam e charac te r s cre en
b utto n is se lec ted, th e lis t s ta rtin g wi th
t h e sub seque nt ch arac te r is di spl ayed.
2. CONT ROLS A N D FEAT URES
15
Page 51 of 164
5. AUDIO SETTINGS
SOUND SETTINGS
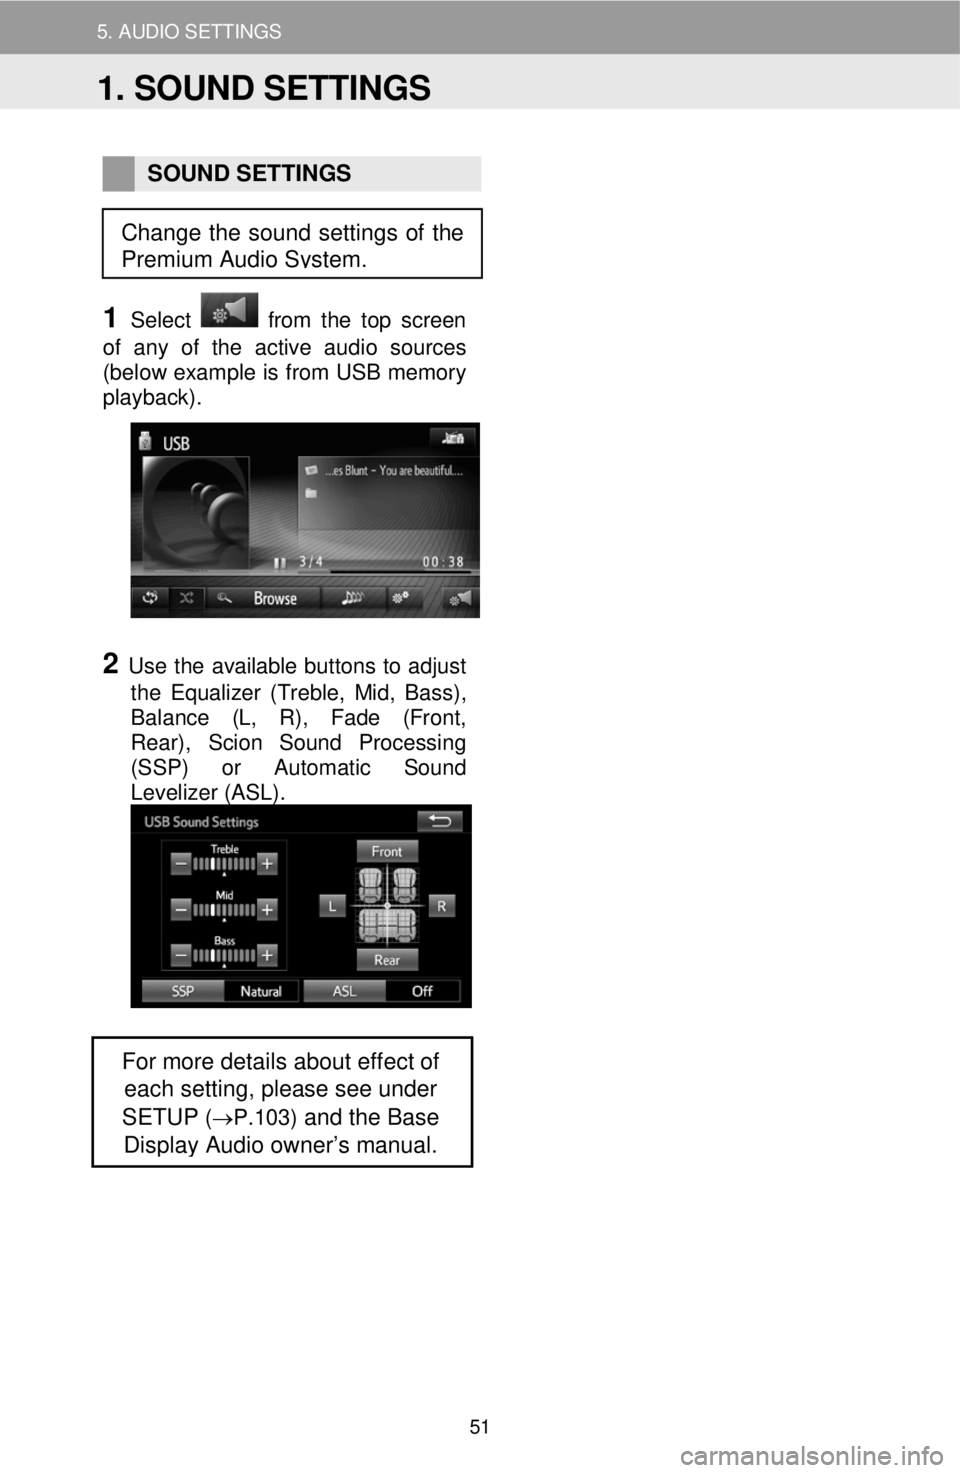
1 Select from the top screen
of any of the active audio sources
(below example is from USB memory
playback) .
2 Use the available buttons to adjust
the Equalizer (Treble, Mid, Bass) ,
Balance (L, R) , Fade (Front,
Rear) , Scion Sound Processing
(SSP) or Automatic S ound
Levelizer (ASL) .
For more details about effect of
each setting, please see under
SETUP
(→P.103) and the Base
Display Audio owner’s manual.
Change the sound settings of the
Premium Audio System.
1. SOUND SETTINGS
51
Page 130 of 164
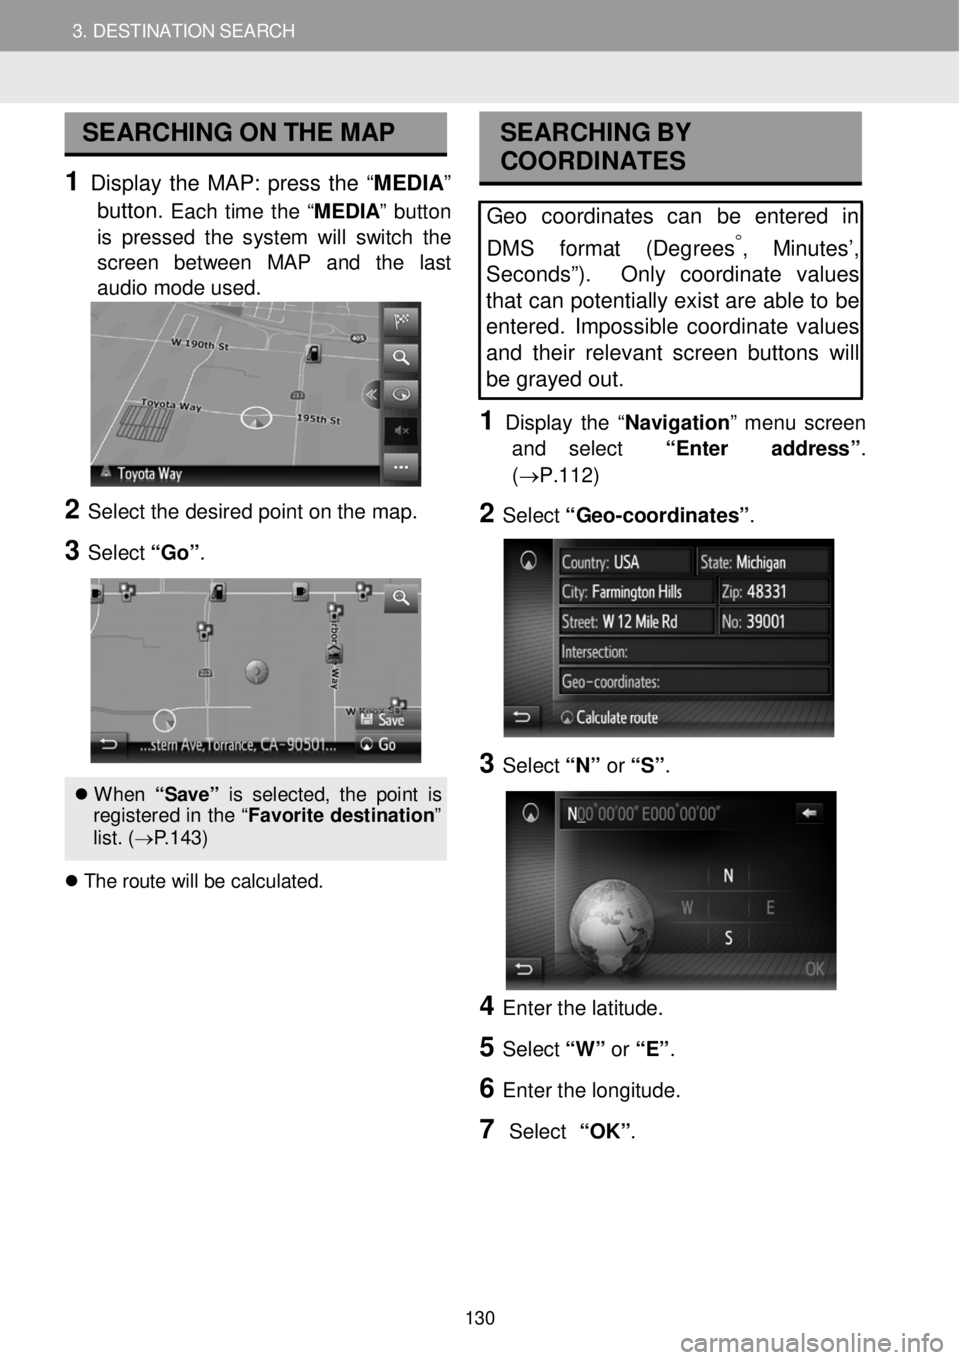
3. DESTINATION SEARCH 3. DESTINATION SEARCH
SEARCHING ON THE MAP
1 Display the MAP: press the “ME DIA ”
button.
Each time the “M EDIA ” button
is pressed the system will switch the
scre en bet ween MAP and the last
audio mode us ed.
2 Se lect the de sired po int o n t he m ap.
3 Select “Go ”.
When “S ave ” is s el ect ed, th e p oin t is
re gis tere d in th e “F avori te d est ina tion ”
l is t. ( → P.143)
T he r o ute w ill b e cal cul ate d.
SEA RCHING BY
COORDI NATES
Geo coordinates can be entered in
DMS f ormat (Degrees
°, Minutes’,
Sec onds”). Only coordinate values
tha t can potentially exist are able to be
entered . Impossible coordinate values
and their relevant screen buttons will
be gray ed out .
1 D is p lay the “Navigati on ” me nu screen
and select “Enter address ”.
(→P.112)
2 Select “G eo -coordinat es” .
3 Select “N” or “S” .
4 Enter th e latitude.
5 Select “W” or “E” .
6 Enter t he lo ngitud e.
7 Select “OK”.
130