headlight bulb TOYOTA PRIUS PLUG-IN 2014 Owners Manual
[x] Cancel search | Manufacturer: TOYOTA, Model Year: 2014, Model line: PRIUS PLUG-IN, Model: TOYOTA PRIUS PLUG-IN 2014Pages: 724, PDF Size: 20.28 MB
Page 550 of 724
510
4-3. Do-it-yourself maintenance
PRIUS PHV_OM_OM47856U_(U)
Light bulbs
Yo u m a y r e p l a c e t h e f o l l o w i n g b u l b s b y y o u r s e l f . T h e d i f f i c u l t y l e v e l
of replacement varies depending on the bulb. As there is a danger
that components may be damaged, we recommend that replacement
is carried out by your Toyota dealer.
■Preparing for light bulb replacement
Check the wattage of the light bulb to be replaced. (→P. 6 2 4 )
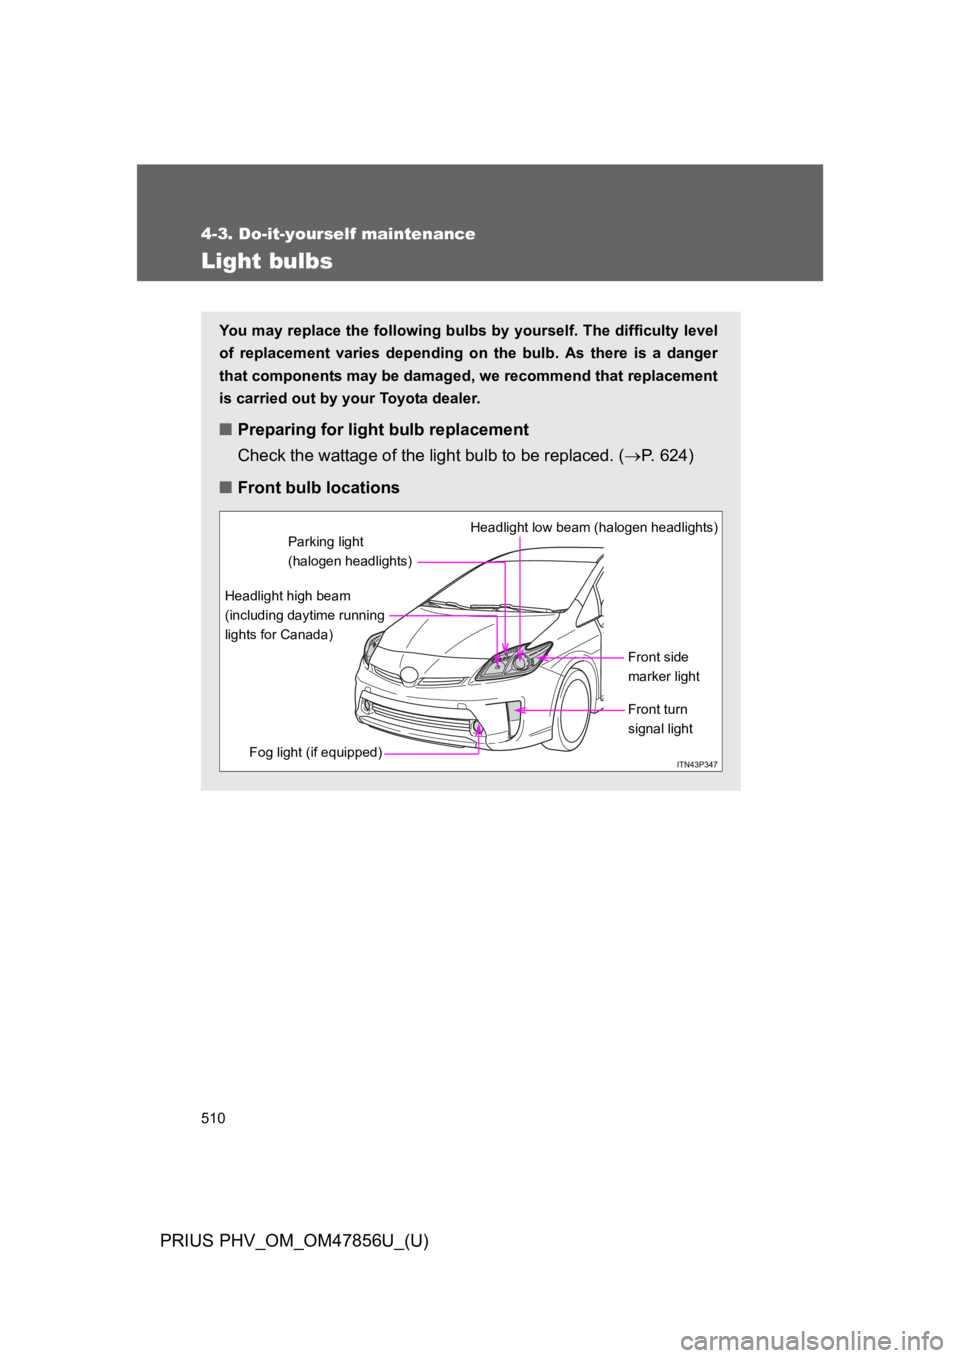
■Front bulb locations
Front side
marker light
Headlight low beam (halogen headlights)
Headlight high beam
(including daytime running
lights for Canada)
Fog light (if equipped)
Front turn
signal light
Parking light
(halogen headlights)
Page 551 of 724
511
4-3. Do-it-yourself maintenance
PRIUS PHV_OM_OM47856U_(U)
4
Maintenance and care
Replacing light bulbs
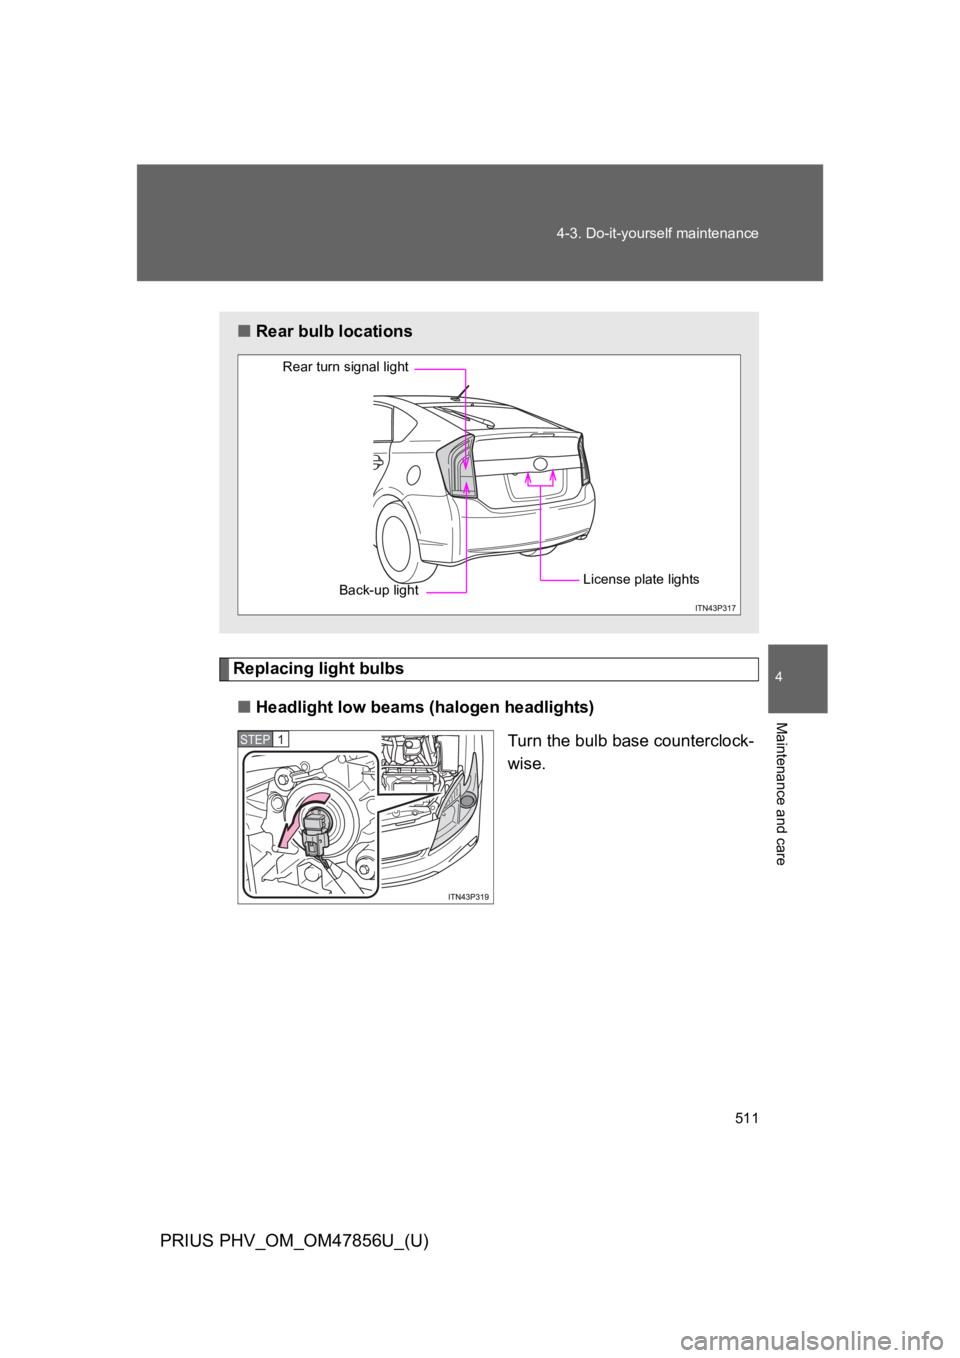
■Headlight low beams (halogen headlights)
Turn the bulb base counterclock-
wise.
■Rear bulb locations
Rear turn signal light
Back-up lightLicense plate lights
STEP 1
Page 552 of 724
512
4-3. Do-it-yourself maintenance
PRIUS PHV_OM_OM47856U_(U)
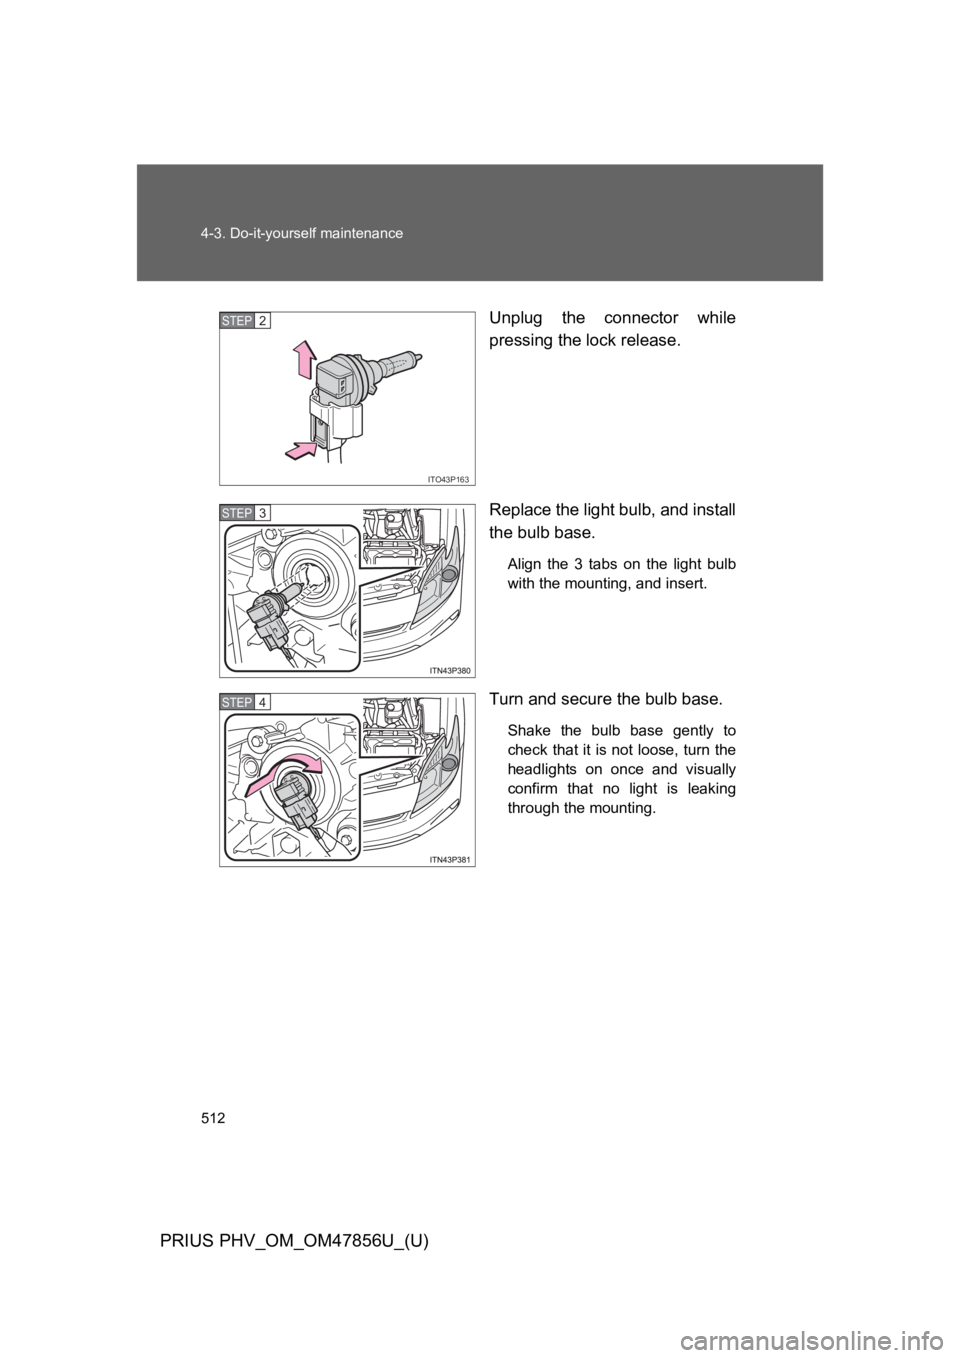
Unplug the connector while
pressing the lock release.
Replace the light bulb, and install
the bulb base.
Align the 3 tabs on the light bulb
with the mounting, and insert.
Turn and secure the bulb base.
Shake the bulb base gently to
check that it is not loose, turn the
headlights on once and visually
confirm that no light is leaking
through the mounting.
ITO43P163
STEP 2
STEP 3
STEP 4
Page 553 of 724
513
4-3. Do-it-yourself maintenance
PRIUS PHV_OM_OM47856U_(U)
4
Maintenance and care
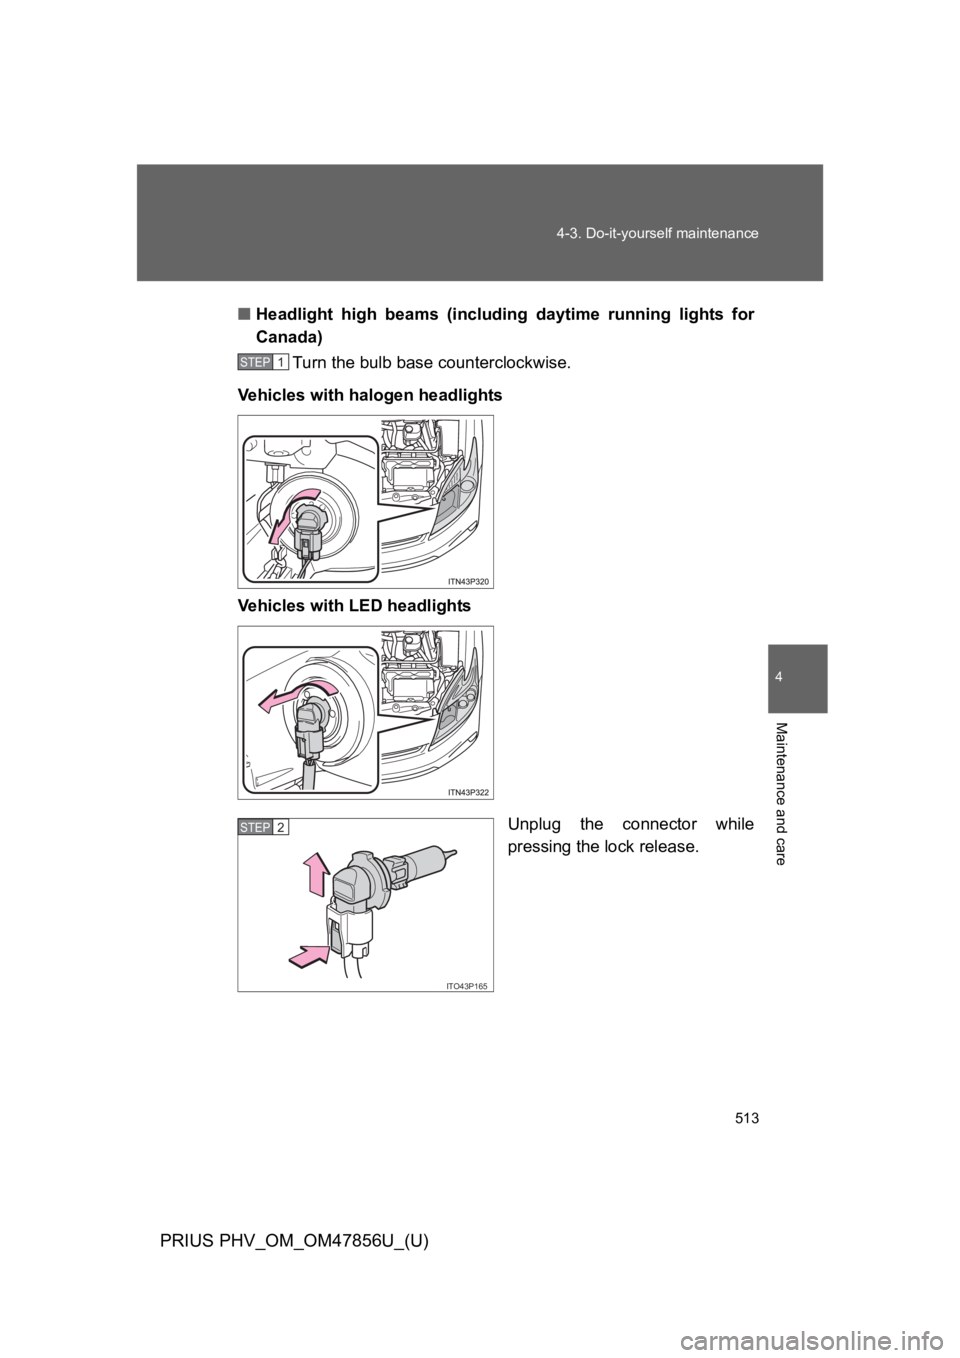
■Headlight high beams (including daytime running lights for
Canada)
Turn the bulb base counterclockwise.
Ve h i c l e s w i t h h a l o g e n h e a d l i g h ts
Ve h i c l e s w i t h L E D h e a d l i g h ts
Unplug the connector while
pressing the lock release.
STEP 1
ITO43P165
STEP 2
Page 554 of 724
514
4-3. Do-it-yourself maintenance
PRIUS PHV_OM_OM47856U_(U)
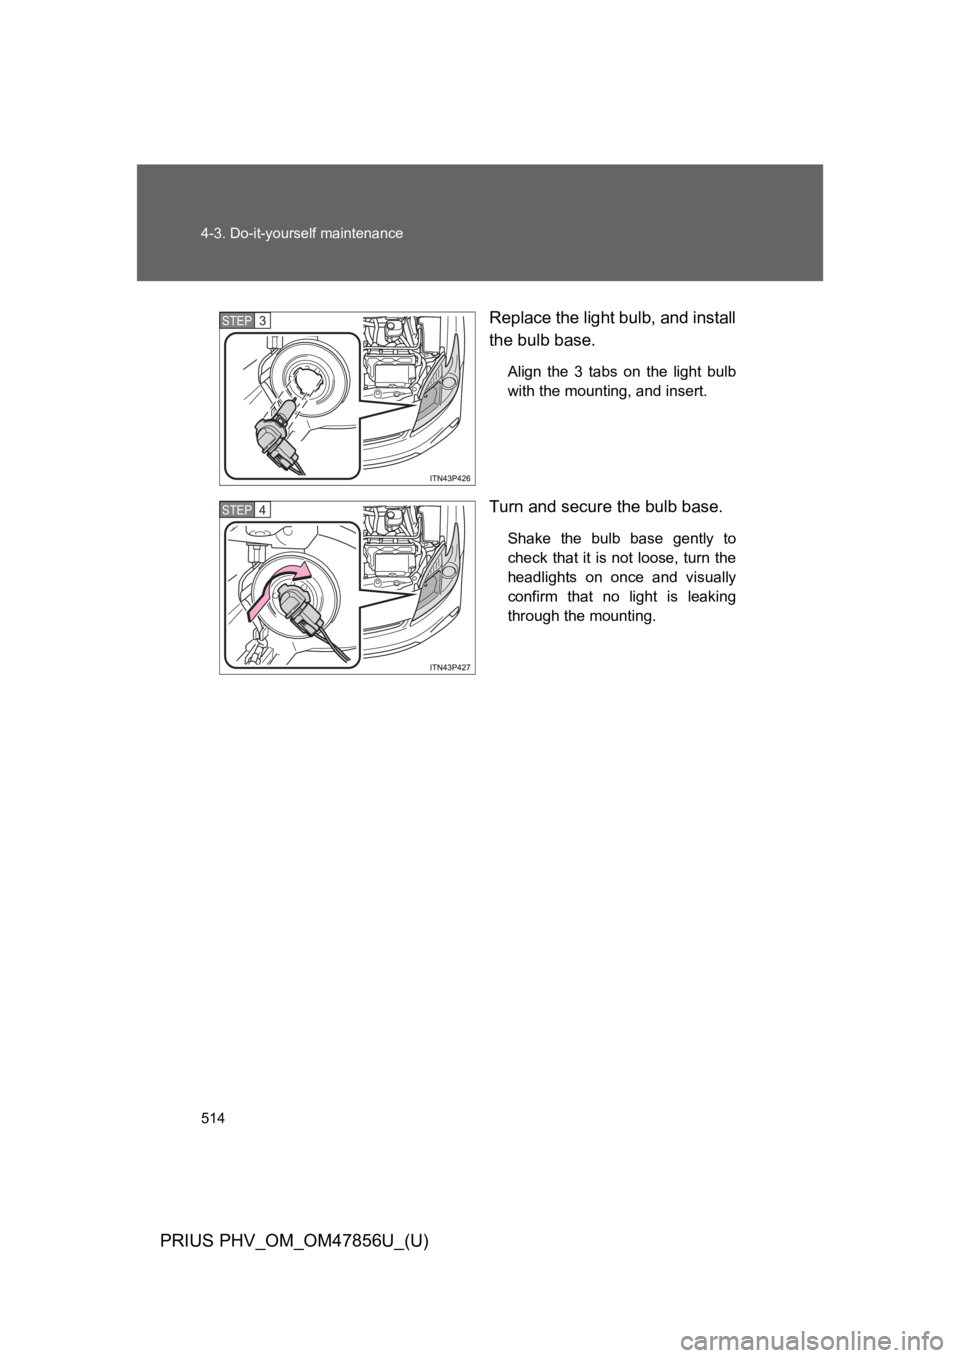
Replace the light bulb, and install
the bulb base.
Align the 3 tabs on the light bulb
with the mounting, and insert.
Turn and secure the bulb base.
Shake the bulb base gently to
check that it is not loose, turn the
headlights on once and visually
confirm that no light is leaking
through the mounting.
STEP 3
STEP 4
Page 555 of 724
515
4-3. Do-it-yourself maintenance
PRIUS PHV_OM_OM47856U_(U)
4
Maintenance and care
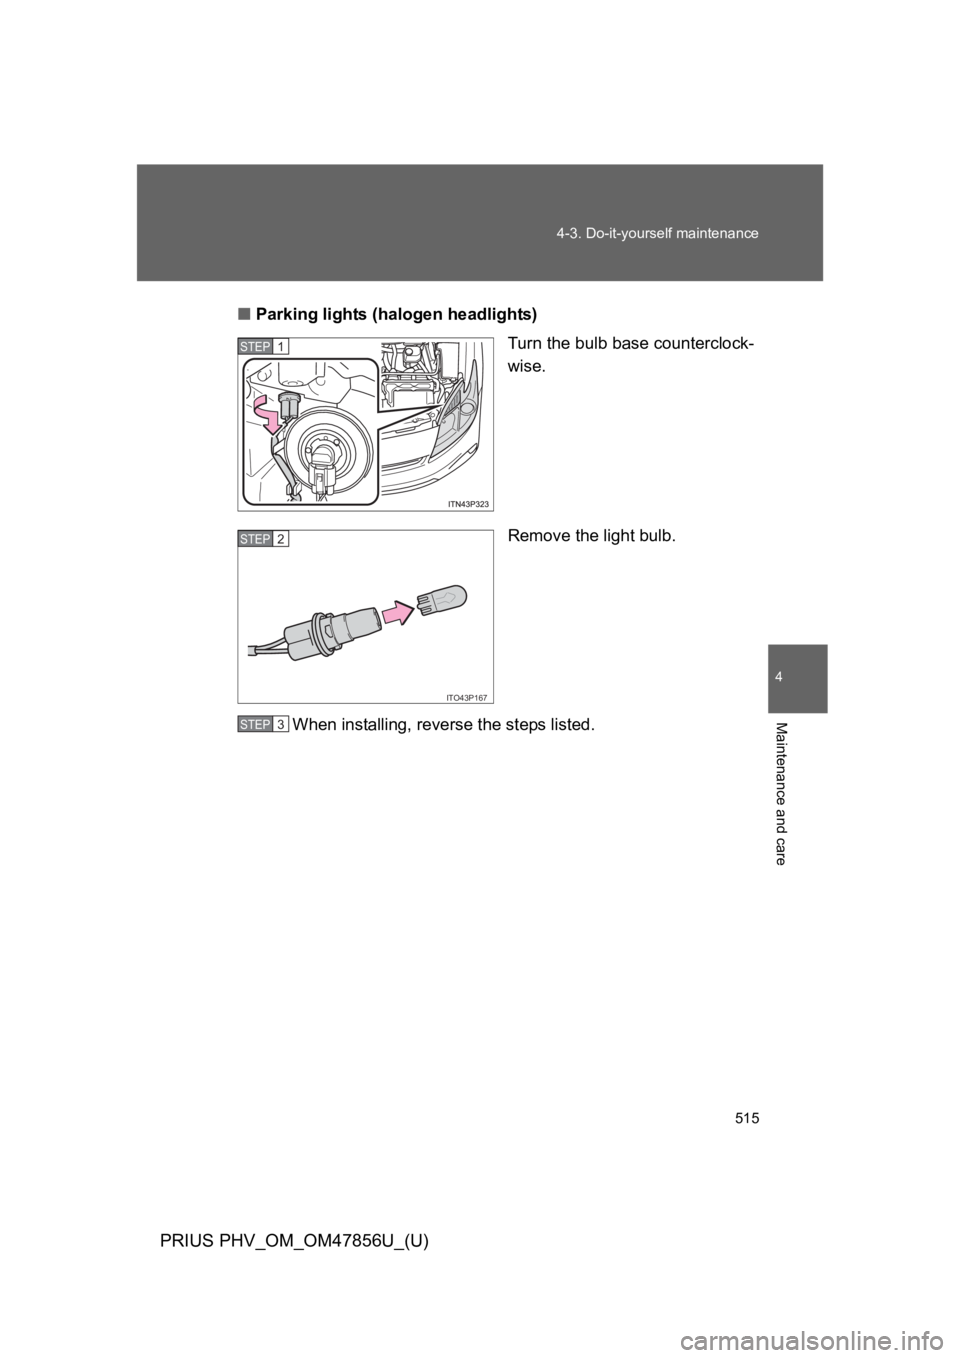
■Parking lights (halogen headlights)
Turn the bulb base counterclock-
wise.
Remove the light bulb.
When installing, reverse the steps listed.
STEP 1
ITO43P167
STEP 2
STEP 3
Page 563 of 724

523
4-3. Do-it-yourself maintenance
PRIUS PHV_OM_OM47856U_(U)
4
Maintenance and care
■Replacing the following bulbs
If any of the lights listed below has burnt out, have it replaced by
your Toyota dealer.
●Headlight low beams (LED headlights)
●Parking lights (LED headlights)
●St op lights
●Ta i l l i g h t s
●High mounted stoplight
●Daytime running lights (except for Canada)
■LED lights
The headlight low beams (LED headlights), parking lights (LED headlights),
stop lights, tail lights, high mounted stoplight and daytime running lights
(except for Canada) consist of a number of LEDs. If any of the LEDs burn
out, take your vehicle to your Toyota dealer to have the light replaced.
■Condensation build-up on the inside of the lens
Te m p o r a r y c o n d e n s a t i o n b u i l d - u p o n t h e i n s i d e o f t h e h e a d l i g h t l e n s d o e s
not indicate a malfunction. Contact your Toyota dealer for more information
in the following situations:
●Large drops of water have built up on the inside of the lens.
●Water has built up inside the headlight.
■When replacing light bulbs
→P. 5 0 8
Page 564 of 724

524
4-3. Do-it-yourself maintenance
PRIUS PHV_OM_OM47856U_(U)
CAUTION
■Replacing light bulbs
●Be sure to stop the hybrid system and turn off the lights. Do not attempt to
replace the bulb immediately after turning off the lights.
The bulbs become very hot and may cause burns.
●Do not touch the glass portion of the light bulb with bare hands. When it is
unavoidable to hold the glass portion, use and hold with a clean dry cloth
to avoid getting moisture and oils on the bulb.
Also, if the bulb is scratched or dropped, it may blow out or crack.
●Fully install light bulbs and any parts used to secure them. Failure to do so
may result in heat damage, fire, or water entering the headlight unit. This
may damage the headlights or cause condensation to build up on the lens.
●Do not attempt to repair or disassemble light bulbs, connectors, electric
circuits or component parts.
Doing so may result in death or serious injury due to electric shock.
■To p r e v e n t d a m a g e o r f i r e
Make sure bulbs are fully seated and locked.
Page 662 of 724
624
6-1. Specifications
PRIUS PHV_OM_OM47856U_(U)
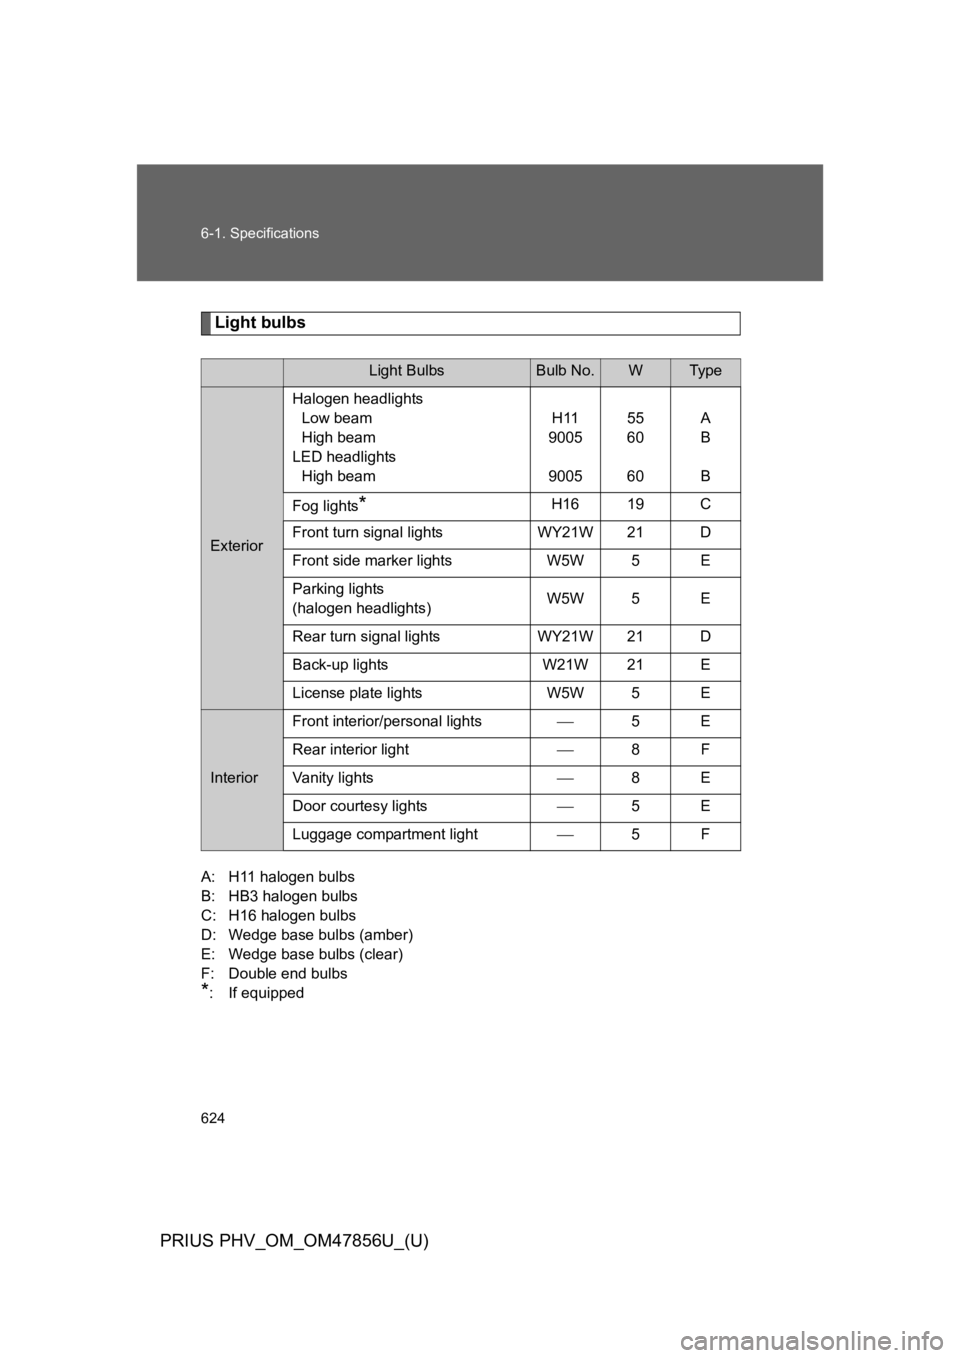
Light bulbs
A: H11 halogen bulbs
B: HB3 halogen bulbs
C: H16 halogen bulbs
D: Wedge base bulbs (amber)
E: Wedge base bulbs (clear)
F: Double end bulbs
*: If equipped
Light BulbsBulb No.WType
Exterior
Halogen headlights
Low beam
High beam
LED headlights
High beam
H11
9005
9005
55
60
60
A
B
B
Fog lights*H16 19 C
Front turn signal lights WY21W 21 D
Front side marker lights W5W 5 E
Parking lights
(halogen headlights)W5W 5 E
Rear turn signal lights WY21W 21 D
Back-up lights W21W 21 E
License plate lights W5W 5 E
Interior
Front interior/personal lights⎯5E
Rear interior light⎯8F
Va n i t y l i g h t s⎯8E
Door courtesy lights⎯5E
Luggage compartment light⎯5F
Page 713 of 724
677
Alphabetical index
PRIUS PHV_OM_OM47856U_(U)
Garage door opener ................ 409
Gauges ..................................... 259
Glove boxes ............................. 388
Hands-free system
(for cellular phone)*
Hazard lights
Switch................................... 526
Head restraints
Adjustment .......................... 156
Headlight cleaner .................... 309
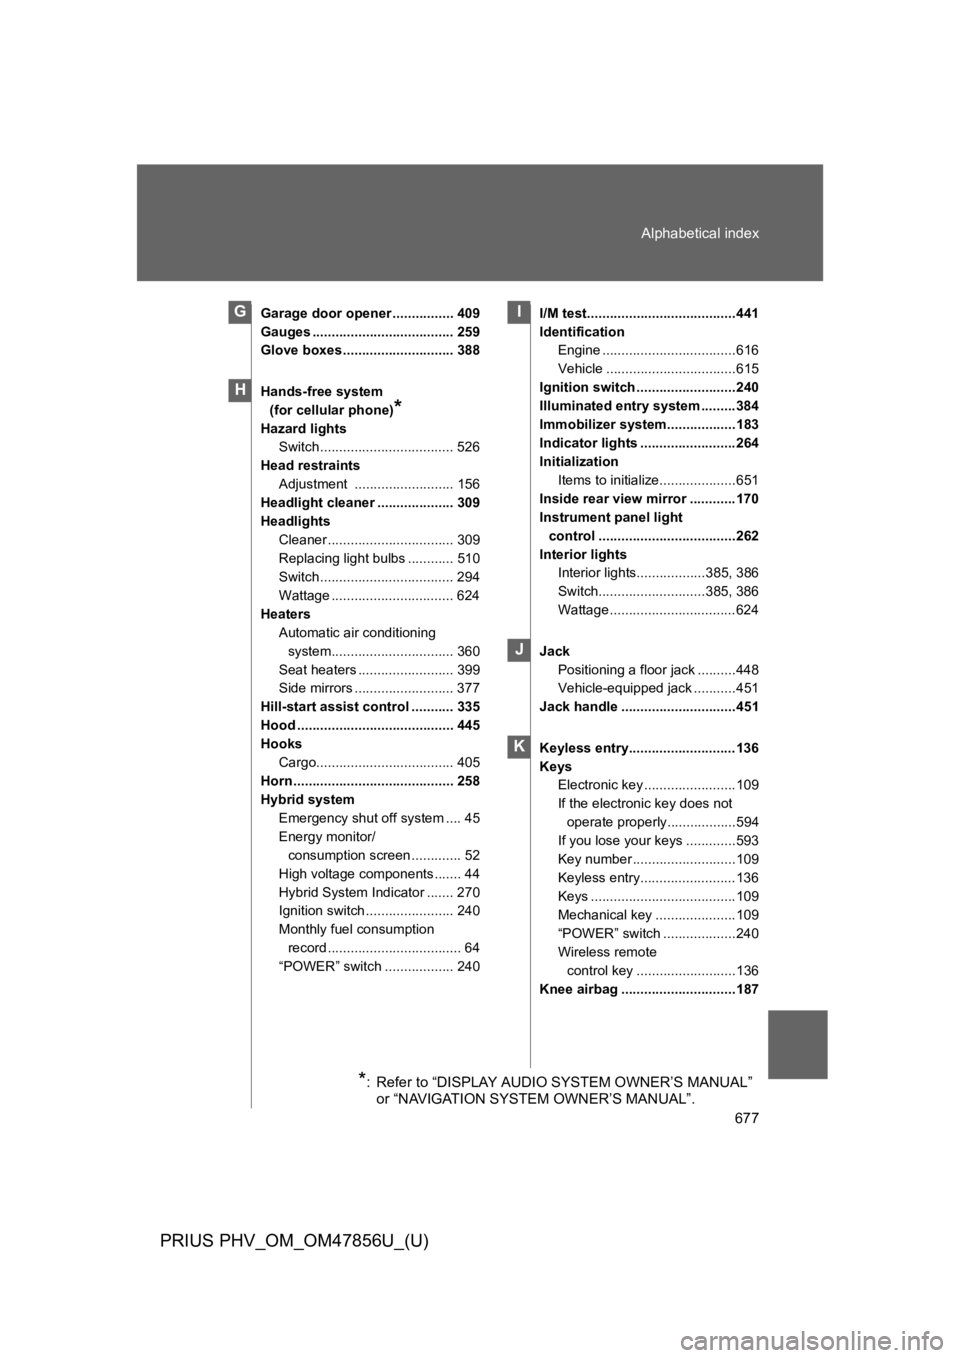
Headlights
Cleaner ................................. 309
Replacing light bulbs ............ 510
Switch................................... 294
Wattage ................................ 624
Heaters
Automatic air conditioning
system................................ 360
Seat heaters ......................... 399
Side mirrors .......................... 377
Hill-start assist control ........... 335
Hood ......................................... 445
Hooks
Cargo.................................... 405
Horn .......................................... 258
Hybrid system
Emergency shut off system .... 45
Energy monitor/
consumption screen ............. 52
High voltage components ....... 44
Hybrid System Indicator ....... 270
Ignition switch ....................... 240
Monthly fuel consumption
record ................................... 64
“POWER” switch .................. 240
I/M test.......................................441
Identification
Engine ...................................616
Vehicle ..................................615
Ignition switch ..........................240
Illuminated entry system .........384
Immobilizer system..................183
Indicator lights .........................264
Initialization
Items to initialize....................651
Inside rear view mirror ............170
Instrument panel light
control ....................................262
Interior lights
Interior lights..................385, 386
Switch............................385, 386
Wattage .................................624
Jack
Positioning a floor jack ..........448
Vehicle-equipped jack ...........451
Jack handle ..............................451
Keyless entry............................136
Keys
Electronic key ........................109
If the electronic key does not
operate properly..................594
If you lose your keys .............593
Key number ...........................109
Keyless entry.........................136
Keys ......................................109
Mechanical key .....................109
“POWER” switch ...................240
Wireless remote
control key ..........................136
Knee airbag ..............................187
G
H
I
J
K
*:Refer to “DISPLAY AUDIO SYSTEM OWNER’S MANUAL”
or “NAVIGATION SYSTEM OWNER’S MANUAL”.