stop start TOYOTA PRIUS PRIME 2023 Manual Online
[x] Cancel search | Manufacturer: TOYOTA, Model Year: 2023, Model line: PRIUS PRIME, Model: TOYOTA PRIUS PRIME 2023Pages: 680, PDF Size: 14.97 MB
Page 438 of 680
4386-1. Using the air conditioning system and defogger
turned on automatically. (P.422)
●To improve air conditioning perfor-
mance, perform the following
operations:
• Adjust the fan speed
• Deactivate Eco drive mode
( P.422)
• Turn off eco air conditioning mode
( P.440)
■Ventilation and air conditioning
odors
●To let fresh air in, set the air condi-
tioning system to the outside air
mode.
●During use, various odors from
inside and outside the vehicle may
enter into and accumulate in the
air conditioning system. This may
then cause odor to be emitted
from the vents.
●In order to suppress odors that
occur when the air conditioning
system starts, the air flow mode
may change to blow air to the feet
or air may stop blowing for a short
period of time immediately after
the air conditioning system is
started in automatic mode.
●When parking, the system auto-
matically switches to outside air
mode to encourage better air cir-
culation throughout the vehicle,
helping to reduce odors that occur
when starting the vehicle.
■Using the voice control system
(if equipped)
Air conditioning system can be
operated using voice control sys-
tem.
For details regarding the voice con-
trol system, refer to “MULTIMEDIA
OWNER’S MANUAL”.
■Air conditioning filter
P.535
■Air conditioning system refrig-
erant
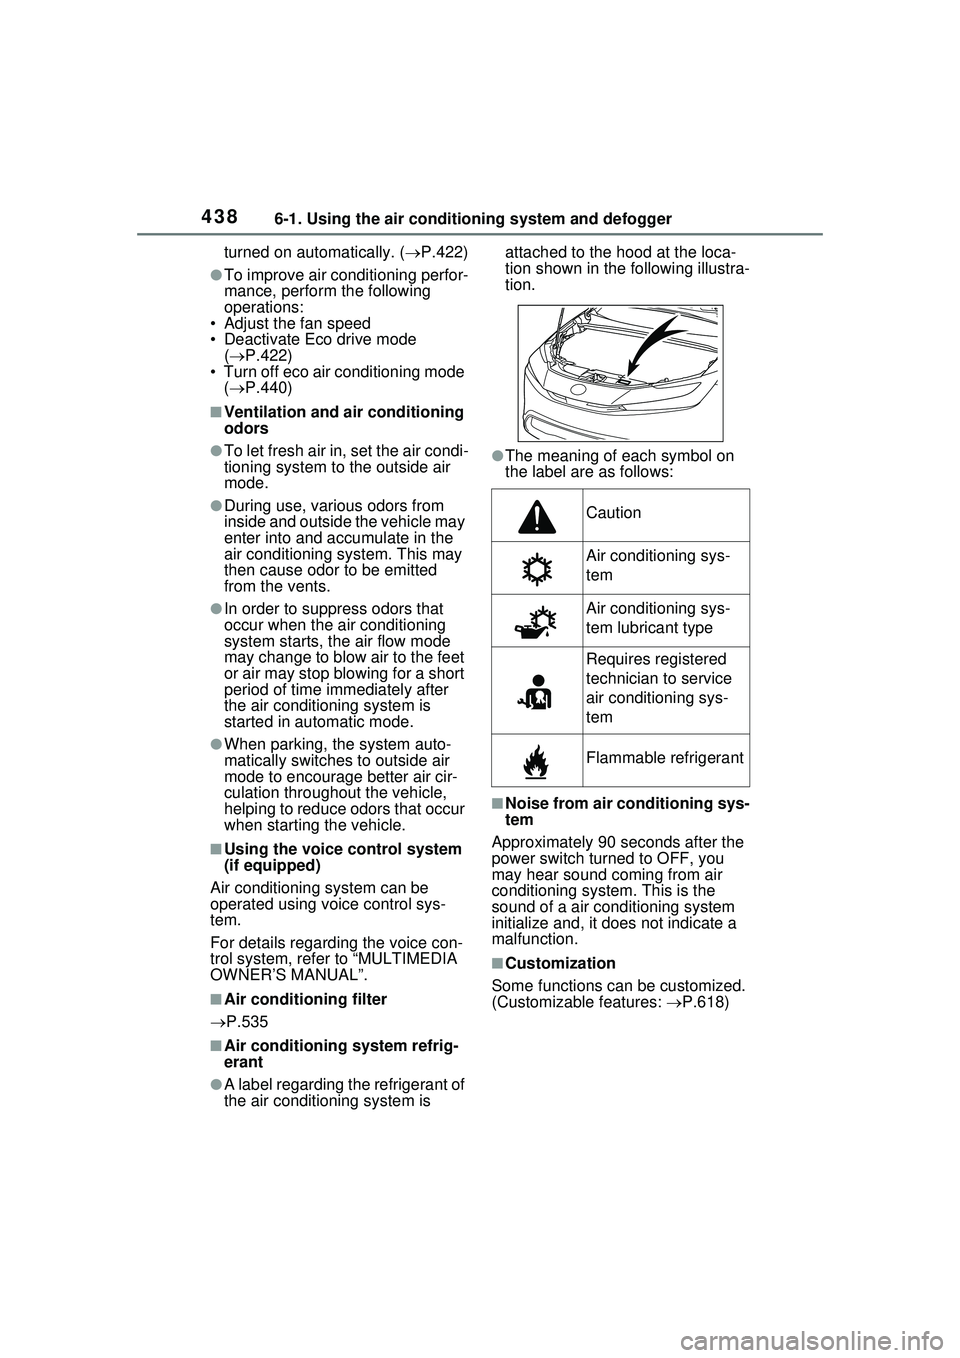
●A label regarding the refrigerant of
the air conditioning system is attached to the hood at the loca-
tion shown in th
e following illustra-
tion.
●The meaning of each symbol on
the label are as follows:
■Noise from air conditioning sys-
tem
Approximately 90 seconds after the
power switch turned to OFF, you
may hear sound coming from air
conditioning system. This is the
sound of a air conditioning system
initialize and, it does not indicate a
malfunction.
■Customization
Some functions can be customized.
(Customizable features: P.618)
Caution
Air conditioning sys-
tem
Air conditioning sys-
tem lubricant type
Requires registered
technician to service
air conditioning sys-
tem
Flammable refrigerant
Page 448 of 680
4486-2. Using the interior lights
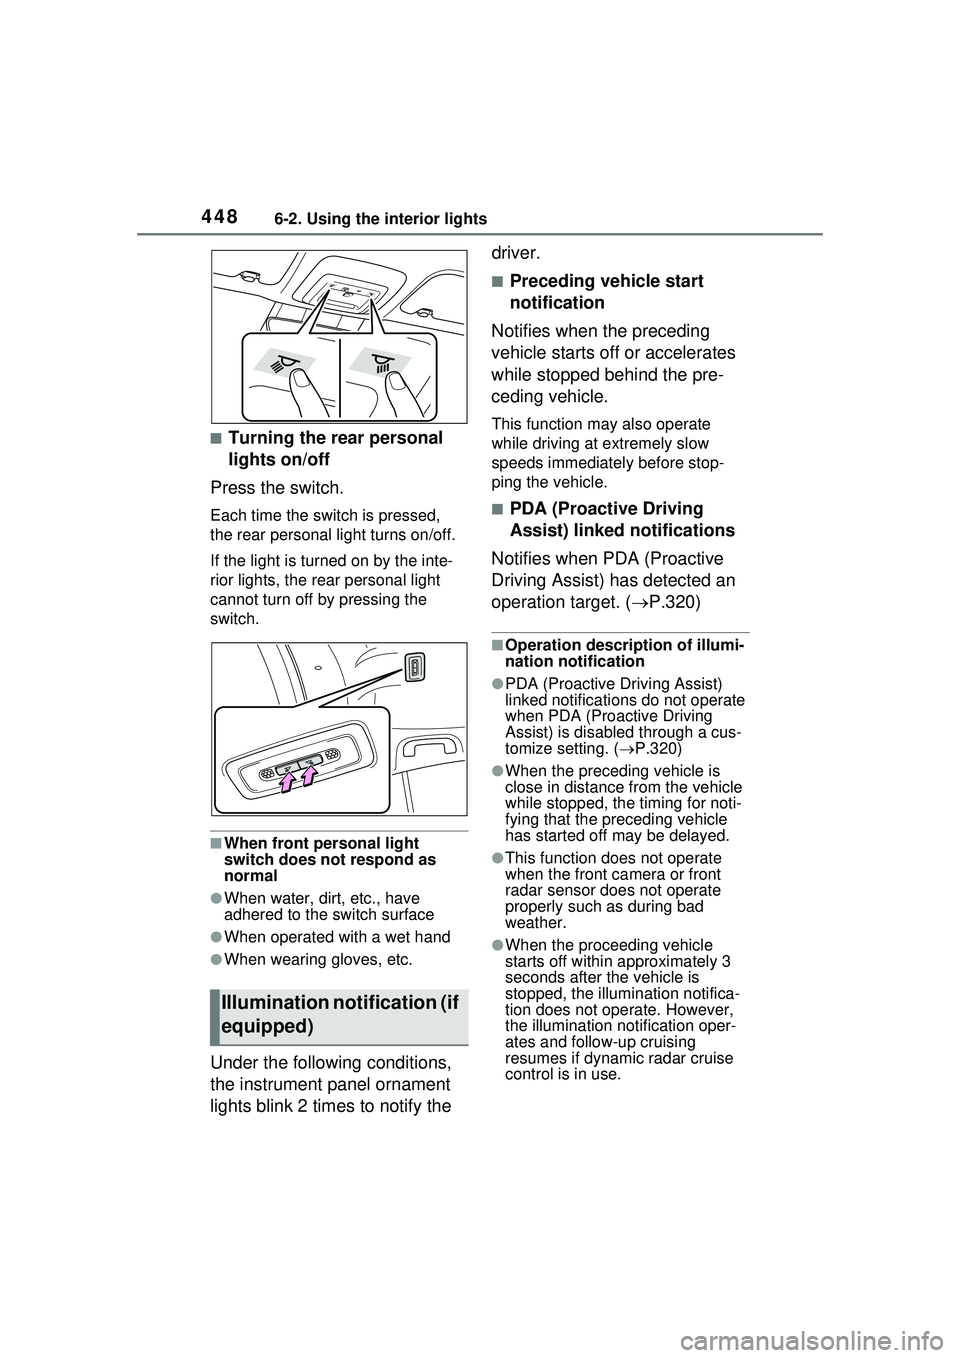
■Turning the rear personal
lights on/off
Press the switch.
Each time the switch is pressed,
the rear personal light turns on/off.
If the light is turned on by the inte-
rior lights, the rear personal light
cannot turn off by pressing the
switch.
■When front personal light
switch does not respond as
normal
●When water, dirt, etc., have
adhered to the switch surface
●When operated with a wet hand
●When wearing gloves, etc.
Under the following conditions,
the instrument panel ornament
lights blink 2 times to notify the driver.
■Preceding vehicle start
notification
Notifies when the preceding
vehicle starts off or accelerates
while stopped behind the pre-
ceding vehicle.
This function may also operate
while driving at extremely slow
speeds immediately before stop-
ping the vehicle.
■PDA (Proactive Driving
Assist) linked notifications
Notifies when PDA (Proactive
Driving Assist) has detected an
operation target. ( P.320)
■Operation description of illumi-
nation notification
●PDA (Proactive Driving Assist)
linked notifications do not operate
when PDA (Proactive Driving
Assist) is disabled through a cus-
tomize setting. (P.320)
●When the preceding vehicle is
close in distance from the vehicle
while stopped, the timing for noti-
fying that the preceding vehicle
has started off may be delayed.
●This function does not operate
when the front ca mera or front
radar sensor does not operate
properly such as during bad
weather.
●When the proceeding vehicle
starts off within approximately 3
seconds after the vehicle is
stopped, the illumi nation notifica-
tion does not operate. However,
the illumination notification oper-
ates and follow-up cruising
resumes if dynamic radar cruise
control is in use.
Illumination notification (if
equipped)
Page 459 of 680
4596-4. Using the other interior features
6
Interior features
■The “Qi” logo
The “Qi” logo is a trademark of
the Wireless Power Consortium.
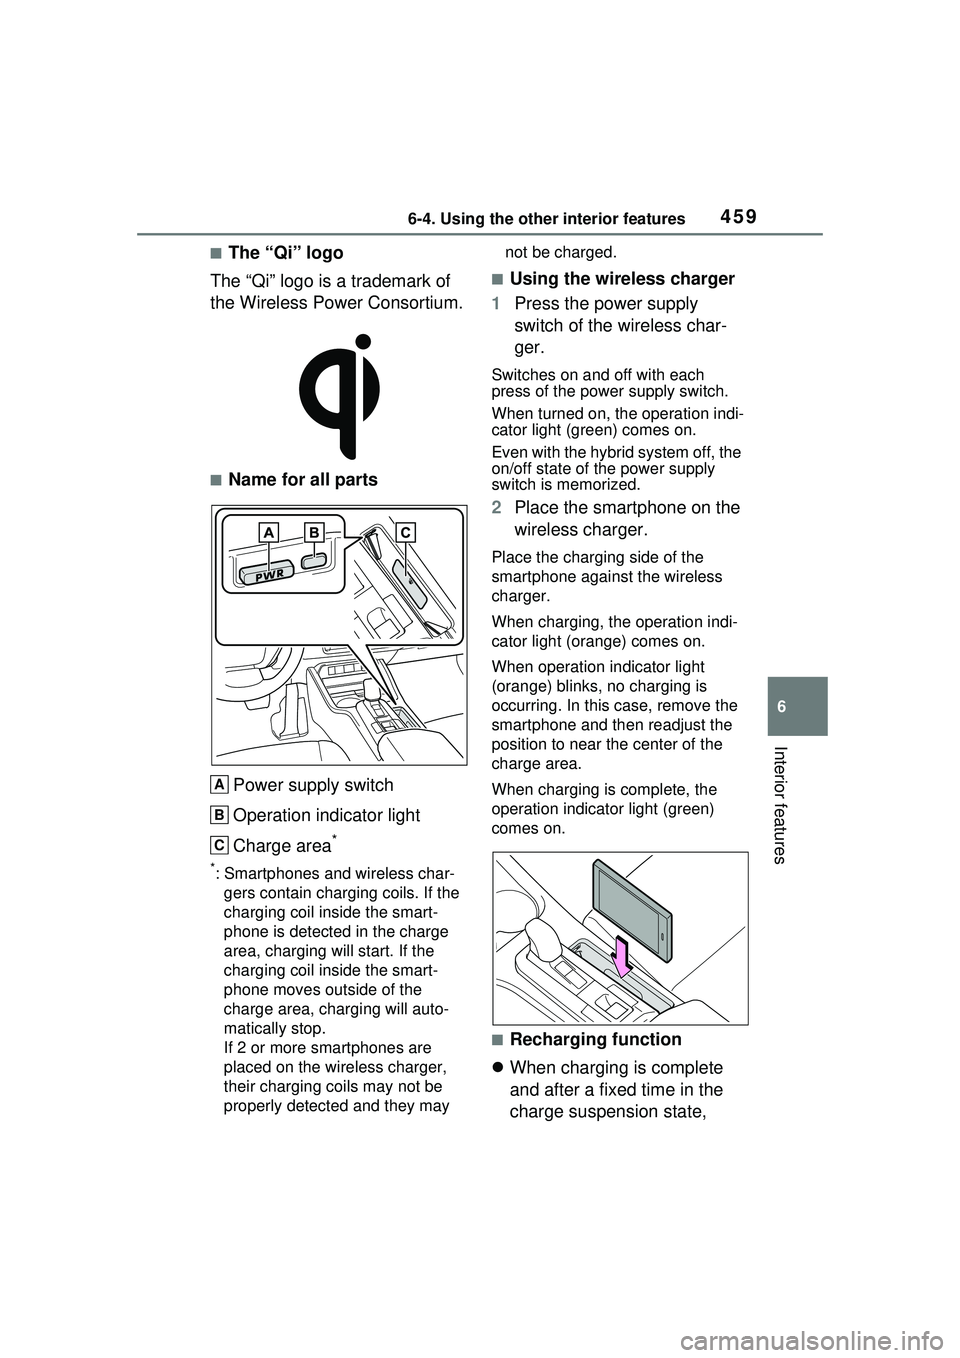
■Name for all parts
Power supply switch
Operation indicator light
Charge area
*
*: Smartphones and wireless char- gers contain charging coils. If the
charging coil inside the smart-
phone is detected in the charge
area, charging will start. If the
charging coil inside the smart-
phone moves outside of the
charge area, charging will auto-
matically stop.
If 2 or more smartphones are
placed on the wireless charger,
their charging coils may not be
properly detected and they may not be charged.
■Using the wireless charger
1 Press the power supply
switch of the wireless char-
ger.
Switches on and off with each
press of the power supply switch.
When turned on, the operation indi-
cator light (green) comes on.
Even with the hybrid system off, the
on/off state of the power supply
switch is memorized.
2Place the smartphone on the
wireless charger.
Place the charging side of the
smartphone against the wireless
charger.
When charging, the operation indi-
cator light (orange) comes on.
When operation indicator light
(orange) blinks, no charging is
occurring. In this case, remove the
smartphone and then readjust the
position to near the center of the
charge area.
When charging is complete, the
operation indicator light (green)
comes on.
■Recharging function
When charging is complete
and after a fixed time in the
charge suspension state,
A
B
C
Page 460 of 680
4606-4. Using the other interior features
charging restarts.
If the smartphone is moved to
somewhere outside of the
charge area, charging will
stop. In this case, the opera-
tion indicator light will blink in
orange. Readjust the position
of the smartphone to near the
center of the charge area.
■Rapid charging function
The following smartphones
support rapid charging.
• Smartphones compliant with
WPC Ver1.2.4 and compatible
with rapid charging
• iPhone’s with an iOS version that supports 7.5 W charging (iPhone
8 and later models)
When a smartphone that sup-
ports rapid charging is
charged, charging automati-
cally switches to the rapid
charging function.
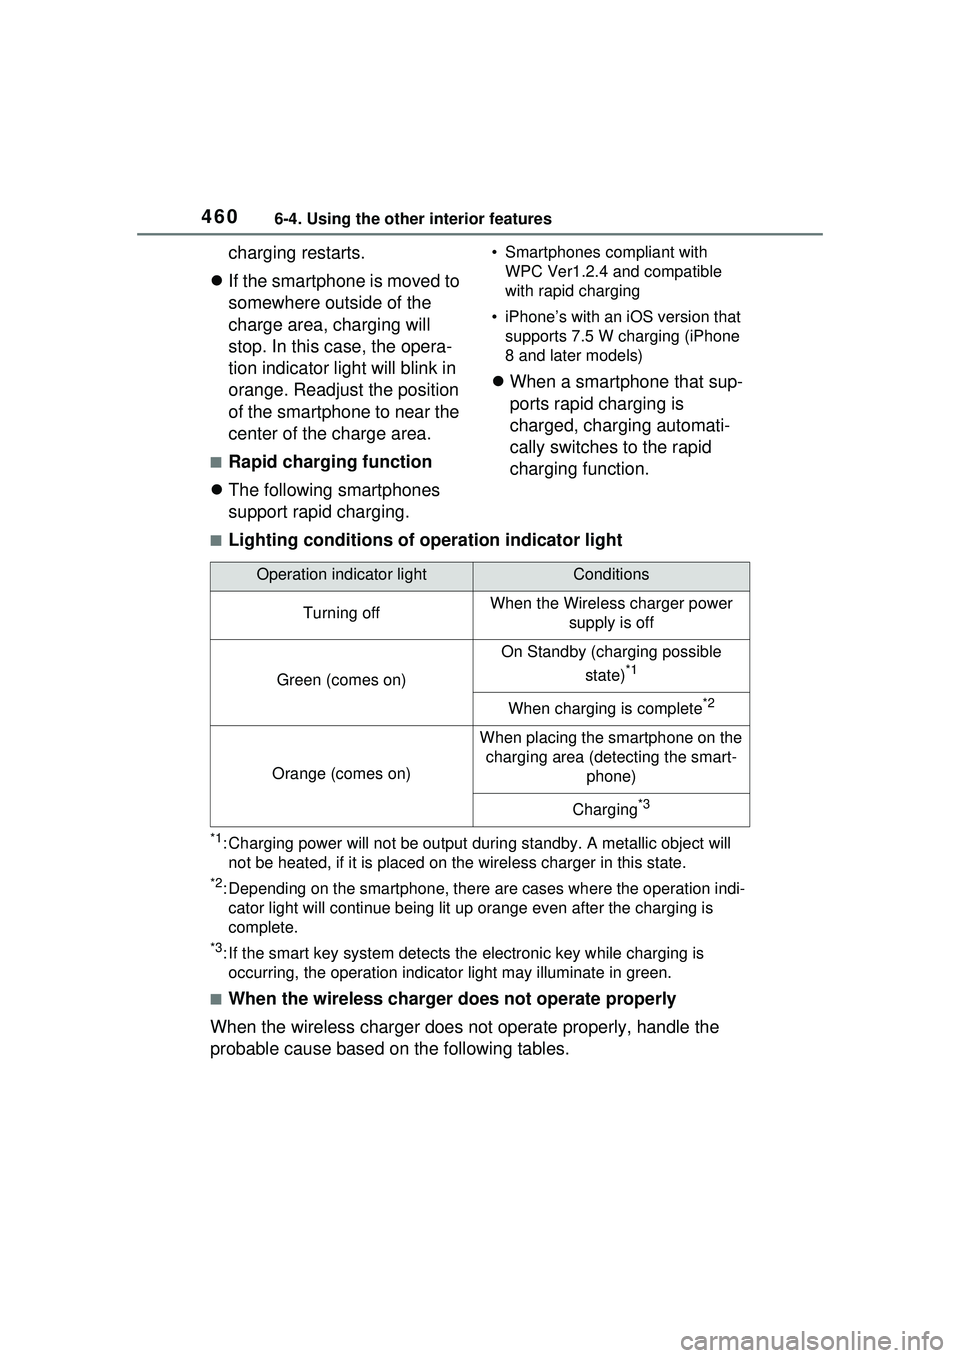
■Lighting conditions of operation indicator light
*1: Charging power will not be output du ring standby. A metallic object will
not be heated, if it is placed on the wireless charger in this state.
*2: Depending on the smartphone, there are cases where the operation indi- cator light will continue being lit up orange even after the charging is
complete.
*3: If the smart key system detects the electronic key while charging is
occurring, the operation indicato r light may illuminate in green.
■When the wireless charger does not operate properly
When the wireless charger does not operate properly, handle the
probable cause based on the following tables.
Operation indicator lightConditions
Turning offWhen the Wireless charger power supply is off
Green (comes on)
On Standby (charging possible
state)
*1
When charging is complete*2
Orange (comes on)
When placing the smartphone on the charging area (detecting the smart- phone)
Charging*3
Page 461 of 680
4616-4. Using the other interior features
6
Interior features
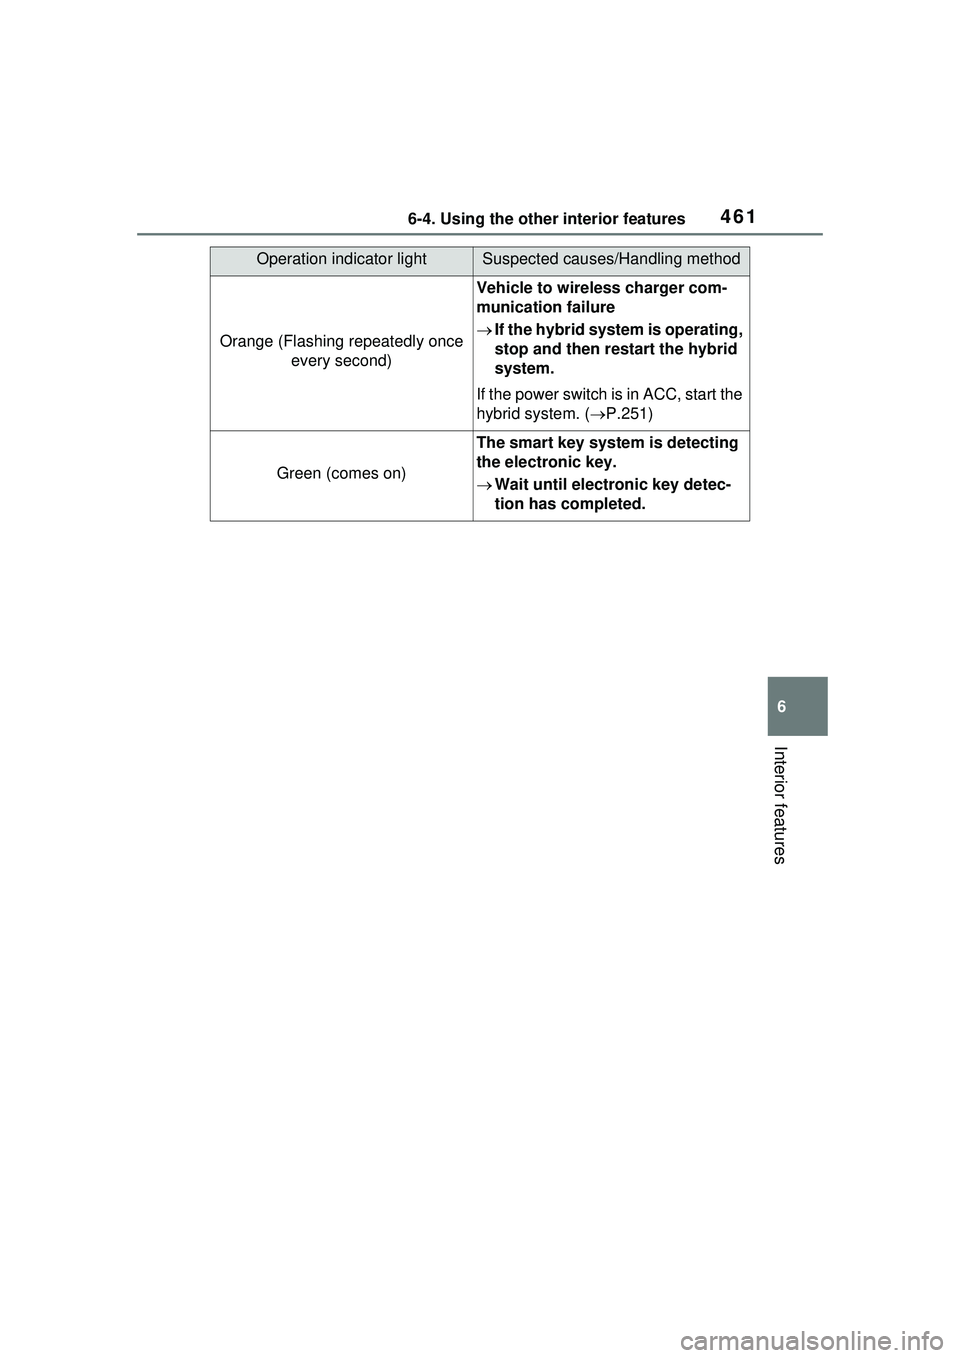
Operation indicator lightSuspected causes/Handling method
Orange (Flashing repeatedly once every second)
Vehicle to wireless charger com-
munication failure
If the hybrid system is operating,
stop and then restart the hybrid
system.
If the power switch is in ACC, start the
hybrid system. ( P.251)
Green (comes on)
The smart key system is detecting
the electronic key.
Wait until electronic key detec-
tion has completed.
Page 463 of 680
4636-4. Using the other interior features
6
Interior features
ported by iPhone’s that support
7.5 W charging.
• Charging at 10 W or less is sup-
ported by smartphones compliant
with EPP output as defined by
WPC standard Ver1.2.4.
■Using the smart key system
Charging will be suspended for the
smart key system to detect the elec-
tronic key during charging such as
when the electronic key has been
brought outside the vehicle. When
the electronic key is detected,
charging will automatically start
again.
■When covers and accessories
are attached to smartphones
Do not charge in situations where
cover and accessories not able to
handle Qi are attached to the smart-
phone. Depending on the type of
cover (including for certain genuine
manufacturer parts) and accessory,
it may not be possible to charge.
When charging is not performed
even with the smartphone placed on
the charge area, remove the cover
and accessories.
■When a smartphone is placed
on the charging area
The application may be opened
unintentionally such as when the
switch on the side of the smart-
phone is pressed. Prevent this from
occurring such as by changing your
smartphone settings as necessary.
■Noise enters the AM radio while
charging
●Turn off the wireless charger and
confirm that the noise has
decreased. If the noise
decreases, continuously pushing
the power supply switch of the
wireless charger for 2 seconds,
the frequency of the charger can
be changed and the noise can be
reduced.
Also, on that occasion, the opera-
tion indicator light will flash orange
2 times.
●iPhone’s use a particular fre-
quency for rapid charging.
Depending on the iOS version,
rapid charging may not be per-
formed while switching frequen-
cies.
■Important points of the wireless
charger
●If the electronic key cannot be
detected within the vehicle inte-
rior, charging cannot be done.
When the door is opened and
closed, charging may be tempo-
rarily suspended.
●When charging, the wireless
charging device and smartphone
will get warmer, however this is
not a malfunction.
When a smartphone gets warm
while charging, charging may stop
due to the protection function on
the smartphone side. In this case,
when the temperature of the
smartphone drops significantly,
charge again.
■Cleaning the wireless charger
P.491
■Situations in which the function
may not operate normally
Devices may not be charged nor-
mally in the following situations.
●The smartphone is fully charged
●The smartphone is being charged
with a cable connected
●There is foreign matter between
the charge area and smartphone
●Charging has caused the smart-
phone to heat up
●The temperature around the wire-
less charger is 95°F (35°C) or
higher, such as in extreme heat
●The smartphone is placed with its
charging side away from the wire-
less charger
●The smartphone is placed in an
area misaligned from the charge
area
●A foldable and smartphone is
Page 468 of 680
4686-4. Using the other interior features
■Power outlets
●With these power outlets, use
devices which operate on 120
VAC and have a combined maxi-
mum power consumption of 1500
W or less. If a device is connected
and the power consumption is
exceeded, a protection circuit may
be activated and the power supply
function may be stopped.
●Some of the devices that con-
sume a large amount of power,
such as an electric grille, may
require the exclusive use of the
power outlets. When such a
device is connected, do not con-nect other device(s) to the power
outlets.
●When multiple devices are con-
nected, depending on the device,
a connected device may not oper-
ate properly. For such a device,
use exclusively the power outlets.
●When a power outlet is being
used, depending on the device to
be used, the current flow may be
high and the initial peak wattage
may exceed 1500 W.
●When a power outlet is being
used, depending on the device to
be used, it may cause interference
with TV and radio broadcasts.
●While a power outlet is being
used, a cooling fan sound may be
heard from near a luggage com-
partment. This does not indicate a
malfunction.
■Devices which may not operate
properly
The following devices may not oper-
ate properly even if the combined
power consumption is 1500 W or
less:
●Devices with high initial peak watt-
age
●Devices requiring larger amount of
power supply than the power con-
sumption specified in its instruc-
tion manual
●Measuring devices that process
precise data
●Devices that require an extremely
stable power supply
●Devices that require a constant
power supply from the power out-
let, such as a device with a timer.
■Idling stop regulations
The engine starts automatically and
charging is performed when the
remaining charge of the hybrid bat-
tery (traction battery) decreases,
etc. Some local governments have
regulations against starting the
engine while parked or stopped.
Use the power outlets appropriately
Power outlet (1500 W)
The system allows the on-
board use of electric
devices which operate on
120 VAC and have a com-
bined power consumption
of 1500 W or less.
Depending on the country
or region where used, it is
not recommended to supply
power to electrical devices
outside of the vehicle as
this may be in conflict with
applicable regulations.
When supplying power to
electrical devices outside of
the vehicle, confirm with the
related local governments
regarding the applicable
regulations in each country
and region in advance. In
addition, be careful not to
drag electrical appliances or
cords when moving the
vehicle.
Page 471 of 680
4716-4. Using the other interior features
6
Interior features
WARNING
• Take due care for not allowing rain to enter. If the power outlet
is wet with raindrops, dry it
before use.
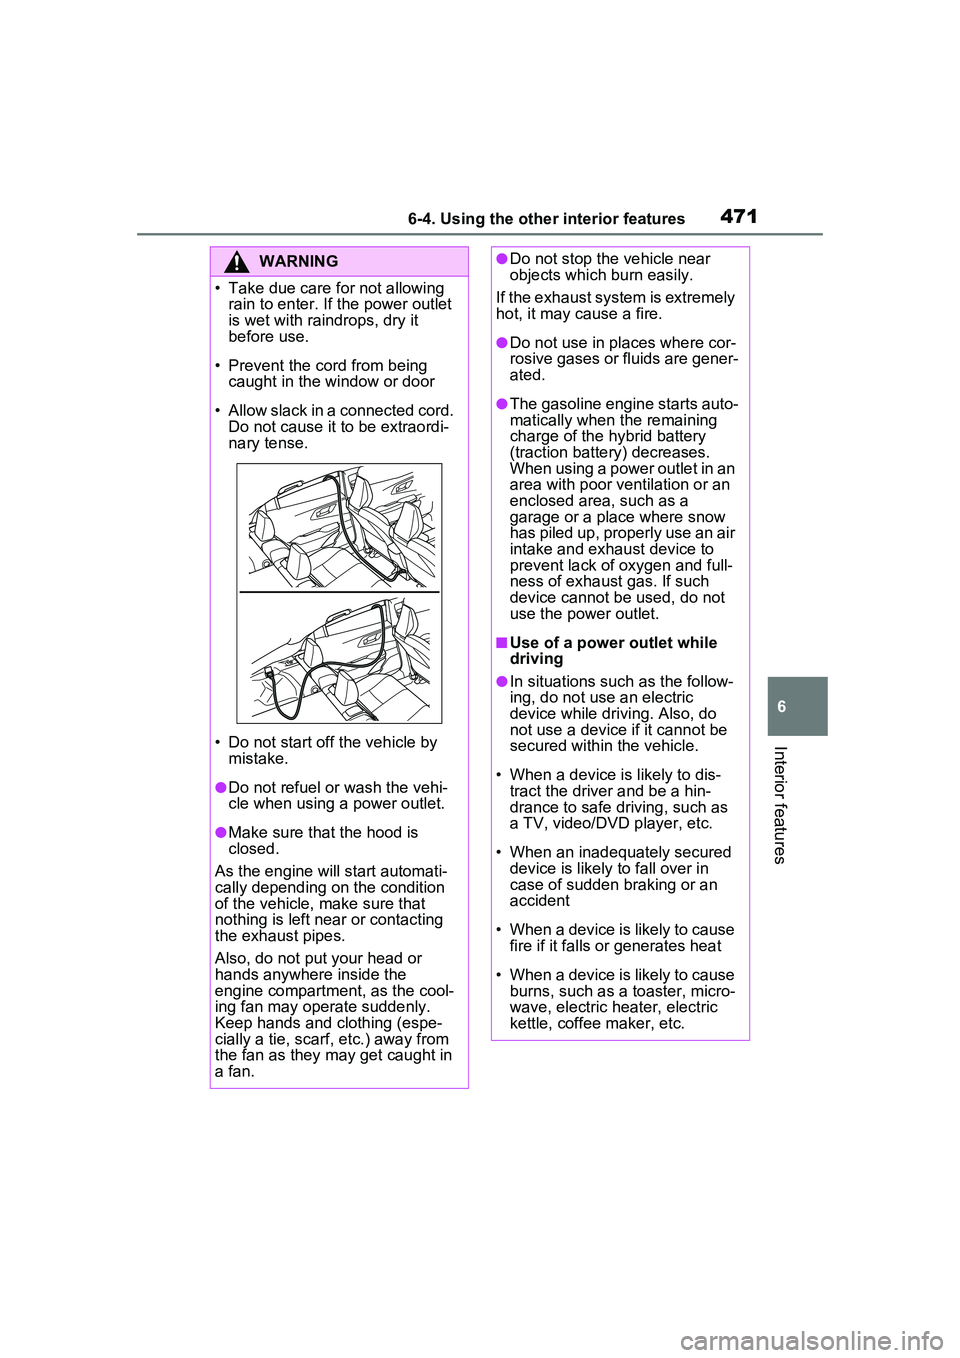
• Prevent the cord from being caught in the window or door
• Allow slack in a connected cord. Do not cause it to be extraordi-
nary tense.
• Do not start off the vehicle by mistake.
●Do not refuel or wash the vehi-
cle when using a power outlet.
●Make sure that the hood is
closed.
As the engine will start automati-
cally depending on the condition
of the vehicle, make sure that
nothing is left near or contacting
the exhaust pipes.
Also, do not put your head or
hands anywhere inside the
engine compartment, as the cool-
ing fan may operate suddenly.
Keep hands and clothing (espe-
cially a tie, scarf, etc.) away from
the fan as they may get caught in
a fan.
●Do not stop the vehicle near
objects which burn easily.
If the exhaust system is extremely
hot, it may cause a fire.
●Do not use in places where cor-
rosive gases or fluids are gener-
ated.
●The gasoline engine starts auto-
matically when the remaining
charge of the hybrid battery
(traction battery) decreases.
When using a power outlet in an
area with poor ventilation or an
enclosed area, such as a
garage or a place where snow
has piled up, properly use an air
intake and exhaust device to
prevent lack of oxygen and full-
ness of exhaust gas. If such
device cannot be used, do not
use the power outlet.
■Use of a power outlet while
driving
●In situations such as the follow-
ing, do not use an electric
device while driving. Also, do
not use a device if it cannot be
secured within the vehicle.
• When a device is likely to dis- tract the driver and be a hin-
drance to safe driving, such as
a TV, video/DVD player, etc.
• When an inadequately secured device is likely to fall over in
case of sudden braking or an
accident
• When a device is likely to cause fire if it falls or generates heat
• When a device is likely to cause burns, such as a toaster, micro-
wave, electric heater, electric
kettle, coffee maker, etc.
Page 472 of 680
4726-4. Using the other interior features
Observe the following precau-
tions before starting the power
supply:
Park the vehicle in a well-ven-
tilated area, avoiding loca-
tions with poor ventilation
such as garages, as the
engine may start while the
system is operating.
Park the vehicle on a solid
and level place.
Block the wheels as needed.
Check that the hood is closed.
Check that the parking brake
is engaged.
Check that the shift position is
in P.
Check that the power switch
is off.
Note that the alarm system
WARNING
• When a device is likely to fall
under the pedals and prevent
the brake pedal from being
depressed, such as a hair dryer,
AC adapter, mouse, etc.
●Do not use devices which pro-
duce steam while the windows
are closed. Doing so may cause
the windows to fog up, reducing
visibility and making it difficult to
drive safely. Also, the steam
may damage or negatively
affect other devices. If the
device must be used, stop the
vehicle and open the windows
before use.
NOTICE
■To avoid short circuit or mal-
function
Observe the following precau-
tions. Failure to do so may lead to
the power outlets not operating
correctly or damage to the vehicle
or a connected device.
●Do not set a toaster or other
device which generates heat
near the interior components or
on a seat. Heat may cause
these parts to melt or burn.
●Do not use devices which are
sensitive to vibration or heat in
the vehicle. These devices may
malfunction due to vibration
while driving or heat while the
vehicle is parked in the sun.
●When not using a power outlet,
make sure to close the lid. If for-
eign matter or a liquid enters the
power outlet, it may cause a
malfunction or short circuit.
■Using the power outlet while
parked or stopped
●Water may leak from the
exhaust pipe while the engine
running if the power outlet is
used for a long time. However,
this is not a malfunction.
●At extremely low temperatures,
water may freeze in the exhaust
pipe and make it difficult to start
the engine, or an odor may
come from the exhaust pipe. In
this case, stop using the power
outlet, and then drive the vehi-
cle for 15 to 30 minutes.
Precautions for using the
power outlets while
parked
Page 482 of 680
4826-4. Using the other interior features
form steps 2 and 3 within the first
10 presses of the HomeLink® but-
ton after programming has been
completed.
2 Press a programmed
HomeLink
® button to oper-
ate a garage door.
3 Within 1 minute of pressing
the HomeLink
® button, after
the garage door operation
has stopped, press the
“Learn” or “Smart” button on
the garage door opener
motor. Within 5 seconds of
the establishment of 2-way
communication with the
garage door opener, both
garage door operation indica-
tors in the vehicle will flash
rapidly (green) and the light
on the garage door opener
motor will blink twice, indicat-
ing that 2-way communica-
tion is enabled.
■Reprogramming a single
HomeLink
® button
When the following procedure is
performed, buttons which
already have devices registered
to them can be overwritten:
1 Press and hold the desired
HomeLink
® button.
2 When the HomeLink
® indica-
tor starts flashing (orange),
release the HomeLink
® but-
ton and perform “Program-
ming HomeLink
®” step 1 (it
takes 20 seconds for the HomeLink
® indicator to start
flashing).
■Before programming
●Install a new battery in the trans-
mitter.
●The battery side of the transmitter
must be pointed away from the
HomeLink
® buttons.
Press the appropriate
HomeLink® button. The
HomeLink® indicator light will
turn on.
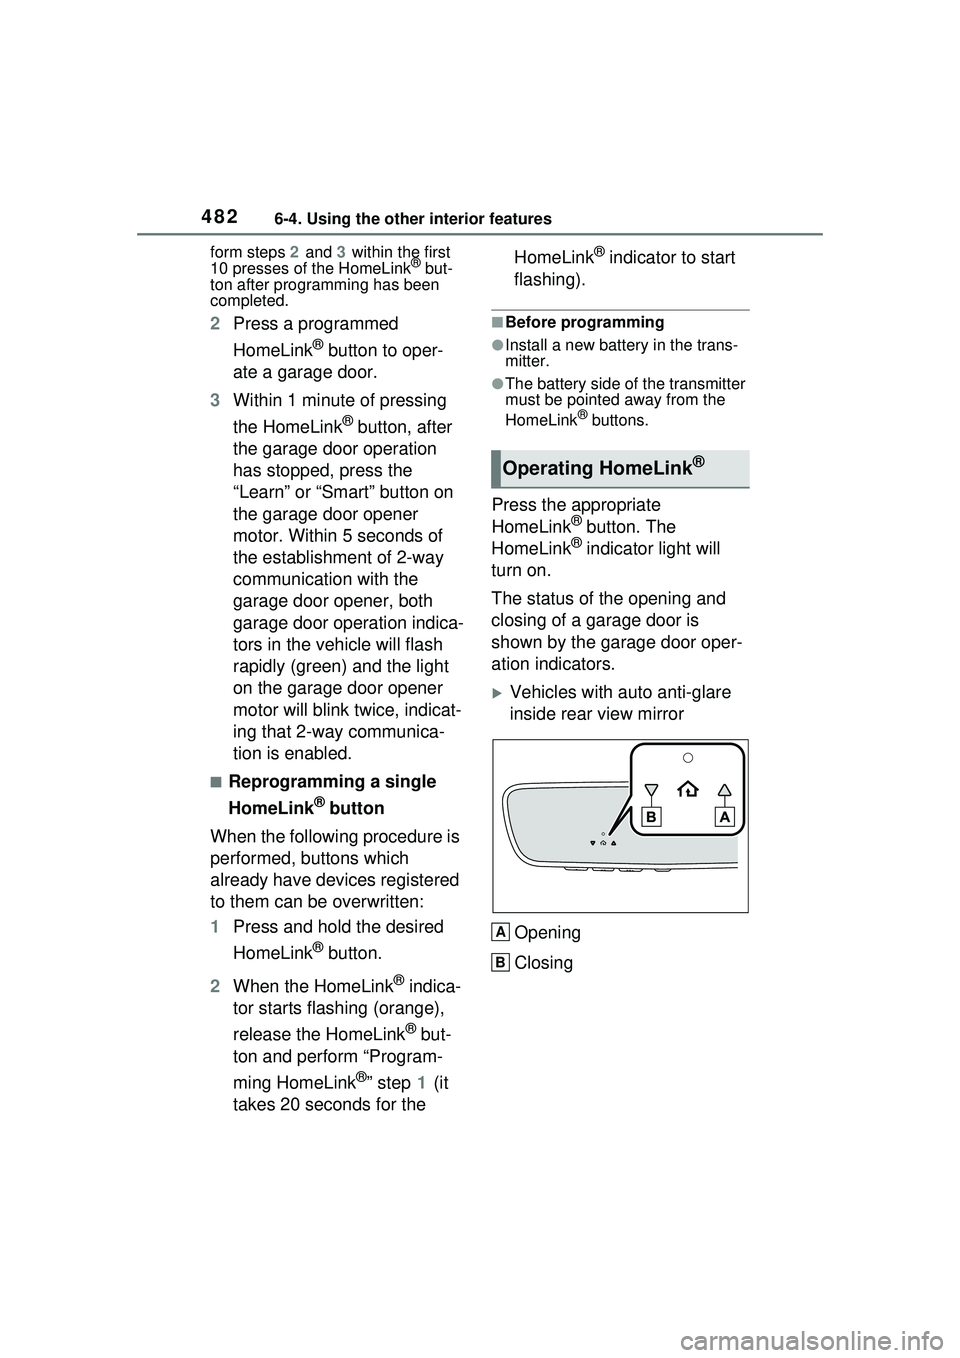
The status of the opening and
closing of a garage door is
shown by the garage door oper-
ation indicators.
Vehicles with auto anti-glare
inside rear view mirror
Opening
Closing
Operating HomeLink®
A
B