steering column TOYOTA RAV4 2006 Service Owner's Manual
[x] Cancel search | Manufacturer: TOYOTA, Model Year: 2006, Model line: RAV4, Model: TOYOTA RAV4 2006Pages: 2000, PDF Size: 45.84 MB
Page 1608 of 2000
PS–8POWER STEERING – ELECTRONIC POWER STEERING SYSTEM
PS
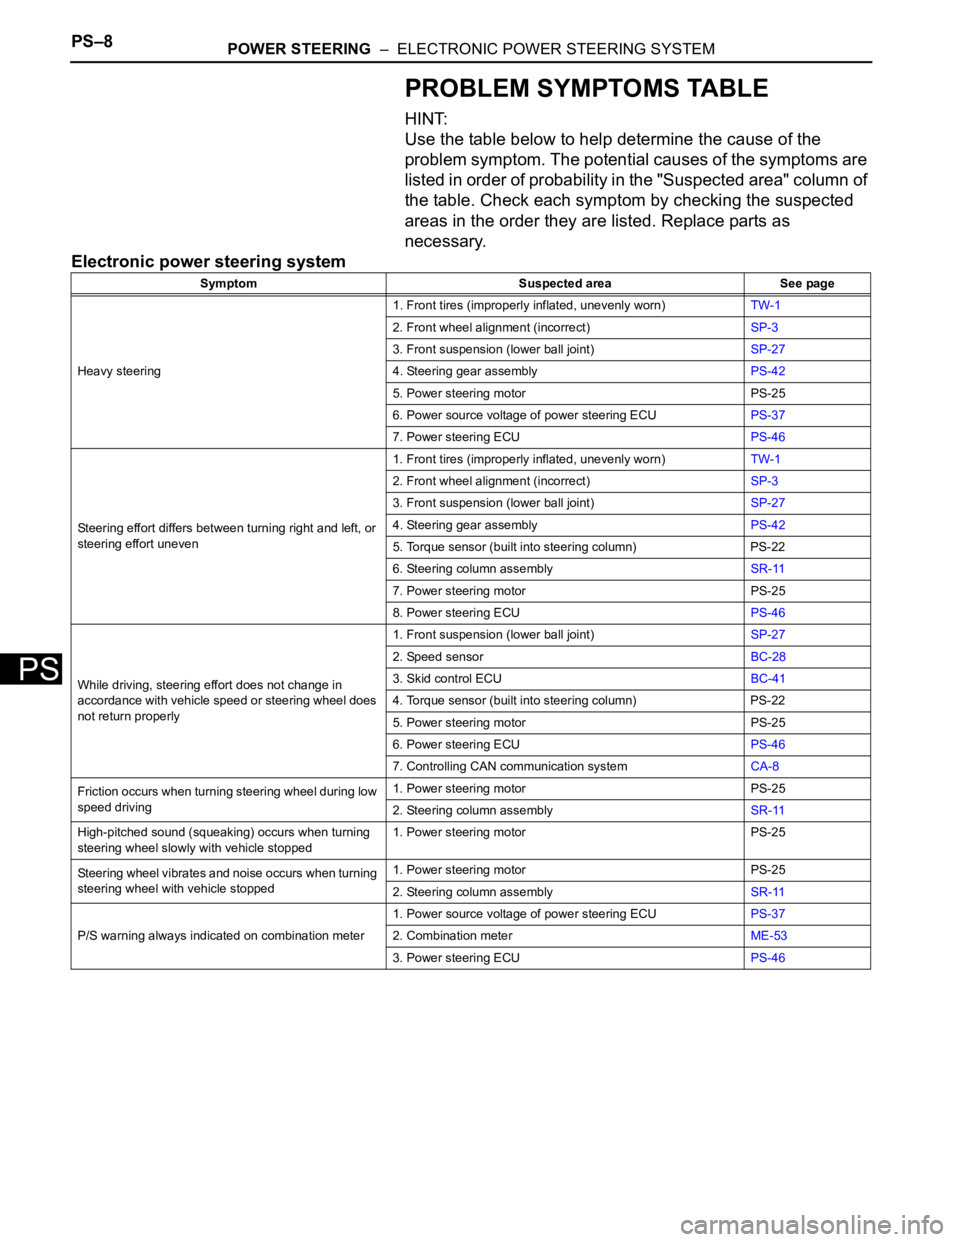
PROBLEM SYMPTOMS TABLE
HINT:
Use the table below to help determine the cause of the
problem symptom. The potential causes of the symptoms are
listed in order of probability in the "Suspected area" column of
the table. Check each symptom by checking the suspected
areas in the order they are listed. Replace parts as
necessary.
Electronic power steering system
Symptom Suspected area See page
Heavy steering1. Front tires (improperly inflated, unevenly worn)TW-1
2. Front wheel alignment (incorrect)SP-3
3. Front suspension (lower ball joint)SP-27
4. Steering gear assemblyPS-42
5. Power steering motor PS-25
6. Power source voltage of power steering ECUPS-37
7. Power steering ECUPS-46
Steering effort differs between turning right and left, or
steering effort uneven1. Front tires (improperly inflated, unevenly worn)TW-1
2. Front wheel alignment (incorrect)SP-3
3. Front suspension (lower ball joint)SP-27
4. Steering gear assemblyPS-42
5. Torque sensor (built into steering column) PS-22
6. Steering column assemblySR-11
7. Power steering motor PS-25
8. Power steering ECUPS-46
While driving, steering effort does not change in
accordance with vehicle speed or steering wheel does
not return properly1. Front suspension (lower ball joint)SP-27
2. Speed sensorBC-28
3. Skid control ECUBC-41
4. Torque sensor (built into steering column) PS-22
5. Power steering motor PS-25
6. Power steering ECUPS-46
7. Controlling CAN communication systemCA-8
Friction occurs when turning steering wheel during low
speed driving1. Power steering motor PS-25
2. Steering column assemblySR-11
High-pitched sound (squeaking) occurs when turning
steering wheel slowly with vehicle stopped1. Power steering motor PS-25
Steering wheel vibrates and noise occurs when turning
steering wheel with vehicle stopped1. Power steering motor PS-25
2. Steering column assemblySR-11
P/S warning always indicated on combination meter1. Power source voltage of power steering ECUPS-37
2. Combination meterME-53
3. Power steering ECUPS-46
Page 1619 of 2000
POWER STEERING – ELECTRONIC POWER STEERING SYSTEMPS–19
PS
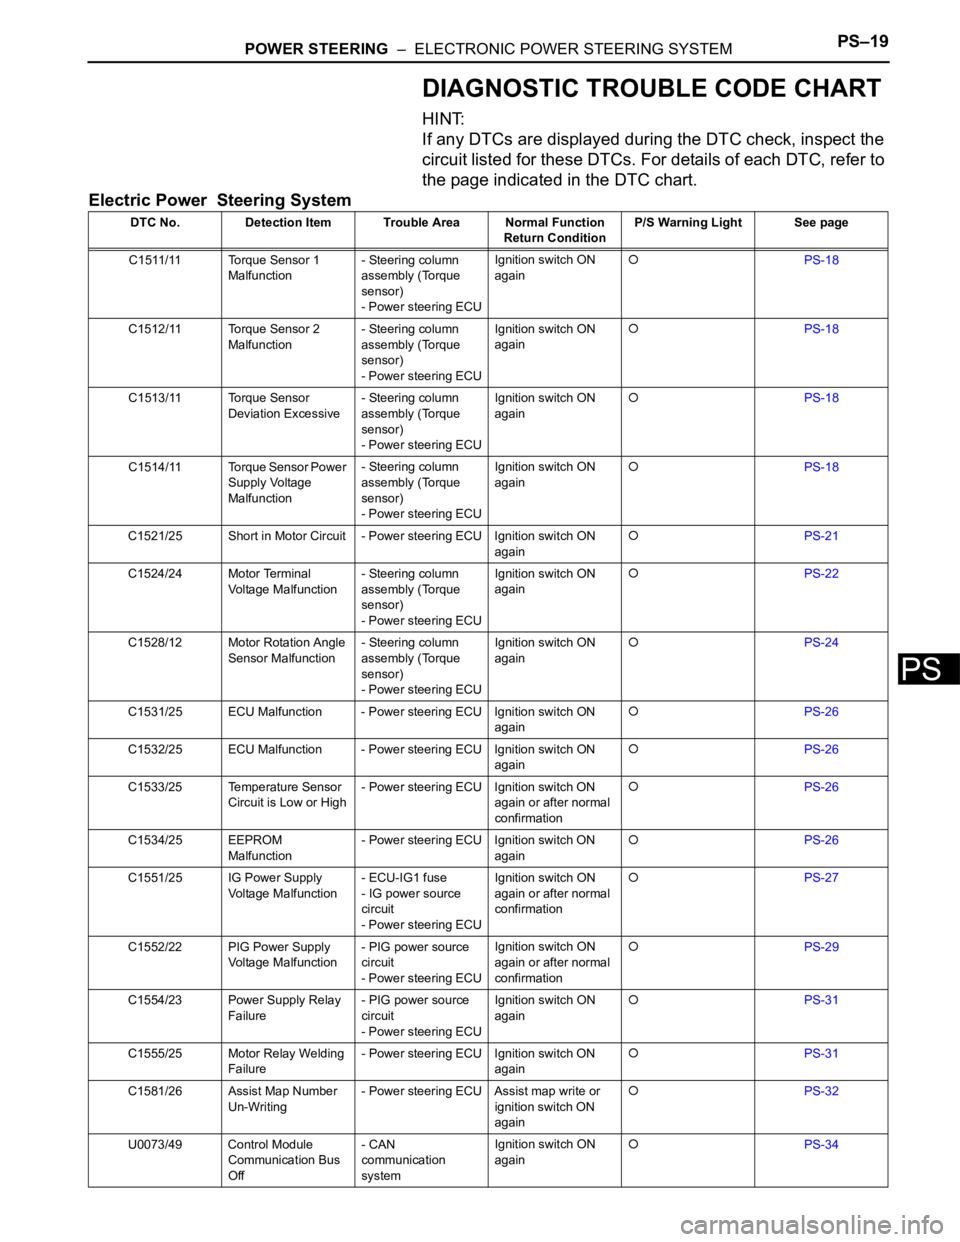
DIAGNOSTIC TROUBLE CODE CHART
HINT:
If any DTCs are displayed during the DTC check, inspect the
circuit listed for these DTCs. For details of each DTC, refer to
the page indicated in the DTC chart.
Electric Power Steering System
DTC No. Detection Item Trouble Area Normal Function
Return ConditionP/S Warning Light See page
C1511/11 Torque Sensor 1
Malfunction- Steering column
assembly (Torque
sensor)
- Power steering ECUIgnition switch ON
again
PS-18
C1512/11 Torque Sensor 2
Malfunction- Steering column
assembly (Torque
sensor)
- Power steering ECUIgnition switch ON
again
PS-18
C1513/11 Torque Sensor
Deviation Excessive- Steering column
assembly (Torque
sensor)
- Power steering ECUIgnition switch ON
again
PS-18
C1514/11 Torque Sensor Power
Supply Voltage
Malfunction- Steering column
assembly (Torque
sensor)
- Power steering ECUIgnition switch ON
again
PS-18
C1521/25 Short in Motor Circuit - Power steering ECU Ignition switch ON
again
PS-21
C1524/24 Motor Terminal
Voltage Malfunction- Steering column
assembly (Torque
sensor)
- Power steering ECUIgnition switch ON
again
PS-22
C1528/12 Motor Rotation Angle
Sensor Malfunction- Steering column
assembly (Torque
sensor)
- Power steering ECUIgnition switch ON
again
PS-24
C1531/25 ECU Malfunction - Power steering ECU Ignition switch ON
again
PS-26
C1532/25 ECU Malfunction - Power steering ECU Ignition switch ON
again
PS-26
C1533/25 Temperature Sensor
Circuit is Low or High- Power steering ECU Ignition switch ON
again or after normal
confirmation
PS-26
C1534/25 EEPROM
Malfunction- Power steering ECU Ignition switch ON
again
PS-26
C1551/25 IG Power Supply
Voltage Malfunction- ECU-IG1 fuse
- IG power source
circuit
- Power steering ECUIgnition switch ON
again or after normal
confirmation
PS-27
C1552/22 PIG Power Supply
Voltage Malfunction- PIG power source
circuit
- Power steering ECUIgnition switch ON
again or after normal
confirmation
PS-29
C1554/23 Power Supply Relay
Failure- PIG power source
circuit
- Power steering ECUIgnition switch ON
again
PS-31
C1555/25 Motor Relay Welding
Failure- Power steering ECU Ignition switch ON
again
PS-31
C1581/26 Assist Map Number
Un-Writing- Power steering ECU Assist map write or
ignition switch ON
again
PS-32
U0073/49 Control Module
Communication Bus
Off- CAN
communication
systemIgnition switch ON
again
PS-34
Page 1621 of 2000
POWER STEERING – ELECTRONIC POWER STEERING SYSTEMPS–21
PS
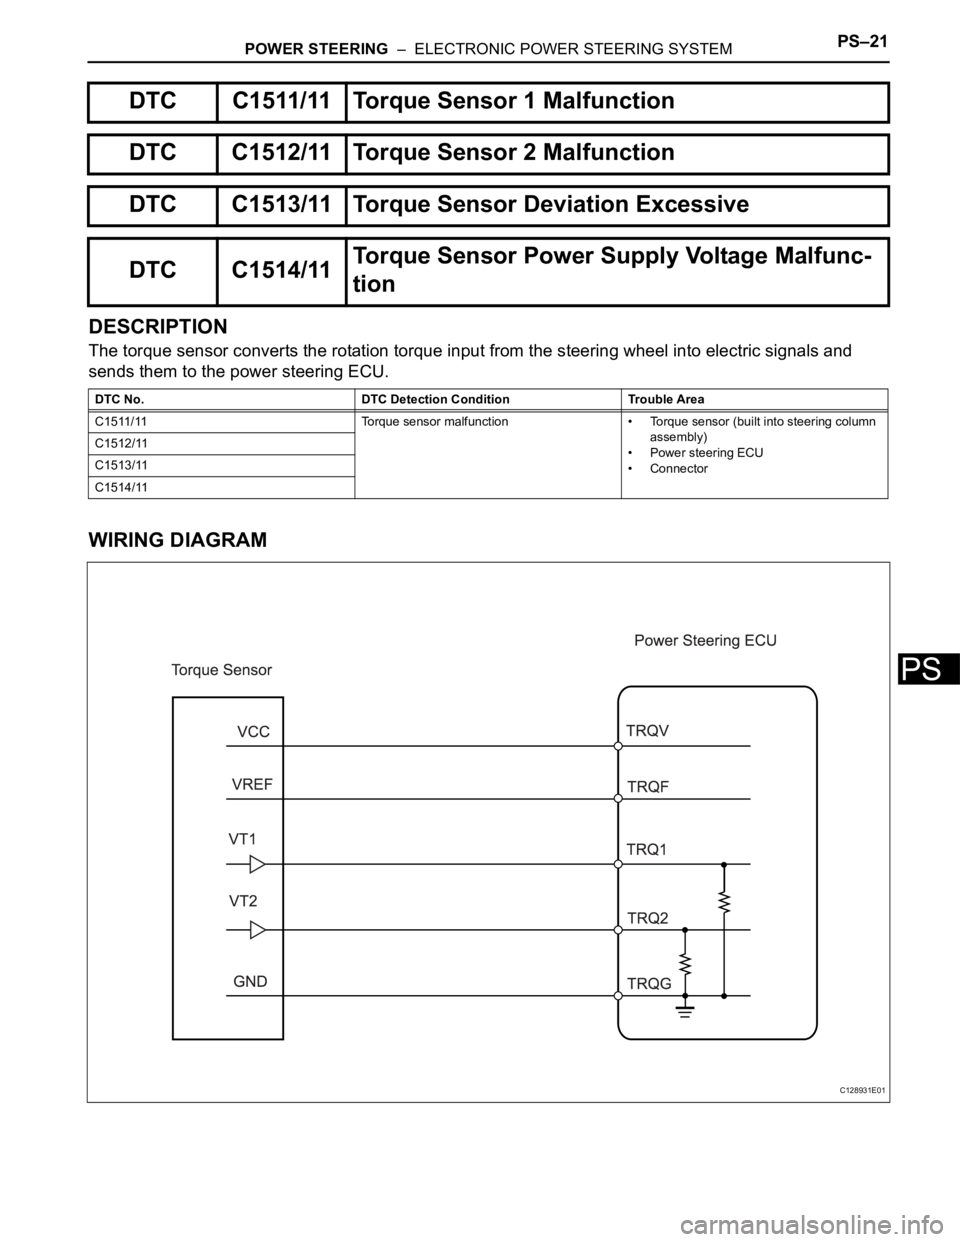
DESCRIPTION
The torque sensor converts the rotation torque input from the steering wheel into electric signals and
sends them to the power steering ECU.
WIRING DIAGRAM
DTC C1511/11 Torque Sensor 1 Malfunction
DTC C1512/11 Torque Sensor 2 Malfunction
DTC C1513/11 Torque Sensor Deviation Excessive
DTC C1514/11Torque Sensor Power Supply Voltage Malfunc-
tion
DTC No. DTC Detection Condition Trouble Area
C1511/11 Torque sensor malfunction • Torque sensor (built into steering column
assembly)
• Power steering ECU
• Connector C1512/11
C1513/11
C1514/11
C128931E01
Page 1623 of 2000
POWER STEERING – ELECTRONIC POWER STEERING SYSTEMPS–23
PS
NG
OK
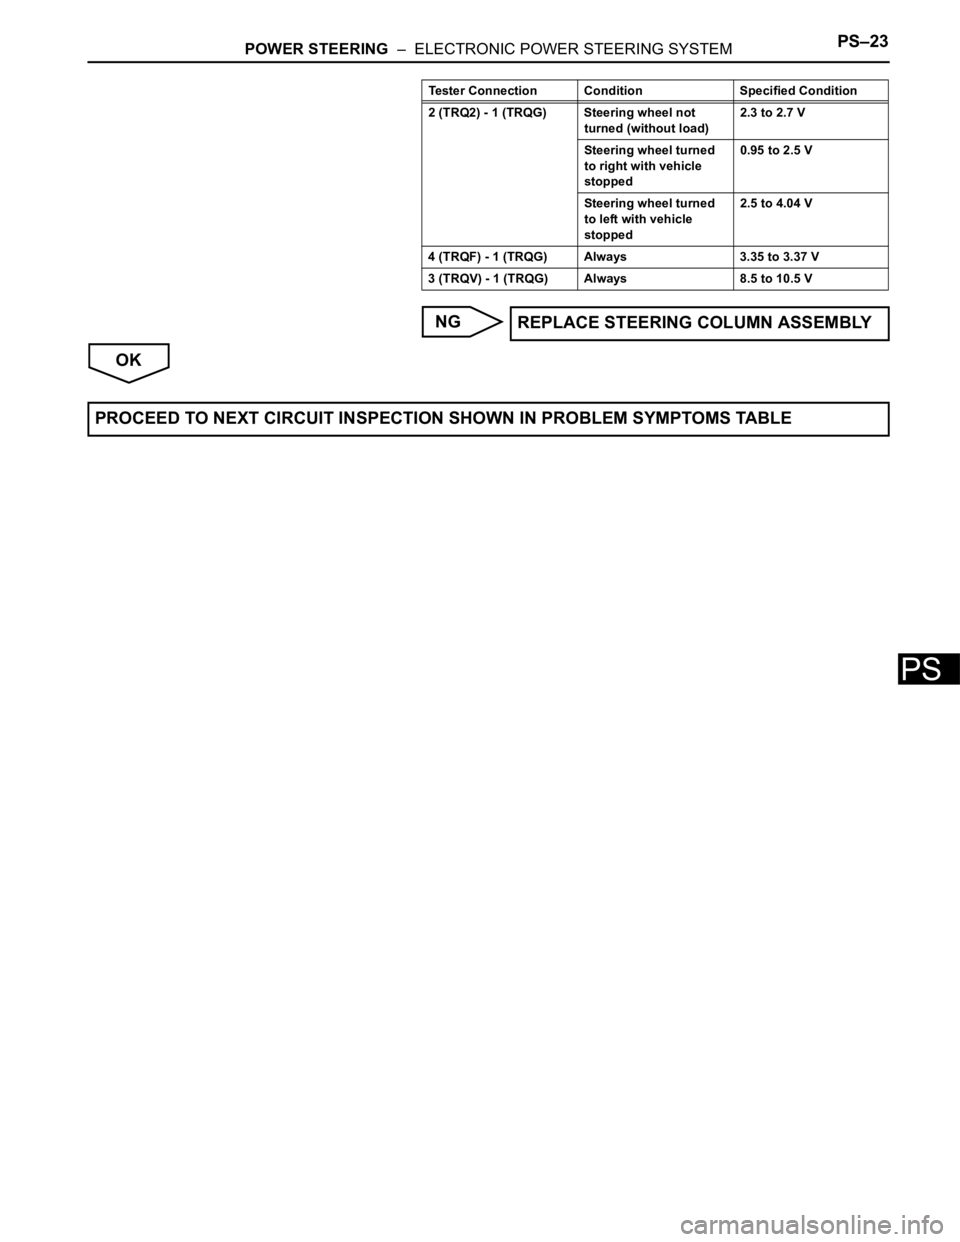
2 (TRQ2) - 1 (TRQG) Steering wheel not
turned (without load)2.3 to 2.7 V
Steering wheel turned
to right with vehicle
stopped0.95 to 2.5 V
Steering wheel turned
to left with vehicle
stopped2.5 to 4.04 V
4 (TRQF) - 1 (TRQG) Always 3.35 to 3.37 V
3 (TRQV) - 1 (TRQG) Always 8.5 to 10.5 V
REPLACE STEERING COLUMN ASSEMBLY
Tester Connection Condition Specified Condition
PROCEED TO NEXT CIRCUIT INSPECTION SHOWN IN PROBLEM SYMPTOMS TABLE
Page 1625 of 2000
POWER STEERING – ELECTRONIC POWER STEERING SYSTEMPS–25
PS
DESCRIPTION
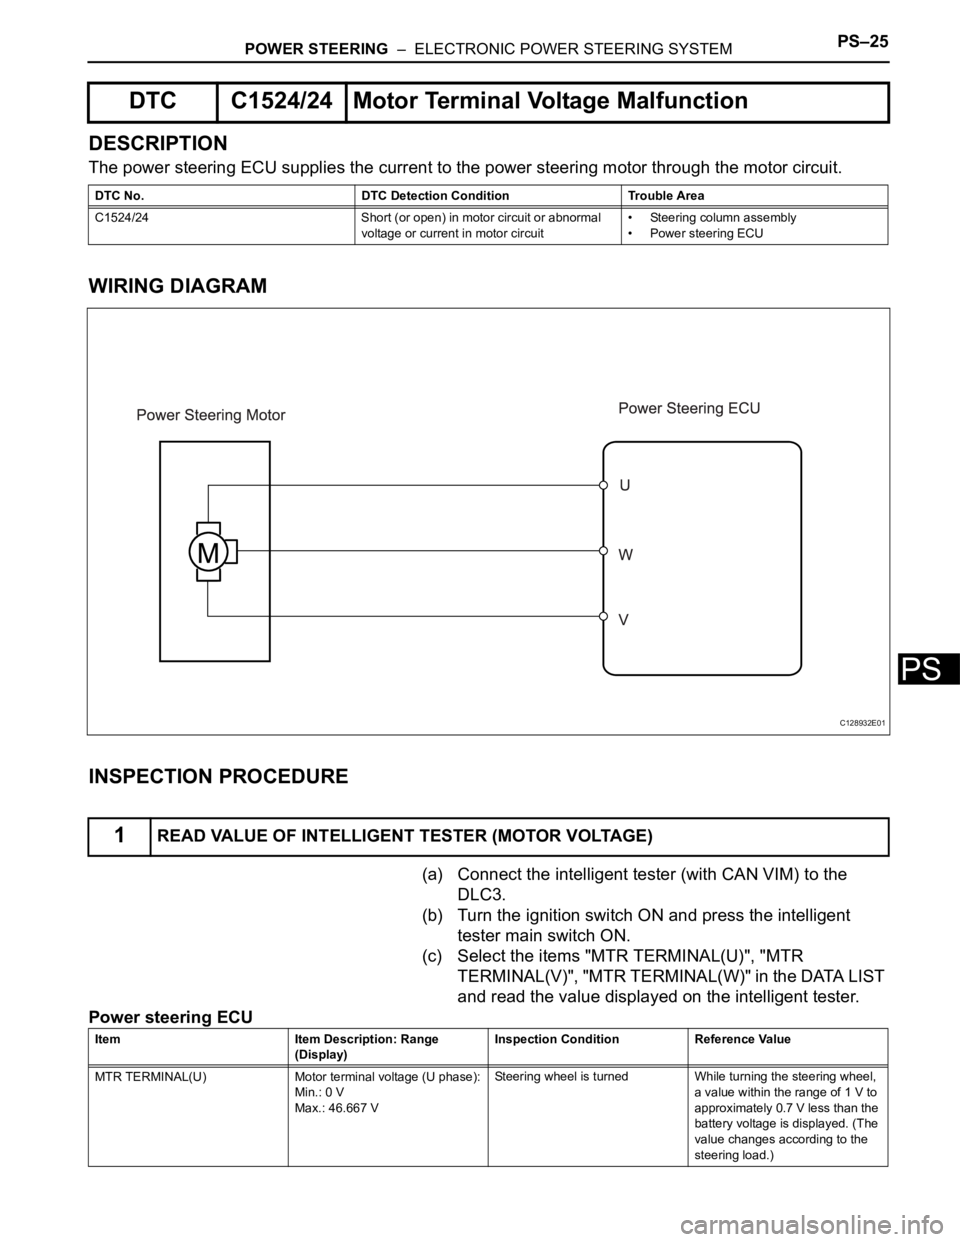
The power steering ECU supplies the current to the power steering motor through the motor circuit.
WIRING DIAGRAM
INSPECTION PROCEDURE
(a) Connect the intelligent tester (with CAN VIM) to the
DLC3.
(b) Turn the ignition switch ON and press the intelligent
tester main switch ON.
(c) Select the items "MTR TERMINAL(U)", "MTR
TERMINAL(V)", "MTR TERMINAL(W)" in the DATA LIST
and read the value displayed on the intelligent tester.
Power steering ECU
DTC C1524/24 Motor Terminal Voltage Malfunction
DTC No. DTC Detection Condition Trouble Area
C1524/24 Short (or open) in motor circuit or abnormal
voltage or current in motor circuit• Steering column assembly
• Power steering ECU
1READ VALUE OF INTELLIGENT TESTER (MOTOR VOLTAGE)
C128932E01
Item Item Description: Range
(Display)Inspection Condition Reference Value
MTR TERMINAL(U) Motor terminal voltage (U phase):
Min.: 0 V
Max.: 46.667 VSteering wheel is turned While turning the steering wheel,
a value within the range of 1 V to
approximately 0.7 V less than the
battery voltage is displayed. (The
value changes according to the
steering load.)
Page 1626 of 2000
PS–26POWER STEERING – ELECTRONIC POWER STEERING SYSTEM
PS
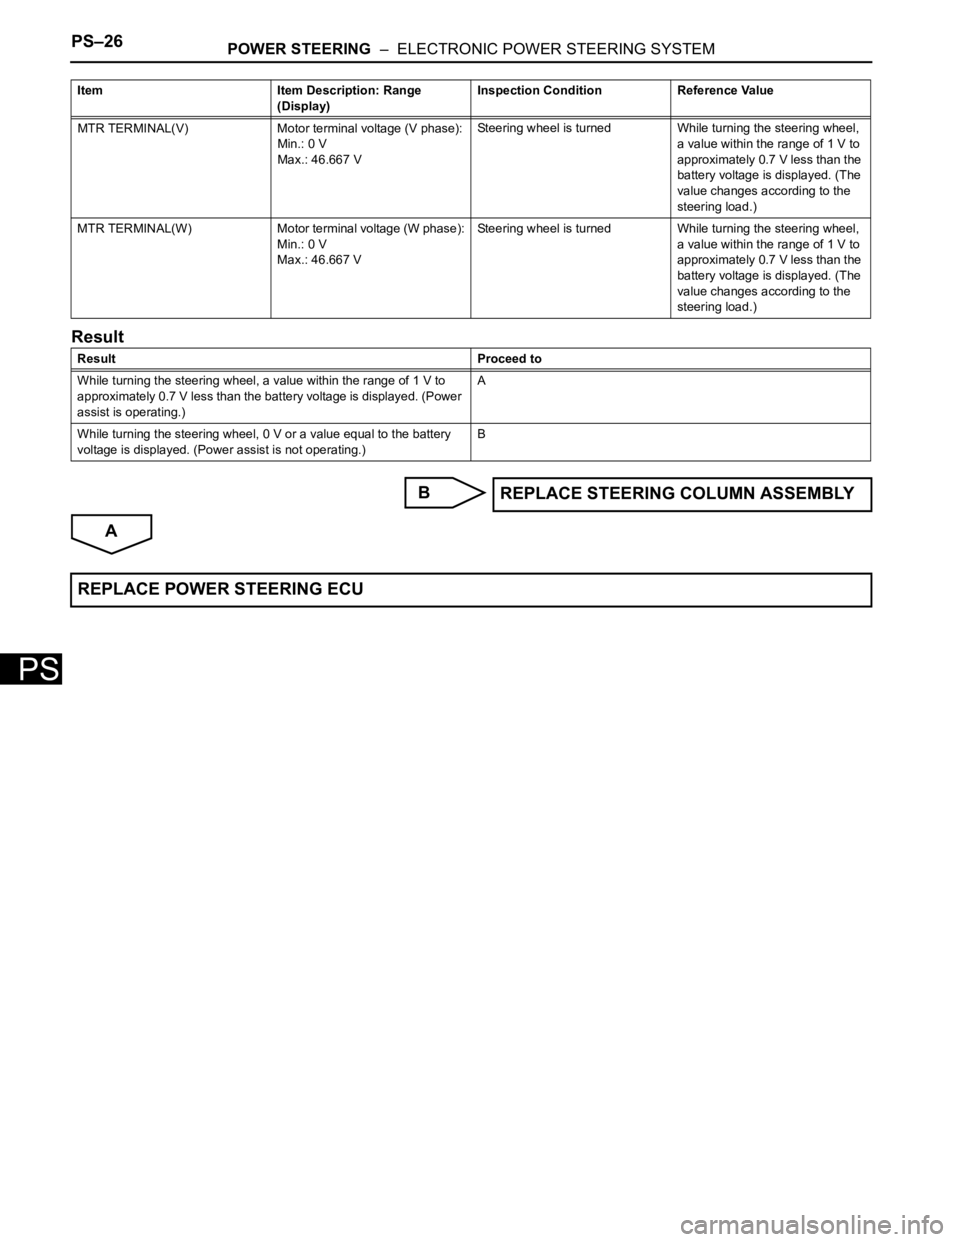
Result
B
A
MTR TERMINAL(V) Motor terminal voltage (V phase):
Min.: 0 V
Max.: 46.667 VSteering wheel is turned While turning the steering wheel,
a value within the range of 1 V to
approximately 0.7 V less than the
battery voltage is displayed. (The
value changes according to the
steering load.)
MTR TERMINAL(W) Motor terminal voltage (W phase):
Min.: 0 V
Max.: 46.667 VSteering wheel is turned While turning the steering wheel,
a value within the range of 1 V to
approximately 0.7 V less than the
battery voltage is displayed. (The
value changes according to the
steering load.)
Result Proceed to
While turning the steering wheel, a value within the range of 1 V to
approximately 0.7 V less than the battery voltage is displayed. (Power
assist is operating.)A
While turning the steering wheel, 0 V or a value equal to the battery
voltage is displayed. (Power assist is not operating.)B Item Item Description: Range
(Display)Inspection Condition Reference Value
REPLACE STEERING COLUMN ASSEMBLY
REPLACE POWER STEERING ECU
Page 1627 of 2000
POWER STEERING – ELECTRONIC POWER STEERING SYSTEMPS–27
PS
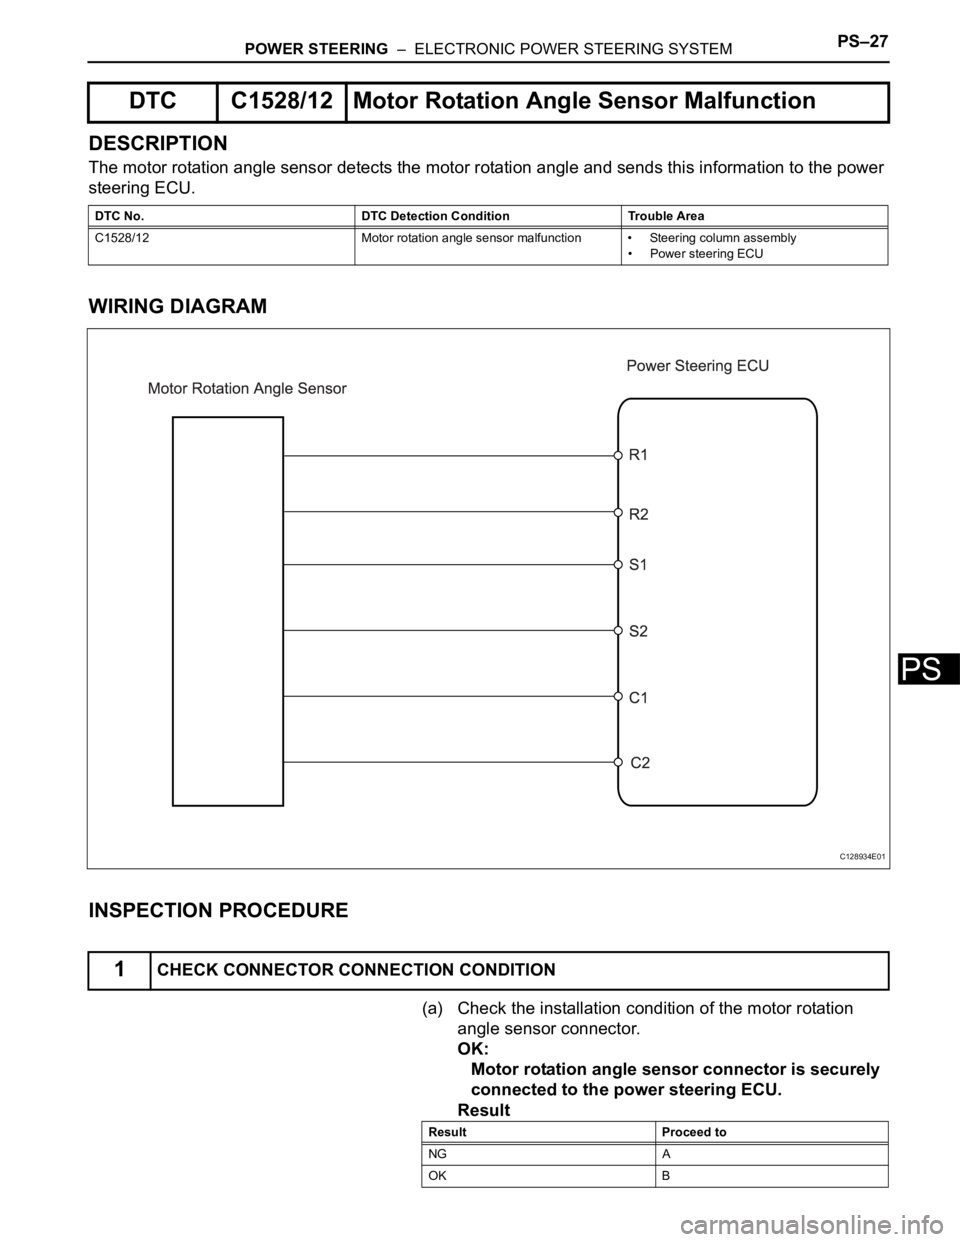
DESCRIPTION
The motor rotation angle sensor detects the motor rotation angle and sends this information to the power
steering ECU.
WIRING DIAGRAM
INSPECTION PROCEDURE
(a) Check the installation condition of the motor rotation
angle sensor connector.
OK:
Motor rotation angle sensor connector is securely
connected to the power steering ECU.
Result
DTC C1528/12 Motor Rotation Angle Sensor Malfunction
DTC No. DTC Detection Condition Trouble Area
C1528/12 Motor rotation angle sensor malfunction • Steering column assembly
• Power steering ECU
1CHECK CONNECTOR CONNECTION CONDITION
C128934E01
Result Proceed to
NG A
OK B
Page 1628 of 2000
PS–28POWER STEERING – ELECTRONIC POWER STEERING SYSTEM
PS
B
A
(a) Reinstall motor rotation angle sensor connector.
(b) Check for DTC.
OK:
DTC is not output.
Result
B
A
(a) Connect the intelligent tester (with CAN VIM) to the
DLC3.
(b) Turn the ignition switch ON and press the intelligent
tester main switch ON.
(c) Select the items "MOTOR ROTATE" in the DATA LIST
and read the value displayed on the intelligent tester.
OK:
During steering operation, motor rotation angle
value changes from 0 to 360
NG
OK Go to step 3
2RECONFIRM DTC
Result Proceed to
DTC is output A
DTC is not output B
END
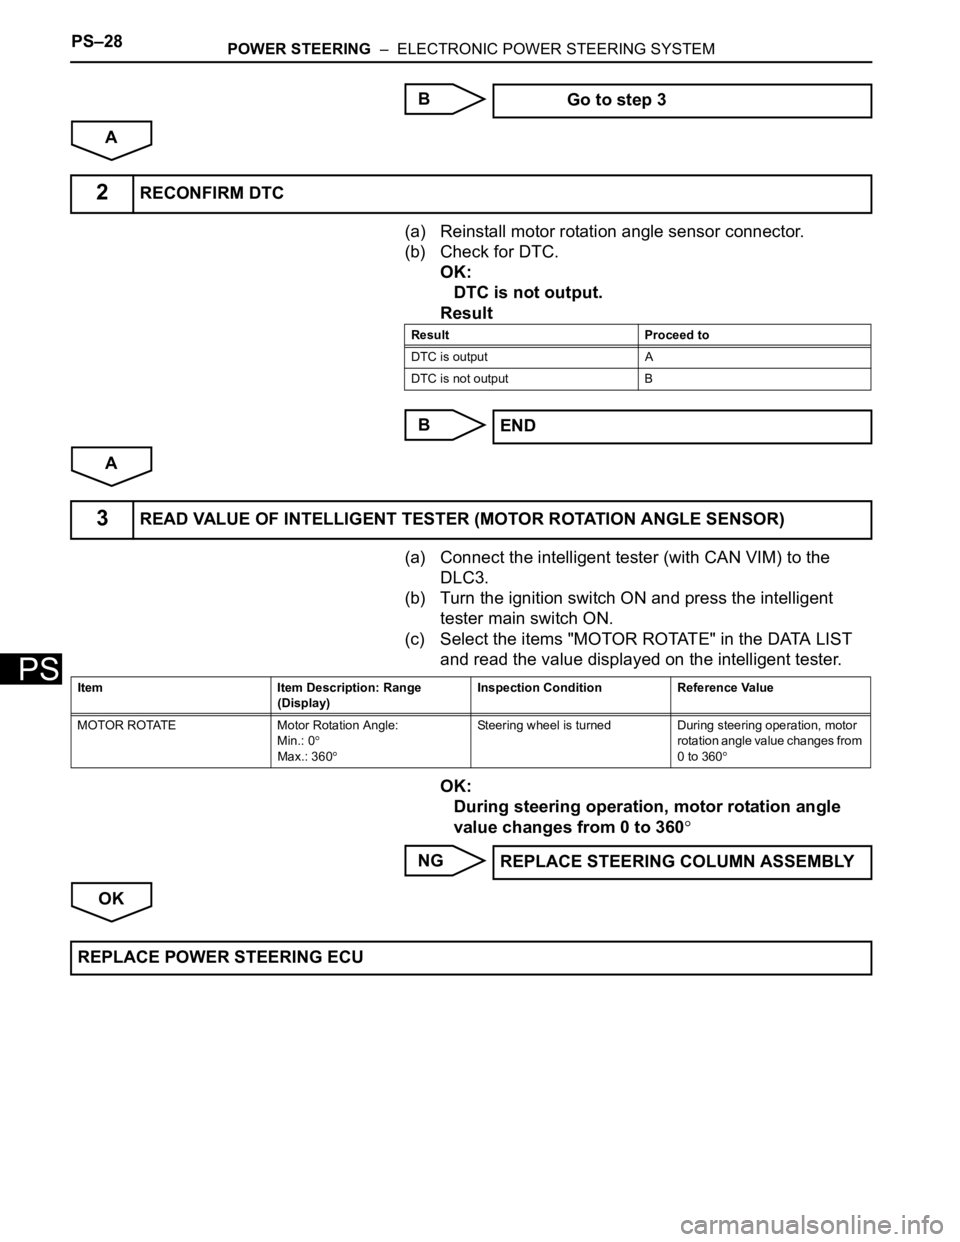
3READ VALUE OF INTELLIGENT TESTER (MOTOR ROTATION ANGLE SENSOR)
Item Item Description: Range
(Display)Inspection Condition Reference Value
MOTOR ROTATE Motor Rotation Angle:
Min.: 0
Max.: 360
Steering wheel is turned During steering operation, motor
rotation angle value changes from
0 to 360
REPLACE STEERING COLUMN ASSEMBLY
REPLACE POWER STEERING ECU
Page 1884 of 2000
LI–134LIGHTING – HEADLIGHT DIMMER SWITCH
LI
REMOVAL
1. DISCONNECT CABLE FROM NEGATIVE BATTERY
TERMINAL
CAUTION:
Wait at least 90 seconds after disconnecting the
cable from the negative (-) battery terminal to
prevent airbag and seat belt pretensioner activation.
2. PLACE FRONT WHEELS FACING STRAIGHT AHEAD
3. REMOVE STEERING PAD ASSEMBLY (See page RS-
336)
4. REMOVE STEERING WHEEL ASSEMBLY (See page
SR-12)
5. REMOVE STEERING COLUMN COVER (See page
SR-12)
6. REMOVE SPIRAL CABLE SUB-ASSEMBLY (See page
RS-346)
7. REMOVE WIPER AND WASHER SWITCH (See page
WW-27)
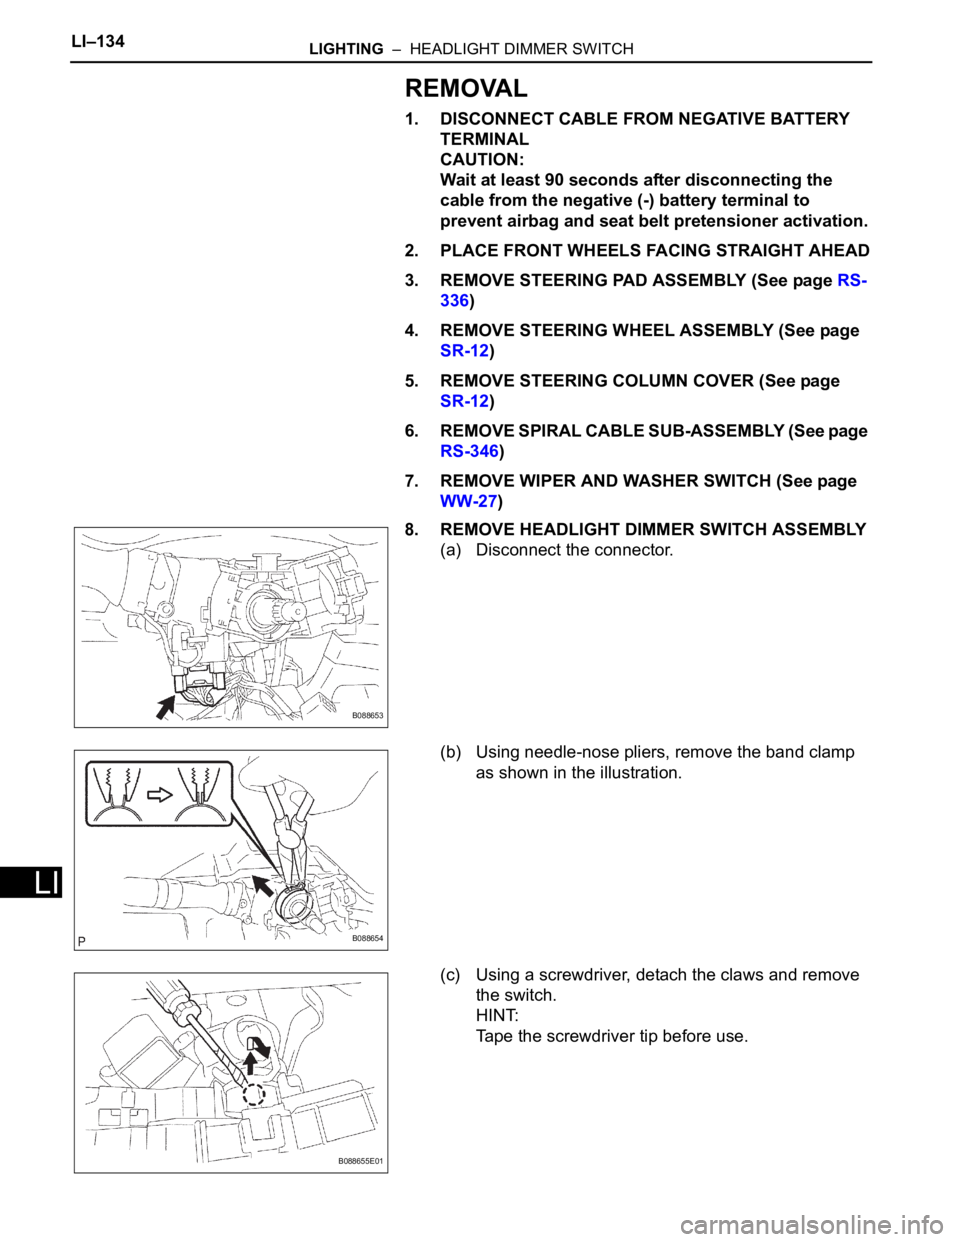
8. REMOVE HEADLIGHT DIMMER SWITCH ASSEMBLY
(a) Disconnect the connector.
(b) Using needle-nose pliers, remove the band clamp
as shown in the illustration.
(c) Using a screwdriver, detach the claws and remove
the switch.
HINT:
Tape the screwdriver tip before use.
B088653
B088654
B088655E01
Page 1886 of 2000
LI–136LIGHTING – HEADLIGHT DIMMER SWITCH
LI
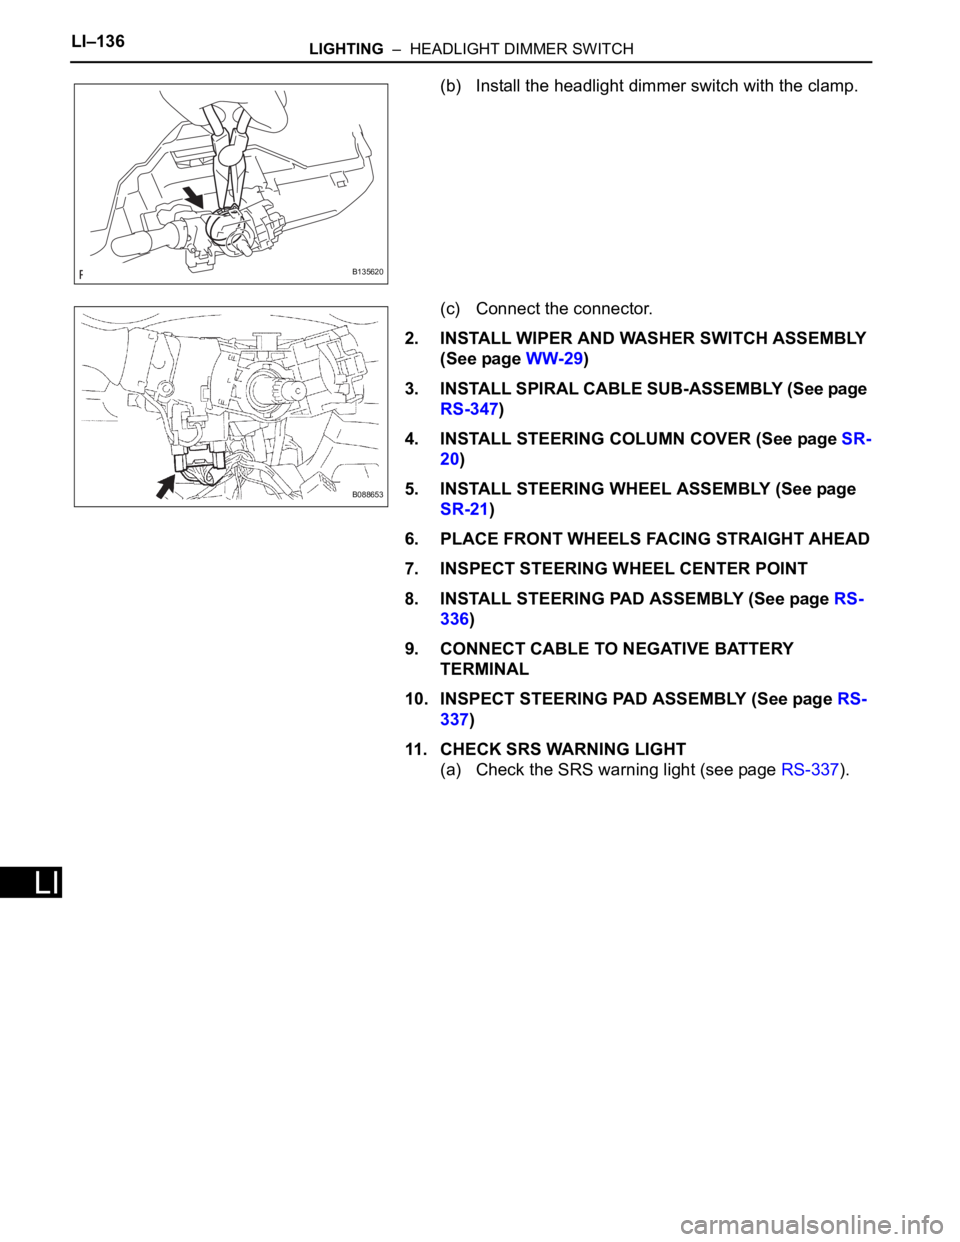
(b) Install the headlight dimmer switch with the clamp.
(c) Connect the connector.
2. INSTALL WIPER AND WASHER SWITCH ASSEMBLY
(See page WW-29)
3. INSTALL SPIRAL CABLE SUB-ASSEMBLY (See page
RS-347)
4. INSTALL STEERING COLUMN COVER (See page SR-
20)
5. INSTALL STEERING WHEEL ASSEMBLY (See page
SR-21)
6. PLACE FRONT WHEELS FACING STRAIGHT AHEAD
7. INSPECT STEERING WHEEL CENTER POINT
8. INSTALL STEERING PAD ASSEMBLY (See page RS-
336)
9. CONNECT CABLE TO NEGATIVE BATTERY
TERMINAL
10. INSPECT STEERING PAD ASSEMBLY (See page RS-
337)
11. CHECK SRS WARNING LIGHT
(a) Check the SRS warning light (see page RS-337).
B135620
B088653