ECU TOYOTA RAV4 HYBRID 2020 (in English) Owner's Manual
[x] Cancel search | Manufacturer: TOYOTA, Model Year: 2020, Model line: RAV4 HYBRID, Model: TOYOTA RAV4 HYBRID 2020Pages: 744, PDF Size: 31.43 MB
Page 58 of 744
581-2. Child safety
When using the rear seat: If there is
a gap between the child restraint
system and the seatback, adjust
the seatback angle until good con-
tact is achieved.
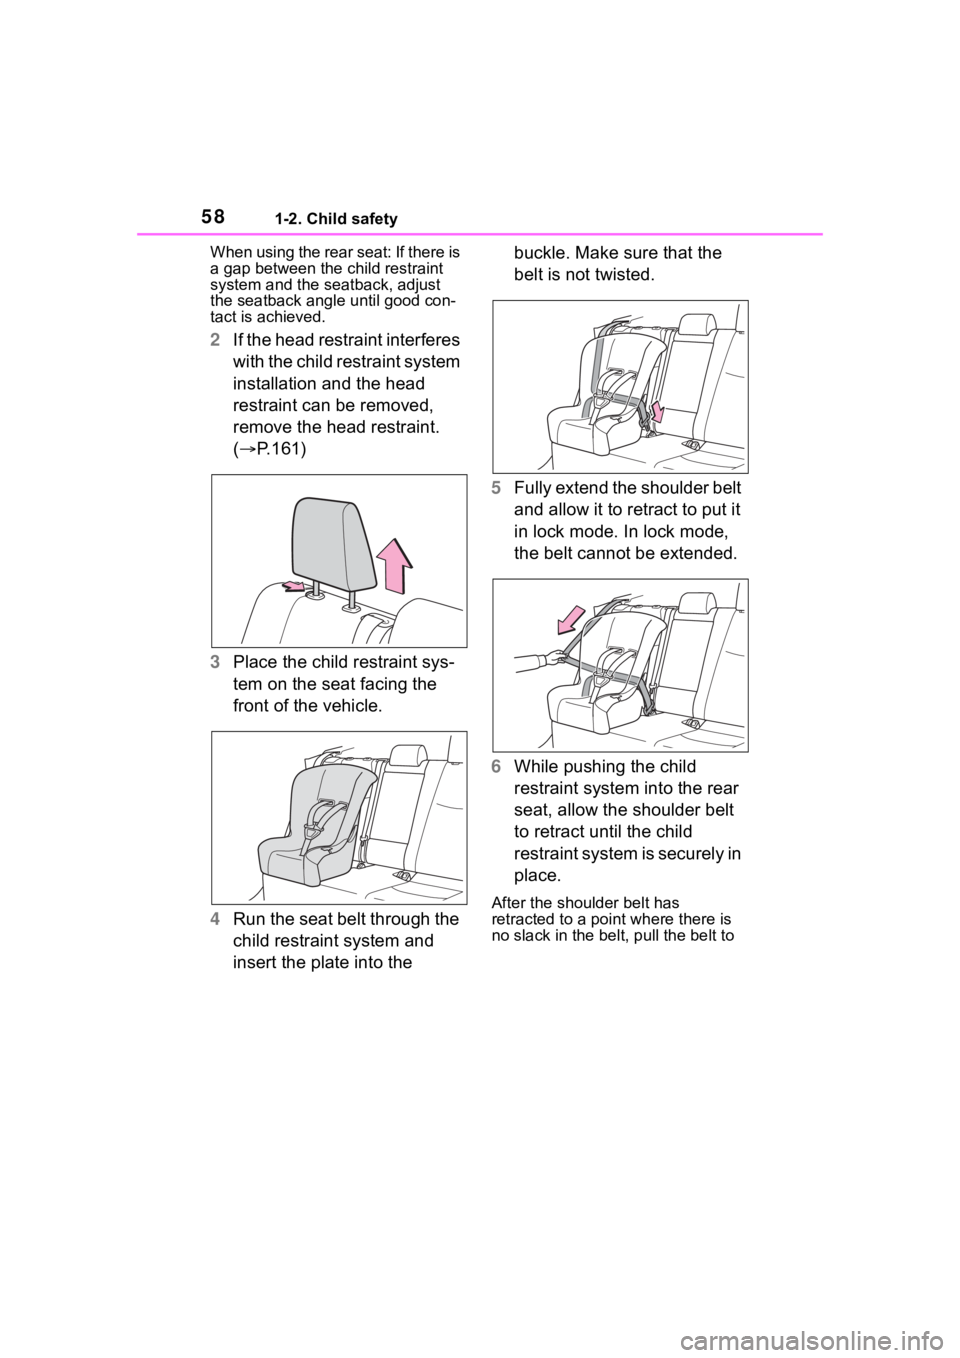
2 If the head restraint interferes
with the child restraint system
installation and the head
restraint can be removed,
remove the head restraint.
( P.161)
3 Place the child restraint sys-
tem on the seat facing the
front of the vehicle.
4 Run the seat belt through the
child restraint system and
insert the plate into the buckle. Make sure that the
belt is not twisted.
5 Fully extend the shoulder belt
and allow it to retract to put it
in lock mode. In lock mode,
the belt cannot be extended.
6 While pushing the child
restraint system into the rear
seat, allow the shoulder belt
to retract until the child
restraint system is securely in
place.
After the shoulder belt has
retracted to a poi nt where there is
no slack in the belt, pull the belt to
Page 59 of 744
591-2. Child safety
1
For safety and security
check that it cannot be extended.
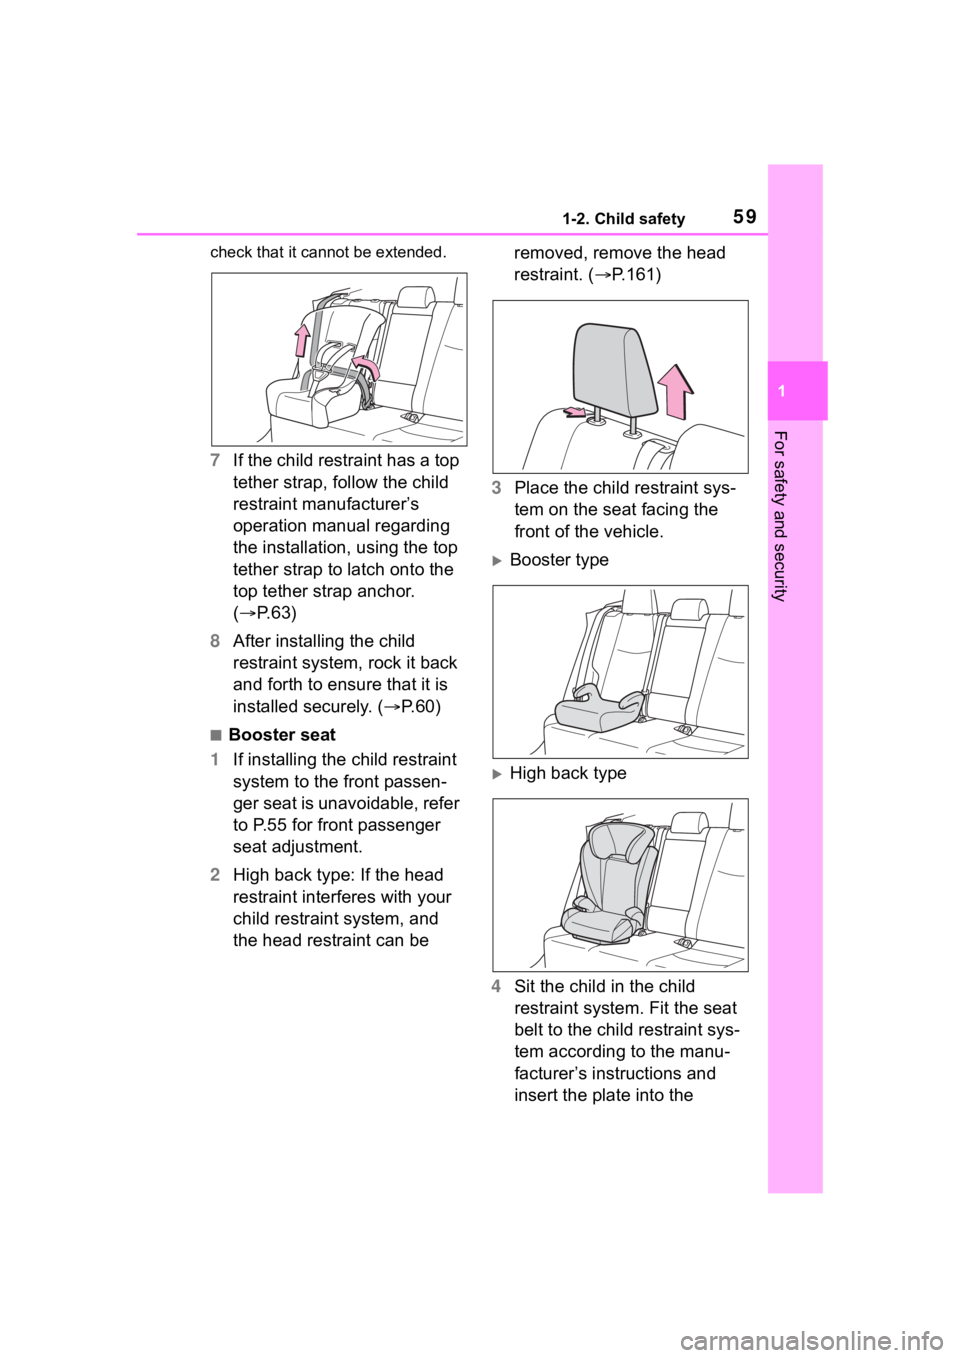
7If the child restraint has a top
tether strap, follow the child
restraint manufacturer’s
operation manual regarding
the installation, using the top
tether strap to latch onto the
top tether strap anchor.
( P. 6 3 )
8 After installing the child
restraint system, rock it back
and forth to ensure that it is
installed securely. ( P.60)
■Booster seat
1 If installing the child restraint
system to the front passen-
ger seat is unavoidable, refer
to P.55 for front passenger
seat adjustment.
2 High back type: If the head
restraint interferes with your
child restraint system, and
the head restraint can be removed, remove the head
restraint. (
P.161)
3 Place the child restraint sys-
tem on the seat facing the
front of the vehicle.
Booster type
High back type
4 Sit the child in the child
restraint system. Fit the seat
belt to the child restraint sys-
tem according to the manu-
facturer’s instructions and
insert the plate into the
Page 60 of 744
601-2. Child safety
buckle. Make sure that the
belt is not twisted.
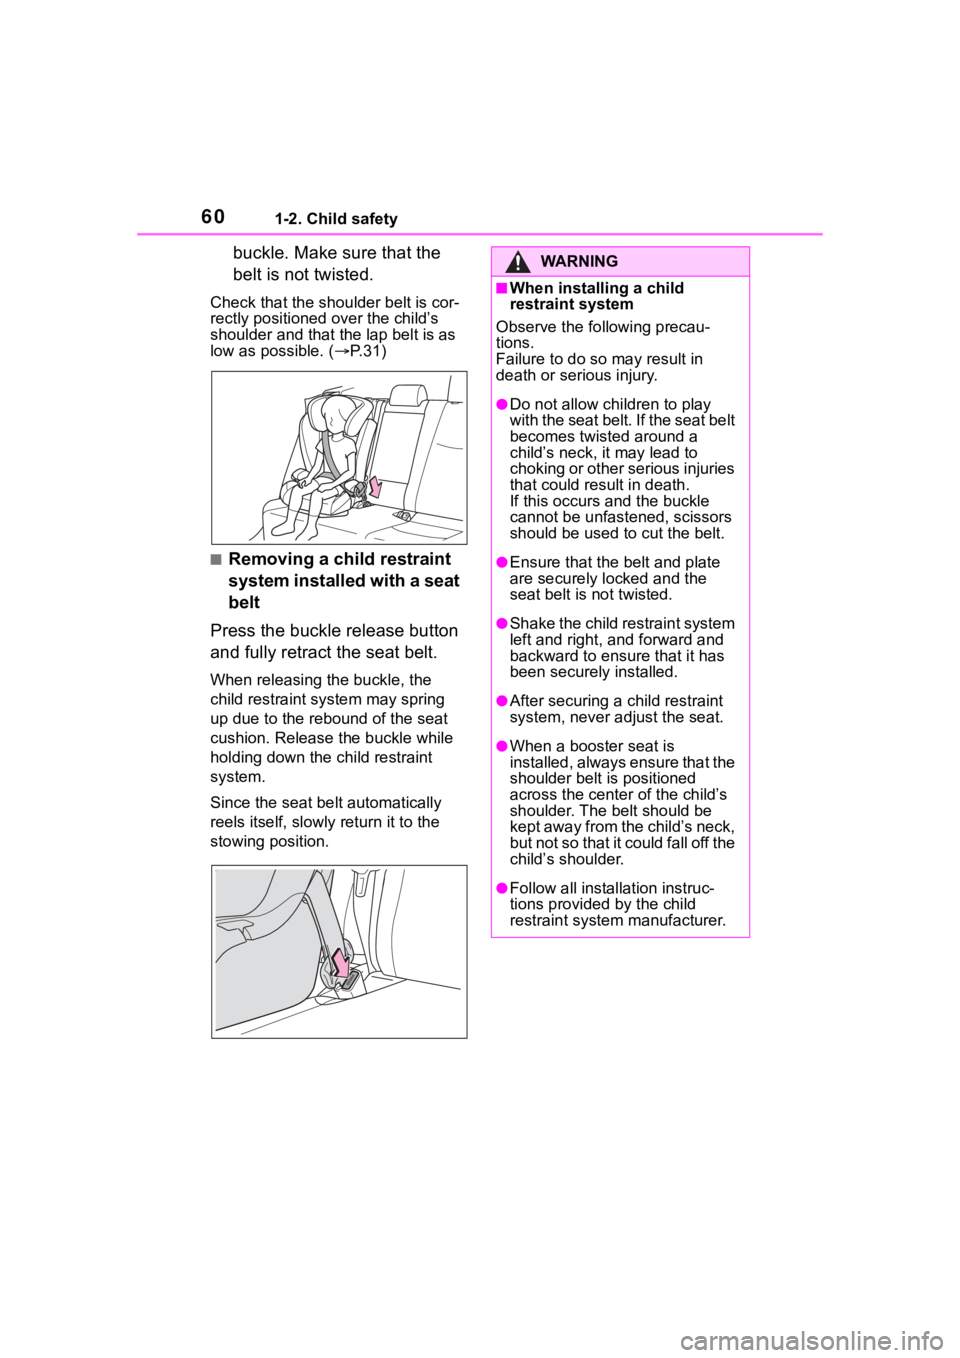
Check that the shoulder belt is cor-
rectly positioned over the child’s
shoulder and that the lap belt is as
low as possible. (P.31)
■Removing a child restraint
system installed with a seat
belt
Press the buckle release button
and fully retract the seat belt.
When releasing the buckle, the
child restraint system may spring
up due to the rebound of the seat
cushion. Release the buckle while
holding down the child restraint
system.
Since the seat belt automatically
reels itself, slowly return it to the
stowing position.
WA R N I N G
■When installing a child
restraint system
Observe the following precau-
tions.
Failure to do so may result in
death or serious injury.
●Do not allow children to play
with the seat belt. If the seat belt
becomes twisted around a
child’s neck, it may lead to
choking or other serious injuries
that could result in death.
If this occurs and the buckle
cannot be unfastened, scissors
should be used to cut the belt.
●Ensure that the belt and plate
are securely locked and the
seat belt is not twisted.
●Shake the child restraint system
left and right, and forward and
backward to ensure that it has
been securely installed.
●After securing a child restraint
system, never adjust the seat.
●When a booster seat is
installed, always ensure that the
shoulder belt is positioned
across the center of the child’s
shoulder. The belt should be
kept away from the child’s neck,
but not so that it could fall off the
child’s shoulder.
●Follow all installation instruc-
tions provided by the child
restraint system manufacturer.
Page 61 of 744
611-2. Child safety
1
For safety and security
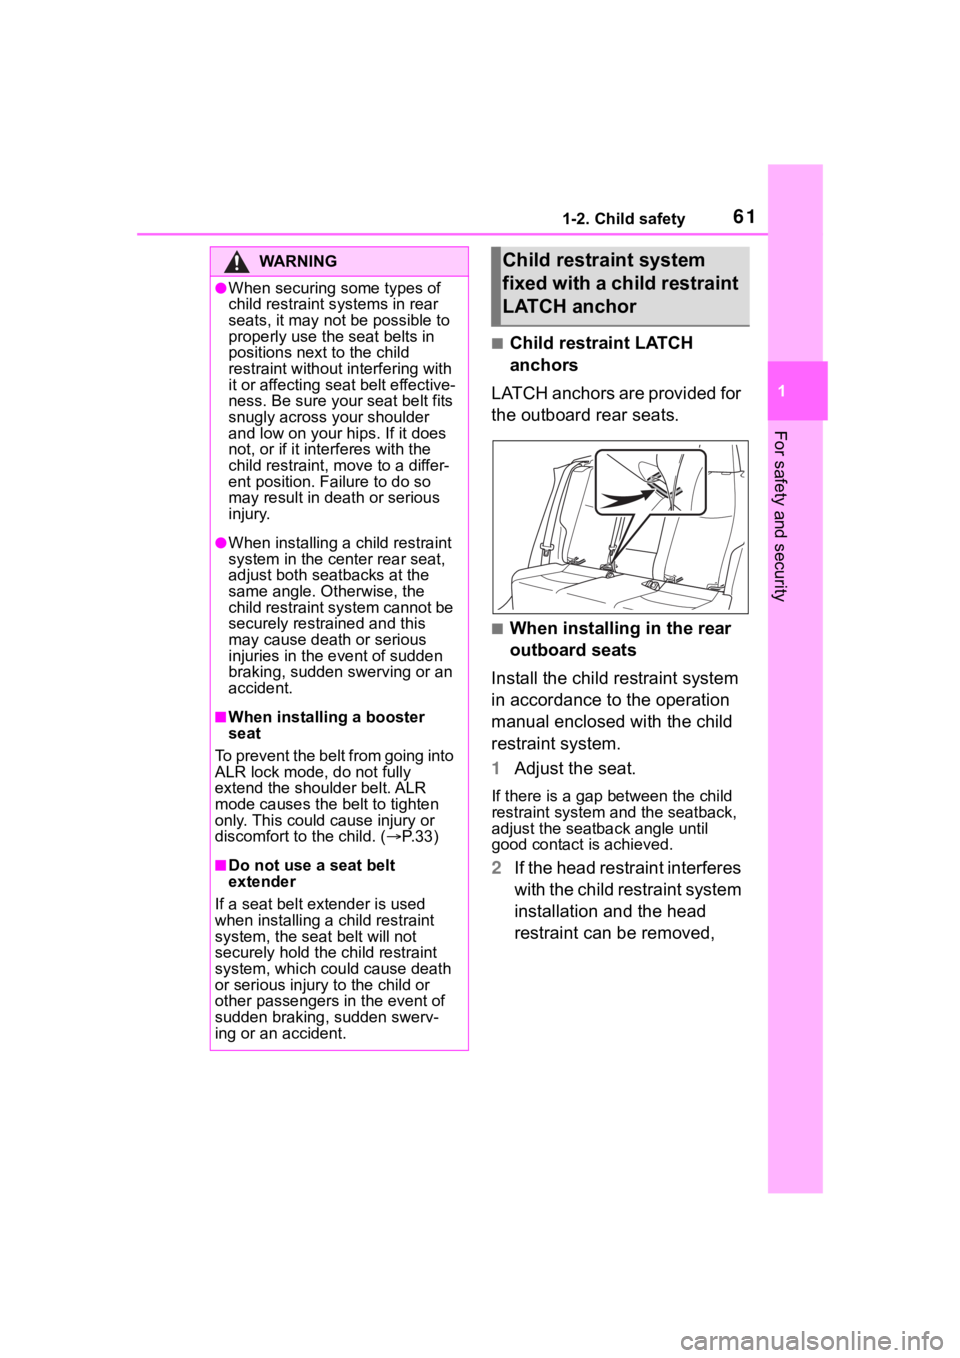
■Child restraint LATCH
anchors
LATCH anchors are provided for
the outboard rear seats.
■When installing in the rear
outboard seats
Install the child restraint system
in accordance to the operation
manual enclosed with the child
restraint system.
1 Adjust the seat.
If there is a gap between the child
restraint system and the seatback,
adjust the seatback angle until
good contact is achieved.
2If the head restraint interferes
with the child restraint system
installation and the head
restraint can be removed,
WA R N I N G
●When securing some types of
child restraint s ystems in rear
seats, it may not be possible to
properly use the seat belts in
positions next to the child
restraint without interfering with
it or affecting seat belt effective-
ness. Be sure your seat belt fits
snugly across your shoulder
and low on your hips. If it does
not, or if it interferes with the
child restraint, move to a differ-
ent position. Failure to do so
may result in death or serious
injury.
●When installing a child restraint
system in the center rear seat,
adjust both seatbacks at the
same angle. Otherwise, the
child restraint system cannot be
securely restrained and this
may cause deat h or serious
injuries in the event of sudden
braking, sudden swerving or an
accident.
■When installing a booster
seat
To pr ev en t t he b elt fr om g oin g int o
ALR lock mode, do not fully
extend the shoulder belt. ALR
mode causes the belt to tighten
only. This could cause injury or
discomfort to the child. ( P.33)
■Do not use a seat belt
extender
If a seat belt extender is used
when installing a child restraint
system, the seat belt will not
securely hold the child restraint
system, which could cause death
or serious injury to the child or
other passengers in the event of
sudden braking, sudden swerv-
ing or an accident.
Child restraint system
fixed with a child restraint
LATCH anchor
Page 62 of 744
621-2. Child safety
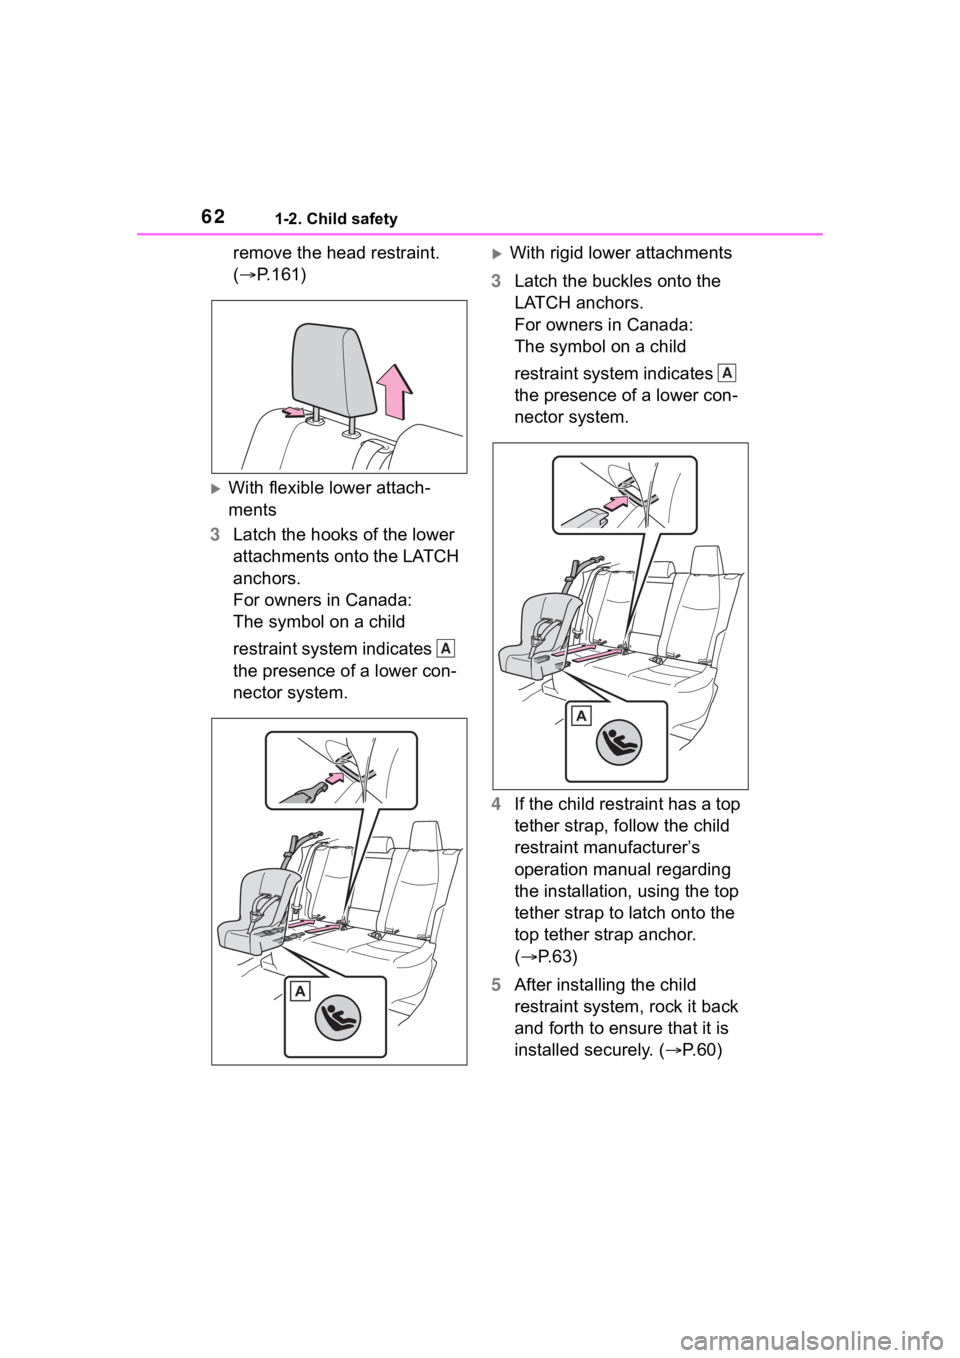
remove the head restraint.
(P.161)
With flexible lower attach-
ments
3 Latch the hooks of the lower
attachments onto the LATCH
anchors.
For owners in Canada:
The symbol on a child
restraint system indicates
the presence of a lower con-
nector system.
With rigid lower attachments
3 Latch the buckles onto the
LATCH anchors.
For owners in Canada:
The symbol on a child
restraint system indicates
the presence of a lower con-
nector system.
4 If the child restraint has a top
tether strap, follow the child
restraint manufacturer’s
operation manual regarding
the installation, using the top
tether strap to latch onto the
top tether strap anchor.
( P.63)
5 After installing the child
restraint system, rock it back
and forth to ensure that it is
installed securely. ( P.60)
A
A
Page 63 of 744
631-2. Child safety
1
For safety and security
■When installing in the rear
center seat
There are no LATCH anchors
behind the rear center seat.
However, the inboard LATCH
anchors of the outboard seats,
which are 17.3 in. (440 mm)
apart, can be used if the child
restraint system manufacturer’s
instructions permit use of those
anchors with the anchor spacing
stated.
Child restraint systems with rigid
lower attachments cannot be
installed in the center seat. This
type of child restraint system
can only be installed in the out-
board seat.
■Laws and regulations pertain-
ing to anchors
The LATCH system conforms to
FMVSS225 or CMVSS210.2.
Child restraint systems conforming
to FMVSS213 or CMVSS213 speci-
fications can be used.
This vehicle is de signed to conform
to SAE J1819.
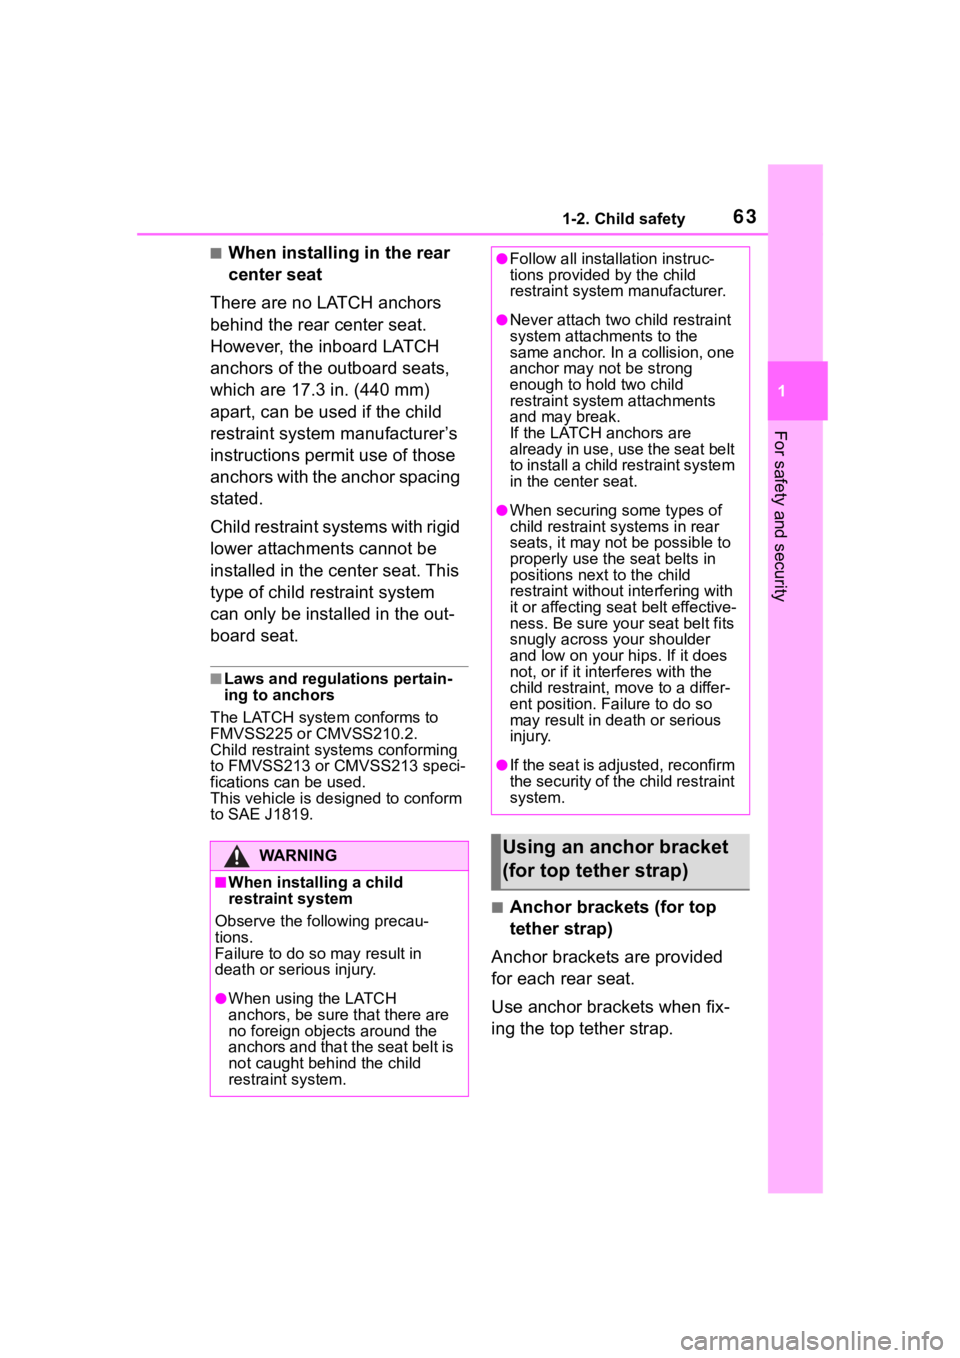
■Anchor brackets (for top
tether strap)
Anchor brackets are provided
for each rear seat.
Use anchor brackets when fix-
ing the top tether strap.
WA R N I N G
■When installing a child
restraint system
Observe the following precau-
tions.
Failure to do so m ay result in
death or serious injury.
●When using the LATCH
anchors, be sure that there are
no foreign objects around the
anchors and that the seat belt is
not caught behind the child
restraint system.
●Follow all installation instruc-
tions provided by the child
restraint system manufacturer.
●Never attach two c hild restraint
system attachments to the
same anchor. In a collision, one
anchor may not be strong
enough to hold two child
restraint system attachments
and may break.
If the LATCH anchors are
already in use, use the seat belt
to install a child restraint system
in the center seat.
●When securing some types of
child restraint systems in rear
seats, it may not be possible to
properly use the seat belts in
positions next to the child
restraint without interfering with
it or affecting seat belt effective-
ness. Be sure your seat belt fits
snugly across your shoulder
and low on your hips. If it does
not, or if it interferes with the
child restraint, move to a differ-
ent position. Fa ilure to do so
may result in death or serious
injury.
●If the seat is adjusted, reconfirm
the security of the child restraint
system.
Using an anchor bracket
(for top tether strap)
Page 64 of 744
641-2. Child safety
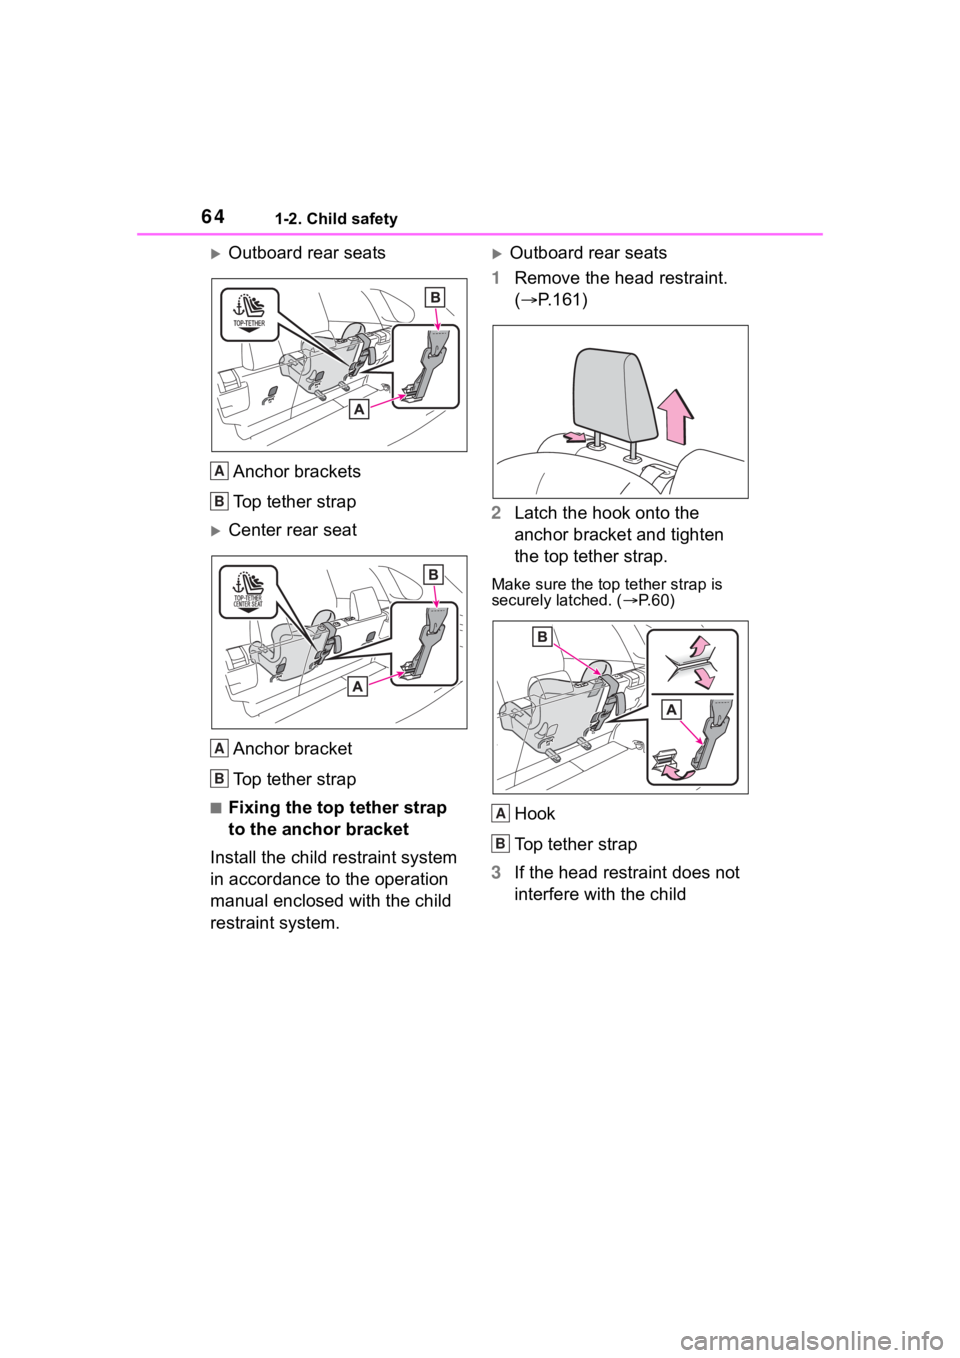
Outboard rear seatsAnchor brackets
Top tether strap
Center rear seatAnchor bracket
Top tether strap
■Fixing the top tether strap
to the anchor bracket
Install the child restraint system
in accordance to the operation
manual enclosed with the child
restraint system.
Outboard rear seats
1 Remove the head restraint.
( P.161)
2 Latch the hook onto the
anchor bracket and tighten
the top tether strap.
Make sure the top tether strap is
securely latched. ( P. 6 0 )
Hook
Top tether strap
3 If the head restraint does not
interfere with the child
A
B
A
B
A
B
Page 65 of 744
651-2. Child safety
1
For safety and security
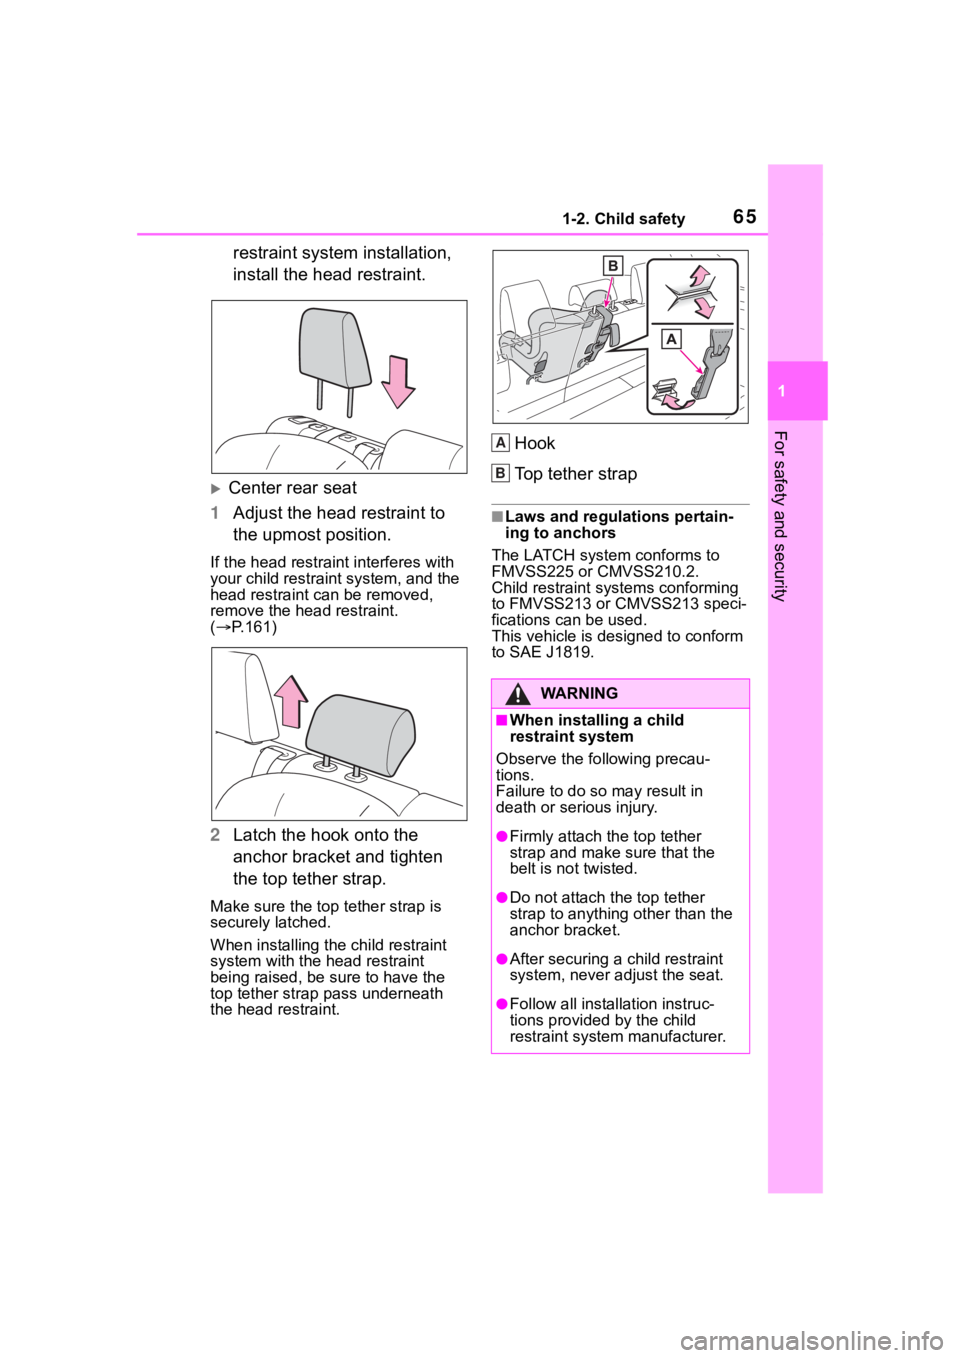
restraint system installation,
install the head restraint.
Center rear seat
1 Adjust the head restraint to
the upmost position.
If the head restraint interferes with
your child restraint system, and the
head restraint can be removed,
remove the head restraint.
( P.161)
2 Latch the hook onto the
anchor bracket and tighten
the top tether strap.
Make sure the top tether strap is
securely latched.
When installing the child restraint
system with the head restraint
being raised, be sure to have the
top tether strap pass underneath
the head restraint.
Hook
Top tether strap
■Laws and regulations pertain-
ing to anchors
The LATCH system conforms to
FMVSS225 or CMVSS210.2.
Child restraint systems conforming
to FMVSS213 or CMVSS213 speci-
fications can be used.
This vehicle is designed to conform
to SAE J1819.
WA R N I N G
■When installing a child
restraint system
Observe the following precau-
tions.
Failure to do so may result in
death or serious injury.
●Firmly attach the top tether
strap and make sure that the
belt is not twisted.
●Do not attach the top tether
strap to anything other than the
anchor bracket.
●After securing a child restraint
system, never adjust the seat.
●Follow all installation instruc-
tions provided by the child
restraint system manufacturer.
A
B
Page 67 of 744
671-3. Emergency assistance
1
For safety and security
1-3.Emergency assistance
*: If equipped
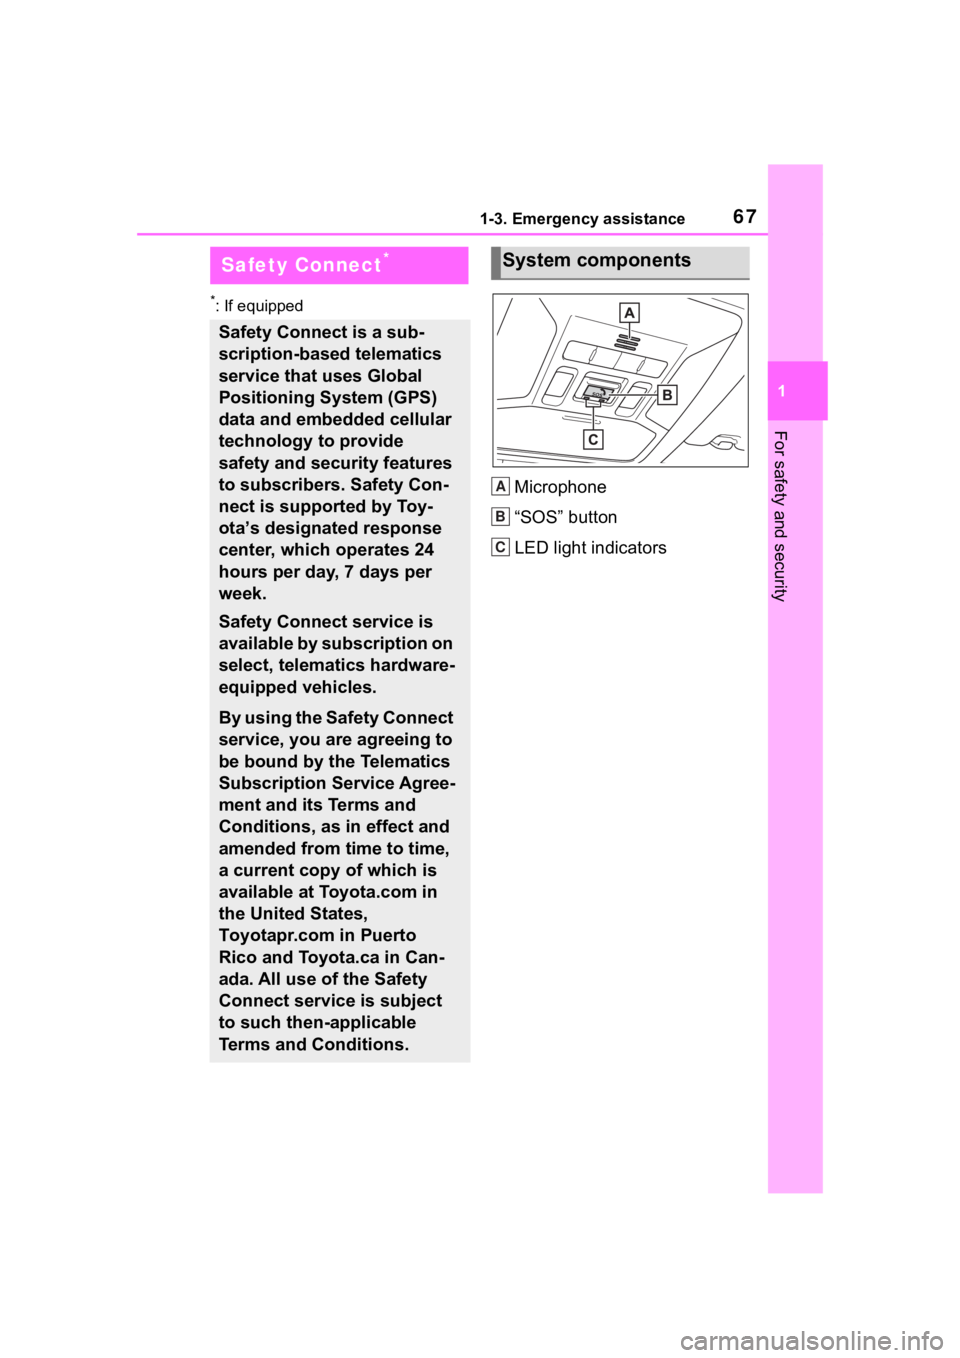
Microphone
“SOS” button
LED light indicators
Safety Connect*
Safety Connect is a sub-
scription-based telematics
service that uses Global
Positioning System (GPS)
data and embedded cellular
technology to provide
safety and security features
to subscribers. Safety Con-
nect is supported by Toy-
ota’s designated response
center, which operates 24
hours per day, 7 days per
week.
Safety Connect service is
available by subscription on
select, telematics hardware-
equipped vehicles.
By using the Safety Connect
service, you are agreeing to
be bound by the Telematics
Subscription Service Agree-
ment and its Terms and
Conditions, as in effect and
amended from time to time,
a current copy of which is
available at Toyota.com in
the United States,
Toyotapr.com in Puerto
Rico and Toyota.ca in Can-
ada. All use of the Safety
Connect service is subject
to such then-applicable
Terms and Conditions.
System components
A
B
C
Page 69 of 744
691-3. Emergency assistance
1
For safety and security
(“SOS”)
Connects drivers to response-cen-
ter support. (
P. 7 0)
Enhanced Roadside Assis-
tance
Provides drivers various on-road
assistance. (
P. 7 1)
After you have signed the
Telematics Subscription Service
Agreement and are enrolled,
you can begin receiving ser-
vices.
A variety of subscription terms
are available for purchase. Con-
tact your Toyota dealer, call the
following appropriate Customer
Experience Center or push the
“SOS” button in your vehicle for
further subscription details.
The United States
1-800-331-4331
Canada
1-888-869-6828
Puerto Rico
1-877-855-8377
■Safety Connect Services Infor-
mation
●Phone calls using the vehicle’s
Bluetooth® technology will not be
possible when Safety Connect is
active and in use.
●Safety Connect is available begin-
ning Fall 2009 on select Toyota
models (in the contiguous United
States only). Contact with the
Safety Connect response center is dependent upon
the telematics
device being in operative condi-
tion, cellular connection availabil-
ity, and GPS satellite signal
reception, which can limit the abil-
ity to reach the response center or
receive emergency service sup-
port. Enrollment and Telematics
Subscription Service Agreement
are required. A variety of subscrip-
tion terms are available; charges
vary by subscription term selected
and location.
●Automatic Collision Notification,
Emergency Assistance and Stolen
Vehicle Location are available in
the United States, including
Hawaii and Alaska , Puerto Rico
and Canada, and Enhanced
Roadside Assist ance are avail-
able in the United States, Puerto
Rico and Canada.
●Automatic Collision Notification,
Emergency Assistance, Stolen
Vehicle and Enhanced Road
Assistance are not available in the
U.S. Virgin Islands.
For vehicles first sold in the U.S.
Virgin Islands, no Safety Connect
services will function in or outside
the U.S. Virgin Islands.
●Safety Connect services are not
subject to section 255 of the Tele-
communications Act and the
device is not TTY compatible.
■Languages
The Safety Connect response cen-
ter will offer suppor t in multiple lan-
guages. The Safety Connect system
will offer voice prom pts in English,
Spanish, and French. Please indi-
cate your language of choice when
enrolling.
■When contacting the response
center
You may be unable to contact the
response center if the network is
busy.
Subscription