display TOYOTA RAV4 PHEV 2021 Owner's Manual
[x] Cancel search | Manufacturer: TOYOTA, Model Year: 2021, Model line: RAV4 PHEV, Model: TOYOTA RAV4 PHEV 2021Pages: 666, PDF Size: 161.28 MB
Page 109 of 666
107
2
2-2. Charging
Plug-in hybrid system
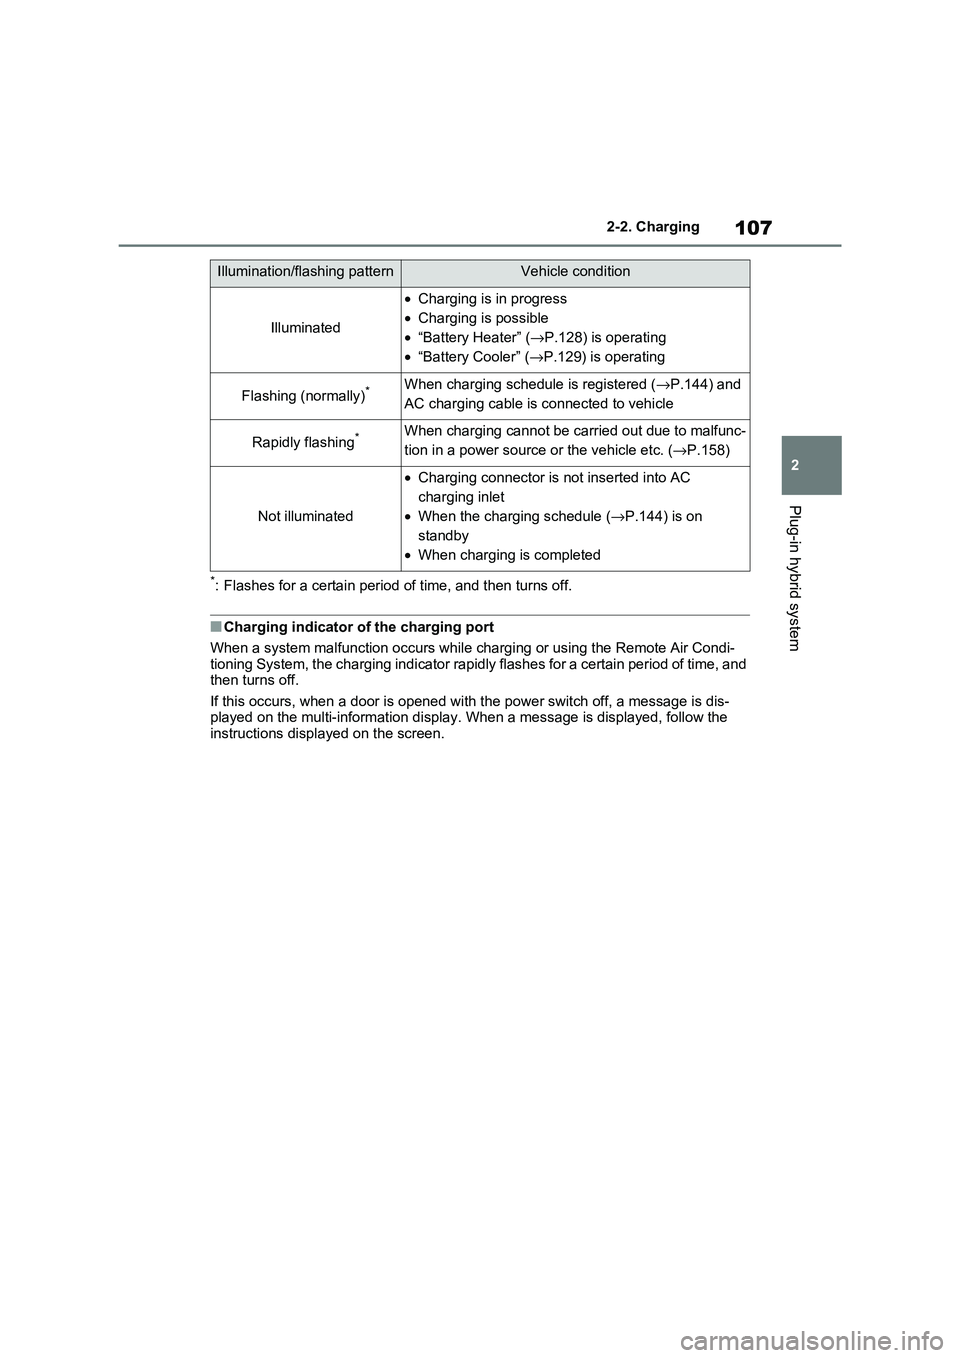
*: Flashes for a certain period of time, and then turns off.
■Charging indicator of the charging port
When a system mal function occurs while charging or using the Remote Air Condi-
tioning System, the charging indicator rapidly flashes for a ce rtain period of time, and then turns off.
If this occurs, when a door is o pened with the power switch off, a message is dis-
played on the multi-information display. When a message is displayed, follow the instructions displ ayed on the screen.
Illumination/flashing patternVehicle condition
Illuminated
•Charging is in progress
• Charging is possible
• “Battery Heater” (→P.128) is operating
• “Battery Cooler” (→P.129) is operating
Flashing (normally)*When charging schedule is registered (→P.144) and
AC charging cable is c onnected to vehicle
Rapidly flashing*When charging cannot be carried out due to malfunc-
tion in a power source or the vehicle etc. (→P.158)
Not illuminated
•Charging connector is not inserted into AC
charging inlet
• When the charging schedule (→P.144) is on
standby
• When charging is completed
Page 127 of 666
125
2
2-2. Charging
Plug-in hybrid system
equipped with a Residual Cur -
rent Circuit-Breaker (RCCB). If it
is not, have one installed by a
duly qualified professional.
When charging outdoors, make
sure to connect to a rain-tight
socket that is certified for outdoor
use. Checking Residual Current
Circuit-Breaker (RCCB) opera -
tion before its use is recom -
mended.
Check whether there are any
local EV-charging regulations in
place, and adhere to them.
*: For detailed informa tion, consult an
electrician.
■The charging environment
For safe charging, the following charging equipment and settings are
recommended.
●Rain-tight socket
When charging outdoors, connect the
plug to a rain-tight socket, and ensure
that the plug remains waterproof while
the plug is connected.
●Dedicated circuit
• To reduce the risk of fire, connect only to an at least 13A branch circuit with
an over-current protection.
• To reduce the risk of electric shock when working with the plug, connect
to a socket that has a Residual Cur-
rent Circuit-Breaker (RCCB) installed.
●Remote switch
Allows the electricity from the socket to
be interrupted by operating a switch,
thus allowing safe removal and insertion
of the plug on rainy days.
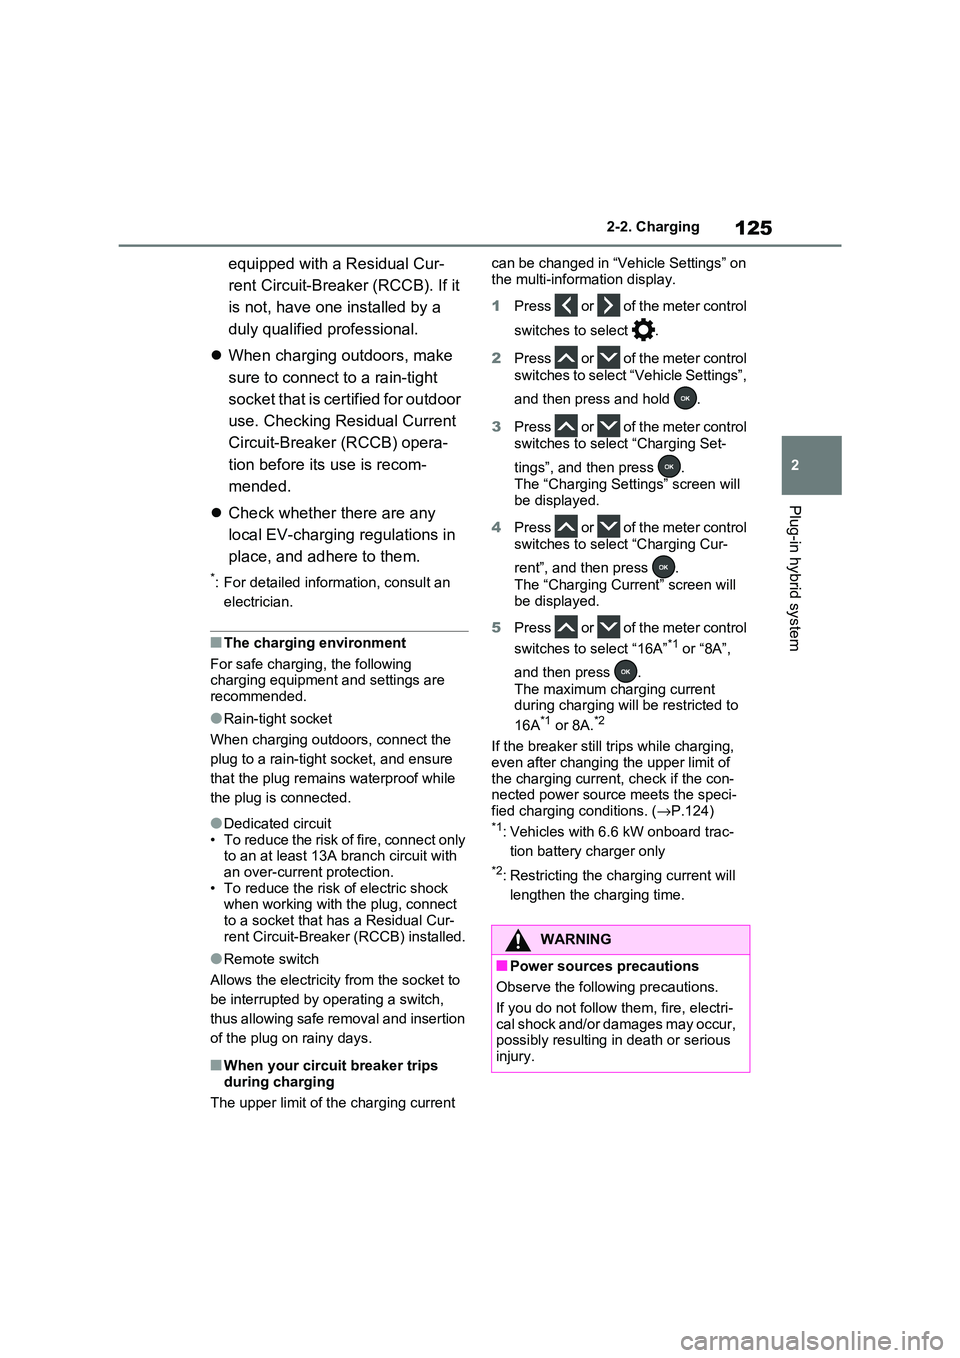
■When your circuit breaker trips
during charging
The upper limit of the charging current
can be changed in “Vehicle Settings” on
the multi-information display.
1 Press or of the meter control
switches to select .
2 Press or of the meter control
switches to select “ Vehicle Settings”,
and then press and hold .
3 Press or of the meter control
switches to select “Charging Set -
tings”, and then press .
The “Charging Settings” screen will
be displayed.
4 Press or of the meter control
switches to select “Charging Cur -
rent”, and then press .
The “Charging Current” screen will
be displayed.
5 Press or of the meter control
switches to select “16A”*1 or “8A”,
and then press .
The maximum charging current
during charging will be restricted to
16A*1 or 8A.*2
If the breaker still tri ps while charging,
even after changing the upper limit of
the charging current , check if the con- nected power sourc e meets the speci-
fied charging conditions. ( →P.124)*1: Vehicles with 6.6 kW onboard trac-
tion battery charger only
*2: Restricting the charging current will
lengthen the charging time.
WARNING
■Power sources precautions
Observe the following precautions.
If you do not follow them, fire, electri-
cal shock and/or damages may occur,
possibly resulting in death or serious injury.
Page 130 of 666
1282-2. Charging
such as the remaining charge of the
hybrid battery (traction battery), the
outside temperature and specifica -
tions of a charger (charging station).
*4: When using “My Room Mode”
( →P.153), the time required for
charging to complete may be longer
or the charging may not be com -
pleted.
*5: If equipped
■Charging time may increase
In the following situations, charging time may become longer than normal:
●In very hot or very cold temperatures.
●When the hybrid bat tery (traction bat-
tery) becomes ho t, such as immedi- ately after high-load driving.
●The vehicle is consuming a lot of elec - tricity, for example, when the head -
lights are on etc.
●When using “My Room Mode”.
( →P.153)
●There is a power outage during
charging.
●There is an interrup tion in the electri-
cal supply.
●There is a drop in t he voltage of exter- nal power source.
●The charge in the 12-volt battery is low, for example due to the vehicle
being left unused fo r a long period of
time.
●The maximum charging current is set
to 8A or 16A* through “Vehicle Set -
tings”. ( →P.125)
●When the “Battery Heater” operates.
( →P.128)
●When the “Battery Cooler” is operated
before charging. ( →P.129)
●When the plug generates heat due to
a loose socket connection etc.*: Vehicles with 6.6 kW onboard traction
battery charger only
■Using a DC Charger
DC Chargers cannot be used with this vehicle.
■Charging electricity
This vehicle can be charged up to
approximately 3. 3 kW or 6.6 kW*.
However, depending on the used char -
ger or AC charging cable, charging elec -
tricity may be limited.*: Vehicles with 6.6 kW onboard traction
battery charger only
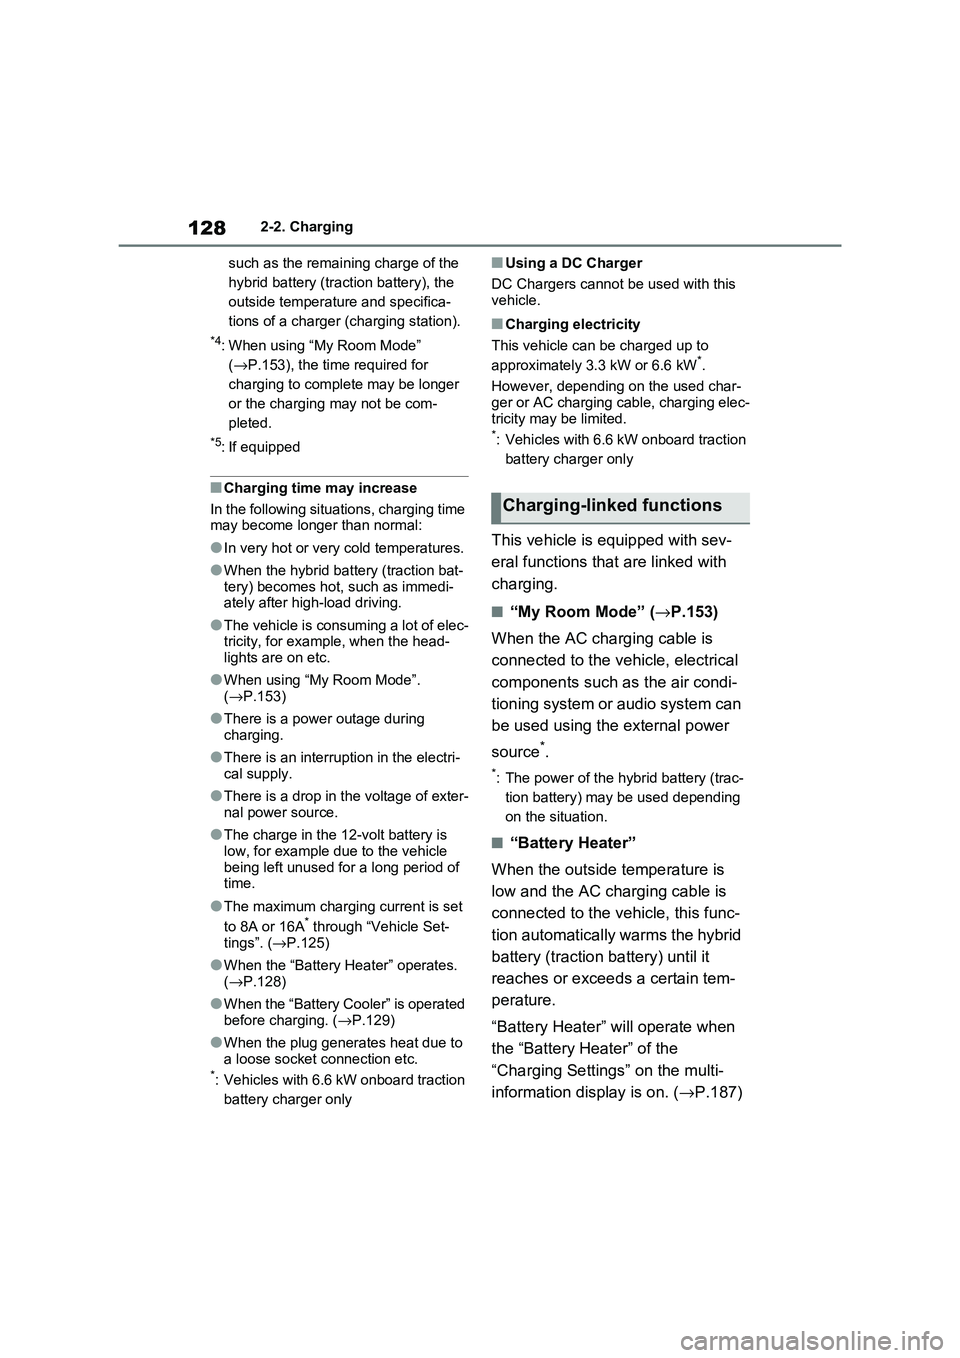
This vehicle is equipped with sev -
eral functions that are linked with
charging.
■“My Room Mode” ( →P.153)
When the AC charging cable is
connected to the vehicle, electrical
components such as the air condi -
tioning system or audio system can
be used using the external power
source*.
*: The power of the hybrid battery (trac -
tion battery) may be used depending
on the situation.
■“Battery Heater”
When the outside temperature is
low and the AC cha rging cable is
connected to the vehicle, this func -
tion automatically warms the hybrid
battery (traction battery) until it
reaches or exceeds a certain tem -
perature.
“Battery Heater” will operate when
the “Battery Heater” of the
“Charging Settings” on the multi-
information display is on. ( →P.187)
Charging-linked functions
Page 133 of 666
131
2
2-2. Charging
Plug-in hybrid system
battery).
If there are no char ging facilities at
your destination, t he hybrid battery
(traction battery) can be charged
using the hybrid battery (traction
battery) charge mode. ( →P.87)*
*: When using the hybrid battery (trac-
tion battery) charge mode while
parked, make sure that no flammable
objects are near t he vehicle and the
vehicle is parked in a well-ventilated
area. ( →P.88)
■After returning home
In order to drive the next time,
charge the hybrid battery (traction
battery).
Settings the charging schedule allows
you to charge the hy brid battery (trac-
tion battery) at the desired time such as
late at night or earl y in the morning.
Furthermore, the charging schedule
can be set to automat ically charge the
hybrid battery (traction battery) every
day or at the same time on certain
days. ( →P.144)
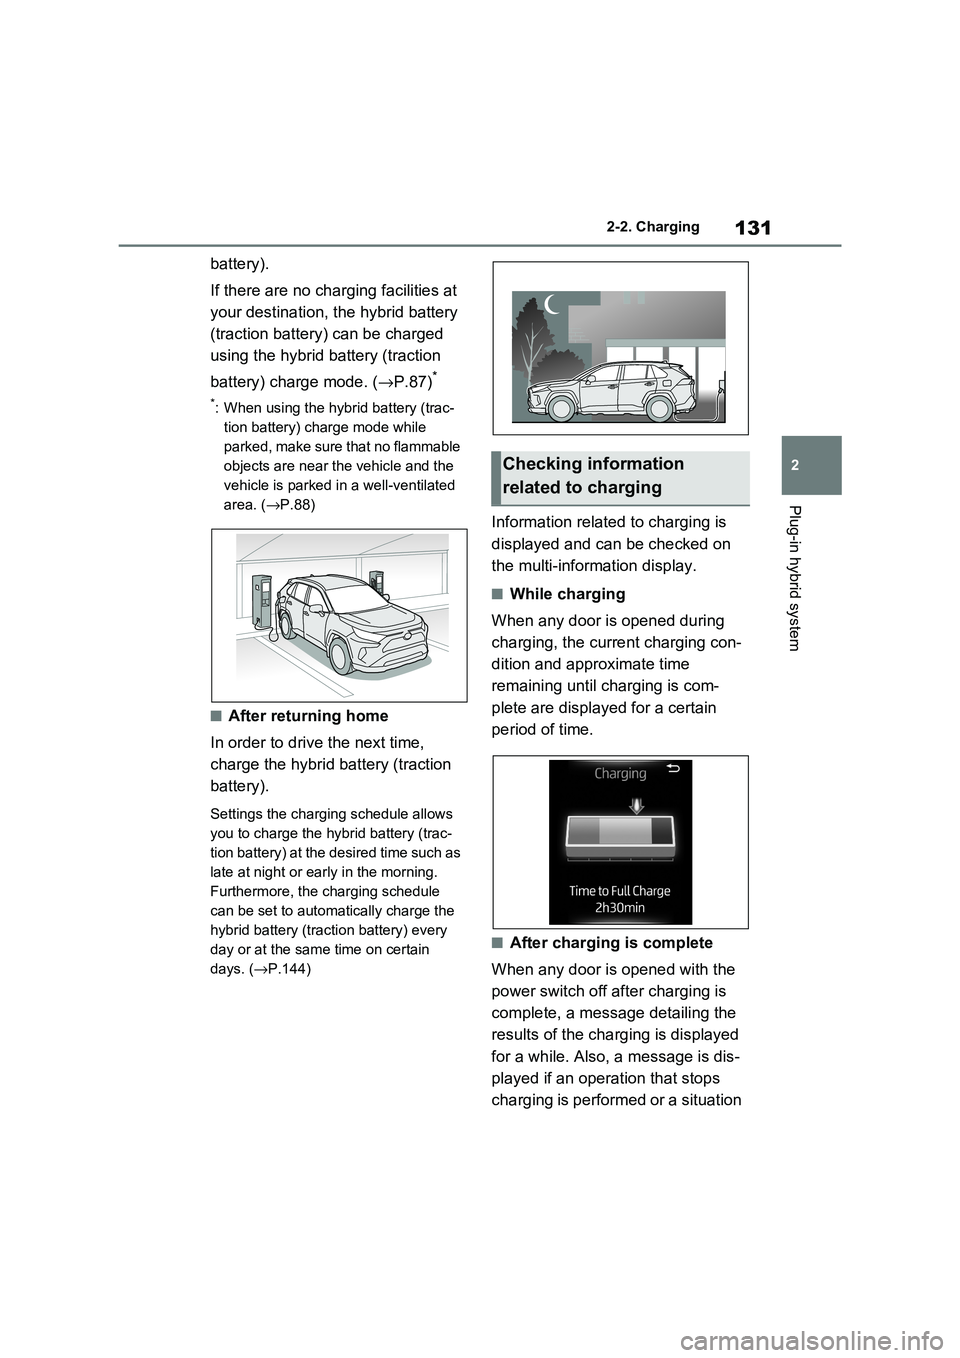
Information related to charging is
displayed and can be checked on
the multi-information display.
■While charging
When any door is opened during
charging, the current charging con -
dition and approximate time
remaining until charging is com -
plete are displayed for a certain
period of time.
■After charging is complete
When any door is opened with the
power switch off after charging is
complete, a message detailing the
results of the charging is displayed
for a while. Also, a message is dis -
played if an operation that stops
charging is performed or a situation
Checking information
related to charging
Page 134 of 666
1322-2. Charging
where charging cannot be per-
formed occurs.
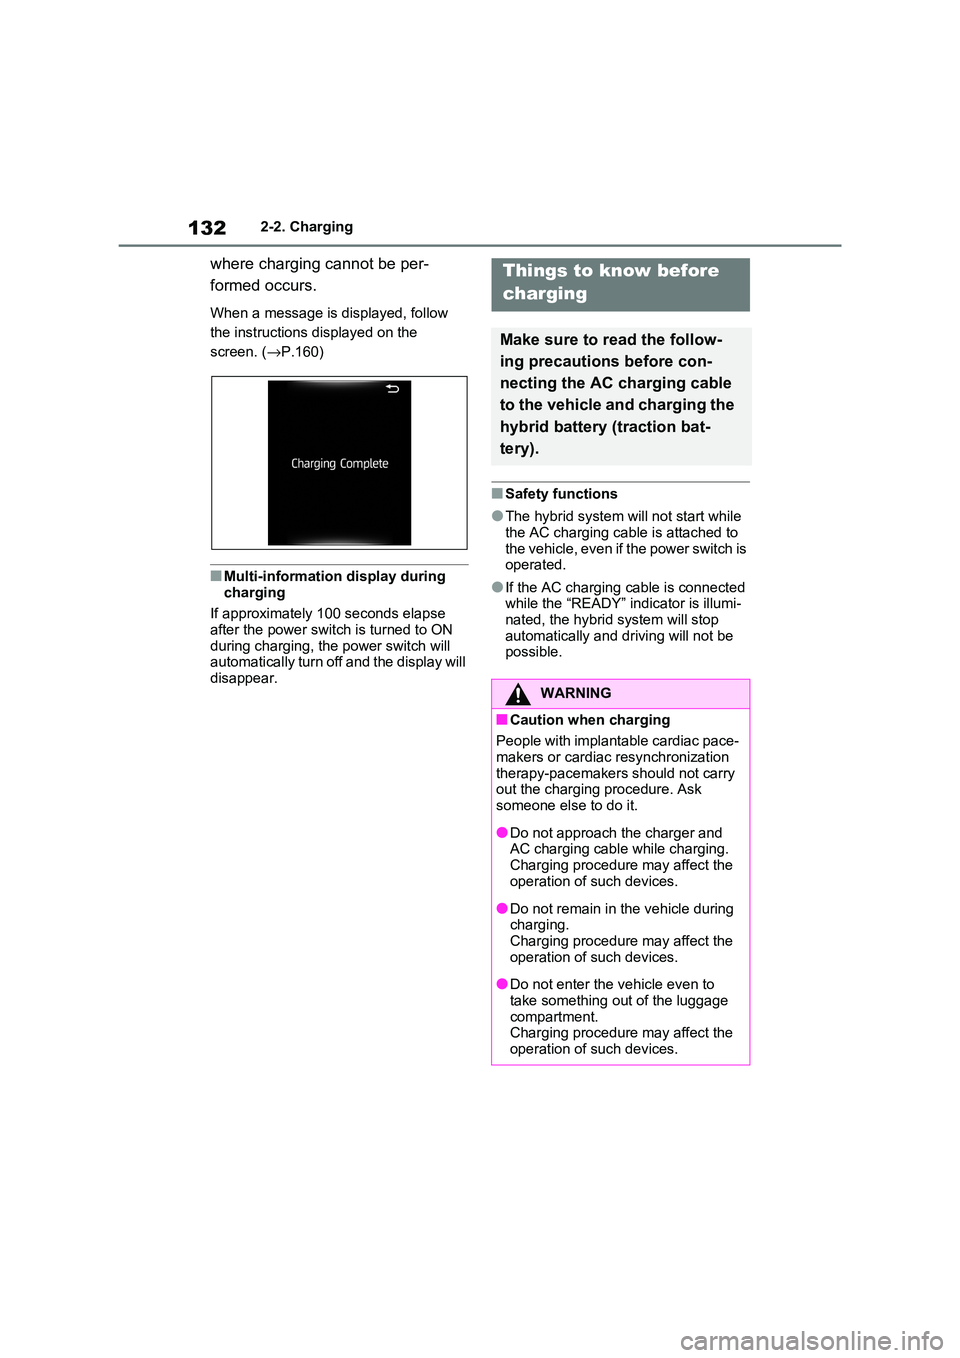
When a message is displayed, follow
the instructions displayed on the
screen. ( →P.160)
■Multi-information display during
charging
If approximately 100 seconds elapse
after the power switch is turned to ON
during charging, the power switch will automatically turn off and the display will
disappear.
■Safety functions
●The hybrid system wi ll not start while the AC charging cable is attached to
the vehicle, even if the power switch is
operated.
●If the AC charging cable is connected
while the “READY” indicator is illumi- nated, the hybrid system will stop
automatically and dr iving will not be
possible.
Things to know before
charging
Make sure to read the follow -
ing precautions before con -
necting the AC c harging cable
to the vehicle and charging the
hybrid battery (traction bat -
tery).
WARNING
■Caution when charging
People with implantable cardiac pace -
makers or cardiac resynchronization
therapy-pacemakers should not carry out the charging procedure. Ask
someone else to do it.
●Do not approach the charger and
AC charging cable while charging.
Charging procedure may affect the operation of such devices.
●Do not remain in the vehicle during charging.
Charging procedure may affect the
operation of such devices.
●Do not enter the vehicle even to
take something out of the luggage compartment.
Charging procedure may affect the
operation of such devices.
Page 136 of 666
1342-2. Charging
each part of the AC charging cable
is in good condition. ( →P.117)
■During charging
●The charging starting time may differ
depending on the state of the vehicle,
but this does not indicate a malfunc - tion.
●Cooling fan sounds may be heard from near the rear seat. ( →P.98)
●During charging, sounds may be heard from near the hybrid battery
(traction battery) in accordance with
the operation of the air conditioning system or “Battery Cooler” ( →P.129).
●During and after charging, the rear seat and its surrounding area in which
the onboard traction battery charger is
installed may get warm.
●The surface of the CCID (Charging
Circuit Interrupting Device) may become hot, but this does not indicate
a malfunction. ( When using Mode 2
AC charging cable.)
●Depending on radio wave conditions,
interference may be heard on the radio.
●The current chargi ng condition and the estimated time until charging will
complete can be checked on the
multi-information display.
■Capacity reduction of the hybrid
battery (tracti on battery)
The capacity of the hybrid battery (trac -
tion battery) will dec line gradually when
the hybrid battery (tr action battery) is in use. The rate at which it declines will dif -
fer in accordance with environmental
conditions and the way in which the vehicle is used. Observing the following
can help suppress battery capacity
decline.
●Avoid parking the vehicle in areas with
a high temperature under direct sun - light when the hybrid battery (traction
battery) is fully charged.
●Avoid accelerating and decelerating
frequently and suddenly when EV
driving.
●Avoid frequent driving near the top
speed for EV driving. ( →P.90)
●Leave a low level of charge in the
hybrid battery (trac tion battery) when leaving the vehicle undriven for a long
period of time.
After confirming that EV mode or AUTO EV/HV mode has switched to
HV mode, turn the power switch off.
●Use the charging schedule function as
much as possible in order to fully
charge the hybrid battery (traction bat - tery) immediately bef ore starting off.
( →P.144)
Also, if the hybrid battery (traction bat- tery) capacity reduces, the distance that
can be driven in EV mode or AUTO
EV/HV mode decreases. However, vehi - cle performance does not significantly
become worse.
■When the remaining charge of the
hybrid battery (trac tion battery) is low after charging
In the following situations, the remaining
charge of the hybrid battery (traction battery) after charging completes may
be less than normal in order to protect
the system (the EV dr iving range after the battery is fully charged may be
shorter).*
●Charging is carried out when the out -
side temperature is low or high.
●Charging is carried out immediately
after high-load driv ing or in extreme
heat.
When none of the above situations
apply and there is a drastic drop in the
remaining charge of the hybrid battery
(traction battery) after charging com - pletes, have the veh icle inspected by
any authorized Toyota retailer or Toyota
authorized repairer, or any reliable repairer.*: When this occurs, even if the remain -
ing charge display of the hybrid bat-
tery (traction battery) shows that it is
Page 140 of 666
1382-2. Charging
the charging connector is not locked.*
*: If the charging connector is not firmly
inserted, locking operation will be
performed se veral times.
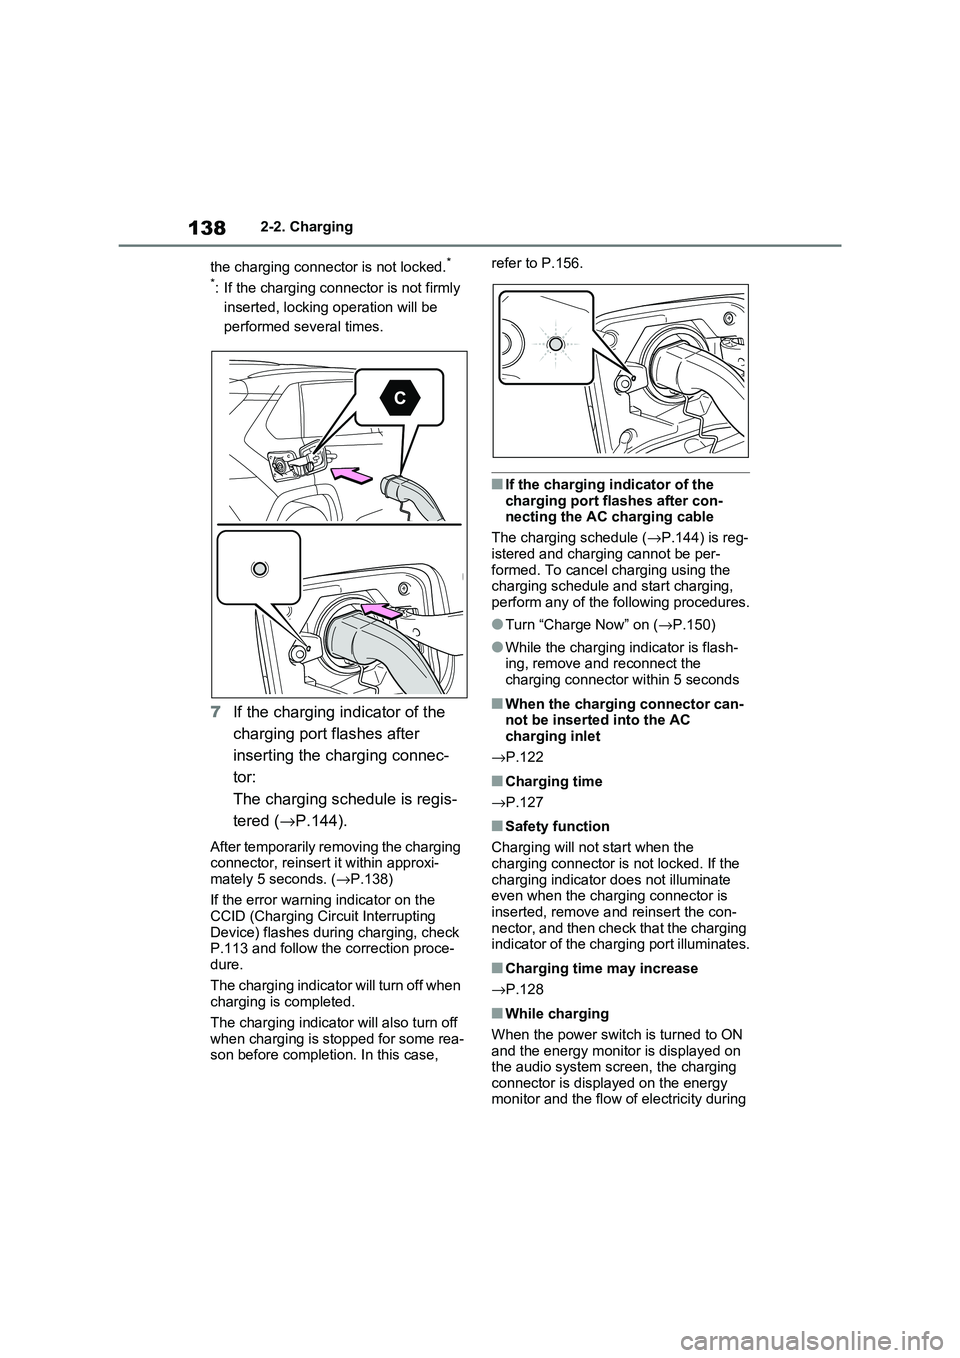
7If the charging indicator of the
charging port flashes after
inserting the charging connec -
tor:
The charging schedule is regis -
tered ( →P.144).
After temporarily removing the charging connector, reinsert it within approxi -
mately 5 seconds. ( →P.138)
If the error warning indicator on the CCID (Charging Circuit Interrupting
Device) flashes during charging, check
P.113 and follow the correction proce - dure.
The charging indicator will turn off when
charging is completed.
The charging indicator will also turn off
when charging is stopped for some rea -
son before completi on. In this case,
refer to P.156.
■If the charging indicator of the
charging port flashes after con - necting the AC charging cable
The charging schedule ( →P.144) is reg-
istered and charging cannot be per - formed. To cancel charging using the
charging schedule and start charging,
perform any of the following procedures.
●Turn “Charge Now” on ( →P.150)
●While the charging indicator is flash-
ing, remove and reconnect the
charging connector within 5 seconds
■When the charging connector can - not be inserted into the AC
charging inlet
→ P.122
■Charging time
→ P.127
■Safety function
Charging will not start when the
charging connector is not locked. If the charging indicator does not illuminate
even when the charging connector is
inserted, remove a nd reinsert the con- nector, and then check that the charging
indicator of the charging port illuminates.
■Charging time may increase
→ P.128
■While charging
When the power switch is turned to ON and the energy monitor is displayed on
the audio system scr een, the charging
connector is displayed on the energy monitor and the flow of electricity during
Page 141 of 666
139
2
2-2. Charging
Plug-in hybrid system
charging is displayed ( →P.195).
■Charging at a public charging sta-
tion with authenti cation function
When a door is unlocked during
charging, the charging connector is
unlocked and chargi ng will be stopped. In this case, the charging station
authentication is canceled and charging
may not be able to restart. Reconnect the charging connector and perform
authentication for the charging station.
■Protection function of AC charging
inlet overheating (vehicles with 6.6 kW onboard traction battery char -
ger)
By installing a temperature sensor to the AC charging inlet, prevents parts from
melting when the temperature rises due
to foreign matter ent ering the charging connector. When a certain temperature
increase is detected, charging is
stopped immediately and a message is displayed on the multi-information dis -
play. After the temperature has
decreased, charging resumes by per - forming the operation to start charging
again.
WARNING
■When charging
Observe the following precautions.
Failure to do so may cause an unex -
pected accident, resulting in death or
serious injury.
●Connect to a power source suitable
for charging. ( →P.124)
●Check that the AC charging cable,
plug and socket are free of foreign
matter.
●Before charging, check that the AC
charging inlet is not deformed, damaged or corroded, and check
that the inlet is fr ee of foreign mat-
ter such as dirt , snow and ice. If there is dirt or dust in these areas,
remove completely before inserting
the charging connector.
●Before inserting the charging plug into the charger, make sure there is
no dirt or dust on the terminal
areas. If there is dirt or dust in these areas, remove completely before
inserting the charging plug.
●Do not get the terminals of the AC
charging inlet wet.
●Only use sockets where the plug
can be securely inserted.
●Do not bundle or wind the AC
charging cable while charging, as
doing so may result in overheating.
●Do not touch the te rminals of the
charging connector and AC charging inlet with a sharp metal
objects (needles etc.) or hands, or
short them with foreign objects.
●When charging ou tdoors, make
sure to connect to a rain-tight socket for outdoor u se. Ensure the
rain-tight cover closes completely. If
the rain-tight cover cannot be closed, install a rain-tight cover that
will close.
●In order to stop charging at the
charging station, f ollow the instruc-
tions of the charger.
●If any heat, smoke , odors, noise or
other abnormaliti es are noticed during charging, stop charging
immediately.
●Do not insert the plug if the socket
is submerged in water or snow.
●When charging while it is raining or
snowing, do not connect or discon -
nect the plug if your hands are wet.
Also, do not get the plug or outlet wet.
●Do not charge the vehicle during a lightning storm.
●Prevent the AC charging cable from being caught in the door or back
door.
Page 146 of 666
1442-2. Charging
■Calendar settings
Current date and tim e information is
automatically set u sing GPS. However, if GPS calibration of clock is turned off in
the multimedia system s ettings, the date
needs to be set on t he multi-information display.
If the calendar settings check screen is
displayed when an attempt was made to register a charge schedule, check that
the correct date is set. If it is incorrect,
be sure to correct it.
If the calendar information is wrong, the
charging schedule function will not oper -
ate normally.
When registering the charging
schedule, the following settings can
be changed.
■Select the charging mode
One of the two following charging
modes can be selected.
“Start”
Starts charging at the set time*1 and fin -
ishes charging when fully charged.*2
“Departure”
Starts charging to finish at the set
time.*3, 4
When this setting is selected, the air
conditioning-linked function can be
used.
*1: Charging schedule function is per -
formed in accordance with the clock
in the multi-information display.
Before registering the charging
schedule, check the clock settings to
the proper time.
*2: There might be a slight error in the
timing when charging starts due to
the state of the hy brid battery (trac-
tion battery).
*3: When the system d etermines that
there is no time to finish charging by
the set scheduled departure time, it
starts charging. Check the charging
schedules.
*4: If sudden changes in temperature or
changes in the condition of the
power source occur while charging,
charging may not end exactly at the
time estimated by the system.
■Repeated setting
The periodic charging schedule can
be set by select ing your desired
day of the week. (If no days are
selected, charging is only carried
out once.)
■Air conditioning-linked set -
ting (“Climate Prep”)
When the charging mode is set to
“Departure”, the vehicle air condi -
tioning system ( →P.452) can be set
to automatically operate* according
Using the charging
schedule function
Charging can be carried out at
the desired time by registering
the charging schedule. Also, it
is possible to set the charging
schedule to one’s prefer -
ences, such as having
charging complete by a certain
departure time or be carried
out at the same time on certain
days.
Settings of the charging
schedule function
Page 149 of 666
147
2
2-2. Charging
Plug-in hybrid system
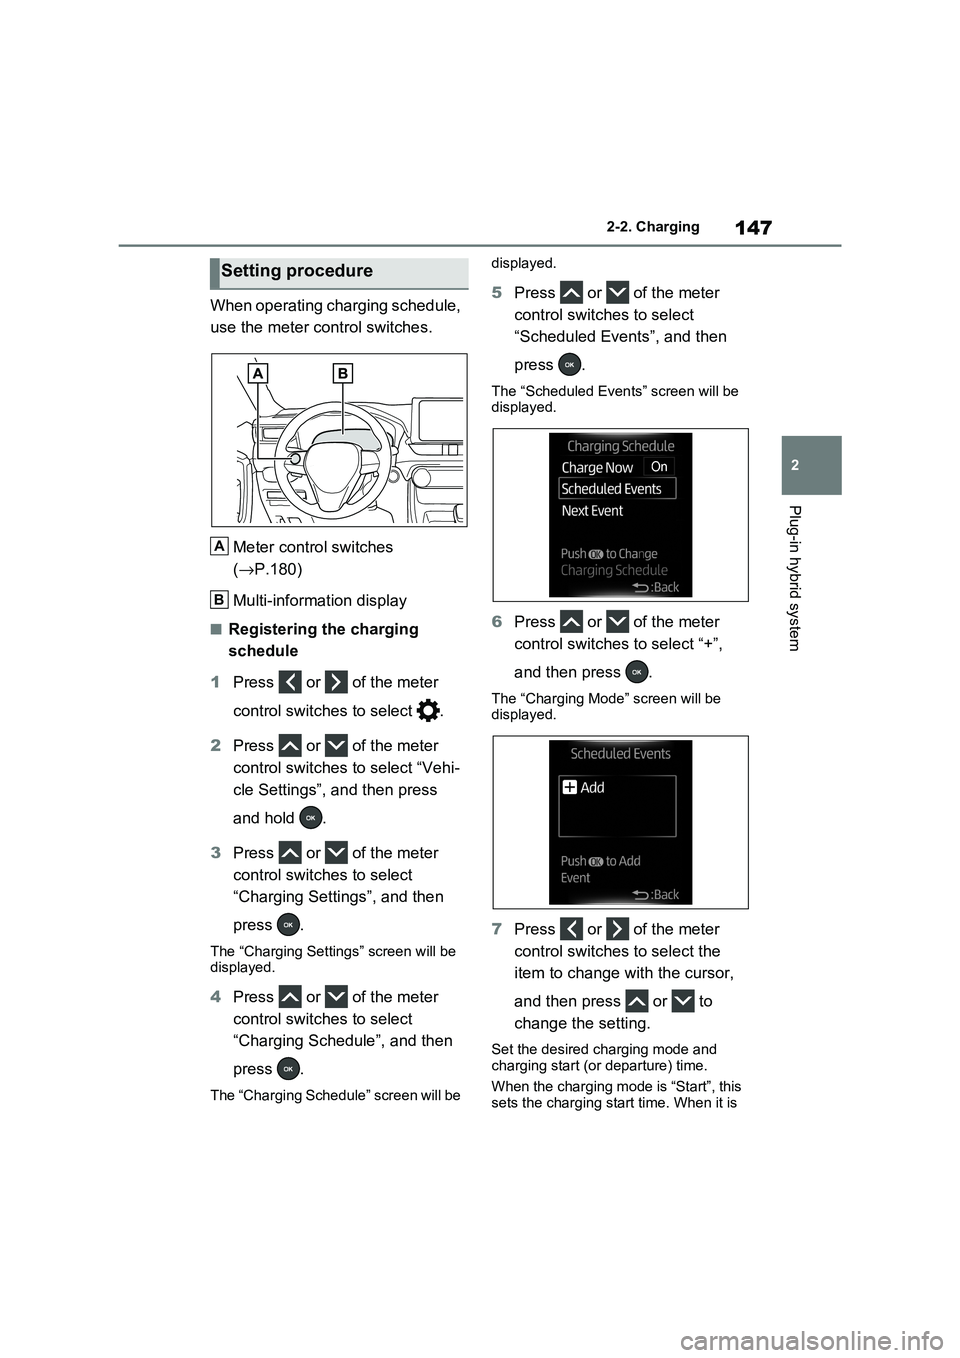
When operating charging schedule,
use the meter co ntrol switches.
Meter control switches
( →P.180)
Multi-information display
■Registering the charging
schedule
1 Press or of the meter
control switches to select .
2 Press or of the meter
control switches to select “Vehi -
cle Settings”, and then press
and hold .
3 Press or of the meter
control switches to select
“Charging Settings”, and then
press .
The “Charging Settings” screen will be
displayed.
4 Press or of the meter
control switches to select
“Charging Schedule”, and then
press .
The “Charging Schedule” screen will be
displayed.
5 Press or of the meter
control switches to select
“Scheduled Events”, and then
press .
The “Scheduled Even ts” screen will be
displayed.
6 Press or of the meter
control switches to select “+”,
and then press .
The “Charging Mode” screen will be displayed.
7 Press or of the meter
control switches to select the
item to change with the cursor,
and then press or to
change the setting.
Set the desired charging mode and charging start (or departure) time.
When the charging mode is “Start”, this
sets the charging start time. When it is
Setting procedure
A
B