headlights TOYOTA SEQUOIA 2008 2.G Owners Manual
[x] Cancel search | Manufacturer: TOYOTA, Model Year: 2008, Model line: SEQUOIA, Model: TOYOTA SEQUOIA 2008 2.GPages: 596, PDF Size: 12.93 MB
Page 8 of 596
8
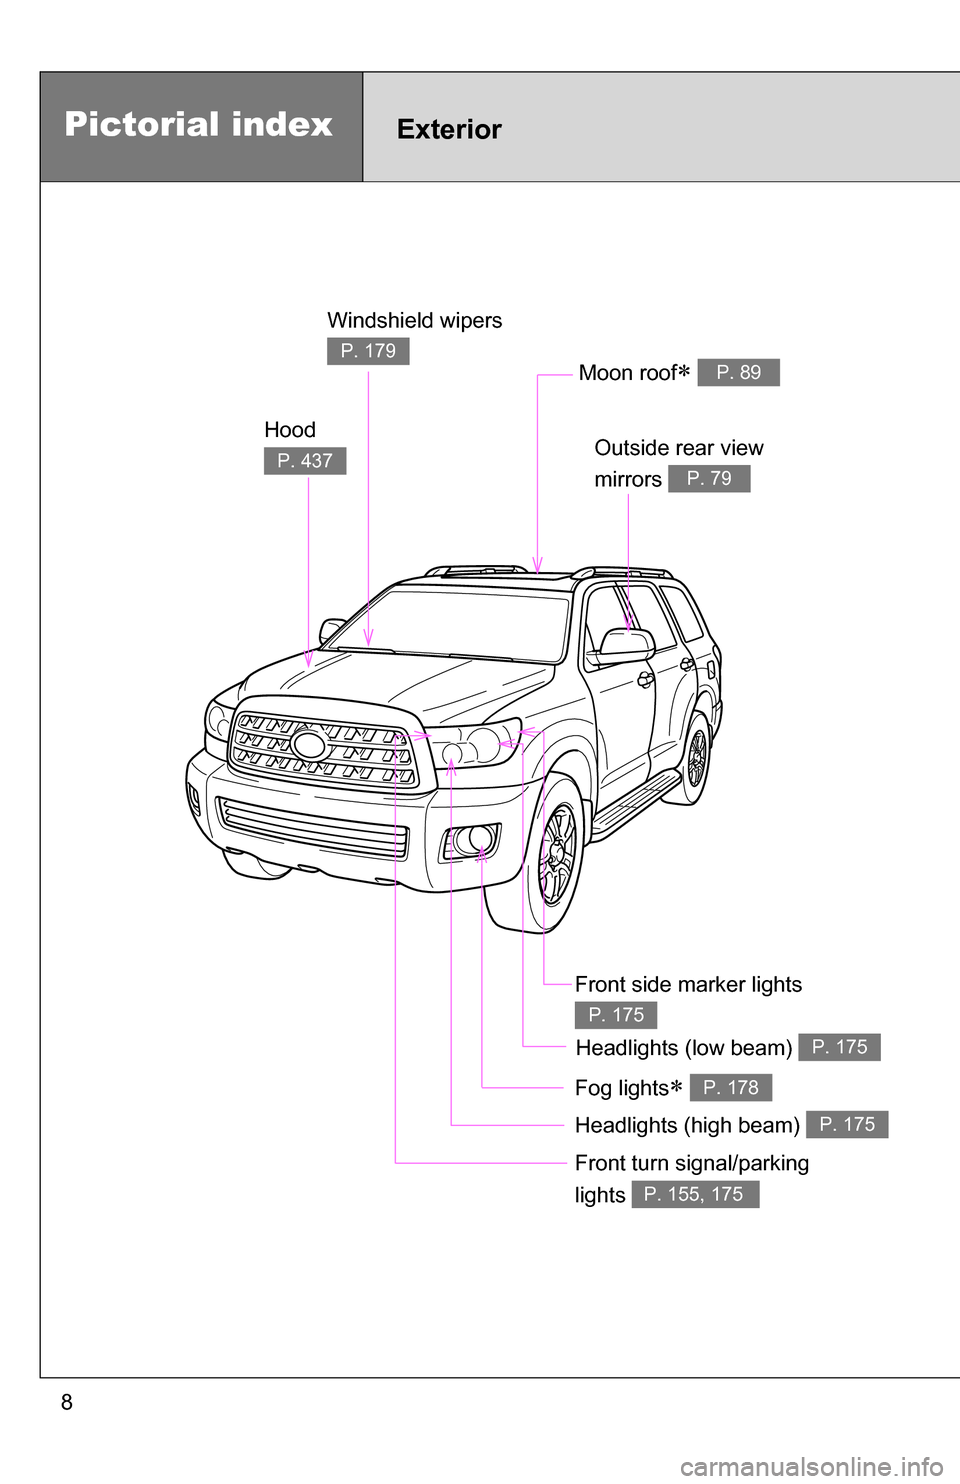
Headlights (high beam) P. 175
Pictorial indexExterior
Hood
P. 437
Windshield wipers
P. 179
Outside rear view
mirrors
P. 79
Front turn signal/parking
lights
P. 155, 175
Moon roof P. 89
Fog lights P. 178
Headlights (low beam) P. 175
Front side marker lights
P. 175
Page 76 of 596
76
1-3. Adjustable components (seats, mirrors, steering wheel)
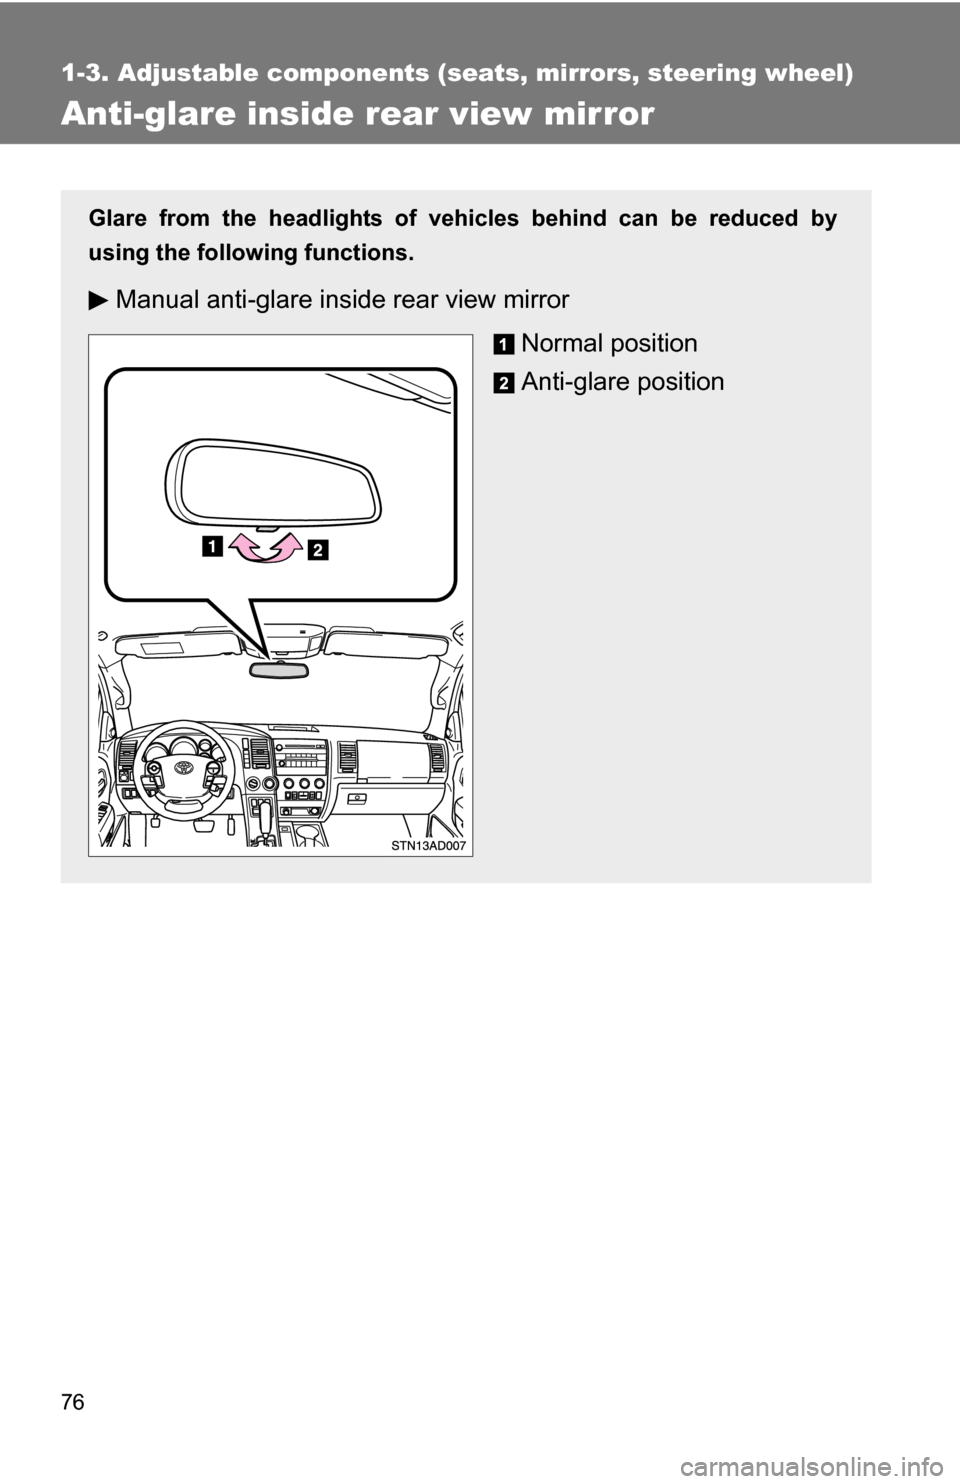
Anti-glare inside rear view mirror
Glare from the headlights of vehicles behind can be reduced by
using the following functions.
Manual anti-glare inside rear view mirrorNormal position
Anti-glare position
Page 77 of 596
77
1-3. Adjustable components (s
eats, mirrors, steering wheel)
1
Before driving
■To prevent sensor error (vehicles with auto anti-glare inside rear view
mirror)
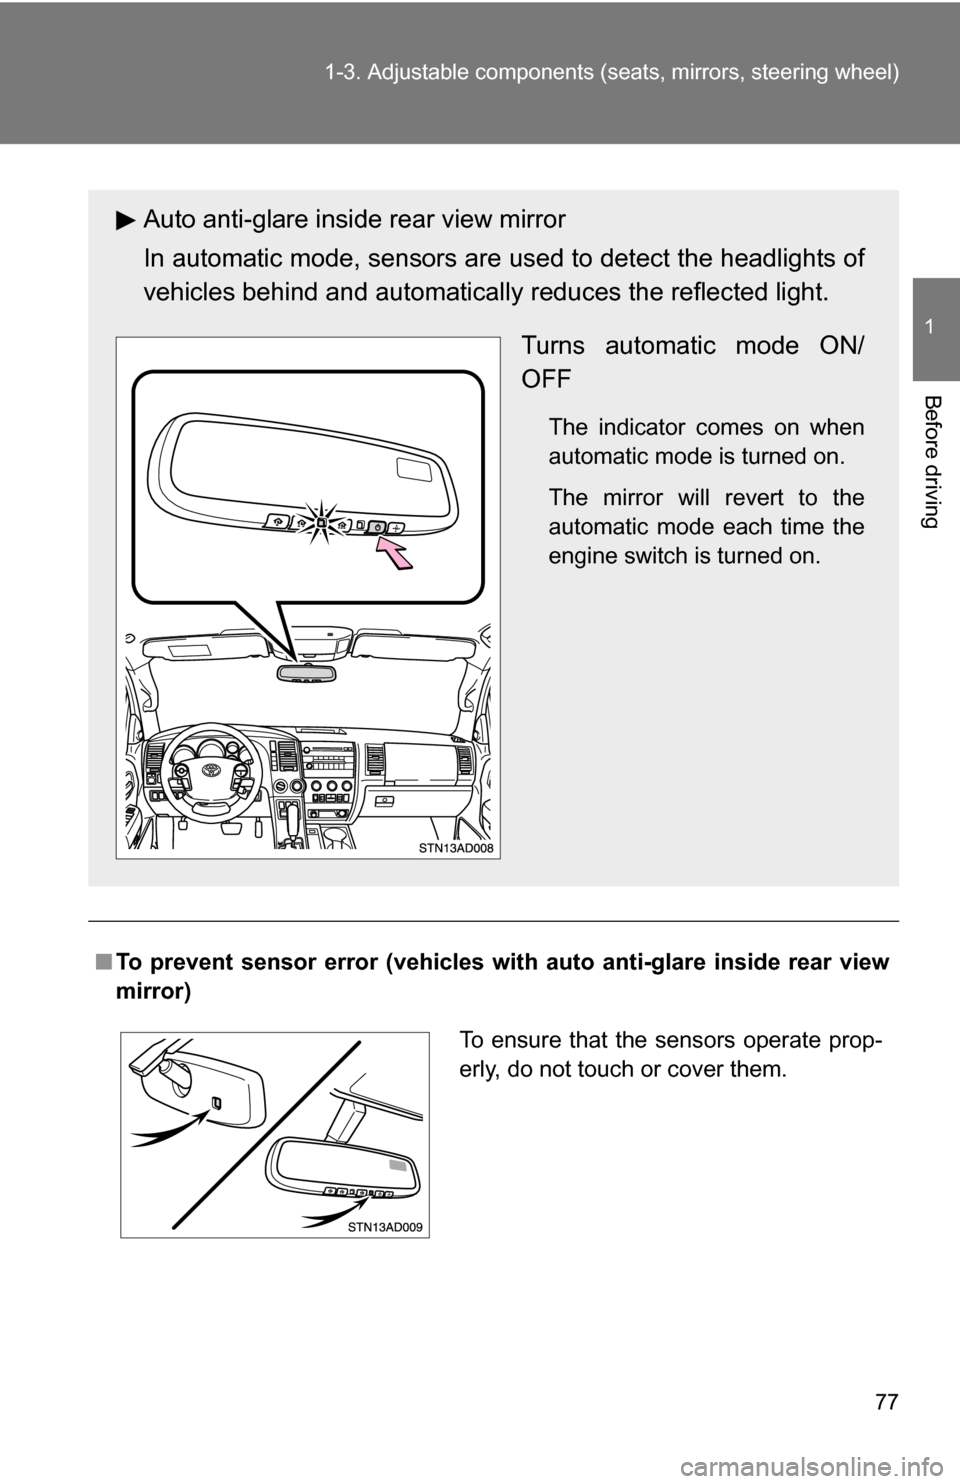
Auto anti-glare inside rear view mirror
In automatic mode, sensors are used to detect the headlights of
vehicles behind and automatical ly reduces the reflected light.
Turns automatic mode ON/
OFF
The indicator comes on when
automatic mode is turned on.
The mirror will revert to the
automatic mode each time the
engine switch is turned on.
To ensure that the sensors operate prop-
erly, do not touch or cover them.
Page 161 of 596
161
2-2. Instrument cluster
2
When driving
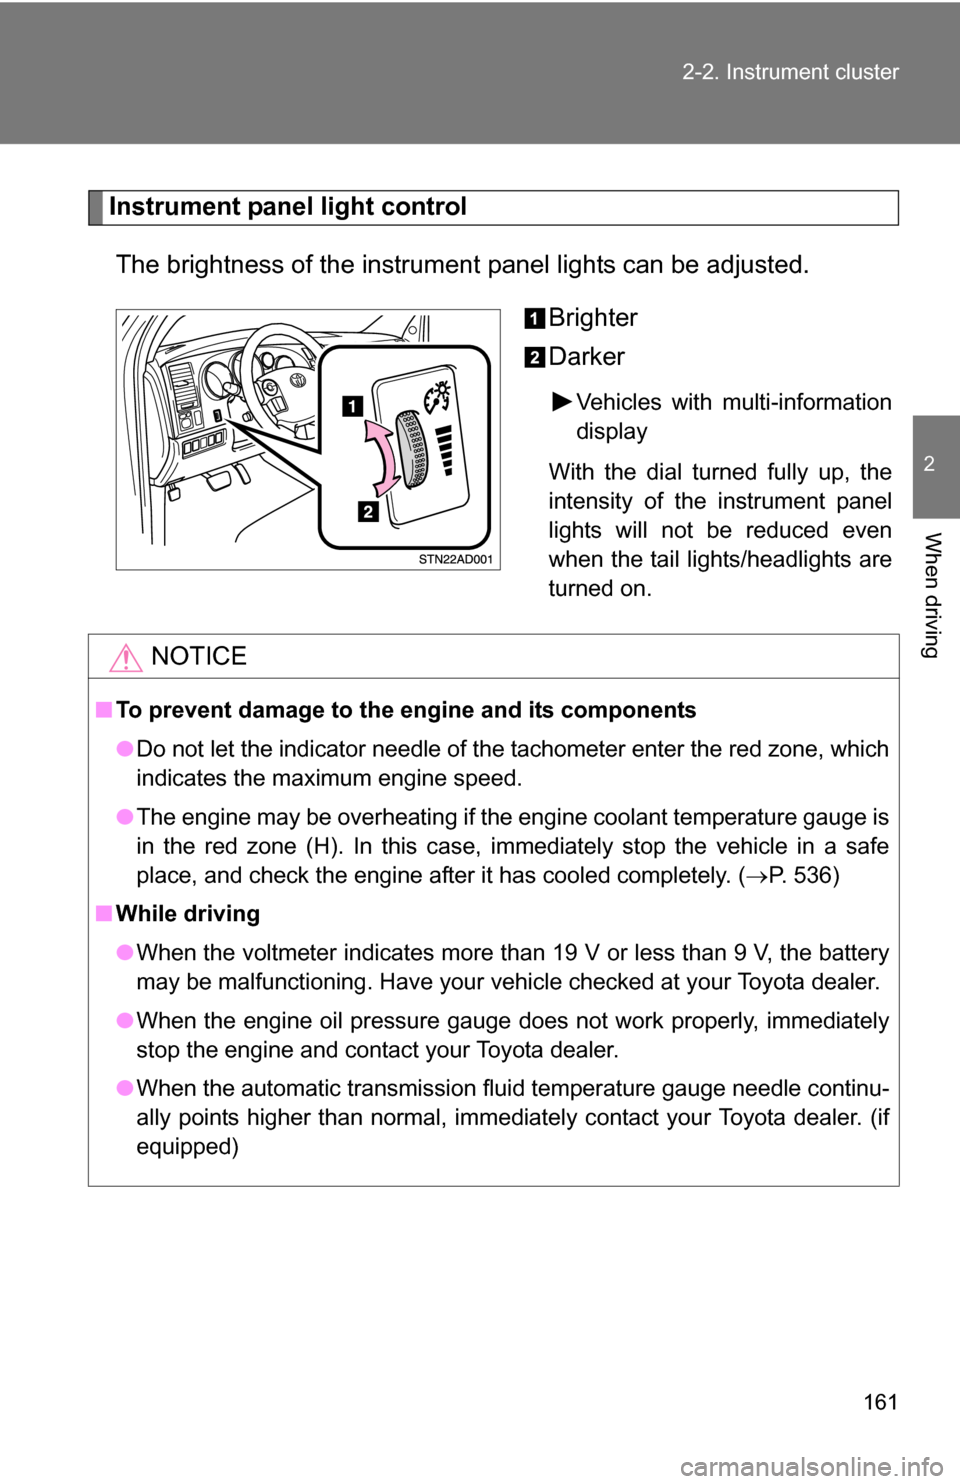
Instrument panel light control
The brightness of the instrument panel lights can be adjusted.
Brighter
Darker
Vehicles with multi-information
display
With the dial turned fully up, the
intensity of the instrument panel
lights will not be reduced even
when the tail lights/headlights are
turned on.
NOTICE
■ To prevent damage to the engine and its components
●Do not let the indicator needle of the tachometer enter the red zone, which
indicates the maximum engine speed.
● The engine may be overheating if the engine coolant temperature gauge is
in the red zone (H). In this case, immediately stop the vehicle in a safe
place, and check the engine after it has cooled completely. ( P. 536)
■ While driving
●When the voltmeter indicates more than 19 V or less than 9 V, the battery
may be malfunctioning. Have your vehicle checked at your Toyota dealer.
● When the engine oil pressure gauge does not work properly, immediately
stop the engine and contact your Toyota dealer.
● When the automatic transmission fluid temperature gauge needle continu-
ally points higher than normal, immediately contact your Toyota dealer. (if
equipped)
Page 175 of 596
175
2
When driving
2-3. Operating the lights and wipers
Headlight switch
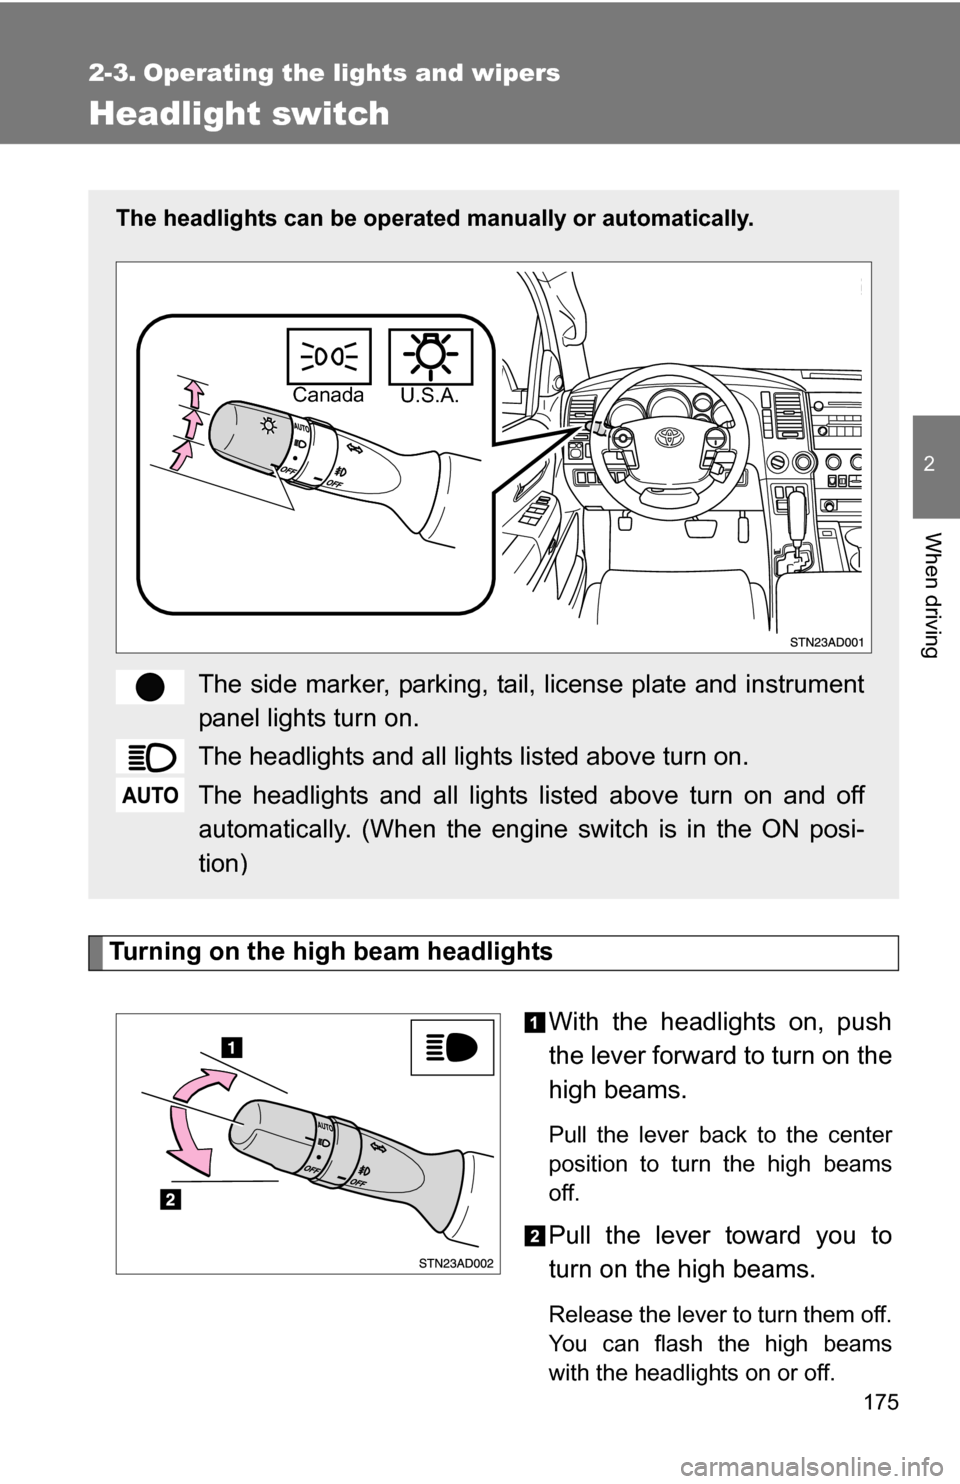
Turning on the high beam headlightsWith the headlights on, push
the lever forward to turn on the
high beams.
Pull the lever back to the center
position to turn the high beams
off.
Pull the lever toward you to
turn on the high beams.
Release the lever to turn them off.
You can flash the high beams
with the headlights on or off.
The headlights can be operated manually or automatically.
The side marker, parking, tail, license plate and instrument
panel lights turn on.
The headlights and all lights listed above turn on.
The headlights and all lights listed above turn on and off
automatically. (When the engine switch is in the ON posi-
tion)
Canada U.S.A.
Page 176 of 596

176 2-3. Operating the lights and wipers
■Daytime running light system (if equipped)
To make your vehicle more visible to other drivers, the front turn signal lights
turn on automatically whenever the engine is started and the parking brake
is released. Daytime running lights are not designed for use at night.
■ Headlight control sensor
■ Automatic light off system
●When the headlights come on: The headlights and tail lights automati-
cally turn off after 30 seconds when all doors are closed with the engine
switch turned to the ACC or LOCK position. (The lights turn off immedi-
ately if the button on the wireless remote control is pressed after all
doors are locked.)
● When only the tail lights come on: The tail lights turn off automatically
with the engine switch turned to the ACC or LOCK position and the
driver’s door is opened.
To turn the lights on again, turn the engine switch to the ON position, or turn
the headlight switch off once and then back to the or position.
■ Customization
●That can be configured at Toyota dealer (vehicles without multi-informa-
tion display)
Settings (automatic light off system) can be changed. (Customizable
features P. 569)
● It is possible to change the settings (vehicles with multi-information dis-
play) (Feature customization P. 169)
The sensor may not function properly if
an object is placed on the sensor, or any-
thing that blocks the sensor is affixed to
the windshield.
Doing so interferes with the sensor
detecting the level of ambient light and
may cause the automatic headlight sys-
tem to malfunction.
Page 178 of 596
178
2-3. Operating the lights and wipers
Fog light switch (if equipped)
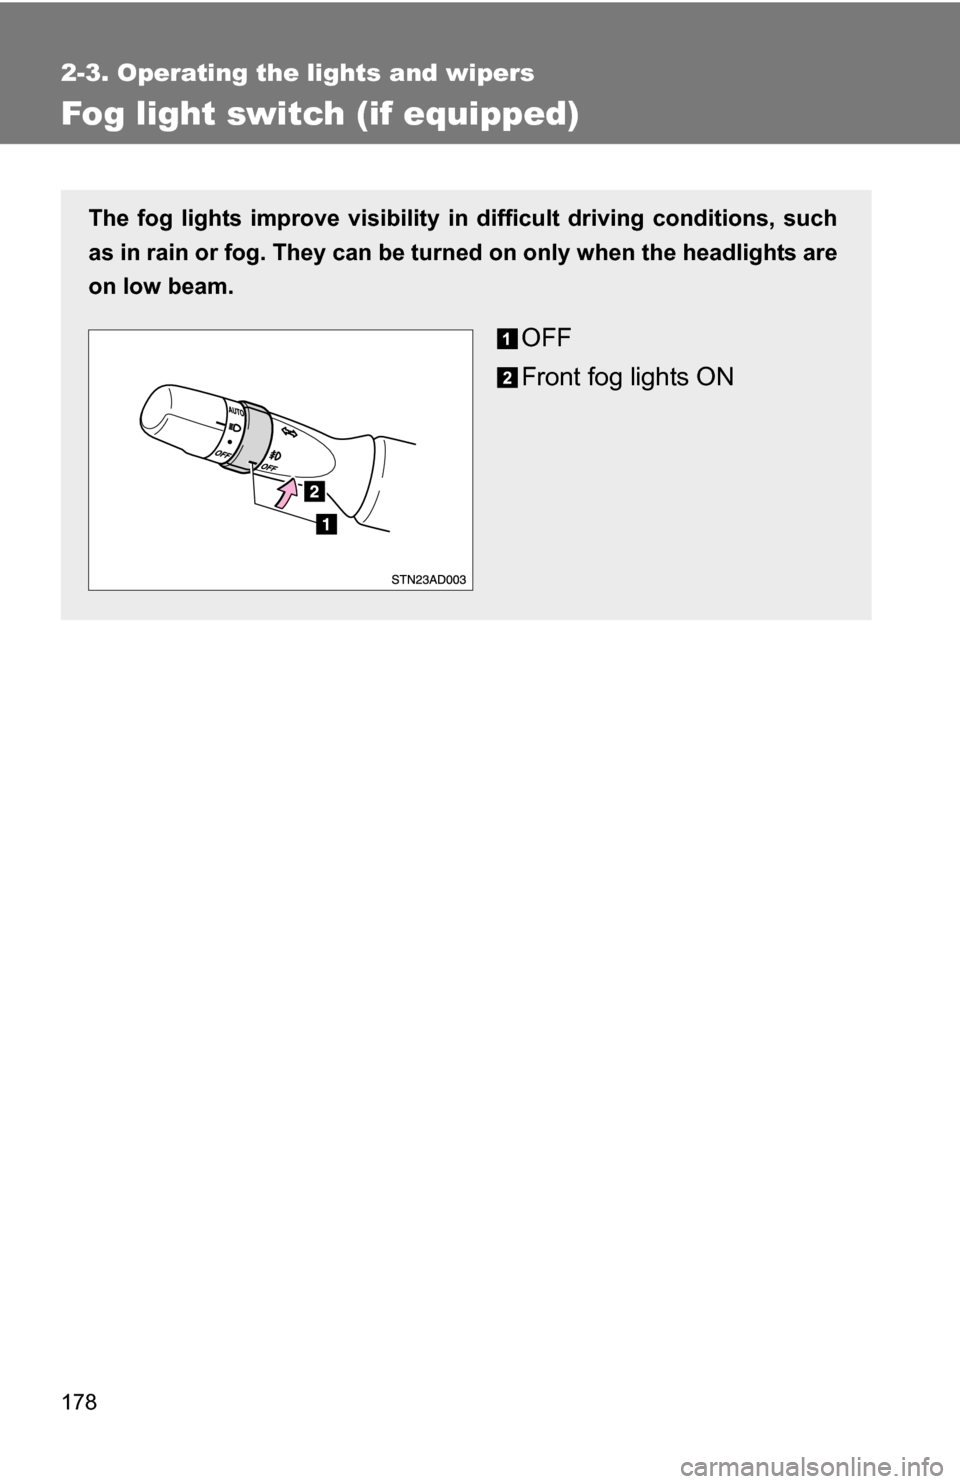
The fog lights improve visibility in difficult driving conditions, such
as in rain or fog. They can be turned on only when the headlights are
on low beam.
OFF
Front fog lights ON
Page 182 of 596
182
2-3. Operating the lights and wipers
Headlight cleaner switch (if equipped)
■The headlight cleaner can be operated when
The engine switch is in the ON position and the headlights are turned on.
NOTICE
■When the washer fluid tank is empty
Do not use this function when the washer fluid tank is empty. This may
cause the washer fluid pump to overheat.
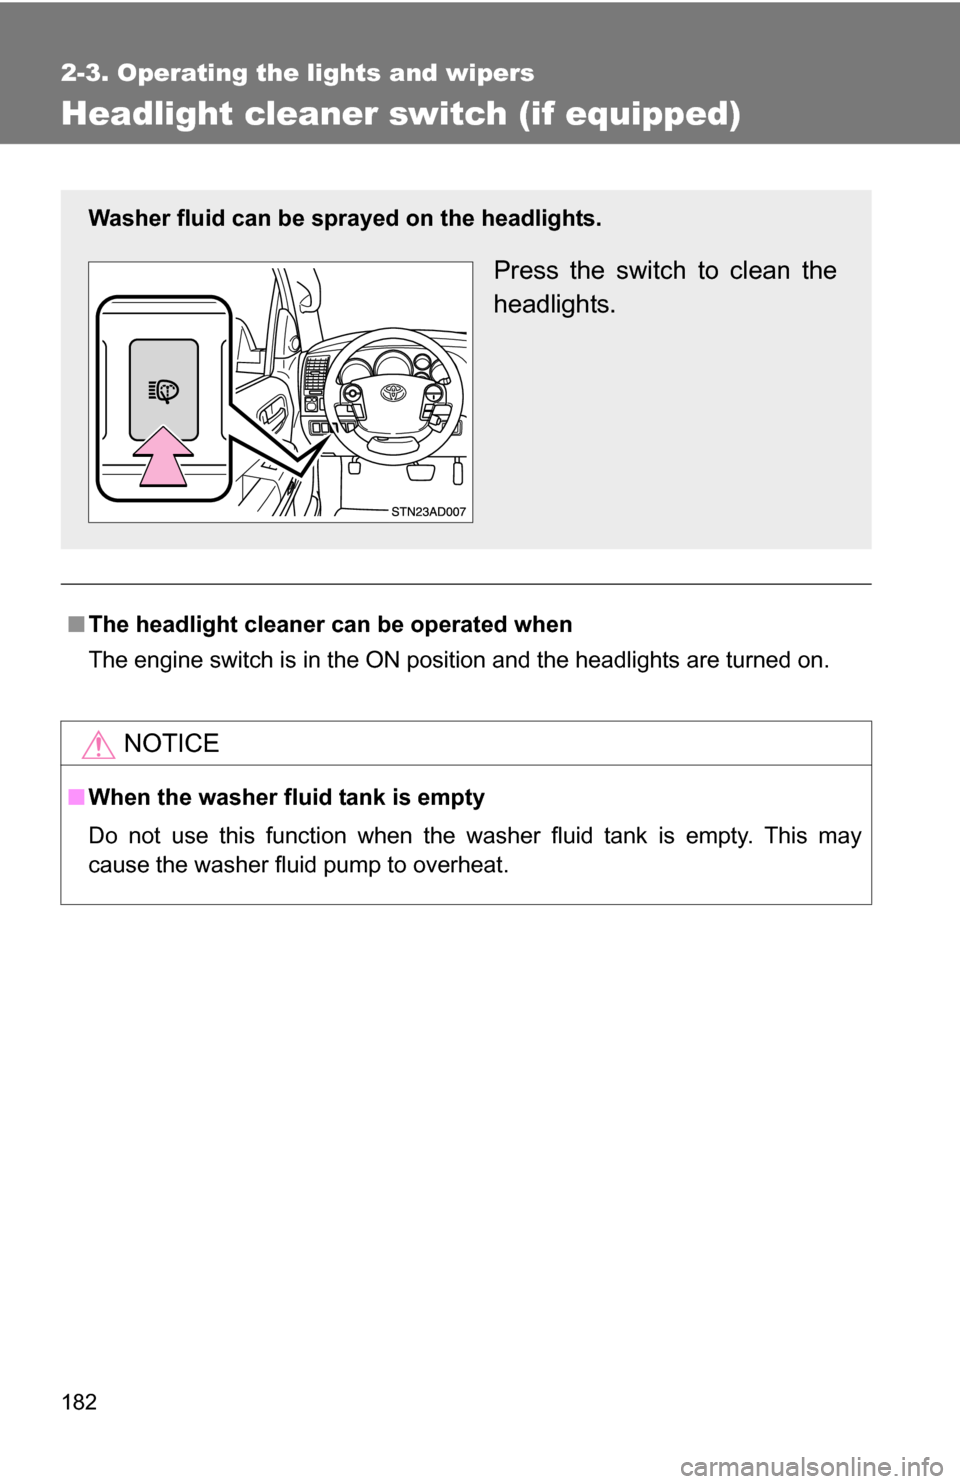
Washer fluid can be sprayed on the headlights.
Press the switch to clean the
headlights.
Page 430 of 596
430 4-2. Maintenance
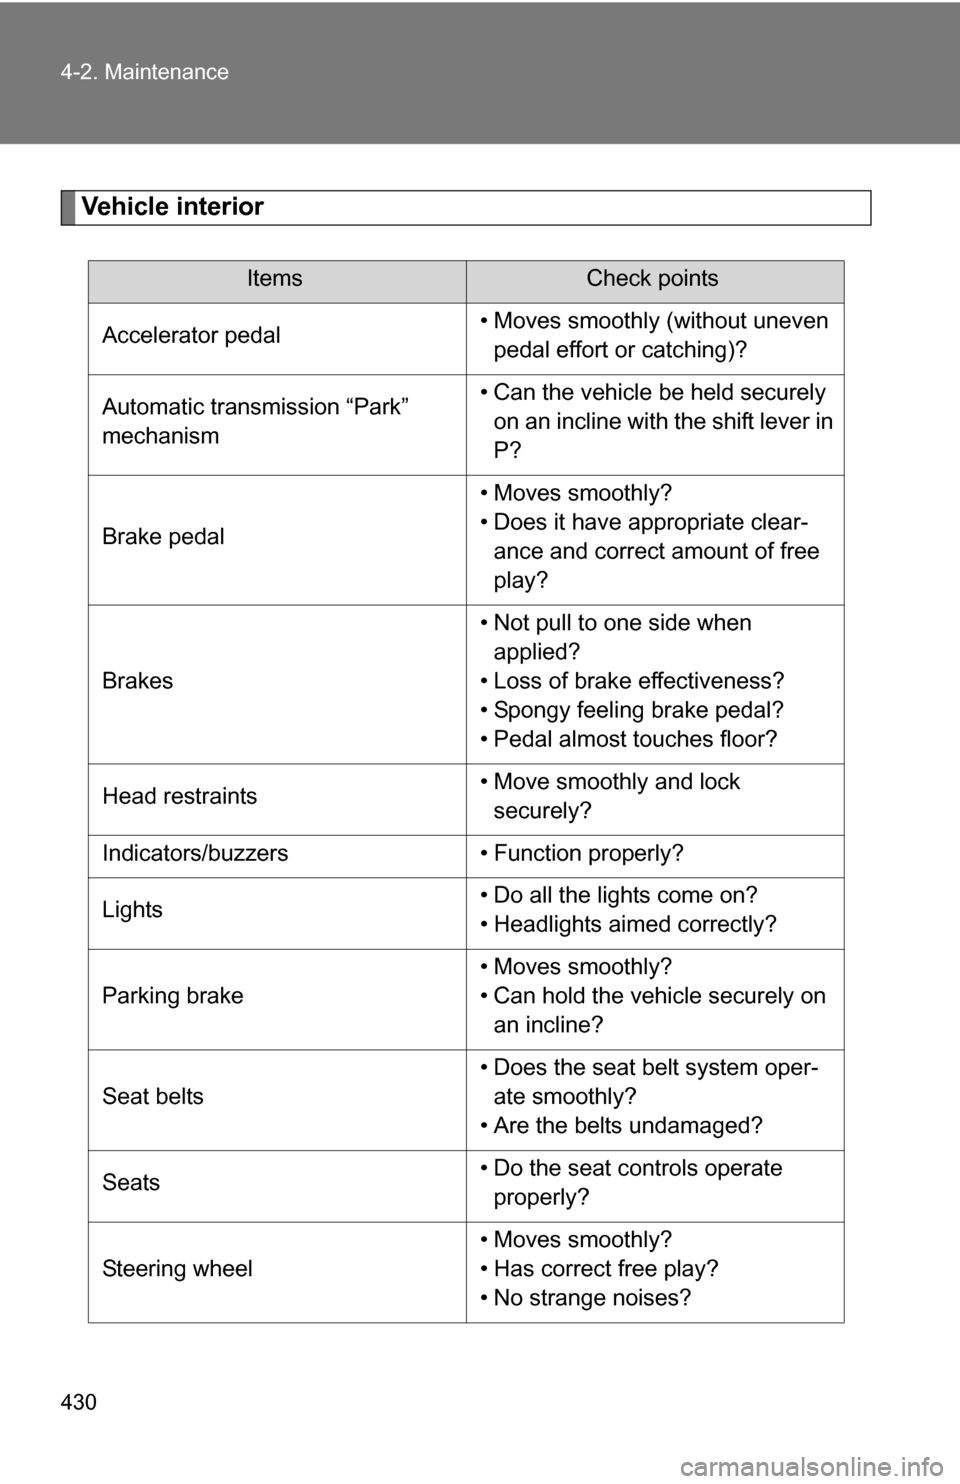
Vehicle interior
ItemsCheck points
Accelerator pedal • Moves smoothly (without uneven
pedal effort or catching)?
Automatic transmission “Park”
mechanism • Can the vehicle be held securely
on an incline with the shift lever in
P?
Brake pedal • Moves smoothly?
• Does it have appropriate clear-
ance and correct amount of free
play?
Brakes • Not pull to one side when
applied?
• Loss of brake effectiveness?
• Spongy feeling brake pedal?
• Pedal almost touches floor?
Head restraints • Move smoothly and lock
securely?
Indicators/buzzers • Function properly?
Lights • Do all the lights come on?
• Headlights aimed correctly?
Parking brake • Moves smoothly?
• Can hold the vehicle securely on
an incline?
Seat belts • Does the seat belt system oper-
ate smoothly?
• Are the belts undamaged?
Seats • Do the seat controls operate
properly?
Steering wheel • Moves smoothly?
• Has correct free play?
• No strange noises?
Page 494 of 596
494 4-3. Do-it-yourself maintenance
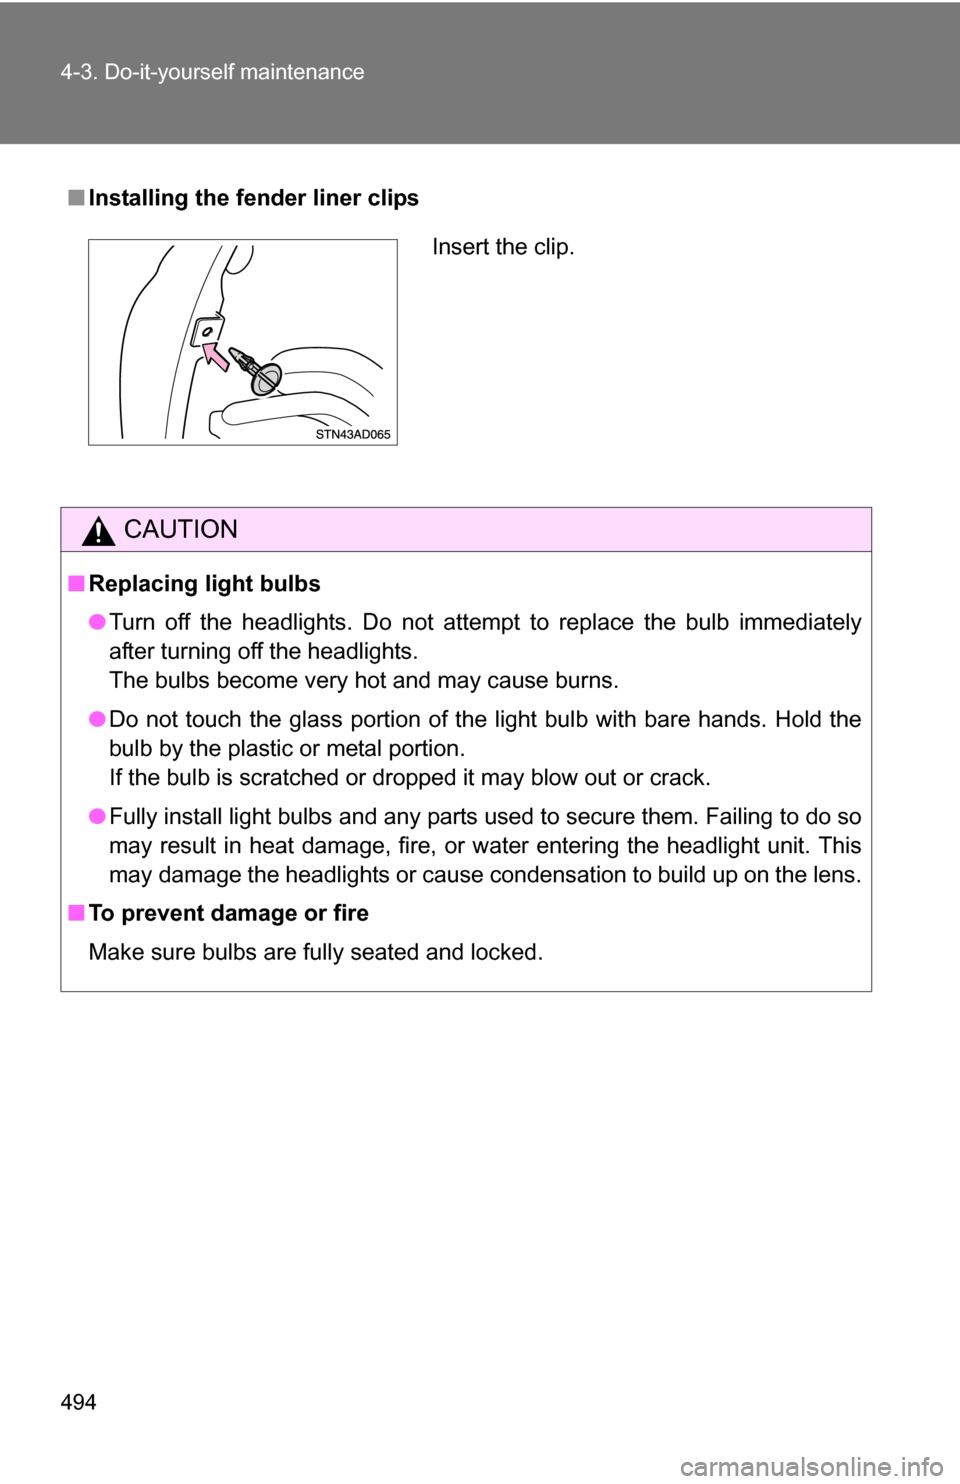
■Installing the fender liner clips
CAUTION
■Replacing light bulbs
●Turn off the headlights. Do not attempt to replace the bulb immediately
after turning off the headlights.
The bulbs become very hot and may cause burns.
● Do not touch the glass portion of the light bulb with bare hands. Hold the
bulb by the plastic or metal portion.
If the bulb is scratched or dropped it may blow out or crack.
● Fully install light bulbs and any parts used to secure them. Failing to do so
may result in heat damage, fire, or water entering the headlight unit. This
may damage the headlights or cause condensation to build up on the lens.
■ To prevent damage or fire
Make sure bulbs are fully seated and locked.
Insert the clip.