display TOYOTA SIENNA 2019 Accessories, Audio & Navigation (in English)
[x] Cancel search | Manufacturer: TOYOTA, Model Year: 2019, Model line: SIENNA, Model: TOYOTA SIENNA 2019Pages: 441, PDF Size: 9.89 MB
Page 65 of 441
65
SIENNA_Navi+MM_OM08027U_(U)
18.05.08 11:51
BASIC FUNCTION
2
3. OTHER SETTINGS
1. GENERAL SETTINGS
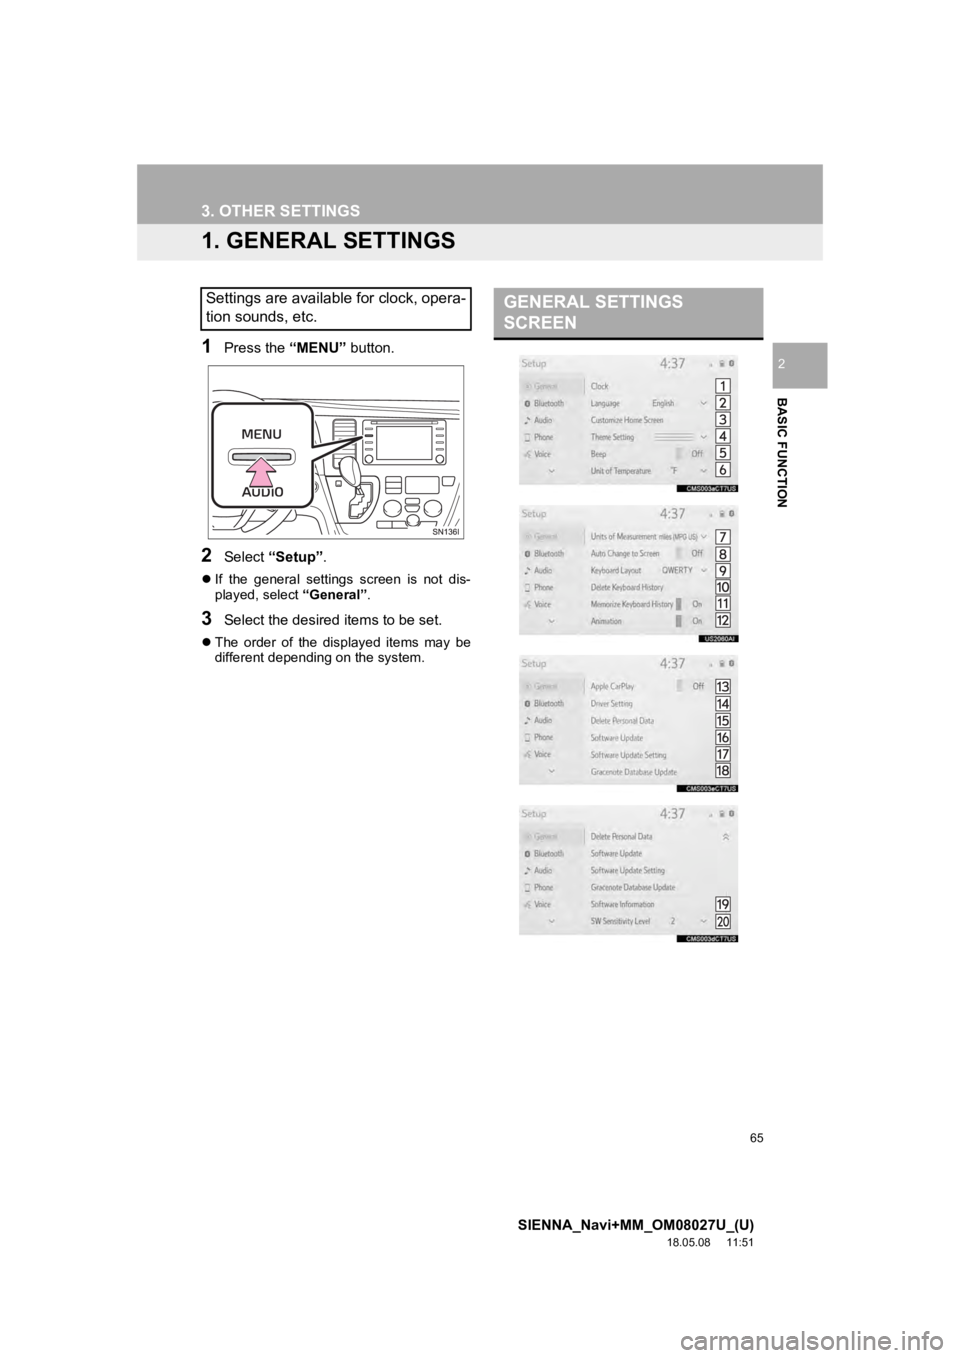
1Press the “MENU” button.
2Select “Setup” .
If the general settings screen is not dis-
played, select “General”.
3Select the desired items to be set.
The order of the displayed items may be
different dependi ng on the system.
Settings are available for clock, opera-
tion sounds, etc.GENERAL SETTINGS
SCREEN
Page 66 of 441
66
3. OTHER SETTINGS
SIENNA_Navi+MM_OM08027U_(U)
18.05.08 11:51
No.Function
Select to change the time zone and
select “On” or “Off” or “Auto” *1
for daylight saving time, automatic
adjustment of the clock, etc.
( P.67)
Select to change the language. The
language setting of Apple CarPlay
can only be changed on the con-
nected iPhone.
Select to customize the home
screen. ( P.35)
Select to change the screen theme
settings.
Select to turn the beep sound on/
off.
*1Select to change the unit of tem-
perature.
Select to change the unit of mea-
sure for distance/fuel consumption.
*1
Select to set automatic screen
changes from the audio control
screen to the home screen to on/
off. When set to on, the screen will
automatically return to the home
screen from the audio control
screen after 20 seconds.
Select to change the keyboard lay-
out.
Select to delete the keyboard histo-
ry.
Select to set the memorize key-
board history on/off.
Select to set the animations on/off.
*2
Select to turn automatic Apple Car-
Play connection establishment on/
off when a compatible iPhone is
connected to the system via USB.
( P.62)
Depending on the system, this set-
ting cannot be changed when a de-
vice is connected to the system via
USB. Disconnect the device before
attempting to change the setting.
Select to change the driver set-
tings. ( P.68)
Select to delete personal data.
( P.69)
Select to update software versions.
For details, contact your Toyota
dealer.
*3Select to set software update set-
tings. ( P.70)
Select to update “Gracenote®” da-
tabase versions. For details, con-
tact your Toyota dealer.
Select to display the software infor-
mation. Notices related to third par-
ty software used in this product are
enlisted. (This includes instructions
for obtaining such software, where
applicable.)
Select to change the capacitive
touch screen button sensitivity to 1
(low), 2 (medium), or 3 (high).
*
1: Entune Premium Audio only
*2: This function is not made available in
some countries or areas.
*
3: Entune Audio Plus/Entune Premium Au- dio only
INFORMATION
● Apple CarPlay language cannot be
changed in the general settings screen.
Please set the language on the iPhone.
No.Function
Page 67 of 441
67
3. OTHER SETTINGS
SIENNA_Navi+MM_OM08027U_(U)
18.05.08 11:51
BASIC FUNCTION
2
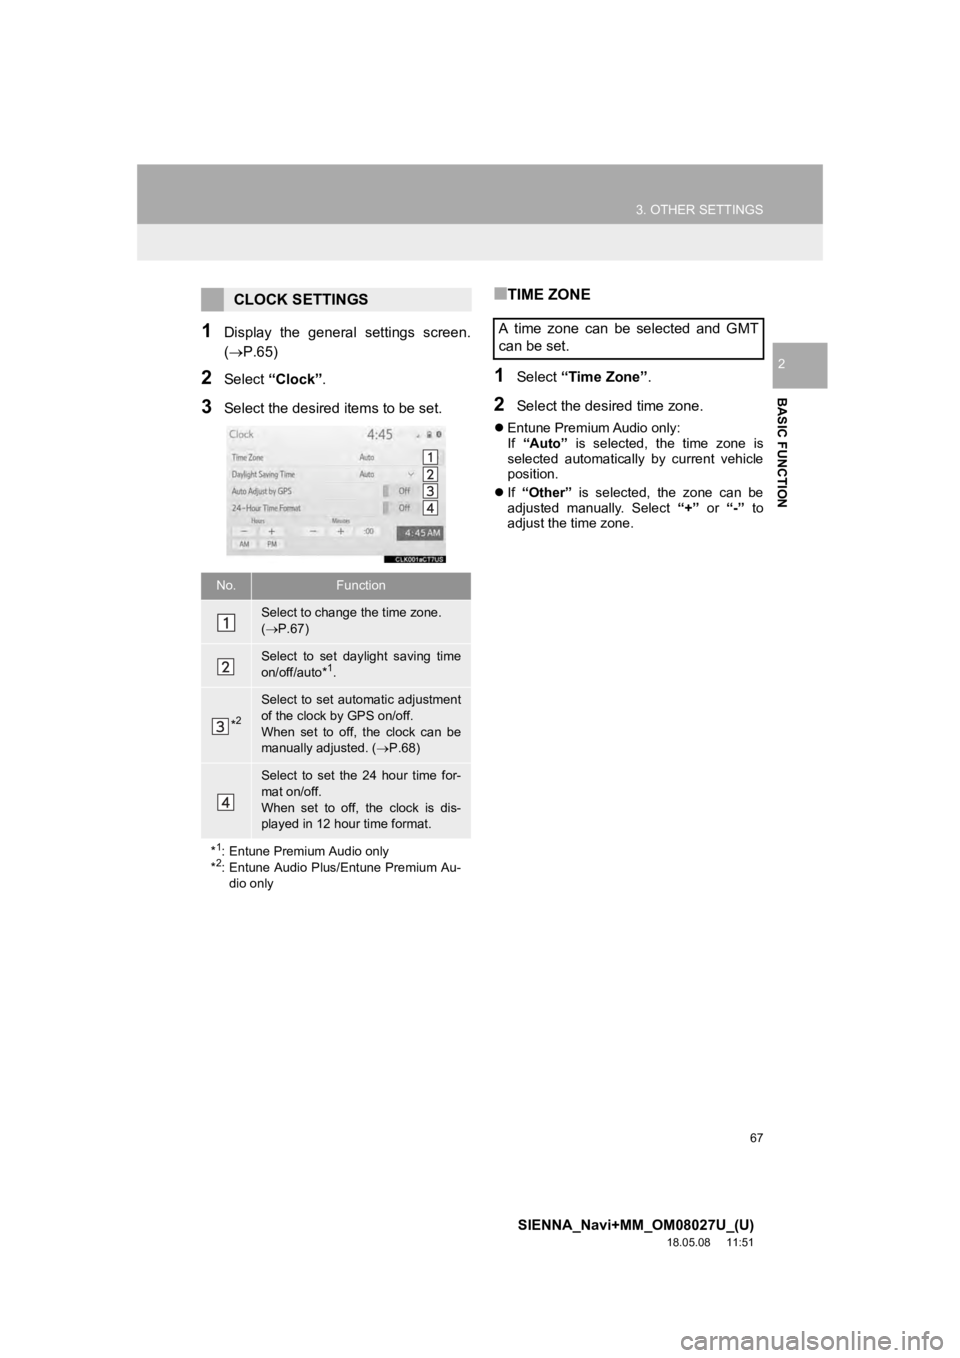
1Display the general settings screen.
(P.65)
2Select “Clock”.
3Select the desired items to be set.
■TIME ZONE
1Select “Time Zone” .
2Select the desired time zone.
Entune Premium Audio only:
If “Auto” is selected, the time zone is
selected automatically by current vehicle
position.
If “Other” is selected, the zone can be
adjusted manually. Select “+” or “-” to
adjust the time zone.
CLOCK SETTINGS
No.Function
Select to change the time zone.
( P.67)
Select to set daylight saving time
on/off/auto*1.
*2
Select to set automatic adjustment
of the clock by GPS on/off.
When set to off, the clock can be
manually adjusted. ( P.68)
Select to set the 24 hour time for-
mat on/off.
When set to off, the clock is dis-
played in 12 hour time format.
*
1: Entune Premium Audio only
*2: Entune Audio Plus/Entune Premium Au-
dio only
A time zone can be selected and GMT
can be set.
Page 68 of 441
68
3. OTHER SETTINGS
SIENNA_Navi+MM_OM08027U_(U)
18.05.08 11:51
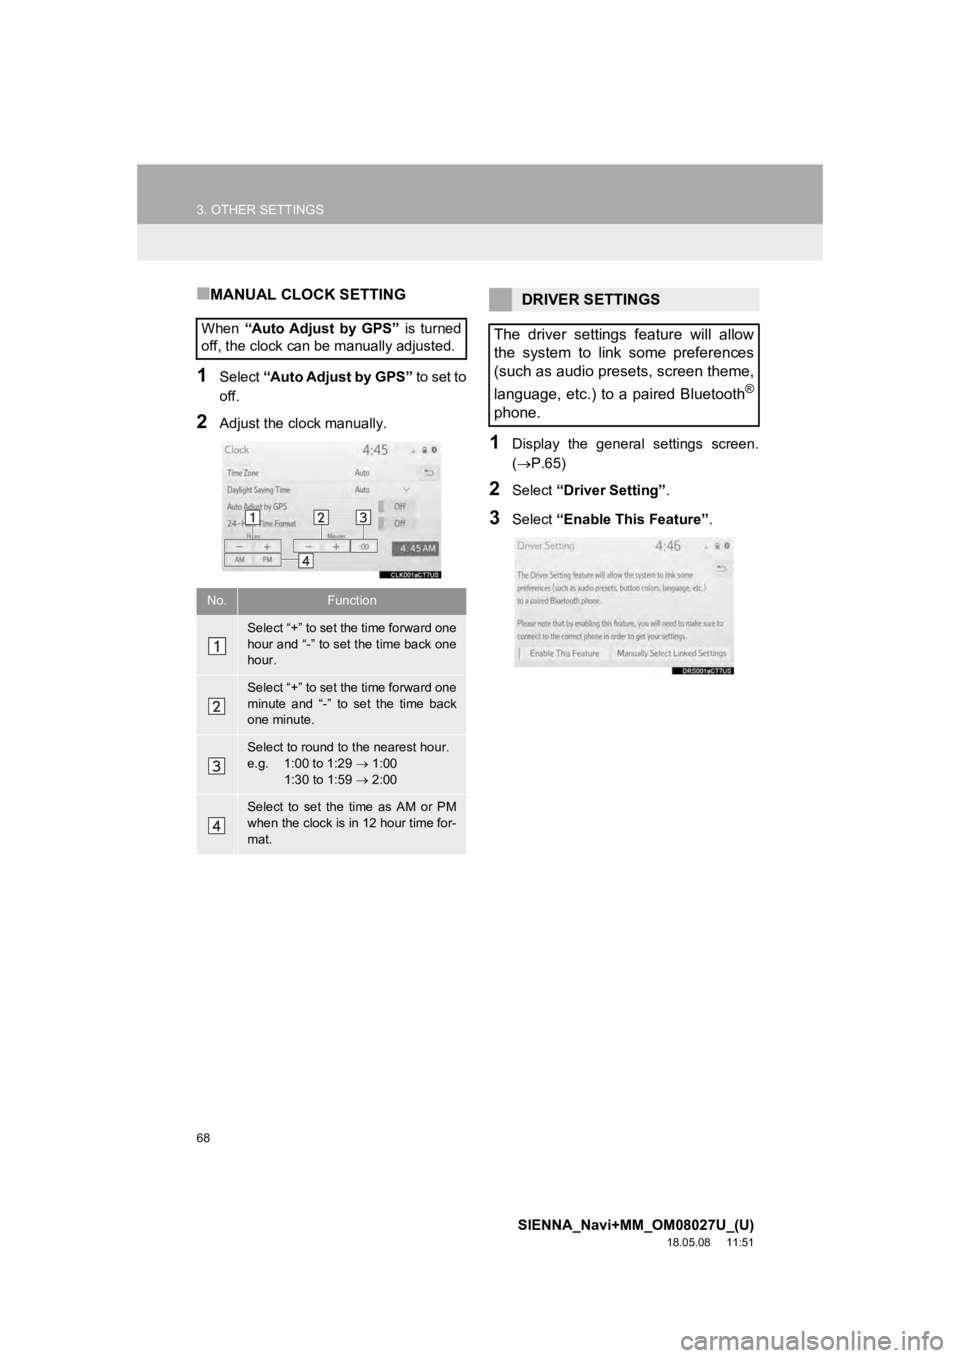
■MANUAL CLOCK SETTING
1Select “Auto Adjust by GPS” to set to
off.
2Adjust the clock manually.
1Display the general settings screen.
( P.65)
2Select “Driver Setting” .
3Select “Enable This Feature” .
When
“Auto Adjust by GPS” is turned
off, the clock can be manually adjusted.
No.Function
Select “+” to set the time forward one
hour and “-” to set the time back one
hour.
Select “+” to set the time forward one
minute and “-” to set the time back
one minute.
Select to round to the nearest hour.
e.g. 1:00 to 1:29 1:00
1:30 to 1:59 2:00
Select to set the time as AM or PM
when the clock is in 12 hour time for-
mat.
DRIVER SETTINGS
The driver settings feature will allow
the system to link some preferences
(such as audio presets, screen theme,
language, etc.) to a paired Bluetooth
®
phone.
Page 69 of 441
69
3. OTHER SETTINGS
SIENNA_Navi+MM_OM08027U_(U)
18.05.08 11:51
BASIC FUNCTION
2
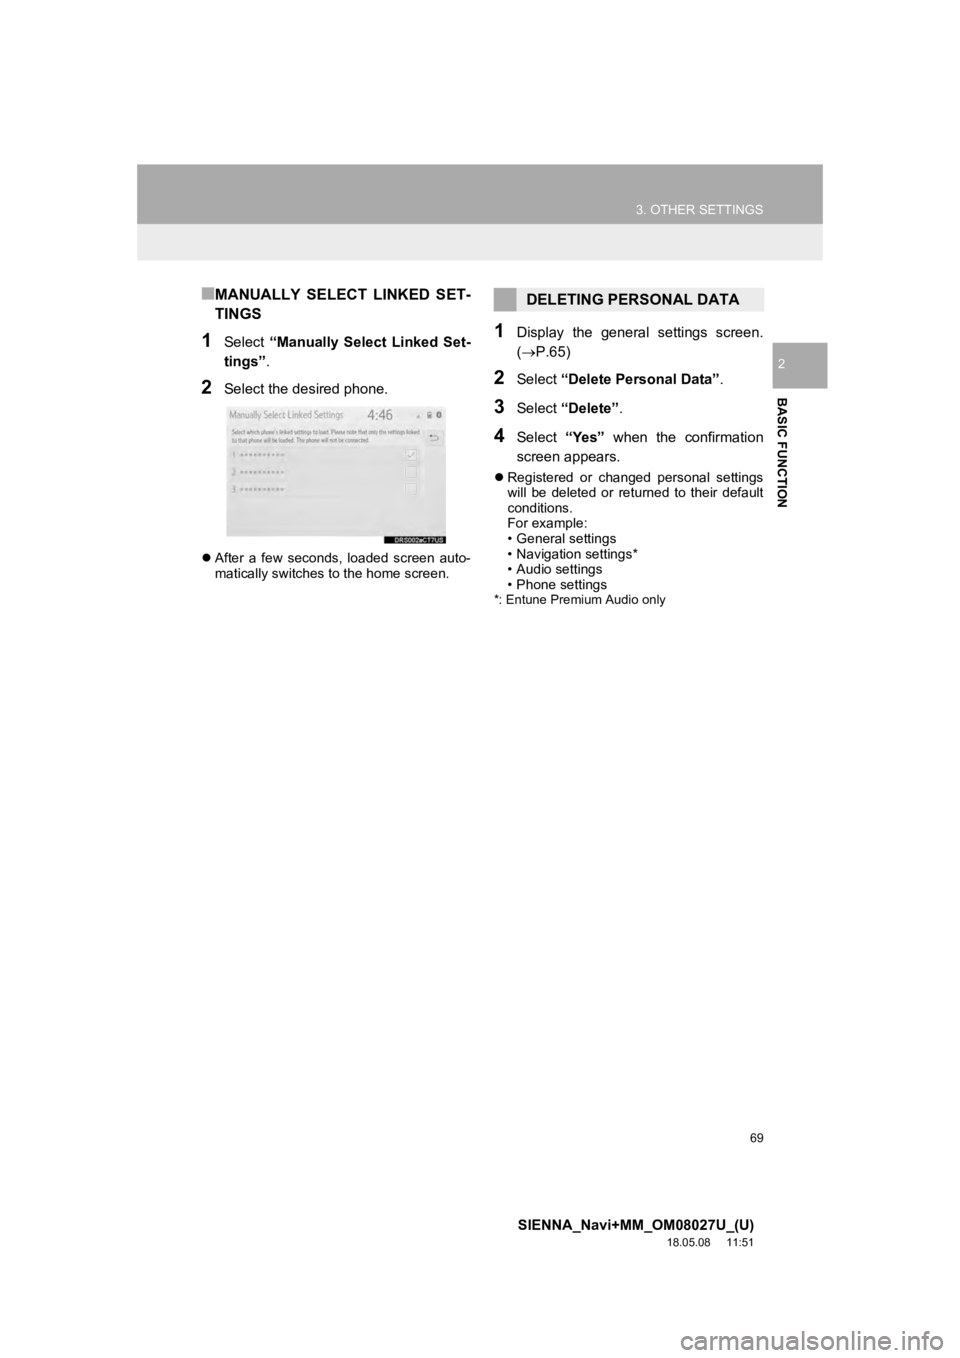
■MANUALLY SELECT LINKED SET-
TINGS
1Select “Manually Select Linked Set-
tings” .
2Select the desired phone.
After a few seconds, loaded screen auto-
matically switches to the home screen.
1Display the general settings screen.
(P.65)
2Select “Delete Personal Data” .
3Select “Delete” .
4Select “Yes” when the confirmation
screen appears.
Registered or changed personal settings
will be deleted or returned to their default
conditions.
For example:
• General settings
• Navigation settings*
• Audio settings
• Phone settings
*: Entune Premium Audio only
DELETING PERSONAL DATA
Page 70 of 441
70
3. OTHER SETTINGS
SIENNA_Navi+MM_OM08027U_(U)
18.05.08 11:51
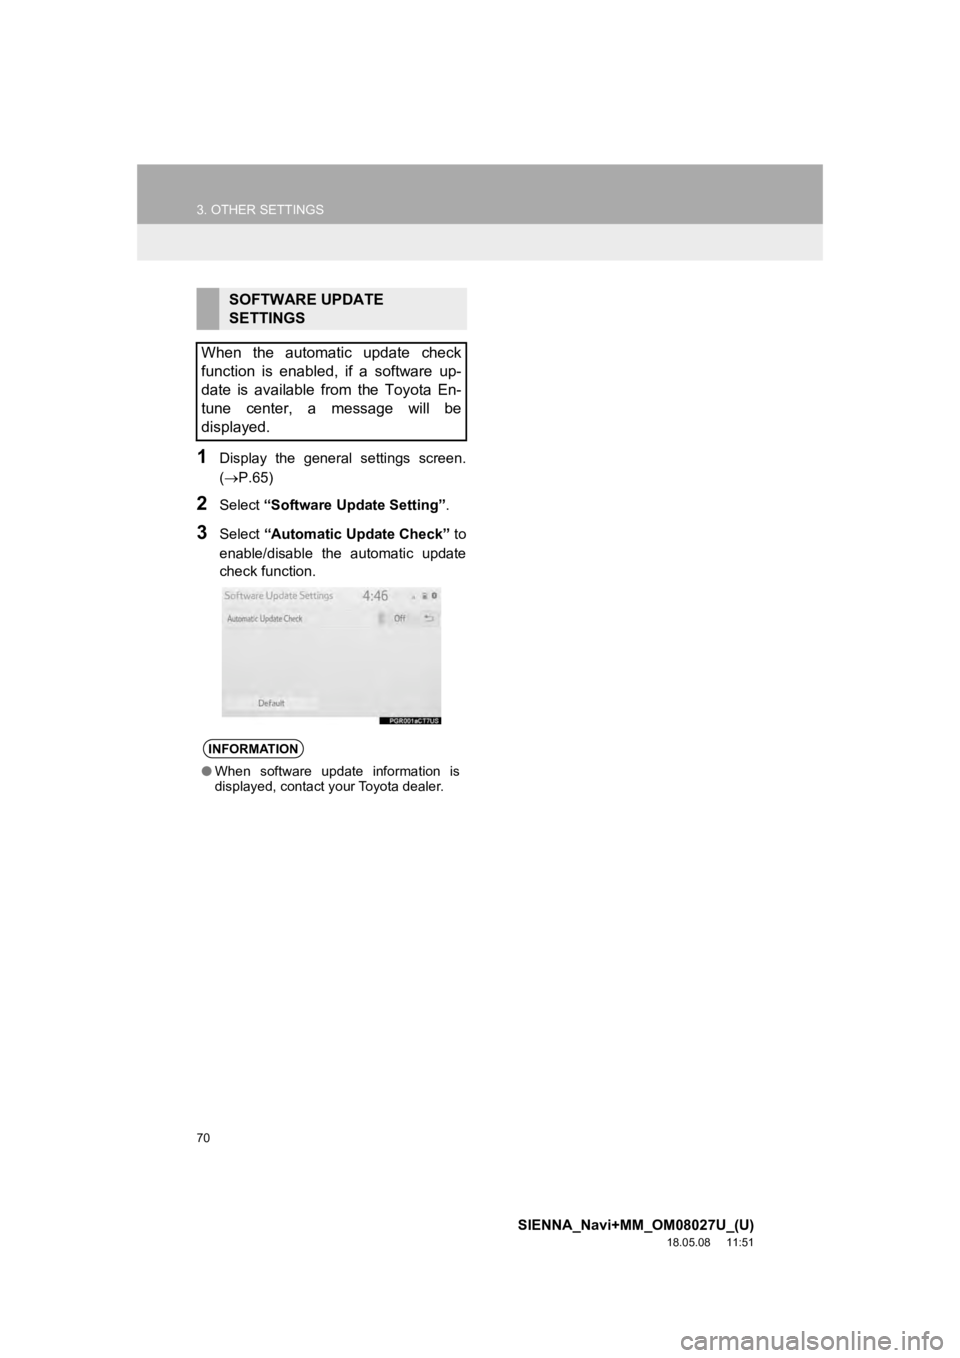
1Display the general settings screen.
(P.65)
2Select “Software Update Setting” .
3Select “Automatic Update Check” to
enable/disable the automatic update
check function.
SOFTWARE UPDATE
SETTINGS
When the automatic update check
function is enabled, if a software up-
date is available from the Toyota En-
tune center, a message will be
displayed.
INFORMATION
● When software update information is
displayed, contact your Toyota dealer.
Page 73 of 441
73
3. OTHER SETTINGS
SIENNA_Navi+MM_OM08027U_(U)
18.05.08 11:51
BASIC FUNCTION
2
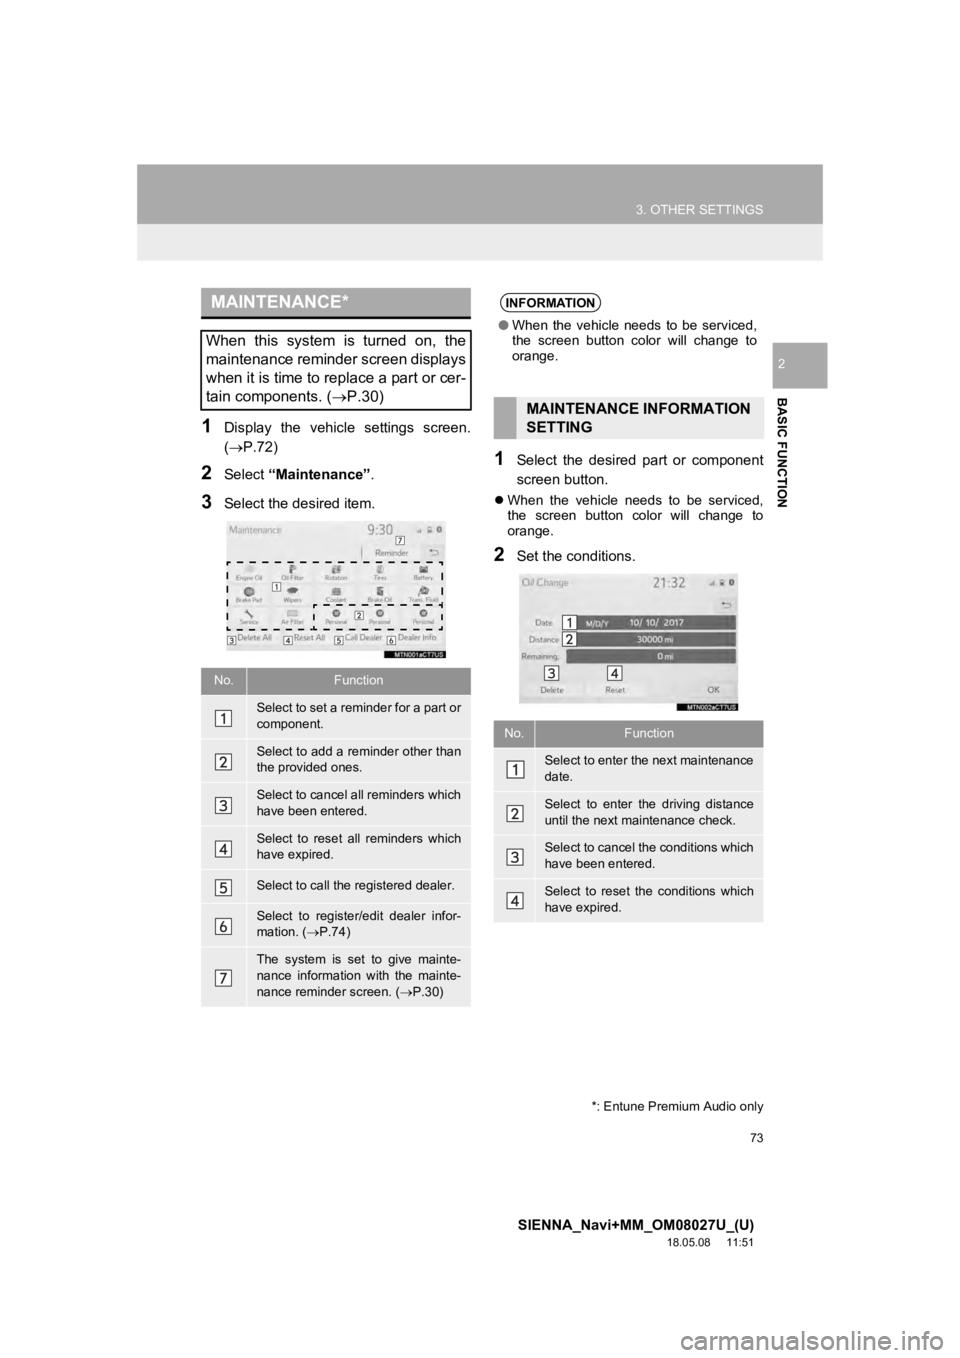
1Display the vehicle settings screen.
(P.72)
2Select “Maintenance” .
3Select the desired item.
1Select the desired part or component
screen button.
When the vehicle needs to be serviced,
the screen button color will change to
orange.
2Set the conditions.
MAINTENANCE*
When this system is turned on, the
maintenance reminder screen displays
when it is time to replace a part or cer-
tain components. ( P.30)
No.Function
Select to set a reminder for a part or
component.
Select to add a reminder other than
the provided ones.
Select to cancel all reminders which
have been entered.
Select to reset all reminders which
have expired.
Select to call the registered dealer.
Select to register/edit dealer infor-
mation. (P.74)
The system is set to give mainte-
nance information with the mainte-
nance reminder screen. ( P.30)
*: Entune Premium Audio only
INFORMATION
● When the vehicle needs to be serviced,
the screen button color will change to
orange.
MAINTENANCE INFORMATION
SETTING
No.Function
Select to enter the next maintenance
date.
Select to enter the driving distance
until the next maintenance check.
Select to cancel the conditions which
have been entered.
Select to reset the conditions which
have expired.
Page 74 of 441
74
3. OTHER SETTINGS
SIENNA_Navi+MM_OM08027U_(U)
18.05.08 11:51
3Select “OK” after entering the condi-
tions.
1Select “Set Dealer” .
2Select the desired item to search for
the location. ( P.346)
The editing dealer screen appears after
setting the location.
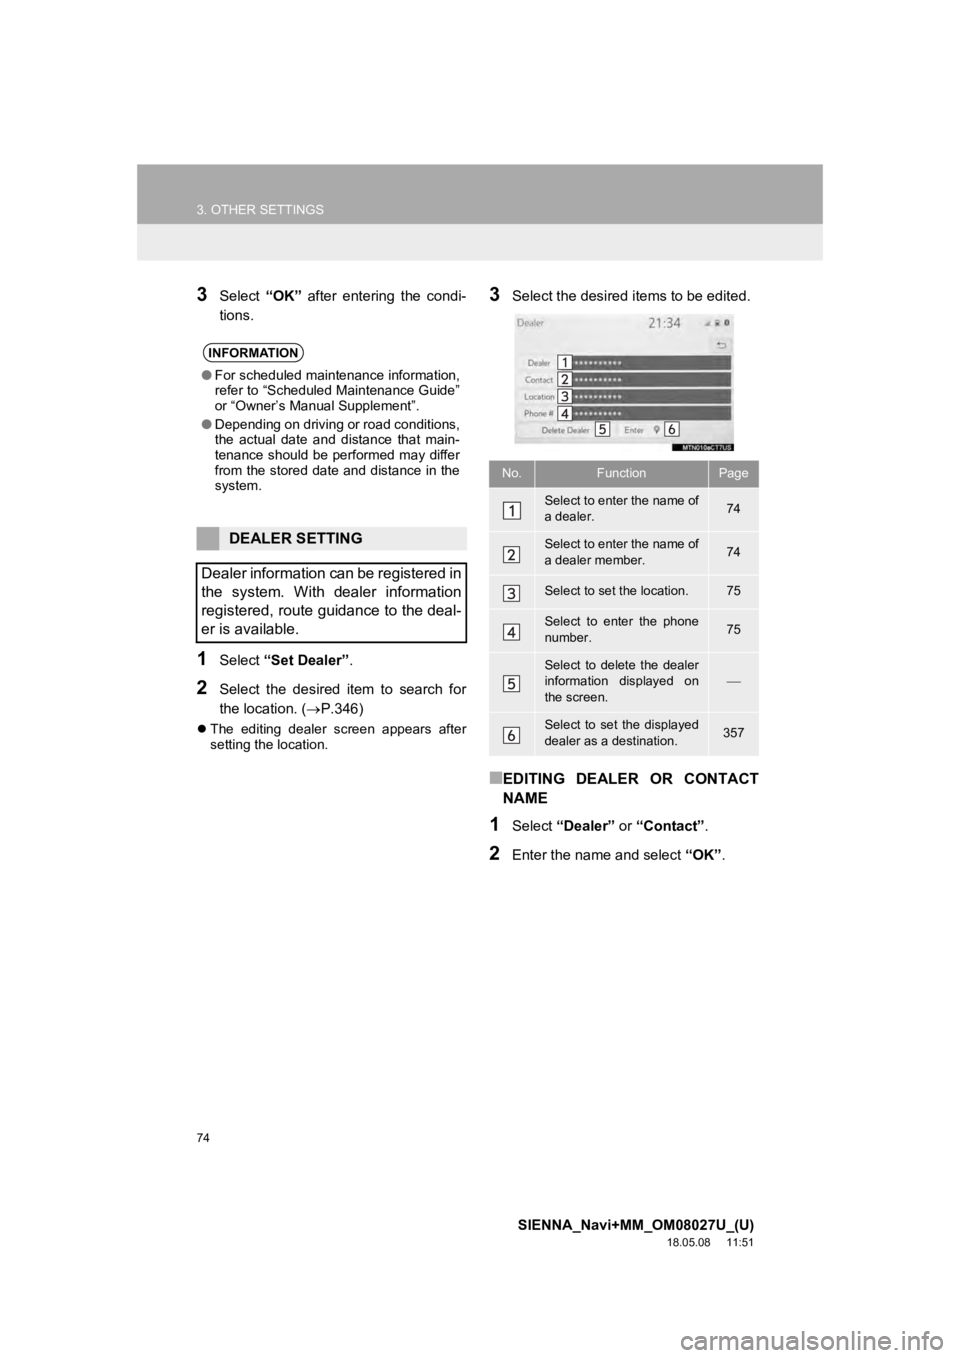
3Select the desired items to be edited.
■EDITING DEALER OR CONTACT
NAME
1Select “Dealer” or “Contact” .
2Enter the name and select “OK”.
INFORMATION
●For scheduled maintenance information,
refer to “Scheduled Maintenance Guide”
or “Owner’s Manual Supplement”.
● Depending on driving or road conditions,
the actual date and distance that main-
tenance should be performed may differ
from the stored date and distance in the
system.
DEALER SETTING
Dealer information can be registered in
the system. With dealer information
registered, route guidance to the deal-
er is available.
No.FunctionPage
Select to enter the name of
a dealer.74
Select to enter the name of
a dealer member.74
Select to set the location.75
Select to enter the phone
number.75
Select to delete the dealer
information displayed on
the screen.
Select to set the displayed
dealer as a destination.357
Page 75 of 441
75
3. OTHER SETTINGS
SIENNA_Navi+MM_OM08027U_(U)
18.05.08 11:51
BASIC FUNCTION
2
■EDITING THE LOCATION
1Select “Location” .
2Scroll the map to the desired point
(P.336) and select “Enter”.
■EDITING PHONE NUMBER
1Select “Phone #” .
2Enter the phone number and select
“OK”.
1Display the vehicle settings screen.
(P.72)
2Select “Valet Mode” .
3Enter the 4-digit personal code and se-
lect “OK” .
4Enter the same 4-digit personal code
again and select “OK”.
The system will request that you input the
security code again to confirm that you
remember it correctly.
VALET MODE
The security system can be set to on
by entering a security code (4-digit
number).
When set to on, the system will be-
come inoperative once the electrical
power source is disconnected until the
security code is entered.
SETTING THE VALET MODE
When valet mode activates, the system
stops and a security code (4-digit num-
ber) standby screen is displayed.
( P. 7 6 )
INFORMATION
●If the 4-digit personal code is forgotten,
please contact your Toyota dealer.
Page 76 of 441
76
3. OTHER SETTINGS
SIENNA_Navi+MM_OM08027U_(U)
18.05.08 11:51
1Enter the 4-digit personal code and se-
lect “OK” .
1Display the vehicle settings screen.
(P.72)
2Select “Dealer Info” .
3Select the items to be edited.
IF THE VALET MODE HAS
BEEN ACTIVATED
INFORMATION
●If an incorrect security code (4-digit
number) is entered 6 times, the system
will not accept another security code (4-
digit number) for 10 minutes.
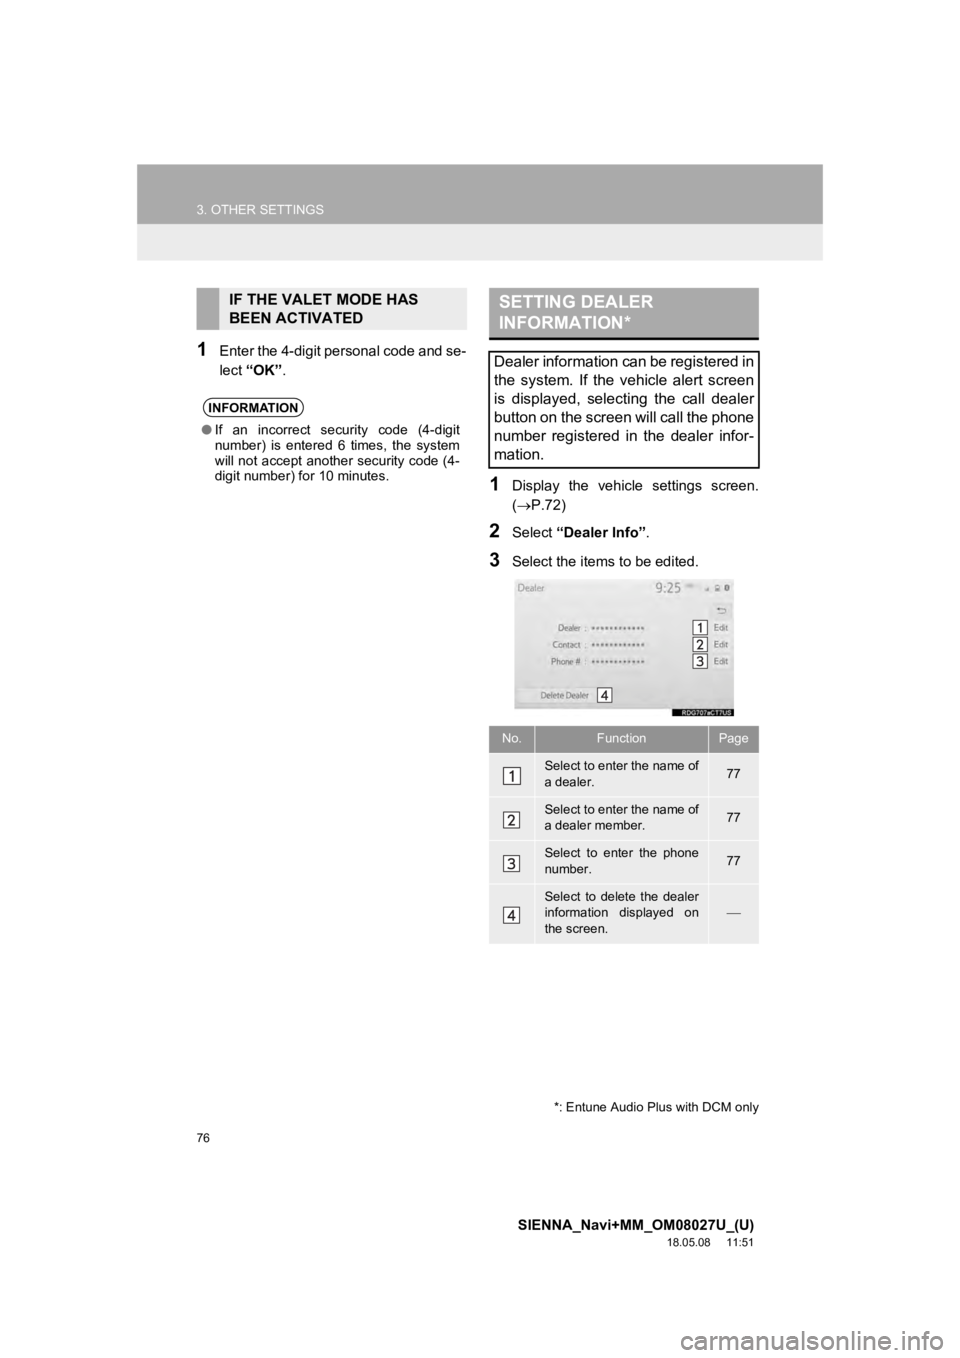
SETTING DEALER
INFORMATION*
Dealer information can be registered in
the system. If the vehicle alert screen
is displayed, selecting the call dealer
button on the screen will call the phone
number registered in the dealer infor-
mation.
No.FunctionPage
Select to enter the name of
a dealer.77
Select to enter the name of
a dealer member.77
Select to enter the phone
number.77
Select to delete the dealer
information displayed on
the screen.
*: Entune Audio Plus with DCM only