tow VAUXHALL ADAM 2016 Owner's Manual
[x] Cancel search | Manufacturer: VAUXHALL, Model Year: 2016, Model line: ADAM, Model: VAUXHALL ADAM 2016Pages: 237, PDF Size: 7.16 MB
Page 17 of 237
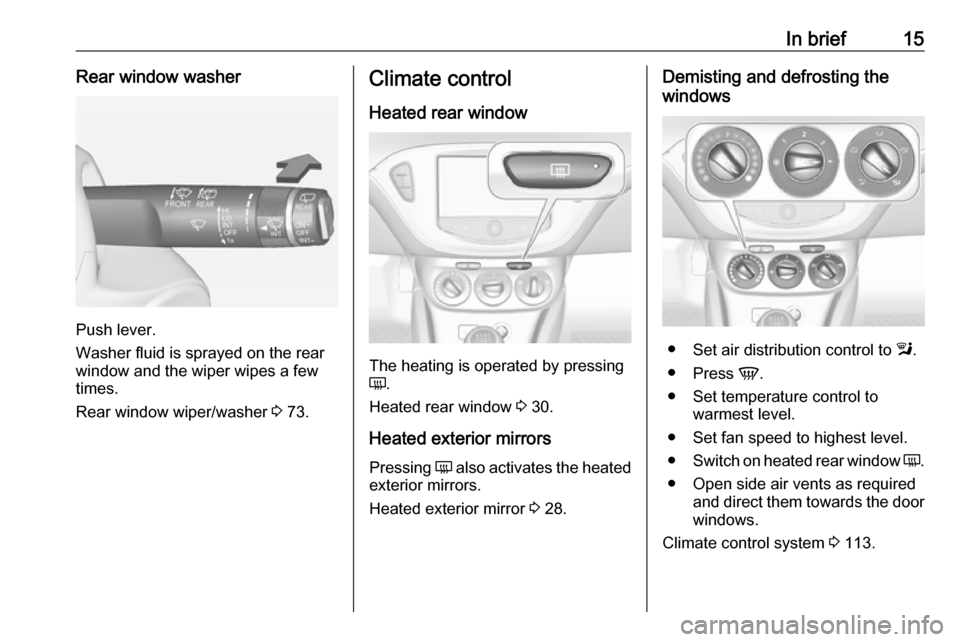
In brief15Rear window washer
Push lever.
Washer fluid is sprayed on the rear
window and the wiper wipes a few
times.
Rear window wiper/washer 3 73.
Climate control
Heated rear window
The heating is operated by pressing
Ü .
Heated rear window 3 30.
Heated exterior mirrors
Pressing Ü also activates the heated
exterior mirrors.
Heated exterior mirror 3 28.
Demisting and defrosting the
windows
● Set air distribution control to l.
● Press V.
● Set temperature control to warmest level.
● Set fan speed to highest level.
● Switch on heated rear window Ü.
● Open side air vents as required and direct them towards the doorwindows.
Climate control system 3 113.
Page 20 of 237
18In briefParking9Warning
● Do not park the vehicle on an
easily ignitable surface. The
high temperature of the
exhaust system could ignite the
surface.
● Always apply the parking brake. Activate the parking
brake without pressing the
release button. Apply as firmly
as possible on a downhill slope
or uphill slope. Depress brake
pedal at the same time to
reduce operating force.
● Switch off the engine.
● If the vehicle is on a level surface or uphill slope, engage
first gear before removing the ignition key. On an uphill slope, turn the front wheels away from
the kerb.
If the vehicle is on a downhill
slope, engage reverse gear
before removing the ignition
key. Turn the front wheels
towards the kerb.
● Close the windows and the sunroof.
● Remove the ignition key from the ignition switch. Turn the
steering wheel until the
steering wheel lock is felt to
engage.
For vehicles with manual
transmission automated, the key can only be removed from
the ignition switch when the
parking brake is applied.
● Lock the vehicle by pressing e on
the radio remote control.
Activate the anti-theft alarm
system 3 25.
● The engine cooling fans may run
after the engine has been
switched off 3 160.
Caution
After running at high engine
speeds or with high engine loads,
operate the engine briefly at a low load or run in neutral for
approx. 30 seconds before
switching off, in order to protect
the turbocharger.
Keys, locks 3 19, Laying-up the
vehicle for a long period of time
3 159.
Page 37 of 237
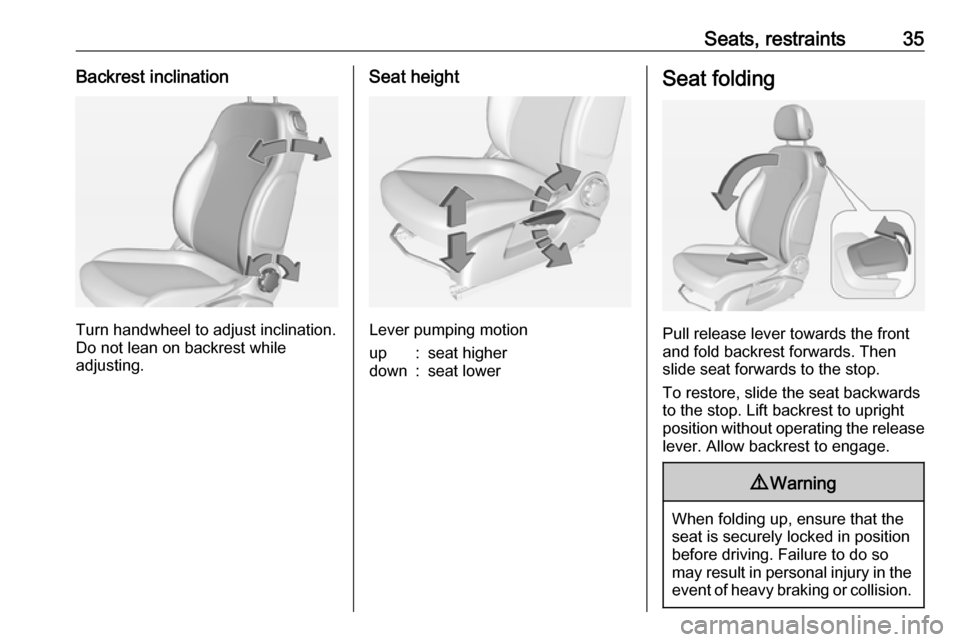
Seats, restraints35Backrest inclination
Turn handwheel to adjust inclination.
Do not lean on backrest while
adjusting.
Seat height
Lever pumping motion
up:seat higherdown:seat lowerSeat folding
Pull release lever towards the front
and fold backrest forwards. Then
slide seat forwards to the stop.
To restore, slide the seat backwards
to the stop. Lift backrest to upright
position without operating the release
lever. Allow backrest to engage.
9 Warning
When folding up, ensure that the
seat is securely locked in position
before driving. Failure to do so
may result in personal injury in the event of heavy braking or collision.
Page 43 of 237

Seats, restraints41AIRBAG ATTIVO di fronte ad esso:
pericolo di MORTE o LESIONI
GRAVI per il BAMBINO!
EL: ΠΟΤΕ μη χρησιμοποιείτε παιδικό
κάθισμα ασφαλείας με φορά προς τα πίσω σε κάθισμα που προστατεύεται
από μετωπικό ΕΝΕΡΓΟ ΑΕΡΟΣΑΚΟ,
διότι το παιδί μπορεί να υποστεί
ΘΑΝΑΣΙΜΟ ή ΣΟΒΑΡΟ
ΤΡΑΥΜΑΤΙΣΜΟ.
PL: NIE WOLNO montować fotelika
dziecięcego zwróconego tyłem do
kierunku jazdy na fotelu, przed
którym znajduje się WŁĄCZONA
PODUSZKA POWIETRZNA.
Niezastosowanie się do tego
zalecenia może być przyczyną
ŚMIERCI lub POWAŻNYCH
OBRAŻEŃ u DZIECKA.
TR: Arkaya bakan bir çocuk emniyet
sistemini KESİNLİKLE önünde bir
AKTİF HAVA YASTIĞI ile
korunmakta olan bir koltukta
kullanmayınız. ÇOCUK ÖLEBİLİR
veya AĞIR ŞEKİLDE
YARALANABİLİR.
UK: НІКОЛИ не використовуйте
систему безпеки для дітей, що
встановлюється обличчям назад,на сидінні з УВІМКНЕНОЮ
ПОДУШКОЮ БЕЗПЕКИ, інакше це
може призвести до СМЕРТІ чи
СЕРЙОЗНОГО ТРАВМУВАННЯ
ДИТИНИ.
HU: SOHA ne használjon hátrafelé
néző biztonsági gyerekülést előlről
AKTÍV LÉGZSÁKKAL védett ülésen,
mert a GYERMEK HALÁLÁT vagy
KOMOLY SÉRÜLÉSÉT okozhatja.
HR: NIKADA nemojte koristiti sustav
zadržavanja za djecu okrenut prema
natrag na sjedalu s AKTIVNIM
ZRAČNIM JASTUKOM ispred njega,
to bi moglo dovesti do SMRTI ili
OZBILJNJIH OZLJEDA za DIJETE.
SL: NIKOLI ne nameščajte otroškega
varnostnega sedeža, obrnjenega v
nasprotni smeri vožnje, na sedež z
AKTIVNO ČELNO ZRAČNO
BLAZINO, saj pri tem obstaja
nevarnost RESNIH ali SMRTNIH
POŠKODB za OTROKA.
SR: NIKADA ne koristiti bezbednosni
sistem za decu u kome su deca
okrenuta unazad na sedištu sa
AKTIVNIM VAZDUŠNIMJASTUKOM ispred sedišta zato što
DETE može da NASTRADA ili da se
TEŠKO POVREDI.
MK: НИКОГАШ не користете детско
седиште свртено наназад на
седиште заштитено со АКТИВНО
ВОЗДУШНО ПЕРНИЧЕ пред него,
затоа што детето може ДА ЗАГИНЕ или да биде ТЕШКО ПОВРЕДЕНО.
BG: НИКОГА не използвайте
детска седалка, гледаща назад,
върху седалка, която е защитена
чрез АКТИВНА ВЪЗДУШНА
ВЪЗГЛАВНИЦА пред нея - може да
се стигне до СМЪРТ или
СЕРИОЗНО НАРАНЯВАНЕ на
ДЕТЕТО.
RO: Nu utilizaţi NICIODATĂ un scaun
pentru copil îndreptat spre partea din
spate a maşinii pe un scaun protejat
de un AIRBAG ACTIV în faţa sa;
acest lucru poate duce la DECESUL
sau VĂTĂMAREA GRAVĂ a
COPILULUI.
CS: NIKDY nepoužívejte dětský
zádržný systém instalovaný proti
směru jízdy na sedadle, které je
chráněno před sedadlem AKTIVNÍM
Page 62 of 237
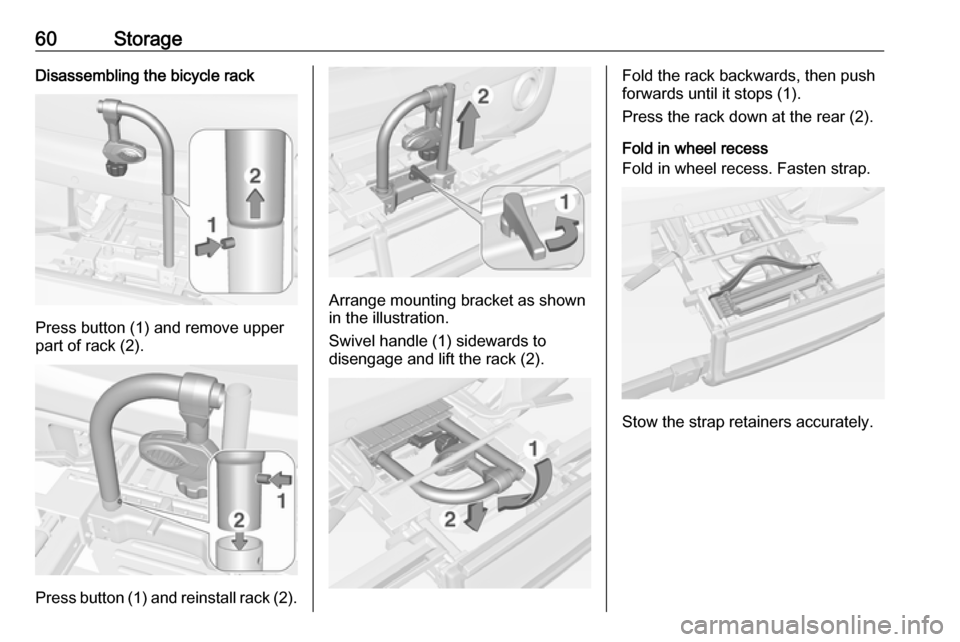
60StorageDisassembling the bicycle rack
Press button (1) and remove upper
part of rack (2).
Press button (1) and reinstall rack (2).
Arrange mounting bracket as shown
in the illustration.
Swivel handle (1) sidewards to
disengage and lift the rack (2).
Fold the rack backwards, then push
forwards until it stops (1).
Press the rack down at the rear (2).
Fold in wheel recess
Fold in wheel recess. Fasten strap.
Stow the strap retainers accurately.
Page 63 of 237
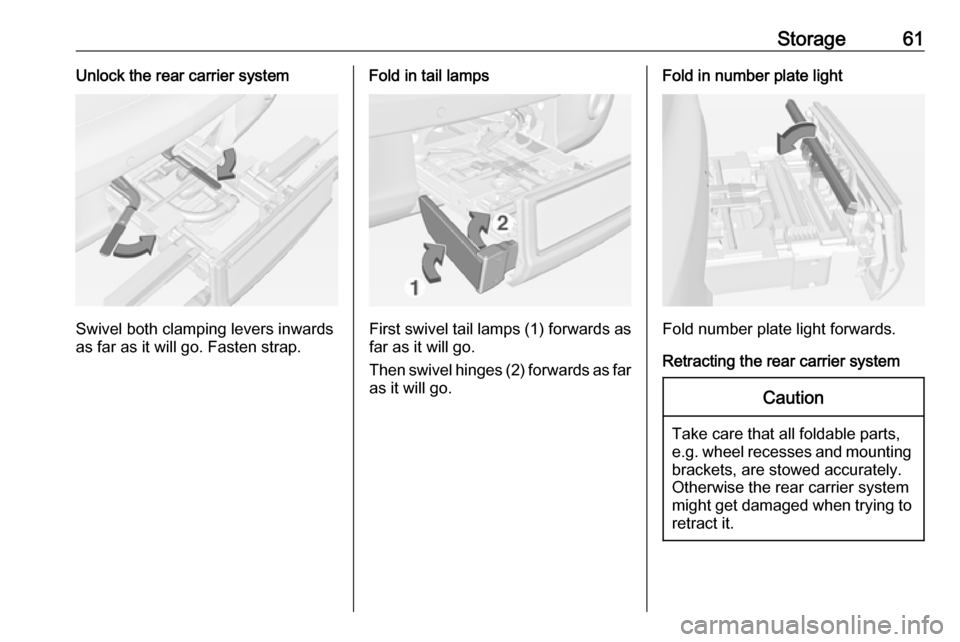
Storage61Unlock the rear carrier system
Swivel both clamping levers inwards
as far as it will go. Fasten strap.
Fold in tail lamps
First swivel tail lamps (1) forwards as
far as it will go.
Then swivel hinges (2) forwards as far as it will go.
Fold in number plate light
Fold number plate light forwards.
Retracting the rear carrier system
Caution
Take care that all foldable parts,
e.g. wheel recesses and mounting brackets, are stowed accurately.
Otherwise the rear carrier system might get damaged when trying to retract it.
Page 66 of 237
64Storage● Raise the lashing eyes on bothsides and turn the lock hooks to
the front to fix the box to the
lashing eyes.
● Raise the rear backrests and install the load compartment
cover.
● Stow the suitcase with tyre repair
kit in a chamber of the storage
box.
● Close and lock the cover.
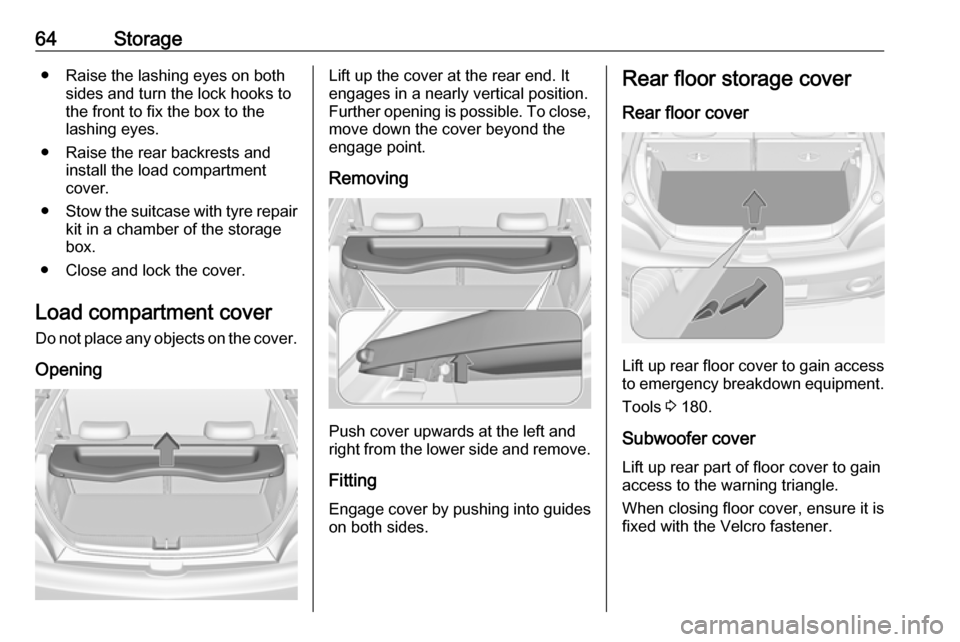
Load compartment cover
Do not place any objects on the cover.
OpeningLift up the cover at the rear end. It
engages in a nearly vertical position.
Further opening is possible. To close, move down the cover beyond the
engage point.
Removing
Push cover upwards at the left and
right from the lower side and remove.
Fitting Engage cover by pushing into guides
on both sides.
Rear floor storage cover
Rear floor cover
Lift up rear floor cover to gain access
to emergency breakdown equipment.
Tools 3 180.
Subwoofer cover
Lift up rear part of floor cover to gain
access to the warning triangle.
When closing floor cover, ensure it is
fixed with the Velcro fastener.
Page 68 of 237
66StorageGeneral hint9Warning
For safety reasons, stow all parts
in the load compartment in its
position, always drive with a
closed rear floor cover and, if
possible, with folded up rear
backrests.
Otherwise, vehicle occupants
could be injured by objects being
thrown around in the event of
sharp braking, a sudden change in direction or an accident.
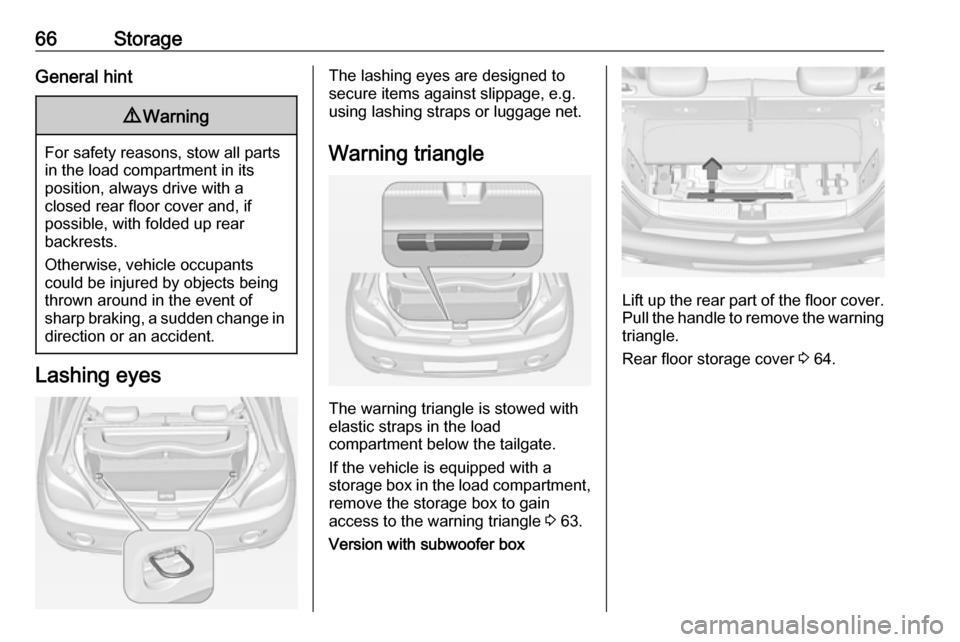
Lashing eyes
The lashing eyes are designed to
secure items against slippage, e.g.
using lashing straps or luggage net.
Warning triangle
The warning triangle is stowed with
elastic straps in the load
compartment below the tailgate.
If the vehicle is equipped with a
storage box in the load compartment,
remove the storage box to gain
access to the warning triangle 3 63.
Version with subwoofer box
Lift up the rear part of the floor cover. Pull the handle to remove the warning
triangle.
Rear floor storage cover 3 64.
Page 69 of 237
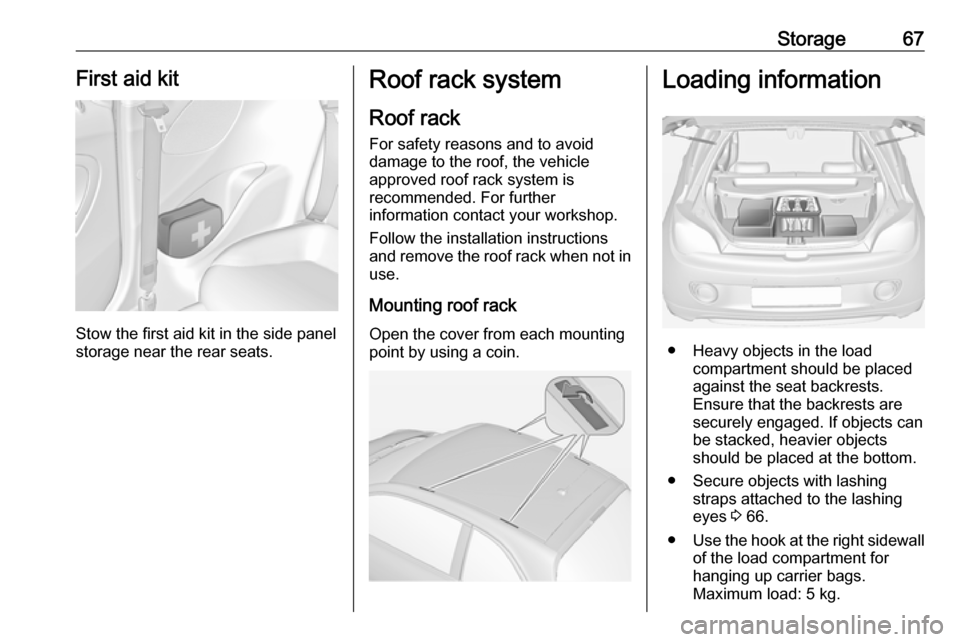
Storage67First aid kit
Stow the first aid kit in the side panel
storage near the rear seats.
Roof rack system
Roof rack
For safety reasons and to avoid
damage to the roof, the vehicle
approved roof rack system is
recommended. For further
information contact your workshop.
Follow the installation instructions
and remove the roof rack when not in use.
Mounting roof rack Open the cover from each mounting
point by using a coin.Loading information
● Heavy objects in the load compartment should be placed
against the seat backrests.
Ensure that the backrests are
securely engaged. If objects can
be stacked, heavier objects
should be placed at the bottom.
● Secure objects with lashing straps attached to the lashing
eyes 3 66.
● Use the hook at the right sidewall
of the load compartment for
hanging up carrier bags.
Maximum load: 5 kg.
Page 70 of 237

68Storage● Secure loose objects in the loadcompartment to prevent themfrom sliding.
● When transporting objects in the load compartment, the backrests
of the rear seats must not be
angled forward.
● Do not allow the load to protrude above the upper edge of the
backrests.
● Do not place any objects on the load compartment cover or the
instrument panel, and do not cover the sensor on top of the
instrument panel.
● The load must not obstruct the operation of the pedals, parking
brake and gear selector lever, or
hinder the freedom of movement of the driver. Do not place any
unsecured objects in the interior.
● Do not drive with an open load compartment.9Warning
Always make sure that the load in
the vehicle is securely stowed.
Otherwise objects can be thrown
around inside the vehicle and
cause personal injury or damage
to the load or vehicle.
● The payload is the difference between the permitted gross
vehicle weight (see identification
plate 3 211) and the EC kerb
weight.
To calculate the payload, enter
the data for your vehicle in the
weights table at the front of this
manual.
The EC kerb weight includes
weights for the driver (68 kg),
luggage (7 kg) and all fluids (fuel
tank 90% full).
Optional equipment and
accessories increase the kerb
weight.
● Driving with a roof load increases
the sensitivity of the vehicle to
cross-winds and has a
detrimental effect on vehicle
handling due to the vehicle's
higher centre of gravity.
Distribute the load evenly and secure it properly with retaining
straps. Adjust the tyre pressure
and vehicle speed according to
the load conditions. Check and
retighten the straps frequently.
Do not drive faster than 75 mph.
The permissible roof load is
50 kg. The roof load is the
combined weight of the roof rack and the load.