open VAUXHALL GRANDLAND X 2020 Repair Manual
[x] Cancel search | Manufacturer: VAUXHALL, Model Year: 2020, Model line: GRANDLAND X, Model: VAUXHALL GRANDLAND X 2020Pages: 283, PDF Size: 21.87 MB
Page 225 of 283
Vehicle care223
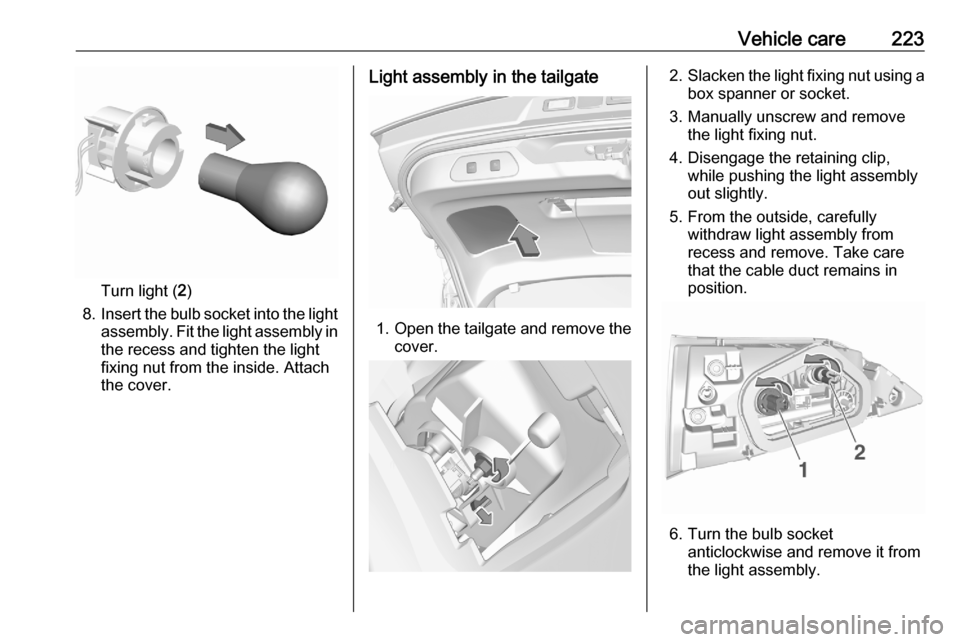
Turn light (2)
8. Insert the bulb socket into the light
assembly. Fit the light assembly in the recess and tighten the light
fixing nut from the inside. Attach
the cover.
Light assembly in the tailgate
1. Open the tailgate and remove the
cover.
2. Slacken the light fixing nut using a
box spanner or socket.
3. Manually unscrew and remove the light fixing nut.
4. Disengage the retaining clip, while pushing the light assembly
out slightly.
5. From the outside, carefully withdraw light assembly from
recess and remove. Take care
that the cable duct remains in
position.
6. Turn the bulb socket anticlockwise and remove it from
the light assembly.
Page 229 of 283
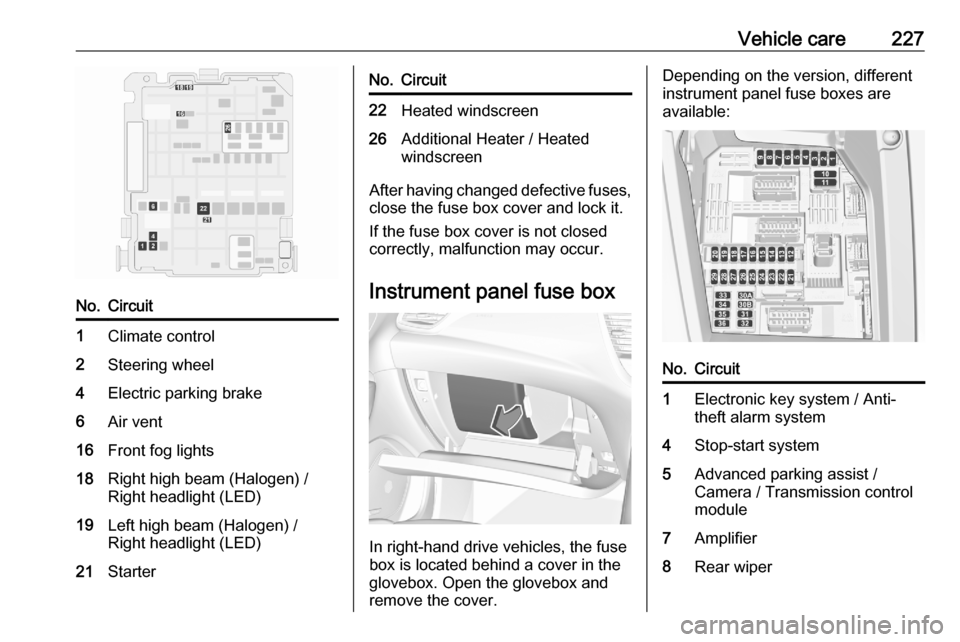
Vehicle care227No.Circuit1Climate control2Steering wheel4Electric parking brake6Air vent16Front fog lights18Right high beam (Halogen) /
Right headlight (LED)19Left high beam (Halogen) /
Right headlight (LED)21StarterNo.Circuit22Heated windscreen26Additional Heater / Heated
windscreen
After having changed defective fuses,
close the fuse box cover and lock it.
If the fuse box cover is not closed
correctly, malfunction may occur.
Instrument panel fuse box
In right-hand drive vehicles, the fuse
box is located behind a cover in the
glovebox. Open the glovebox and
remove the cover.
Depending on the version, different
instrument panel fuse boxes are
available:No.Circuit1Electronic key system / Anti-
theft alarm system4Stop-start system5Advanced parking assist /
Camera / Transmission control
module7Amplifier8Rear wiper
Page 231 of 283
Vehicle care229No.Circuit22Camera / Rain sensor / Auto‐
matic light control23Seat belt reminder24Automatic transmission /
Advanced parking assist /
Panoramic view system25Airbag26Electronic Stability Control27Alarm28BTA module29Infotainment32Cigarette lighter / Power outlet
front34Heated rear window / Heated
windscreen / Inductive charging35Light switch / Diagnostic
connector module36LightingVehicle tools
Tools
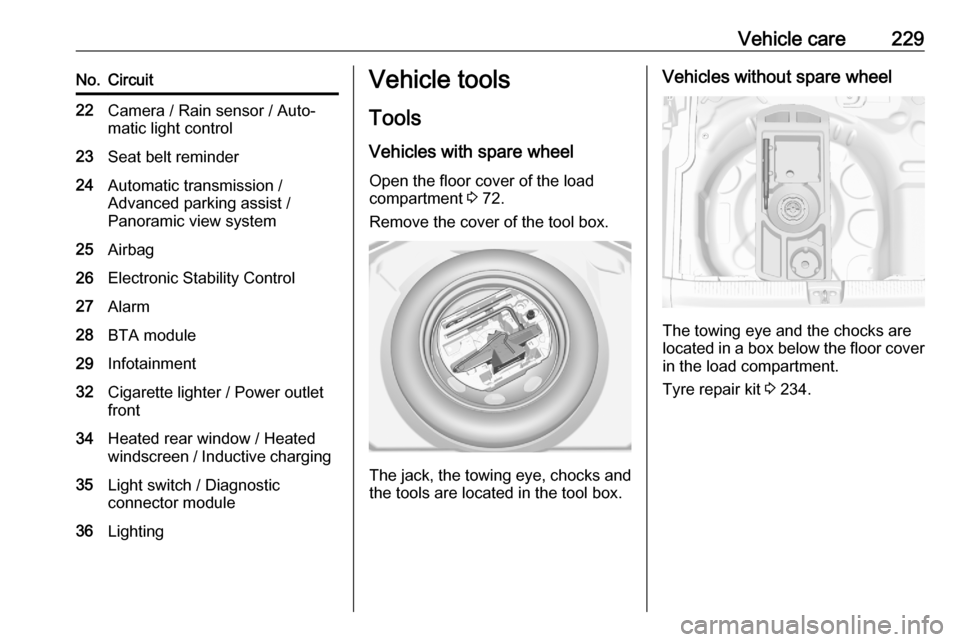
Vehicles with spare wheel Open the floor cover of the load
compartment 3 72.
Remove the cover of the tool box.
The jack, the towing eye, chocks and
the tools are located in the tool box.
Vehicles without spare wheel
The towing eye and the chocks are
located in a box below the floor cover in the load compartment.
Tyre repair kit 3 234.
Page 239 of 283
Vehicle care237
16. Continue driving immediately sothat sealant is evenly distributed
in the tyre. After driving approx.
3 miles but no more than
10 minutes, stop and check tyre
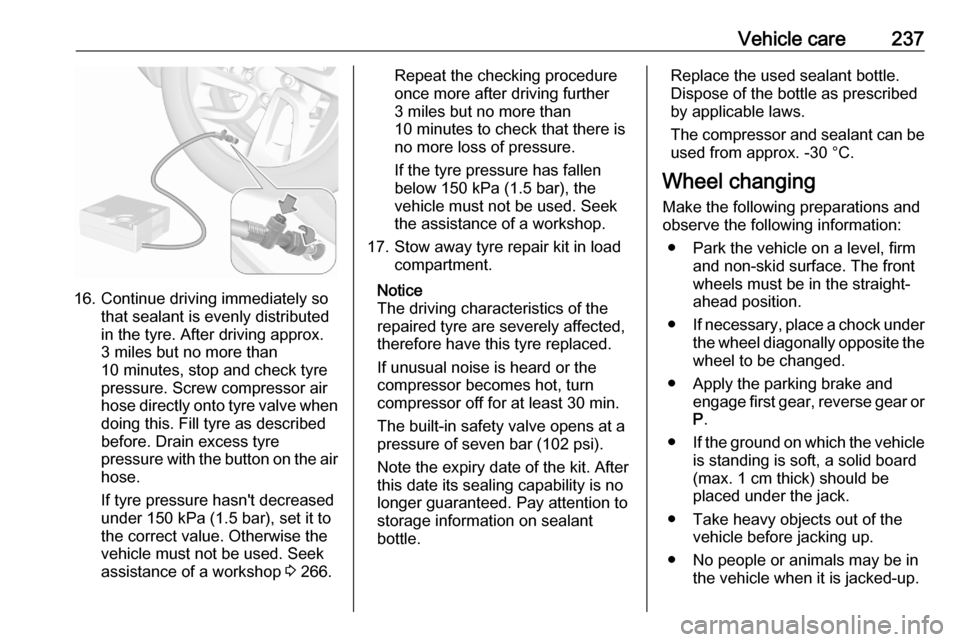
pressure. Screw compressor air
hose directly onto tyre valve when
doing this. Fill tyre as described
before. Drain excess tyre
pressure with the button on the air
hose.
If tyre pressure hasn't decreased
under 150 kPa (1.5 bar), set it to
the correct value. Otherwise the
vehicle must not be used. Seek
assistance of a workshop 3 266.
Repeat the checking procedure
once more after driving further
3 miles but no more than
10 minutes to check that there is
no more loss of pressure.
If the tyre pressure has fallen
below 150 kPa (1.5 bar), the
vehicle must not be used. Seek
the assistance of a workshop.
17. Stow away tyre repair kit in load compartment.
Notice
The driving characteristics of the repaired tyre are severely affected,
therefore have this tyre replaced.
If unusual noise is heard or the
compressor becomes hot, turn
compressor off for at least 30 min.
The built-in safety valve opens at a
pressure of seven bar (102 psi).
Note the expiry date of the kit. After
this date its sealing capability is no
longer guaranteed. Pay attention to
storage information on sealant
bottle.Replace the used sealant bottle. Dispose of the bottle as prescribed
by applicable laws.
The compressor and sealant can be used from approx. -30 °C.
Wheel changing
Make the following preparations and
observe the following information:
● Park the vehicle on a level, firm and non-skid surface. The front
wheels must be in the straight- ahead position.
● If necessary, place a chock under
the wheel diagonally opposite the
wheel to be changed.
● Apply the parking brake and engage first gear, reverse gear orP .
● If the ground on which the vehicle
is standing is soft, a solid board
(max. 1 cm thick) should be
placed under the jack.
● Take heavy objects out of the vehicle before jacking up.
● No people or animals may be in the vehicle when it is jacked-up.
Page 241 of 283
Vehicle care239Front arm position of the lifting
platform centrically under the relevant
vehicle jacking point.
Spare wheel
The spare wheel can be classified as
a temporary spare wheel depending
on the size compared to the other
mounted wheels and country
regulations. In this case a permissible maximum speed applies, even
though no label at the spare wheel
indicates this.
Only mount one temporary spare
wheel. Do not drive faster than
50 mph. Take curves slowly. Do not
use for a long period of time.Caution
The use of a spare wheel that is smaller than the other wheels or in combination with winter tyres
could affect driveability. Have the defective tyre replaced as soon as
possible.
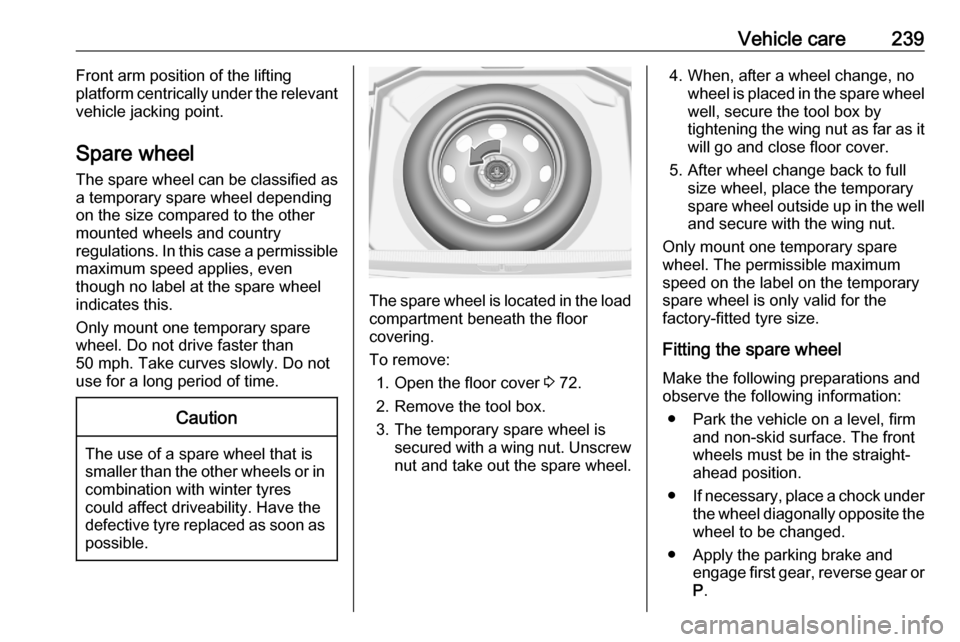
The spare wheel is located in the load
compartment beneath the floor
covering.
To remove: 1. Open the floor cover 3 72.
2. Remove the tool box.
3. The temporary spare wheel is secured with a wing nut. Unscrew
nut and take out the spare wheel.
4. When, after a wheel change, no wheel is placed in the spare wheelwell, secure the tool box by
tightening the wing nut as far as it
will go and close floor cover.
5. After wheel change back to full size wheel, place the temporary
spare wheel outside up in the well and secure with the wing nut.
Only mount one temporary spare
wheel. The permissible maximum
speed on the label on the temporary
spare wheel is only valid for the
factory-fitted tyre size.
Fitting the spare wheel
Make the following preparations and
observe the following information:
● Park the vehicle on a level, firm and non-skid surface. The front
wheels must be in the straight- ahead position.
● If necessary, place a chock under
the wheel diagonally opposite the
wheel to be changed.
● Apply the parking brake and engage first gear, reverse gear or
P .
Page 245 of 283
Vehicle care2439Warning
Avoid contact of the battery with
eyes, skin, fabrics and painted
surfaces. The fluid contains
sulphuric acid which can cause
injuries and damage in the event
of direct contact.
● Never expose the vehicle battery
to naked flames or sparks.
● A discharged vehicle battery can already freeze at a temperature
of 0 °C. Defrost the frozen battery before connecting jump leads.
● Wear eye protection and protective clothing when
handling a battery.
● Use a booster battery with the same voltage (12 V). Its capacity
(Ah) must not be much less than
that of the discharged vehicle battery.
● Use jump leads with insulated terminals and a cross section of
at least 16 mm 2
(25 mm 2
for
diesel engines).
● Do not disconnect the discharged
vehicle battery from the vehicle.
● Switch off all unnecessary electrical consumers.
● Do not lean over the vehicle battery during jump starting.
● Do not allow the terminals of one
lead to touch those of the other
lead.
● The vehicles must not come into contact with each other during
the jump starting process.
● Apply the parking brake, transmission in neutral,
automatic transmission in P.Open the positive terminal protection
caps of both vehicle batteries.
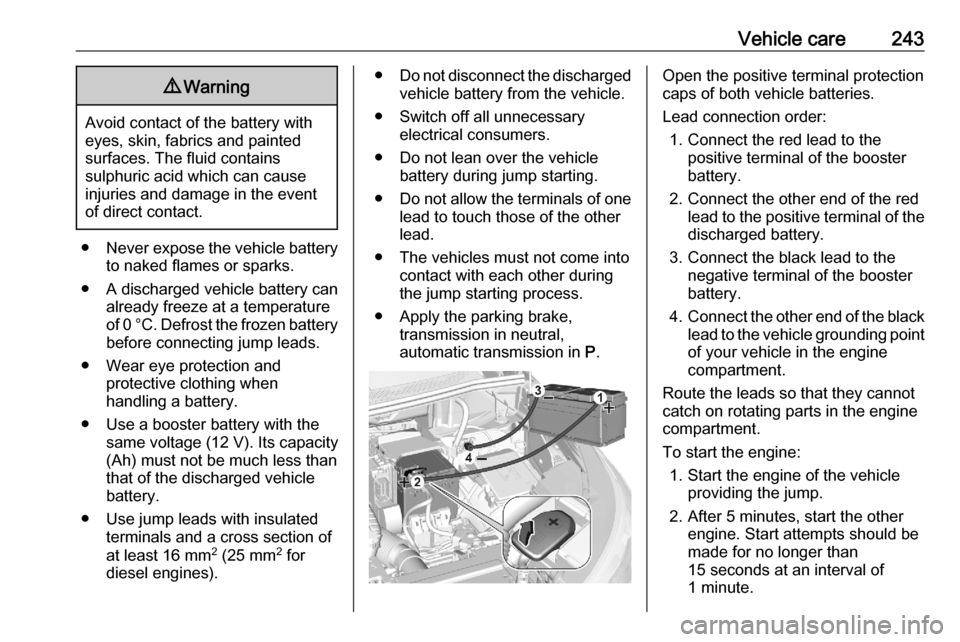
Lead connection order: 1. Connect the red lead to the positive terminal of the booster
battery.
2. Connect the other end of the red lead to the positive terminal of the
discharged battery.
3. Connect the black lead to the negative terminal of the boosterbattery.
4. Connect the other end of the black
lead to the vehicle grounding point
of your vehicle in the engine
compartment.
Route the leads so that they cannot
catch on rotating parts in the engine
compartment.
To start the engine: 1. Start the engine of the vehicle providing the jump.
2. After 5 minutes, start the other engine. Start attempts should be
made for no longer than
15 seconds at an interval of
1 minute.
Page 248 of 283
246Vehicle careScrew in the towing eye as far as it willgo until it stops in a horizontal
position.
The lashing eye at the rear
underneath the vehicle must never be used as a towing eye.
Attach a tow rope – or better still a tow
rod – to the towing eye.
The towing eye must only be used for
towing and not for recovering a
vehicle.Caution
Drive slowly. Do not drive jerkily.
Excessive tractive force can
damage the vehicle.
After towing, unscrew the towing eye.
Insert cap with the upper flange into
the recess and fix cap by pushing.
Appearance care
Exterior care LocksThe locks are lubricated at the factoryusing a high quality lock cylinder
grease. Use a de-icing agent only
when absolutely necessary, as this
has a degreasing effect and impairs
lock function. After using a de-icing
agent, have the locks regreased by a
workshop.
WashingThe paintwork of your vehicle is
exposed to environmental influences.
Wash and wax your vehicle regularly.
When using automatic vehicle
washes, select a programme that
includes waxing.
Bird droppings, dead insects, resin,
pollen and the like should be cleaned
off immediately, as they contain
aggressive constituents which can
cause paint damage.If using a vehicle wash, comply with
the vehicle wash manufacturer's instructions. The windscreen wiperand rear window wiper must be
switched off. Remove antenna and
external accessories such as roof
racks etc.
If you wash your vehicle by hand,
make sure that the insides of the
wheel housings are also thoroughly
rinsed out.
Wax painted parts of the vehicle regularly.
Clean edges and folds on opened
doors and the bonnet as well as the
areas they cover.
Clean bright metal mouldings with a
cleaning solution approved for
aluminium to avoid damages.Caution
Always use a cleaning agent with
a pH value of 4 to 9.
Do not use cleaning agents on hot surfaces.
Page 250 of 283
248Vehicle careBitumen / rubber materials coulddamage the PVC coating. Have
underbody work carried out by a
workshop.
Before and after winter, wash the
underbody and have the protective
wax coating checked.
Liquid gas system9 Danger
Liquid gas is heavier than air and
can collect in sink points.
Take care when performing work
at the underbody in a pit.
For painting work and when using a
drying booth at a temperature above
60 °C, the liquid gas tank must be
removed.
Do not make any modifications to the
liquid gas system.
Towing equipment
Do not clean the coupling ball bar with a steam-jet or high-pressure jet
cleaner.
Interior care
Interior and upholstery
Only clean the vehicle interior,
including the instrument panel fascia
and panelling, with a dry cloth or
interior cleaner.
Clean the leather upholstery with
clear water and a soft cloth. In case of heavy soiling, use leather care.
The instrument cluster and the
displays should only be cleaned using
a soft damp cloth. If necessary use a
weak soap solution.
Clean fabric upholstery with a
vacuum cleaner and brush. Remove
stains with an upholstery cleaner.
Clothing fabrics may not be
colourfast. This could cause visible
discolourations, especially on light-
coloured upholstery. Removable
stains and discolourations should be
cleaned as soon as possible.
Clean seat belts with lukewarm water or interior cleaner.Caution
Close Velcro fasteners and open
Velcro fasteners on clothing could damage seat upholstery.
The same applies to clothing with
sharp-edged objects, e.g. zips,
belts or studded jeans.
Plastic and rubber parts
Plastic and rubber parts can be
cleaned with the same cleaner as
used to clean the body. Use interior
cleaner if necessary. Do not use any
other agent. Avoid solvents and petrol in particular. Do not use high-
pressure jet cleaners.
Floor mats
9 Warning
If a floor mat has the wrong size or
is not properly installed, it can
interfere with the accelerator pedal
and/or brake pedal, what can
cause unintended acceleration
Page 279 of 283

277Charging status.......................... 198
Charging system .......................... 94
Child locks ................................... 28
Child restraint installation locations ................................... 64
Child restraints.............................. 61
Child restraint systems ................61
Cigarette lighter ........................... 87
Climate control ............................. 15
Climate control systems .............122
Clock............................................. 83
Collision damage repair ..............270
Control indicators.......................... 92
Control of the vehicle .................134
Controls ........................................ 79
Convex shape .............................. 36
Coolant and antifreeze ...............254
Cruise control ...................... 99, 159
Cupholders .................................. 68
Curtain airbag system .................. 59
Curve lighting.............................. 114
D Danger, Warnings and Cautions ...4
Daytime running lights ...............114
Declaration of conformity ............268
DEF ............................................ 142
Deflation detection system ...........98
Diesel exhaust fluid ....................142
Diesel fuel system bleeding .......218Door open .................................. 100
Doors ............................................ 29
Drive modes ............................... 151
Driver alert .................................. 193
Driver assistance systems ..........159
Driver Information Centre ...........100
Driving characteristics and towing tips .............................. 205
Driving hints ................................ 134
E Electric adjustment ......................36
Electrical system......................... 225
Electric parking brake ...95, 152, 153
Electric parking brake fault ...........95
Electronic climate control system 126
Electronic driving programmes ..149
Electronic key system ...................22
Electronic Stability Control and Traction Control system ....96, 156
Electronic Stability Control and Traction Control system off .......97
Emergency call ........................... 110
End-of-life vehicle recovery .......212
Engine compartment fuse box ...226
Engine coolant ........................... 215
Engine coolant temperature ........97
Engine coolant temperature gauge ....................................... 91
Engine data ............................... 260Engine exhaust .......................... 141
Engine identification ...................257
Engine oil ................... 214, 254, 258
Engine oil level monitor ................91
Engine oil pressure ......................98
Entry lighting .............................. 121
Event data recorders ..................271
Exhaust filter ......................... 97, 141
Exit lighting ................................ 121
Exterior care .............................. 246
Exterior light ................................. 98
Exterior lighting ....................12, 112
Exterior mirrors ............................. 36
F
Fault ........................................... 149
First aid ......................................... 75
First aid kit ................................... 75
Fixed air vents ........................... 132
Floor mats................................... 248
Folding mirrors ............................. 37
Forward collision alert................. 170
Front airbag system .....................58
Front fog lights .............99, 118, 221
Front pedestrian protection ........175
Front seats.................................... 45
Fuel............................................. 201
Fuel for diesel engines ..............202
Fuel for petrol engines ...............201