VAUXHALL VIVARO C 2020 Manual Online
VIVARO C 2020
VAUXHALL
VAUXHALL
https://www.carmanualsonline.info/img/38/19597/w960_19597-0.png
VAUXHALL VIVARO C 2020 Manual Online
Trending: turn signal, Fuse panel, coolant level, maintenance, Adblu, Fuse for windows, high beam
Page 81 of 289
Storage79
To open the storage compartment
press the button and open the cover.
Folding tray 3 85.
Underseat storage
Storage box
There may be a storage box under the
centre bench seat next to the driver
seat. Lift up the seat cushion by
pulling the handle.
There may be a storage box under the centre and left bench seat. Lift up the
seat cushion.
Depending on version the storage
box can be removed from the back to accommodate long objects.
Page 82 of 289

80StorageLoad compartmentDepending on version, the load
compartment area can be increased by folding up or removing the seats in the second and third row.
Vehicle version with seat benches
in second and third row
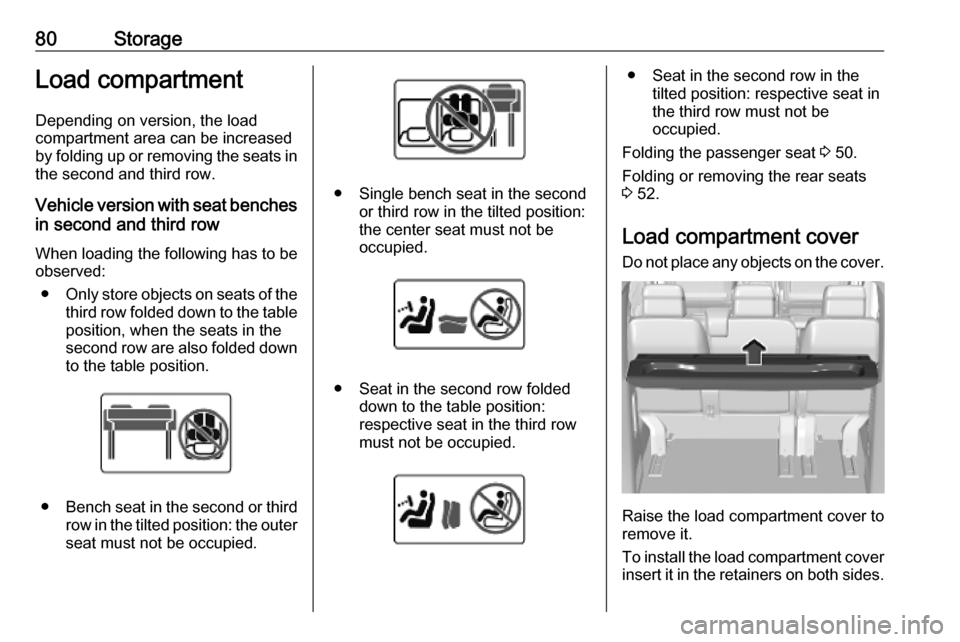
When loading the following has to be
observed:
● Only store objects on seats of the
third row folded down to the table
position, when the seats in the
second row are also folded down to the table position.
● Bench seat in the second or third
row in the tilted position: the outer
seat must not be occupied.
● Single bench seat in the second or third row in the tilted position:
the center seat must not be
occupied.
● Seat in the second row folded down to the table position:
respective seat in the third row must not be occupied.
● Seat in the second row in the tilted position: respective seat inthe third row must not be
occupied.
Folding the passenger seat 3 50.
Folding or removing the rear seats
3 52.
Load compartment cover Do not place any objects on the cover.
Raise the load compartment cover to
remove it.
To install the load compartment cover
insert it in the retainers on both sides.
Page 83 of 289
Storage81Lashing eyes
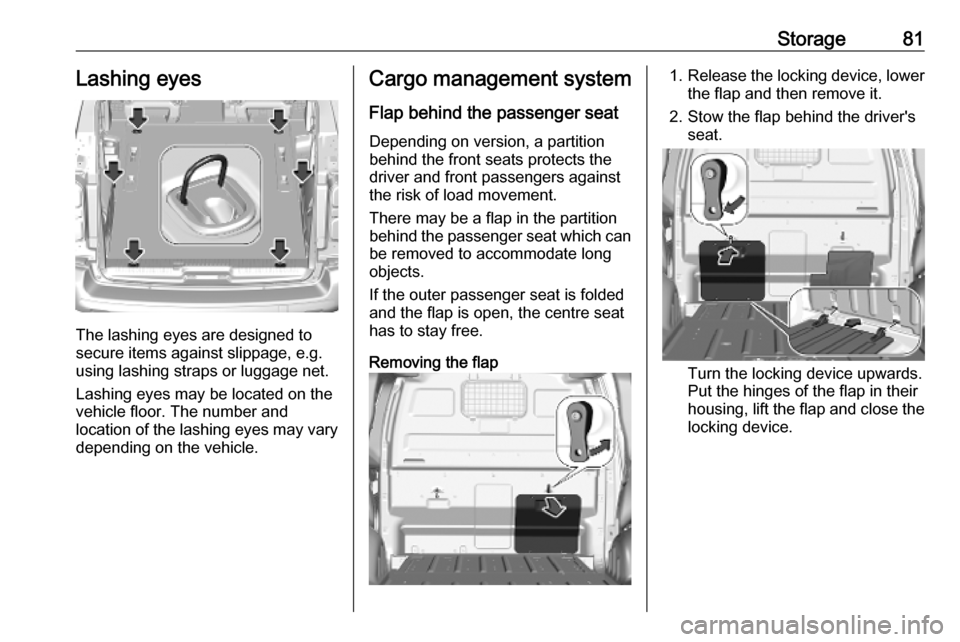
The lashing eyes are designed to
secure items against slippage, e.g.
using lashing straps or luggage net.
Lashing eyes may be located on the
vehicle floor. The number and
location of the lashing eyes may vary depending on the vehicle.
Cargo management system
Flap behind the passenger seat Depending on version, a partition
behind the front seats protects the
driver and front passengers against
the risk of load movement.
There may be a flap in the partition
behind the passenger seat which can
be removed to accommodate long
objects.
If the outer passenger seat is folded
and the flap is open, the centre seat
has to stay free.
Removing the flap1. Release the locking device, lower
the flap and then remove it.
2. Stow the flap behind the driver's seat.
Turn the locking device upwards.
Put the hinges of the flap in their
housing, lift the flap and close the
locking device.
Page 84 of 289
82StorageSliding the flap
Slide the flap to the side. It is kept in
position by magnets.
Fitting the protective net
The protective net must be installed
whenever the bench seat of the front
passenger side is folded and the
partition flap is open.
1. Lift the seat cushion of the bench seat of the front passenger side.
Seat folding 3 50.
2. Fix the net like shown on the
picture.
3. Fit the attachment in the opening.
To lock the attachment turn it
clockwise a quarter turn.
4. Attach the hooks to the lashing eyes in the glovebox and on the
floor.
After transportation remove the
protective net and fold down the seat.
Second row bench seat in the
commercial vehicle
The bench seat in the second row can be folded to increase the load
compartment.
Page 85 of 289

Storage839Warning
When seats are being adjusted or
folded, keep hands and feet away
from the moving area. Risk of
injury.
Ensure that there are no objects
on the anchor points or rails.
Never adjust seats while driving as they could move uncontrollably.
Drive only with engaged seats and
backrests.
Folding
1. Tilt the head restraints to the front.
Pull the loop upwards to unlock
the bench seat.
2. Raise the bench seat taking the handle and fold the bench seat to
the front until it is engaged.
Unfolding
1. To restore the bench seat to the original position pull the loop to
unlock it.
2. Take the handle to fold the bench
seat to the back until it is engaged in the original position.
Tilt up the head restraints.
Safety net
Safety net behind the seats Depending on version, the safety net
can be installed behind the second
row seats, the third row seats or
behind the front seats.
To increase the loading capacity the
seats behind the safety net can be
folded or removed.
Rear seats 3 52.
Seat backrests in front of the safety
net must be raised up.
Passengers must not be transported
behind the safety net.
Page 86 of 289
84StorageInstallation in the roof frame
1.There are installation openings on
both sides in the roof frame. If
present, open the covers.
2. Suspend and engage the rod of net at one side, compress rod and
suspend and engage at the other
side.
Installation on the floor 1. a) Installation with lashing eyes
Attach the hooks of safety net
straps in the lashing eyes.
Lashing eyes 3 81.
b) Installation with rear seats on
rails
Insert the fixings in the floor
anchorages on both sides. To lock
the fixings turn them clockwise a
quarter turn. Place them as close as possible to the end of the rail.
c) Installation with fixed rear seats
Insert the fixings in the floor
anchorages on both sides.
Page 87 of 289
Storage85
It is possible to install the safety
net together with folded seats.
Folded seats 3 52.
2. Tension both straps by pulling at the loose end.
Safety net on the floor
Attached to the lashing eyes on the
rear floor, it allows objects to be held down.
Lashing eyes 3 81.
Additional storage
features
Folding tray
Trays may be located on the
backrests of the front seats.
Fold down the tray. The tray contains a cupholder and a strap to secure
objects.
Do not place any hard or heavy
objects on the tray.
Page 88 of 289
86StorageDocument tray in the centre
seatback
The front centre passenger seat
backrest can contain a document
tray.
Fold down the tray. The document
tray contains a storage compartment
and a swivelling shelf.
Return the swivelling shelf to its
original position before raising the tray.
Table
Multifunctional table
The multifunctional table can be
positioned in second or third row.
To move the multifunctional table pull the handle in the front without going
beyond the point of resistance. Slide
the multifunctional table forwards or
backwards. Release the handle when it is in the desired position. Make sure
that the multifunctional table is
securely engaged.
Page 89 of 289
Storage87Storage compartment in the
multifunctional table
Press the cover to open the storage
compartment.
The maximum permitted load is 3 kg.
Unfolding
To unfold the multifunctional table pull
the handle on the top. Pull the rear
part to the vertical position until it
engages.
On the two sides there are tables
located. Pull the table fully up and
then move it into the horizontal
position.
Each table can bear a maximum load of 10 kg.
Caution
To avoid damaging the table tops
never unfold the table when it is
between individual seats.
Page 90 of 289
88StorageFolding
To staw the table use the handle to
move it back in the folded position.
To fold the multifunctional table pull
the handle and move the rear part
downwards until it engages.
Removing
To remove the multifunctional table
pull the handle in the front beyond the point of resistance. Remove the
multifunctional table.
Refitting
The multifunctional table can be fitted in two positions.
Trending: adblue reset, wiper size, side door, TURBOCHARGER, Horn, oil viscosity, climate settings


