mirror VAUXHALL VIVARO C 2020 Owner's Manual
[x] Cancel search | Manufacturer: VAUXHALL, Model Year: 2020, Model line: VIVARO C, Model: VAUXHALL VIVARO C 2020Pages: 289, PDF Size: 10.16 MB
Page 11 of 289
In brief9Mirror adjustment
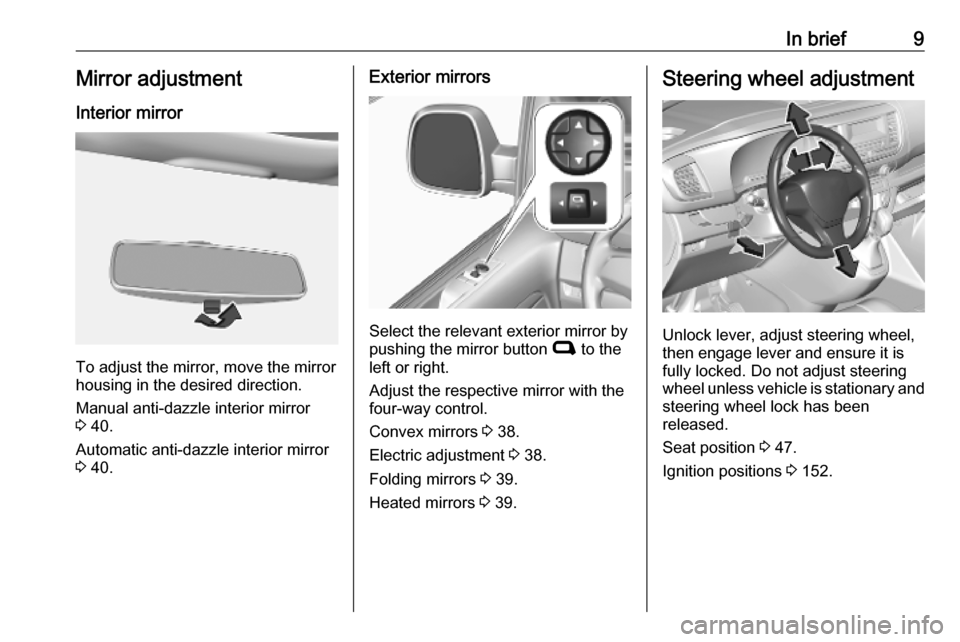
Interior mirror
To adjust the mirror, move the mirror
housing in the desired direction.
Manual anti-dazzle interior mirror
3 40.
Automatic anti-dazzle interior mirror 3 40.
Exterior mirrors
Select the relevant exterior mirror by
pushing the mirror button C to the
left or right.
Adjust the respective mirror with the
four-way control.
Convex mirrors 3 38.
Electric adjustment 3 38.
Folding mirrors 3 39.
Heated mirrors 3 39.
Steering wheel adjustment
Unlock lever, adjust steering wheel,
then engage lever and ensure it is fully locked. Do not adjust steering
wheel unless vehicle is stationary and steering wheel lock has been
released.
Seat position 3 47.
Ignition positions 3 152.
Page 13 of 289

In brief111Power windows .....................41
2 Exterior mirrors .....................38
3 Side air vents ...................... 148
4 Selective ride control ..........171
5 Turn lights ........................... 133
Headlight flash ....................131
High beam ........................... 130
Exit lighting .......................... 136
6 Head-up display controls ....120
7 Steering wheel controls ........93
8 Steering wheel paddles ........93
9 Instruments ......................... 104
Driver Information Centre .... 115
10 Button for Driver
Information Centre ..............115
Windscreen wiper and
washer .................................. 94
Rear wiper and washer .........96
11 Head-up display ..................120
12 Air vents .............................. 148
13 Control elements for Info
Display ................................ 11914Info Display ......................... 119
15 Climate control system ........ 140
16 Storage compartment ...........78
17 Storage compartment ...........78
18 AUX input
19 Power outlet .......................... 97
20 Airbag deactivation ...............64
21 USB port ............................... 97
22 Seat heating .......................... 51
23 Electronic Stability Control
and Traction Control ...........170
Tyre deflation detection
system ................................. 238
Stop-start system ................156
Heated windscreen ...............44
Electric child locks ................. 28
Central locking system ..........24
24 Hazard warning flashers .....132
25 Manual transmission ...........167
Automatic transmission .......164
26 Power button ....................... 153
27 Automatic locking ..................2828Ignition switch .....................152
29 Control elements for
Infotainment system
30 Steering wheel adjustment ...93
31 Fuse box ............................. 230
32 Horn ...................................... 94
33 Cruise control ...................... 173
Speed limiter ....................... 176
Adaptive cruise control .......179
34 Bonnet release lever ...........213
35 Anti-theft alarm system .........36
Lane departure warning ......200
Side blind spot alert ............194
Parking assist ...................... 191
Parking heater ....................146
Headlight range adjustment 131
High beam assist ................130
Page 17 of 289
In brief15Climate control
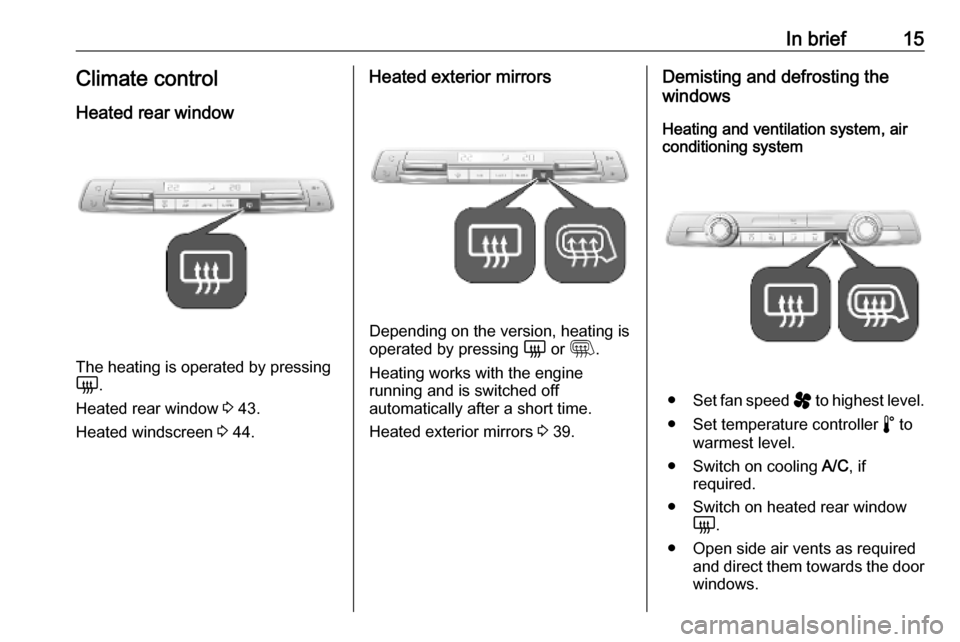
Heated rear window
The heating is operated by pressing
è .
Heated rear window 3 43.
Heated windscreen 3 44.
Heated exterior mirrors
Depending on the version, heating is
operated by pressing è or m .
Heating works with the engine
running and is switched off
automatically after a short time.
Heated exterior mirrors 3 39.
Demisting and defrosting the
windows
Heating and ventilation system, air
conditioning system
● Set fan speed ý to highest level.
● Set temperature controller ñ to
warmest level.
● Switch on cooling A/C, if
required.
● Switch on heated rear window è.
● Open side air vents as required and direct them towards the doorwindows.
Page 20 of 289
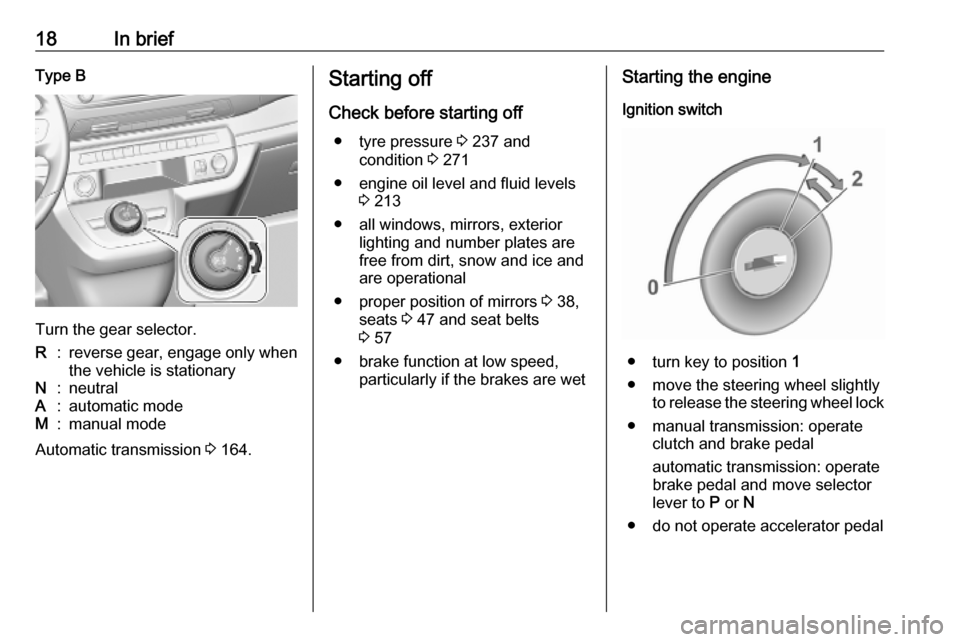
18In briefType B
Turn the gear selector.
R:reverse gear, engage only when
the vehicle is stationaryN:neutralA:automatic modeM:manual mode
Automatic transmission 3 164.
Starting off
Check before starting off ● tyre pressure 3 237 and
condition 3 271
● engine oil level and fluid levels 3 213
● all windows, mirrors, exterior lighting and number plates are
free from dirt, snow and ice and
are operational
● proper position of mirrors 3 38,
seats 3 47 and seat belts
3 57
● brake function at low speed, particularly if the brakes are wetStarting the engine
Ignition switch
● turn key to position 1
● move the steering wheel slightly to release the steering wheel lock
● manual transmission: operate clutch and brake pedal
automatic transmission: operate
brake pedal and move selector lever to P or N
● do not operate accelerator pedal
Page 23 of 289

Keys, doors and windows21Keys, doors and
windowsKeys, locks ................................... 21
Keys .......................................... 21
Radio remote control .................22
Electronic key system ................23
Central locking system ..............24
Automatic locking ......................28
Child locks ................................. 28
Doors ........................................... 30
Sliding doors .............................. 30
Load compartment ....................32
Vehicle security ............................ 35
Anti-theft locking system ...........35
Anti-theft alarm system ..............36
Immobiliser ................................ 38
Exterior mirrors ............................ 38
Convex shape ........................... 38
Electric adjustment ....................38
Folding mirrors .......................... 39
Heated mirrors ........................... 39
Interior mirrors ............................. 40
Manual anti-dazzle ....................40
Automatic anti-dazzle ................40
Child surveillance mirror ............40Windows ...................................... 41
Windscreen ............................... 41
Power windows ......................... 41
Rear windows ............................ 42
Heated rear window ..................43
Heated windscreen ....................44
Sun visors .................................. 44
Roller blinds ............................... 44
Roof ............................................. 45
Glass panel ............................... 45Keys, locks
KeysCaution
Do not attach heavy or bulky items to the ignition key.
Replacement keys
The key number is specified on a
detachable tag.
The key number must be quoted
when ordering replacement keys as it
is a component of the immobiliser
system.
Locks 3 253.
Central locking 3 24.
Starting the engine 3 154.
Radio remote control 3 22.
Electronic key 3 23.
The code number of the adapter for
the locking wheel nuts is specified on
a card. It must be quoted when
ordering a replacement adapter.
Wheel changing 3 244.
Page 24 of 289
22Keys, doors and windowsKey with foldaway key section
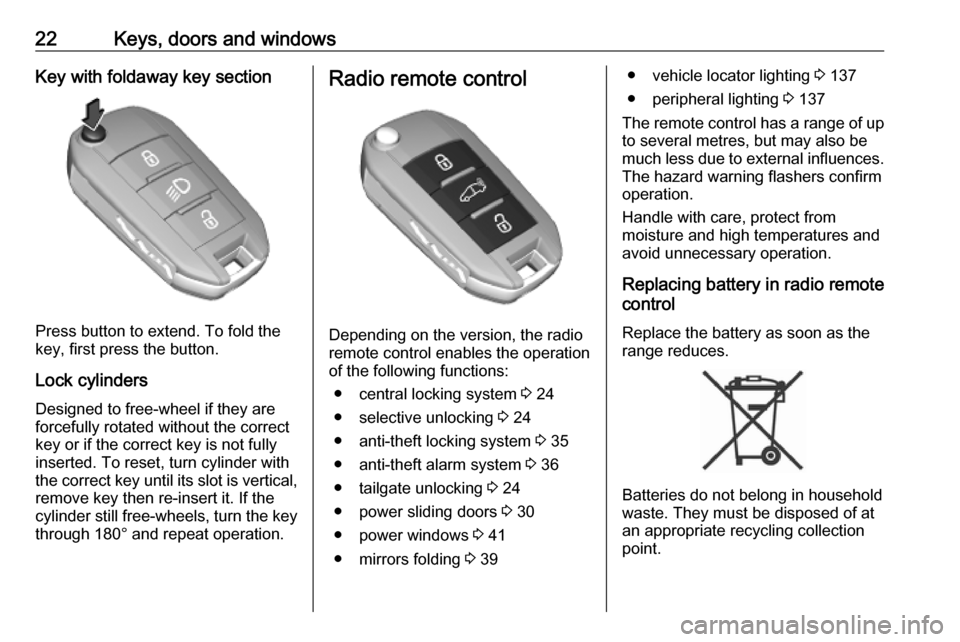
Press button to extend. To fold the
key, first press the button.
Lock cylinders
Designed to free-wheel if they are forcefully rotated without the correct
key or if the correct key is not fully
inserted. To reset, turn cylinder with
the correct key until its slot is vertical, remove key then re-insert it. If the
cylinder still free-wheels, turn the key
through 180° and repeat operation.
Radio remote control
Depending on the version, the radio
remote control enables the operation of the following functions:
● central locking system 3 24
● selective unlocking 3 24
● anti-theft locking system 3 35
● anti-theft alarm system 3 36
● tailgate unlocking 3 24
● power sliding doors 3 30
● power windows 3 41
● mirrors folding 3 39
● vehicle locator lighting 3 137
● peripheral lighting 3 137
The remote control has a range of up
to several metres, but may also be
much less due to external influences. The hazard warning flashers confirm
operation.
Handle with care, protect from
moisture and high temperatures and
avoid unnecessary operation.
Replacing battery in radio remote
control
Replace the battery as soon as the
range reduces.
Batteries do not belong in household
waste. They must be disposed of at
an appropriate recycling collection
point.
Page 40 of 289
38Keys, doors and windowsdeactivated as follows: switch the
ignition on then off, then disconnect
the vehicle's battery within
15 seconds.
If the battery has been reconnected,
wait for 10 minutes to restart the
engine.
Locking the vehicle without
activation of the anti-theft alarm
Lock the vehicle by inserting andturning the integrated key of the
remote control or the electronic key
system in the lock cylinder of the
driver's door.
Malfunction of the remote control
Unlock the vehicle by inserting and
turning the integrated key of the
remote control or the electronic key
system in the lock cylinder of the
driver's door.
Open the driver's door.
The horn of the anti-theft alarm will
sound.
Switch on ignition.
The horn will stop sounding and the status LED extinguishes.Immobiliser
The system is part of the ignition
switch and checks whether the
vehicle is allowed to be started with
the key being used.
The immobiliser is activated
automatically after the key has been removed from the ignition switch.
Notice
Radio Frequency Identification
(RFID) tags may cause interference
with the key. Do not have it placed
near the key when starting the
vehicle.
Notice
The immobiliser does not lock the
doors. Always lock the vehicle after
leaving it 3 24.
Switch on the anti-theft alarm
system 3 36.
Emergency operation of electronic
key 3 153.Exterior mirrors
Convex shape The shape of the mirror makes
objects appear smaller, which will affect the ability to estimate
distances.
Side blind spot alert 3 194.
Electric adjustment
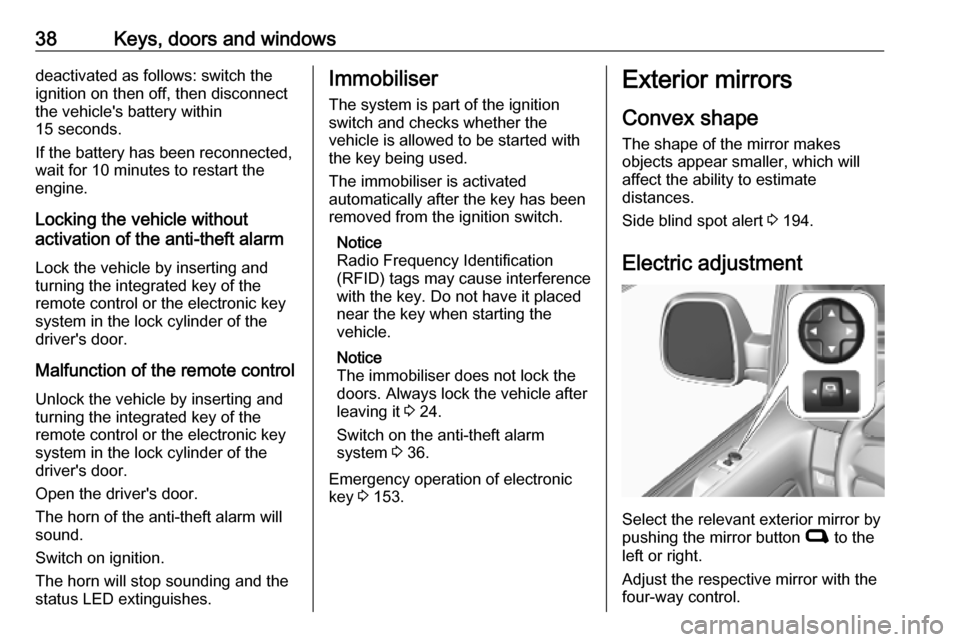
Select the relevant exterior mirror by
pushing the mirror button C to the
left or right.
Adjust the respective mirror with the
four-way control.
Page 41 of 289
Keys, doors and windows39Folding mirrors
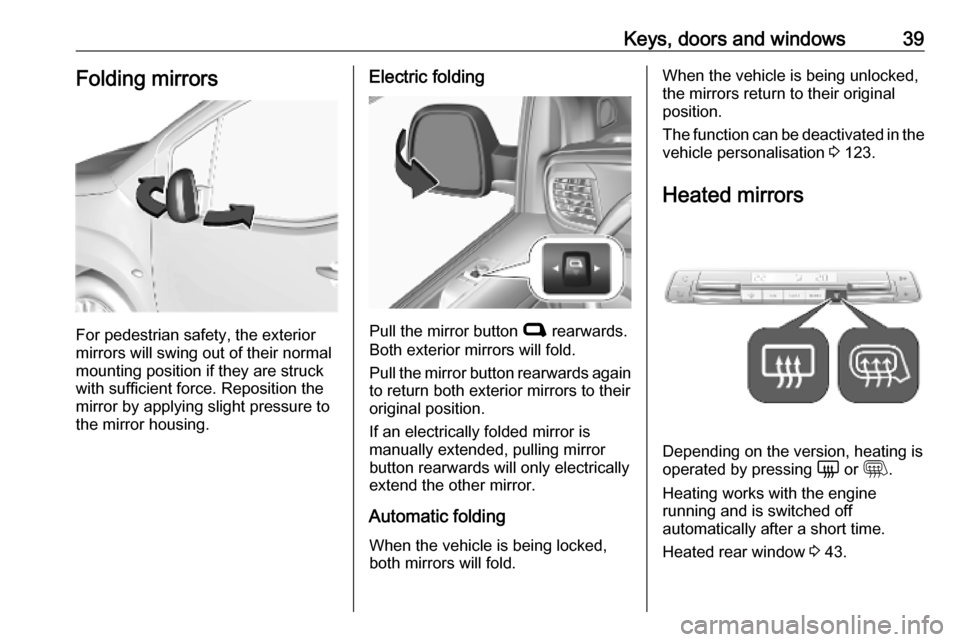
For pedestrian safety, the exterior
mirrors will swing out of their normal
mounting position if they are struck
with sufficient force. Reposition the mirror by applying slight pressure tothe mirror housing.
Electric folding
Pull the mirror button C rearwards.
Both exterior mirrors will fold.
Pull the mirror button rearwards again
to return both exterior mirrors to their
original position.
If an electrically folded mirror is
manually extended, pulling mirror
button rearwards will only electrically
extend the other mirror.
Automatic folding When the vehicle is being locked,
both mirrors will fold.
When the vehicle is being unlocked,
the mirrors return to their original
position.
The function can be deactivated in the vehicle personalisation 3 123.
Heated mirrors
Depending on the version, heating is
operated by pressing è or m .
Heating works with the engine
running and is switched off
automatically after a short time.
Heated rear window 3 43.
Page 42 of 289
40Keys, doors and windowsInterior mirrors
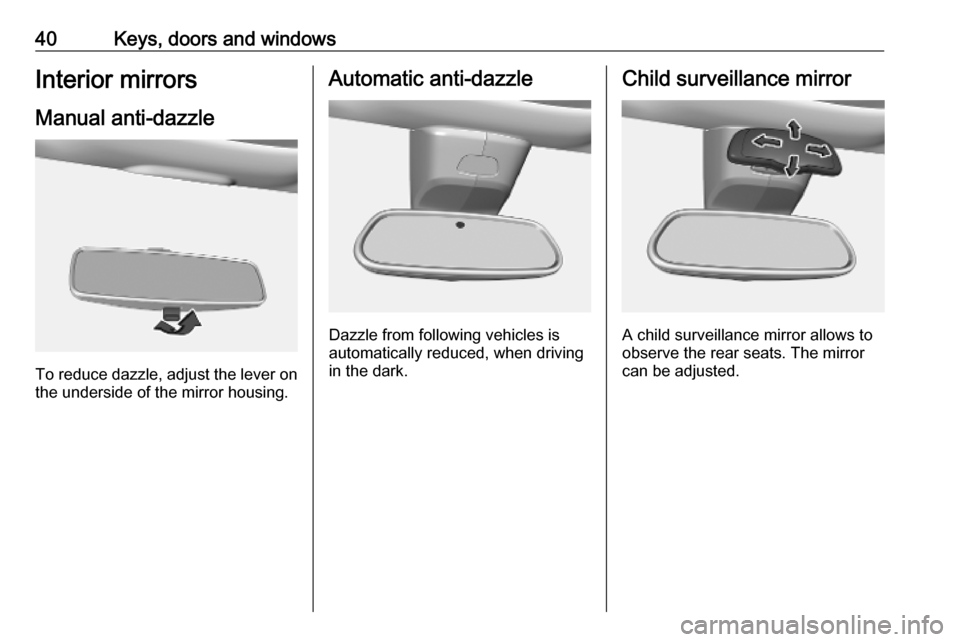
Manual anti-dazzle
To reduce dazzle, adjust the lever on the underside of the mirror housing.
Automatic anti-dazzle
Dazzle from following vehicles is
automatically reduced, when driving
in the dark.
Child surveillance mirror
A child surveillance mirror allows to
observe the rear seats. The mirror can be adjusted.
Page 43 of 289
Keys, doors and windows41Windows
Windscreen
Windscreen stickers
Do not attach stickers such as toll
road stickers or similar on the
windscreen in the area of the interior
mirror. Otherwise the detection zone
of the sensor and the view area of the camera in the mirror housing could be
restricted.
Windscreen replacementCaution
If the vehicle has a front-looking
camera sensor for the driver
assistance systems, it is very
important that any windscreen
replacement is performed
accurately according to Vauxhall
specifications. Otherwise, these systems may not work properly
and there is a risk of unexpected
behaviour and / or messages from these systems.
Power windows9 Warning
Take care when operating the
power windows. Risk of injury,
particularly to children.
If there are children on the rear seats, switch on the child safety
system for the power windows.
Keep a close watch on the
windows when closing them.
Ensure that nothing becomes
trapped in them as they move.
Switch on ignition to operate power
windows.
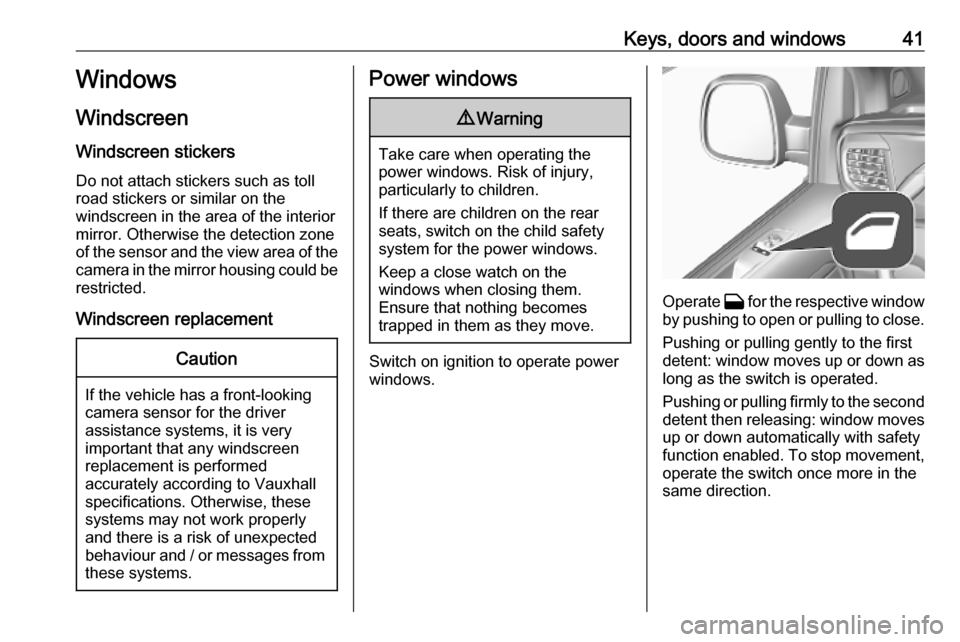
Operate G for the respective window
by pushing to open or pulling to close.
Pushing or pulling gently to the first
detent: window moves up or down as long as the switch is operated.
Pushing or pulling firmly to the second
detent then releasing: window moves
up or down automatically with safety
function enabled. To stop movement,
operate the switch once more in the
same direction.