warning VAUXHALL ZAFIRA 2014.5 Owner's Manual
[x] Cancel search | Manufacturer: VAUXHALL, Model Year: 2014.5, Model line: ZAFIRA, Model: VAUXHALL ZAFIRA 2014.5Pages: 219, PDF Size: 7.83 MB
Page 6 of 219

4IntroductionDanger, Warnings and
Cautions9 Danger
Text marked 9 Danger provides
information on risk of fatal injury.
Disregarding this information may
endanger life.
9 Warning
Text marked 9 Warning provides
information on risk of accident or
injury. Disregarding this
information may lead to injury.
Caution
Text marked Caution provides
information on possible damage to
the vehicle. Disregarding this
information may lead to vehicle
damage.
Symbols
Page references are indicated with 3.
3 means "see page".
Thank you for choosing a Vauxhall
We wish you many hours of
pleasurable driving.
Your Vauxhall Team
Page 13 of 219

In brief11
1Light switch ........................ 109
Instrument illumination .......114
Rear fog light ....................... 113
Front fog lights ...................112
Headlight range
adjustment ......................... 110
2 Side air vents ...................... 123
3 Turn and lane-change
signals, headlight flash,
low beam and high beam ...112
Exit lighting .......................... 115
Parking lights ...................... 113
Cruise control ....................... 93
4 Steering wheel controls ........78
5 Horn ...................................... 79
Driver airbag ......................... 60
6 Instruments .......................... 84
7 Windscreen wiper,
windscreen washer
system, headlight washer
system .................................. 79
8 Centre air vents ................... 1239Left heated seat ....................48
Tyre pressure monitoring
system ................................. 176
Ultrasonic parking assist ......90
Hazard warning flashers .....112
Central locking system ..........30
Sport mode ........................... 90
Right heated seat ..................48
10 Info-Display ........................... 94
Trip computer ...................... 103
Electronic climate control
system ................................. 120
11 Front passenger airbag .........60
12 Glovebox .............................. 68
13 Infotainment system ..............10
14 Climate control system ........ 117
15 Selector lever, manual
transmission ....................... 134
Manual transmission
automated ........................... 135
Automatic transmission .......12916Ashtray .................................. 83
17 Start/Stop button .................. 27
18 Accelerator pedal ................125
19 Ignition switch with
steering wheel lock .............126
Sensor panel for
emergency operation of
Open&Start system ..............27
20 Brake pedal ......................... 139
21 Clutch pedal ........................ 125
22 Steering wheel adjustment ...78
23 Bonnet release lever ...........154
Page 14 of 219

12In briefExterior lighting
Turn light switch
7=Off8=sidelights9=low beamAUTO=Automatic light control
Press light switch
>=Front fog lightsr=Rear fog light
Lighting 3 109, Headlight warning
device 3 101.
Headlight flash, high beam and
low beamHeadlight flash=Pull leverHigh beam=Push leverLow beam=Push or pull lever
High beam 3 110, Headlight flash
3 110.
Turn and lane-change signalsTo the right=Lever upTo the left=Lever down
Turn and lane-change signals
3 112.
Page 15 of 219

In brief13
Hazard warning flashers
Operated with the ¨ button.
Hazard warning flashers 3 112.
Horn
Press j.
Washer and wiper systems
Windscreen wiper&=fast%=slow$=timed interval wipe or
automatic wiping with rain
sensor§=off
For a single swipe when the
windscreen wiper is off, press the
lever down.
Windscreen wiper 3 79, Wiper
blade replacement 3 158.
Page 21 of 219

In brief19Notable featuresSeats in second row9Warning
When the row of seats or the
backrests are being adjusted,
keep hands away from the hinge
area.
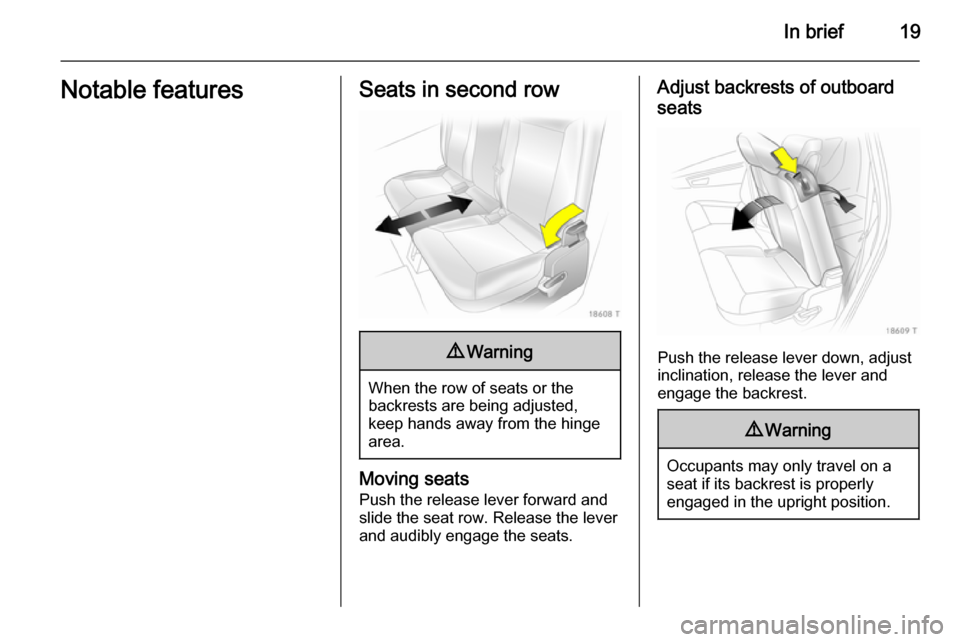
Moving seats
Push the release lever forward and
slide the seat row. Release the lever
and audibly engage the seats.
Adjust backrests of outboard
seats
Push the release lever down, adjust
inclination, release the lever and
engage the backrest.
9 Warning
Occupants may only travel on a
seat if its backrest is properly
engaged in the upright position.
Page 22 of 219

20In briefSeats in third row9Warning
When the seats are being moved
upright or folded in, keep hands
away from hinge area.
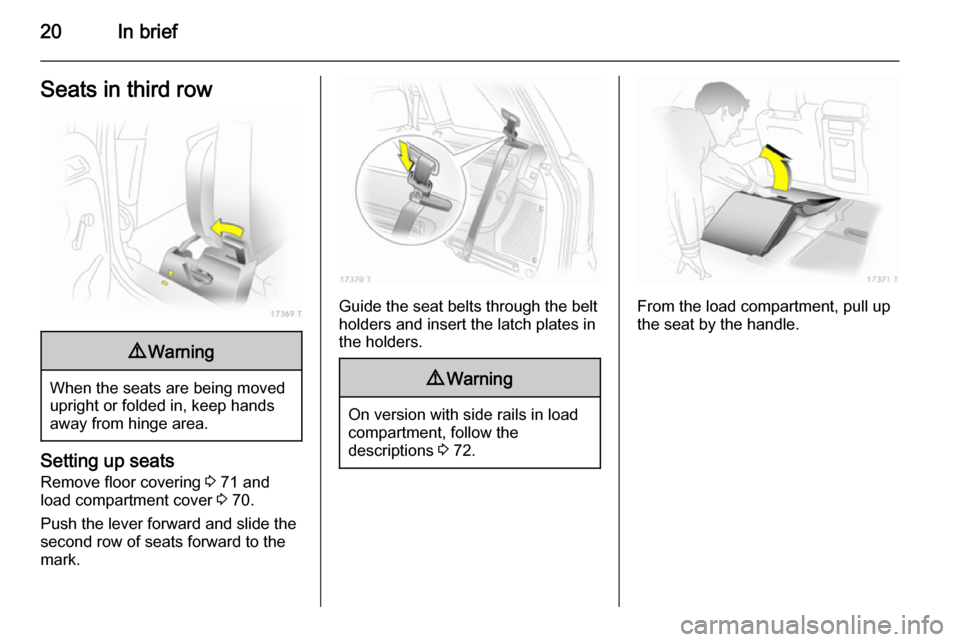
Setting up seats
Remove floor covering 3 71 and
load compartment cover 3 70.
Push the lever forward and slide the
second row of seats forward to the
mark.
Guide the seat belts through the belt
holders and insert the latch plates in the holders.
9 Warning
On version with side rails in load
compartment, follow the
descriptions 3 72.
From the load compartment, pull up
the seat by the handle.
Page 23 of 219

In brief21
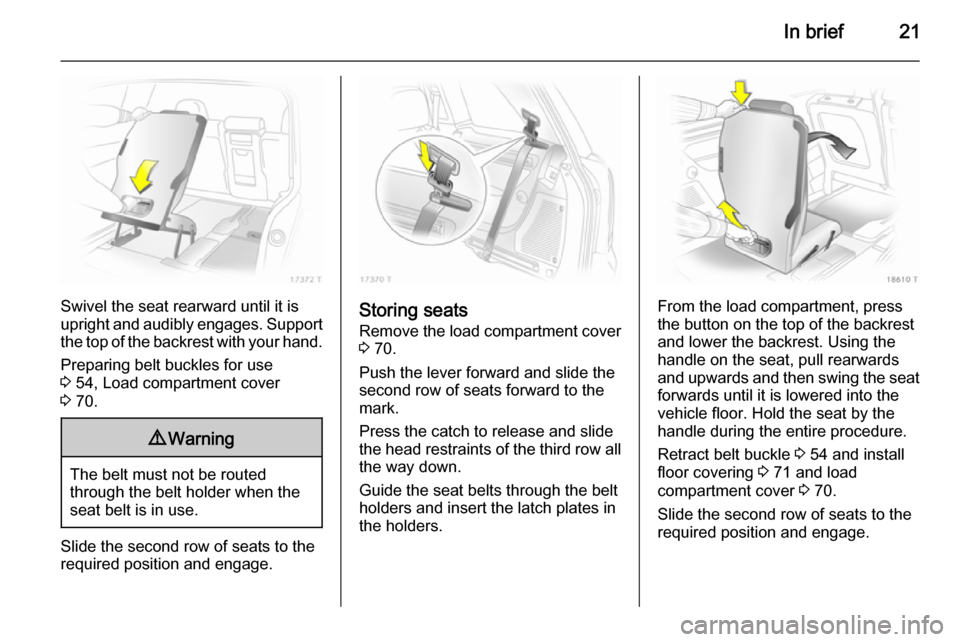
Swivel the seat rearward until it is
upright and audibly engages. Support the top of the backrest with your hand.
Preparing belt buckles for use
3 54, Load compartment cover
3 70.
9 Warning
The belt must not be routed
through the belt holder when the seat belt is in use.
Slide the second row of seats to the
required position and engage.
Storing seats
Remove the load compartment cover 3 70.
Push the lever forward and slide the
second row of seats forward to the
mark.
Press the catch to release and slide
the head restraints of the third row all
the way down.
Guide the seat belts through the belt
holders and insert the latch plates in the holders.From the load compartment, press
the button on the top of the backrest
and lower the backrest. Using the
handle on the seat, pull rearwards
and upwards and then swing the seat forwards until it is lowered into the
vehicle floor. Hold the seat by the
handle during the entire procedure.
Retract belt buckle 3 54 and install
floor covering 3 71 and load
compartment cover 3 70.
Slide the second row of seats to the
required position and engage.
Page 25 of 219

In brief23Sport mode
Activate by pressing the SPORT
button.
The Sport mode is used to make
suspension and steering more direct.
The engine is more responsive to
throttle application. With manual
transmission automated and
automatic transmission, gear
changing is altered.
Sport mode 3 141.
FlexOrganizer
The side walls contain retaining
strips, where various components can be attached to divide the load
compartment or fasten loads.
The system consists of: ■ adapters
■ variable partition net
■ mesh pockets for the side walls
■ hooks in the load compartment
FlexOrganizer 3 72.
Tyre pressure monitoring
system
A pressure sensor is integrated in
each wheel to monitor tyre pressure.
Low tyre pressure will be indicated
with a yellow control indicator A. The
current tyre pressure and warning messages may be displayed in the
Info-display.
Tyre pressure monitoring system
3 91, 3 176.
Page 28 of 219

26Keys, doors and windowsRadio remote control
Used to operate:■ Central locking system,
■ Anti-theft locking system,
■ Anti-theft alarm system,
■ Power windows.
The radio remote control has a range of approx. 5 metres. This range can
be affected by outside influences.
The hazard warning flashers confirm
operation.
Handle with care, protect from
moisture and high temperatures and
avoid unnecessary operation.
Fault
If the central locking system cannot
be operated with the radio remote
control, it may be due to the following:
■ Range exceeded,
■ Battery voltage too low,
■ Frequent, repeated operation of the
radio remote control while not in
range, which will require re-
synchronisation,
■ Overload of the central locking system by operating at frequent
intervals, the power supply is
interrupted for a short time,
■ Interference from higher-power radio waves from other sources.
Unlocking 3 30.
Radio remote control battery replacement
Replace the battery as soon as the
range reduces.
Batteries do not belong in household
waste. They must be disposed of at
an appropriate recycling collection
point.Key with foldaway key section
Extend the key and open the unit.
Replace the battery (battery type CR 2032), paying attention to the
installation position. Close the unit
and synchronise.
Key with fixed key section
Have the battery replaced by a
workshop.
Page 35 of 219

Keys, doors and windows33Child locks9Warning
Use the child locks whenever
children are occupying the rear
seats.
Using a key or suitable screwdriver,
turn button on rear door lock to the
horizontal position. The door cannot
be opened from inside.
Doors
Load compartment
Opening
Press the button underneath the
moulding.
9 Danger
Do not drive with the tailgate open
or ajar, e.g. when transporting
bulky objects, since toxic exhaust
gases, which cannot be seen or
smelled, could enter the vehicle.
This can cause unconsciousness
and even death.
Notice
The installation of certain heavy
accessories onto the tailgate may
affect its ability to remain open.
Closing
Use the interior handle.
Do not press the button under the
tailgate moulding while closing as this will unlock the tailgate again.