VOLKSWAGEN CORRADO 1993 Repair Manual
Manufacturer: VOLKSWAGEN, Model Year: 1993, Model line: CORRADO, Model: VOLKSWAGEN CORRADO 1993Pages: 920, PDF Size: 6.92 MB
Page 761 of 920

VR65 ENGINE: AFFIX NEW VACUUM HOSE ROUTING LABEL
Article Text (p. 2)
1993 Volkswagen Corrado
For Volkswagen Technical Site: http://vw.belcom.ru
Copyright © 1998 Mitchell Repair Information Company, LLC
Wednesday, March 22, 2000 09:26PM
Osnabrueck, Germany
5. Evaluation of Emissions and Driveability of the Defect:
Not Applicable.
6. Available Emissions Data:
Not Applicable.
7. Anticipated Follow-Up Action:
VWoA will recall all affected vehicles and instruct dealers to
affix a new label in addition to performing safety recall work.
The details of the safety recall have been reported to the
NHTSA.ÄÄÄÄÄÄÄÄÄÄÄÄÄÄÄÄÄÄÄÄÄÄÄÄÄÄÄÄÄÄÄÄÄÄÄÄÄÄÄÄÄÄÄÄÄÄÄÄÄÄÄÄÄÄÄÄÄÄÄÄÄÄÄÄÄÄÄÄÄÄATTACHMENT I
RECALL CAMPAIGN BULLETIN - SQ
Date: July 1993
SECURE ENGINE COMPARTMENT ELECTRICAL WIRING AND AFFIX
VACUUM HOSE ROUTING LABEL
REPLACEMENT PARTS REQUIRED
ÄÄÄÄÄÄÄÄÄÄÄÄÂÄÄÄÄÄÄÄÄÄÄÄÄÂÄÄÄÄÄÄÄÄÄÄÄÄÄÄÄÄÄÄÄÄÄÄÄÄÄÄÄÄÄÂÄÄÄÄÄÄÄÄÄÄÄÄÄÄRepair Step
³ Quantity ³ Description ³ Part Number
ÄÄÄÄÄÄÄÄÄÄÄÄÅÄÄÄÄÄÄÄÄÄÄÄÄÅÄÄÄÄÄÄÄÄÄÄÄÄÄÄÄÄÄÄÄÄÄÄÄÄÄÄÄÄÄÅÄÄÄÄÄÄÄÄÄÄÄÄÄÄ A
³ 1 (290 mm) ³ Protective Sleeve ³ N905 930.01
³ 1 ³ Beading ³ 535 853 879 A
³ 1 ³ Tie Wrap ³ N020 906.3
³ 3 ³ Tie Wrap ³ ZVW 601 100
B
³ 2 ³ Lock Nut ³ N902 920.01
C
³ ³ No parts required ³ D
³ 1 ³ Beading ³ 701 947 149A
E
³ 1 ³ Clamp ³ 535 253 139
F
³ 1 ³ ECM ³ 095 927 731BD
G
³ 1 ³ Label ³ 021 010 058G
ÄÄÄÄÄÄÄÄÄÄÄÄÁÄÄÄÄÄÄÄÄÄÄÄÄÁÄÄÄÄÄÄÄÄÄÄÄÄÄÄÄÄÄÄÄÄÄÄÄÄÄÄÄÄÄÁÄÄÄÄÄÄÄÄÄÄÄÄÄÄ General Repair Information
REPAIR STEPS TO BE PERFORMED
ÄÄÄÄÄÄÄÄÄÄÄÄÄÄÄÄÄÄÄÄÄÄÄÄÄÄÄÄÄÄÄÄÄÄÄÄÄÄÄÄÄÄÄÂÄÄÄÄÄÄÄÄÄÄÄÄÄÄÄÄÄÄÄÄÄÄÄÄÄÄ VIN Range
³ Repair Steps
ÄÄÄÄÄÄÄÄÄÄÄÄÄÄÄÄÄÄÄÄÄÄÄÄÄÄÄÄÄÄÄÄÄÄÄÄÄÄÄÄÄÄÄÅÄÄÄÄÄÄÄÄÄÄÄÄÄÄÄÄÄÄÄÄÄÄÄÄÄÄFrom 50_NK 000 001 through 50_PK 002 707
³ A, B, C, D, E and G
From 50_PK 000 708 through 50_PK 003 049
³ A, B, C, D, and E
Page 762 of 920
VR65 ENGINE: AFFIX NEW VACUUM HOSE ROUTING LABEL
Article Text (p. 3)
1993 Volkswagen Corrado
For Volkswagen Technical Site: http://vw.belcom.ru
Copyright © 1998 Mitchell Repair Information Company, LLC
Wednesday, March 22, 2000 09:26PM
From 50_PK 003 050 through 50_PK 005 031 ³ A, B, C, and D
From 50_NK 004 148 through 50_NK 012 142
³ A, C, D, E, F and G
³ (automatic transmission
³ vehicles)
ÄÄÄÄÄÄÄÄÄÄÄÄÄÄÄÄÄÄÄÄÄÄÄÄÄÄÄÄÄÄÄÄÄÄÄÄÄÄÄÄÄÄÄÁÄÄÄÄÄÄÄÄÄÄÄÄÄÄÄÄÄÄÄÄÄÄÄÄÄÄ REPAIR STEPS EXPLANATION:
Repair Step A - Secure Cooling Fan Wiring Harness
Repair Step B - Modify Shift Linkage Balance Weight Mounting
(Standard Transmission Only)
Repair Step C - Re-route Ignition Cables and Breather Hose
Repair Step D - Secure Engine Compartment Harness
Repair Step E - Secure Exhaust System
Repair Step F - Replace Transmission Control Module (Automatic
Transmission Only)
Repair Step G - Replace Vacuum Hose Routing Label
WORK PROCEDURE
A. Secure Cooling Fan Wiring Harness
- Open hood
- Connect power saver to protect radio code
- Remove battery
- Disconnect harness plug from fan motor
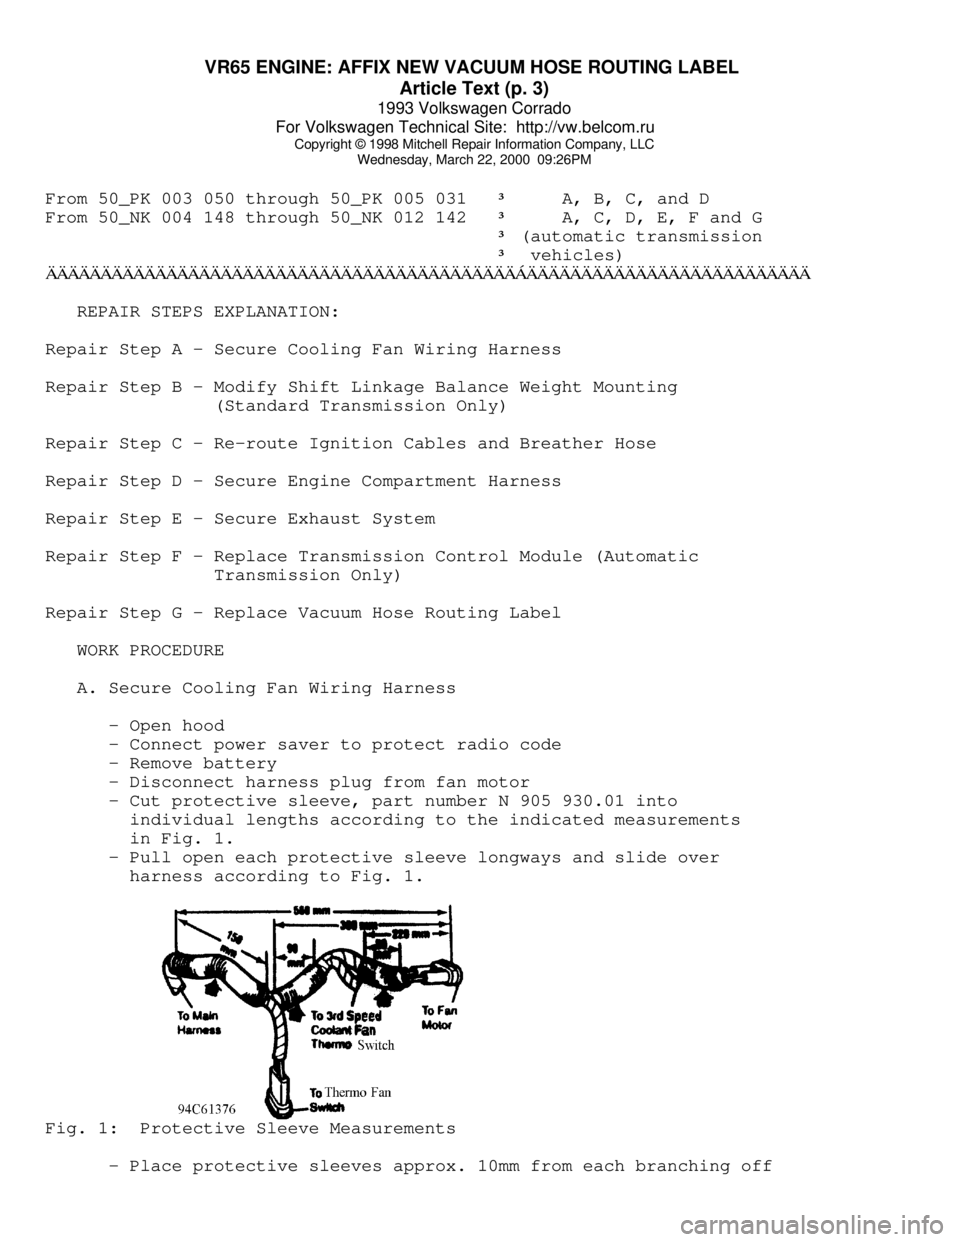
- Cut protective sleeve, part number N 905 930.01 into
individual lengths according to the indicated measurements
in Fig. 1.
- Pull open each protective sleeve longways and slide over
harness according to Fig. 1.Fig. 1: Protective Sleeve Measurements
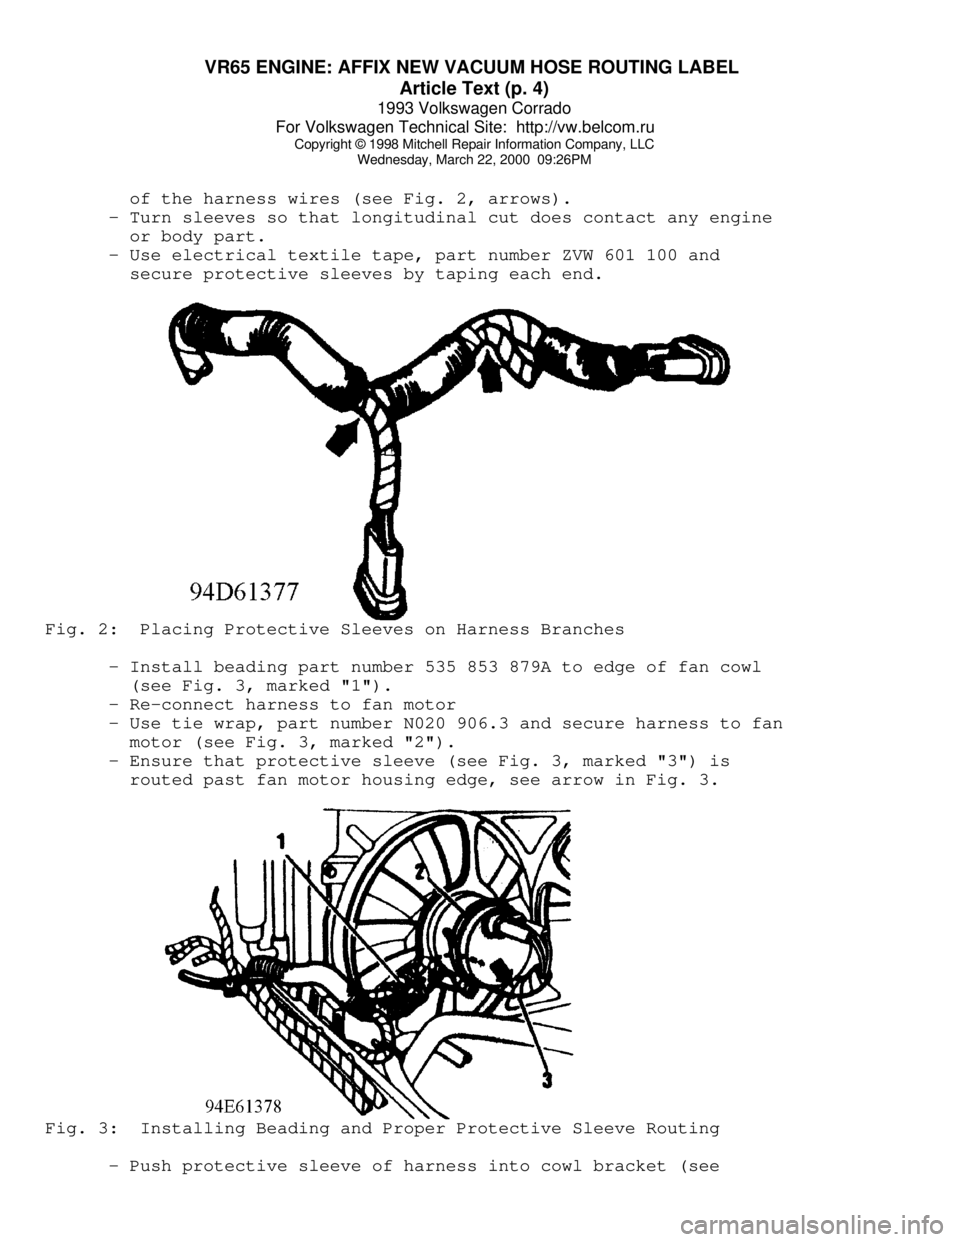
- Place protective sleeves approx. 10mm from each branching off
Page 763 of 920
VR65 ENGINE: AFFIX NEW VACUUM HOSE ROUTING LABEL
Article Text (p. 4)
1993 Volkswagen Corrado
For Volkswagen Technical Site: http://vw.belcom.ru
Copyright © 1998 Mitchell Repair Information Company, LLC
Wednesday, March 22, 2000 09:26PM
of the harness wires (see Fig. 2, arrows).
- Turn sleeves so that longitudinal cut does contact any engine
or body part.
- Use electrical textile tape, part number ZVW 601 100 and
secure protective sleeves by taping each end.Fig. 2: Placing Protective Sleeves on Harness Branches
- Install beading part number 535 853 879A to edge of fan cowl
(see Fig. 3, marked "1").
- Re-connect harness to fan motor
- Use tie wrap, part number N020 906.3 and secure harness to fan
motor (see Fig. 3, marked "2").
- Ensure that protective sleeve (see Fig. 3, marked "3") is
routed past fan motor housing edge, see arrow in Fig. 3.Fig. 3: Installing Beading and Proper Protective Sleeve Routing
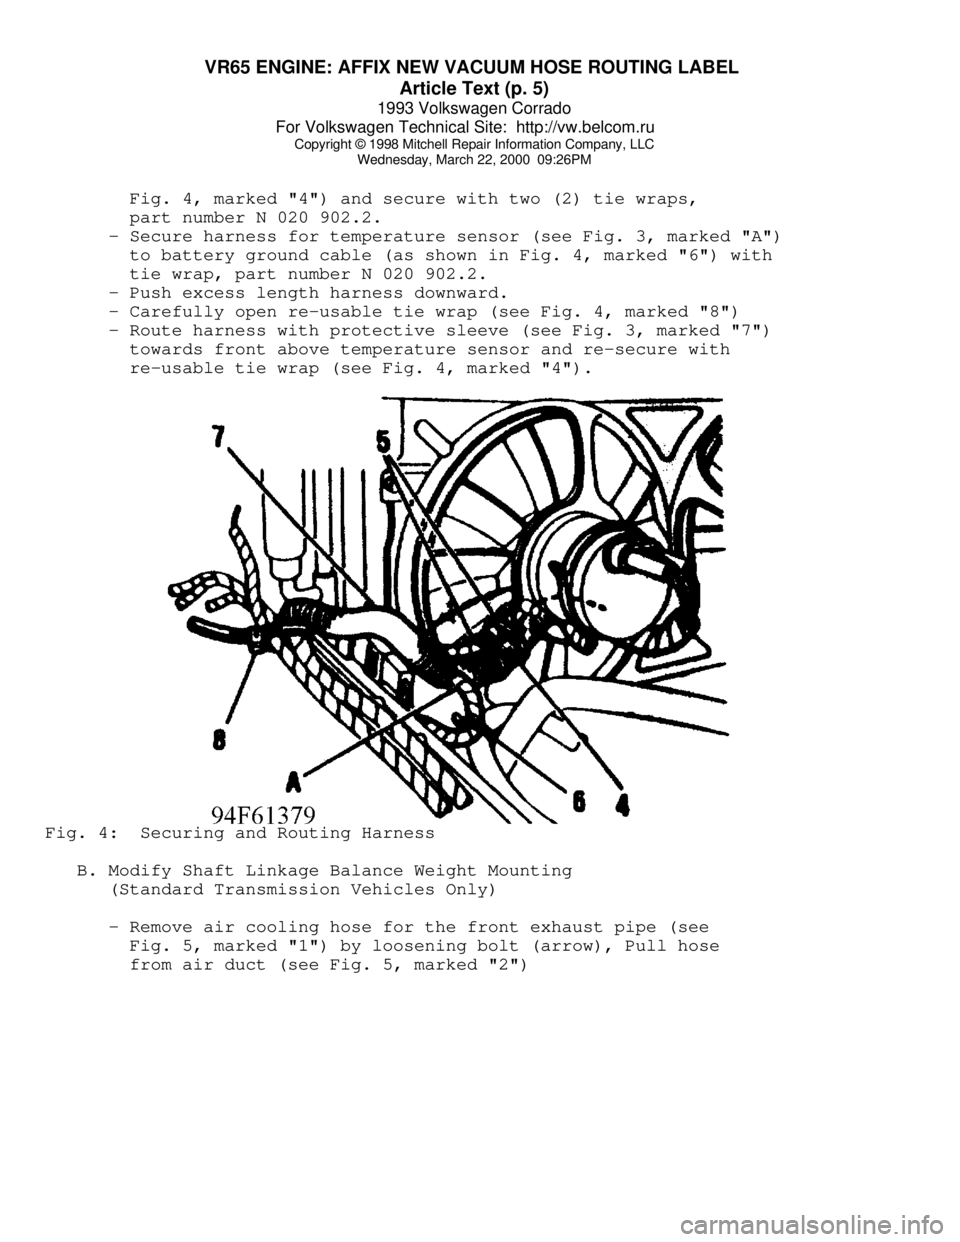
- Push protective sleeve of harness into cowl bracket (see
Page 764 of 920
VR65 ENGINE: AFFIX NEW VACUUM HOSE ROUTING LABEL
Article Text (p. 5)
1993 Volkswagen Corrado
For Volkswagen Technical Site: http://vw.belcom.ru
Copyright © 1998 Mitchell Repair Information Company, LLC
Wednesday, March 22, 2000 09:26PM
Fig. 4, marked "4") and secure with two (2) tie wraps,
part number N 020 902.2.
- Secure harness for temperature sensor (see Fig. 3, marked "A")
to battery ground cable (as shown in Fig. 4, marked "6") with
tie wrap, part number N 020 902.2.
- Push excess length harness downward.
- Carefully open re-usable tie wrap (see Fig. 4, marked "8")
- Route harness with protective sleeve (see Fig. 3, marked "7")
towards front above temperature sensor and re-secure with
re-usable tie wrap (see Fig. 4, marked "4").Fig. 4: Securing and Routing Harness
B. Modify Shaft Linkage Balance Weight Mounting
(Standard Transmission Vehicles Only)
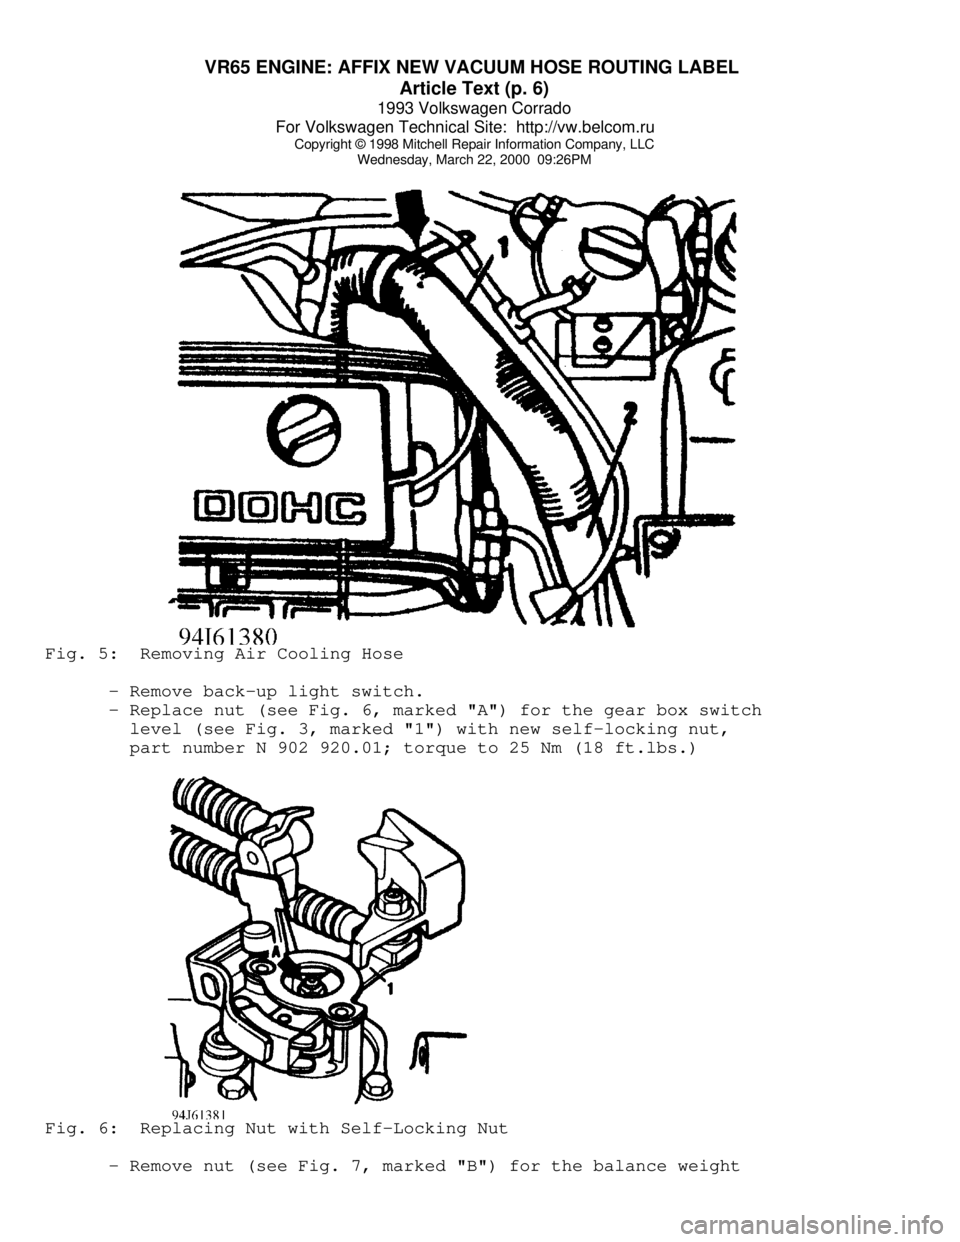
- Remove air cooling hose for the front exhaust pipe (see
Fig. 5, marked "1") by loosening bolt (arrow), Pull hose
from air duct (see Fig. 5, marked "2")
Page 765 of 920
VR65 ENGINE: AFFIX NEW VACUUM HOSE ROUTING LABEL
Article Text (p. 6)
1993 Volkswagen Corrado
For Volkswagen Technical Site: http://vw.belcom.ru
Copyright © 1998 Mitchell Repair Information Company, LLC
Wednesday, March 22, 2000 09:26PMFig. 5: Removing Air Cooling Hose
- Remove back-up light switch.
- Replace nut (see Fig. 6, marked "A") for the gear box switch
level (see Fig. 3, marked "1") with new self-locking nut,
part number N 902 920.01; torque to 25 Nm (18 ft.lbs.)Fig. 6: Replacing Nut with Self-Locking Nut
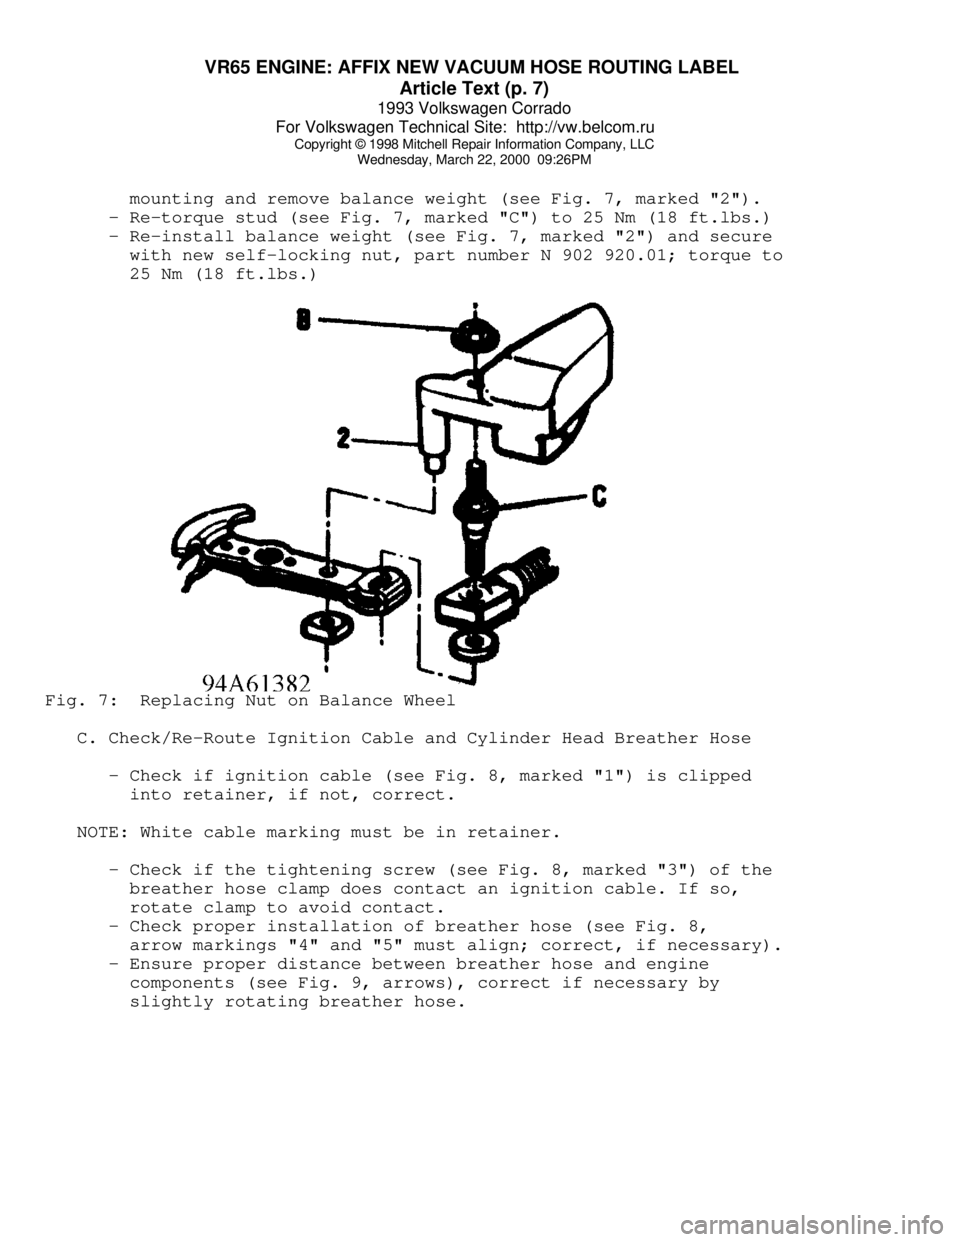
- Remove nut (see Fig. 7, marked "B") for the balance weight
Page 766 of 920
VR65 ENGINE: AFFIX NEW VACUUM HOSE ROUTING LABEL
Article Text (p. 7)
1993 Volkswagen Corrado
For Volkswagen Technical Site: http://vw.belcom.ru
Copyright © 1998 Mitchell Repair Information Company, LLC
Wednesday, March 22, 2000 09:26PM
mounting and remove balance weight (see Fig. 7, marked "2").
- Re-torque stud (see Fig. 7, marked "C") to 25 Nm (18 ft.lbs.)
- Re-install balance weight (see Fig. 7, marked "2") and secure
with new self-locking nut, part number N 902 920.01; torque to
25 Nm (18 ft.lbs.)Fig. 7: Replacing Nut on Balance Wheel
C. Check/Re-Route Ignition Cable and Cylinder Head Breather Hose
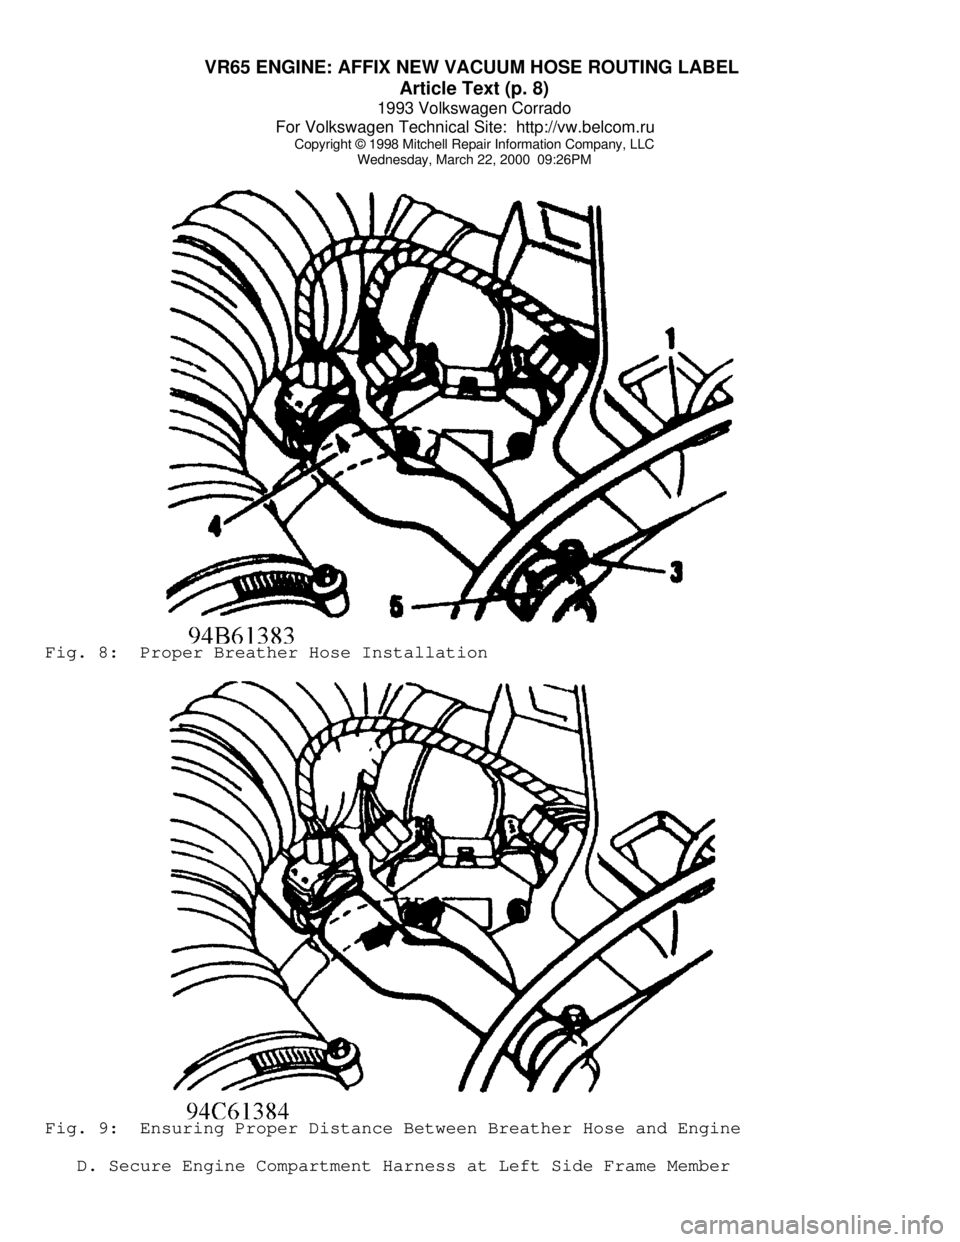
- Check if ignition cable (see Fig. 8, marked "1") is clipped
into retainer, if not, correct.
NOTE: White cable marking must be in retainer.
- Check if the tightening screw (see Fig. 8, marked "3") of the
breather hose clamp does contact an ignition cable. If so,
rotate clamp to avoid contact.
- Check proper installation of breather hose (see Fig. 8,
arrow markings "4" and "5" must align; correct, if necessary).
- Ensure proper distance between breather hose and engine
components (see Fig. 9, arrows), correct if necessary by
slightly rotating breather hose.
Page 767 of 920
VR65 ENGINE: AFFIX NEW VACUUM HOSE ROUTING LABEL
Article Text (p. 8)
1993 Volkswagen Corrado
For Volkswagen Technical Site: http://vw.belcom.ru
Copyright © 1998 Mitchell Repair Information Company, LLC
Wednesday, March 22, 2000 09:26PMFig. 8: Proper Breather Hose InstallationFig. 9: Ensuring Proper Distance Between Breather Hose and Engine
D. Secure Engine Compartment Harness at Left Side Frame Member
Page 768 of 920
VR65 ENGINE: AFFIX NEW VACUUM HOSE ROUTING LABEL
Article Text (p. 9)
1993 Volkswagen Corrado
For Volkswagen Technical Site: http://vw.belcom.ru
Copyright © 1998 Mitchell Repair Information Company, LLC
Wednesday, March 22, 2000 09:26PM
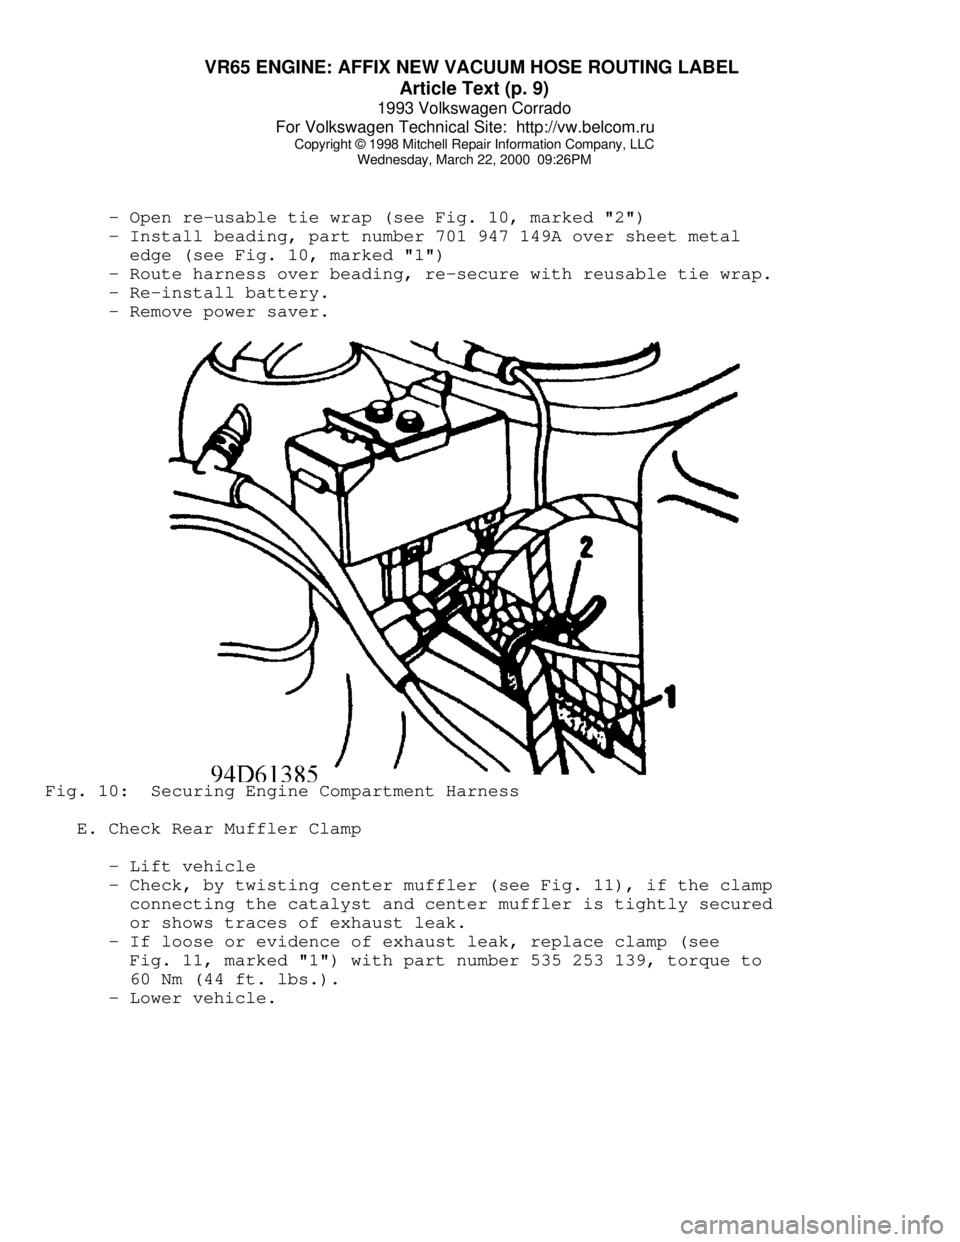
- Open re-usable tie wrap (see Fig. 10, marked "2")
- Install beading, part number 701 947 149A over sheet metal
edge (see Fig. 10, marked "1")
- Route harness over beading, re-secure with reusable tie wrap.
- Re-install battery.
- Remove power saver.Fig. 10: Securing Engine Compartment Harness
E. Check Rear Muffler Clamp
- Lift vehicle
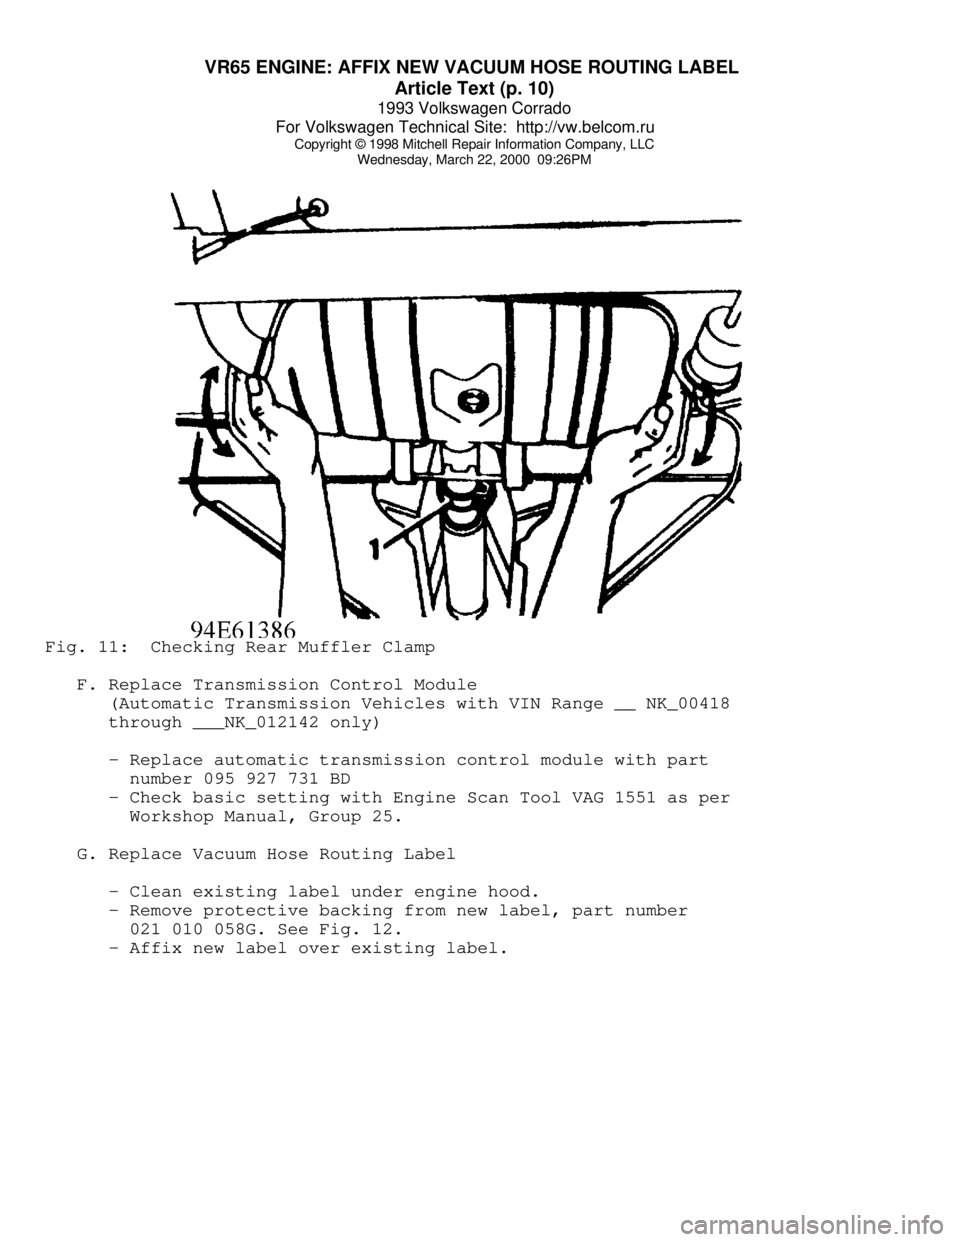
- Check, by twisting center muffler (see Fig. 11), if the clamp
connecting the catalyst and center muffler is tightly secured
or shows traces of exhaust leak.
- If loose or evidence of exhaust leak, replace clamp (see
Fig. 11, marked "1") with part number 535 253 139, torque to
60 Nm (44 ft. lbs.).
- Lower vehicle.
Page 769 of 920
VR65 ENGINE: AFFIX NEW VACUUM HOSE ROUTING LABEL
Article Text (p. 10)
1993 Volkswagen Corrado
For Volkswagen Technical Site: http://vw.belcom.ru
Copyright © 1998 Mitchell Repair Information Company, LLC
Wednesday, March 22, 2000 09:26PMFig. 11: Checking Rear Muffler Clamp
F. Replace Transmission Control Module
(Automatic Transmission Vehicles with VIN Range __ NK_00418
through ___NK_012142 only)
- Replace automatic transmission control module with part
number 095 927 731 BD
- Check basic setting with Engine Scan Tool VAG 1551 as per
Workshop Manual, Group 25.
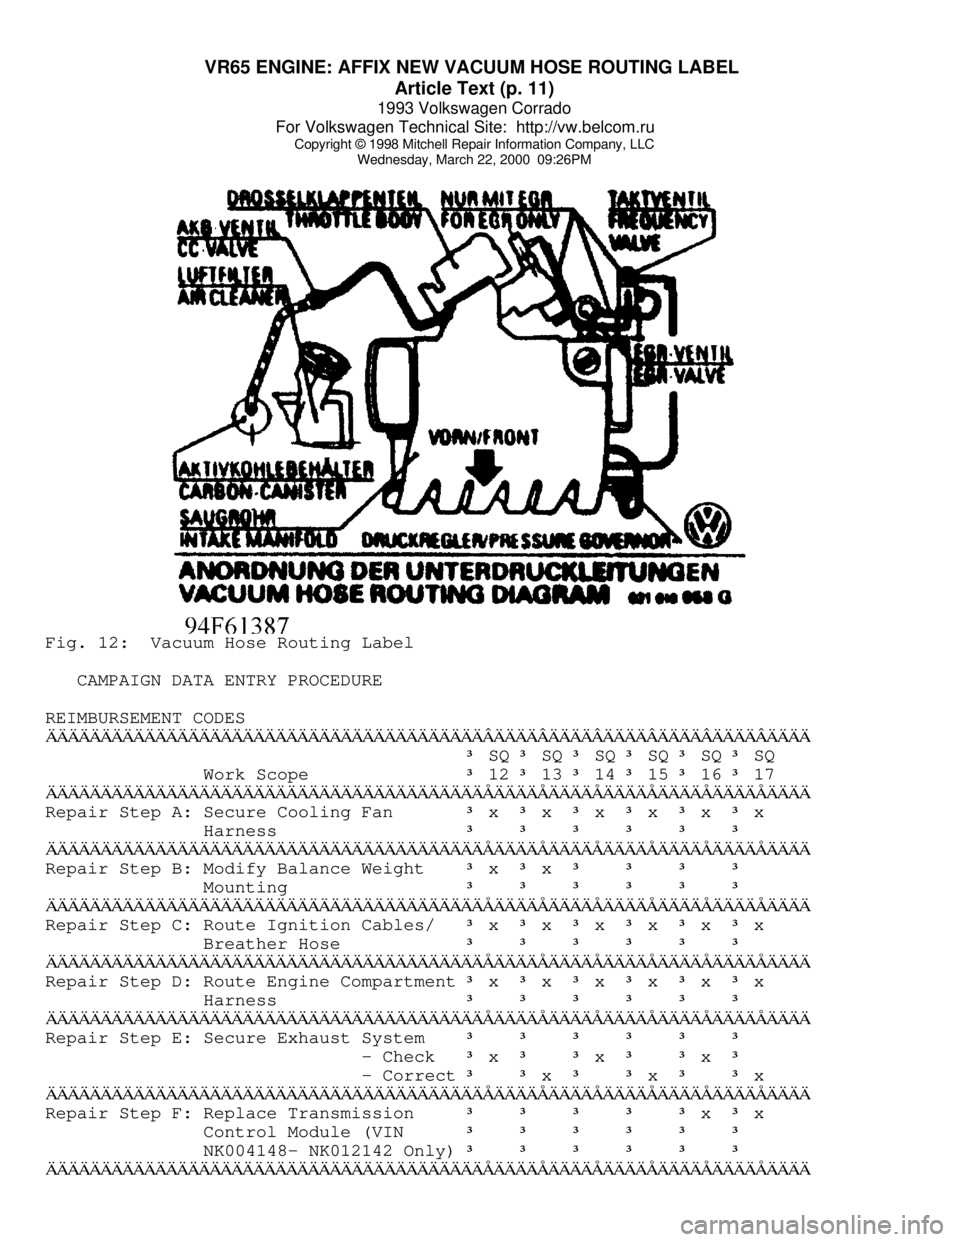
G. Replace Vacuum Hose Routing Label
- Clean existing label under engine hood.
- Remove protective backing from new label, part number
021 010 058G. See Fig. 12.
- Affix new label over existing label.
Page 770 of 920
VR65 ENGINE: AFFIX NEW VACUUM HOSE ROUTING LABEL
Article Text (p. 11)
1993 Volkswagen Corrado
For Volkswagen Technical Site: http://vw.belcom.ru
Copyright © 1998 Mitchell Repair Information Company, LLC
Wednesday, March 22, 2000 09:26PMFig. 12: Vacuum Hose Routing Label
CAMPAIGN DATA ENTRY PROCEDURE
REIMBURSEMENT CODESÄÄÄÄÄÄÄÄÄÄÄÄÄÄÄÄÄÄÄÄÄÄÄÄÄÄÄÄÄÄÄÄÄÄÄÄÄÄÄÄÂÄÄÄÄÂÄÄÄÄÂÄÄÄÄÂÄÄÄÄÂÄÄÄÄÂÄÄÄÄ
³ SQ ³ SQ ³ SQ ³ SQ ³ SQ ³ SQ
Work Scope
³ 12 ³ 13 ³ 14 ³ 15 ³ 16 ³ 17
ÄÄÄÄÄÄÄÄÄÄÄÄÄÄÄÄÄÄÄÄÄÄÄÄÄÄÄÄÄÄÄÄÄÄÄÄÄÄÄÄÅÄÄÄÄÅÄÄÄÄÅÄÄÄÄÅÄÄÄÄÅÄÄÄÄÅÄÄÄÄRepair Step A: Secure Cooling Fan
³ x ³ x ³ x ³ x ³ x ³ x
Harness
³ ³ ³ ³ ³ ³
ÄÄÄÄÄÄÄÄÄÄÄÄÄÄÄÄÄÄÄÄÄÄÄÄÄÄÄÄÄÄÄÄÄÄÄÄÄÄÄÄÅÄÄÄÄÅÄÄÄÄÅÄÄÄÄÅÄÄÄÄÅÄÄÄÄÅÄÄÄÄRepair Step B: Modify Balance Weight
³ x ³ x ³ ³ ³ ³ Mounting
³ ³ ³ ³ ³ ³
ÄÄÄÄÄÄÄÄÄÄÄÄÄÄÄÄÄÄÄÄÄÄÄÄÄÄÄÄÄÄÄÄÄÄÄÄÄÄÄÄÅÄÄÄÄÅÄÄÄÄÅÄÄÄÄÅÄÄÄÄÅÄÄÄÄÅÄÄÄÄRepair Step C: Route Ignition Cables/
³ x ³ x ³ x ³ x ³ x ³ x
Breather Hose
³ ³ ³ ³ ³ ³
ÄÄÄÄÄÄÄÄÄÄÄÄÄÄÄÄÄÄÄÄÄÄÄÄÄÄÄÄÄÄÄÄÄÄÄÄÄÄÄÄÅÄÄÄÄÅÄÄÄÄÅÄÄÄÄÅÄÄÄÄÅÄÄÄÄÅÄÄÄÄRepair Step D: Route Engine Compartment
³ x ³ x ³ x ³ x ³ x ³ x
Harness
³ ³ ³ ³ ³ ³
ÄÄÄÄÄÄÄÄÄÄÄÄÄÄÄÄÄÄÄÄÄÄÄÄÄÄÄÄÄÄÄÄÄÄÄÄÄÄÄÄÅÄÄÄÄÅÄÄÄÄÅÄÄÄÄÅÄÄÄÄÅÄÄÄÄÅÄÄÄÄRepair Step E: Secure Exhaust System
³ ³ ³ ³ ³ ³ - Check
³ x ³ ³ x ³ ³ x ³ - Correct
³ ³ x ³ ³ x ³ ³ x
ÄÄÄÄÄÄÄÄÄÄÄÄÄÄÄÄÄÄÄÄÄÄÄÄÄÄÄÄÄÄÄÄÄÄÄÄÄÄÄÄÅÄÄÄÄÅÄÄÄÄÅÄÄÄÄÅÄÄÄÄÅÄÄÄÄÅÄÄÄÄRepair Step F: Replace Transmission
³ ³ ³ ³ ³ x ³ x
Control Module (VIN
³ ³ ³ ³ ³ ³ NK004148- NK012142 Only)
³ ³ ³ ³ ³ ³
ÄÄÄÄÄÄÄÄÄÄÄÄÄÄÄÄÄÄÄÄÄÄÄÄÄÄÄÄÄÄÄÄÄÄÄÄÄÄÄÄÅÄÄÄÄÅÄÄÄÄÅÄÄÄÄÅÄÄÄÄÅÄÄÄÄÅÄÄÄÄ