check engine VOLKSWAGEN PASSAT 1995 B3, B4 / 3.G Service Manual PDF
[x] Cancel search | Manufacturer: VOLKSWAGEN, Model Year: 1995, Model line: PASSAT, Model: VOLKSWAGEN PASSAT 1995 B3, B4 / 3.GPages: 369, PDF Size: 12.33 MB
Page 337 of 369
Downloaded from www.Manualslib.com manuals search engine 48-67
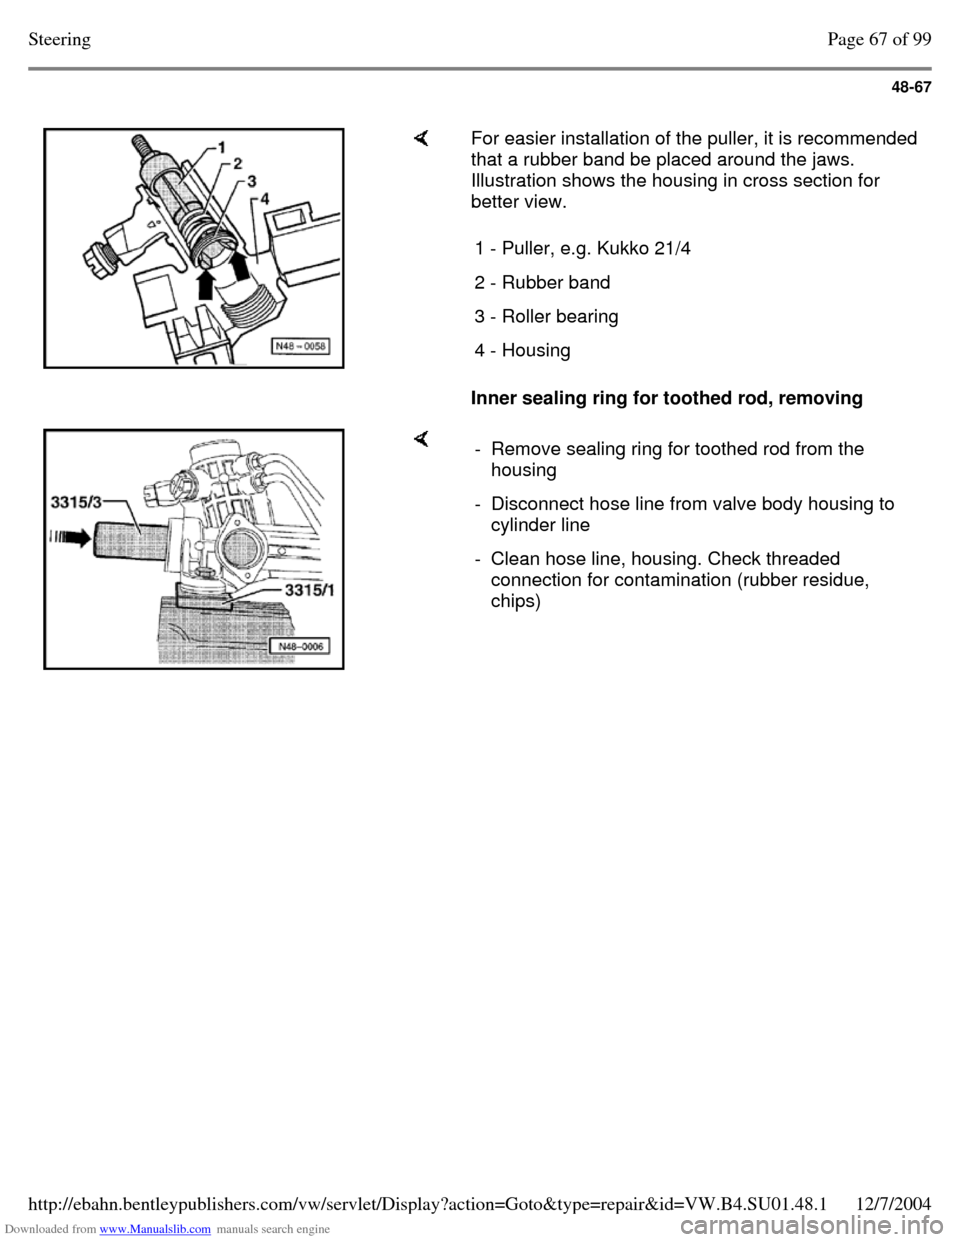
For easier installation of the puller, it is recommended
that a rubber band be placed around the jaws.
Illustration shows the housing in cross section for
better view.
Inner sealing ring for toothed rod, removing 1 - Puller, e.g. Kukko 21/4 2 - Rubber band 3 - Roller bearing 4 - Housing - Remove sealing ring for toothed rod from the
housing
- Disconnect hose line from valve body housing to
cylinder line
- Clean hose line, housing. Check threaded
connection for contamination (rubber residue,
chips) Page 67 of 99Steering12/7/2004http://ebahn.bentleypublishers.com/vw/servlet/Display?action=Goto&type=repair&id=VW.B4.SU01.48.1
Page 338 of 369
Downloaded from www.Manualslib.com manuals search engine 48-68
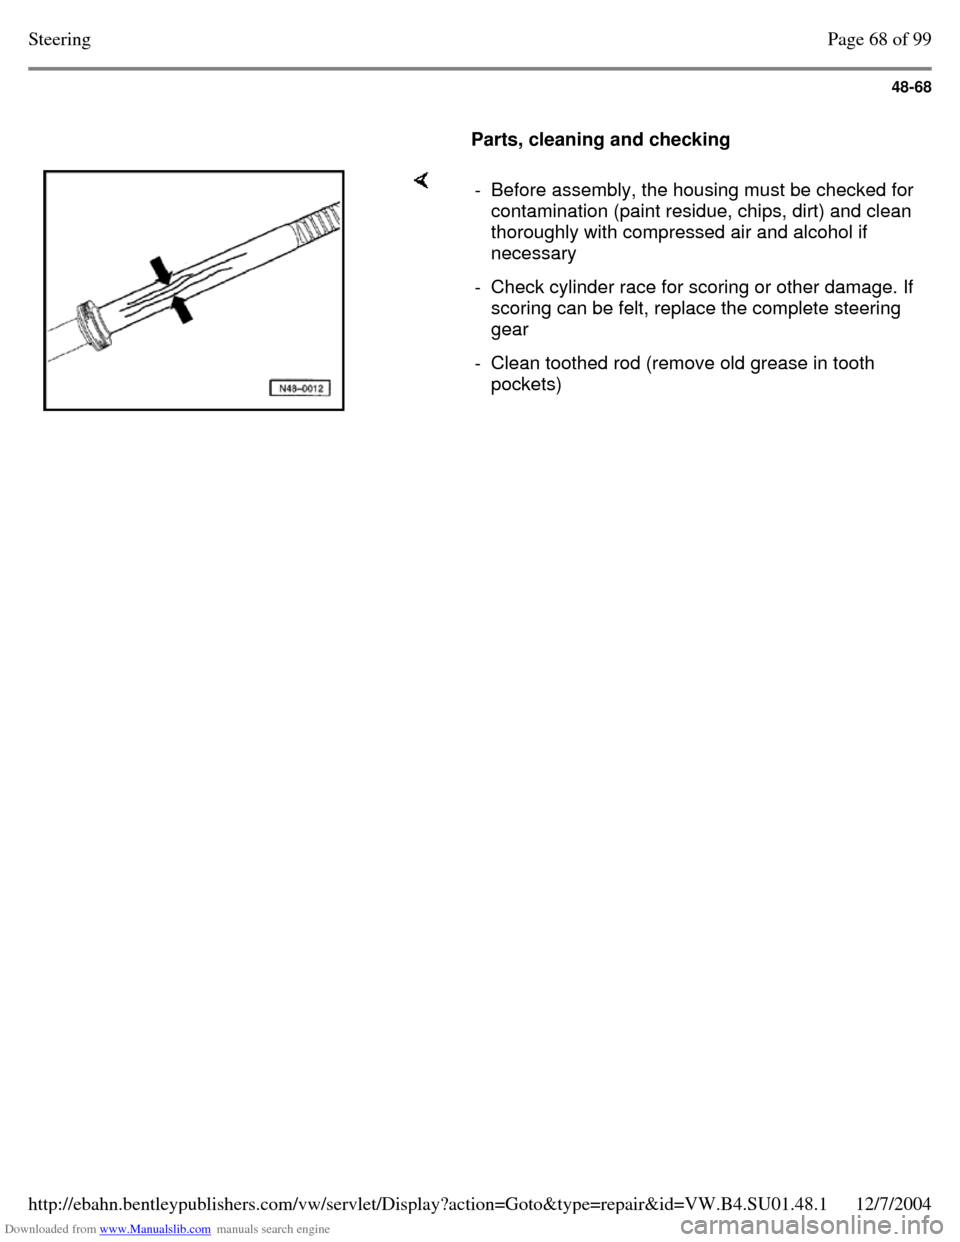
Parts, cleaning and checking - Before assembly, the housing must be checked for contamination (paint residue, chips, dirt) and clean
thoroughly with compressed air and alcohol if
necessary
- Check cylinder race for scoring or other damage. If scoring can be felt, replace the complete steering
gear
- Clean toothed rod (remove old grease in tooth
pockets) Page 68 of 99Steering12/7/2004http://ebahn.bentleypublishers.com/vw/servlet/Display?action=Goto&type=repair&id=VW.B4.SU01.48.1
Page 339 of 369
Downloaded from www.Manualslib.com manuals search engine 48-69
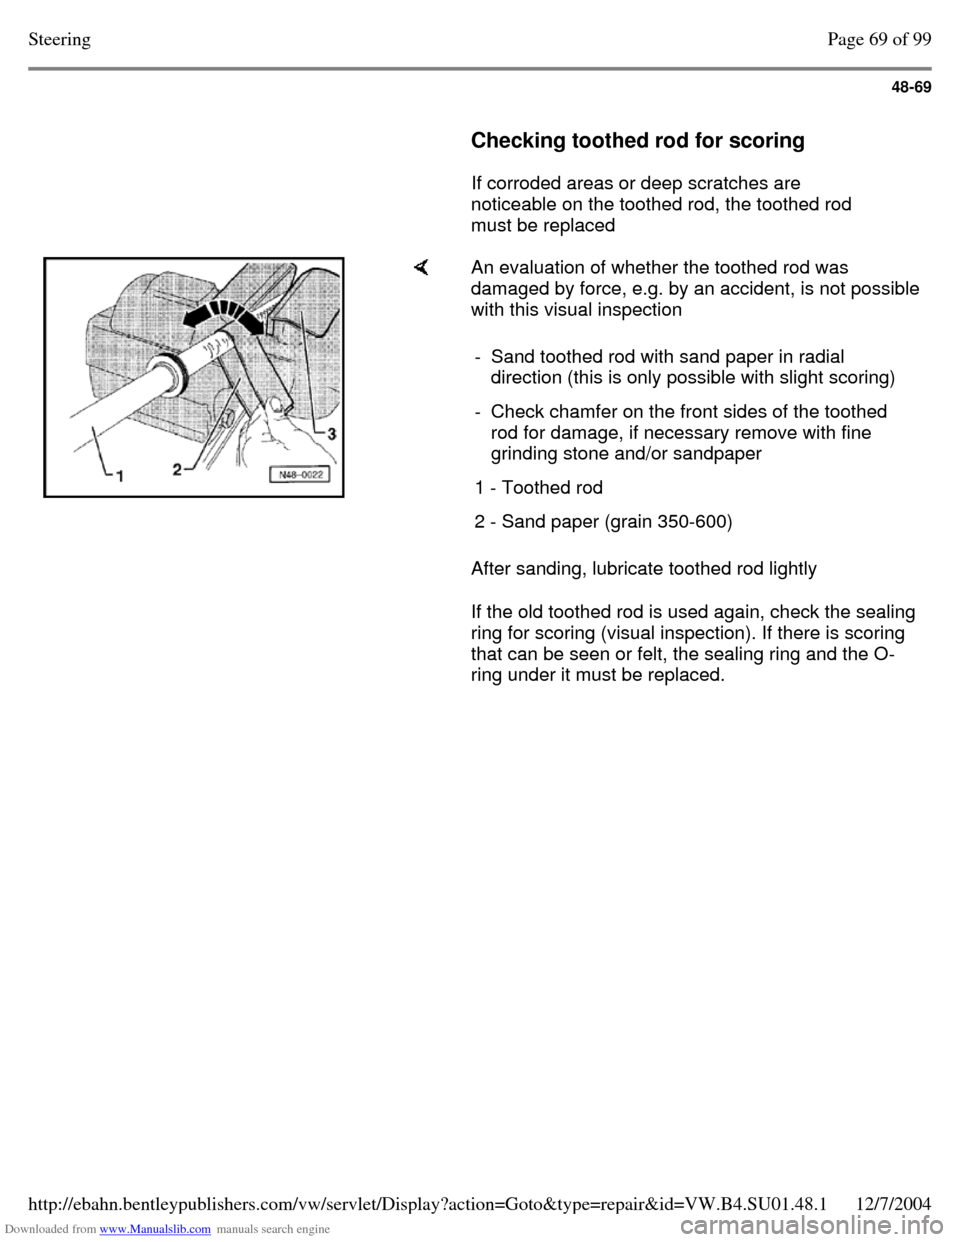
Checking toothed rod for scoring
If corroded areas or deep scratches are
noticeable on the toothed rod, the toothed rod
must be replaced An evaluation of whether the toothed rod was
damaged by force, e.g. by an accident, is not possible
with this visual inspection
After sanding, lubricate toothed rod lightly
If the old toothed rod is used again, check the sealing
ring for scoring (visual inspection). If there is scoring
that can be seen or felt, the sealing ring and the O-
ring under it must be replaced. - Sand toothed rod with sand paper in radial
direction (this is only possible with slight scoring)
- Check chamfer on the front sides of the toothed
rod for damage, if necessary remove with fine
grinding stone and/or sandpaper
1 - Toothed rod 2 - Sand paper (grain 350-600) Page 69 of 99Steering12/7/2004http://ebahn.bentleypublishers.com/vw/servlet/Display?action=Goto&type=repair&id=VW.B4.SU01.48.1
Page 348 of 369
Downloaded from www.Manualslib.com manuals search engine 48-78
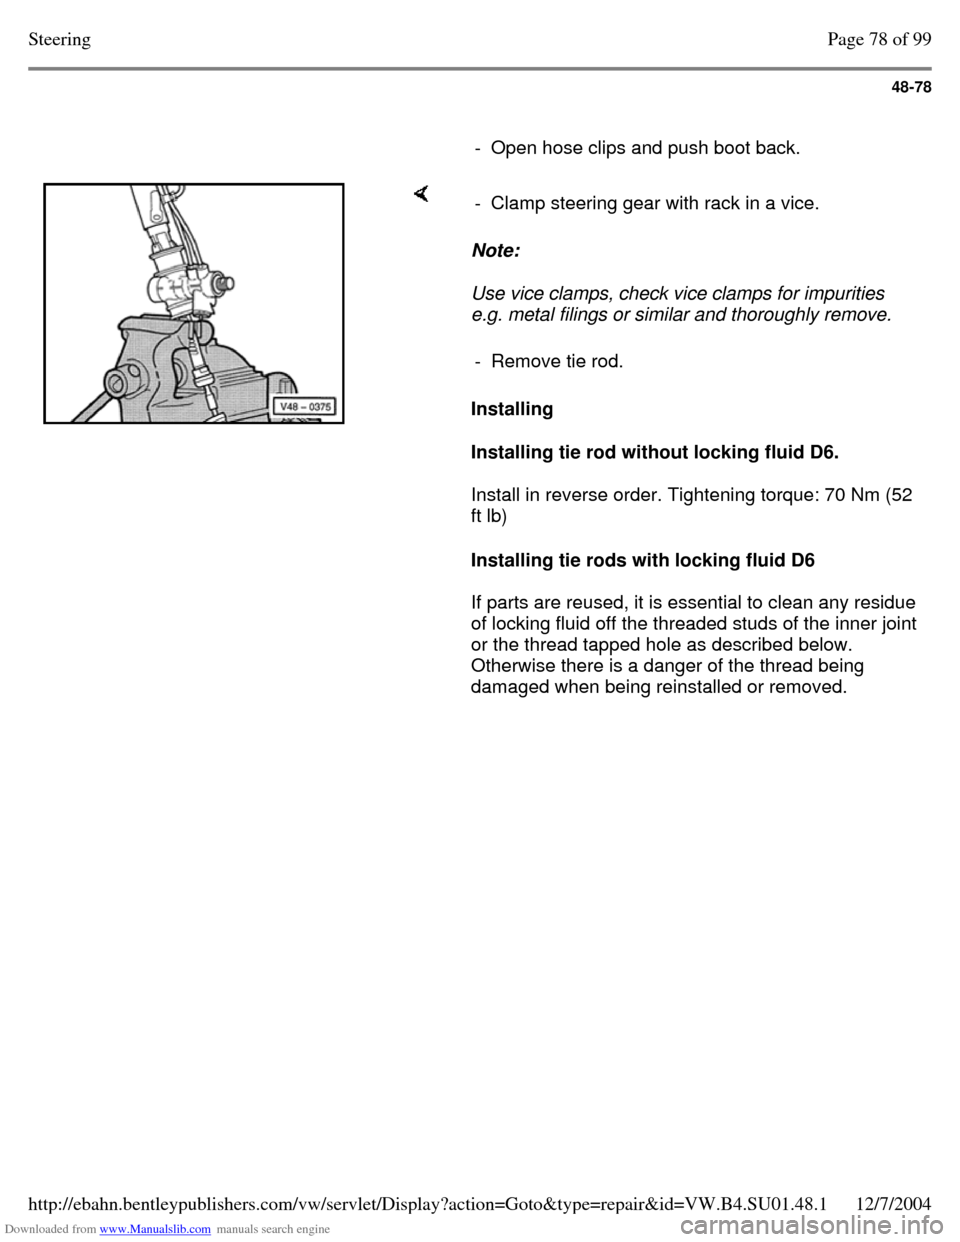
- Open hose clips and push boot back. Note:
Use vice clamps, check vice clamps for impurities
e.g. metal filings or similar and thoroughly remove.
Installing
Installing tie rod without locking fluid D6.
Install in reverse order. Tightening torque: 70 Nm (52
ft lb)
Installing tie rods with locking fluid D6
If parts are reused, it is essential to clean any residue
of locking fluid off the threaded studs of the inner joint
or the thread tapped hole as described below.
Otherwise there is a danger of the thread being
damaged when being reinstalled or removed. - Clamp steering gear with rack in a vice. - Remove tie rod. Page 78 of 99Steering12/7/2004http://ebahn.bentleypublishers.com/vw/servlet/Display?action=Goto&type=repair&id=VW.B4.SU01.48.1
Page 351 of 369
Downloaded from www.Manualslib.com manuals search engine 48-81
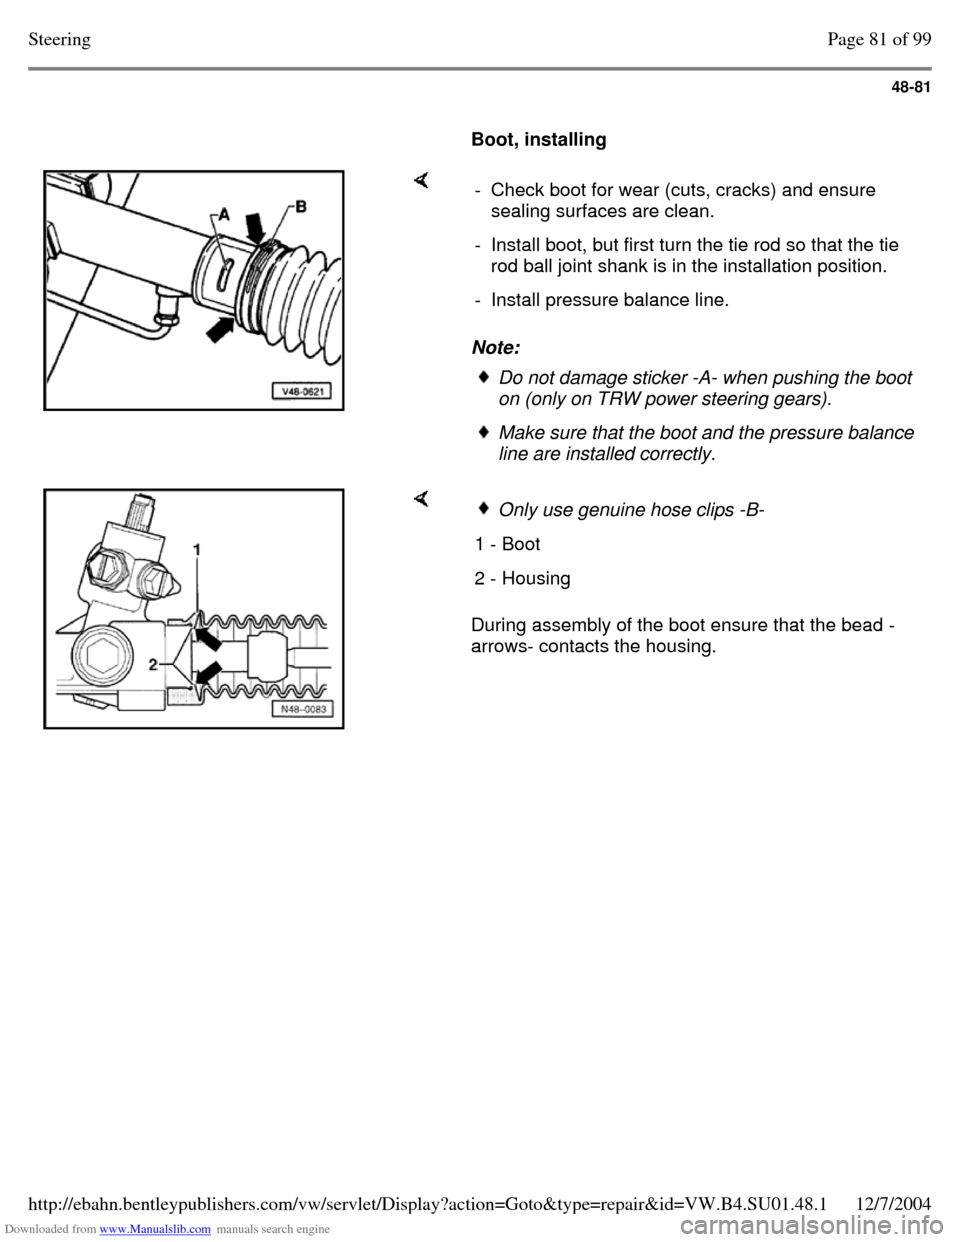
Boot, installing Note: - Check boot for wear (cuts, cracks) and ensure
sealing surfaces are clean.
- Install boot, but first turn the tie rod so that the tie
rod ball joint shank is in the installation position.
- Install pressure balance line. Do not damage sticker -A- when pushing the boot
on (only on TRW power steering gears). Make sure that the boot and the pressure balance
line are installed correctly. During assembly of the boot ensure that the bead -
arrows- contacts the housing. Only use genuine hose clips -B- 1 - Boot 2 - Housing Page 81 of 99Steering12/7/2004http://ebahn.bentleypublishers.com/vw/servlet/Display?action=Goto&type=repair&id=VW.B4.SU01.48.1
Page 354 of 369
Downloaded from www.Manualslib.com manuals search engine 48-84
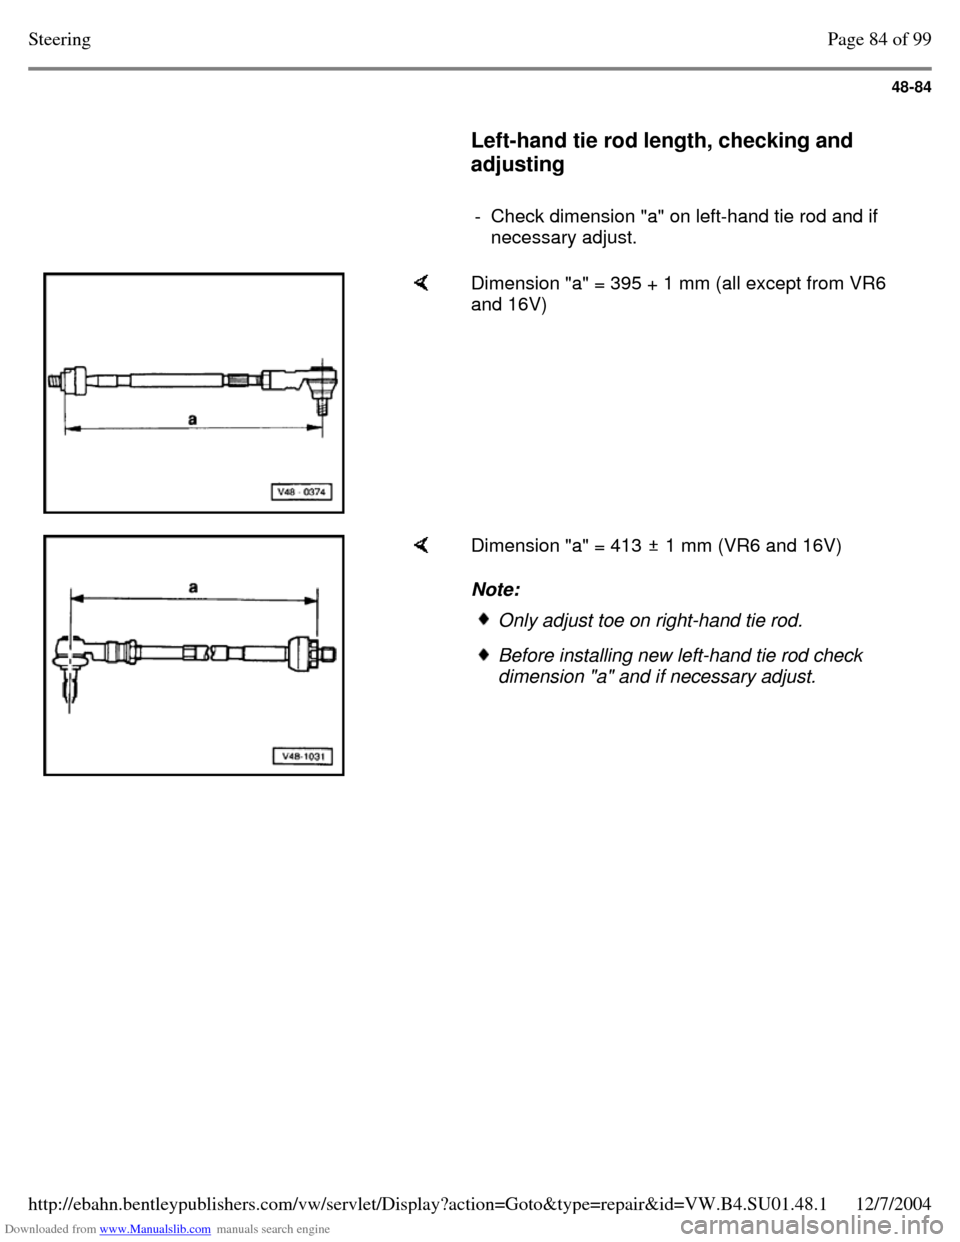
Left-hand tie rod length, checking and
adjusting
- Check dimension "a" on left-hand tie rod and if
necessary adjust. Dimension "a" = 395 + 1 mm (all except from VR6
and 16V) Dimension "a" = 413 1 mm (VR6 and 16V)
Note: Only adjust toe on right-hand tie rod. Before installing new left-hand tie rod check
dimension "a" and if necessary adjust. Page 84 of 99Steering12/7/2004http://ebahn.bentleypublishers.com/vw/servlet/Display?action=Goto&type=repair&id=VW.B4.SU01.48.1
Page 361 of 369
Downloaded from www.Manualslib.com manuals search engine 48-91
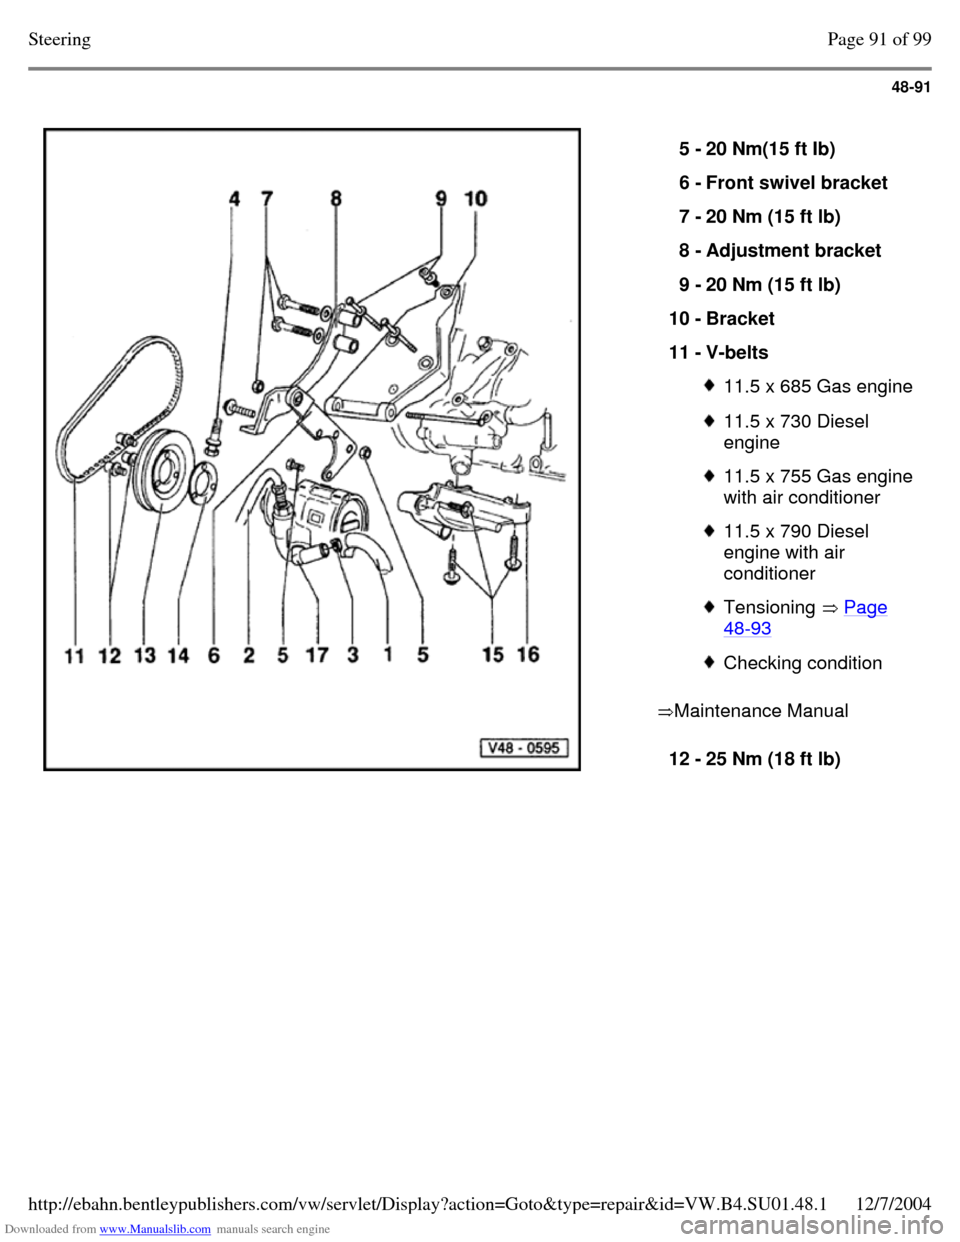
Maintenance Manual 5 - 20 Nm(15 ft Ib)
6 - Front swivel bracket
7 - 20 Nm (15 ft lb)
8 - Adjustment bracket
9 - 20 Nm (15 ft lb)
10 - Bracket
11 - V-belts 11.5 x 685 Gas engine 11.5 x 730 Diesel
engine 11.5 x 755 Gas engine with air conditioner 11.5 x 790 Diesel
engine with air
conditioner Tensioning Page 48-93 Checking condition 12 - 25 Nm (18 ft lb) Page 91 of 99Steering12/7/2004http://ebahn.bentleypublishers.com/vw/servlet/Display?action=Goto&type=repair&id=VW.B4.SU01.48.1
Page 362 of 369
Downloaded from www.Manualslib.com manuals search engine 48-92
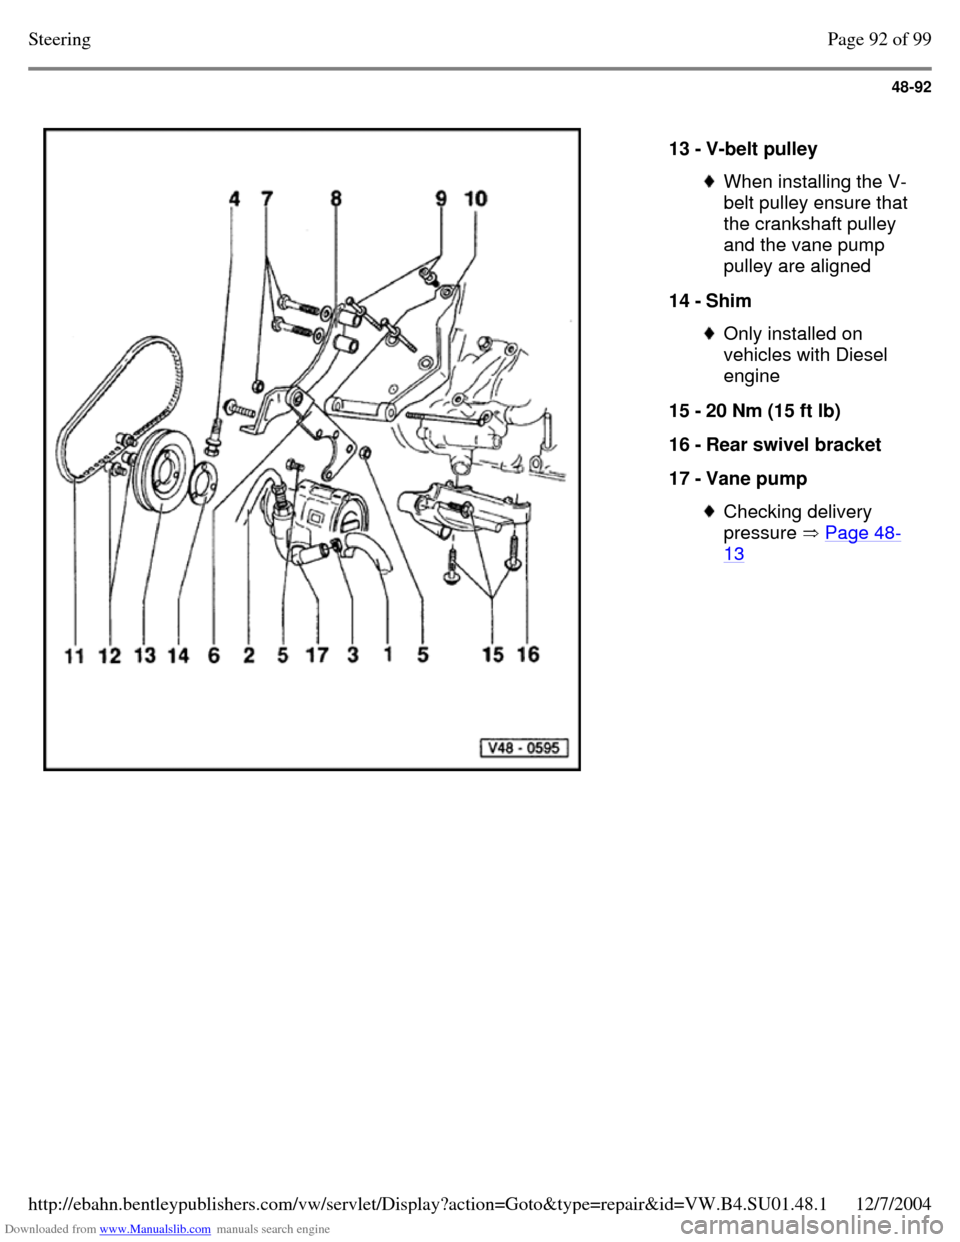
13 - V-belt pulley When installing the V-
belt pulley ensure that
the crankshaft pulley
and the vane pump
pulley are aligned
14 - Shim Only installed on
vehicles with Diesel
engine
15 - 20 Nm (15 ft lb)
16 - Rear swivel bracket
17 - Vane pump Checking delivery
pressure Page 48-13 Page 92 of 99Steering12/7/2004http://ebahn.bentleypublishers.com/vw/servlet/Display?action=Goto&type=repair&id=VW.B4.SU01.48.1
Page 368 of 369
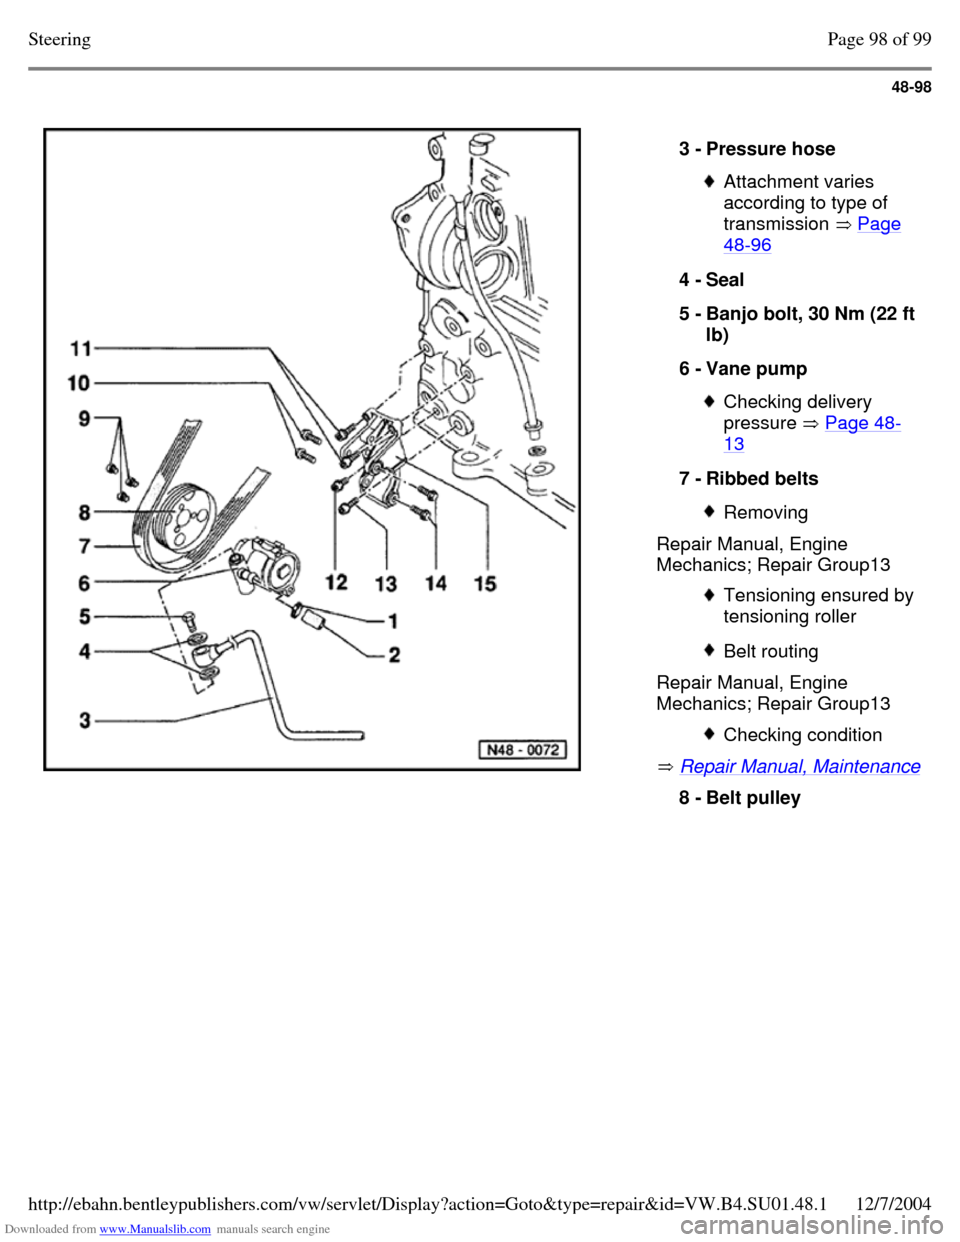
Downloaded from www.Manualslib.com manuals search engine 48-98
Repair Manual, Engine
Mechanics; Repair Group13
Repair Manual, Engine
Mechanics; Repair Group13
Repair Manual, Maintenance 3 - Pressure hose Attachment varies
according to type of
transmission Page 48-96 4 - Seal
5 - Banjo bolt, 30 Nm (22 ft lb)
6 - Vane pump Checking delivery
pressure Page 48-13 7 - Ribbed belts Removing Tensioning ensured by tensioning roller Belt routing Checking condition 8 - Belt pulley Page 98 of 99Steering12/7/2004http://ebahn.bentleypublishers.com/vw/servlet/Display?action=Goto&type=repair&id=VW.B4.SU01.48.1