radio VOLVO S80 2007 Owners Manual
[x] Cancel search | Manufacturer: VOLVO, Model Year: 2007, Model line: S80, Model: VOLVO S80 2007Pages: 251, PDF Size: 5.7 MB
Page 5 of 251
driving experience. Improperly used, any of these could cause a distraction.
For all of these systems, we want to provide the following warning that reflects the strong Volvo concern for your
safety:
Never use these devices or any feature of your vehicle in a way that distracts you from the task of driving safely.
Distraction can lead to a serious accident. In addition to this general warning, we offer the following guidance
regarding specific newer features that may be found in your vehicle:
Never use a hand -held cellular telephone while driving. Some jurisdictions prohibit cellular telephone use by a
driver while the vehicle is moving.
If your vehicle is equipped with a navigation system, set and make changes to your travel itinerary only with the
vehicle parked.
Never program your audio system while the vehicle is moving. Program radio presets with the vehicle parked, and
use your programmed presets to make radio use quicker and simpler.
Never use portable computers or personal digital assistants while the vehicle is moving.
Accessory installation
We strongly recommend that Volvo owners install only genuine, Volvo-approved accessories, and that accessory
installations be performed only by the factory-trained technicians at your authorized Volvo retailer.
Genuine Volvo accessories are tested to ensure compatibility with the performance, safety, and emission systems in
your vehicle. Additionally, your authorized Volvo retailer knows where accessories may and may not be safely
installed in your Volvo. In all cases, please consult your authorized Volvo retailer before installing any accessory in or
on your vehicle.
Accessories that have not been approved by Volvo may or may not be specifically tested for compatibility with your
vehicle. Additionally, an inexperienced installer may not be familiar with some of your car's systems.
Any of your car's performance and safety systems could be adversely affected if you install accessories that Volvo
has not tested, or if you allow accessories to be installed by someone unfamiliar with your vehicle.
Damage caused by unapproved or improperly installed accessories may not be covered by your new vehicle
warranty.
8 Introduction
Important warnings
See your Warranty and Service Records Information booklet for more warranty information. Volvo assumes no
responsibility for death, injury, or expenses that may result from the installation of non-genuine accessories.
9 Introduction
Environment
Volvo and the environment
Volvo is committed to the well being of its customers. As a natural part of this commitment, we care about the
environment in which we all live. Caring for the environment means an everyday involvement in reducing our
environmental impact. Volvo's environmental activities are based on a holistic view, which means we consider the
overall environmental impact of a product throughout its complete life cycle. In this context, design, production,
product use, and recycling are all important considerations. In production, Volvo has partly or completely phased out
several chemicals including CFCs, lead chromates, asbestos, and cadmium; and reduced the number of chemicals used
in our plants 50% since 1991.
Volvo was the first in the world to introduce into production a three-way catalytic converter with a Lambda sond, now
called the heated oxygen sensor, in 1976. The current version of this highly efficient system reduces emissions of
ProCarManuals.com
Page 109 of 251
The navigation button can be used instead of ENTER and EXIT when navigating the menu hierarchy. The right arrow
is equal to ENTER and the left arrow to EXIT .
The menu options are numbered and can also be selected directly with the numerical keypad (1-9 only).
115 04 Comfort and driving pleasure
Menus and messages
Menu overview
Car key memory
Seat & mirror positions
Car settings
Fold mirr. when locking (option on certain markets only)
Collision warning settings (option)
Light settings
Lock settings
Parking camera settings (accessory)
Steering force level (option)
Information
Climate settings
Automatic blower adjust
Recirculation timer
Auto. rear defroster
Reset climate settings
Main menu AM
Audio settings
1
Sound stage
Equalizer, front
Equalizer, rear
Auto. volume control
Resets all audio settings.
Main menu FM
FM settings
Radio text
Advanced radio settings
Audio settings
Main menu CD
Random
Off
Folder
Disc
Single disc
All discs
CD settings
Disc text (option)
Audio settings
Main menu AUX
Volume, AUX input
ProCarManuals.com
Page 121 of 251
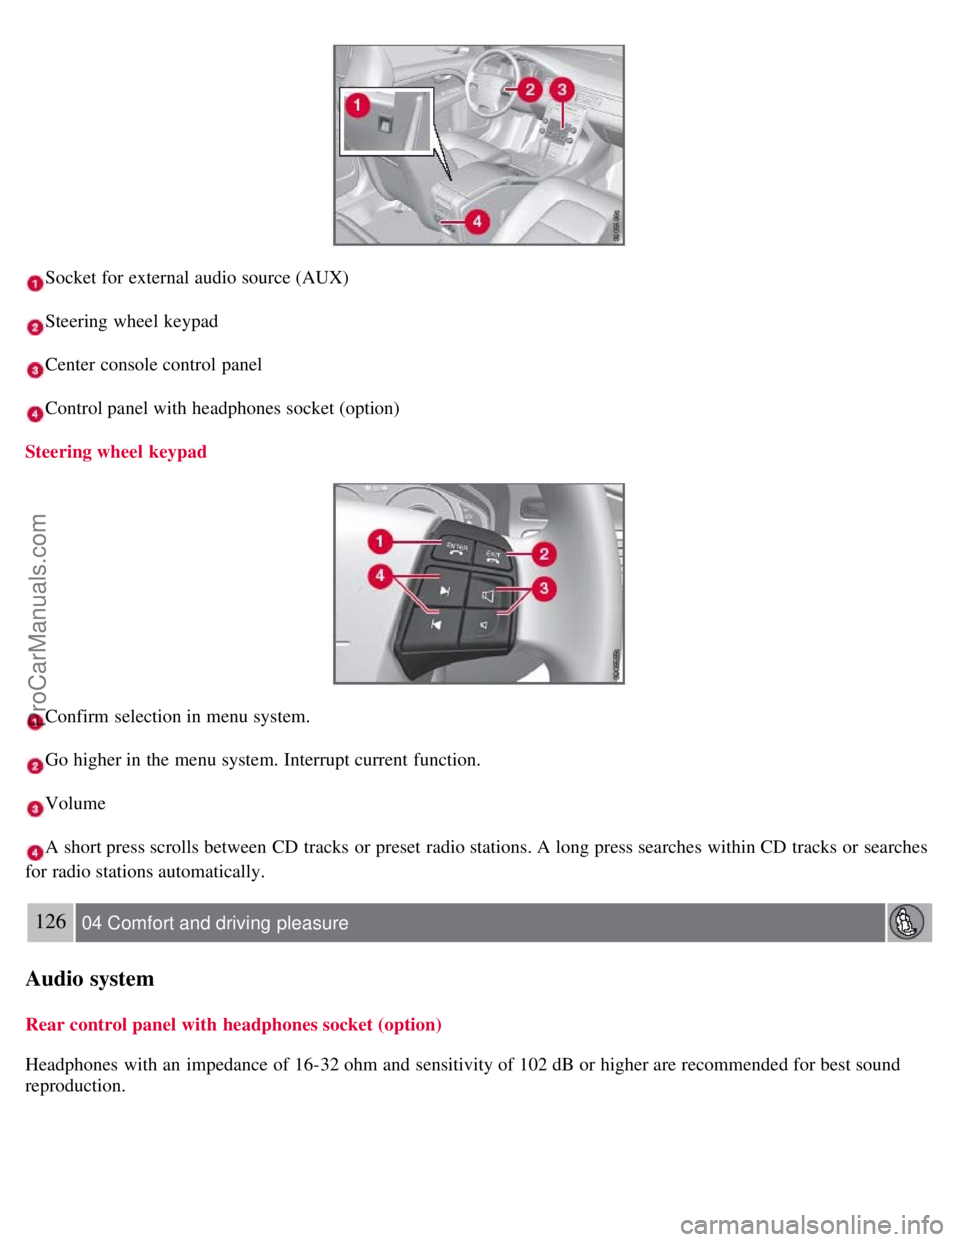
Socket for external audio source (AUX)
Steering wheel keypad
Center console control panel
Control panel with headphones socket (option)
Steering wheel keypad
Confirm selection in menu system.
Go higher in the menu system. Interrupt current function.
Volume
A short press scrolls between CD tracks or preset radio stations. A long press searches within CD tracks or searches
for radio stations automatically.
126 04 Comfort and driving pleasure
Audio system
Rear control panel with headphones socket (option)
Headphones with an impedance of 16-32 ohm and sensitivity of 102 dB or higher are recommended for best sound
reproduction.
ProCarManuals.com
Page 122 of 251
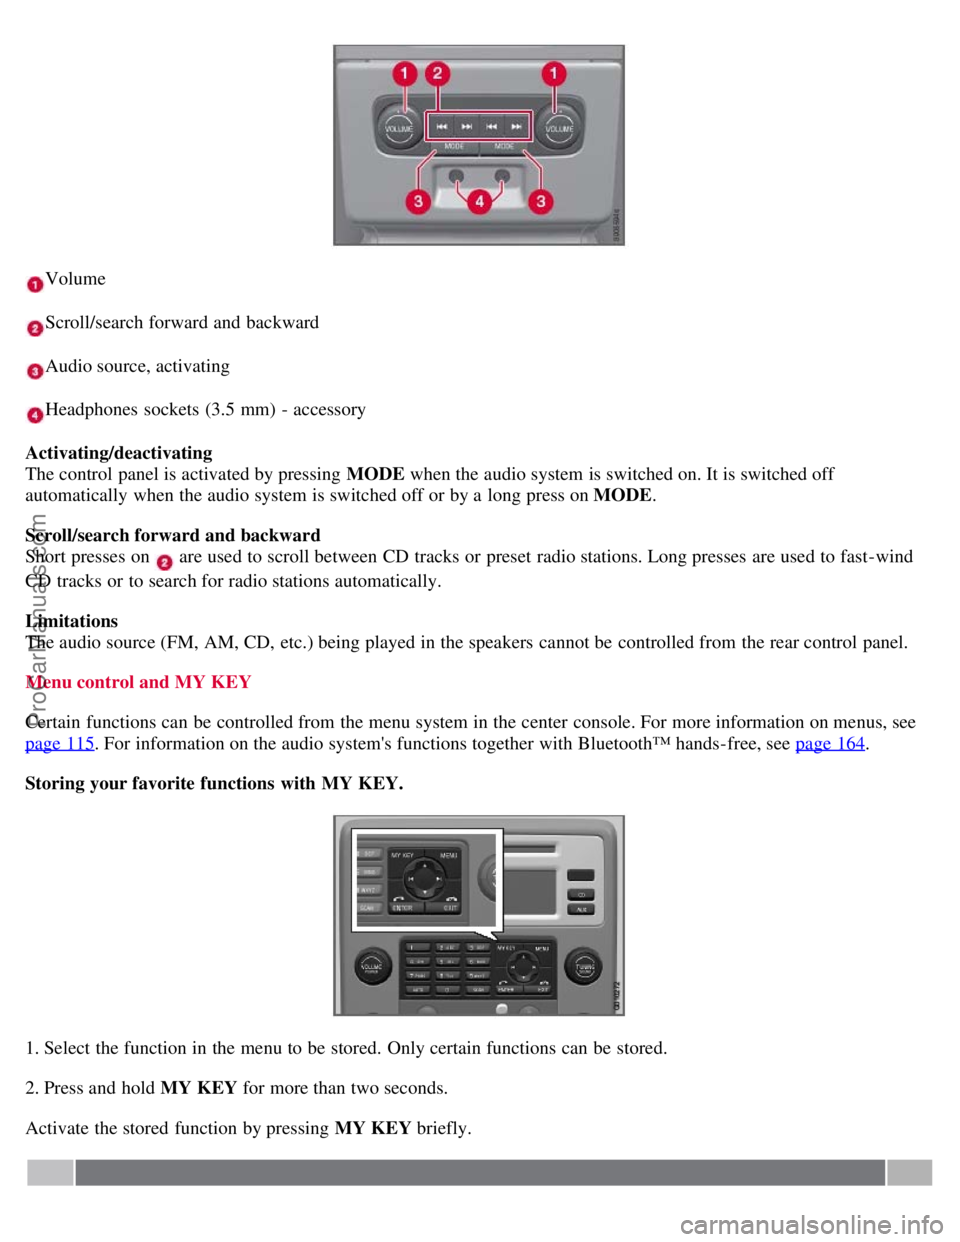
Volume
Scroll/search forward and backward
Audio source, activating
Headphones sockets (3.5 mm) - accessory
Activating/deactivating
The control panel is activated by pressing MODE when the audio system is switched on. It is switched off
automatically when the audio system is switched off or by a long press on MODE .
Scroll/search forward and backward
Short presses on
are used to scroll between CD tracks or preset radio stations. Long presses are used to fast -wind
CD tracks or to search for radio stations automatically.
Limitations
The audio source (FM, AM, CD, etc.) being played in the speakers cannot be controlled from the rear control panel.
Menu control and MY KEY
Certain functions can be controlled from the menu system in the center console. For more information on menus, see
page 115
. For information on the audio system's functions together with Bluetooth™ hands-free, see page 164.
Storing your favorite functions with MY KEY.
1. Select the function in the menu to be stored. Only certain functions can be stored.
2. Press and hold MY KEY for more than two seconds.
Activate the stored function by pressing MY KEY briefly.
ProCarManuals.com
Page 123 of 251
127 04 Comfort and driving pleasure
Audio system
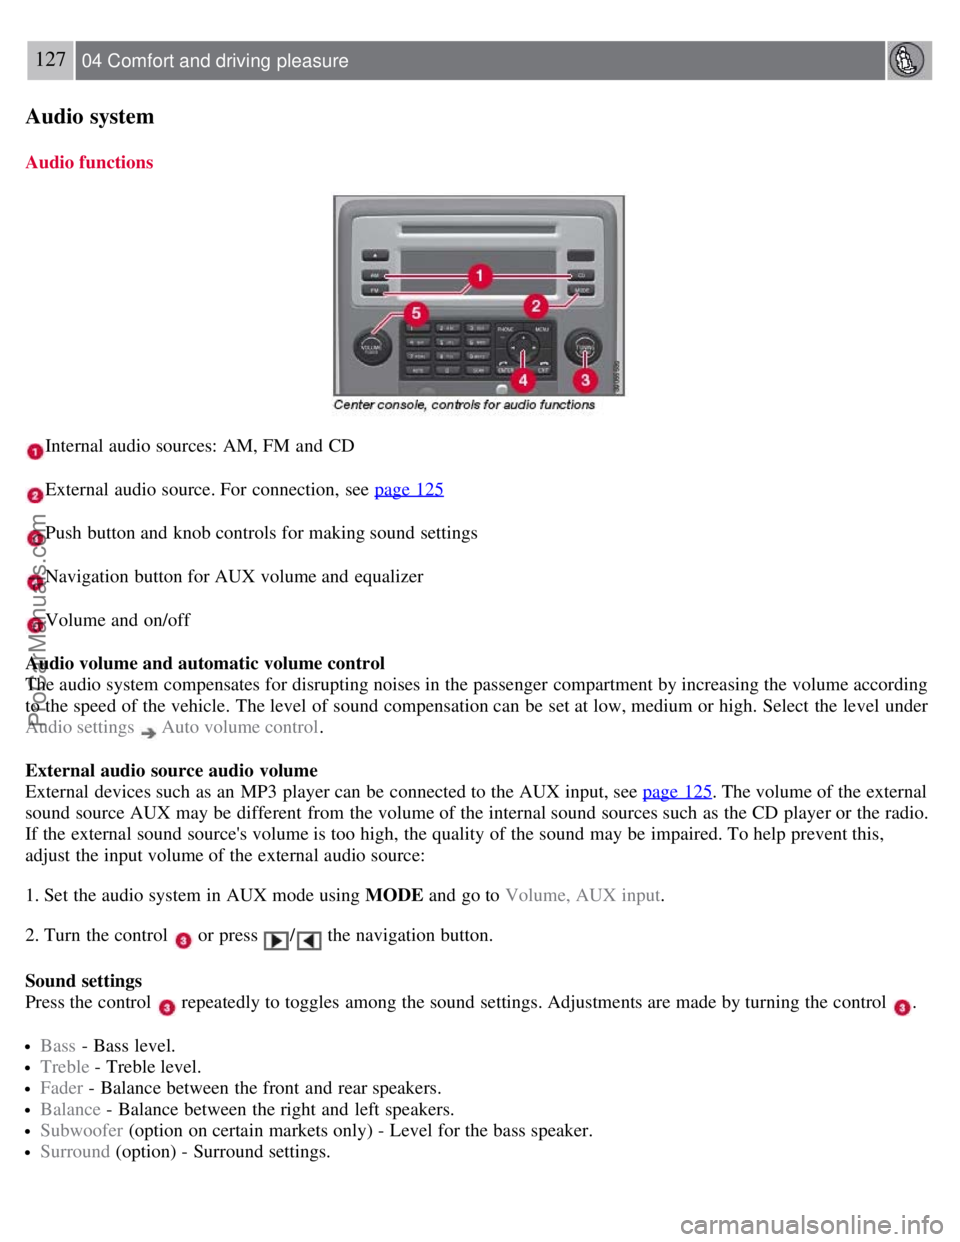
Audio functions
Internal audio sources: AM, FM and CD
External audio source. For connection, see page 125
Push button and knob controls for making sound settings
Navigation button for AUX volume and equalizer
Volume and on/off
Audio volume and automatic volume control
The audio system compensates for disrupting noises in the passenger compartment by increasing the volume according
to the speed of the vehicle. The level of sound compensation can be set at low, medium or high. Select the level under
Audio settings
Auto volume control .
External audio source audio volume
External devices such as an MP3 player can be connected to the AUX input, see page 125
. The volume of the external
sound source AUX may be different from the volume of the internal sound sources such as the CD player or the radio.
If the external sound source's volume is too high, the quality of the sound may be impaired. To help prevent this,
adjust the input volume of the external audio source:
1. Set the audio system in AUX mode using MODE and go to Volume, AUX input.
2. Turn the control
or press / the navigation button.
Sound settings
Press the control
repeatedly to toggles among the sound settings. Adjustments are made by turning the control .
Bass - Bass level.
Treble - Treble level.
Fader - Balance between the front and rear speakers.
Balance - Balance between the right and left speakers.
Subwoofer (option on certain markets only) - Level for the bass speaker.
Surround (option) - Surround settings.
ProCarManuals.com
Page 127 of 251
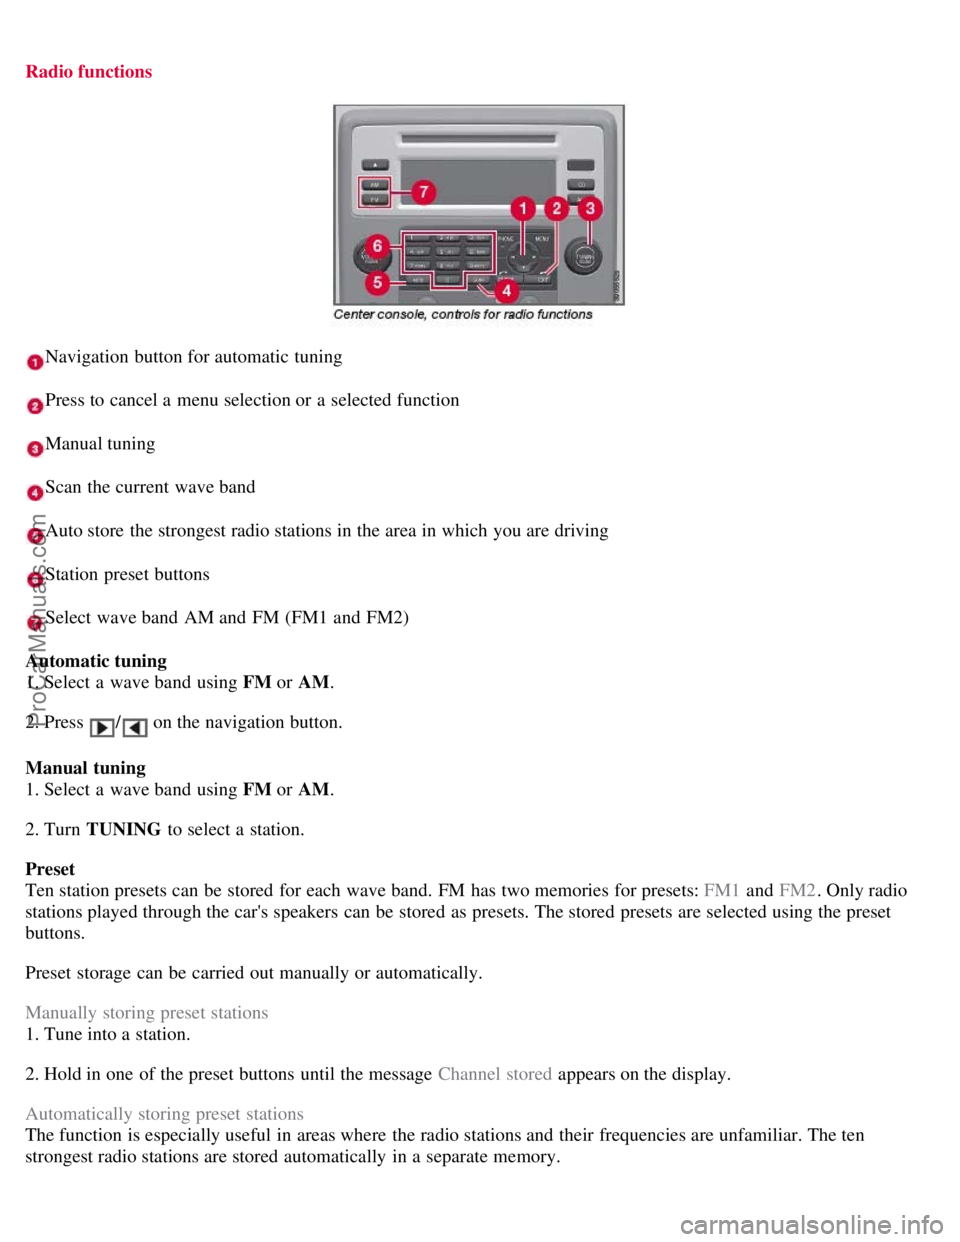
Radio functions
Navigation button for automatic tuning
Press to cancel a menu selection or a selected function
Manual tuning
Scan the current wave band
Auto store the strongest radio stations in the area in which you are driving
Station preset buttons
Select wave band AM and FM (FM1 and FM2)
Automatic tuning
1. Select a wave band using FM or AM.
2. Press
/ on the navigation button.
Manual tuning
1. Select a wave band using FM or AM.
2. Turn TUNING to select a station.
Preset
Ten station presets can be stored for each wave band. FM has two memories for presets: FM1 and FM2. Only radio
stations played through the car's speakers can be stored as presets. The stored presets are selected using the preset
buttons.
Preset storage can be carried out manually or automatically.
Manually storing preset stations
1. Tune into a station.
2. Hold in one of the preset buttons until the message Channel stored appears on the display.
Automatically storing preset stations
The function is especially useful in areas where the radio stations and their frequencies are unfamiliar. The ten
strongest radio stations are stored automatically in a separate memory.
ProCarManuals.com
Page 128 of 251
1. Select a wave band using FM or AM.
2. Hold in AUTO until Autostoring... appears on the display.
Once Autostoring... disappears from the display, the stations are stored. The radio continues in Auto mode and Auto
appears on the display. The automatically stored presets can now be selected using the preset buttons. Automatic
preset storage can be cancelled using EXIT .
Auto mode is cancelled by pressing for example AUTO or FM.
Returning to Auto mode provides access to the autostored presets:
1. Press AUTO .
Auto appears on the display.
2. Press a preset button.
Scan
The function automatically searches the current wave band for strong stations. When a station is found, it is played for
approx. eight seconds before scanning is resumed. While the station is playing it can be stored as a preset as usual.
1. Select a wave band using AM or FM.
2. Press SCAN .
SCAN appears on the display. Close using SCAN or EXIT.
131 04 Comfort and driving pleasure
Audio system
Radio text
Some stations transmit information on program content, artists, etc. This information can be shown on the display.
Activate/deactivate in FM mode under Radio text.
132 04 Comfort and driving pleasure
Audio system
Sirius satellite radio (option)
Listening to satellite radio
The Sirius satellite system consists of a number of high elevation satellites in geosynchronous orbit.
NOTE
The digital signals from the Sirius satellites are line-of-sight, which means that physical obstructions such as bridges,
tunnels, etc, may temporarily interfere with signal reception.
Selecting Sirius radio mode
ProCarManuals.com
Page 129 of 251
1. Press Power to switch on the audio system (see pages 127 and 130 for information on the standard audio and radio
functions).
2. Press the MODE button repeatedly until Sirius 1 or 2 is displayed.
Activating Sirius radio
1. Tune to a satellite channel that has no audio, which means that the channel is unsubscribed and the text "Call 888-
539-SIRIUS TO SUBSCRIBE" is displayed (see also "Selecting a channel".
2. Call Sirius at 1-888-539-SIRIUS (7474).
3. When asked for the Sirius ID number press AUTO to display this number. It is also possible to retrieve the Sirius ID
from the menu.
4. UPDATING SUBSCRIPTION will be displayed while the subscription is being updated, after which the display
will return to the normal view.
SIRIUS ID
The SIRIUS ID is required when contacting the Sirius Call Center. It is used to activate your account and when making
any account transactions. The SIRIUS ID is sometimes referred to as the Electronic Serial Number (ESN).
Selecting a channel category
1. Select Sirius radio mode as described above.
2. Press ENTER .
3. Use the up/down arrow keys to scroll through the list of categories.
4. Press ENTER or the right arrow key to select a category.
The first channel in the selected category will then be played.
NOTE
The category ALL is default, which enables you to scroll through the entire list of available satellite channels.
The channel categories are automatically updated several times a year. This takes approximately two minutes and
will interrupt normal broadcasting. A message will be displayed while updating is in progress. Information on
channel or feature updates is available at www.sirius.com
.
Selecting a channel
There are three ways of tuning in a channel:
Using the left and right arrow keys
By turning the tuning control
Through direct channel entry.
NOTE
The numbers of skipped or locked channels will not be displayed.
If a channel is locked, the access code must be entered before the channel can be selected. See "Unlocking a
channel" on page 134
.
133 04 Comfort and driving pleasure
ProCarManuals.com
Page 130 of 251
Audio system
Direct channel entry
The Sirius satellite channels are in numerical order throughout all of the categories. To access a channel directly:
1. Press MENU and scroll to Direct channel entry .
2. Use the numerical keypad to enter the channel's number.
3. Press ENTER . The radio will tune to this channel, even if it belongs to a category other than the currently selected
one.
Scanning
SCAN automatically searches through the list of satellite channels. The search will only be carried out in the selected
category. See page 130
for more detailed information.
Storing a channel
A total of 20 satellite channels can be stored; 10 channels each for Sirius 1 and 2. See page 130
for detailed
information on storing channels.
A long press on one of the number keys stores the currently tuned channel on that key.
A short press on a number key while the radio is in Sirius 1or 2 mode will tune to the preset satellite channel stored
on that button, regardless of the currently selected channel category.
Song Seek and Song Memory
The Song Seek and Song Memory functions provide both audio and visual notification when Sirius is broadcasting
your favorite songs. Song Seek enables you to store the name of the song for future advance notification when that
song is being played. The Song Memory feature makes it possible to view all of the current songs that are stored in
memory.
Song memory
Up to ten songs can be saved in the system's memory.
1. Press MENU .
2. Scroll to Add song to song mem. and follow the instructions shown in the display.
If a new song is selected when the memory is full, you will be prompted to press ENTER to delete the last song on
the list.
NOTE
The remaining songs in the list will move down one position, and the newly added song will be placed at the top of
the list.
Song seek
When a satellite radio channel plays one of the songs stored in the song memory, the listener will be alerted by a text
message and an audible signal.
Press ENTER to listen to the song or EXIT to cancel.
To activate/deactivate the song seek function:
1. Press MENU
ProCarManuals.com
Page 131 of 251
2. Scroll to Song seek
3. Press ENTER to activate or deactivate the function.
NOTE
When the song has ended, the radio will remain tuned to the channel on which the song was played.
Radio text
The text that is displayed about the song that is currently playing can be changed. Use the AUTO button or the menu
to display the Artist, Title, Composer, or switch radio text off.
134 04 Comfort and driving pleasure
Audio system
Advanced settings
This menu function enables you to make settings on certain Sirius satellite radio functions.
To access this menu:
1. Press MENU .
2. Scroll to the Sirius menu.
3. Select Advanced Sirius settings .
WARNING
Settings should be made when the vehicle is at a standstill.
The following settings can be made in the Sirius menu:
The list of saved songs can be displayed
Channel skip settings can be made
Channel lock settings can be made
The channel access code can be displayed or changed
Your Sirius ID can be displayed
Skip options
This function is used to remove a channel from the list of available channels.
Skipping a channel
1. Select CHANNEL SKIP LIST and press ENTER.
2. Select a category in the list and press ENTER .
3. Skip channels in the list presented by pressing ENTER or right arrow key.
Unskip all channels
This permanently removes all channels from the skip list and makes them available for selection.
ProCarManuals.com