VOLVO S80 2008 Owners Manual
Manufacturer: VOLVO, Model Year: 2008, Model line: S80, Model: VOLVO S80 2008Pages: 275, PDF Size: 7.17 MB
Page 101 of 275
Introduction
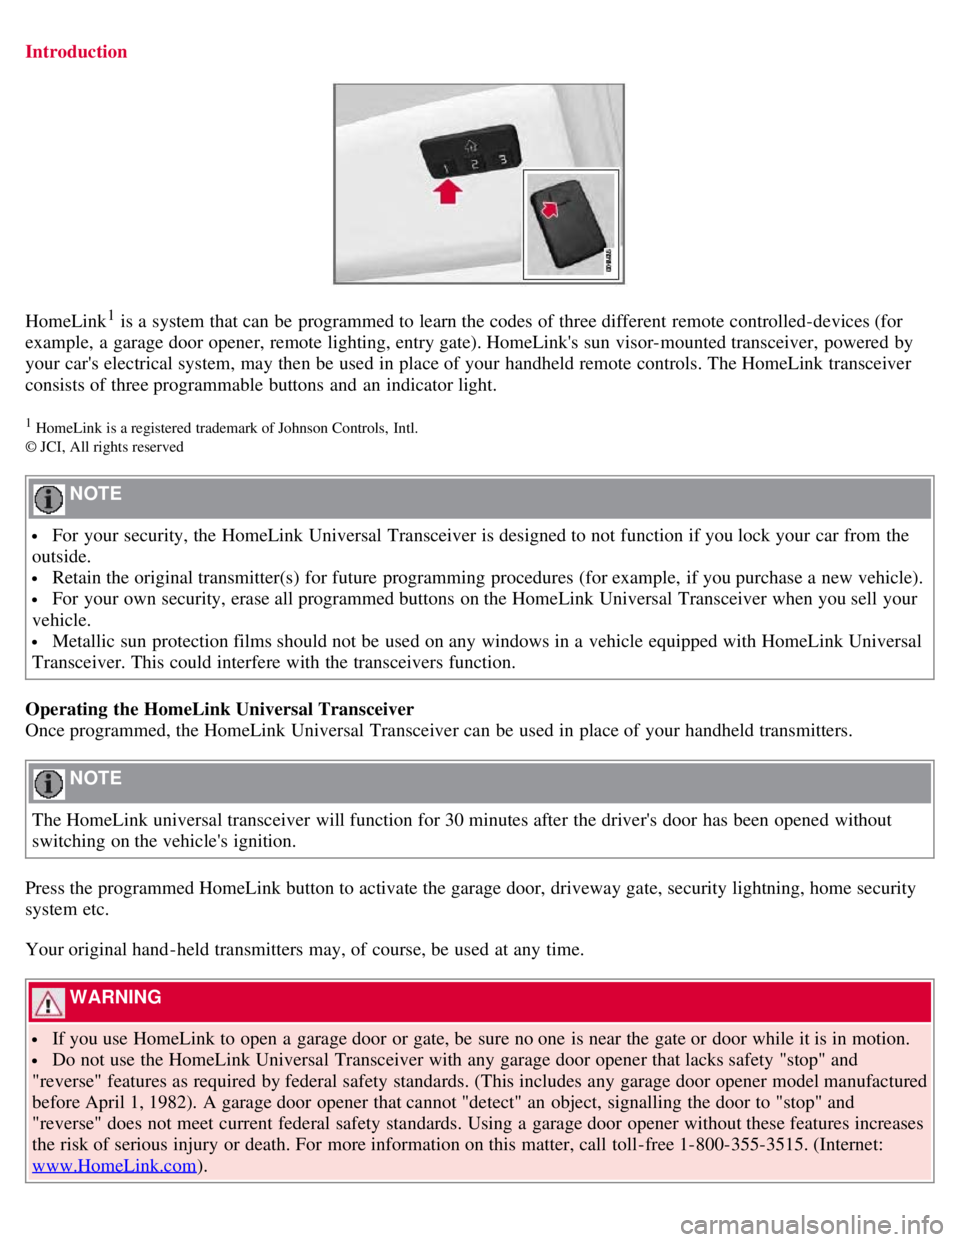
HomeLink1 is a system that can be programmed to learn the codes of three different remote controlled-devices (for
example, a garage door opener, remote lighting, entry gate). HomeLink's sun visor-mounted transceiver, powered by
your car's electrical system, may then be used in place of your handheld remote controls. The HomeLink transceiver
consists of three programmable buttons and an indicator light.
1 HomeLink is a registered trademark of Johnson Controls, Intl.
© JCI, All rights reserved
NOTE
For your security, the HomeLink Universal Transceiver is designed to not function if you lock your car from the
outside.
Retain the original transmitter(s) for future programming procedures (for example, if you purchase a new vehicle).
For your own security, erase all programmed buttons on the HomeLink Universal Transceiver when you sell your
vehicle.
Metallic sun protection films should not be used on any windows in a vehicle equipped with HomeLink Universal
Transceiver. This could interfere with the transceivers function.
Operating the HomeLink Universal Transceiver
Once programmed, the HomeLink Universal Transceiver can be used in place of your handheld transmitters.
NOTE
The HomeLink universal transceiver will function for 30 minutes after the driver's door has been opened without
switching on the vehicle's ignition.
Press the programmed HomeLink button to activate the garage door, driveway gate, security lightning, home security
system etc.
Your original hand -held transmitters may, of course, be used at any time.
WARNING
If you use HomeLink to open a garage door or gate, be sure no one is near the gate or door while it is in motion.
Do not use the HomeLink Universal Transceiver with any garage door opener that lacks safety "stop" and
"reverse" features as required by federal safety standards. (This includes any garage door opener model manufactured
before April 1, 1982). A garage door opener that cannot "detect" an object, signalling the door to "stop" and
"reverse" does not meet current federal safety standards. Using a garage door opener without these features increases
the risk of serious injury or death. For more information on this matter, call toll-free 1-800-355-3515. (Internet:
www.HomeLink.com
).
Page 102 of 275
Programming the transceiver for the first time (U.S. residents)
1. For first time training, press and hold the two outer HomeLink buttons, releasing only when the HomeLink indicator
light begins to flash after 20 seconds. (Do not perform this step when training the additional HomeLink buttons.)
2. Position the hand -held transmitter 1-3 inches away from the HomeLink surface
104 03 Your driving environment
HomeLink® Universal Transceiver
(located on your sun visor), keeping the HomeLink indicator light in view.
Using both hands, simultaneously press and hold both the desired HomeLink button and hand held transmitter button.
DO NOT release until the HomeLink indicator light flashes slowly and then rapidly. When the indicator light flashes
rapidly, both buttons may be released. (The rapid flashing indicates successful training.)
NOTE
Some garage door openers may require you to replace step 3 with the "cycling" procedure noted in the
"Programming the transceiver for the first time (Canadian residents)" section.
3. Press and hold the trained HomeLink button and observe the indicator light.
If the indicator light is solid/continuous, training is complete and your device should activate when the HomeLink
button is pressed and released.
If the indicator light blinks rapidly for 2 seconds and then turns a solid/continuous light, proceed with the following
training instructions for a rolling code device. A second person may make the following steps quicker and easier.
Please use a ladder or other device. Do not stand on your vehicle to perform the next steps.
4. At the garage door opener receiver (motorhead unit) in the garage, locate the "learn" or "smart" button (usually near
where the hanging antenna wire is attached to the unit). If there is difficulty locating the training button, reference the
garage door opener's manual or contact us toll-free 1-800-355-3515 (Internet: www.HomeLink.com
).
5. Press and release the "learn" or "smart" button (the name and color of the button may vary by manufacturer).
NOTE
Once the button is pressed, there are 30 seconds in which to initiate the next step.
6. Return to the vehicle and firmly press and hold the trained HomeLink button for two seconds and release. Repeat
the "press/hold/release" sequence up to 3 times to complete the training process.
To train additional HomeLink buttons, begin with step two.
Programming the transceiver for the first time (Canadian residents)
1. For first time training, press and hold the two outer HomeLink buttons releasing only when the HomeLink indicator
light begins to flash after 20 seconds. (Do not perform this step when training the additional HomeLink buttons.)
2. Position the hand -held transmitter 1-3 inches (2.5-7.5 cm) away from the HomeLink surface (located on your)
keeping the HomeLink indicator light in view.
3. Using both hands, simultaneously press and hold both the desired HomeLink button and hand held transmitter
Page 103 of 275
button. During programming, your handheld transmitter may automatically stop transmitting. Continue to press and
hold the desired HomeLink button while you press and re-press ("cycle") your handheld transmitter every two seconds
until the frequency signal has been learned. The indicator light will flash slowly and then rapidly after several seconds
upon successful training. DO NOT release until the HomeLink indicator light flashes slowly and then rapidly. When
the indicator light flashes rapidly, both buttons may be released. (The rapid flashing indicates successful training.)
105 03 Your driving environment
HomeLink® Universal Transceiver
4. Press and hold the trained HomeLink button and observe the indicator light.
If the indicator light is solid/continuous, training is complete and your device should activate when the HomeLink
button is pressed and released.
If the indicator light blinks rapidly for 2 seconds and then turns a solid/continuous light, proceed with the following
training instructions for a rolling code device. A second person may make the following steps quicker and easier.
Please use a ladder or other device. Do not stand on your vehicle to perform the next steps.
5. At the garage door opener receiver (motorhead unit) in the garage, locate the "learn" or "smart" button (usually near
where the hanging antenna wire is attached to the unit). If there is difficulty locating the training button reference the
garage door opener's manual or contact us.
6. Press and release the "learn" or "smart" button (the name and color of the button may vary by manufacturer).
NOTE
Once the button is pressed, there are 30 seconds in which to initiate the next step.
7. Return to the vehicle and firmly press and hold the trained HomeLink button for two seconds and release. Repeat
the "press/hold/release" sequence up to 3 times to complete the training process.
NOTE
During programming, your hand -held transmitter may automatically stop transmitting. Continue to press and hold
the desired HomeLink button while you press and repress ("cycle") your hand -held transmitter every two seconds
until the frequency signal has been learned. The indicator light will flash slowly and then rapidly after several
seconds upon successful training. If necessary, follow steps 5-7 to complete the training for a rolling code device.
To train additional HomeLink buttons, begin with step two.
Rolling Code Programming
Rolling code garage door openers that are "code-protected" and manufactured after 1996 may be determined by the-
following:
Reference the garage door opener owner's manual for verification.
The handheld transmitter appears to program the HomeLink Universal Transceiver but does not activate the garage
door.
Press and hold the trained HomeLink button. The garage door opener has the rolling code feature if the indicator
light flashes rapidly and then turns solid after 2 seconds.
To train a garage door with the rolling code feature, follow these instructions (the aid of a second person may make the
Page 104 of 275
training quicker and easier):
1. Locate the training button on the garage door opener motor head unit. Exact location and color of the button may
vary by garage door opener brand. If there is difficulty locating the training button, reference the garage door opener
owner's manual or please visit our Web site at www.homelink.com
.
2. Press the training button on the garage door opener motor head unit (which activates the "training light").
NOTE
Following step 2, there are 30 seconds in which to initiate step 3.
3. Firmly press and release the programmed HomeLink® button. Press and release the HomeLink button a second time
to complete the training process. (Some garage door openers may require
106 03 Your driving environment
HomeLink® Universal Transceiver
you to do this procedure a third time to complete the training.)
The garage door opener should now recognize the HomeLink Wireless Control System. The remaining two buttons
may now be trained if this has not previously been done. Refer to the Programming portion of this text. The
HomeLink Wireless Control System (once programmed) or the original handheld transmitter may be used to activate
the garage door. In the event that there are still difficulties in programming the HomeLink Wireless Control System,
please visit our Web site, www.homelink.com
.
Reprogramming a Single HomeLink Button
To program a device to HomeLink using a HomeLink button previously trained, follow these steps:
1. Press and hold the desired HomeLink button. Do NOT release until step 4 has been completed.
2. When the indicator light begins to flash slowly ( after 20 seconds), position the handheld transmitter 1 to 3 inches
away from the HomeLink surface.
3. Press and hold the handheld transmitter button. The HomeLink indicator light will flash, first slowly and then
rapidly.
4. When the indicator light begins to flash rapidly, release both buttons.
The previous device has now been erased and the new device can be activated by pushing the HomeLink button that
has just been programmed. This procedure will not affect any other programmed HomeLink.
Erasing Channels
Individual buttons cannot be erased. However, to erase all three programmed buttons:
1. Press and hold the two outside buttons until the indicator light begins to flash (after 20 seconds).
2. Release both buttons.
The HomeLink® Wireless Control System is now in the training (learning) mode and can be programmed at any time
following steps 2 through 4 in the Programming section.
Page 105 of 275
107 03 Your driving environment
Starting the engine
Starting the engine
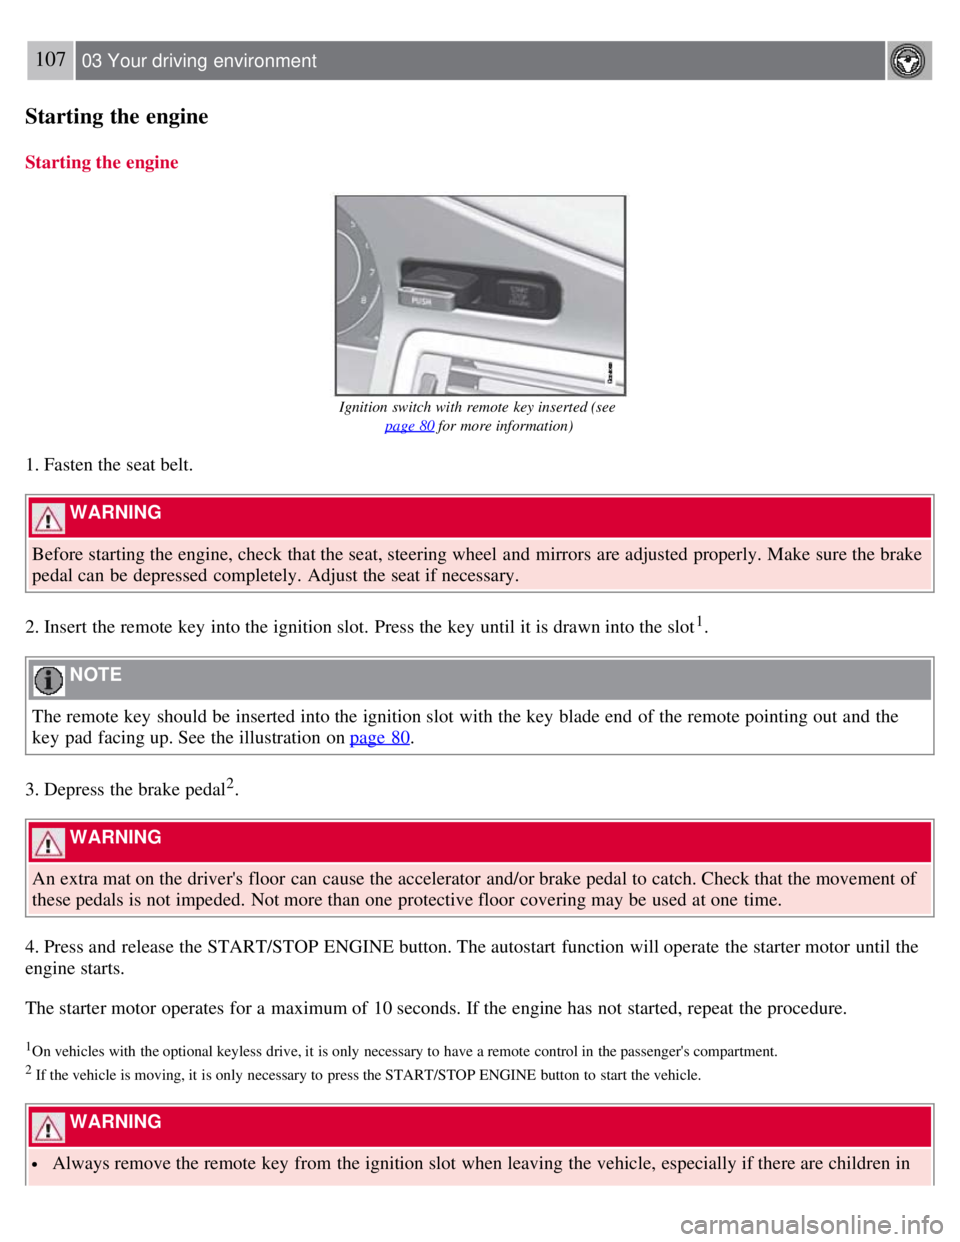
Ignition switch with remote key inserted (see page 80
for more information)
1. Fasten the seat belt.
WARNING
Before starting the engine, check that the seat, steering wheel and mirrors are adjusted properly. Make sure the brake
pedal can be depressed completely. Adjust the seat if necessary.
2. Insert the remote key into the ignition slot. Press the key until it is drawn into the slot
1.
NOTE
The remote key should be inserted into the ignition slot with the key blade end of the remote pointing out and the
key pad facing up. See the illustration on page 80
.
3. Depress the brake pedal
2.
WARNING
An extra mat on the driver's floor can cause the accelerator and/or brake pedal to catch. Check that the movement of
these pedals is not impeded. Not more than one protective floor covering may be used at one time.
4. Press and release the START/STOP ENGINE button. The autostart function will operate the starter motor until the
engine starts.
The starter motor operates for a maximum of 10 seconds. If the engine has not started, repeat the procedure.
1On vehicles with the optional keyless drive, it is only necessary to have a remote control in the passenger's compartment.
2 If the vehicle is moving, it is only necessary to press the START/STOP ENGINE button to start the vehicle.
WARNING
Always remove the remote key from the ignition slot when leaving the vehicle, especially if there are children in
Page 106 of 275
the vehicle.
Never remove the remote key from the ignition slot while driving or when the vehicle is being towed. The
steering lock could otherwise be activated, making it impossible to steer the vehicle. Never remove the remote key
with keyless drive function (option) from the vehicle while driving or during towing.
Always place the gear selector in Park and apply the parking brake before leaving the vehicle. Never leave the
vehicle unattended with the engine running.
Always open garage doors fully before starting the engine inside a garage to ensure adequate ventilation. The
exhaust gases contain carbon monoxide, which is invisible and odorless but very poisonous.
108 03 Your driving environment
Starting the engine
NOTE
The idling speed can be noticeably higher than normal during cold starts. This is to enable emission control system
can reach normal operating temperature as quickly as possible, which helps reduce exhaust emissions
1.
Keylock: Your vehicle is equipped with a keylock system. When the engine is switched off, the gear selector must
be in the Park position before the key can be removed
2 from the ignition slot.
1If the gear selector is in the D or R positions and the car is not moving, engine speed (rpm) will be lower and it will take longer for the engine to
reach normal operating temperature.
2Does not apply to vehicles with the optional keyless drive.
CAUTION
When starting in cold weather, the automatic transmission may shift up at slightly higher engine speeds than
normal until the automatic transmission fluid reaches normal operating temperature.
Do not race a cold engine immediately after starting. Oil flow may not reach some lubrication points fast enough
to prevent engine damage.
The engine should be idling when you move the gear selector. Never accelerate until after you feel the
transmission engage. Accelerating immediately after selecting a gear will cause harsh engagement and premature
transmission wear.
Selecting P or N when idling at a standstill for prolonged periods of time will help prevent overheating of the
automatic transmission fluid.
Keyless drive (option)
Follow steps 3-4 for starting the engine.
NOTE
For the vehicle to start, one of the vehicle's remote keys must be in the passenger compartment.
Steering wheel lock
The steering wheel lock is deactivated when the remote key is inserted into the ignition slot
1 and activated when the
remote key is removed from the ignition slot.
Always take the remote key or keyless drive remote when leaving the vehicle to help reduce the risk of theft.
1 On vehicles with the optional keyless drive, the steering lock is deactivated when the start button is pressed for the first time (assuming that a
Page 107 of 275
remote control is in the passenger's compartment). It is activated when the ignition is switched off and the driver's door is opened.
109 03 Your driving environment
Starting the engine
Jump starting
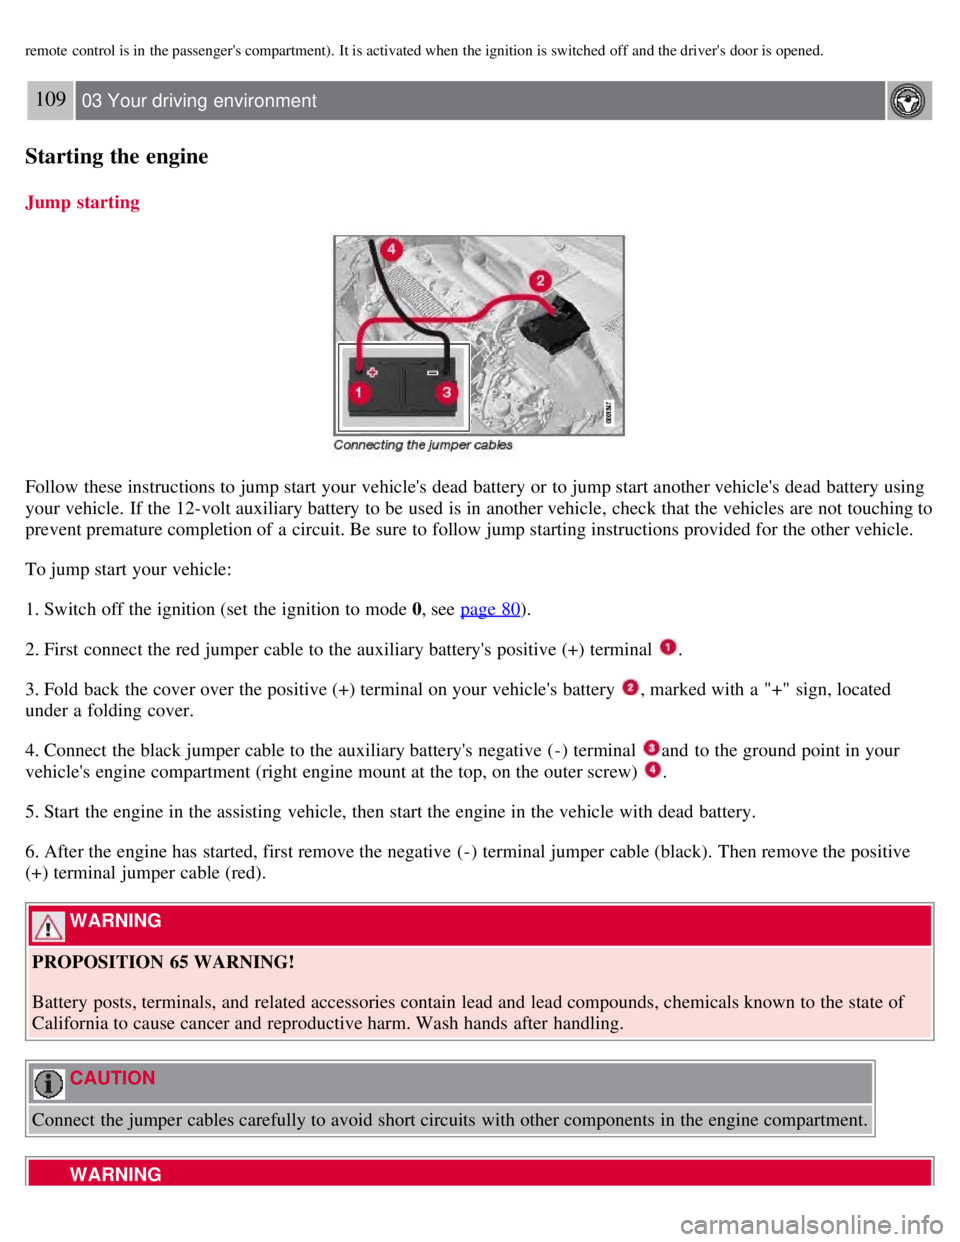
Follow these instructions to jump start your vehicle's dead battery or to jump start another vehicle's dead battery using
your vehicle. If the 12-volt auxiliary battery to be used is in another vehicle, check that the vehicles are not touching to
prevent premature completion of a circuit. Be sure to follow jump starting instructions provided for the other vehicle.
To jump start your vehicle:
1. Switch off the ignition (set the ignition to mode 0, see page 80
).
2. First connect the red jumper cable to the auxiliary battery's positive (+) terminal
.
3. Fold back the cover over the positive (+) terminal on your vehicle's battery
, marked with a "+" sign, located
under a folding cover.
4. Connect the black jumper cable to the auxiliary battery's negative (-) terminal
and to the ground point in your
vehicle's engine compartment (right engine mount at the top, on the outer screw)
.
5. Start the engine in the assisting vehicle, then start the engine in the vehicle with dead battery.
6. After the engine has started, first remove the negative (-) terminal jumper cable (black). Then remove the positive
(+) terminal jumper cable (red).
WARNING
PROPOSITION 65 WARNING!
Battery posts, terminals, and related accessories contain lead and lead compounds, chemicals known to the state of
California to cause cancer and reproductive harm. Wash hands after handling.
CAUTION
Connect the jumper cables carefully to avoid short circuits with other components in the engine compartment.
WARNING
Page 108 of 275
Do not connect the jumper cable to any part of the fuel system or to any moving parts. Avoid touching hot
manifolds.
Batteries generate hydrogen gas, which is flammable and explosive.
Battery fluid contains sulfuric acid. Do not allow battery fluid to contact eyes, skin, fabrics or painted surfaces. If
contact occurs, flush the affected area immediately with water. Obtain medical help immediately if eyes are affected.
Never expose the battery to open flame or electric spark.
Do not smoke near the battery.
Failure to follow the instructions for jump starting can lead to injury.
110 03 Your driving environment
Transmission
Automatic transmission
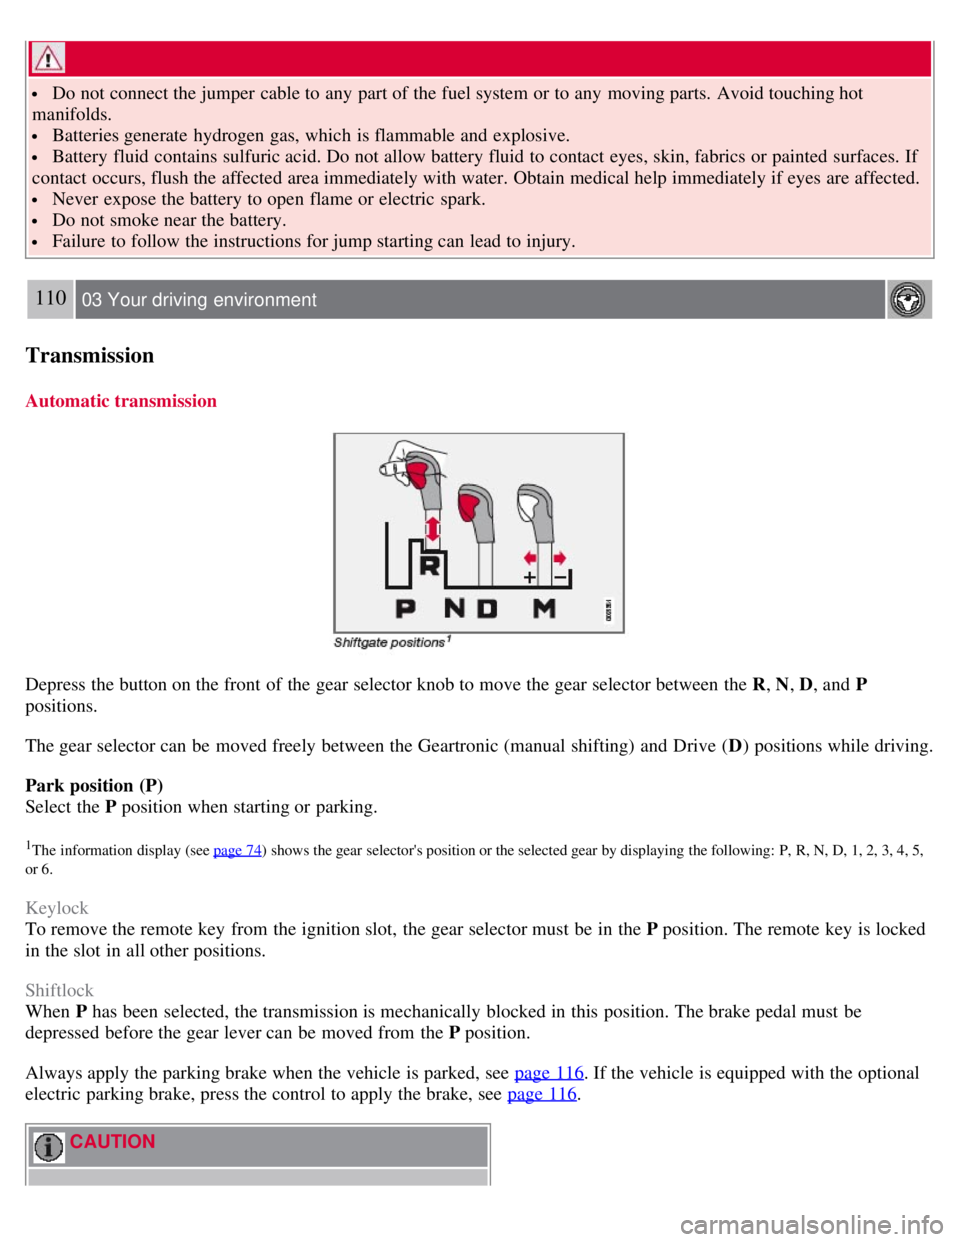
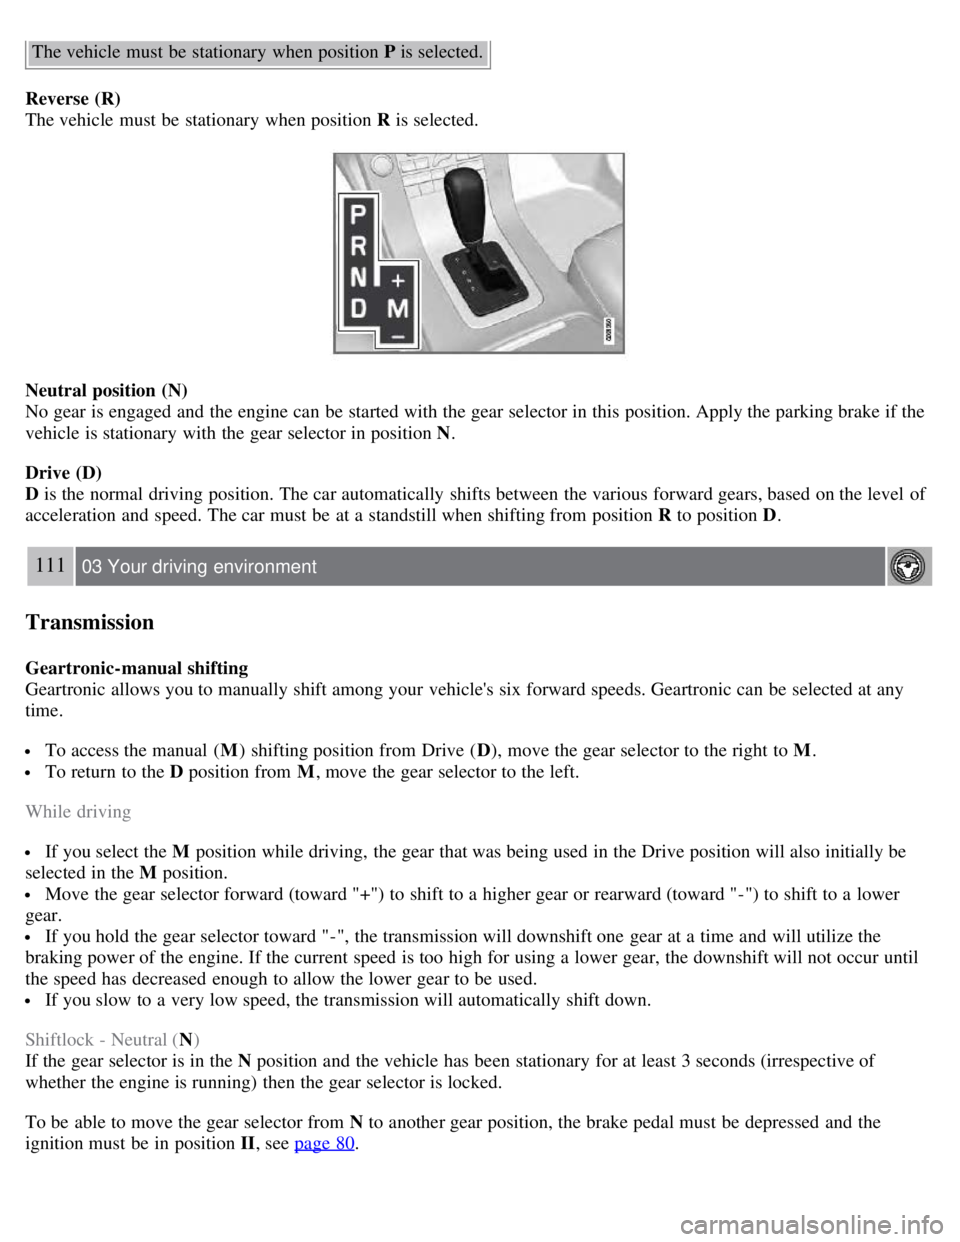
Depress the button on the front of the gear selector knob to move the gear selector between the R , N, D, and P
positions.
The gear selector can be moved freely between the Geartronic (manual shifting) and Drive ( D) positions while driving.
Park position (P)
Select the P position when starting or parking.
1The information display (see page 74) shows the gear selector's position or the selected gear by displaying the following: P, R, N, D, 1, 2, 3, 4, 5,
or 6.
Keylock
To remove the remote key from the ignition slot, the gear selector must be in the P position. The remote key is locked
in the slot in all other positions.
Shiftlock
When P has been selected, the transmission is mechanically blocked in this position. The brake pedal must be
depressed before the gear lever can be moved from the P position.
Always apply the parking brake when the vehicle is parked, see page 116
. If the vehicle is equipped with the optional
electric parking brake, press the control to apply the brake, see page 116
.
CAUTION
Page 109 of 275
The vehicle must be stationary when position P is selected.
Reverse (R)
The vehicle must be stationary when position R is selected.
Neutral position (N)
No gear is engaged and the engine can be started with the gear selector in this position. Apply the parking brake if the
vehicle is stationary with the gear selector in position N .
Drive (D)
D is the normal driving position. The car automatically shifts between the various forward gears, based on the level of
acceleration and speed. The car must be at a standstill when shifting from position R to position D.
111 03 Your driving environment
Transmission
Geartronic-manual shifting
Geartronic allows you to manually shift among your vehicle's six forward speeds. Geartronic can be selected at any
time.
To access the manual ( M) shifting position from Drive ( D), move the gear selector to the right to M .
To return to the D position from M, move the gear selector to the left.
While driving
If you select the M position while driving, the gear that was being used in the Drive position will also initially be
selected in the M position.
Move the gear selector forward (toward "+") to shift to a higher gear or rearward (toward "-") to shift to a lower
gear.
If you hold the gear selector toward "-", the transmission will downshift one gear at a time and will utilize the
braking power of the engine. If the current speed is too high for using a lower gear, the downshift will not occur until
the speed has decreased enough to allow the lower gear to be used.
If you slow to a very low speed, the transmission will automatically shift down.
Shiftlock - Neutral ( N)
If the gear selector is in the N position and the vehicle has been stationary for at least 3 seconds (irrespective of
whether the engine is running) then the gear selector is locked.
To be able to move the gear selector from N to another gear position, the brake pedal must be depressed and the
ignition must be in position II , see page 80
.
Page 110 of 275
Shiftlock override
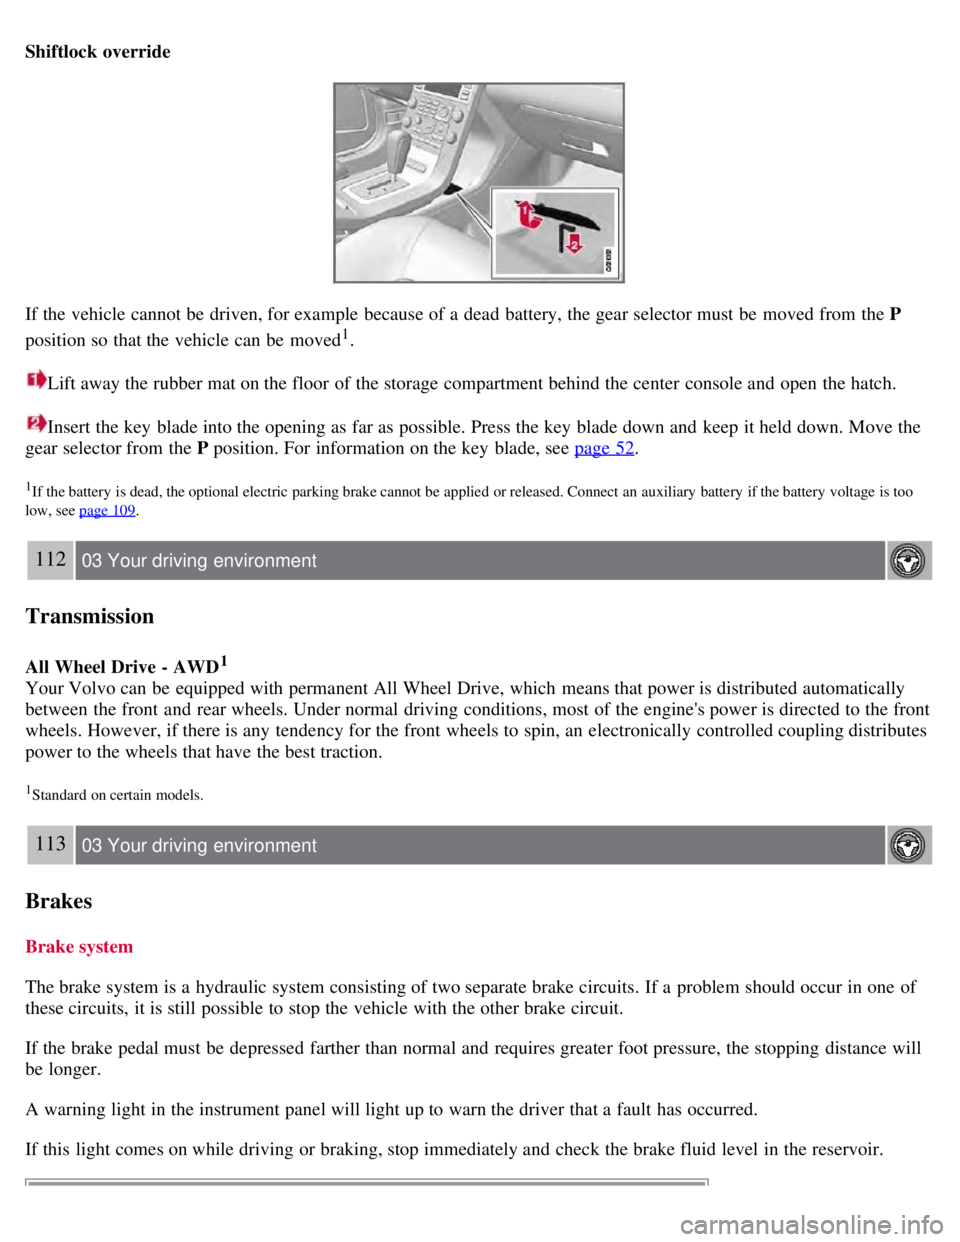
If the vehicle cannot be driven, for example because of a dead battery, the gear selector must be moved from the P
position so that the vehicle can be moved
1.
Lift away the rubber mat on the floor of the storage compartment behind the center console and open the hatch.
Insert the key blade into the opening as far as possible. Press the key blade down and keep it held down. Move the
gear selector from the P position. For information on the key blade, see page 52
.
1If the battery is dead, the optional electric parking brake cannot be applied or released. Connect an auxiliary battery if the battery voltage is too
low, see page 109
.
112 03 Your driving environment
Transmission
All Wheel Drive - AWD1
Your Volvo can be equipped with permanent All Wheel Drive, which means that power is distributed automatically
between the front and rear wheels. Under normal driving conditions, most of the engine's power is directed to the front
wheels. However, if there is any tendency for the front wheels to spin, an electronically controlled coupling distributes
power to the wheels that have the best traction.
1Standard on certain models.
113 03 Your driving environment
Brakes
Brake system
The brake system is a hydraulic system consisting of two separate brake circuits. If a problem should occur in one of
these circuits, it is still possible to stop the vehicle with the other brake circuit.
If the brake pedal must be depressed farther than normal and requires greater foot pressure, the stopping distance will
be longer.
A warning light in the instrument panel will light up to warn the driver that a fault has occurred.
If this light comes on while driving or braking, stop immediately and check the brake fluid level in the reservoir.