window VOLVO XC60 TWIN ENGINE 2019 Repair Manual
[x] Cancel search | Manufacturer: VOLVO, Model Year: 2019, Model line: XC60 TWIN ENGINE, Model: VOLVO XC60 TWIN ENGINE 2019Pages: 695, PDF Size: 14.96 MB
Page 541 of 695
AUDIO, MEDIA AND INTERNET
}}
* Option/accessory.539
Connecting the vehicle to theInternet via a Bluetooth-connectedphone
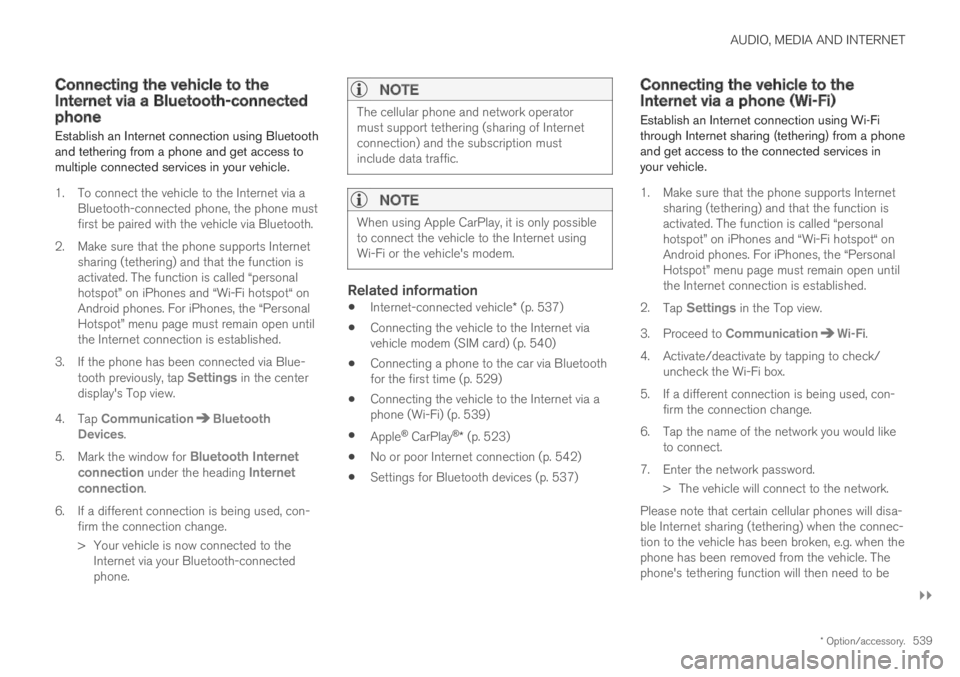
Establish an Internet connection using Bluetoothand tethering from a phone and get access tomultiple connected services in your vehicle.
1. To connect the vehicle to the Internet via aBluetooth-connected phone, the phone mustfirst be paired with the vehicle via Bluetooth.
2.Make sure that the phone supports Internetsharing (tethering) and that the function isactivated. The function is called “personalhotspot” on iPhones and “Wi-Fi hotspot“ onAndroid phones. For iPhones, the “PersonalHotspot” menu page must remain open untilthe Internet connection is established.
3. If the phone has been connected via Blue-tooth previously, tap Settings in the centerdisplay's Top view.
4.Tap CommunicationBluetoothDevices.
5.Mark the window for Bluetooth Internetconnection under the heading Internetconnection.
6.If a different connection is being used, con-firm the connection change.
> Your vehicle is now connected to theInternet via your Bluetooth-connectedphone.
NOTE
The cellular phone and network operatormust support tethering (sharing of Internetconnection) and the subscription mustinclude data traffic.
NOTE
When using Apple CarPlay, it is only possibleto connect the vehicle to the Internet usingWi-Fi or the vehicle's modem.
Related information
Internet-connected vehicle* (p. 537)
Connecting the vehicle to the Internet viavehicle modem (SIM card) (p. 540)
Connecting a phone to the car via Bluetoothfor the first time (p. 529)
Connecting the vehicle to the Internet via aphone (Wi-Fi) (p. 539)
Apple® CarPlay®* (p. 523)
No or poor Internet connection (p. 542)
Settings for Bluetooth devices (p. 537)
Connecting the vehicle to theInternet via a phone (Wi-Fi)
Establish an Internet connection using Wi-Fithrough Internet sharing (tethering) from a phoneand get access to the connected services inyour vehicle.
1. Make sure that the phone supports Internetsharing (tethering) and that the function isactivated. The function is called “personalhotspot” on iPhones and “Wi-Fi hotspot“ onAndroid phones. For iPhones, the “PersonalHotspot” menu page must remain open untilthe Internet connection is established.
2.Tap Settings in the Top view.
3.Proceed to CommunicationWi-Fi.
4. Activate/deactivate by tapping to check/uncheck the Wi-Fi box.
5. If a different connection is being used, con-firm the connection change.
6. Tap the name of the network you would liketo connect.
7. Enter the network password.
> The vehicle will connect to the network.
Please note that certain cellular phones will disa-ble Internet sharing (tethering) when the connec-tion to the vehicle has been broken, e.g. when thephone has been removed from the vehicle. Thephone's tethering function will then need to be
Page 546 of 695
AUDIO, MEDIA AND INTERNET
544
Terms of use and data sharing
The first time certain services and apps arestarted, a pop-up window with the headingTerms and conditions and Data sharing mayopen.
The aim is to inform the user about Volvo's termsof use and data sharing policy. By accepting datasharing, the user accepts that certain informationwill be sent from the vehicle. This is required forcertain services and apps to work with full func-tionality.
Data sharing can be set from the center display'sSettings menu.
Related information
Activating and deactivating data sharing(p. 544)
Activating and deactivating datasharing
Data sharing for relevant services and apps canbe set via the Settings menu in the center dis-play.
1.Tap Settings in the Top view in the centerdisplay.
2.Tap SystemPrivacy and data.
3. Select to activate or deactivate data sharingfor individual services and all apps.
NOTE
After visiting a Volvo workshop, you may needto reactivate data sharing so that services andapps will work again.
Related information
Terms of use and data sharing (p. 544)
Hard disk storage space
It is possible to view how much space is remain-ing on the vehicle's hard disk.
Storage information for the vehicle's hard diskcan be shown, including total capacity, availablecapacity and how much space is used for instal-led apps. The information is found under
SettingsSystemSystem InformationStorage.
Related information
Apps (p. 494)
Page 597 of 695
LOADING, STORAGE AND PASSENGER COMPARTMENT
}}
* Option/accessory.595
Cargo compartment
The vehicle has a flexible cargo compartmentthat makes it possible to carry and secure largeobjects.
The cargo capacity of the vehicle can be consid-erably increased by folding down the rear seatbackrests. To make loading and unloading easier,the rear section of the vehicle can be raised andlowered using the level control function*. Use theload anchoring eyelets or grocery bag holders tohelp secure objects in place, and the retractablecargo compartment cover* to help concealobjects in the cargo compartment.
If the vehicle is equipped with a temporary sparetire, this is secured to the cargo compartmentfloor under the cover. The towing eyelet and tiresealing system are located under the cargo com-partment floor.
Related information
Loading recommendations (p. 595)
Grocery bag holders (p. 597)
Load anchoring eyelets (p. 598)
Installing and removing the cargo compart-ment cover* (p. 598)
Loading recommendations
There are a number of things to consider whencarrying loads in or on the vehicle.
Load-carrying capacity is determined by the vehi-cle's curb weight. The total weight of all passen-gers and any installed accessories reduces thevehicle's load-carrying capacity by the corres-ponding amount.
WARNING
The vehicle's driving characteristics changedepending on the weight and position of theload.
Loading the cargo compartment/trunk
Position objects so they are pressing againstthe rear seat backrests.
Distribute the load evenly.
Heavy objects should be positioned as lowas possible. Avoid placing heavy objects onfolded-down seat backrests.
Cover sharp corners with a soft cloth or simi-lar to help prevent damage to the upholstery.
Use the load anchoring eyelets and tension-ing straps or similar to secure all objects.
WARNING
In a head-on collision at a speed of 50 km/h(30 mph), an unsecured object weighing 20kg (44 pounds) can reach a projectile weightequivalent to 1000 kg (2200 pounds).
WARNING
If objects are loaded higher than the upperedge of the side windows, leave a 10 cm (4in.) space between the objects and the win-dow. Objects placed closer to this couldimpede the function of the inflatable curtainconcealed inside the headlining.
WARNING
Always secure the load. Otherwise, it may shiftduring heavy braking and injure people in thevehicle.
Cover sharp edges and sharp corners withsomething soft.
Turn off the engine and apply the parkingbrake when loading/unloading long objects.Otherwise, it is possible for the load to reachthe gear lever or gear selector and move it toa drive position – which could cause the vehi-cle to begin rolling.
Page 636 of 695
||
MAINTENANCE AND SERVICE
* Option/accessory.634
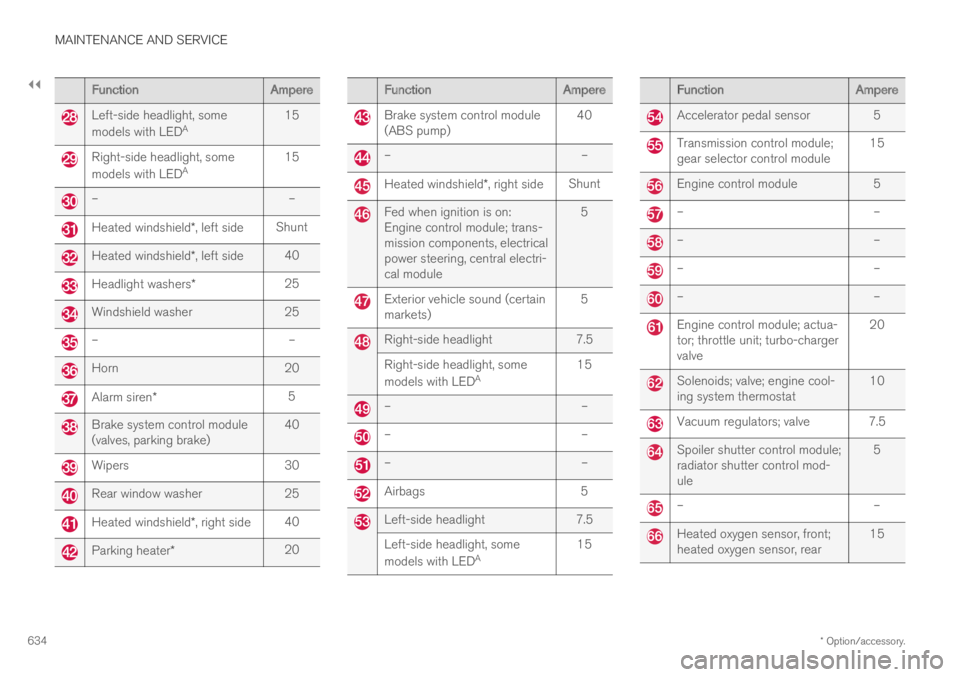
FunctionAmpere
Left-side headlight, some
models with LEDA15
Right-side headlight, some
models with LEDA15
––
Heated windshield*, left sideShunt
Heated windshield*, left side40
Headlight washers*25
Windshield washer25
––
Horn20
Alarm siren*5
Brake system control module(valves, parking brake)40
Wipers30
Rear window washer25
Heated windshield*, right side40
Parking heater*20
FunctionAmpere
Brake system control module(ABS pump)40
––
Heated windshield*, right sideShunt
Fed when ignition is on:Engine control module; trans-mission components, electricalpower steering, central electri-cal module
5
Exterior vehicle sound (certainmarkets)5
Right-side headlight7.5
Right-side headlight, some
models with LEDA15
––
––
––
Airbags5
Left-side headlight7.5
Left-side headlight, some
models with LEDA15
FunctionAmpere
Accelerator pedal sensor 5
Transmission control module;gear selector control module15
Engine control module5
––
––
––
––
Engine control module; actua-tor; throttle unit; turbo-chargervalve
20
Solenoids; valve; engine cool-ing system thermostat10
Vacuum regulators; valve 7.5
Spoiler shutter control module;radiator shutter control mod-ule
5
––
Heated oxygen sensor, front;heated oxygen sensor, rear15
Page 640 of 695
||
MAINTENANCE AND SERVICE
* Option/accessory.638
FunctionAmpere
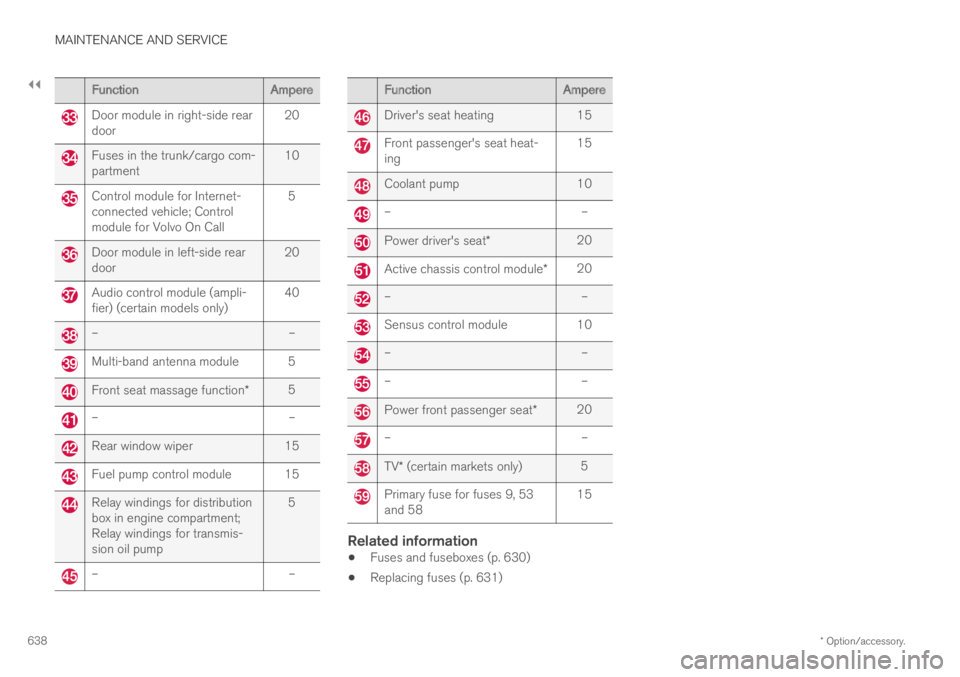
Door module in right-side reardoor20
Fuses in the trunk/cargo com-partment10
Control module for Internet-connected vehicle; Controlmodule for Volvo On Call
5
Door module in left-side reardoor20
Audio control module (ampli-fier) (certain models only)40
––
Multi-band antenna module 5
Front seat massage function*5
––
Rear window wiper15
Fuel pump control module 15
Relay windings for distributionbox in engine compartment;Relay windings for transmis-sion oil pump
5
––
FunctionAmpere
Driver's seat heating15
Front passenger's seat heat-ing15
Coolant pump10
––
Power driver's seat*20
Active chassis control module*20
––
Sensus control module10
––
––
Power front passenger seat*20
––
TV* (certain markets only)5
Primary fuse for fuses 9, 53and 5815
Related information
Fuses and fuseboxes (p. 630)
Replacing fuses (p. 631)
Page 643 of 695
MAINTENANCE AND SERVICE
}}
* Option/accessory.641
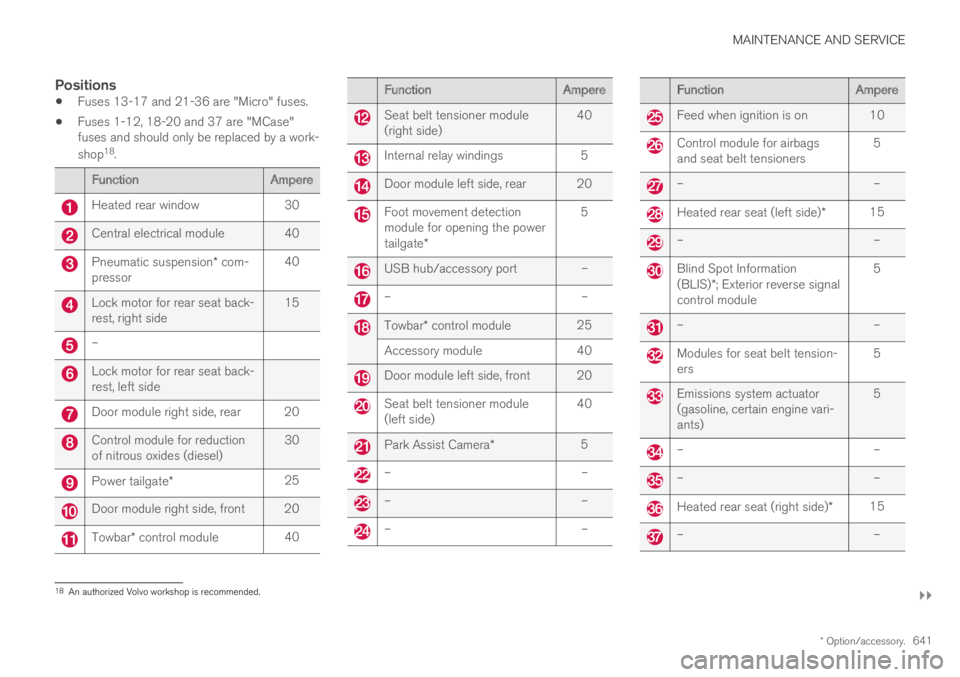
Positions
Fuses 13-17 and 21-36 are "Micro" fuses.
Fuses 1-12, 18-20 and 37 are "MCase"fuses and should only be replaced by a work-
shop18.
FunctionAmpere
Heated rear window30
Central electrical module 40
Pneumatic suspension* com-pressor40
Lock motor for rear seat back-rest, right side15
–
Lock motor for rear seat back-rest, left side
Door module right side, rear 20
Control module for reductionof nitrous oxides (diesel)30
Power tailgate*25
Door module right side, front 20
Towbar* control module40
FunctionAmpere
Seat belt tensioner module(right side)40
Internal relay windings5
Door module left side, rear 20
Foot movement detectionmodule for opening the powertailgate*
5
USB hub/accessory port –
––
Towbar* control module25
Accessory module40
Door module left side, front 20
Seat belt tensioner module(left side)40
Park Assist Camera*5
––
––
––
FunctionAmpere
Feed when ignition is on 10
Control module for airbagsand seat belt tensioners5
––
Heated rear seat (left side)*15
––
Blind Spot Information(BLIS)*; Exterior reverse signalcontrol module
5
––
Modules for seat belt tension-ers5
Emissions system actuator(gasoline, certain engine vari-ants)
5
––
––
Heated rear seat (right side)*15
––
18An authorized Volvo workshop is recommended.
Page 646 of 695
||
MAINTENANCE AND SERVICE
* Option/accessory.644
CAUTION
The microfiber cloth must be free of sand anddirt when cleaning the center display.
CAUTION
When cleaning the center display, apply onlylight pressure to the screen. Pressing toohard could damage the screen.
CAUTION
Do not spray liquid or corrosive chemicalsdirectly onto the center display. Do not usewindow cleaners, cleaning agents, aerosolsprays, solvents, alcohol, ammonia or deter-gents that contain abrasives.
Never use abrasive cloths, paper towels or tis-sue paper, as these may scratch the centerdisplay.
Related information
Cleaning the interior (p. 643)
Cleaning fabric upholstery and ceiling liner(p. 645)
Cleaning the seat belt (p. 645)
Cleaning floor mats and inlay mats (p. 645)
Cleaning leather upholstery (p. 646)
Cleaning the leather steering wheel(p. 647)
Cleaning interior plastic, metal and wood sur-faces (p. 648)
Cleaning the head-up display*
Carefully wipe the glass covering the head-updisplay unit with a clean and dry microfiber cloth.If necessary, the cloth may be slightly moistened.
Never use strong stain removers. For difficultcleaning conditions, a special cleaning agent canbe purchased at a Volvo retailer.
Related information
Activating and deactivating the head-up dis-play* (p. 143)
Head-up display* (p. 142)
Page 655 of 695
MAINTENANCE AND SERVICE
* Option/accessory.653
Cleaning exterior plastic, rubber andtrim components
The vehicle should be washed as soon as itbecomes dirty. This makes the vehicle easier toclean because dirt does not attach as strongly. Italso reduces the risk of scratches and keeps thevehicle looking new. Wash the vehicle in a carwash or garage with an oil separator and use carwashing detergent.
Exterior plastic, rubber and trim
components
A special cleaning agent available from Volvoretailers is recommended for the cleaning andcare of colored plastic parts, rubber and trimcomponents, e.g. glossy trim. Follow the usageinstructions for the cleaning agent carefully.
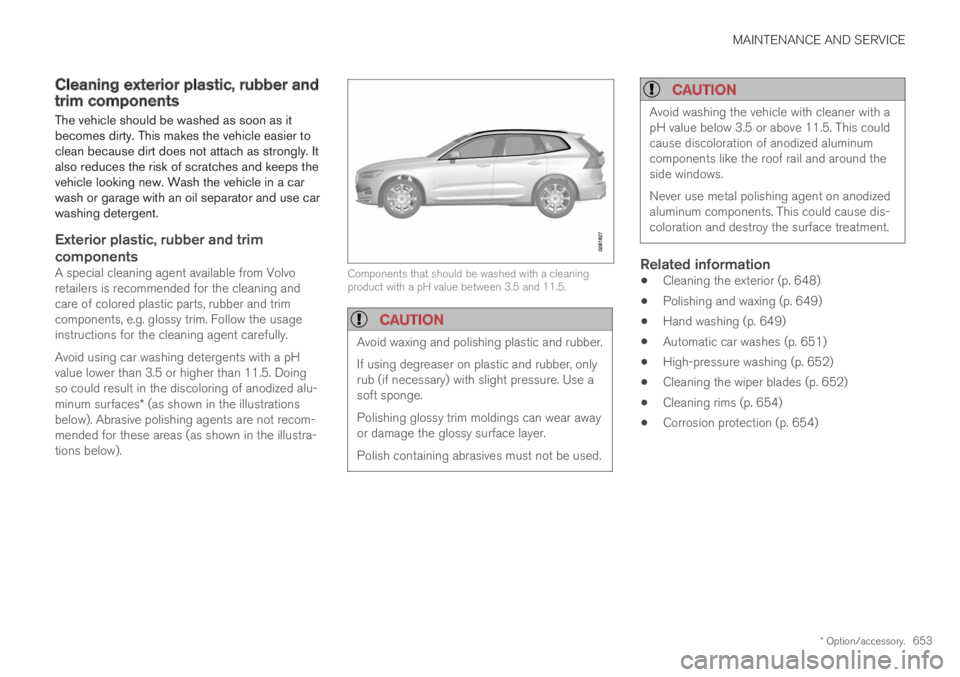
Avoid using car washing detergents with a pHvalue lower than 3.5 or higher than 11.5. Doingso could result in the discoloring of anodized alu-minum surfaces* (as shown in the illustrationsbelow). Abrasive polishing agents are not recom-mended for these areas (as shown in the illustra-tions below).
Components that should be washed with a cleaningproduct with a pH value between 3.5 and 11.5.
CAUTION
Avoid waxing and polishing plastic and rubber.
If using degreaser on plastic and rubber, onlyrub (if necessary) with slight pressure. Use asoft sponge.
Polishing glossy trim moldings can wear awayor damage the glossy surface layer.
Polish containing abrasives must not be used.
CAUTION
Avoid washing the vehicle with cleaner with apH value below 3.5 or above 11.5. This couldcause discoloration of anodized aluminumcomponents like the roof rail and around theside windows.
Never use metal polishing agent on anodizedaluminum components. This could cause dis-coloration and destroy the surface treatment.
Related information
Cleaning the exterior (p. 648)
Polishing and waxing (p. 649)
Hand washing (p. 649)
Automatic car washes (p. 651)
High-pressure washing (p. 652)
Cleaning the wiper blades (p. 652)
Cleaning rims (p. 654)
Corrosion protection (p. 654)
Page 659 of 695
MAINTENANCE AND SERVICE
657
Changing rear window wipers
The wiper blades help remove water from thewindshield and rear window. Along with thewasher fluid, they clean the glass and helpimprove visibility while driving. The windshieldand rear window wiper blades can be replaced.
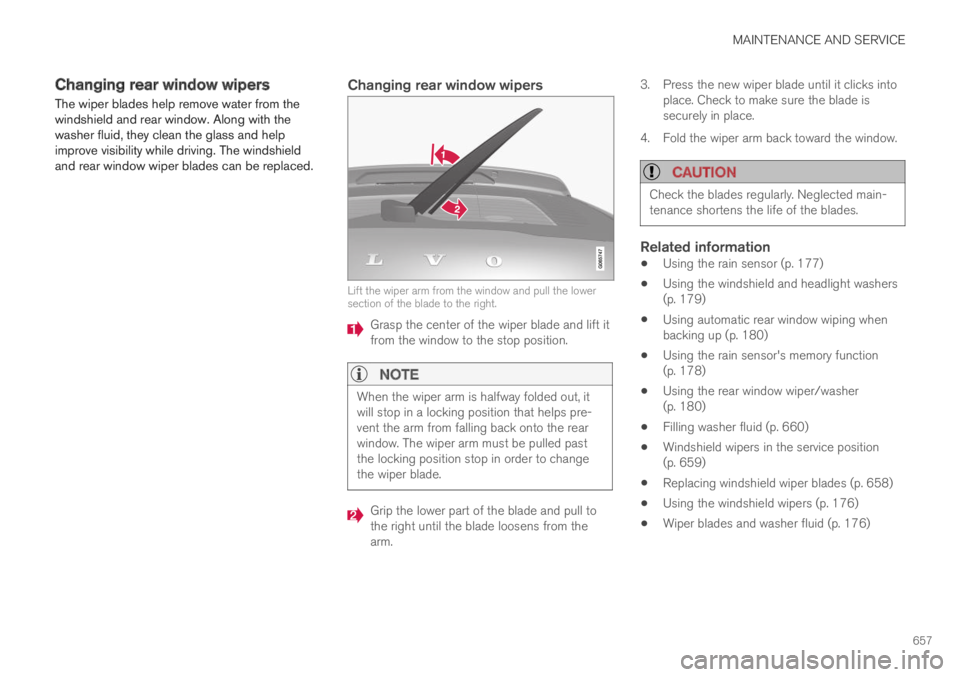
Changing rear window wipers
Lift the wiper arm from the window and pull the lowersection of the blade to the right.
Grasp the center of the wiper blade and lift itfrom the window to the stop position.
NOTE
When the wiper arm is halfway folded out, itwill stop in a locking position that helps pre-vent the arm from falling back onto the rearwindow. The wiper arm must be pulled pastthe locking position stop in order to changethe wiper blade.
Grip the lower part of the blade and pull tothe right until the blade loosens from thearm.
3.Press the new wiper blade until it clicks intoplace. Check to make sure the blade issecurely in place.
4. Fold the wiper arm back toward the window.
CAUTION
Check the blades regularly. Neglected main-tenance shortens the life of the blades.
Related information
Using the rain sensor (p. 177)
Using the windshield and headlight washers(p. 179)
Using automatic rear window wiping whenbacking up (p. 180)
Using the rain sensor's memory function(p. 178)
Using the rear window wiper/washer(p. 180)
Filling washer fluid (p. 660)
Windshield wipers in the service position(p. 659)
Replacing windshield wiper blades (p. 658)
Using the windshield wipers (p. 176)
Wiper blades and washer fluid (p. 176)
Page 660 of 695

MAINTENANCE AND SERVICE
658
Replacing windshield wiper blades
The wiper blades help remove water from thewindshield and rear window. Along with thewasher fluid, they clean the glass and helpimprove visibility while driving. The windshieldand rear window wiper blades can be replaced.
Replacing wiper blades
1. Raise the wiper arms to the service position.Service position is activated/deactivated viathe function view in the center display whenthe car is stationary and the windshield wip-ers are not on.
2. Put the wiper blade in removal positionby folding it out from the wiper arm until itclicks.
3. Press and hold the button on the wiperblade attachment and pull the wiper blade
straight out , parallel with the wiper arm.
4.Slide in the new wiper blade until it clicksinto place.
5. Fold the blade back toward the arm until itclicks into place. The blade is no longer in itsremoval position and can once again bemoved.
6. Check to make sure the wiper blade issecurely in place.
7. Press the wiper blade back against the wind-shield.
Wiper blades come in varying lengths NOTE
When changing wiper blades, make sure thatthe blades are of different lengths. The bladeon the driver's side is longer than the one onthe passenger side.
Related information
Using the rain sensor (p. 177)
Using the windshield and headlight washers(p. 179)
Using automatic rear window wiping whenbacking up (p. 180)
Using the rain sensor's memory function(p. 178)
Using the rear window wiper/washer(p. 180)
Filling washer fluid (p. 660)
Windshield wipers in the service position(p. 659)
Changing rear window wipers (p. 657)
Using the windshield wipers (p. 176)
Wiper blades and washer fluid (p. 176)